
What are
/r/ModelCars'
favorite Products & Services?
From 3.5 billion Reddit comments
The most popular Products mentioned in /r/ModelCars:


The most popular Services mentioned in /r/ModelCars:
The most popular reviews in /r/ModelCars:
Someone just recommend this to me, and I'm now in the process of trying to figure out what I can spray it over.
I'd recommend getting a cheaper Tamiya kit like this RX7 or this Supra.
Tamiya kits are pretty consistently great and will go together really well. I tend to steer clear of AMT kits as they're very hit or miss, but I've had some pretty good Revell kits recently. Those are the only companies I have much experience with so far, but highly highly recommend a Tamiya kit.
Only Tamiya tape reads Tamiya tape. Kamoi is totally different and not as thin as tamiya which is what you need for the most crisp lines, If it doesn't have this package it isn't the real deal. Wise choice ditching the Sharpie, it is truly bluish purple and not a true black.
https://www.amazon.com/Tamiya-Masking-Tape-2pcs-Refill/dp/B00J3TLZQC
Usually the name is something along the lines of a helping hands soldering stand
It's the Tamiya spray stand set, it's the best ~$20 you can spend on model tools. You get some little alligator clips or something similar, and you can hold tons of small parts while they're drying. Plus you get the stand with the adjustable clips that holds onto the main body while you spray it. It really is a must for anyone that does model cars.
Hey!, glad i could help. I dont rly have a preferred brush brand, but i linked you some recommendations. If you dont end up getting these, just note, Generally you will need really small and thin brushes, you will rarely need large brushes.
AIEX 9 Pieces Fine Detail Paint Brush Miniature Painting Brushes Kit Mini Paints Brush Set for Acrylic, Watercolor, Oil, Face, Nail, Scale Model Painting, Line Drawing(Black) https://www.amazon.com/dp/B07PJ5GMX7/ref=cm_sw_r_cp_api_glc_fabc_BAFS326WMHQ36FP5E5AP
Some are from licensed kits but most of them are custom, the A-Team van is the most recent and is made from a glue bomb AMT Vantasy that I build years ago. The green Gran Torino was the most work so far- It is made using a MPC stockcar kit for the body and another Starsky and Hutch Torino for the interior, chassis and engine- it was painted using the factory correct paint code and has custom made decals.
The Ford Falcon from Mad Max is defiantly on the list as soon as I find a kit that is priced reasonably. The kit is rare and the cheapest I have found with shipping to Australia is $250.
The thinner in the enamel is likely to damage the surface. Acylics are a safer choice. Honestly these things make it so much easier to do it. The thin brush they have works perfect and just follows the line around without much cleanup. Well worth the money IMO
https://www.amazon.com/TAMIYA-87131-Panel-Accent-Plastic/dp/B01HDJ7BR0
I've always just wiped off excess with a paper towel. The trick on panel lines is to trace them out before paint with an exacto knife to deepen them. They look a thousand times better when you do this.
Oh, I'm not familiar with that tape. I personally use 3M 1/4" vinyl tape for taping up my two-tones, since that's what we use at the body shop for real cars. Works well.
What's the difference between a cheapo one on amazon and a good one? I got one of those expensive ass michaels ones but never got it to cooperate. Meanwhile, I'm loving the cheapo one I got on amazon, and can hardly find anything I cant do with it.
The wheels I'm getting are these. The bronze TE37's by Aoshima must have been discontinued or sold out, I had them in my amazon cart for months, but they're unavailable now. I can't find them anywhere else either. I was really hoping I'd find them those as I want a set for my mk4 Supra.
I was just gonna do some body mods. I really like the Liberty Walk GTR, but I'm just going to tone that down some as it's my first time doing anything like that.
Pearl white may look good on it. There's only one kit of mine that's white. ('68 Judge) I'd do the gunmetal but both my RC R34 Z-tune and 1/24 R34 v-spec II are already that color.
Thank you for all the suggestions :)
LED Lighting added to the album.
If anyone is interested this is the kit I ordered from amazon. The kit includes 3 lights, extension cable, and a dimmer switch.
https://www.amazon.com/gp/product/B01L1JK2CE/ref=oh_aui_detailpage_o00_s00?ie=UTF8&psc=1
This is also good and nearly the same price, also from Amazon in UK if they're out of stock of hycote or vice versa
I was in your situation about 6 months ago. I got something like this
To start with. I've used stuff from a kit like this nonstop. It's worth every cent imo!
Welcome back to the hobby🤘
Love this one! I’ve used it for multiple models at this point and I always get a great shine from it. I don’t know where you are based, but since it’s on Amazon, it’s really easy to get here in the U.S. Have fun building!
You want micro cutters/nippers like these for cutting parts off the sprue: https://www.amazon.com/gp/product/B07NWBG938/ref=ppx_yo_dt_b_search_asin_title?ie=UTF8&psc=1
The saws are more for customizing/modifying.
It can be recovered if you can get it off the car.
Dress it down with some 600 grit until the blems are gone.
If the blems are deep you might have to start with 400 grit.
Get to 600 grit then some 800 grit. Clean both sides with soap and water. It is going to look like a scuffed up POS at this point, but believe me, the next step will be the charm. Let dry and then dip the piece end-on and end out into some Pledge Acrylic floor wax. Hang onto it with an alligator clip on some hidden edge if you have one and do not turn it or tip it while it is curing or you will get ripples. Dip it and hang it to cure in the same orientation that you dipped it. The floor wax will sheet off to the end where it can be gently wicked off with a bunch of paper towel corners while it is wet, that way you don't end up with a fat edge that might hold it away from the windshield frame. Let sit overnight and install with some G&S Hypo Watch Crystal Cement.
Assuming this is the Tamiya kit you could contact them about replacement windows.
Not sure what your installation process was but you can just use PVA (white glue like Elmer's) or canopy glue https://www.amazon.com/Pacer-Canopy-Glue-Flexible-2oz/dp/B0006O8EVM
If you don't already have a good brush cleaner/preserver like 'The Masters Brush Cleaner and Preserver Soap', you should probably get some. It's pretty amazing stuff. It's surprising how much paint it takes out of a 'clean' brush.
That being said, that's a really inexpensive Tamiya brush. It may be beyond hope. If it's paint buildup in the bristles that's making it spread, a good clean may relax it. If not, start with the brush soap on your replacement brush and treat it really well. It's one thing for a $3 brush to go bad, it's entirely another when you buy a fancy $25 brush and that happens.
By the way, don't buy a $25 brush unless you just really want one, the Tamiya brushes can work just fine...ultimately it's more about the painter and not the tool. A good painter can get good results from a $3 brush, a poor painter cannot get a good result from any brush. You'll know if/when the quality of the brush will affect your results.
They call it a 2 in 1, but there aren't that many options to choose from.
Here's the link for the kit from Amazon.
A can of white Tamiya Paint will give you a great foundation for stickers or water slide decals. Both of these can be made with just a printer, some appropriate paper, and some clear spray like Mod Podge super gloss in a can.
Decal paper source (this is for a laser printer, but inkjet decal paper is also available): https://www.amazon.com/Sunnyscopa-Urethane-Transfer-Transparent-sheets/dp/B076VFHV1F/ref=sr_1_1_sspa?crid=25PFNNC5YHNAZ&keywords=decal%2Bpaper%2Bfor%2Blaser%2Bprinter&qid=1666570878&qu=eyJxc2MiOiI0LjA0IiwicXNhIjoiMy42NCIsInFzcCI6IjMuNT...
It's like a super thin sticker that conforms really well, you can get it at a lot of hobby shops, amazon, ebay, etc. https://www.amazon.com/Bare-Metal-Foil-Adhesive-Bare-Metal/dp/B01M7YKA4O/ref=asc_df_B01M7YKA4O/?tag=hyprod-20&linkCode=df0&hvadid=331739865015&hvpos=&hvnetw=g&hvrand=7940952560655609495&hvpone=&hvptwo=&hvqmt=&hv...
My hobby shop carries it i just get it there. You just gotta make sure you press it on really well (i use the rounded side of some fancy toothpicks i have) and then a brand new xacto / scalpel blade to trim off the excess. It works great.
Thanks!
The kit is this Aoshima INGS WRX STI.
I mentioned it in another comment, but just a lot of poor fitment in the model, fiddly parts, and for the price I paid I felt it lacked a lot of automotive details.
It looks to me like that silver MBZ paint is beyond recovery.
Those spots on the roof look like the paint is gone.
I would try a mild spray & wipe like this Dri Wash 'n Guard Classic Waterless Car Wash Kit which is a wash that I believe contains a silicone based type of polish.
There is also the single bottle HERE
Better living through chemistry can be pricey........
Yep. I use a visor with a headlight similar to THIS or THIS
The exact thing I have is old so I don't see it around, but the LED head lamp ran on 2 AAA and the thing has held up OK for being cheap chineez. I like it because I can have my readers on, and still use the flip-up/flip down magnifier lenses.
The lenses are thick enough, I broke one in half right down the middle and it superglued back together ok.
If you have access to a vinyl cutter, you could do something like this with an Initial D character. I've seen 2 cars in town with anime vinyl cutouts (just black on white like in the picture) and they get lots of looks! https://www.amazon.com/Vinyl-Decal-Anime-Music-Headphones/dp/B00ZC3TTB6
This is like the set I have from Amazon. Not sure if this will help. I'm hoping you can get something off of this that is helpful.
https://www.amazon.com/dp/B07M5NL9LL?psc=1&ref=ppx_yo2ov_dt_b_product_details
​
for some reason i couldnt add a picture but these are the applicators I tried.
My 5c.
Thin paint dries evenly, like Tamiya, or MrHobby (acrylic). These are "AirBrush ready" so they got to be thin for such use. When paint is thick, like Revel enamels, for example you got to finish painting part with brush in less then 3 min (own exp.) to get even results. I.e. before it dries out. Also, from my exp., it is almost impossible to get even surface that is more that square inch with enamels. It is possible with thinner paints in several layers though.
I cut the sprue into color sections, so i can paint all the black bits together, all the body color bits, all the interior color bits. also leaving some sprue on the part gives it a good place to hold it (or put in a 3rd-hand-clamp= https://www.amazon.com.au/Helping-Soldering-Hobby-Magnifying-Electricians/dp/B09DYL854K/ref=sr_1_2_sspa?keywords=3rd+hand&qid=1658391021&sr=8-2-spons&psc=1&spLa=ZW5jcnlwdGVkUXVhbGlmaWVyPUEyS1AyVk5JQjMwNTdDJmVuY3J5cHRlZElkPUEwNTM1NjM4MUxMVkhLR0pLUURBQSZlbmNyeXB0ZWRBZElkPUEzUzczS0NNTUNaVVBLJndpZGdldE5hbWU9c3BfYXRmJmFjdGlvbj1jbGlja1JlZGlyZWN0JmRvTm90TG9nQ2xpY2s9dHJ1ZQ==
Oh yeah you can get the paint easily online. Tamiya and Vallejo are on Amazon, Vallejo has some nice variety packs where you can get for instance all their metallics, which gives you your aluminum, steel, rust, etc. The model air is prethinned for airbrushing but you can brush paint with it also, you're better off brushing paint that's kinda thin because you won't get as many brushstrokes.
You might get lower prices at a hobby shop though, mine sells the Tamiya jars for around $4.50 each, the Tamiya jars on Amazon are a little over $7 each.
Oh yeah. If you have a Hobby Lobby or Michaels (or Jo-Anns) find a cutting mat. It's also chemical resistant for when you tip over a bottle of paint. :)
This is what I'm talking about, should be able to find it locally and save some $ with a coupon or a recurring sale: https://www.amazon.com/OLFA-Double-Sided-Self-Healing-Rotary-Mat/dp/B0006SDOFO
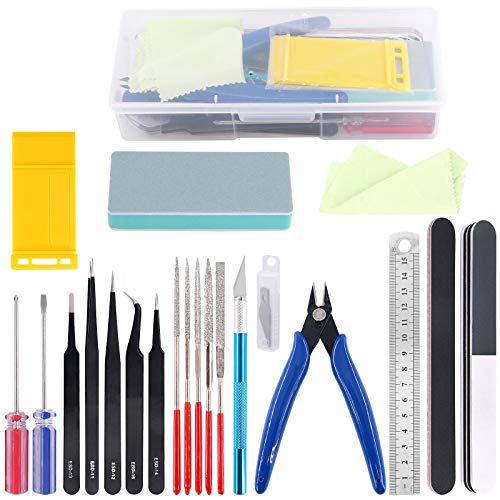
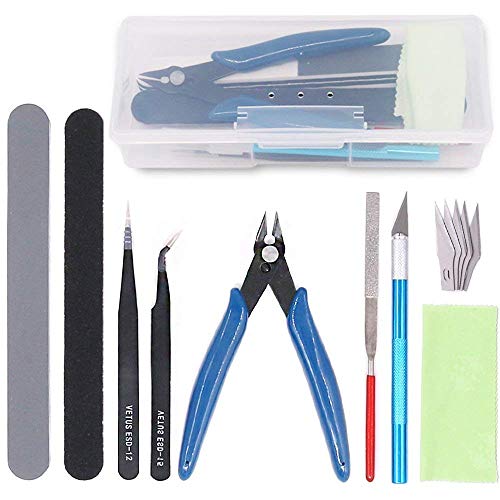
As a beginner you could pick up something like this, it has your flush cutters for cutting parts off sprues, an xacto knife for trimming, a file for smoothing, tweezers for holding small parts. You could hit up a craft store for some kinda cutting mat.
Paint wise, I'd recommend Tamiya or Vallejo acrylics, they dry fast and are pretty forgiving for beginners, if you paint something and hate it you can get acrylic off pretty easily. I'd suggest Tamiya or Testors spray cans for the body.
As for the kit itself, #1 it needs to be something you're interested in for sure. Tamiya make the best kits hands down, so if you could find a Tamiya kit that interests you that'd be ideal. Newer Revell kits are really nice as well, I have pretty much no experience with Aoshima or Fujimi kits but they're more budget oriented Japanese kits. If you're into old American cars, you're looking more at AMT and MPC, which are very hit or miss IMO. Salvinos Jr does NASCAR kits, and Atlantis does the really old Revell US cars.
There's no real tips or tricks aside from have fun, if you're not having fun, don't do it. Take your time, patience helps a lot, but you're going to mess stuff up, not every kit is gonna turn out perfect.
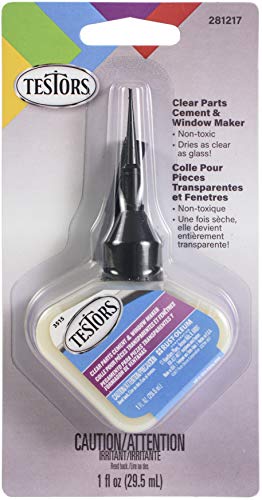
Looks like this but I'd try to find a better deal on a single bottle. 30$ is excessive. Also grab a glue that's specifically for clear parts. Some glue fumes can react with clear plastic pieces and fog them permanently. Something like testors clear parts cement
Fantastic work! The best paint lines for me come with this tape: https://www.amazon.com/Masking-Tape-Curves-Tamiya-Japan/dp/B075HJBQY9/ref=sr_1_2?crid=8FB3F43CYUQO&keywords=tamiya%2Bfine%2Bline%2Btape&qid=1654603819&sprefix=tamiya%2Bfine%2Bline%2Btap%2Caps%2C80&sr=8-2&th=1
I put safe release masking tape behind the Tamiya tape.
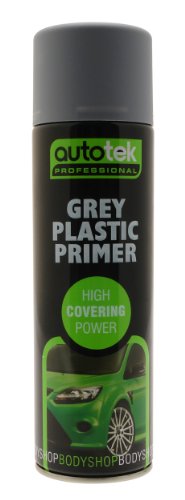
Lacquer paints need a lacquer primer. Don't let the fact that this stuff is in a can from Duplicolor throw you, it lays down a fine layer and even comes in gray, black and red oxide as well as white: https://www.amazon.com/Dupli-Color-DAP1689-General-Purpose-Sandable/dp/B002984MTG/ref=sr_1_1?crid=2MUQ979VQB8IG&keywords=duplicolor%2Bsandable%2Bprimer&qid=1654346434&sprefix=Duplicolor%2Bsandable%2Bprimer%2Caps%2C108&sr=8-1&th=1
Try this. I found this to work perfect. I have struggled with painting window trim black in the past. Most times I skip it. But my last model I taped all the window trim and weather stripping and using this marker turned out great.
Edding400PermanentBlackBullet...https://www.amazon.com/dp/B000KJOYDU?ref=ppx_pop_mob_ap_share
A few thoughts:
From the picture it looks like a topcoat of clear may have lifted off of a lower coat (also clear)?
If you mixed the 2k well and at the proper ratio, then the problem is not the age of the clear.
Some clears have recoat windows. If you wait too long between clear coats, you have to scuff before topcoating. Similarly, you wouldn't want to sand and polish a clear and then expect more clear to stick to it.
As for tape, time is the enemy when masking. The longer the tape stays on the greater the risk of lifting paint. It may save a few minutes cleaning the airbrush by masking a whole bunch of trim to spray at once, but if it means the tape sits on the paint a whole day then maybe rethink the plan.
As for tape, I use this stuff for my edges: https://www.amazon.com/Tamiya-TAM87177-Masking-Tape-Curves/dp/B00VTDYTR2/ref=sr_1_2?crid=2GWAFPNXZRSQX&keywords=Tamiya+thin+line+tape&qid=1652741826&sprefix=tamiya+thin+line+tape%2Caps%2C269&sr=8-2
I back that up with a plain blue painter's tape, but there are two types and you want the right one. The wrong one just feels like yellow household masking tape with a crinkled crepe feel to it. The 3M Safe Release tape should be smoother, much harder to stretch and will feel less sticky.
There is more than one way to go at this, but this works great for me. I hope that helps.
There's a couple of options there. First off, assemble as much as possible before painting - anything that's the same color like frames, engine block halves/cylinder heads, etc - glue them together and let them dry first. In fact, I often assemble things while they're still on the sprue so I can keep the parts labeled and provide a handle at the same time. Remember, there's no rule that says the sprue has to stay in one piece, so feel free to butcher it up as needed.
Another option, there's sets of little alligator clips with stems on them (check Amazon, there's tons of cheap options with little plastic bases for holding them like this). Then I put masking-tape flags on the stems and sharpie on the part number.
You sure can, but use a good lacquer primer on the plastic like this one https://www.amazon.com/Dupli-Color-DAP1689-General-Purpose-Sandable/dp/B002984MTG/ref=mp_s_a_1_3?crid=2VIAL8YVUC8A0&keywords=duplicolor+sandable+primer+white&qid=1650496529&sprefix=duplicolor+sandable+primer%2Caps%2C130&sr=8-3
Thin the polish with lacquer thinner, and obviously try your primer/polish/clearcoat combo on some spoons first.
You will find that polish isn't much cheaper than model paint, but there are some wild colors available.
If you're working with bare styrene, give MEK a try. It welds bare plastic in a couple of seconds. https://www.amazon.com/Plastruct-Plastic-Weld-applicator-Bottle/dp/B00FDFWJD8/ref=sr_1_14?crid=2MQUYQF44EKD9&keywords=mek+solvent+quart&qid=1649155038&sprefix=Mek+quart%2Caps%2C99&sr=8-14
That particular bottle seems to allow evaporation too easily. If you buy it, consider moving most of the product to a better-sealing jar.
Spray accelerants do work, but if you need them then you might be using too much cyanoacrylate. A medium CA kicks off pretty quickly. Don't use accelerants on painted parts.
I'm gonna agree with most of the other posters, get some cheaper kits to get your feet wet, once you're more comfortable bust this one out. Get some flush cutters, some brushes, some Tamiya / Vallejo paints, tweezers, some sanding sticks, clear parts glue and model cement, and you'll be off to a good start.
Something like this would have everything you need and then some.
Oh wow, I didn’t realize they had gotten so expensive. I bought this one in 2020 for $80 and it has served me well.
So, he wants adhesive backed stickers and not water-slide decals?
If so, printing the stickers is easy to do on any laser printer. If you want a glossy finish to the print, you can topcoat the image with an acrylic gloss spray like Mod Podge: https://www.amazon.com/Mod-Podge-1470-Acrylic-Sealer/dp/B003VYD9DM
It is cutting out the stickers along the border that is harder to do. Professionals create a metal stamp to die-cut the lines precisely for large-batch production.
As a hobbyist, you could try something like a Silhouette or Cricut to do this. It would take some fiddling to get the alignment right. Create an SVG file with the outlines of the stickers, and then use the Silhouette or Cricut to cut the SVG on a sticker page that you've already printed and cleared.
If he just wants a set of stickers made once in a while, I'm sure there are services that can handle this. The setup fee will seem steep for just one page of stickers but might be cheaper than buying the needed equipment.
The light is a generic Amazon special photography/ video light. I see it's $70 now... About $30 more than when I bought it two years ago. Here's a link!
You should buy these kits ( i but one like this 5 years ago whe i started doing this) which come with basically everithin to start with. Also make sure to check which glue and paints you are gonna use
That primer is an enamel. I use this plastic-safe lacquer primer: https://www.amazon.com/Dupli-Color-DAP1689-General-Purpose-Sandable/dp/B002984MTG/ref=sr_1_5?crid=35L0DBUIYBMVN&keywords=dap1689&qid=1642601559&sprefix=dap1689%2Caps%2C67&sr=8-5&th=1
Your lacquer paint will go great over this lacquer primer. If you decide to source a different lacquer primer, be aware that some lacquer's are hotter than others, meaning that some can attack plastic. Test on some scrap sprue from your kit. Plastic spoons are great for testing interactions of paint combinations, but the spoons are not polystyrene like your model. The DAP1689 that I use hasn't attacked anything I've used it on.
As others have said, a trip into a bag full of oven cleaner will strip that paint right off. With a little scrub with an old toothbrush, a rinse and a wash with some Dawn or other dishsoap you'll be good as new. If you don't like the idea of oven cleaner, a tupperware full of undiluted degreaser like Purple Power works as well though it will take a little longer. Modelers call this the purple pond, and if you seal it up you can use it for years on multiple parts.
Do you know if this TAMIYA primer can be used under enamel? I read through some of the reviews but I’m not sure. I didn’t see anything in the product description about what kind of base it’s made of.
A lacquer color coat gave you the widest possible set of choices for a clearcoat. For a first timer, I'd recommend sticking to lacquer with something like this: https://www.amazon.com/TESTORS-CORPORATION-Boys-1161X-Gloss/dp/B0006O55ZK/ref=sr_1_1?crid=3W2UC3JSKS2CI&keywords=Testors+glosscote+lacquer&qid=1642459963&sprefix=testors+glosscote+lacquer%2Caps%2C108&sr=8-1
Paint some plastic spoons with your colorcoat so you can practice with the clear.
There are of course many other options out there.
You said Vallejo paints in your comment and I have been looking at them. Do you think this set will work with a paintbrush?
Thanks! What is the difference between the white glue and this transparant school glue?
Must I put the glue in the pinhole twice? First for the taillights + bumper and then taillights and bumper + chassis?
I use the Loctite Professional stuff that I get from WalMart and it refuses to clog. I do nothing to it save for keeping the lid on and standing it upright.
Here's the one I'm talking about: https://www.amazon.com/Loctite-1365882-0-71-Professional-Super/dp/B00KOCC46W/ref=sr_1_2_sspa?crid=2TNLDI8RC8YN3&keywords=loctite+professional&qid=1640717754&sprefix=loctite+professional%2Caps%2C78&sr=8-2-spons&psc=1&smid=A6...
Spray painting is a mix of so many variables, it just takes practice to get proficient.
With a can, you can't control the quantity of paint that comes out when you press the trigger, nor can you control the spray pattern or the mix of paint and thinner to try to slow the dry time.
This leaves you with just a few variables that you can control: distance from the object and spray pattern/speed. This all assumes that the can is well shaken and used in the temperature range recommended.
Bumpy paint can mean that the paint is drying on the way to the model, or at least partially drying. You want the applied paint to have time to level out after hitting the model before it dries enough to stop levelling. Move the can closer and make quicker passes and see if that helps.
This is where plastic spoons come in so handy. Every spray can will be a little bit different. You have a much better chance of developing good technique with a finer spray pattern like you get with a Tamiya spray can.
While I don't recommend most non-model spray paints, this primer is my go to. It is lacquer that just refuses to harm anything I've sprayed it at, and it has a very fine spray pattern with great coverage. Since it is lacquer, you can put any type of model paint over it with no issue (lacquer, enamel, acrylic). It is also a large can and lasts for several models, and is available in white, black, red and gray: https://www.amazon.com/Dupli-Color-DAP1689-General-Purpose-Sandable/dp/B002984MTG/ref=sr_1_25?keywords=duplicolor%2B1692&qid=1639659265&sr=8-25&th=1
I shot a few pics of this primer a few years back: https://imgur.com/gallery/2mGMdLx
It won't be long and you'll have this dialed in! :)
I think it is a 70s. I did it few months ago and threw away the kit.
I think is the kit
1970 Ford F-100 Custom Cab 4x4 1:25 Scale Model Kit https://www.amazon.com/dp/B07FXVXSJ9/ref=cm_sw_r_apan_glt_fabc_6DZX2F8DKP68CFJBP9NV
Thanks, I am gonna order that. Would this work for primer?
Rust-Oleum 7582838 Professional Primer Spray Paint, 15 oz, Gray Primer https://www.amazon.com/dp/B00106IZLO/ref=cm_sw_r_apan_glt_fabc_M037N08N4ESERAMMVW04
This page on your vendor's site is showing polycarbonate paint for the bodies, so that's the type that I'd use: https://www.ncphobbies.com/body-paint-1/24-slot-cars/
As for tape, I use this stuff inside bodies: https://www.amazon.com/Tamiya-TAM87178-Masking-Tape-Curves/dp/B00VTDYX5U/ref=sr_1_3?keywords=tamiya+tape+3mm&qid=1636771107&sr=8-3
It is a pain in the neck to tape inside the body. I used tweezers and toothpicks to place it, and lots of patience. Be sure to burnish it all right before spraying, and use light coats.
For fine details, consider brush painting. The polycarbonate paint acts like acrylic, so use multiple thin coats when brush painting.
The good news is you don't need to prime or clearcoat. Just give it a good wash with dishsoap and dry before painting.
You need to remove most of that primer to get where you want to be, and with sandpaper you're going to remove lots of the molded detail. You're also going to sand through the primer down to the plastic in lots of places and need to shoot another primer coat anyway.
Tamiya makes a good hobby primer, but I prefer this from Duplicolor (DAP1689): https://www.amazon.com/Dupli-Color-DAP1689-General-Purpose-Sandable/dp/B002984MTG/ref=sr_1_1?crid=2V2Q44C9CZDN4&keywords=duplicolor+sandable+primer&qid=1636225594&qsid=130-7608329-3263411&sprefix=duplicolor+sandable+primer%2Caps%2C...
It comes in white, black, gray, and even red. You're not likely to find it locally, I get it on Amazon nowadays. One can lasts for 6 to 7 models, and the results speak for themselves: https://imgur.com/gallery/2mGMdLx
The first time you squeeze the trigger you'll wonder why you used anything else. It sprays such a fine coat. Look at the two light coats of white primer on a black spoon, and since it is lacquer you can spray lacquer, enamel or acrylic over it with no issues.
Also, get some spoons to practice before spraying your model. It'll save a ton of hassle as you get proficient. Welcome to the hobby! :)
It takes a little work, but if the paint is still liquid then you should be able to remix it. You need a good stirrer. I use these, which I pick up for about $4 at Hobby Lobby (look for their dowels section and you'll be real close to the picks): https://www.amazon.com/Perfect-Stix-Craft-Picks-90-1000/dp/B01MR827DE/ref=sr_1_1?crid=3R99LR259XQGM&dchild=1&keywords=craft+picks&qid=1635726398&qsid=144-5254712-3516458&sprefix=craft+picks%2Caps%2C89&sr=8-1&sres=B01MR8...
As for thinner, enamel thinner won't help you with acrylic paint and vice versa. You can always look up the paint code if you're not sure whether you have acrylic or enamel. Model Masters even had some lacquers.
I airbrush everything I can, but I use this stuff for priming. It is lacquer so you can put any kind of paint over it, and it will not fry plastic. You can get it in white, gray, black and oxide red and it sprays like a dream. It looks pricey but that can will prime 6 or 7 kits.
No it doesn't Here are some examples of paint you should use.
​
Thanks a lot for your reply! felt a bit helpless so started to do my own research on YT
Sadly, removing the paint with chemicals wasn't an option, I painted it using some Rustoleom/Krylon like paint that was meant for metal, so it ended basically melting the whole surface of the car, the roughness you see in the photos isnt the paint, but the plastic itself.
I sanded the whole thing, im missing less now and am doing all the gap panels with a scriber knife and sanding the lines to give them some depth, inevitably Ive lost a TON of detail but have a plan.
About the A pillars, I contacted someone here in reddit that repaired a civic model kit with a broken A pillar, I already ordered These evergreen strips + Tamiya white putty and tamiya Quick epoxy.
After all the sanding/primer/etc I know it wont be 100% so Im thinking of doing it as a Drift Missile style: Like this ... sort of like what most people do out of heavily damaged/thrashed cars= turn them into race cars.
Although Im not going to make it look crashed, it has to look worn out, clapped out, like a heavily drifted car and I had some R32 spare wheels laying around and some racing seats, harness, intercooler, etc so I think I can pull it off.
And Im buying stuff online from US retailers, am planning to buy from Hiroboy in the coming future, besides the evergreen strips, putty and epoxy, I ordered Tamiya Primer, tamiya set of pliers, cutter, scribing tool, sand sponges.
After I deem the body done for paint Ill start assembly and ordering paints, more glue, etc.
Get these. I’ve had the same pair for 20 years and they’re indispensable. They have an angled edge that lets you get really close to the part on the sprue.
They are an automotive acrylic like Gravity-Spain or Splash-Paints in the US. They are intended to be cleared, and these sellers make a 2 part clear that works wonderfully. You owe it to yourself to try these paints if you have an airbrush, they are stunning and you can get OEM matched colors.
For priming, I use and recommend Duplicolor sandable lacquer primer. Some lacquers can be too hot for plastic, but this stuff is fantastic over styrene and resin: https://www.amazon.com/dp/B002984MTG?ref=nb_sb_ss_w_as-ypp-ro-model_ypp_ro_model_k1_1_11&crid=EU12S04LYNCA&sprefix=duplicolor+
A note on safety, don't mess around with any paint fumes , but especially not automotive paint fumes. Have a proper respirator and good ventilation.
Use the back side of an Xacto blade, a safety pin, or get yourself a set of dental picks. Dental picks are great to have for modeling in general anyway for scribing panel lines and other things.
https://www.amazon.com/Dental-Tooth-Probe-Hygiene-Stainless/dp/B0765PRTHB
Thank you for the reply. So considering I'm already picking up Tamiya extra things cement, would a clear Elmer's glue and Testor's modeling glue be enough? I'm based in the US. These are the flies I'm thinking of getting. Plastic Model Glue https://www.amazon.com/dp/B00BH0NN1A/ref=cm_sw_r_apan_glt_fabc_48BSE9FGW9AVS5VR5EV4 Elmer's E305 Washable School Glue, 5 oz Bottle, 2 Pack, Clear https://www.amazon.com/dp/B0030BZ650/ref=cm_sw_r_apan_glt_fabc_PCGN4HSWJ6N5E7CA1R86 Thank you!
He had next to zero orange peel and that's why he was able to get the finish that he did with zero wet sanding and only polishing. If you can get clear to lay down just like he did, wet sanding is unnecessary and you can get straight to polishing. Using 2K lacquer clear will allow you to do that and is most likely what he used.
You want these https://www.amazon.com/gp/product/B01HT1QC2C/ref=ppx\_yo\_dt\_b\_asin\_title\_o02\_s00?ie=UTF8&psc=1
Here fella's this is the set that you need!!! Use them in the order of Orange, Yellow, and finally Black. Combine them with the Tamiya compounds. Orange for Course, Yellow for Fine, and finally Black for Finish. Then use the black pad again with a regular Pure Liquid polish, and finally a Carnauba Wax.
Testors used to make a Decal Bonder for making decals, but they no longer do. You can overcoat fragile decals with a wet coat of this product: https://www.amazon.com/Krylon-K01303007-Acrylic-Crystal-11-Ounce/dp/B00023JE7K/ref=sr_1_3?dchild=1&keywords=krylon+clear+coat&qid=1628162339&sr=8-3
You'll still have to treat them carefully. Use plenty of water to float them into place.
Since the finish is red anyway, grab a Tamiya white primer and then shoot your color coat. You're adding more layers of paint to your finish, and you want those layers to cover without being thick.
Do yourself a favor and grab a coat of this primer. It is safe for styrene and you can shoot ANY kind of paint over it: https://www.amazon.com/Dupli-Color-DAP1689-General-Purpose-Sandable/dp/B002984MTG/ref=sr_1_2?dchild=1&keywords=duplicolor+automotive+primer&qid=1625610879&sr=8-2
On balance, it is cheaper than Tamiya primer and you'll love how it lays down. It is available in gray, black and red as well.
Good luck!
You should be fine with that. I agree with /u/FiskTireBoy, try a little thinner and if that doesn't work see if you can get more air pressure.
The Zero Paints FAQ calls for 15-40 psi, but that will be for all of their paints. That's quite a range, and if you're on the low end of that you might not be able to spray the thicker primer.
The good news is that their are very nice primers out there. My favorite for models is Duplicolor's Sandable Primer. It is a lacquer primer safe for plastic, and you can spray anything over it with no problem. It comes in white, gray, black and even red and a can will last for 4-5 models: https://www.amazon.com/Dupli-Color-DAP1689-General-Purpose-Sandable/dp/B002984MTG/ref=sr_1_1?dchild=1&keywords=duplicolor+sandable+primer&qid=1622507331&sr=8-1
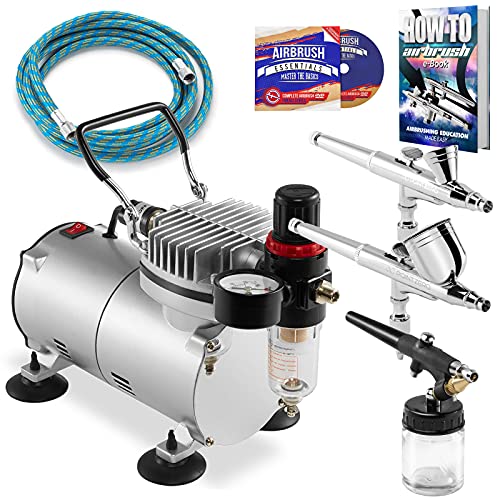
Master Airbrush Cool Runner II Dual Fan Air Compressor Professional Airbrushing System Kit with 3 Airbrushes, Gravity and Siphon Feed - 6 Primary Opaque Colors Acrylic Paint Artist Set - How to Guide https://www.amazon.com/dp/B00EKT30JK/ref=cm_sw_r_cp_api_glt_fabc_4JVW4451MV45FEQ39GXY
I plan to use this glue and transfer to these applicators: https://www.amazon.com/Fineline-Applicators-20-Gauge-Bottles/dp/B00756OEVI/ref=sr_1_40?dchild=1&keywords=needle+tip+glue+bottle&qid=1621381701&sr=8-40
I already use it for the clear parts cement. I do worry about light exposure of the cement, maybe there is a reason it is in a black plastic container to start with.
I'd go with the speaker. A horn at scale size would sound like a chirping bird. :)
There are probably cheaper alternatives, but I used one of these last Christmas for a gift. You can get them push-button activated, light-activated, or like you see in talking greeting cards where a tab slides back and forth to trigger the audio. It also holds multiple files and plays a different sound each time it is triggered: https://www.amazon.com/gp/product/B0845VL9HG/ref=ppx_yo_dt_b_asin_title_o09_s00?ie=UTF8&th=1
It must be the thermal mass. Most of the body was thin plastic, so whatever the paint did to change the temp was done uniformly. Where the blu-tack sat you created a heat sink where the body temp changed much less, and the paint dried with more gloss.
The Tamiya paint stand would save this happening again. So would a creatively bent wire hanger: https://www.amazon.com/Tamiya-300074522-spray-work-painting-stand/dp/B00080DIWE/ref=sr_1_1?crid=MCOA22QSE50E&dchild=1&keywords=tamiya+paint+stand&qid=1618661745&sprefix=Tamiya+paint+stand%2Caps%2C186&sr=8-1
I bought a cheap airbrush kit off of Amazon for about $80 cad a few weeks ago:
Its not great, but as a starter kit it's ok. Mine came with a warped needle, but customer service was great and sent me a whole new kit for free. But eventually you'll want to upgrade to something better. There's a lot of kits on Amazon.
​
Recently bought a Badger 105 and it's great for $110 cad. Just for the gun tho.
That's a lacquer color coat over an enamel primer. Here is my favorite lacquer primer. It lays down great and you can spray anything over it. It also comes in multiple colors: https://www.amazon.com/Dupli-Color-DAP1689-General-Purpose-Sandable/dp/B002984MTG/ref=sr_1_1?dchild=1&keywords=dap1689&qid=1615927760&sr=8-1
Some samples of the primer that I sprayed: https://imgur.com/gallery/2mGMdLx
Master Airbrush Multi-purpose Gravity Feed Dual-action Airbrush Kit with 6 Foot Hose and a Powerful 1/5hp Single Piston Quiet Air Compressor https://www.amazon.com/dp/B001TO578Q/ref=cm_sw_r_cp_api_glt_fabc_XK0F4XSYS22EZD9BD38R
This is the one I was looking at.
Welcome to the hobby! Check out Tom Ruijter's Youtube channel. In this video he talks about building your first kit: https://www.youtube.com/watch?v=HfT8zZ-xpYA
To start out with, it's hard to go wrong with Tamiya Extra thin Cement, Tamiya Acrylic paints, and Tamiya Spray paints. Also, pick up a clear parts cement like this one (you can substitute Elmer's school glue if that's available to you): https://www.amazon.ae/Testors-238257-Clear-Parts-Cement-1oz/dp/B0006N6ZHS/ref=sr_1_2?dchild=1&keywords=clear+parts+cement&qid=1610890822&sr=8-2
Enjoy your first build!
I found this kit on amazon which I think includes everything. But what about the the other stuff ? Glue, colors, spray and all those stuff https://www.amazon.ae/BXQINLENX-Professional-Airplane-Building-Assemble/dp/B071CZ7V4K/ref=pd_sbs_1?pd_rd_w=XZ41L&pf_rd_p=40639751-b257-4a87-a6e4-197dfafc0282&pf_rd_r=YXYDQN3DWDF0TSENSE94&pd_rd_r=bacf83a9-cb67-4e7a-9b3b-54f5889ca5c1&...
To start, you can just use cheap spray paint until you see if you like it. This channel has lots of videos, and he always uses rustoleum and gets reasonable results: https://www.youtube.com/watch?v=3pWrb1amyQU
For a cheap kit, if you're in the US, hobby lobby has 40% off cars a lot of the time, so you can get them under 20$
Then you just want something like this to cut the parts from the "sprue" and file down any rough parts: https://www.amazon.com/Rustark-Gundam-Building-Repairing-Fixing/dp/B071LB1T5D/ref=sr_1_1?dchild=1&keywords=hobby+kit&qid=1610678772&sr=8-1
After that, you'll need some glue. You can get by with super glue to try out, but tamiya's glue doesn't leave big globs, and is recommended.
This is the filter that you need. You screw it into the bottom of your brush and the hose screws onto the other end. Shop around to find it at a cheaper price first.
Amazon.com: Iwata-Medea Pistol Grip Moisture Filter: Toys & Games
Go with a white primer. Gray will mute the colors, and for this color scheme you don't want that.
A can of this primer will last for several models, and you'll love the results: https://www.amazon.com/Dupli-Color-DAP1689-General-Purpose-Sandable/dp/B002984MTG/ref=sxts_sxwds-bia-wc-drs1_0?cv_ct_cx=Dupli-Color+DAP1689&dchild=1&keywords=Dupli-Color+DAP1689&pd_rd_i=B002984MTG&pd_rd_r=4cb381d8-1c9d-4100-abf7-27...
That primer is also available in gray, black and red oxide if you ever need those. I have a full set of sprayguns and airbrushes, and I still use this to prime models. Give is a light wetsand with 600 grit before spraying your color coats.
My advice: buy the regular Easy Off (not the fume free) and order a pack of these so you don't tear up the surface of the parts: https://www.amazon.com/FOSHIO-Scrapers-Contoured-Refillable-Application/dp/B076BBW1WM/ref=sr_1_1?dchild=1&keywords=FOSHIO+2PCS+Plastic+Razor+Scrapers+Knife&qid=1604757198&s=hi&sr=1-1
Let the parts sit for 20 minutes, then rinse with water before removing what you can. You might need to do this two or three times. https://youtu.be/9aRNTiPjk3g?t=267
You'll be done in no time, and you'll have some cool plastic scrapers leftover that you will find all kinds of uses for!
use a sanding block so you are sanding evenly instead of dealing with the shape of your hand. Also very little pressure so you don't sand through the clear, just the top of it
​
Amazon has a set of sanding pads with the super high grit sandpaper on them here (not a brand I've used but just wanted to at least give you an idea of what I mean)
hah here's the amazon link: https://www.amazon.com/CDL0002-The-Glue-Looper/dp/B00ET8FJ1E/ref=sr_1_1?keywords=glue+looper&qid=1566256002&s=gateway&sr=8-1
although I think I got mine from someplace else hee hee hee
I use a paasche talon. Fairly inexpensive and it is dual action for high control. Gravity fed is much better than siphon feed as well.
It's like a self healing type of mat that comes with a rotary cutter. I'm sure you can find it at any fabric store or hobby store.
Welcome back to the hobby!
Everybody has their preference and warnings about other brands. For me, it is a question of finding a top-loading, dual action brush with a selection of needles and nozzles, and available replacement parts. I settled on the Paasche Talon (this one comes with all 3 needle/nozzle/head sizes): https://www.amazon.com/Paasche-Airbrush-TG-3SA-Talon/dp/B07FDGSZ6Z/ref=sr_1_2?dchild=1&keywords=paasche+talon&qid=1600867069&sr=8-2
Paul Budzik's videos on airbrushes and sprayguns are fantastic. You'll see that he likes the Iwata brand. I do use the LPH80 airgun for spraying bodies. Start with this video: https://youtu.be/mh4AbXuhXYI
I've done a few of these over the years: http://www.carrollclan.com/HWCUSTOMS/index.htm
Flip the car over and drill out the rivets holding the body to the chassis. This will let you separate the metal body from the plastic bits.
If you want to save a few bucks, try oven cleaner in a ziploc bag to strip the paint from the body. If that doesn't cut it, check your local auto parts store for a can of paint stripper. Follow the directions as the stuff is nasty.
Use a brass bristled brush to brush paint out of the nooks and crannies. Repeat until the paint is gone, then wash the body with dishsoap and towel it dry.
Grab an automotive primer like this one: https://www.amazon.com/Dupli-Color-DAP1689-General-Purpose-Sandable/dp/B002984MTG
Now you can finish with your favorite paint. Good luck!
Edit: when drilling, drill only far enough to release the body. You will use the "stumps" later as a base for epoxy to secure the body again.
I think it would probably be easier to check out ebay and amazon, not sure if the link will work but i found the r32 on amazon https://www.amazon.co.uk/Tamiya-300024341-24-Nissan-Standing-Construction/dp/B0111YVTTY/ref=asc_df_B0111YVTTY/?tag=googshopuk-21&linkCode=df0&hvadid=309819440071&hvpos=&hvnetw=g&hvrand=6417205887817505990&hvpone=&hvptwo...
It’s a diecast, I bought this one pre-assembled at a craft store. However, I was able to find the same one for sale on Amazon.
https://www.amazon.com/dp/B07DMF4KJ3/ref=cm_sw_r_cp_api_i_lUP5EbES29Y81
No, honestly, not really. The setup I recommended is probably the best bang for your buck and I did a LOT of research before buying what I did. I have too many hobbies already, so my setup was focused on getting the best I could under $150. The Paasche Model H is probably the best airbrush you can buy for $50 or less. I love it, easy to clean, easy to use, consistent results. If mine broke, I'd buy another the same day. Now, you might be able to find a cheaper compressor, like one without a tank, but even the cheapest I've seen are about $50-60 bucks. I did see this kit for $99 on Amazon. It looks decent, but I've had that type of cheap airbrush before and I will tell you that the Paasche Model H will be a much easier airbrush to use and maintain.
I'll just say this. After years of being into various hobbies, the one thing I've learned is to buy the right thing the first time. Sure you can buy something cheaper, but in the long run, you'll regret not just waiting, saving up and buying what you really need. What happens is you buy a cheap alternative, realize it's garbage, then you end up buying something else and something else and then, before you know it, you've already spent the money you could have saved to buy the right thing from the start. And when I comes to skill-based hobbies or building hobbies, it's all about having the right tools.
In the meantime, you might just stick with the Tamiya rattle cans. They're really good and can deliver an excellent paint job. I saw your black Miata build and the problems you had with it. I think it is because you sprayed a lacquer over acrylic. You have to be careful layering different types of paints. Anyway, best of luck, whichever path you take!
Just my experience, but I tried one of those portable, handheld, rechargable airbrushes like this. My fiance does spray tans and she had bought this for doing people's faces. And it is great for that. But I tried it with Tamiya acrylics and it was a complete pain in the ass. The air delivery was inconsistent and seemed to max out around 10-12 psi. It also only ran consistently with the charging/power cable plugged in, which make the rechargability pointless. It would sputter and spit and the tip would dry out and clog easily. I had to strip a body twice because of it. For my third attempt at painting the body, I finally broke down and bought a Paasche Model H ($50) and one of those $80 air compressors from Amazon. All I can say is it was a night/day difference. I just thought airbrushing was finicky and took skill/practice. It turns out I just needed the right equipment. I'd really recommend spending the extra money on a proper airbrush setup. If you do get an Amazon air compressor, make sure to get one with a moisture trap, pressure regulator and tank, like this one.
Looked on Amazon, and found the airbrush I'm using for $30 + shipping from the company's sales page. Haven't used it for cars yet, but the 0.5mm tip did well on the 4 planes I just finished.