
What are
/r/cargocamper's
favorite Products & Services?
From 3.5 billion Reddit comments
The most popular Products mentioned in /r/cargocamper:


The most popular reviews in /r/cargocamper:
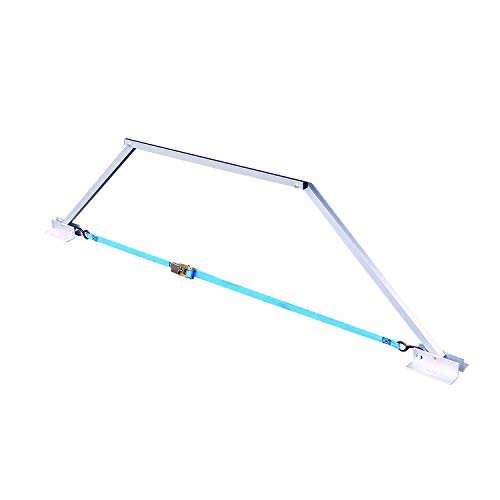
Sharing this with you since you have a 6ft wide trailer, these are awesome on the rear door:
You’ll need a new tongue trailer coupler.
CURT 25135 Straight Tongue Trailer Coupler for 2-1/2-Inch Channel, 2-In Hitch Ball, 3,500 lbs https://smile.amazon.com/dp/B0007LZGXS/ref=cm_sw_r_cp_api_glt_fabc_WM17J7Y4B5BFHYJPS9WX
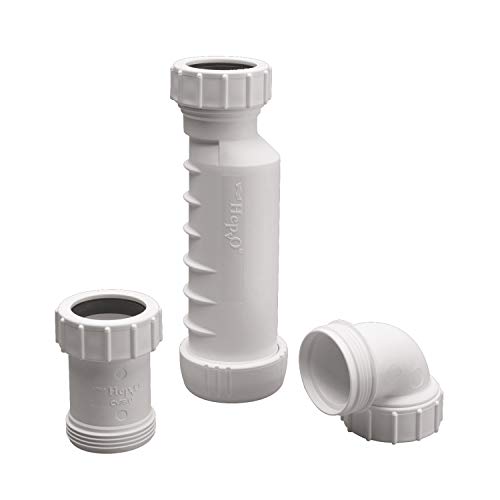
I don't know how this compares, but I was considering a HepvO valve instead of a P-trap, you theoretically don't need to anti-freeze anything. I don't know anything about how well they work or their longevity so I'd want it to be accessible/replaceable if necessary.
https://smile.amazon.com/dp/B00NLMPLDU/
I'm not in a humid area and don't typically camp in super hot locations, but I've had no issues cooling my camper down with the use of those cheesy bug screens that are magnetic in the middle. I have them on the front door, and even found some that were wide enough for the rear. You might have to do a little trimming on the bottoms for length, but they have been awesome.
At night, I have a single side window I leave a little open for a cross breeze and a dometic veiling vent fan I can flip on if the venting alone isn't doing enough.
Edit: this should do for the rear door if you're a 6 wide trailer. https://www.amazon.com/Magnetic-Screen-Sliding-Glass-French/dp/B07QTKFRX5/ref=sr\_1\_6?dchild=1&keywords=magnetic+bug+screen+80+inches&qid=1627326570&sr=8-6
Why put it down low? And why night one of these https://www.amazon.com/dp/B08K3ND7Y4/ref=cm_sw_r_cp_api_glt_fabc_4A604CM1NJT1Z9F5SVQC?_encoding=UTF8&psc=1
It has a DC inverter, quiet, more efficient and could be hooked up to solar later on
Alright then if I were you I'd run the trailer 12v system off a big deep cycle car/RV battery installed in a waterproof battery box on the trailer tongue. Connect it to your 7 prong trailer connector with this widget. It will slowly charge the battery when your tow vehicle is plugged in and running but when you turn it off it won't drain anything from its battery. It charges slowly though so from time to time you might need to boost the AUX battery. Make sense?
Mine is just removable not adjustable. They do make removable adjustable ones tho!
Mine table and removable stand- https://www.amazon.com/dp/B0000AZ89Y/ref=cm_sw_r_cp_apa_fabc_wfWZFbW0KX7EK
Removable adjustable stand only (no table top) - https://www.amazon.com/dp/B07MJ58D6H/ref=cm_sw_r_cp_apa_fabc_ffWZFbCX6212Y
Consider one of these it can go on the floor or on the side if an 18” access is big enough and the cable long enough
There is no inherent problem with your plan, however, I would still recommend against it. You likely will not be shipped the proper branch connectors to set up a 2p2s array. I am familiar with the Will Prowse videos and yes, there are some advantages for a 2p2s over a 4s config but they are minor for your use case. The difference only comes in play for partial shade conditions where one series string is shaded and the other is not. Maybe that matters to you?
OK, that said. Here is how to do what you want.
You will need to add a branch connector: Like this one for ~10$
This will connect your two series strings of series panels.
Then you will want to up that inline fuse to a 30A. Because that is the limit of your 10ga wire. PV array -> MPPT charger. It is a bit odd to ship with a 15A in either config. I would change it either way but that's me.
I would prefer to see a proper breakers instead of inline fuses: Something like this breaker from mcmaster. This allows you to turn off the panels via switch when you want to service them rather than rely on a simple fuse. Both are 'safe' but the breaker is also convenient.
Let me know if that helps. If anything is confusing I can go into detail and draw pictures and stuff.
Indeed, using a cable of sorts works great to get your deck leveled immediately. I eventually found Dyneema Rope and now use it instead of cable. Soft, flexible and as strong as cable for this application. I can walk on my deck with just two 1/8" Dyneema ropes !
Jack stands are a royal pain. Pain to haul around, pain to adjust. Same for wobbly scissor jacks, same for those flip down rear legs junky things. BUILD something like this and affix it right to the door: https://www.amazon.com/Valterra-020106-RV-Stabilizer/dp/B001UGJPXQ/ref=sr_1_5?crid=TEY6YJVG83OA&keywords=trailer+stabilizer&qid=1669447811&sprefix=trailer+stabilizer%2Caps%2C186&sr=8-5&ufe=app_do%3Aamzn1.fos.18ed3cb5-28d5-4975-8bc7-93deae8f9840
It deploys in seconds, automatically adjusts to the terrain, and takes all the wobble out of your trailer. BTW, I also have mounted the one in the link on the back of the trailer frame and all I need to do is level the tongue jack, drop the Valterra unit, pull it up with a strap and I am DONE. It is fairly easy to build out of aluminum. I've done this on two ramp doors now and it is fantastic.
Jack stands stink. You always have to adjust them to fit the landscape, and with holes that are at fixed increments, you end up shimming with whatever you got.
Scissor Jacks also sting because they offer zero anti-wobble.
Do yourself a favor. BUILD this concept with slightly heavier aluminum tubing: https://www.amazon.com/Valterra-020106-RV-Stabilizer/dp/B001UGJPXQ/ref=sr_1_5?crid=TEY6YJVG83OA&keywords=trailer+stabilizer&qid=1669447811&sprefix=trailer+stabilizer%2Caps%2C186&sr=8-5&ufe=app_do%3Aamzn1.fos.18ed3cb5-28d5-4975-8bc7-93deae8f9840
Again, BUILD it... Affix it right to the door. Make it fold up into itself. It SELF adjusts to fit the landscape.... its the fastest thing I found to set up and use regardless of terrain. I've done this on two ramp door rigs now and its fabulous. BTW, I also use the one in the link to stabilize the trailer when parked. It is the easiest thing to deploy and most rigid thing I could find.
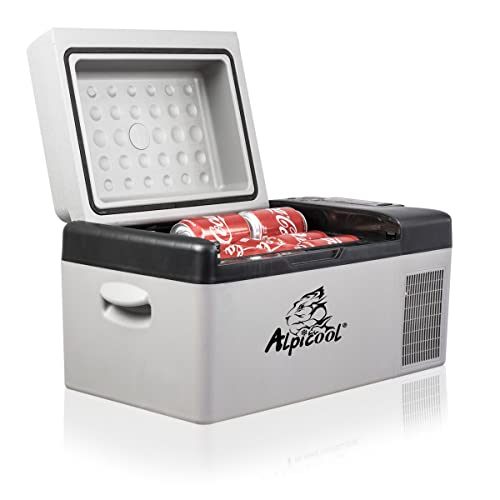
Here is 48qt at a very good price. The trick we learned is use the Alpicool as a freezer and to make ice and use an ice chest as refrigerator.
https://www.amazon.com/Alpicool-CF45-LG-Portable-Refrigerator-Outdoor-12/dp/B0894SJHL6
Compressor fridges start around $250
https://www.amazon.com/gp/product/B09QHPN9K7?th=1&psc=1&tag=viewonam-20
https://www.amazon.com/gp/product/B0969Y6QWJ?th=1&psc=1&tag=viewonam-20
I have no experience with them - just YouTube videos.
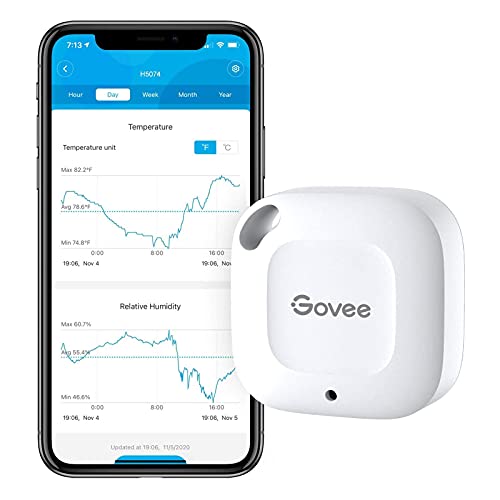
Speaking from unfortunate experience, I just wanted to point out that pasteurized milk should be stored below 40 degrees to slow spoiling. That unit mentions 40deg as its coldest, so I would definitely agree with you on adding ice packs.
I have a bluetooth temp sensor in our household fridge which I sync with an app on my phone that lets me see how well it's keeping the food cold. When the power goes out, I see the temps rise above 40 degrees in less than an hour and a half. The fridge is old but this still surprised me. I was figuring I'd get at least 6-8 hours before getting to that point if I didn't open the door.
With that in mind, if I were to pack milk or uncured meats I didn't plan to cook in a portable cooler that might go unplugged for a while over the course of 2-3 days, I might just prefer a quality well manufactured cooler and stick with ice packs.
It sounds like you made the purchase already, perhaps you might be interested in using a temp sensor to see how well it holds up. That would at least give you a base line on how well it performs in various situations. You can set it to alarm on your phone when it reaches 40 degrees if you like. Adhere one to the underside of the lid and you'd be set.
Ended up finding a 540Wh Lifepo4 solar generator on an amazon deal and used an old gift card for it. I m gonna try it out and see if it works for me. Thanks for everyone's help.
Here is what I decided: Looks like its a rebranded rockpal solar generator as the model numbers match.
https://www.amazon.com/dp/B0B5RZ8B66?psc=1&smid=A2X28BW8WA2V1X&ref\_=chk\_typ\_imgToDp
How hard would it be to increase the door's thickness around the latch? Might be able to beef the latch area up with some 1/4 inch ply. Then either router the edges, paint it a different color from the door and count it as a trim piece, or sand the edges flat and paint it the same color so it doesn't stick out.
I searched for 1 inch door latch and found some storm door latches that advertise for 1 inch doors. Aesthetically these might look out of place, and I assume the locks are garbage, but it's an option. https://www.hardwareandtools.com/hardware/storm-screen-and-patio-door-hardware/screen-and-storm-door-knob-and-latch-sets/?features_hash=69-638
Also found this cabinet door latch that says it can fit 1" material: https://www.amazon.com/Cabinet-Different-Cylinder-Chrome-Plated-Thickness/dp/B07VW5RPMQ
I think your best choice will depend on if your priorities, are you more concerned about aesthetics, price, or security?
Adding a layer to that section of the door/frame would be my choice, but it's the highest cost and highest labor option.
I'm starting my 7x12 build and trying to figure out some electrical stuff first. Anyone able to steer me in the right direction with a couple questions? I want to power a few things with a Jackery 1500, which I already own, rather than an additional battery setup.
I want to power the existing interior trailer lights. I bought this 12v adapter https://www.amazon.com/gp/product/B01MRPKPPG and want to run it from the Jackery to the Phoenix 7-way junction box (pictured) that came with the trailer. What color(s) should I be connecting to or should it be done another way?
I also want to power a Maxxair vent with the Jackery. Should that also go through the junction box? Or buy a 12v splitter for the Jackery, and another cord like the above link, and skip the junction box? Thanks!
Ok, I'm not an expert but here's what I'd do.
Try to isolate which of those wires is for your interior lights. How? Turn on the lights, and start removing those connections until the lights go out. That's the one!
For your goal of using the Jackery, I'd probably do a separate 12V Fuse Box, and wire your lights and fan to this (red is positive, black is ground). Your 12V adapter can then be connected to provide load when needed. This little box will allow you to easily add any other 12V items you might want. The only downfall I can see is if you don't have your Jackery with you, your interior lights won't have a power source to turn on.
Personally, I think the stock interior lights suck, so I'd snag some modest LEDs or light strips and connect to the new 12V Fuse Box. That way, you have your trailer's stock lighting set up if you need it, but better lighting when the Jackery is plugged in.
Set 4 Libra 24" 6000lbs RV Trailer Stabilizer Leveling Scissor Jacks w/ Dual Power Drill sockets & mounting Hardware Set https://www.amazon.com/dp/B00VW7CV7U/ref=cm_sw_r_apan_i_NKDQ7SV4D0SR9AM0M5NG?_encoding=UTF8&psc=1
Pre-drill your holes and the "self-tappers" will work.
I don't have a camper yet, but I too love sitting in a hot water especially in the nature, so I imagined myself getting one of these portable bathtub that I could perhaps deploy outside or at least on the "patio".
Keep us updated!
I used an older version of this. I wired it to running lights instead of back-up, and now I can see behind me when I'm going down the road. It's kinda big and bulky, but I just sit it on the floor of the van and remove it when I'm not towing.
https://www.amazon.com/gp/product/B00571QERU/ref=ppx_yo_dt_b_search_asin_title?ie=UTF8&psc=1
It's sturdy AF. We put a trash bag inside it's little bucket. After use, depending on water content in the bag, we may add unscented kitty litter until it's a solid clump. Then pack out the bag. While you can pee in it, it's honestly a waste of resources unless you're in a situation where you have to go inside the trailer/tow vehicle due to proximity of civilization. My wife and all our friends much prefer to use a P-style taco (not a SheWee, etc type of funnel) for peeing in the woods (or gas stations, state parks, other poorly cleaned places) than wasting the bag and a bunch of kitty litter. As a dude, if you're sick in the middle of the night and you've got both liquids and solids coming out at once, the hole in the seat is a little too short front to back, so you've got to be damned careful to position things exactly right to make sure you've got everything pointed into the bucket.
Overall, would recommend for a low-cost, low-tech solution. Better than a bucket with a ring, IMO.
I've seen this one. There are tons of videos on the tube that can help, but better to be safe then sorry. SO if you don't feel comfortable, have a professional do it.
Maybe use something like this instead of a house breaker panel.
WFCO WF-8930/50NPB-50 50 Amp or 30 Amp AC Distribution Center https://smile.amazon.com/dp/B06WP5JPWQ/ref=cm_sw_r_cp_apan_glt_i_JP574YF0MW7FC93FP2C5
I have this installed already. Pretty much the same thing, right?
NOCO GCP1 15 Amp AC Port Plug, 125 Volt Power Inlet Socket, and Waterproof Electrical Outlet Receptacle Box with 16-Inch Integrated Outdoor Extension Cord https://www.amazon.com/dp/B009ANV81S/ref=cm_sw_r_cp_api_glt_i_X3J4P1SJY5X9595T860F?_encoding=UTF8&psc=1
WELLUCK 15 Amp 125V AC Power Inlet Port Plug with Integrated Dual 18" Extension Cord, NEMA 5-15 RV Flanged Inlet with Waterproof & Back Cover Y Splitter Cable, 2 Pole 3-Wire Shore Power Plug for Boat https://smile.amazon.com/dp/B08GLFQV2P/ref=cm_sw_r_cp_apan_glt_i_P6NJ1YVAF8M03BB7F6HD
This will get you easy and quick shore power. Just know it's 15 amps and don't run many things at once. Probably best to have a fused surge protector after this as well.
NP. I built my electrical out like a commercial RV, but you could just have an outlet strip plugged into one of these.
If you get more elaborate than that though, make sure you do it safely with circuit breakers, proper grounding etc.... Stuff like that.
Doesn't have to be crazy, but I have a family, so I need HVAC, TV, radio, coffee etc....
You could just wire for 110, but having 12V for lighting and some accessories is super handy. I wired the hell out of my trailer. I have 110 outlets everywhere, inside, outside (with GFI's), all over the kitchen area. The walls were off and wire was cheap, so I went crazy. If the toilet stall wasn't a shower, I would have dropped one in there too. I forgot to put one underneath (for the heating tape on the poop-pipe) and kicked myself for that. Maybe in the spring.
I downloaded some schematic images off the interwebs, (Google RV wiring or something) then started with a power-center like this, but a little bigger; then and then pulled 14/2 romex to everywhere I wanted outlets, and two 12/2 runs for 20Amp loads (my mini-split AC and the microwave/ hot-water heater circuit). I pulled a bunch of 12V runs for lighting too. I used #14 THHN or something, cause it was cheap, but using primary wire would probably be more appropriate.
I'm not clear on what "switching" means either. Right now, this PS is temporarily hooked up to a chinese diesel heater - which draws 8-9 amps on start up to heat the glow plug. I've monitored the voltage (one of these meters) during this high draw period - and the voltage stays the same - never moves at all. To monitor during charging with this PS, is the best way to just wire a meter (like I linked above?) between the PS and the bus bar the battery will be connected to?
A multi-angle measuring ruler might be what you're looking for. This one has pictures that look like they address your problem. Others have a better rating, so look around some.
https://smile.amazon.com/SCKUBMF-Measuring-Universal-Section-Aluminum/dp/B08KY6BYTT/
I got a shitty ball lock that can be kicked off. This will leave evidence if someone tries to steal my trailer. I also have a really good chain and lock holding wheels to the frame.
shitty ball lock: https://www.amazon.com/gp/product/B001IH8PXI/
good chain: https://www.youtube.com/watch?v=kxkK9RBYVCA
Its an AP Products window I got off of Amazon. I was unsure about them considering how inexpensive they were, but they seem to be working great so far and I was able to install them by myself.
I'm running two 6V golf cart batteries to get 225amp hours of 12V. I charge that with 200W of solar with a 40amp MPPT charge controller. And have a 1500w Pure Sine Inverter.
I pretty much got tired of having battery anxiety and went with 4x what I calculated as my daily need. I live in the PNW, so there's never a sure thing for sun, or a spot that isn't shaded by trees.
Lithium has come down in price substantially since I built, and the ability to use 100% of its capacity without harming it is great. My golf cart batteries can draw down to ~30% before I'm hurting their life span.
If you're interested, these are the batteries I have. I've used their 12v 225amp hour, and then these 6v golf cart ones without any issues.
VMAXTANKS 6 Volt 225Ah AGM Battery: High Capacity & Maintenance Free Deep Cycle Battery for Golf Carts, Solar Energy, Wind Energy. https://www.amazon.com/dp/B009MOR58A/ref=cm_sw_r_apan_glt_fabc_QB2TC8AX5YT6X85T4Z3T?_encoding=UTF8&psc=1
Nothing wrong with your approach to the table, just offering another solution for anyone else curious. I used locking hinges for my pop up table and just an easy piece of hobby wood from Lowes. Easy install, minimal construction.
480W is only 40A, cable size is basically irrelevant here. Pick up some 10AWG or 8AWG and call it a day.
Cheapest way is probably to buy a welder extension cord and cut it up: https://smile.amazon.com/dp/B072C3NW99/
The more important thing here, IMO, is what you use for your connector. Are you planning to run this through the standard trailer connector?
A few thoughts:
If this is the regular alternator for the vehicle (and not a second one) then connecting to the alternator means connecting your vehicle's batteries too. If the trailers batteries are at any different a voltage than the vehicle then a massive amount of current will try to flow from battery to battery. Fuses will blow or things will catch on fire.
I would avoid the 2x DC-DC because of energy loss.
I was planning on using my vehicle as a secondary charging source in addition to solar. I was going to use my car and trailer's existing wiring for auxiliary power. I don't remember if it has a 20A or 30A fuse. A DC-DC charge controller will limit the current to something safe, and stop charging when the battery is full. Victron and other companies make larger ones if you still want to run your own wires and increase charge speed.
https://smile.amazon.com/VICTRON-ORION-TR-CONVERTER-12-30A-ISOLATED/dp/B01M0YCDJ8/
Just got the power plant as organized as I can. Figured I'd share it with you guys for ideas.
Seem to be doing a good enough job. Enough juice to run my gaming PC all night.
I am pretty happy with how simple the system is compared to most I see.
My plan is off-grid only, electric tanked water heater. It will have a lot smaller power requirement than tankless. A 4 gal water heater can be turned on an hour before showering so it's not sitting there wasting power. If half your water comes from hot and half from cold you can take an 8 gallon shower. With a 1 gpm shower head that's 8 minutes or hot running water, pretty luxurious by camping standards. I'm going with a cheap 110V model on amazon. It will lose some power unnecessarily in the DC-to-AC conversion, but the only 12V models I've seen are ridiculously expensive.
1440W, 4gal
https://www.amazon.com/dp/B0148O65IE/
I didn't like how low scissor jacks would sit, so I put these on. They're actually recessed up in the frame, so they don't reduce my clearance, but they are a pain to lower as I have to kneel down and reach up under to grab them.
I seldom use any rear jacks anymore, especially on level ground. I just wedge the following style of stabilizer under the rear and one under the side when necessary. Works fantastic. BTW, I built my own out of aluminum tubing. Not much to them really....
ZENY 24/40inch Dog Pen Foldable Metal 8/16 Panels Exercise Pen Pet Playpen Puppy Cat Exercise Fence Barrier Playpen Kennel https://www.amazon.com/dp/B012FMM4MM/ref=cm_sw_r_cp_api_glt_fabc_6DW0GJ8AXG4ECXVN6CES
I use 6 panels on the rear ramp. The chihuahuas can get out to the “deck” from inside but not off of it.
Yescom 4.6x6.6' Car Side Awning Rooftop Pull Out Tent Shelter PU2000mm UV50+ Shade SUV Outdoor Camping Travel Beige https://www.amazon.com/dp/B075L4YDG3/ref=cm_sw_r_cp_api_glt_fabc_N4GSJ764DPY4XZXQKWSM?psc=1
6.6’ for the rear and 7.6’ for the side. The larger size really benefits from 2 people setting up. The rear I can do by myself.
Class A Customs | Pair of Telescoping Trailer Swing Down Stabilizer Jacks (1000lb Capacity Each) 12"-19" | Includes 9" Long Bar/Crank https://www.amazon.com/dp/B089B5MF1P/ref=cm_sw_r_cp_api_glt_fabc_KPFZ460T9JK6E299EEZK
I purchased this for my 23' sailboat. It is quite accurate. State of charge is done off of a percentage of full charge. So will work "ok" for agm or lead acid. It tells you active current usage and total usage from last reset. Meaning when you are unplugging from full charge, reset the counts and you will know how much you are using and total draw. It will not keep track of input from solar or other means. So basically it's a cheap way to keep instant accurate track in an automatic/manual way. Although a hell of a cheaper than something you'd want for a large battery bank. Hope this helps.
https://www.amazon.com/dp/B07FN3VXH4?ref=ppx_pop_mob_ap_share
I added some Automotive LED strips (people put them in their truck beds). The colored lights are cheezey, but the soft yellow makes my camper warm almost like Edison Lighting.
Over my kitchen area, I have some other LED lights I use that are pretty basic.
Check Amazon, I got my 14x22 for a lot cheaper. It looks like they do t have one thick enough for your wall endless you recess it, which I think is a good idea because wood trim will look much better.
That's great! so much storage room closing in the v nose. The small sink is perfect for us. We only really use it to brush our teeth and clean up before bed. Added a battery powered water jug dispenser for the faucet. Works amazing! Plus it's rechargable. https://www.amazon.com/Drinking-Charging-Automatic-Dispenser-Universal/dp/B07KW4TPNG/ref=mp_s_a_1_4?dchild=1&keywords=5+gal+jug+tap&qid=1629062663&sr=8-4
I will be attaching a small, thin steel plate to the aluminum skin. Then I'll mount some magnets to the back of the unit. I just pull it down when I'm ready to travel and no wires!!
We keep a little white noise speaker to help with my snoring and rain. This little thing works great for its size.
AC’s like this one have a DC inverter. They’re really quiet and efficient too. I’ve seen a lot of people run them off solar
PIONEER Diamante Series Ductless Mini-Split Air Conditioner Inverter Heat Pump Full Set with 16 Ft. Kit https://www.amazon.com/dp/B08K3N8QPS/ref=cm_sw_r_cp_api_glt_fabc_AEJ9SHCDG48XT14D1CTX
Might have to build it yourself. I built all my own beds out of plywood, 2x2's and 4" foam for the mattress. One of the beds is a murphy bed, and for that I had to order plans and hardware (which I modified), but googling :murphy bed plans" might be another avenue to search or at least get ideas.
Installed a 15k btu ac system on a friends travel trailer for him. Expect a full days work. But easy non the less. Only cost $1,000 on amazon directions were easy to follow. Needed a few tools that if you don't have already it might not be worth it (sawsall, jigsaw, circular saw etc) Wire strippers, cutters, fish tape, glow rod, multimeter. Cheapest one was common sense.https://www.amazon.com/Dometic-Polar-White-Conditioners-B59516-XX1C0/dp/B00SQ2GEJA?th=1
Yeah, the mini-split is my fall back plan. BTW, the issue wasn't that it wasn't holding it, it's just that it bowed down some, which causes water to puddle and leak. If the room unit doesn't work (and it should, I insulated the walls and ceiling) then I would go with a mini-split like you're showing. I would have to mount my external unit over the fender, I don't have enough room on the front (v-nose), plus if it's not covered the coils will just get killed by debris. The room units are basically the same size as the roof mount units anyway and they run on 110V. There are mini-splits that run on 110, but most I've seen run 220V.