
What are
/r/gaggiaclassic's
favorite Products & Services?
From 3.5 billion Reddit comments
The most popular Products mentioned in /r/gaggiaclassic:


The most popular reviews in /r/gaggiaclassic:
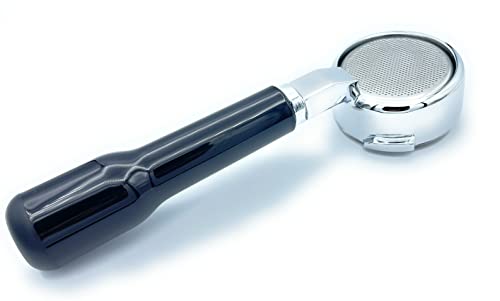
So I've had this brewing in my head for like 3 months now, and I finally got around to pulling it off.
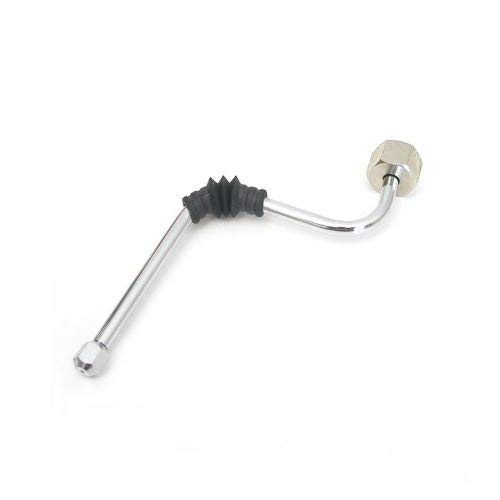
A friend of mine had a spare handle lying around (probably from an old Mazzer??) that I used. If not for that, I was looking at using this replacement knob from Othmro, except I'm not sure it would be narrow enough to clear the side of the machine.
More detailed images and a video here:
http://imgur.com/gallery/tm3IbjX
Let me know what you guys think!
Good idea. My solution was to put a silicone straw tip (link) on the end of the stock pipe. It added just enough extra length to extend past the grille, but it's flexible so it's still easy to remove the drip tray.
Replace the silicone tubes. I believe this is what I bought. Quickun Pure Silicone Tubing, 5mm ID x 8mm OD High Temp Food Grade Tube Pure Silicone Hose Tube for Home Brewing, Beer Line, Kegerator, Wine Making, Aquaponics, Air Hose by Proper Pour (3.28 Ft) https://www.amazon.com/dp/B08BRJ94HM/ref=cm_sw_r_cp_api_glt_fabc_S6Y2TRABP6PC8WVWS1ND?_encoding=UTF8&psc=1
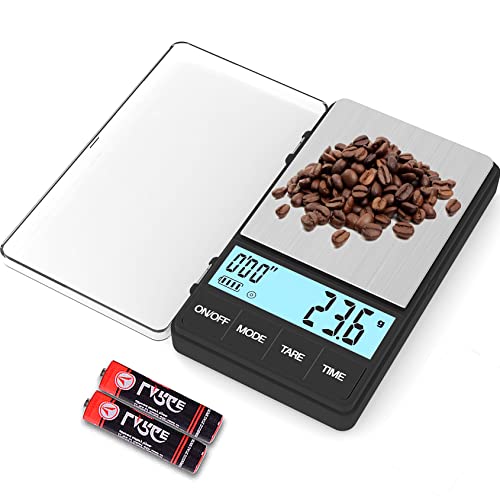
I use this one because it has a built-in timer: https://www.amazon.com/dp/B089JYMRK6/ref=cm_sw_r_cp_apa_glt_fabc_Y34R23H1KGA0K3VEVMP0?_encoding=UTF8&psc=1
My main complaint is that the cover hinges to the left, so I have to be careful not to cover the OPV valve when I slide the scale in. Otherwise, it's great. And I really like having the built-in timer.
I bought the blue cafelat 8.5mm gasket for my GCP and it works great. The previous owner had the 8mm red gasket and it caused the machine to leak during shots
I use this one ( virtually a no name brand ) https://www.amazon.com/gp/product/B07SJTXGN7 with my gaggia. I still use the PF with a bottom spout, and I am quite easily able to slide in the scale and the cup. Should work better for a bottomless PF.
Its pretty accurate, may be not as fast as the more expensive ones, but you can quickly get used to offsetting it.
The knob is a bit clunky design-wise, and sometimes it wants to come off but over all it feels way better. It’s a dowel with this part and a couple of screws: 6mm Bore Set Screw D-Hub (Tapped), 0.770" Pattern https://www.amazon.com/dp/B06X6JDRNQ/ref=cm_sw_r_cp_api_glt_fabc_40SBNYEWT48JMVXW8A8N
Thanks for the compliment. So that was honestly the hardest part of the steam knob, and I tried a few things until I finally just bought a “shaft coupler connector” from Amazon. I’m sure there are other options but this works fine.. the main challenge is tightening and loosening it once you get it sunk into the knob. I had to drill holes in the side to have access to the set screws, which kind of bothers me but otherwise it would only slide on and off and not cinch down. Here’s the part on Amazon
Thanks!
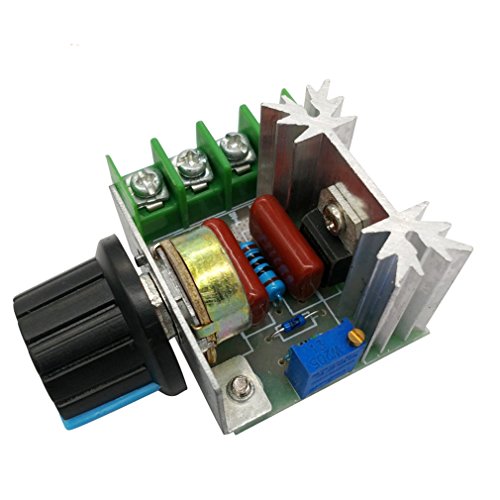
Westek 6077B 200-Watt Manual Dimmer Replacement Kit , Black , 1.75"Lx 1.25"Wx 1.5"H https://smile.amazon.com/dp/B000FPCEH2/ref=cm_sw_r_cp_api_glt_fabc_68RDTERB9S43VP9GG927?_encoding=UTF8&psc=1
Here’s the guy. Works like a charm
Maybe use a funnel and give it a couple taps before you go in for the tamp?
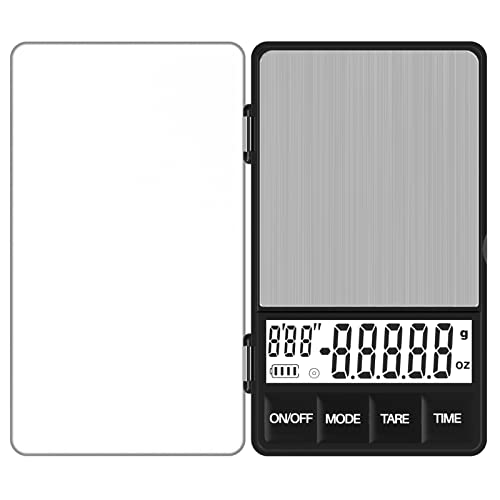
This one is about as good as it gets for the price and has a shot timer. Fits under the Gaggia classic with bottomless PF and a small shot cup.
I've been using it for about 1-2wks so can't speak of it's durability but it has worked great so far. Really nice to not need to pull out my phone and just have what I need on the counter. Seems to be as accurate as my other cheap scale and definitely responsive enough. I would definitely buy it again for $12.
Double Walled Glass Espresso Cups by Hearth I 2, 4oz Amber Insulated Cortado Glasses With Handles I Perfect Double Shot Espresso Glass Or Cortado Cup | Designed In The USA by Espresso Parts Ltd. https://smile.amazon.com/dp/B085D7WXFF/ref=cm_sw_r_cp_api_glt_fabc_1ZJ1WXMCDH7AMTH8NYWW?_encoding=UTF8&psc=1
I'm glad WDT worked! It's really crazy how helpful it is.
The included tamper is... pretty terrible. I'm already bad enough at consistent tamping, so I struggled with it for sure. I'm using this thing (though there are a ton of nicer options I'm sure):
Soulhand Espresso Tamper 2 In 1 Coffee Distributor & Tamper
Using only the distributor side (what I do) effectively does the job of a tamper, if you have the collar set right haha... otherwise it smashes the crap out of your puck and leaves ridges (if it's set too deep) or leaves it way too loose (if it's set too shallow). It compresses quite well; I've experimented with tamping afterwards (using the other side of the tool), and have to use significant force to feel any compression. But: the collar does have to be set correctly, which is arguably part of the dialing in process. When switching beans I'll maybe have to slightly adjust it, but that's about it. The biggest thing is being consistent, I think.
Eh, I don't have one. I've been using this and just holding the portafilter under the grinder:
https://www.amazon.com/gp/product/B086K48DLQ
It's working well enough that I don't think I'd bother. Plus, the funnel is also useful for doing WDT.
As an alternative, I used a dehydrator sheet (link) on my machine. It's a thin silicone grid that lets the heat through and it's grippy enough that it keeps my cups from bouncing around while brewing, plus it's food grade.
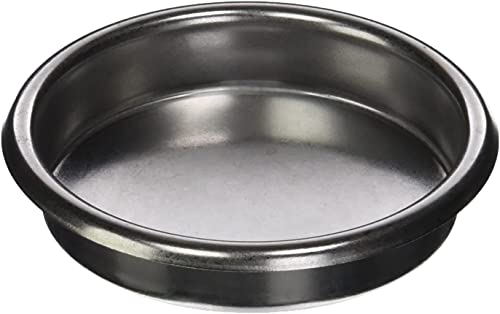
you should try to get a pressurized basket(double walled filter with a small hole on the bottom, something like https://www.amazon.com/Gaggia-21000491-Pressurized-Filter-Basket/dp/B002C1OXH6) if you are using grounded coffee. Or get a good grinder and grind your own coffee with a normal filter basket.
OPV mod before a PID?? I am using this basket currently https://www.amazon.com/dp/B01L81YUBO?psc=1&ref=ppx_pop_dt_b_product_details
but I saw someone suggest a Baristapro Nano tech one. What basket do you use? Any suggestions on where to get a bottomless portafilter?
This one fits pretty well on this drip tray, room for most of my espresso and cappuccino cups.
I just removed the little plastic cover which is attached.
I usually stop a gram or two before my target to account for lag.
I got this one recently.
someone on here recommended it and it's been great. I just need to find a way to balance the portafilter on there since I'm grinding directly into it
I was getting scuff marks from my glasses so my workaround was to use a silicone dehydrator sheet (link) cut to fit. It's thin silicone mesh so it still warms my cups, and it's grippy so it helps keep them from bouncing around as much while I'm pulling shots. It probably wouldn't help much for water stains, but you could probably do the same thing with a thin silicone placemat.
You can also get a 3D printed low profile drip tray LIKE THIS which is what I did because I like to brew directly into my 12oz mug. Cost me $10. BTW, I use the WEIGHTMAN scale because it has a timer built in. It is not the most advanced and has a few quirks (put the mug in place before you turn it on), but it's also only $20.
GDEALER Digital Pocket Kitchen Scale 0.001oz/0.01g 500g Kitchen Food Scale
https://www.amazon.com/gp/product/B01LRXNWXU/ref=ppx_yo_dt_b_search_asin_title?ie=UTF8&psc=1
Got this one in Oct of last year, started working from home, and man, late 2019 was a good time to get into espresso. I soloed a 5 lb bag in the last few months!
​
Love this scale, even with the massive drip tray. and I get my 18g to the 1/10th of a point.
I bought these. Rip extra metal off. Straighten a bit and long side has to go down back. Amazing Drapery Hardware 3 Qty: Vertical Blind L Brackets with Clips- All Steel https://www.amazon.com/dp/B00KEYC9UQ/ref=cm_sw_r_cp_tai_w7erFbNARMZXB
Cool then you just buy the pieces. I got my spout off by shoving a thin screwdriver through the spouts so I could unscrew. EDGE INDUSTRIAL Brass REDUCING Coupling 3/8" X 1/4" Female NPT FNPT Fuel/AIR/Water/Oil/Gas WOG (Qty 01) https://www.amazon.com/dp/B07D23JS2X/ref=cm_sw_r_cp_tai_U8YpFb2Z0H1TK CARBO Instruments 2 1-2" Pressure Gauge, Stainless Steel Case, Chrome Plated Brass Connection, Lqiuid Filled, 0-200 psi/kPa, Lower Mount 1/4" NPT https://www.amazon.com/dp/B07FB78KPS/ref=cm_sw_r_cp_tai_q-YpFb5S17NXZ
My favorite DESCALER:
Does this model have the 3-way solenoid. Backflushing works only when there is a 3-way solenoid.
Here’s a recipe. https://www.home-barista.com/water/70-30-water-t35657.html some use filters. So you test your water hardness. You can purify from there. Another person recommend these. JNW Direct Water Total Hardness Test Strips, 150 Strip MEGA Pack, Best Kit for Accurate Water Quality Testing to Determine Soft or Hard Water, Free App & Ebook Included https://www.amazon.com/dp/B07B31M49N/ref=cm_sw_r_cp_api_i_TildFbEX4JMWS if you have hard water the scale will really mess with your machine. It’s the white crusty stuff. I started with distilled and you add in baking soda and Epsom salt. The recipe is in the link. I’m switching to crystal springs purified 5 gallon pumping it straight to the water reservoir.
Where'd you find that switch? It's sold out on amazon, but there's a replacement part that seems capable of fitting these specs.
https://www.amazon.com/Replaces-SC-239A-Replacement-Incandescent-Ketofa/dp/B07JK7K39P
That’s the one i used. It’s a Pulse Width Modulator, a potentiometer may be better, I got one but haven’t compared.
You can easily change the knobs on them though
I stopped using towels and use these sponges. They're amazing. They don't get stinky or mildewy, and rinse super easily. Also useful to catch the inevitable steam wand drip. Quickie Brand Sponges
IMO, just spend the $40 and buy a bottomless portafilter. It'll be a lot less of a headache, and the additional feedback will probably lead to making better shots.
I got this one. Good quality for the price.
https://www.amazon.com/gp/product/B09G4X1M2S/ref=ppx_yo_dt_b_search_asin_title?ie=UTF8&psc=1
The basket that comes with it is also good. It looks like an uncoated IMS basket, probably from the same factory. It's a 3 cup basket but still works for double shots.
I use this one with my IMS baskets. It's magnetic so it sits on top and doesn't protrude into the basket. Only $15.
The IMS are just an ever so little tiny bit bigger than stock so this doesn't "lock" like it does to the stock basket.
Still the magnets are strong enough that it stays in place regardless of what method I use to pour in and manipulate the grounds. Also my 58.5mm tamper slips through it while in place.
Just get something from Amazon. They all do the same thing.
Yeah you can get that almost perfect with JX-Pro.. You can get J-MAX for (180€), the upgraded version of JX-PRO. Alternatively you can get Kinu M47 Phoenix for 200€ish.
Atleast on my old Timemore C2, it took like 5 minutes to grind fine enough for espresso. JX-Pro it takes around 30 seconds. About same as for filter. I can't even imagine trying to dial in with a timemore adjustment system, where you have like 30ish usable steps, when you have like 400 steps with JX-Pro and J-Max. Upgrade is worth it alone in quality of life features, let alone upgrade in grind quality...
I bought the dimmer from Amazon, it’s like $6. ‘HiLetgo 2000W PWM AC Motor Speed Control Module Dimmer Speed Regulator 50-220V Adjustable Voltage Regulator’
No instructions other than the terminal diagram on the website and the gaggia wiring diagram.
Maybe an ezout stud extractor? I have a set of them and they have saved the day a few times for me. https://www.amazon.com/Extractor-Stripped-HassleFree-Hardness-63-65hrc/dp/B07GZ17QD9/ref=sr_1_2_sspa?keywords=Ez+Out&qid=1665250578&qu=eyJxc2MiOiI1LjM5IiwicXNhIjoiNC45NyIsInFzcCI6IjQuOTMifQ%3D%3D&sr=8-2-spons&psc=1
Just a regular Hand saw rof metal to cut, half-rounded file, and knife sharpening stones to polish. IT took me 30 minutes to cut and 2 hours to file and polish to mirror finish ) You dont need mirror finish - it will be ruined after first shot )))
For a few bucks more you can get a brand new classic pro.
They routinely drop to ~400.
Stalling the machine doesn't really hurt it.
Because the puck screen is so thick you have to adjust your dose down because the grounds usually come in contact with the shower screen (the screen on the machine).
I use paper filters, makes for more complete flow/extraction, and easy cleanup. not to mention they add almost no space so I don't have to adjust my dose.
Do a search for "tubing brush".
Or as others mentioned, you can get replacement tubing for pretty cheap.
How much are you warming your milk? After foaming it with surface-level steam, you should be putting the tip of the steam wand down to the bottom of your milk pitcher and heating the milk up until it gets really hot (but not enough to scald it).
Personally I use a Bodum Bistro milk frother which gets the milk hot enough without needing a lot of fussiness, although it's not suitable for latte art if that's something you care about.
Parts from wholelattelove:
SKU Item Name Status Unit Cost Qty Total MC-52545K42 Tube clamps - Part In Stock $1.00 2 $2.00 GA-421944028581 L-F/BR.SAFETY VALVE 11 BAR ASSY - 421944028581 - Part In Stock $17.84 1 $17.84
Clamping tool from amazon:
KNIPEX - 10 99 i220 Tools - Ear... https://www.amazon.com/dp/B01I3H6UIC?ref=ppx_pop_mob_ap_share
I added some comments here on what i did to reach the red pipe with the tool: https://www.reddit.com/r/gaggiaclassic/comments/w9rv2s/help_opc_mod_broke_safety_valve_need_safety_valve/?utm_source=share&utm_medium=ios_app&utm_name=iossmf
https://www.amazon.com/gp/product/B09G4X1M2S/ref=ppx_yo_dt_b_search_asin_title?ie=UTF8&psc=1
I bought this a bit cheaper but this one is still a good price. The basket this comes with was too big so I use the stock gaggia double.
They're just some warm white eBay generic LED strip lights that I finally connected with a 5v converter, after running from a phone charger for a while.
that 58mm bottomless is like a 24g basket. It's huge. I bought the same one. If you are dosing 18 into a 22-24 this will happen. (this one? https://www.amazon.com/dp/B09G4X1M2S?psc=1&ref=ppx_yo2ov_dt_b_product_details)
Take the stock (~18g) basket that came with the gaggia portafilter and try that in the bottomless portafilter. Try the same thing again with that setup.
I guess so.
You should have used just your regular cleaner. Vinegar is a bit rough. But the screws aren’t damaged.
I got one of these guys and put the probe in contact with the boiler, ran the wires out of the back under the plastic top and have the display hanging on the wall behind the machine.
I can flip the steam switch on and then turn it off as the boiler temp starts to rise above 220, then wait till it starts ramping down to either brew directly, or do the pseudo-profiling by opening the steam wand, then slowly closing as I start brewing.
The thermometer is a little slow, but actually seeing numbers really helps. I didn't modify the machine and have realized an incremental improvement in control and temp surfing when needed. The upgrade is worth more than the $12 for the device.
I jumping in to second what u/Shook1- said about the 9-bar spring mod. It makes a huge difference, I waited like a year to do the mod on mine and was stunned how much better it made my espresso.
Watch some videos on temperature surfing with it. You can get pretty close to the same results you can with a PID. This video helped me a lot.
One other small piece of advice is to really let the machine warm up. I try to turn mine on about 30 minutes before I use it. You can use a smart outlet for that or if you are cheap like me just an old-fashioned wall timer.
GE Single Pole Rotating Dimmer... https://www.amazon.com/dp/B002DN2PGY?ref=ppx_pop_mob_ap_share
I will say though, I had to pry off the large black plastic back of it. Perhaps I didn’t actually have to do that but it would have been more challenging to fit into the Gaggia without removing it. If you plan to keep the dimmer external (like in a little box, which is doable and requires no drilling) the you don’t need to remove the plastic backing.
Are you getting the same results with different beans? I have the brass plate from Amazon and an IMS competition basket.
Sometimes beans just don't want to cooperate. I have started doing an improvised pre-infusion by getting the cup and loaded pf set up and then running the steam valve at 1/4 of a turn with just the brew switch engaged for about 10 seconds then turning off the steam and letting the shot finish.
This really helps when I am getting any kind of spritzing or channeling. Pretty much every bag of beans has been different for me.
If you want to replace the tubing this is what I bought. I only use purified water in my machine. I have a 5 gallon bottle, tubing and usb pump. https://www.amazon.com/gp/product/B08BRJ94HM/ref=ox_sc_act_title_1?smid=A3DDU64V0NHDQT&psc=1
Oh yeah! i forgot about that. Yeah. They are not very helpfull if you don't drill.
I prefer the square ones actually.
Man...! just seeing the drill makes me uncomfortable! It was bound to strip. :/
Peoples, please don't use drill for one screw, with like, 6 treads on it. Take the 20 seconds it takes to do it by hand.
yes, I'm afraid of hammering this further
I'm thinking about the drill extraction option some are explaining here, using this. Do you think it is risky?
like this right?
will any of these 4 work? link to screw extractor
I'd say make filters for your portafilter to use at the bottom of your basket. Keep in mind you'll probably need to grind a bit finer because the fines won't slow your shot like they do without a portafilter.
I bought a 2.25 inch paper punch an punched filters out of chemex paper, it works perfect for my 58mm portafilter.
EK Tools 2.25-Inch Paper Punch,... https://www.amazon.com/dp/B00DJJR3RW?ref=ppx_pop_mob_ap_share
Yeah that's the wrong shower plate, that's the one for commercial machines. The hole on the left lines up with where water flows out from the boiler so usually you'll get a much stronger stream getting forced through that one hole, leaving the others unbalanced. If you want the six-hole brass plate you'd want one like the one in this kit, with the holes on the sides offset from the screw holes.
Personally, I had that plate for a while (upgraded from the old aluminum plate) and found it to be incredibly finnicky and difficult to get it balanced. Some holes would trickle, others would shoot out in an arc instead of flowing straight down; playing around with the tightness of the left and right screws helped even it out a little, but it was a pain. It caused major channeling for me at stock pressure, too. I eventually switch to the 4-hole steel plate that comes stock with new machines, it's so much better. Flows perfectly, and I don't have to play around with the screws for a good fifteen minutes every time I take it apart to clean. I used to dread doing that, now it's a non-issue.
I’ve been using this one for a couple years now. No issues with it.
I just replaced my stock gasket with a cafelat E61 8.5mm silicone gasket. The blue one. It works very well on my 2015 gaggia classic and is a pretty cheap upgrade so you could start there. Just be sure to install with text up towards boiler if you do buy one.
Cafelat Silicone Group Gasket https://www.amazon.com/dp/B00OXA72RW/ref=cm_sw_r_cp_api_i_GGNHNGABYEYYZB2G5D4H
Not sure if it's the same one you've got, but I used this tune-up kit (upgrading from the then-stock aluminum plate) and found the six-hole brass shower plate to be extremely finnicky. If you unscrew the shower screen, put that middle screw back in, and then flip the brew switch check to see how water flows through just the plate. Of the six holes on the plate, some would only drip and others would shoot straight out in an arc rather than streaming down unless I meticulously adjusted the tightness of the left and right screws to balance it out, but it was never really even. I stuck with it for maybe a year before switching to this now-stock steel plate and it's infinitely better. If you bought a new machine, you may want to switch back to the original plate just to see if it makes a difference.
As for water leaking around the portafilter, make sure your turn the portafilter as far as you can when you lock it in. I have the blue gasket as well and sometimes I'm a hair off when I lock the portafilter in and water will start leaking as pressure builds.
This one.
I think it's decent enough.
You must be American? Haha the only ones I see on Amazon Canada are like $20 or more.
Eg: Blue Silicone Group Gasket For E61 / Gaggia Coffee Machines Grouphead/Portafilter - 8.5mm https://www.amazon.ca/dp/B07ZJKFSFY/ref=cm_sw_r_cp_api_i_9GX65X13FRY6ABQJJMQT
Not sure if this would fix your issue, but I just replaced the feet on my machine with these rubber bumper feet to give it more height and traction. I cheaped out and just used a 1/4"-20 hex nut on both sides of the hole to secure it, the hole is actually a bit larger than that, but the feet don't shift or wiggle once it's tightened. The stock feet just push out through the bottom of the base, so you should be able to replace them with something like a leveling foot to help stabilize it.
It’s actually a little rolling shelf thing. I roll it forward when using it and just push it back when done.
Nifty Medium Appliance Rolling... https://www.amazon.com/dp/B079Z4FLBM?ref=ppx_pop_mob_ap_share
Please dont use those clamps, they often leak due to temperature changes. I would recommend one of these constant pressure clamps (attaching link but anything similar will work): https://www.amazon.com/dp/B07GVF9MRM/ref=cm_sw_r_cp_api_i_4TJMH3G5E9CTNRJXPZF4?_encoding=UTF8&psc=1
Jumping on here as well to share this upgrade kit the brass shower head holder is not super necessary but mine happened to be in relatively bad shape. I will say this one in particular does a letter job of distributing water alongside the IMS shower screen. Whole Latte Love has a lot of education on maintenance for these machines as well.
It has held up very well. I use my Gaggia almost every day and the lights have come on faithfully every time I power the machine on. The only thing I would have done differently is the power connection. I don't like that I've got an outlet wired to the switch, a USB brick plugged into that and then the USB power connector for the lights plugged into the brick. The outlet and brick take up a fair amount of space and I worry about what would happen if they get up against the boiler or if water gets on them. There's probably a more elegant solution. Still, as I've said, so far I've had zero issues. The light strip I used is still available.
This is the tamper from Amazon
The knock box I made myself out of a Bean Safe I've had but the lid hinges broke like 5 years ago, I drilled two holes to hold a bolt through the container and cut a piece of SCH 80 PVC I had laying around for the
Usually a bottomless portafilter (which doesn't have the two spouts on the bottom) will give enough clearance to fit a scale and shot glass on top of the drip tray.
In the meantime, another method you can try is to put your empty glass on the scale, tare it out, pull your shot as you've been doing, and then weigh it afterward to see what it's at for the length of time you were pulling the shot for. It's not perfect, but it'll give you more information to work off of. Measuring in ounces can be deceptive because of the amount of crema you're getting, it's at the 2oz mark until it settles, weight is more reliable.
A scale that measures in tenths or even hundredths of a gram is also really helpful for keeping your dose consistent between shots. I've had this generic one for years and it works really well for measuring shots.
I don't know the EU market other than what I can find on Amazon.
Is what I recommend for in home because it does allot for not that much. I don't know anything about that brand it just came up on my first search for a 3 stage. But that's what I would look for.
A 3 stage 10" is everything you need for home drinking water without getting insanely expensive for a salt system or RO. The size is good fit for under counter.
This is my current tamper. Espresso Tamper 58.5 mm for IMS Competition Filter Baskets, Walnut and INOX Steel. Flat Bottom. https://www.amazon.com/dp/B07H42X9LJ/ref=cm_sw_r_apan_i_NSK8TDQNRBXHVF9W95YD?_encoding=UTF8&psc=1
I bought pressure gauge stuff from Amazon
EDGE INDUSTRIAL Brass REDUCING... https://www.amazon.com/dp/B07D23JS2X?ref=ppx_pop_mob_ap_share
Unijin P251 Series 2.5" Dial, Oil... https://www.amazon.com/dp/B086HGJ5TD?ref=ppx_pop_mob_ap_share
3D Printer Nozzle Cleaning Kit -... https://www.amazon.com/dp/B0797XV8ZK?ref=ppx_pop_mob_ap_share I used these. The base of the needle just goes into the base of the WDT tool. It’s actually nice to have the base to help push the needles through the tool for the first time, the holes print pretty small.
It sounds like 6 hole is ideal then? If so, I'm looking at one here. Given I'm a complete noob, would this one be OK or would it be too close to the water hole? Or would it be best to play it safe and go for the 4 hole, like this one?
A lot of questions there, but any guidance is appreciated.
It was $12 on Amazon, seems to work well so far. Comes with double sided tape and drywall anchors. Portafilter holder
My WDT tool from Etsy came with 0.3mm needles, but if you want needles just for cleaning you can get them on amazon, they have kits like this
I have 4 different beans atm, so still playing around with grind setting etc, but I like it very much, I have been using a distributor/tamper and I reckon this combined with the new grinder (was using a cheap bodum bistro before) has sorted it
https://www.amazon.com/dp/B07D23JS2X?ref_=cm_sw_r_cp_ud_dp_PR4SP92RQ3P6XE2XJ4B0
this is the coupling i used
This is the little 3 ounce pitcher I put under mine.
Winco BCS-3 Stainless Steel Bell Creamer, 3-Ounce by Khadin Learn more: https://www.amazon.com/dp/B0016JA59K/ref=cm_sw_em_r_mt_dp_XFFR7K25EBE91APHPCYD
70ML ( 2 1/2 Ounces) Espresso Measuring Cups with Handle, Double Spouts Measuring Triple Pitcher Milk Cup, Espresso Shot Glass with Scale (1PC) https://www.amazon.com/dp/B08SBRCWDL/ref=cm_sw_r_apan_i_AG8MFJGNPTAYJ21T6299?_encoding=UTF8&psc=1
I tried to get away with using my spice grinder that I used for regular coffee, but never got a really good shot without the cheating pressurized portafilter.
I finally sprung for a TIMEMORE Chestnut C2 and holy shit does it make a difference. Night and day.
mirror this isn’t the exact one but its the one i would get now. The one I got is almost comically large (3.25” vs 2.16”) but it definitely does the job. But I’d be lying if it didn’t add to the mad scientist vibe
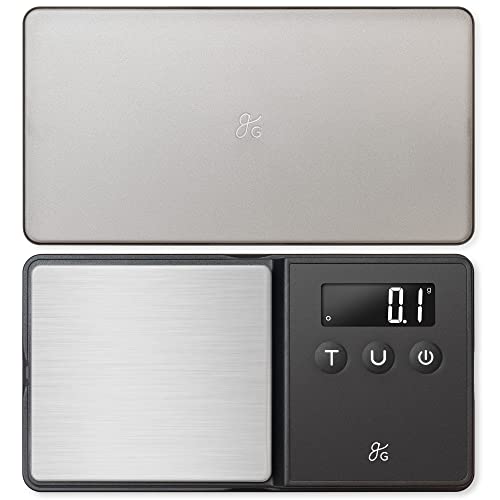
Best $15 spent. Its amazingly accurate and fast. Greater Goods Digital Pocket Scale - 750 x 0.1 Gram Resolution | Lab Analytical Scale, Gram Scale, Espresso Scale, Letter Scales https://www.amazon.com/dp/B07SJTXGN7/ref=cm_sw_r_cp_api_i_2MQZAZ1QPRGTGWNS8DEA?_encoding=UTF8&psc=1
Sure, it is these (but on Amazon as eBay don't have them now it seems).
Yeah you are probably right, if someone can explain why I need to upgrade I'm almost always willing to!
Luckily I have not witnessed the same issues. I will definitely keep an eye on the battery use and keep checking the accuracy. I have calibration weights that I use to monitor such things. I appreciate your information, thanks!
>Greater Goods 2kg
Wow that is an even smaller drip tray than the GC/GCP. Maybe just a druggie scale would work? The scale in this post fits on the GC/GCP deck without any overhang. It looks like a Greater Goods pocket scale might work on your baby.
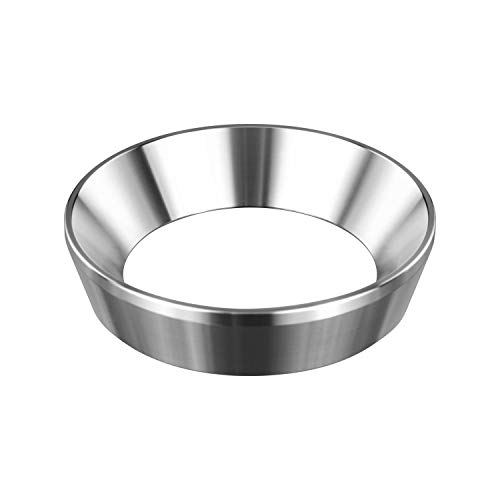
Apexstone 58mm Coffee Distributor,Coffee Distributor 58mm,Coffee Distribution Tool 58mm,Coffee Distributor Tool 58mm,Coffee Distributor/Leveler Too 58mm https://www.amazon.com/dp/B077BZ4CV6/ref=cm_sw_r_awdo_YA9FPAXYTEFXC3Y52QFZ
Not too too bad. Be gentle getting the hex screws out, don't strip them. you can replace the screen, shower head, and head gasket pretty easily. I recommend checking the operation as the machine is now before doing any more disassembly.
Try putting water in the tank and seeing if everything heats up and water comes out of the head as it should (put the screen back on if you want, and put a cup under it. If everything works ok, then do the head tuneup. After that, then consider a complete teardown of the boiler if you are having any issues with the flow or weird tastes.
The reason I say to hold off on a full internal overhaul is just to give yourself time to acclimate to operating the machine and getting to know it in the state that it is in.
Good score!!!
This will fit the classic with no modifications
Rancilio Silvia (V1/V2) Steam Wand by Rancilio https://www.amazon.com/dp/B00K49GMMW/ref=cm_sw_r_cp_api_i_D9Y6ZQM83Y3PNXJ39JR8?_encoding=UTF8&psc=1
great post-- for $15 can't recommend this scale enough
Greater Goods Precision Pocket Scale - 300 x 0.01 Gram Resolution | Lab Analytical Scale, Gram Scale, Medicine Scale, Letter Scale | Perfect for Small, Precise Things https://www.amazon.com/dp/B097Q89BZN
Screw Extractor Set for Damaged Screw of 5PCS Remove Stripped and Broken Screws Drill Bit Set Made from H.S.S 4341 (Silver) https://smile.amazon.com/dp/B09LHLVH8T/ref=cm_sw_r_apan_i_B8MNANY8B07512A6PCC1?psc=1
Something like this might work for you, although this sort of tool requires a drill. You would probably have to remove the boiler assembly in order to use something like this, unless you also want to buy a right-angle adapter (AUTOTOOLHOME 105 Degree Right Angle Driver Drilling and Driving Power Screwdriver Drill Attachment Adapter with 1/4-inch Hex Quick Change Drive and Magnetic Bit Socket https://smile.amazon.com/dp/B010DIHJGG/ref=cm_sw_r_apan_i_6NZ02Z42V4TJVW36BS0H?_encoding=UTF8&psc=1)
https://www.amazon.com/Lenox-Tools-23932-Multi-Tool-Driver/dp/B0013NX2DA
Has the correct bit included (#2 I think). And it’s short enough to clear the base. Turn your machine upside down, make sure you’re driver isn’t at an angle, and apply good pressure with a slow turn. If you feel the driver push outwards, stop and try again with even more pressure, or else you’ll strip it.
Same issue for me, tried elastic bands, heating the machine... Nothing
Order d this off Amazon and No problem getting it off with this Wera 5008851001 350 PH... https://www.amazon.com.au/dp/B085CS81BK?ref=ppx_pop_mob_ap_share
https://www.amazon.com/dp/B0087UCLLG?psc=1&ref=ppx_yo2_dt_b_product_details
this is what i've used before
I just used these:
It was ~$90 for the parts on AliExpress, but you’ll have to wait about a month for everything to be delivered. I already had the breadboard/solder though. Those are not particularly expense items, either