
What are
/r/DiceMaking's
favorite Products & Services?
From 3.5 billion Reddit comments
The most popular Products mentioned in /r/DiceMaking:


The most popular Services mentioned in /r/DiceMaking:
The most popular reviews in /r/DiceMaking:
Thanks! It took me a while to find a font I like, so I was really happy when I found this one! It's Josefin Sans from Google Fonts, which is open liscense!
If your decent with a brush and paint you can probably get a set of blanks fairly cheap on amazon. Most posts on this sub is about dice made with special materials or resin casting techniques.
Yes amazon has blank dice amazon dice I also saw all sorts of colors besides the white I linked.
This is all the advice I have, I hope it helps
I've definitely considered going the 3d printing route. I also don't have a ton of faith in my dremel/knife skills. Believe it or not, the numbers on the 28mm d20 and the 34mm d20 are actually shallower than the numbers on a standard-sized Chessex set. Pretty disappointing.
I did just order these though. One reviewer mentioned they were planning on using them for a set of molds. I'm hoping they work out. I just can't seem to go back to standard-sized dice since I switched to using the larger ones. The new set should be here on Friday so I'll report back on how they look.
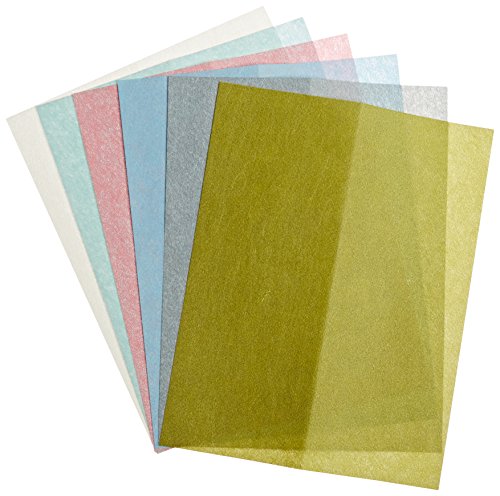
Zona polishing paper is what I use. I trim the sprue down and start with 1500-2000 grit sand paper to get it flush, then start with the zona papers and get a pretty glassy finish without even using polish. The last paper is the equivalent of 14,000 grit sand paper or something absurd like that.
*according to the website the 1-micron paper is equivalent to 14,000 grit, not 20,000
You don't need a tremendous amount of power, so something like this (grabbed at random from a selection of similar ones) is sufficient. It's not "quiet" but it's also not qualitatively louder than an old, crappy dishwasher or washing machine.
I honestly don't know the names of the flowers but here's a link to the packs on Amazon https://smile.amazon.com/dp/B091HYTYCH/ref=cm_sw_r_cp_apa_glt_fabc_HE9NEBR4PSZATHJNXCNF?_encoding=UTF8&psc=1
Not the OP but I promise you that every harbor freight pot will have a leak. That said, it is still very cheap to fix. To find the leak simply mix up a spray bottle of water with a little bit of dish soap in it and spray this mixture lightly on all of the fixtures. Be sure to spray the factory welds too! If the fixtures are leaking (there will be obvious bubbles forming) then either add Teflon tape or get some airtight loctite. If the welds are leaking then just lightly sand around the weld, clean the dust off, and add some JB weld. Once all of this is complete and there is still a leak then it is likely the rubber gasket in the actual lid. If that is the case then just buy this
https://www.amazon.com/gp/product/B07GNFSFN9/ref=ppx_yo_dt_b_search_asin_title?ie=UTF8&psc=1 this is the uv powder im currently using. you get quite a bit of each color
I use these.
Voltage is one thing, but you also need to ensure you're providing enough amperage. You'll want something like this: https://www.amazon.com/AstroAI-Converter-110-220V-Cigarette-Compressor/dp/B07JGS8CN2/
I checked our discord and theres only the western suppliers. I hope one exists for you and they dont price gauge.
If you dont find any, compare the shipping with these:
They use cabochon like these. Fill the dice halfway. Let it cure. Add one of these and cap with a clear resin.
Don't use micro-mesh if you care about maintaining your edges. Get a set of Zona papers (Here's a link as an example) and work your way through the different "grits".
Using this method you can get your dice looking like the one on the right in this picture
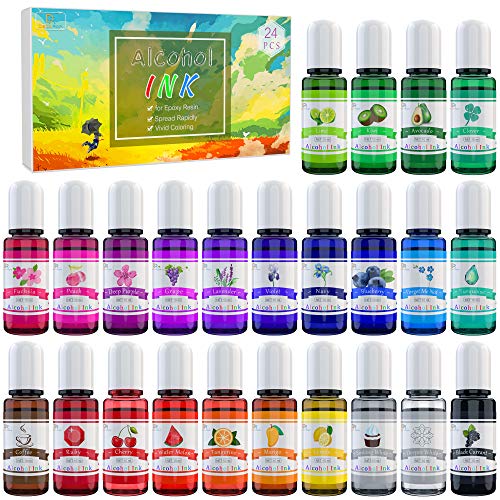
that’s a great idea, if you go through with it i’d love to see how they turn out!! i will say if you’re looking for colors to use but don’t want to invest in a whole lot of different things, i bought this set of alcohol resin inks that work with both 2-part epoxy resins and UV resins (which i use a lot for jewelry and stuff) that are pretty affordable and have a ton of different colors, i’ve had them for months and they last a long time too
Thank you, that is good to know that it's still bigger, they looked close at first glance but now that I look a bit harder I can see it is bigger.
For bubbles, forgive me if these are strategies you've already tried, but a few things might help. If your resin allows it, wait 3-4 minutes and pass a flame or heat gun over it after mixing (I actually use a hair dryer for this... it works alright but one of those bic lighters with the long snouts might work better). A very slow pour with a long, thin stream will help bubbles escape while pouring. After the pour, wait again and use the flame again. Then, make sure you apply some resin to the inside of the cap itself before putting it on. Some will leak out the sides when you put it on but it will help prevent voids. Then fill up the little hole on top so you don't end up with a divot. I've also seen people fill it up most of the way without the caps, then put the caps on and then pipette the rest. I'm always careful to squeeze any air out the tip of the pipette before inserting it into a mold, and try not to squeeze out the last bit of resin from the pipette because I find it will also spurt out lots of air, too.
If your bubbles/voids are big enough, I've actually had some success filling in the voids with a little more resin (put them back in the molds to hold them steady while the resin levels out in the void).
Anyways, I think these look great and I'm sure there's nowhere to go but up!
I tried to leave a good review for it, but Amazon denied it because I wasn't using it for it's intended purpose. Or something. Thanks Amazon.
But seriously, I use the bigger of the two wheels that come with it. You have to be gentle with it. The further out to the edge you get the less pressure it takes to stop it from spinning. Which is ok because you should be doing this gently anyway. :) It saves some time, but it really saves your joints. I did a full 8 die set in 6 hours give or take.
I used a black mica powder from amazon called ninja black
It's not a pitch-black, it does have some of that mica shimmer to it, which I do enjoy, but I want to get a true black down the line. The flame part is just gold foil leafing with an orange/red resin.
Hey, if I remember right (definitely should have written it down), it's 2:1 forget me not:turquoise from this set of alcohol inks
Edit: also, thank you!
If you want to get her some higher quality silicone Dragon skin is a long lasting material and it’s clear, so it’s nice for seeing how the dice look.
I found something now on Amazon, but you can get it on some other websites too. Called micro mesh, it's very fine and goes up to 12000 grit or whatever it's called. Amazon has a set for something about 20€ from 1500 to 12000.
Wait found the link again https://www.amazon.de/dp/B003RTABUK/ref=cm_sw_r_cp_apa_i_UejfFbNREH1DW
I used some basic Loctite: https://smile.amazon.com/dp/B00ELV2D0Y I put three hearty dots in a triangle close to the center, applied pressure with my hand for about a minute, and then let the superglue cure for about 24hrs before I used it.
I have used this pottery wheel now for almost the entirety of this year and have loved every second of it!
https://www.amazon.com/Brrxiur-Pottery-Forming-Electric-Beginners/dp/B09SH5L3GJ
It has a reservoir to catch any water & polishing compound, but I still find it splatters a bit on my work area. Other than that I absolutely adore this wheel and recommend it to anyone! 😁😁
I’ve used this one for the last 2.5 months without any problems: https://smile.amazon.com/dp/B08BFX7RGN/
I superglued this 4” plexiglass circle to the wheel for a flat surface: https://smile.amazon.com/dp/B071D6Q5XG/
The wheel will fling water drops all over, so I covered three pieces of cardboard in packaging tape for water resistance & taped them to the sides of the base, creating 5”ish walls to contain the mess. It looks a little silly, but it does the trick!
Really appreciate the detailed explanation! when you say you mixed white paste in, do you mean like white mica powder or something like this: https://www.amazon.com/HTVRONT-White-Resin-Pigment-Paste/dp/B09NYDRMYX
(Or something completely different). Thanks again
They are. This was my first time trying them. I got a pack with the same stencil in a bunch of different colors. Here Here
You absolutely can use a pressure pot with the wish molds.
The first dice molds I made were with $15 of resin, here it is https://www.amazon.com/gp/product/B08DLL34YG/ not to say that it's great resin or anything but there absolutely are budget options.
You don't HAVE to use a resin 3d printer to make masters, there absolutely is info on doing it with filament printers around here. Also if you're just a hobbyist you don't actually need masters. Rybonator got started by making molds of store bought dice https://www.youtube.com/watch?v=h6PE7WT0jqU A lot of dice makers got started that way.
This is the one I bought it works great i can hold between 45-50pSI
This is what I got for a pot at $90: https://smile.amazon.com/dp/B07G524WHG?ref=ppx_yo2ov_dt_b_product_details&th=1 Its a little shorter than the one you showed but it still probably will fit two layers of shelves if you make one. I can't say as to the compressor. I picked up a 6 gallon husky at a garage sale. The one you linked says 8 bar so it can go up to 110 psi
this the one i got. it's for .es amazon, but it's the one i found for myself.
I had ordered mine on alibaba or banggood or one of those "takes 2 months to get to you" sites way back but i cant find the link. However, amazon has them https://www.amazon.com/gp/product/B07R457BX7/ref=ppx\_yo\_dt\_b\_search\_asin\_title?ie=UTF8&psc=1
>white alcohol ink
Alcohol inks are inherently transparent. White isn't quite as transparent as other colors but it's generally not fully opaque either. Depending on the specific color and how much you use they can appear opaque from certain angles but there will always be some transparency unless you use enough to affect the cure of the resin. If you want truly opaque colors don't use alcohol ink. Mica powders work better provided you use enough but they will be shimmery. If you want a flat white get something like titanium dioxide or a white pigment paste.
Depending on what we are making we currently use white mica powders, eye candy pigment paste in satori white, or titanium dioxide.
I've been having great results with this style from Amazon. It's a cheap model so there's lots of different places selling it. I taped a 4" circular mirror to the top so it has a flat, level surface for sanding. The wheel itself has some grooves that can catch your dice and send them flying without it.
On top of that, make sure you have something in place to catch any splashes. Otherwise, If you're wet sanding, it can get resin water everywhere.
Hope that helps!
So the one I got this time last year is unavailable, but there is a similar one thats £15 more than I paid. https://smile.amazon.co.uk/VEVOR-Gallons-Pressure-Capacity-Painting/dp/B086WBGZ5G/ref=sr_1_8?crid=27223YLP5SCFJ&keywords=paint+sprayer+pot&qid=1664303955&qu=eyJxc2MiOiIxLjU2IiwicXNhIjoiMC4wMCIsInFzcCI6IjAuMDAifQ%3D%3D&sprefix=paint+sprayer+pot%2Caps%2C63&sr=8-8
There's a lot of chaff to sort through on Amazon but there are a couple of gems!
I just got one off of Amazon
https://www.amazon.com/gp/aw/d/B00IK3TTMY?psc=1&ref=ppx_pop_mob_b_asin_title
That said it looks like there’s another that costs less and holds more:
Honestly I feel like the Rybonator video made it seem more intimidating than it really is… basically all you need to do is have any pressure pot and have a pressure relief valve at one place and a hose connection that goes to a ball valve (so that you can close it off) that goes to the regulator. Then block off anything else. It doesn’t really matter what connects to what port. Only roadblock I ran into was that the T splitter was so tight that I literally broke the block trying to get it off the first time I tried so the next time I did it I just put a plug on one end of the T.
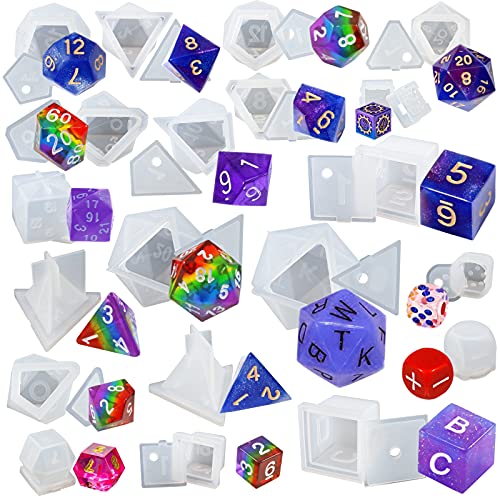
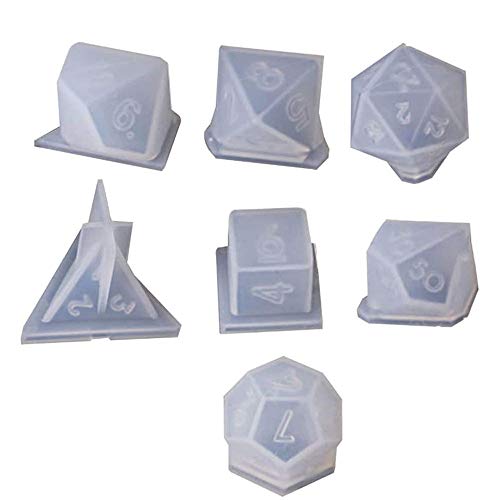
I think most people use glass orbs like these and then seal them with UV resin. However I recently saw these molds (note these can also be found elsewhere, possibly for a better price) and want to try them out to see how they work. The big difficulty is making sure to get the globes that will fit inside your dice molds.
Glycerin can often be purchased at most stores that sell more advanced cake decorating supplies (usually near the crafting supplies not the food section) and at some pharmacies. So places like Walmart, CVS, Walgreens, Michael's, Joann, etc.
>DIY Pressure pots (sealed bucket + bike pump): is there any variation on the pressure from a metal pot? I'm kind of worried that any kind of pressure will make the bucket pop during the curing period.
NO NO NO, do not do this, it is not safe.
You can use a proper metal pressure pot with a bike pump, you just need to add a schrader valve adapter. The pressure pots can be made safely for about $100 depending on current sales on materials.
I lived in an apartment building and used an airbrush compressor to pressurize my pot, it would run for about 15-20 minutes to pressurize it and then that was it, it was quiet, compact and did not need to be run again as my pot was put together with no leaks.
There are methods to avoid bubbles, like using thinner resin, warming your resin bottles in warm water, stirring carefully to avoid bubbles, etc.
You mention Amazon, if you're getting molds like this https://www.amazon.com/Casting-Standard-Triangle-Families-Handmade/dp/B088PYB7L5 you might as well not worry about the pressure pot for now, mess around with resin and worry about it later on.
If you're making your own molds, you can get away without a pressure pot for right now, just know that there's a pretty good chance that using molds not made in a pressure pot inside of one can cause some surface issues on the dice. But molds are consumables, they last 20-30 pulls or more depending on what silicone their made from, so I wouldn't worry too much as you'll need to make more molds eventually anyways.
Hey. Australian here. I’ve found this silicone works really well. It also ships pretty quickly in my experience.
I replaced my ring with this one: Paint Pressure Pot Tank Lid Replacement Rubber Gasket
As far as your second question, I imagine it would be ok to do so. I'm not sure how effective it would be though, but it's worth a shot.
This is going to depend on the foam board you are using. Depending on how rigid or soft/flexible the foam is yes the pressure might affect it. Even if it is rigid enough that it doesn't crumple/collapse under pressure it may not be sturdy enough to support the weight of what you are casting. The cheap stuff you find in the little kids and school crafts sections of the big box craft store probably won't work very well. The pressure stable stuff used in construction may do really well although at that point it may just be more cost effective to buy a pack of wood rounds (example here) in the correct size (ie slightly smaller than the inner diameter of your pot) and make handles for them.
I use about 250g of silicone for a cap mold (200g was streching it, but i made a mold with 200g). Its harder for me to say for epoxy bc i go by volume and i use the lines on these 3 oz cups. The bottom line on the cups is wayy too much, i made a line about halfway up to that bottom line and fill both hardener and resin up to there. Im bad at estimating volumes but id say... maybe 20ml of hardener and another 20ml or resin, so 40ml total?
Just used the foam add on things that came with the polishing pack, I believe. Essentially it's a fairly solid piece of felt/wool/cloth - the thing to the left of the green jar lid :
https://www.amazon.com.au/20Piece-Cleaning-Polishing-Accessory-Mandrels/dp/B00005LEXV/
Did just this. Bought this one.
here's the summary of advice I got from various videos (before getting a pressure pot):
- Let the resin bottles sit in some warm water to make them a little more liquidy and letting bubbles rise easier
- Stir slowly and methodically, rapid stirring introduces bubbles
- Let the resin sit as long as possible in your stir cup, use a lighter/blowtorch to pop surface bubbles (even with a pressure pot, I let them sit for 10-15 minutes to reduce the bubbles)
- You can pour them into the molds if you have cap molds and pop surface bubbles then
- Sprue molds will sometimes let more bubbles out, but sometimes they also get caught in the numbers/inner edges of the sprue
- Drop a little resin in the molds and slowly turn them to coat the inside with resin so fewer bubbles get caught/made in the numbers and corners (the 0's are a nightmare for catching air)
- Pour slowly so the resin creeps up the sides of the molds and doesn't catch any corners for bubbles.
- If you have semi-clear molds, UV resin is a quick fix for bubble holes, just plop a little UV resin on the surface and move it to fill the holes, then recap it and put a UV flashlight on it for a few minutes. after some sanding it'll be hardly noticeable, unless you're looking for it. You can do it without a clear mold too, it'll just be a little harder I think.
I'm sure there's more, but this got me somewhat consistent results, like 2/3 of my sets came out ok.
As you get into the higher grit levels the difference between grit levels can be more subtle until you suddenly hit that magic point where it's clear again.
However in general if you aren't noticing a difference when you move to a higher grit it can be an indication that you either moved up too quickly or the jump between grit levels was too large. Personally I find the grit difference between the blue and pink zona papers too large so I also use sanding/polishing papers from a different set (similar to this) that includes some of the grits that are skipped in the zona papers.
I use an spare round cookie cutter I had sitting around. A piece of pvc pipe or pvc pipe fitting (example here but they come in several sizes) will also work as long as the size is right. I attach a piece from a self adhesive laminating sheet (like these) to a sturdy surface (usually a scrap of wood or a piece of corrugated plastic) with the adhesive side up, position whichever mold case I'm using and whatever I'm making the mold of, then go around the bottom edge with hot glue or another temporary sealant just to make sure there won't be any leaks.
Was one of the Amazon items the Let's Resin adjustable mold housing? We got those and they will work for other mold making ideas I have but the various configurations won't work very well for dice if you are trying to be conservative about how much silicone you are using.
You speak of this yes? : https://www.amazon.com/dp/B08Q4F4DWL/
As I said I've used Siraya tech resin before, it was the first resin I started with. I've used that, their Tenacious, plant base, etc and always had to treat prints and go right to tin cure as they never cured right against plat silicoine. I do more then just dice like designing trinkets and gems and use it for anything that don't need direct perfect edges but they always have to be treated if I want to use my dragon skin or sorta clear on them.
But the issue is again due to how flexible the resin is getting a nice edge is stupidly hard and so far I've never gotten it to work. I had to switch to standard resins and ended up just going with elegoos standard to get any kind of a edge that didn't have warping or curves.
I have used all of them. I use pure cap (also called squish) molds, no vents needed.
Molds with reservoir's tend to have even more of an issue with large voids as the bubbles in the dice will slowly rise up, and get trapped between the dice, and the resin in the reservoir. A vent wont really help that either but add even more clean up.
Cap molds made right shouldn't need much clean up at all unless you are flooding thew mold with a lot of resin. You only need to dome the top of all the dice spots, then add a little to the numbers on the cap and shimmy it in. Many people show to just flood the molds top leaving a LOT of wasted resin and some thick flashing. That also can cause issues as the resin will hold the lid up and as it cures and shrinks it'll allow air in as well. So you want as little resin on top. Finished you should have flashing that is super thin that pretty much comes away on its own.
I would also look into something.. like a Shaker Lab Vibrator. https://www.amazon.com/dp/B07GFCV9SD/ There are cheaper ones out there but that's just a quick search to give an example (that and searching on amazon for anything with the word vibrator gives some questionable results). It's just a surface that vibrates really fast and it helps bubbles loosen and flow upwards. One I had was a flat rectangle and was only $20 and it worked nice before I got my pressure pot. Just mix the resin, divide into the colors you want then stick them on top for like 5 minutes.
You can also look into getting a vacuum chamber but I didn't like those and if you're going that path you might as well save for a pressure pot.
Yeah, no problem! I got it on Amazon, I'll like the exact one I used. It comes with multiple sheets that will last a long time considering how little you use in dice. I just slice up a bunch of squares and crumple em up!
Chemical Guys GAP_V34_16 V34 Optical Grade Hybrid Compound (16 oz) https://www.amazon.com/dp/B00BQA3VEK/ref=cm_sw_r_cp_api_i_VR461ECS6B27G26NDV4G
This is the polish im using and I’m sanding the flashing areas off to a 400 grit
I'm sure that would work if you already have access to a laser cutter, but I just bought one of these: LetsResin Adjustable Mold Housing
I've been super happy with it. Made two molds with it so far and both have turned out perfectly with no fuss.
https://www.amazon.com/dp/B0851BXRBD Get that, (or find a cheaper listed one). Trust me.. my hands are arthritic and a friend surprised me with one. It's small fitting in your palm and the perfect size for sanding dice. Just glue a sheet of plexiglass onto it to give it a flat smooth surface and go. Best of all it helps break bad habits like pressing down too hard when sanding as the motor will just stop dead if you do. You can press, but it will stop solid if you press too hard. Low speed it even works as a basic turn table.
20pcs Cellophane Wrap Paper Clear Rainbow Color for Birthday Mother's Day Valentine's Day Christmas Gift Candy Package Flower Wrapping 20.5" x23.6" https://www.amazon.com/dp/B08MQ79VS1/ref=cm_sw_r_apan_i_99WZA8S7K1K545CTTER4?_encoding=UTF8&psc=1
This one has worked great for me.
Yes you need an air compressor to pump air into the pot, the pot alone wont do it it's self.
https://www.amazon.com/dp/B01LYHYHEA/That is the very compressor I use.
DO NOT try using them cheep $50 pancake or what not ones unless you want to go freaking deaf, I started with one and omg NO. just flat out NO. they are also slow as beans taking 8 minutes to fill my 2 gal pot. You would need ear protection or a sound dampening box.
That CAT-1P1060S linked is QUIET, it's louder then you are talking, actually talking is louder then that thing. It also is fast filling my pot up in 30 secs. To give you an idea I live in an apartment, and my roommate next door can't hear it when it's running.
Now you do not need the compressor on all the time, you typically fill the pot up to 40PSI then shut it off. I don't even use the regulators on either the pot or the compressor as I babysit them monitoring the pressure the whole time and shut it off at the desired psi. Never leave it alone when filling, and I do it this way just to be safe.
For inserts. It's not hard. How big around is the inside of your pot? Buy wooden circles of that size. Then buy a wooden dowel rod. Cut it to the length you want then super glue them in place. Mine I did at 3 points, some use 4. If you worry it wont hold you can screw them in from the bottom too.
I made myself 3 incerts. One with three shelving to fit more smaller molds in place. One with two for taller molds like my chink dice. Then a single one with handles along the edge for wider molds to fit.
I also recommend buying them cheep packs of silicone mats and cutting them to the size of your circles (making cut outs for the wooden dowels) to lay down so resin wont be able to stick if anything spills on them.
Had mine for 4 years now. The gasket and 3d printed bigger handles for the bolts is the last upgrade I did to it just this year and so far yeah it's worked fine.
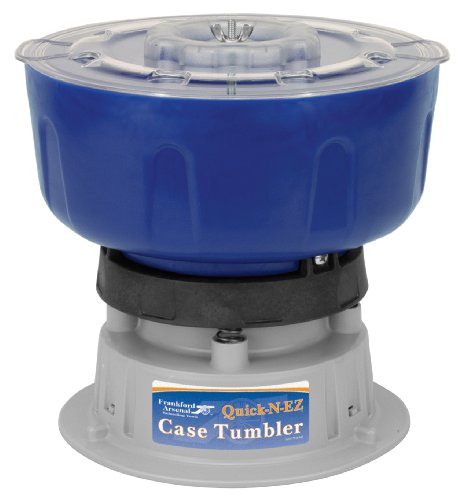
Tumblers. I just use this cheep thing: https://www.amazon.com/dp/B001MYGLJC?th=1 and it's worked great.
I actually used the more transparent pieces from this set on amazon: [Nail Art Decals] https://www.amazon.com/dp/B08HM2T4Z2/ref=cm_sw_r_apan_i_TWGE6G8QW138YPWZEZQ1?_encoding=UTF8&psc=1)
I used a little piece of the color I liked (but still fairly large compared to each individual die), then I crumpled it up, dunked it in the resin I already had mixed up to make sure it gets all nice and coated to avoid any bubbles then squish it into the mold! It's kinda messy and I'm sure there's better ways to do it, this is just how I did it. Hope this helps!
It really depends again, did you make these molds? What were used to make the dice for the molds? They look like basic store bought dice and those are never really 'flat' due to mass production and will come with scratches from the machinery that makes them.
The dice are clearly not flat as your sanding isn't even to the edges, it looks rounded off. This could just be due to the dice used to make the mold not being flat to start with, so all the dice made with it come out curved, and with them scratches as the dice were not clean and polished before hand.
Sanding too fast: you want to do even quick strokes across the paper, rotating the direction you sand as well as how you hold the dice. But do it for a good amount of time, with each level of zonas you want to spend even more time on it, but still stroking it 'fast' across the papers. Sand it for a time, pick it up and look at it, if there are still scratches you can see, go back at it. The dice should be really really smooth with no scratches and by the time you finish the pink zona you should have a shine to the dice that will only get better as you move through the last ones.
I don't know where you are located but here: https://www.amazon.com/dp/B08PV4S9HP
Try and invest in something like that. It will save you time and do most the work for you and is what I use, it's small and fits in the palm of your hand, perfect for dice. Just find some plexiglass you can cut to shape and glue down onto the wheel to give you a smooth top, tape your zonas to it and flip it to full speed and hold the dice in place on top rotating them slowly around in the opposite direction it spins. That thing spins at 2000 rotations a minute so.. a lot more then you could do by hand.
I use ceramic spheres for my polishing medium. the sound is loud but not too bad. If the house is dead silent I can sometimes hear it through the wall the bedroom shares with the garage. I usemeguiars mirror glaze polishing compound, I get a better polish then using cheaper polish. I don’t know anything about cleaning up the inking, but I have used sharp edge and rounded edge dice in my polisher and have had no issues with rounding off. If you have arthritis or don’t have time to do the polishing I strongly suggest getting a tumbler. You will however still have to do the sanding, even if the face looks smooth coming out of the mold, the tumbling will reveal the tiny imperfections. I used to just hit it with the 3k sand paper but now I’ve been going up to between 5-10k just to be safe.
I used Let’s Resin for my non-pressure pot silicone for molds. Worked really well, absolutely no issues with the facings. The only issue I run into is how much extra time it takes for my resin to be bubble free on the upper faces.
If you’re looking for a standing shelf, I would recommend this item which is a cheap alternatives. It’ll hold plenty of dice sets.
Here's a good budget option
I used this set of paints:
https://www.amazon.co.uk/Marabu-Easy-Marble-Paint-Assortment/dp/B0012F82E8
Didn't need anything else, other than cold water.
To be honest, I didn't expect much, but the result were amazing!
A couple of tips I'd offer, if you do try:
1) Use a wider container than the cup I used. This will let you remove the blank easier than me. I had to wait till the ink had formed a film, then scrape it up with a cocktail stick, all the while holding the blank under the water.
2) Have something handy to put the blanks on to try. They're pretty fixed by the time they leave the water, but the surfaces are still tacky and can get ruined. I was thinking some kind of wire mesh tray or something to minimise surface contact.
This one is amazing. Been using it for 2.5 years and now alterations needed. Ready to go out of the box!
California Air Tools Pressure Pot for Resin Casting, Model 365CW https://www.amazon.com/dp/B084DFT6D3/ref=cm_sw_r_apan_i_FCGQA1FSV2RW9TRBK67J
I used Let’s Resin for my molds. I don’t own a pressure pot, and with one purchase of this product I was able to make a circular cap mold for a full set, as well as a cap mold for a d20. It made perfect molds and I have no bubble issues around the dice, but I did use metal dice for my masters as my 3D resin really does not like silicone (I had 3 failed attempts prior to this).
With the molds I made, I also made funnel shaped sprues to allow my dice to cure better without the pressure pot. There’s still voids, but manageable ones that I can fix on a second pour over top of them.
It could be the resin you're using too, but of course settings or supports can help.
Now, I'm in a discord server with well over a hundred other dice-makers, and myself and many others swear by this resin I'm linking below. Obviously you still need to make sure that your model is appropriately supported, BUT these come out like a DREAM with this resin! Also, it doesn't seem to have any cure inhibition issues with platinum cure silicone 😏.
Siraya Tech Fast ABS-Like 3D Printer Resin 405nm UV-Curing Non-Brittle High Precision 3D Printing Liquid Standard Photopolymer Resin for LCD DLP 3D Printing (Navy Grey, 1kg) https://smile.amazon.com/dp/B08Q4F4DWL/ref=cm_sw_r_apan_i_BC3PS6G99D8M8R5M0007?psc=1
I don't know if the color matters, but this is the one I use. Might not help your printing issue with the numbers (or it could), but the added bonus of being castable in platinum cure isn't a bad bonus 😁
I'm not sure what measurements your pot is, but I had to purchase a Paint Pressure Pot Tank Lid Replacement Rubber Gasket from Amazon to get mine to stop leaking.
On standard petri the white sinking ink that i bought because it's crowned king is Pinata blanco blanco. Sinks extremely well, just need 1 drop over each ink drop! The only other inks i have experience with is from this set: https://www.amazon.com/dp/B082G557CR?ref=ppx_pop_mob_ap_share
I hear ranger inks are nice, I'd like to try those some day. Buuuut, these cheap ones are working just fine for me :) i am going to make an assumption with no supporting evidence: i think all alcohol inks are no different other then how vibrant or different the colors are. That is my theory, and in my search for a nice red ink i may end up thinking differently. However for petri you gotta be picky with the sinking ink. The set i linked came with 2 white inks, one of which is labeled as a sinking ink. They both work similarly however and i think they clump up a lot. I've had such a good time with pinata blanco blanco, so just run that as your sinking ink. Or do the mica ink sink technique I shared if you want them to retain their colors.
You can get like suuuuuuper tiny pipettes, too, to use while you experiment! I use some kind of like these when I do pigment paste and they might be a good size:
Mudder 200 Pieces 0.2 ml Capacity Disposable Graduated Transfer Pipettes Dropper Polyethylene https://www.amazon.com/dp/B01EWQZMUU/ref=cm_sw_r_cp_api_i_6NWAPECYK2VQ1JHDFCYA
800 grit hand sand, gray zona, blue zona, pink zona, then dremel polish at speed 5 with meguires ultimate polish using these cotton balls: https://www.amazon.com/dp/B07G75SH4S?ref=ppx_pop_mob_ap_share
SKYTOU Pottery Wheel Pottery Forming Machine 25CM 350W Electric Pottery Wheel with Foot Pedal DIY Clay Tool Ceramic Machine Work Clay Art Craft (Orange) https://www.amazon.com/dp/B07TBLBMSN/ref=cm_sw_r_cp_api_i_Q6FV44Y9JPVRJQJ46FA9
This style, but I would just check Amazon a few times a day when you’re ready to buy because a bunch of different brands sell the same one for varying prices.
OK a few pieces of advice for sanding:
- Ignore instructions that say to make X number of circles/figure8s/whatever or to spend exactly Y amount of time per face. That may work for the person providing that advice but that doesn't mean it will work for anyone else. Your setup is different so the amount of time you need to spend will be different. Spend as much time as you need on each face. As you spend more time sanding you will get better and your speed will improve.
- The face of the die should be even before you move up to the next grit. If you have some areas that are shiny/smooth and other areas that are rough/cloudy you either need to continue with that specific grit or drop down a grit.
- It is possible to start at too low of a grit. Lower grit means larger particles on the sandpaper which in turn means larger scratches that you then have to remove via more sanding. So starting with a lower grit than actually needed means you will have to do even more sanding to get to the polish and shine you want. My preference is to start at 1000 and only drop below that if I'm not seeing progress at that grit.
- Make sure that you are applying even pressure so that the face being sanded remains flat against the sanding surface. To go with this the sanding surface should be very flat and level.
- I have stopped using the blue, gray, and green zona papers and instead use wet/dry sandpapers such as these until I get to the higher grit levels. I do still use the pink, aqua, and white zona papers however there are several grit/micron equivalent levels between the blue (9 micron) and pink (3 micron) papers and I get better results when I don't skip those grits. Other people with a different setup may find that using those extra grits is unnecessary for them.
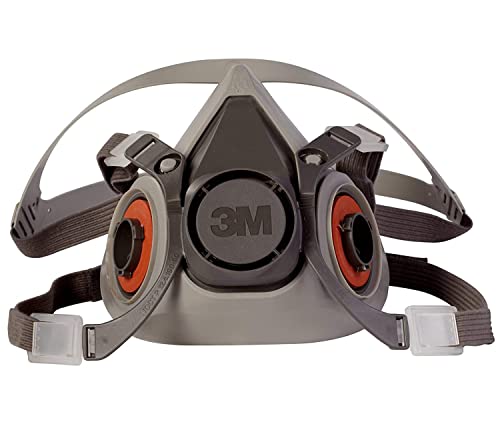
you need a 3M respirator mask and you want the filters for organic materials. Chemically, plastics and their vapor are organic material.
​
Heya! I use a portable one as well! Another brand though. It takes a bit more time to pressurize but it works fine for me :)
I made a quick search but it looks like your compressor can connect to a Schrader valve (check your notice again maybe? Haha). I would toss out the 2 quick connect parts and get something like this:
Milton (S-684-4) 1/4" MNPT Male Tank Valve https://www.amazon.com/dp/B001PLI4BA/ref=cm_sw_r_awdo_navT_g_Y7BPCB4VW7V4KGR3M1B0
Just put it on the female part of the valve (seems to be 1/4 as well). Just be sure to put some thread sealant everywhere like some Loctite or teflon tape.
Best of luck! :)
The zona papers go up to 8,000 grit so I'd think you're fine in that regard. But even after I'm done with the zona papers where I've had to sand is a touch more cloudy than the sides I haven't.
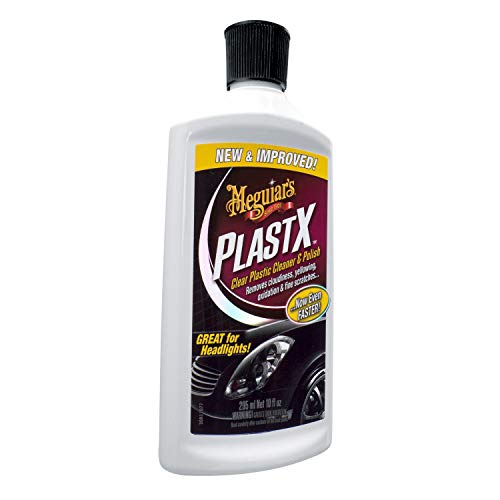
One thing I've heard people to suggest to fix that is using a plastic polish afterward such as https://www.amazon.com/dp/B0000AY3SR/
I sand away with zona papers then rub a little of this guy on each face
Meguiar's G12310 PlastX Clear Plastic Cleaner & Polish, 10 Fluid Ounces https://www.amazon.com/dp/B0000AY3SR/ref=cm_sw_r_cp_api_glt_i_BJ1JDFBZHZ067M4MS2ES?_encoding=UTF8&psc=1
I use Bond It Silicone Release Spray - https://www.amazon.co.uk/dp/B00JFQAR12/ref=cm_sw_r_awdo_navT_g_V4F5S5888A9827SZ15TK
A little goes a long way, and it's great for keeping your moulds easy to release from once you start casting from them too.
We are currently using Super Clear which does a good job although I would prefer a slightly longer working time. We do have a pressure pot but not all of our molds fit into the pot. While we can have some issues with bubbles in those molds they do generally come out with minimal bubbles using Super Clear. Generally the resins recommended for getting clear bubble free river table pours are going to be good options however some do have a minimum mix volumes so they may not be good options for dice.
One other tip that often gets overlooked is to be more careful when mixing the resin because most of the bubbles are introduced while you are mixing the resin. Stirring faster introduces a lot of bubbles that you then need to deal with. All those added bubbles can make it more difficult to actually see if the resin is fully mixed and you now have to spend more time dealing with those bubbles. Stirring slower helps to minimize how many bubbles you add which reduces how much time you need to spend dealing with bubbles.
damn these look good. they remind me of these:
https://www.amazon.com/Dungeons-Dragons-Handmade-Polyhedral-Critical/dp/B097XV1VPV
is this you?
You'll probably want a different type of connector, most typically a 1/4" NPT air nipple, especially if you ever want to leave the tank hooked up to a pump.
Is your bike pump manual? You'll be hard pressed to get the tank up to pressure using one of those, think of it like filling a car tire. You can buy a wide variety of NPT hoses from Amazon or any hardware store.
The pottery wheel can be found by doing a search for small portable pottery wheel. If you have larger hands these may be a bit too small to comfortably work with since the entire thing is about the size of an extra large coffee mug. My husband finds it too small to work with even with the 4 inch acrylic rounds I got for a smoother and slightly larger surface.
Definitely check reviews. I haven't had issues with mine (specifically this listing) but several of the listings had 1 and 2 star reviews.
You're right.
I was going through my purchases and confused it with the Alumilite Amazing Mold Rubber.
I warn you, it's a pain in the backside (10:1 ratio) and NEVER skimp on the hardener (the "1" side of the equation) or the mold won't firm up.
I usually just buy whatever's cheapest at the moment, since I don't sell or anything (I got started making pens, dice are a new hobby for me), but the latest one I bought is Diamond Clarity from Naked Fusion. It seems to cure almost entirely bubble free, even in my extra pour molds that I don't pressurize. I would be careful though, I mixed a moderate volume the first time I used it and it soft cured in about 15 minutes, so I would only mix small amounts at a time, I did enough for two sets last time and it was fine.
https://www.amazon.com/dp/B07JBKDQZJ?psc=1&ref=ppx_yo2_dt_b_product_details
You want a mask that protects against organic vapors. I picked mine up at my local Harbor Freight, but other hardware stores carry them too. A suitable mask (I believe, until someone corrects me) on Amazon is this one:
3M Disposable Respirator, Half Face Piece Assembly 5301, Organic Vapor Respiratory Protection, Large Size https://www.amazon.com/dp/B007JZ1O2C/ref=cm_sw_r_cp_api_glt_fabc_N587GTSJQTP2DKM818QK
(Make sure to get one that is suitable for your own face size! Too small and it’ll be painful to wear, too big and you’ll have a hard time getting the proper seal.)
Here ya go:. Amazon
The description is:. PH PandaHall 200pcs 4 Size Mini Empty Clear Glass Globe Bottle Wish Glass Ball for DIY Pendant Charms Stud Earring Making(12mm, 14mm, 16mm, 18mm)
mm from a local site but I think those are like plain Chinese mold like the ones you get from wish.
I got it by itself but it comes in a pack, here something very very similar if not the same :D
https://www.amazon.com/-/es/silicona-almacenar-pendientes-bol%C3%ADgrafo-portavelas/dp/B0888NXS64/ref=sr\_1\_2?\_\_mk\_es\_US=%C3%85M%C3%85%C5%BD%C3%95%C3%91&dchild=1&keywords=box%2Bmold%2Bfor%2Bresin&qid=1634579151&sr=8-2&th=1
I grabbed one of these for myself. I’m not going to pretend like I have enough experience to say anything with certainty, but as far as I can tell you it works quite well.
I use this one!! It's pretty cheap and has a nice variety or translucent, opaque and metallic! I've loved every pour I used these in♡
Beaute Galleria 24 Pieces Mixed Colors Nail Art DIY Holographic Shattered Broken-Glass Reflective Mirror Shard Effect Rainbow Thin Iridescent Cellophane Films Foils https://www.amazon.com/dp/B075SHCTGT/ref=cm_sw_r_apan_glt_fabc_PKDBJ9BDS60AHJHPPY2T?_encoding=UTF8&psc=1
It was this stuff. I cut pieces up and folded them so they'd be kind of 3 dimensional and not just sink.
40 Pieces Glass Paper Nail Art Sticker Shinning Reflective Mirror Design Broken Glass Nail Art Stickers Iridescent Glass Paper Nail Decal, 20 Colors https://www.amazon.com/dp/B08HM2T4Z2/ref=cm_sw_r_apan_glt_fabc_VTBQMRJ5JR5VQGCAEZKH?_encoding=UTF8&psc=1
Ummm.....I just got some cheap starter stuff from amazon to give it a go:
Here's what I bought
​
I used both bottles in their entirety and checked the settle residue after and I used the same amount as far as my eye could tell....
You should be using a respirator regardless. But buy low or no voc resin, 100000% better. I've settled on this one no smell really at all.
I don't have arthritis but I do have grip issues. Something I haven't tried yet but have thought about is using a clamp or small set of tongs to hold the dice.
You can get fairly small potters wheels. I've got one of these which is about the same size as an oversized coffee mug. I wouldn't use it for making pottery because it's really too small for anything bigger than a thimble or maybe a shot glass but so far it's working for sanding/polishing dice. It did take some time configuring it to work for my needs and I wound up getting some 3 inch and 4 inch round acrylic blanks so that the wheel surface is smooth and a bit bigger. It definitely cuts down on how long sanding takes. The only caveat I have is that my husband finds the wheel too small for his hands so that is something to keep in mind. One of the little wheels sold for kids may also work as long as it's balanced.
I'm not sure this helps you but this is an Amazon link for US. Maybe it will help you get better search terms.
PH PandaHall 30pcs 16mm Mini Clear Glass Globe Bottle Wish Glass Ball Bottles for DIY Pendant Charms Stud Earring Making,8mm Cap (silver,gold) https://www.amazon.com/dp/B07DC4BKXF/ref=cm_sw_r_apan_glt_fabc_3V5D4PNGWH94RZS0331Z?_encoding=UTF8&psc=1
Here's a link to the Amazon ones I got, maybe you could get them in the UK. I've done both dirty pour and the petri dish and they've both worked with the resin it comes with as well as the inks. 🤷♀️ Sorry I couldn't be more helpful!
Epoxy Resin and Resin Pigment Set - Crystal Clear Epoxy Resin, 20 Vibrant Color Liquid Epoxy Resin Dye, Resin Art Supplies Starter Kit for Art, Crafts, Tumblers & Jewelry Making, Molds, Coating https://www.amazon.com/dp/B0892BXVTW/ref=cm_sw_r_apan_glt_fabc_BRN1BGHZ6DFXYJM7E4ZE?_encoding=UTF8&psc=1
If you're looking for other ideas here's my setup. Instead of pouring new silicone I just diced up some of my old molds into tiny bits and poured some into the bottom of the pot. I laid a sheet of 1/4 plexiglass on top for a flat and rigid surface. If you replace the feet on your pressure pot with some leveling feet and put a bubble level on the new floor, you'll be able to move it around your shop and still get it perfectly level.
For this particular problem I'm guessing your pressure pot isn't level, your mold isn't level, you aren't overfilling enough there, or you're accidentally squeezing/bumping that part of it when you put it in your pressure pot. Those are all just guesses though.
This is what I ended up doing at well. Still needs about 2-3 coats but it’s not horrible.
Dispense All - Mini Industrial Syringe Pack - 10ml Syringes with 14G & 18G Blunt Needles, Blunt Needles Covers, and Syringe Caps https://www.amazon.com/dp/B07HPBG71M/ref=cm_sw_r_cp_api_glt_fabc_676ZHWMBA43SNKKKBSMB?_encoding=UTF8&psc=1
I recently got a set of alcohol inks from let's resin that comes with 2 different whites one that's a normal white and the other that is specifically deep sink. Here's the link to it on Amazon: https://smile.amazon.com/dp/B08BZKTN6F/ref=cm_sw_r_apan_glt_fabc_WGQC8WTTH0Z3MMGW12TH?_encoding=UTF8&psc=1
I like to use metallic foil paper, you can break it into as tiny pieces as you like and it's very light so it doesn't sink. https://www.amazon.ca/HYGLOSS-824-Metallic-10-Inch-Assorted/dp/B0044S7MSM/ref=asc_df_B0044S7MSM/?tag=googleshopc0c-20&linkCode=df0&hvadid=381333670537&hvpos=&hvnetw=g&hvrand=6175323500091418547&hvpone=&hvptwo=&hvqmt=&hvdev=c&hvdvcmdl=&hvlocint=&hvlocphy=1002057&hvtargid=pla-314722589723&psc=1
amazon but it is sold out. Like I said, you kinda need to watch for it. The price it's offered at varies widely.
For making molds I've been using cookie/biscuit cutters like these hot glued to a board that is covered in tape. I'm thinking about trying something else for the next set of molds but it will be a bit before I'm ready to make those.
Any links to a proper replacement? I assume this is the one you are talking about, and even the top review says not to order it for the 2.5g pot. I don’t wanna have to jump through hoops to get the proper sized gasket.