
What are
/r/Ender3S1's
favorite Products & Services?
From 3.5 billion Reddit comments
The most popular Products mentioned in /r/Ender3S1:


The most popular reviews in /r/Ender3S1:
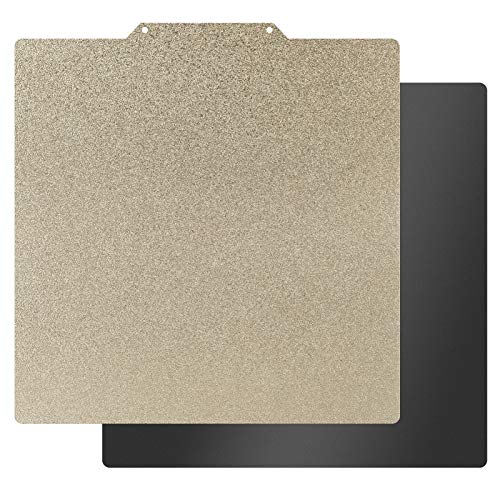
Personally I got this PEI plate for the Plus : https://www.amazon.de/-/en/gp/product/B0895C5BL5/ref=ppx_yo_dt_b_search_asin_title?ie=UTF8&psc=1
It's great.
Yeah, I'd recommend ditching the stock PC plate as its life is not a long one. This is an official Creality/Comgrow one that I have.
Look at this one. It's the whole extruder including the little control board on the back. Most of the upgrade kits don't include the little control board.
https://www.amazon.com/gp/product/B09WVHNPHH/ref=ox_sc_saved_title_5?smid=A3CIAYYPR6VBIT&psc=1
Snip and reconnect. You can get little iron-less solder joints. You obviously don't need a full box of them, but they are like this:
https://www.amazon.com/Kuject-Connectors-Waterproof-Electrical-Automotive/dp/B073RMRCC3
You insert the two ends of the wire, heat it up and it's solder and shrink tube in one. I used this making the exact swap you're talking about. Works perfectly and the 5015 is much much better.
I was sick of the original plate and tried a new one (you can find it here). Since then I don't have any issues with adhesion and I'm cleaning the bed with %99.9 IPA all the time.
Not a dumb question :). 24v. For reference I used this https://www.amazon.fr/dp/B0B94QMHJ6/ref=pe_27091421_487030221_TE_SCE_3p_dp_1 but you need to solder the wires to Micro JST connectors (same they use on the original fan). Maybe you can find a fan with the micro JST connector ready.
Not sure so I ordered these last night for the S1 Pro: https://www.amazon.com/dp/B091C81P57?psc=1&ref=ppx_yo2ov_dt_b_product_details (all the same size at 18mm) Then for my Ender 3 Pros I ordered these 3 same one shorter : https://www.amazon.com/dp/B09MN95217?psc=1&ref=ppx_yo2ov_dt_b_product_details
I'll see how they work!
Yes I used this.
https://www.amazon.com/dp/B09QKRCDPG?psc=1&ref=ppx\_yo2ov\_dt\_b\_product\_details
Make sure you cut holes in it larger than the silicone. I see a lot of people just squish the insulation down insulation and then wonder why they cant level the bed ever.
This one worked well for me. Bonus points that it stacks with other items for an extra discount.
Am using one like this: 4010 fan
Also I installed the fan with the nut hole pointing to the back cover so the air blows to the inside of the case :)
https://3dprinterly.com/mk6-vs-mk8-vs-mk10-vs-e3d-v6-differences-compatibility/ 2 spools of glow filament destroyed a bondtech CHT so I switched to one of these that has been through 5 spools of glow with zero signs of degredation.
These are the ones I just bought. Haven't installed them yet but it says they work on the S1 Pro and they do look identical to the spare nozzle that came with mine.
I got this one it works well and has the added benefit of being 2 sided. The smooth side is nice for PLA prints makes them come out pretty. The textured side is good for other types of filaments that are "extra sticky" like PETG and TPU
https://www.amazon.ca/gp/product/B09Y1WDKM9/ref=ppx_yo_dt_b_asin_title_o02_s00?ie=UTF8&psc=1
This is the one I ordered when I was upgrading parts on my S1 standard. Fits and sits just like the stock sheet, tabs and all. Plus there's a 3 dollar off coupon active on it.
Just the Creality wafer cooling for the Sprite extruder, works ok, but I'd wait till the price comes down a bit. https://www.amazon.com/Creality-High-Temp-Printing-Leak-Free-Compatible/dp/B0B5GC7BD9 It is very quiet and haven't had any problems in the hot end using it, except the one time I forgot to plug it in. I added a TP link switch to it and klipper makes sure it's on every time now.
I never even used the bed it came with. I have 2 Ender 3 Pro printers with the BLTouch and have been using the steel PEI beds... never an issue and $20 https://www.amazon.com/gp/product/B08B4CBY9C/ref=ppx_yo_dt_b_search_asin_title?ie=UTF8&psc=1
I gouged the crap out of my original bed and scraped it smooth in multiple places so I decided to upgrade to a PEI sheet. It’s been absolutely amazing so far. This Is the one I bought and my prints have been coming out fantastic now that I dialed in the bed leveling and z-offset.
I purchased the Wisamic 3mm glass from Amazon and unfortunately, I ordered the 300x300 to match the build volume, you need the 310x310. Using bigger clips (the screw down ones), I've gotten amazing prints. I print with PLA and ASA and everything sticks to it well and comes off clean after the bed cools. When I realized this I ordered a larger size, and went with the Creality one, and it was not near flat and was returned. I then ordered the VoyageX brand, since the Wisamic was not in stock, but it too was not flat. I finally ordered the Wisamic in the 310x310 size and its been great. For ASA, I use a light layer of glue from Elemers glue stick but for PLA, I just make sure the glass is clean. The key to get everything to stick well was the bed temp of 55 for PLA (eSun) and 80 for ASA (Polymaker). https://smile.amazon.com/gp/product/B07FNH1HC3
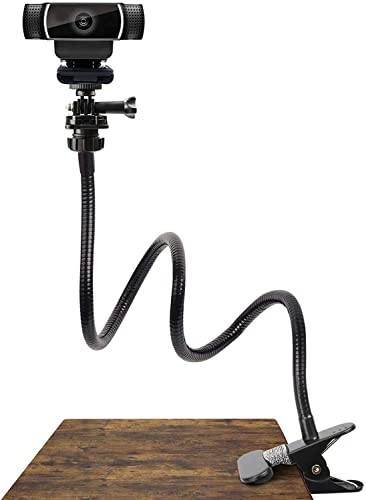
I tried one that mounted to the front and another that mounted to the Z axis which was better but they still just got in the way. Got this several weeks ago and it’s been great. It’s sturdy so if I bump it it doesn’t lose its position I can move it out of the way it’s not attached to the printer so easy to mess with. And cheap
Pipishell 25 Inch Webcam Stand -... https://www.amazon.com/dp/B07VSDF7XT?ref=ppx_pop_mob_ap_share
I don't have a good view of the motherboard end of that cable, but on the display side, mine has a standard 6-position JST keyed connector with 2.54mm (0.1in) centers -- populated with only 4 wires. For example this kit probably has the right connector. https://www.amazon.com/GeeBat-460pcs-Connector-Housing-Adapter/dp/B01MCZE2HM
I can't open up the case right now, but the mainboard side looks like maybe a 10-position connector of the same spec --still with only 4 wires populated.
Another DIY alternative is just to cut the existing cable in the middle (being very careful to keep track of wires) and use whatever connector you want in between, with your own 4 wires. For example LED connectors or whatever.
Pardon the late response,
that one won't do, it's too big. I got this one:
4PCS Official Creality 3D Printer Hotend Silicone Sock Heater Block Silicone Cover for Ender 3/Ender 3 Pro/Ender 3 V2/Ender 5 Pro/CR-10 10S S4 S5 https://smile.amazon.com/dp/B07N18BZQM/ref=cm_sw_r_cp_api_i_9V3W4NECVM0YNKFDV5G1
here is a link for the sticker 2 pack
https://smile.amazon.com/gp/product/B09C1W4WSK/ref=ppx_yo_dt_b_asin_title_o06_s00?ie=UTF8&th=1
note for pei, prints self release once cool. and the non textured one is smooth as glass for the bottom of prints. I only ever use the PC coated bed for tall skinny prints since pla sticks so strongly to it the PC coating does come off with prints (easy to see with dark filaments, it leaves a whitish bottom).
break in a new sheet of pei by washing with dish soap and then using some 1000-1500 grit sandpaper or fine steel wool to skuff up the surface just a little bit.
be super careful printing petg on pei. i suggest adding like .1 to .15 to your z offset in your slicer (or lowering the flow to like 40% for the first layer, should have a similar result). petg sticks like glue to pei, kind of like pla and pc. Also why i bought the 2 pack. 1 of my sheets was destroyed by some petg and has just been sitting at the bottom of a drawer for 2 years.
The only upgrade you need for the S1 is a PEI bed and maybe a raspberry π if you want to use octoprint or klipper (for connecting your printer via wifi, I suggest starting with octoprint and not jumping into klipper until you are advanced in how the machine works hardware and software wise)
For me, the included plate was hit or miss and I wound up with some PLA seemingly totally fused to it, which annoyed me. I can vouch for this one which has been absolutely perfect for me every time, and prints come off of it very easily (and totally) once it has cooled.
https://www.amazon.de/dp/B088841XH9/ref=cm_sw_r_awdo_CKYWKP0WWH6HACT90TTC
And it gives a really nice finish and it sticks good.
First layer 67°C 20mm speed
No brims etc Very nice and around 20€
>Link to cam
I do not recommend my camera because almost no case is ready for it, it's an arducam, which is slightly bigger than the oficial pi camera.
I'm drawing my own case now.
BIQU SSS Ultra-Flexible Removable Spring Steel Sheet Surface Heated Bed Platform 235x235MM 3D Printer Parts Printing Build Plate for Ender 3/Ender3 Pro/BIQU B1 https://www.amazon.com/dp/B088841XH9/ref=cm_sw_r_apan_glt_i_Z00RXKXTZ503QHKXK5CT?_encoding=UTF8&psc=1
Keep it clean, print hot, and wait for it to cool for removal. I have a V2 and an S1 running this one and it's great.
Can you do this and just chuck the magnet?
I used this cable to connect my S1 to my raspberry pi. The cable is really flat so it can hide under the bed since my pi4b is behind the printer.
So one thing that has annoyed me is the usb c port is a pain to keep the cable in. I have just got this adapter and fits in perfectly and lets me run the cable down and under the printer.