
What are
/r/inductionheaters'
favorite Products & Services?
From 3.5 billion Reddit comments
The most popular Products mentioned in /r/inductionheaters:


The most popular Services mentioned in /r/inductionheaters:
The most popular reviews in /r/inductionheaters:
I use a multimeter with digital screen. It's for like RV
https://www.amazon.com/dp/B07YBVHBGV/ref=cm_sw_r_cp_apa_i_7QDnFb7725DNY
It may just have more metal or something. They'll all pull slightly different. Kinda cool it makes each one unique. If you got a power supply rated at 10amps you won't have to worry.
Here is another option that goes to +420°C (not that you'd need that high of a temp for an IH but I was measuring hotter objects like an e-nail). It's been pretty accurate in my testing.
Pretty much. Still need to charge correctly. Something like this. It’ll stop charging when the pack hits 12.6v and the LED will change color.
This is the one I was linked to by someone on here who said they offer more protection -
Maximum operating current: 0-25A
I was just taking it that ment anything that requires under 25amp (0-25A)
This is the one I was linked to by someone on here who said they offer more protection -
Maximum operating current: 0-25A
Will this mosfet work? Appreciate the advice!
I would recommend building your own if you want to have it heat slowly. I used some tiny jars from amazon, and found it took about 15 seconds to click. Every time I used that heater I got a perfect hit so I definitely understand what you mean with letting the heat soak in. Here is a link to the jars I used. https://www.amazon.com/dp/B011PQN9RS/ref=cm_sw_r_cp_apa_fabc_b6.UFbR0BCFH4?_encoding=UTF8&psc=1
That looks like a good buy tbh if it has good form factor and weight for you. Definitely more worth it if you have an IH setup to draws more current as the cig outlet can give some good amps. I personally use a normal USB type c pd powerbank at 12v3a which is enough for me. This board is just the first one I found online, not the one I have and it is nice to make any type c pd source viable
Standard issue IH 3S holder for unprotected cells;
https://www.amazon.com/ZRM-Battery-Storage-Batteries-Container/dp/B07PV6P5K7/ref=sr_1_3?
I actually think it is the junction at the brass rivet in one of six connections. They warm up a bit and fail. Heat comes from junction resistance which is often a cascading failure.
Good info, makes sense. I bought this module (https://www.amazon.com/dp/B01GDVVANA/ref=cm_sw_r_cp_apa_i_1GioFbKM9CSPJ) that says it can run at 5v-12v. Max power 120W. I don't really understand the PC power supply comparison though, because all the components need a minimum of 800w so obviously 400w wouldn't be enough. It sounds like these ih modules support a max wattage, and you're recommending matching a power supply rather than anything less.
Also, when this situation happens and the system shuts down, is it the safety shut off on the ih module or the power supply crapping out?
I use this power supply (https://www.amazon.com/dp/B06Y64QLBM/ref=cm_sw_r_cp_apa_i_OKioFbPP7PG35), which says it has some over current protections, but maybe that's BS and irrelevant. What do you think about this one?
I am 100% NOT trying to argue with you, I just want to learn how to make these things properly and safely. Thanks for the information
These are the ones that did not work for me: https://smile.amazon.com/DGZZI-Transistor-Trigger-Regulator-Electronic/dp/B07PT4MMCK
Here's the one that did work: https://www.aliexpress.com/item/4000002811175.html
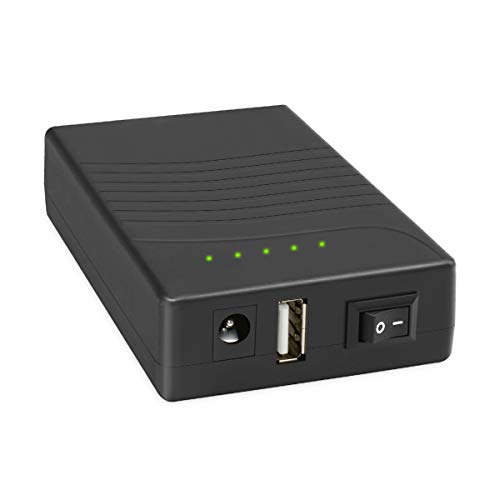
TalentCell Rechargeable 100Wh 12V/8300mAh 9V/11000mAh 5V/20000mAh DC Output Portable Lithium ion Battery Power Bank with AC/DC Adapter Charger for LED https://www.amazon.ca/dp/B01337R4C8/ref=cm_sw_r_cp_apip_os569ptXFqHoM
I use this one with no issues at all.
Hey I’m in the process of building a IH using this :
TalentCell Rechargeable 100Wh 12V/8300mAh 9V/11000mAh 5V/20000mAh DC Output Portable Lithium ion Battery Power Bank with AC/DC Adapter Charger for LED https://www.amazon.ca/dp/B01337R4C8/ref=cm_sw_r_cp_apip_os569ptXFqHoM
Works amazingly well. Just in process of converting it into a single piece instead of two pieces
Can I get away with a cheap soldering kit off amazon? Something like this one.
I have zero soldering experience and zero use for the iron outside of this project lol
LDK Soldering Iron Kit Electric 60W 110V Adjustable Temperature Soldering Gun Welding Tools, 5pcs Replacement Tips and Solder Wire Tube (Basic) https://www.amazon.com/dp/B083L8BXRC/ref=cm_sw_r_cp_api_i_I26zFb9HMJ3QE
More pics on my profile, I've been also asked to make a list of parts. I'll try to make it soon. Spoiler alert, the shell is a 5 pound soap container for camping from Amazon 😂
https://www.amazon.co.uk/dp/B0767LBZDK?ref=ppx_pop_mob_ap_share
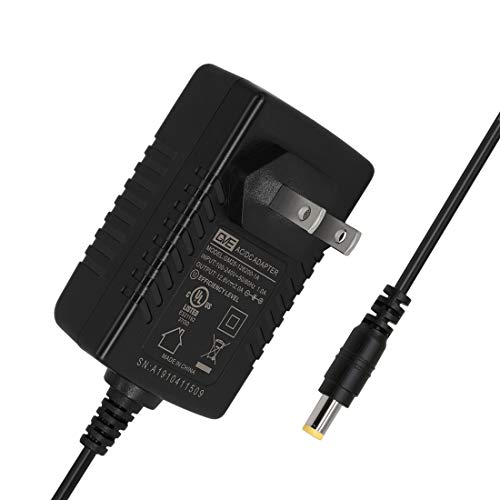
You can get a known brand Kastar 12v 6a adapter for $11.99 on Amazon so you know Kastar AC Adapter, Power Supply 12V 6A 72W, Tip Size 5.52.5mm for LCD Monitor, LCD TV, 5050 3528 5630 LED Strip Light, Tape Light, Rope Light, Wireless Router, ADSL Cats, Security Camera https://www.amazon.com/dp/B003TUMDWG/ref=cm_sw_r_cp_api_i_EXI9EbG5R09C9 save a few bucks and it’s a good brand
Are you sure that industrial unit is what you want? You will need to wire up the mains power plug yourself and then find a housing to keep it in. It is absolutely not safe to use that just sitting out on a table, it has exposed mains voltage terminals. People typically use a power brick similar to what is used for laptop computers, like this
I've heared all of that on a youtube comment section, this is the one that i've bought off Amazon.
LeMotech ABS Plastic Junction Box, Dustproof Waterproof IP65 Electrical Box - Universal Project Enclosure Grey, with PC Transparent/Clear Cover 4.53 x 3.54 x 2.16 inch (115 x 90 x 55 mm) https://www.amazon.com/dp/B07BPPKF2C/ref=cm_sw_r_cp_api_glt_i_60SGS7P3M52ZB6J62PCC?_encoding=UTF8&psc=1
I used this attached to a drill. Wire Twisting Tools, Wire Stripper and Twister, Wire Terminals Power Tools for Stripping and Twisting Wire Cable (1, Orange) https://www.amazon.com/dp/B07TW5JRHX/ref=cm_sw_r_apan_glt_i_AN3BCSSEEVCT4DG93JZX?_encoding=UTF8&psc=1
My old IH used a USB C PD bank with the appropriate stages (Lots have a 12v 3a stage so be careful, you want >= 5a at 12v for the IH). And then I used something like this (just found the first thing on amazon, you can get them for $2-3). Very simple to do, just don't use a phone charger cable, I used my MacBook charger cable.
VapOven provide good equipment at a reasonable price or you can find something like this: https://www.amazon.com/RuiLing-5-Pack-Battery-Storage-Batteries/dp/B07TRPV1ZJ/ref=pd_sbs_5/136-2848323-8517560 If you go looking for single units (instead of the 5 pack) the key points are flat spring clip terminals rather than skinny wire coils and separate connection points for each cell.
For that price you're looking at something like this. Never used one. But seen people on here who have with success. 'Dental Power Dental Lab Infrared Electronic Sensor Induction Carving Knife Wax Heater https://www.amazon.com/dp/B0114AD8TO/ref=cm_sw_r_apan_glt_i_BD8ZHCZT232BTBVN2H37
Bro where do you connect the switch that activates when you push the Dynavap? i read that you need a button of 10v(https://www.amazon.com.mx/API-ELE-GQ16-1-NO1NC-Anillo-interruptor-Rojo/dp/B079FQ2DPM/ref=pd_sim_6/144-6380159-1794411?pd_rd_w=QUddG&pf_rd_p=cc332105-90f3-443c-9351-ae2c0f28b732&pf_rd_r=X9165F4GG1N9P5EYF1NR&pd_rd_r=20adf8d1-af3f-4fa6-9677-80c26b6bfdb5&pd_rd_wg=66joJ&pd_rd_i=B079FQ2DPM&th=1 like this) to avoid use mosfet, but you dont have that button, how you did it? sorry for my english :(
Thanks for the tips!
I have the higher voltage (12V) side of my circuit digitally controlled by a button, with some active power monitoring that digitally cuts the power to my inductor mosfets if amperage gets too high.
Any tips for calculating the internal oscillation frequency of my induction module?
If the power jack is smoking, could just be that jack isn't suited to handle the level of power draw you're pulling, so it's starting to melt. Look for a metal jack with terminals you can solder the wires to, like these.
You want this: https://www.amazon.com/TEMCo-AWG-Copper-Magnet-Wire/dp/B00LV8W120. Cut a length to match the default coil, approx 33 inches. Use a wooden dowel, spoon handle, something the desired diameter to help with wrapping. Try to get it right the first time, rewrapping a work hardened coil is a huge pain. Use sand paper to remove the enamel from the ends where you want to solder it to the board.
I guess I should put this in the FAQ...
Yes I already have tac switches but I actually picked up some more to test the height of the buttons. I’m super excited but don’t wanna mess it up lol I spent close 100 on the parts. Here’s the case I used if you wanna use it too. https://www.tinkercad.com/things/byNcMRr3i3e-copy-of-dynavap-induction-heater
sure, heres my tinkercad post so you can edit it! i updated this case with a new screw to hold the sliding bottom in place. https://www.tinkercad.com/things/2xtNs7pJ5LI-tiny-induct
I was familiar with different drawing programs, and mainly used it like that, as I teach myself about the deeper functions. Id like to be able to share and work easily with others on these types of projects in the future.
I’m late but THIS right here what you said. I use these https://www.amazon.com/dp/B07C46XMPT/ref=cm_sw_r_cp_api_glt_fabc_7K9BEWJ0JY2J4C0THGVK?_encoding=UTF8&psc=1 I’ve built over 200 heaters and haven’t had a report of any that have failed to date.
That's an important question. For the main power lines you should use 18 gauge wire, stranded with silicone insulation is soft, flexible and easy to work with. Solid wire, as opposed to stranded, is good when you need to force the wire into a complicated path with tight bends and have it stay exactly in place. Shaping it is more trouble than it's worth if there is room to let softer wire just bend naturally.
If you expect to do more electronics hobby work in future a set with different colors is useful: https://www.amazon.ca/StrivedayTM-18AWG-Coper-Electric-stranded/dp/B01LH1FQJ0 The US Amazon site seems to have a better selection of wire but you should be able to find smaller single rolls to save money with a little poking around.
Ya was looking at something similar to that, this was one I was looking at. Still a bit expensive to take a gamble on weather it will work or not.
TalentCell Rechargeable 12V/11000mAh 9V/14500mAh 5V/26400mAh DC Output Lithium ion Battery Pack for LED Strip and CCTV Camera, Portable Li-ion Power Bank with AC/DC Charger, Black https://www.amazon.com/dp/B016BJCRUO/ref=cm_sw_r_apan_glt_fabc_VBRNX3KEM1F2WKNZSMPK?_encoding=UTF8&psc=1
Maybe this will work. Maybe snip one of the big black capacitors off the induction board though it will make it pull less amps
Barebones you could control a driver mosfet with something like a 555 timer. That requires the 555 and a couple of cheap resistors (pot for tuning frequency) and capacitors. Mostly I've seen people using a microcontroller like the Arduino so you can customize it in software and have complex behaviors.
For a prebuilt try searching for "square wave generator circuit board". Here is an example: https://www.amazon.com/Acxico-Frequency-Adjustable-Generator-Stepper/dp/B082PJWYX9 This has limited options for adjustment and it would be easy to buy a version that wasn't suitable. You want a low frequency, under 1000 Hz, ideally under 100 Hz.
You want 12 AWG magnet wire like this: https://www.amazon.com/TEMCo-AWG-Copper-Magnet-Wire/dp/B00LV8W120 . Use about a 33 inch length to get the resistance of the coil right. If you don't need the full length in the coil use s bends outside the coil. It's much easier to form the wraps around a cylinder of the right diameter, if you don't have a wooden dowel the right size check the handles on things in your kitchen (seriously).
I do not know the inductance value of the choke. It size is approximatly 20mm diameter by 12 mm thick and 2x25 turns of enameld wire.
The nickel strips I used are the same used to connect battery together.
I mean.....For just this purpose, can i use a small momentary switch (like theese: https://www.amazon.com/Momentary-Tactile-Through-Breadboard-Friendly/dp/B07WF76VHT/ref=sr_1_10?crid=3VL5HP5U2D1UX&dchild=1&keywords=small+push+button+switch&qid=1633562177&sprefix=small+push%2Caps%2C313&sr=8-10) or it needs to be something like theese : https://www.amazon.com/AutoEC-Momentary-Pushbutton-Waterproof-Terminal/dp/B08F2D7D5Q/ref=sr_1_1_sspa?dchild=1&keywords=momentary+switch&qid=1633562084&sr=8-1-spons&psc=1&spLa=ZW5jcnlwdGVkUXVhbGlmaWVyPUExSFZLUEIyS1ZTVlM5JmVuY3J5...
Is that battery holder is using springs, if so you will want to replace it as I've heard of them melting from overheating.
Find one that has tabs like this: https://www.amazon.com/Battery-Parallel-Batteries-Soldering-Ltvystore/dp/B07CWKV9H7/
Part list
12v 7a power supply Zvs module Standard mosfet 12v Button APIELE 19mm Momentary Push Button... https://www.amazon.com/dp/B07DFMWH6V?ref=ppx_pop_mob_ap_share
Wago connectors
Wago 221-413 LEVER-NUTS 3... https://www.amazon.com/dp/B06XGYXVXR?ref=ppx_pop_mob_ap_share
Power bricks don't do well being regulated on the input side.
Two options - a small lab supply from Amazon maybe. That is my poison...
Then there are these guys - you want a 12V10A unit - https://www.amazon.com/Yosooo-Universal-Adjustable-Regulating-110-240V/dp/B08424K7ST
Be sure to get the 5.5x2.1 plug version. There are others.
Something like a sicone blanking cap used for painting may fit around the end of your guitar slide.
Mardatt 80Pcs Silicone Rubber Tapered Stopper Plug and Protective End Cap Assortment Kit Withstand High Temperature for Powder Coating Painting Anodizing Repairing Masking Spraying https://www.amazon.com/dp/B09124J3LN/ref=cm_sw_r_cp_api_glt_fabc_FVMBCY7CKTCER4SBMPAE?_encoding=UTF8&psc=1
Edit: checked the extra one, and with my captive cap(pic is the 2020m one, idk the name lol), and yeah none fit through, so that's cool. It could probably be pushed through so it's not perfect
also, is this the right kind of bms? https://www.amazon.ca/gp/product/B07PHZ71YK/ref=ox_sc_act_title_1?smid=A160PCGAWPEDXQ&psc=1
DIYhz Momentary Push Button Switch, 1A 250VAC SPST Mini Pushbutton Switches Normal Closed(NC) Black & Red Cap - 20pcs https://www.amazon.com/dp/B07BD23B9B/ref=cm_sw_r_cp_api_glt_fabc_CVKWQQ1EAPRFEJ268FJW?_encoding=UTF8&psc=1
For the carbon? This one works really well. Just cut the inside straps and it works perfect!
When I can find some time I’ll be adding USC-C with this https://www.amazon.com/Eletechsup-Multi-Cell-Step-Up-Polymer-Charger/dp/B08H7XMWCG/ref=mp_s_a_1_4?dchild=1&keywords=3s%2Btype%2Bc%2Bcharger&qid=1619022932&sr=8-4&th=1&psc=1
Pretty sure this will give you the same result...used this for a mains powered, but sadly usb generally tops out at 5v, so I couldn't get enough power. https://www.amazon.com/dp/B08NFKV2LD/ref=cm_sw_r_cp_apa_glt_fabc_ZTNKKNJG37C0MAPTPMQZ?_encoding=UTF8&psc=1
Hey friend.
I am going to say it’s your power supply at this point. They can burn out their fuse and be dead. Especially with a rewire and a mosfet added if you aren’t getting power it’s your power supply.
This is the supply I am using right now with good success. Strong enough for a pico PSU (Small power supply relying on external PSU for old computers) and will power an induction heater just fine.
Hey, sorry for the delay in reply.
This sensor from Amazon. Less expensive can probably be found from China. If I were to build a bunch of heaters, I’d source it elsewhere. For now I’m going to give one of these a try in testing.
I found these 2s batteries that are 7.4v and 12x20x38mm. It takes like 35 seconds to click, but u/tommydeethegreat mentioned that one can shorten the coil to get higher power from lower output batteries.i haven't tried this yet, but will be testing over the weekend. I was going to attach both to a 4s bms, but that makes it a 14.8v battery, and the 4s bms is huge.
Thanks! I used this one with a small piece of cork at the bottom.
Essential Adapter Compact Clear 18mm Male to 14mm Female Glass Adapter (2 Pcs) https://www.amazon.com/dp/B08PBWCKWZ/ref=cm_sw_r_cp_api_glt_fabc_9ZWFBH85MCQMCHWSSMS0?_encoding=UTF8&psc=1
https://www.amazon.com/dp/B07J9NXQ6W/ref=cm_sw_r_cp_apa_fabc_41IcGb8KZ4RBQ?_encoding=UTF8&psc=1
With these battery trays:
https://www.amazon.com/dp/B07ZHW53KD/ref=cm_sw_r_cp_apa_fabc_13IcGbQ0ZXN98?_encoding=UTF8&psc=1
It is strange, all 18650s are charged full as I used my active ones from my box mod to test.
5-10 seconds of power at a time can be enough to fry something like that. That MOSFET is made to be used to control light loads that are too high for the outputs of a small micro-controller. These are what most of us use here and they are cheap https://smile.amazon.com/gp/product/B07S735WWN/ref=ppx_yo_dt_b_search_asin_title?ie=UTF8&psc=1
This is the power supply, its 6A
Kastar AC Adapter, Power Supply 12V 6A 72W, Tip Size 5.52.5mm for LCD Monitor, LCD TV, 5050 3528 5630 LED Strip Light, Tape Light, Rope Light, Wireless Router, ADSL Cats, Security Camera https://www.amazon.com/dp/B003TUMDWG/ref=cm_sw_r_cp_api_glc_fabc_ji09FbDPF7C2P
You will melt your dynavap! You just need a small one. The one you have is much more expensive than you need, too. https://www.amazon.com/Treedix-Voltage-Induction-Heating-Supply/dp/B086V6CYM6/ref=sr_1_5?dchild=1&keywords=induction+heater&qid=1609943271&sr=8-5
Here are the 2 cups I ordered- 2 because I screwed up my lid holes a couple of times. The 12oz is what stealth uses. The larger cup is just cheaper and will fit 20700 or 21700 batteries instead of 18650- but either take some ingenuity.
https://www.amazon.com/dp/B07YDMF2S7/ref=cm_sw_r_cp_apa_fabc_OfK8Fb6MQRQ70?_encoding=UTF8&psc=1
https://www.amazon.com/dp/B0865ZN8DD?ref=ppx_pop_mob_ap_share
This is the cup I’m going to try my hand at modding. Looks the same as the stealth induction cup.
https://www.amazon.com/Coffee-Compact-Vacuum-Insulated-Travel/dp/B07JW5JKQM
https://www.amazon.com/Double-Insulated-Thermos-Stainless-Leakproof/dp/B08662D91P
(I dislike Amazon, but I couldn’t find a Chinese supplier who would sell me just 1 cup)
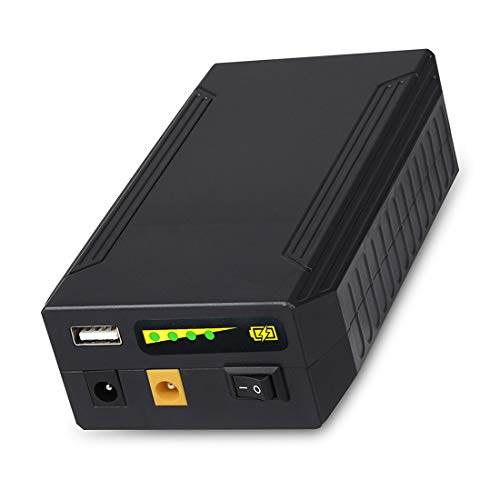
I don’t know how true it is but this one says that max voltage is 9v - 12.6v / 10A which would be perfect for the IH https://www.amazon.com/dp/B089M57N7C/ref=cm_sw_r_cp_awdb_imm_t1_wNmTFbR2B8M03?_encoding=UTF8&psc=1
Also i used the exact same button as you for my first built and the wire harness was taking up way too much space.
For the second build i switched to this button and it takes up less space and I prefer the feel of this one: https://www.amazon.com/dp/B07WWLHBQR/ref=cm_sw_r_cp_api_fabc_igCQFb70ADJ73?_encoding=UTF8&psc=1
You can also just solder wires directly to the button and get rid of the harness all together
That switch is rated for 5amps so it should work with the mosfet attached.
I used the following wires for two of my builds: 18awg https://www.amazon.com/dp/B07G744V5Z/ref=cm_sw_r_cp_api_fabc_EcCQFbQQG82WX?_encoding=UTF8&psc=1
Best of luck and share pictures:D
Actually, can I see the layout of the top side of your shell? I think that shell had those batteries in parallel, not series, and you might have it a bit backwards
Edit: also, I don’t think that controller has one of the protections that this one does
Back in the spring I constructed a bench top supply using an old PC 400 W supply. It works for 5 and 12 V. There are many guides online for this conversion.
I was planning to use a boost\buck voltage regulator off Amazon ($20) for intermediate voltages but found it was a huge pain in the ass. There was a lot of voltage sag which meant if the voltage was right before firing up a vape it would drop too low when firing. If it was correct under load it would jump too high when the current dropped risking the rest of the vape's circuitry.
I recently bought this supply for $70 and am happy with it: https://www.amazon.com/gp/product/B07DQR177D/ref=ppx_yo_dt_b_asin_title_o01_s00?ie=UTF8&psc=1 This will drive a powerful vape without generating enough heat to even turn the fan on.
I’ve been using this one for almost 2 months now with no trouble:
https://www.amazon.com/dp/B01M7Z9Z1N?ref=ppx_pop_mob_ap_share
It’s only rated for 3 amps DC, so in order to safely use it you need to measure the dc amps while heating up your Dynavap. Also, the battery voltage drops as it discharges which causes the current to go up proportionally (ohm’s law). The battery pack I linked goes from 12v at full charge to 9v at full discharge. I only run mine down to about 10v, so that means I need at least 20% headroom on my amps.
At 12v, mine draws 2a, so at 10v it draws 2.4a (ohm’s law again: 2x12/10). Even if I run the battery all they way down to 9v, I’m still only drawing 2.6a, so I’m good there.
I confirmed all these calculations with a meter after I hooked up the battery and they’re spot on. I use it a couple times a day and only need to charge it every 3 or 4 days.
That used to happen to me too. I wasnt properly tinning my tip and using the flux.
Looks like u got your problem sorted, but I do suggest this tip tinner: https://www.amazon.com/Thermaltronics-FBA_TMT-TC-2-Lead-Tinner-Container/dp/B00NS4J6BY
Also just look up “solder balls up” on the internet and u will find a lot of advice for that.
Rated for 10 amps. This will work
APIELE All New Design 10 Amp 22mm Momentary Push Button Switch 12V Angel Eye LED Waterproof Stainless Steel Round Self Reset 7/8'' 1NO 1NC (10 Amp/Red Led) https://www.amazon.com/dp/B07ZB2GDL4/ref=cm_sw_r_cp_api_i_apfKFbDEYN0XX?_encoding=UTF8&psc=1
I see, and I appreciate that!
I think I see where the confusion is coming from
Do you mean the power switch (rated 12v20a)? Bc my momentary switch is rated for 12v5a, so with a 10a power supply it'd need to be on the output of the mosfet. The power switch in the top left isn't a momentary or a latching switch, it's one of these, used as a means to safely stop the flow of power to the switches and zvs board completely as when it's in it's off position the power directly from the supply is stopped at that switch, like it breaks the connection so not even it is powered. That way I can leave it plugged in with no worries.
Try amazon smile to donate to a charity of your choice automatically at no cost to you!
https://smile.amazon.com/dp/B07T1JG6BD?ref=ppx_pop_mob_ap_share
^^^I'm ^^^a ^^^bot ^^^and ^^^this ^^^action ^^^was ^^^performed ^^^automatically.
You have the extra room there for the battery but also, in my opinion fitting it into another case the size comes down to your skills in putting it back together. You could go for a real small case and fit it all tightly in there or have enough room to nicely fit everything in. I’ve used this before and it’s nice size. LeMotech ABS Plastic Electrical Project Case Power Junction Box, Project Box Black 6.2 x 3.5 x 2.4 inch (158 x 90 x 60 mm) https://www.amazon.com/dp/B07W6SJGJM/ref=cm_sw_r_cp_api_i_e7rEFb6N6S165
They have other sizes too like a cube size but like I said it would be a real tight fit.
Yeah, 14mm-18mm glass adapter like this
Quentacy Momentary Push Button Switch 1NO1NC Waterproof Silver Stainless Steel Shell 12V LED Ring Switch with Wire Socket Plug Suitable for 19mm 3/4 Mounting Hole (Blue) https://www.amazon.com/dp/B075QBJVTS/ref=cm_sw_r_cp_api_i_AQWCFb66XDN2H
Something like this.
Thank you! I wanted to make sure I didn’t break the seal of the case by drilling into it. That way it stays 100% smell proof. I agree the cord is a little awkward but I didn’t really know where else to put it.
Here is the link to the glass piece I used: https://www.amazon.com/dp/B08CH3WB8N/ref=cm_sw_r_cp_api_i_xB6BFb7GFATD3
I got a cheap $20kit that worked fine. Of course, the better your tools are the easier it would be to work with them. The cheap kits will be fine. Just be a little patient. If you have some electrical components laying around, try soldering on it first as a practice. With my iron i had to figure out what's best temperature to keep it at. Watch a bunch of videos on how to solder & desolder.
If you want to stick to something cheap, i suggest this kit as it comes with a multimeter too which can be super helpful troubleshooting your wiring and also be handy around the house. https://www.amazon.com/dp/B07Q2B4ZY9/ref=cm_sw_r_cp_apa_i_YT8zFb6BQ6HMW
I'm capable of the soldering just trying to avoid it if i can but you're quite the inspiration to get better. The LiPo option seems much more expensive than just honing my skills especially with the added cost of the hobby charger. If we're talking straight plug and play the would something like this work with a male to male adapter? Or would the output be too low? https://www.amazon.com/dp/B01M7Z9Z1N/ref=cm_sw_r_cp_apa_i_KgryFbBKRPACJ
https://www.amazon.com/dp/B07RNW8316/ref=cm_sw_r_cp_apa_i_JvwwFbFSE732J
That is the one I have on my desktop, and it hasn't let me down. You may want to make sure the charge port size is the same as what you use.
I copied the picture. Let me see if I see it. Still have hard time posting pictures from my phone. Any way it was made out of this??
PDP Donkey Kong Barrel Game Card Storage - Nintendo 2DS https://www.amazon.com/dp/B0130LNTHG/ref=cm_sw_r_cp_api_i_uarvFb38PD6FR
You could always just build your own power supply with something like this, which could be enclosed in the IH body.
Don't forget to attach the coil solidly before powering the IH.
Otherwise it looks good to go if the switch wires are what I think they are.
red& black for switch light and grn/blu for contacts.
I like the battery testers that have a built-in switch. That way they can go straight to the input and only light up when I want them to. I prefer a stealthier IH.
I like this one personally - https://www.amazon.com/Lithium-Battery-Indicator-Display-Capacity/dp/B07VVJLM86
But there are all kinds of nice testers. You want 3S for 3 18650's.
I use Shoe Goo. It comes off clean if you need it to.
There is no heat. I just stabilized the 2 inductors and the capacitors. Never good to stress the wires and the connections. Tying them together made them very stable. I have since completely removed all the components and started fresh. Great feature for a very strong hold. Sets in an hour and cures overnight. Smells like vinegar; ventilate.
I matched up the voltage/wattage/amperage values on the back of the power supply to this battery:
Talentcell Rechargeable 6000mAh... https://www.amazon.com/dp/B00MF70BPU?ref=ppx_pop_mob_ap_share
It takes about 9 seconds to get to the click and I need to give it an additional 6 seconds to get the proper temp for my herb (so 15 seconds from start of heating cycle to taking a puff) which is longer than it takes if plugged into a power supply.... but the freedom of not being tethered to a wall is priceless.
https://www.amazon.com/dp/B07C46XMPT/ref=cm_sw_r_cp_apa_i_ZwimFbMMM6YQN
This should give you an idea. The center post is for the red wire and the flat post is for black wire. I can see on your black connection that the flat post is still in the wire connection. You can can just pull that out and cut the red wire off on use this new connection and just solder it back together. I would watch some videos maybe on it.
https://www.amazon.com/dp/B01GDVVANA/ref=cm_sw_r_cp_apa_i_jFllFb46ZKBCG
This is the one I bought. It's clearly attached in the photos, guess I'm just wondering if I can solder to the surface of the board, or if I have to connect it somewhere deeper
This would be a perfect size for wall powered or battery powered heater. Book Safe with Combination Lock - Jssmst Home Dictionary Diversion Metal Safe Lock Box 2017, SM-BS0402L, black large https://www.amazon.com/dp/B0728KW8W6/ref=cm_sw_r_cp_api_i_d1FjFbB08BGE3
The 4.5x3.5x2.2 here seems like a good option, thanks!
Yes, but not the kind of power banks you are probably thinking of. Phone banks only do 5 volts 2.4 amps. You need a 12 volt 5 amp power bank minimum. A quick amazon search found me this one but you would do well to look around.
This one I picked up at a local store actually, but Id try this one that the other commenter linked. https://www.amazon.com/dp/B07JMY631D/ref=cm_sw_r_cp_api_i_GEV2Eb7HDVA3M
It looks like it also has balance protection. I'm about to order another just since I need a few things on amazon.
This is the only thing I can think of
Yeah I made a post about this actually. If you buy these type of usb pd boards (assuming your powerbank supports usb pd charging, and if it does-most likely yours is 12v 3a so it'll be slower):
then you can just solder (or get the ones with terminals) this board in place of the + & - of the original power supply
Yes, unless he has changed his pricing model you should still be able to get a PSM for $125. The caveat being that he usually has a relatively lengthy waitlist. If you want to get one as affordable and fast as possible you could always grab one of the SJK dental IH on eBay or amazon. They aren’t portable and they are roughly the size of an electric pencil sharpener, but they definitely get the job done. Last time I looked they go for somewhere between 50-60 dollars (whatever that is in Canadian money). https://www.amazon.com/dp/B07K7HQXWJ/ref=cm_sw_r_cp_api_i_w43HEbP4PVCK5 And with one of these DDave adapters it’s even better. https://www.ddavemods.com/store/p73/The_IH_%28Induction_Heater%29_Hands-Free_Mod.html
Here's a 2 pack of mosfets on Amazon.
You will be fine with a 6A switch and a 6A power supply without the mosfet though.
I got it from AMAZON. I really like how this one is coming out. I’m still waiting on the brass toggle switch, but I added a jewe indicator light, and I swapped out the lid screws for brass flathead machine screws. This is how it looks so far.
i use these LEDs from amazon. They come with a built in resistor, and pre-wires. so if you want the LEDs to come on when the heater is fired, simplest way is to just wire one of those babies right into the positive and negative terminals on the induction module.
i can post a full parts list with links later on when i have a minute.