
What are
/r/largeformat's
favorite Products & Services?
From 3.5 billion Reddit comments
The most popular Products mentioned in /r/largeformat:


The most popular Android Apps mentioned in /r/largeformat:
The most popular reviews in /r/largeformat:
Thanks again - also check out William Mortensen, he did a lot of Bromoil work but he was kinda nuts, too. He wrote a book called "The Command to Look", it's been re-released in paperback. It's a really interesting take on composition and grabbing a viewer's attention, a little off the wall but well worth reading. We all talk about gear, gear, gear with little discussion about theme and subtext and grabbing someone by the psyche.
Obviously the first items on anyone's list should be Adams' set of 3 "The Ansel Adams Photography Series". The 3rd volume, The Print, may not be of particular interest to you at the moment, but it's still a valuable resource, IMHO. But the first two volumes, The Camera and The Negative, are essential reading. Here's a link to the set on Amazon, but obviously you can find your preferred price and format with some Interweb Searching:
https://www.amazon.com/dp/B083TXD946/ref=cm_sw_r_cp_apa_i_D-VOFbKKTWFZ5?_encoding=UTF8&psc=1
I grabbed one of these Manfrotto "Chicago" bags (the medium, not the small) and it looks great, is sturdy and is perfect for my crown graphic setup. It has a pull out rain fly, side access on both sides and straps that can be utilized a few different ways for attaching a small to medium sized travel tripod. It has a divider for the bottom section (perfect for bisecting the whole section for your camera on the bottom and wrapped lenses on top) and a separate top section for easy access to smaller assorted gear. There's like one video review on youtube but I can vouch for this as an option. Oh and there's a separate bag that can be stowed inside the main bag but I leave it out and use it as my film holder bag. It fits them perfectly!
I've used a digital camera, cell phone app, and a Sekonic L308. All worked fine though the Sekonic wins for ease of use. I still use my digital camera for test shots if I'm shooting with strobes. The Sekonic can do flash metering if you do some mental math but I like seeing a preview before I commit it to film.
Since you have a digital camera already, go with that.
Large format is a lot less scary once you get those first few shots under your belt.
FWIW, I've always had great luck using a cheap linen tester. They're inexpensive, fold up tiny, and while the optical quality may be great, they're just fine for testing focus.
(I wear glasses, so swapping to reading glasses is a bit of a PITA, but that's a fabulous idea, too.)
I have this tank and I'm able to develop two 4x5 by hot gluing a two little strips of plastic 180 degrees apart so that there's no way both sheets overlap. You can avoid this and just develop 1 sheet at a time too. Don't listen to anyone saying you need giant tanks or that it's not possible, I've developed literally 100 sheets of 4x5 using this tank.
Matt Marrash has done it with a huge roll of expired aerial film. It's definitely possible. https://youtu.be/2HxnHZcpiYM
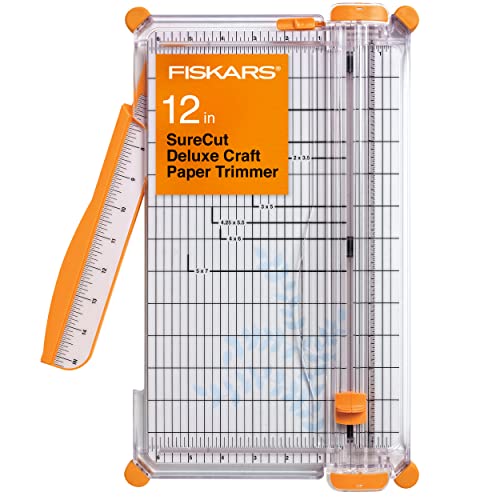
You can buy a paper cutter and mark the dimensions you need with tape or some other way so you can feel, line up the film, and cut to properly size in the darkroom. The rotary trimmer type cutter that Mat uses is the most expensive, but works the best. Maybe you can find a nice used one on eBay.
I personally use a paper cutter that has a little razer blade tip underneath to cut 8x10 paper into 4x5 for paper negatives. Something like this. https://www.amazon.com/dp/B0038F1A0S?ref=ppx_pop_mob_ap_share
I wouldn't recommend a guillotine paper cutter. The ones with the large arm on the side that you bring down to shear paper. They definitely do work, but it can be a royal pain. You may have better luck than me so feel free to experiment!
Older editions have more on film cameras. I think i have 4th edition and that ones got lots of info on view cameras.
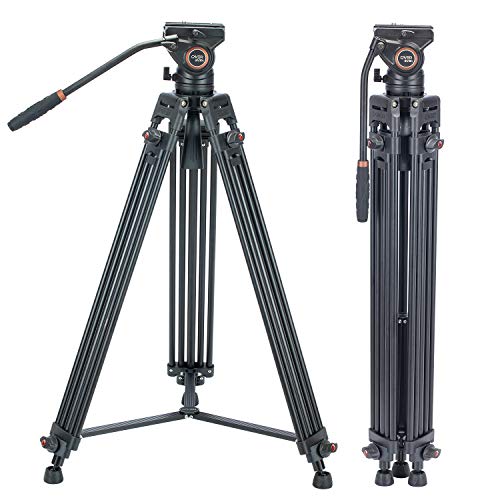
For my Toyo monorail, I just use a cheap video tripod similar to this one. Easy to set up. Simple to level. Sturdy in a breeze. I leave the handle off if because it's not required. Mine came with a bag and a 3 wheel collapsible dolly. The only down side is it's on the heavy side. It's not for hiking with, but then neither is a Sinar F. :)
I bought a pack like this https://www.amazon.com/Filters-Graduated-Adapter-Cleaning-Accessories/dp/B0834NSX88 which attaches to the lens and there are pieces for many lens sizes so it's flexible and I use it with all of my cameras.
Do you mean buying something like this and doing a test exposure? Would that be useful for processing at the lab or editing on photoshop after? Curious how we'd use this.
An eye loupe for fine focusing might be helpful. I'm assuming you already have some sort of hood for the camera so you can see what you're shooting on sunny days.
yay, lens board fun!!! My foray into LF has been learning that it's all pretty much hand tinkered and made up as people go along. I have a cambo 4x5 but every cambo lens board I buy on CL is 2x too big. Apparently I have an odd unit, now where have I heard that before? In the LF world, lenses, shutters, and lens boards can all be sold separately, or together in different ways. You could get all 3 pieces, only 2, or just 1. Shutters are mostly built to the "copal" sizing and lens boards can be pre-drilled to those dimensions, or not drilled at all and you have to drill your own.
First, buy a lens wrench lens wrench. When buying lenses, I prefer to buy lenses with shuttters. It's just easier that way. And I'll also order or make lens boards as I need them. You can make them out of wood, you can 3d print them or laser cut them, you can order them to match a certain size on ebay. You have a lot of flexibility. And trust me, breaking out the laser cutter to make a new lens board is a lot of fun. (new hobby!)
Shutters - never open them... trust me... there were a lot of really smart, really capable engineers that built those things and if it works, leave it alone. I opened one up that wasn't working and I felt it exploded on me. tiny parts everywhere.
Super common issue with a 90mm on 4x5. You will be looking at one of 2 or maybe both solutions to al lens this wide.
1 Recessed lens board as seen here, this gets your lens deeper in the body so you can focus. You can make your own if you want and have the time, it doesn't take much skill, or just pick one up used.
2 Wide angle bellows such as these, allows you to use what movements your lens will allow.
This is the link for the containers I use for film holders. Water proof and durable. Sterilite 03211106 Ultra Seal 5.8 Cup Food Storage Container, Clear lid and base with Tangerine Accents, 6-Pack https://www.amazon.com/dp/B004GXB696/ref=cm_sw_r_apan_glt_i_9RZ9N62RYN2F0AGYPQSY
Re, umm, got the email notice but the reply is deleted - I was going from the assumption that most DSLR/Mirrorless guys have a couple lenses to mess with (and extension tubes are so dang cheap). A 4x5 neg shouldn't be that hard to frame up - though I haven't tried it, all the jewelry and small-packaging shots i've done, like cosmetics and stuff, didn't need anything special to shoot things in the 2"-5" range.
(I was just meeting for lunch with a guy to discuss making an 8' square aluminum frame covered in thin sheet metal... to make 6-8' B&W darkroom prints on... so the "huge scan" jokes make me slightly embarrassed, I lay in bed thinking this stuff up...) BTW, seems like a really easy DSLR scan rig could be made with a set of cheap cinema rails, and then adapt a 15mm lens support bracket to hold a sanddwich of white translucent plex and glass to hold the film. Everything's squared up, and the camera and film holder can slide fore and aft without getting out of square. I've only DSLR-scanned a few times with tubes, I'd rather print, but if I were shooting for scanning, I'd give the rails a try.
I usually use Amazon Japan for the best price, but they're out of stock right now. I'm in the U.S btw.
Why not buy existing sleeves? The collectible / trading card folks are fanatical about their cards, so the existing sleeves are going to be quality and archival in nature.
https://www.amazon.com/sleeving-Standard-Gathering-Pro-Support/dp/B07SS52JFK
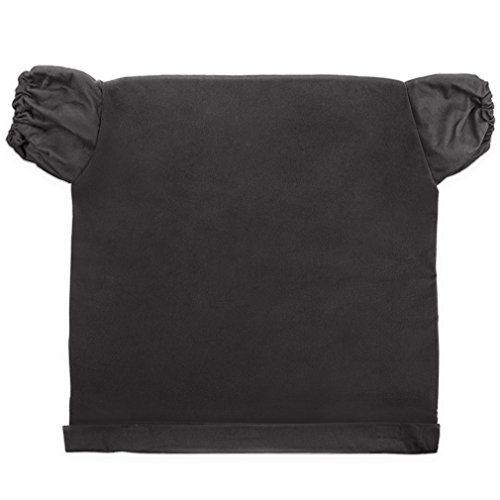
I have this changing bag and have taken it with me on loads of overnight trips. I haven't had any issues with light leaks, and I'm not neurotic about only using it in the dark in my sleeping bag etc, although I do try and use it out of direct sunlight.
The one problem for novices is that they don't *have* old boxes/bags. Makes things a bit awkward. :)
Haven't tried it myself, and you'd want to test it with a very bright flashlight, but you might consider some of the opaque mylar bags like this:
https://www.amazon.com/Inch-Black-Reclosable-Resealable-Zipper/dp/B00J8SIFAC
I'd be worried about the seal, but if you fold it over and tape it down, you should be OK.
I'm another proponent of starting out with a crown graphics. If someone was new to shooting 35mm film and wanted to know what to get I would tell them to get any old canon ft/ nikon f (fe, fm, fwhatever), pentax k1000.... and a 50mm lens. The crown graphic is the equivalent to this. You will learn about shutters, minor movements, and exposure compensation for your bellow length. The other thing I would one hundred percent recommend is the patterson daylight 4x5 developing thing... It can do six sheets at a time. And the results are great. And I use (i think this is the right size, definitely the right color) these: https://www.amazon.com/STERILITE-RectFood-Container-Clear-Tangerine/dp/B001KYLKAE/ref=sr_1_17?dchild=1&qid=1615483343&refinements=p_n_feature_twenty_browse-bin%3A3254105011&s=kitchen&sr=1-17
I use them to hold three film holders in at a time. If you get nine holders you can be shooting the same film at n-1, n and n+1 and once that container is done, they get developed together....
Once you are in it a bit the gear will find its way to you.
Well, you've joined the club of people who've been bitch-slapped by their squeegee. Watch how many people here say "well, they've always worked for me, no problem" but eventually they can get you, and they tend to wreck an entire roll. Throw it out, or burn it slowly and watch it writhe in pain.
Many people mention the "two wet fingers", but make sure that skin is very smooth and very clean. Many of us have a nice callous between those fingers from pencils or tools.
IMO, the safest thing to do is - final photoflo/distilled rinse - mix the photoflo per instructions, don't just "splash some in". Setup your hanging film clip.
Get the film from the roll, and grab a single kim wipe or pec pad, they are lint-free paper lab wipes (they're great for cleaning lenses and optics, too). Dry the top of the film, where it will clip - so no water is trapped behind the clip. Clip it and hang it.
Now you have a damp kim wipe. Wrap it loosely around the film at the top, all the way around, and gently pull it to the bottom, one time. Dry the bottom with the wipe, clip it, and toss the used wipe. This will give you faster-drying film, without watermarks, and a very low risk of scratches.
I use a Pentax Digital Spotmeter and love its simplicity. I also use the zone system and that works for me.
A read and enjoyed the Ansel Adams trilogy of books. I think the Practical Zone System was most useful for me when I was starting, as it also referred to digital systems. There is a revised version available: https://www.amazon.co.uk/Practical-Zone-System-Digital-Photography-dp-1138206318/dp/1138206318/ref=dp_ob_title_bk
I never use an incident meter with my Large Format. Perhaps because I mostly shoot landscapes etc.
I also think starting with B&W film is a good way. Because the film is cheaper, you can develop it fairly easily at home, there's more latitude on exposure than you get with say transparency (where exposure is often critical to get spot on.)
I'd also start by photographing where you don't need to factor in other things like bellows extension. This helps you get your basic exposure correct before embarking on other complications.
Hope this helps
I have a book primitive photography that has plans for larger cameras and is targeted at an unskilled worker. Sadly I don't recall any 4x5's in it.
I've ground glass with water, another piece of glass and fine silicon carbide powder. 600grit was brightest and 800 grit had finder detail.
If it were me I'd get a few film holders, a lens plus lens board then do my own design between those two elements. When I built my own camera I used graflex lens boards because they were cheap, had a light trap, and were readily available. Later I got jealous of higher end lens boards like linhoff.
I have 4 Elite Fidelity holders, this model: https://www.amazon.com/Fidelity-Elite-Sheet-Film-Holder/dp/B003YM0Z6A
I loaded the negatives in a changing bag: 1. Pull darkslide out halfway 2. Open bottom of holder 3. Find negative notch, hold in right hand with notch at bottom corner 4. Push in negative until it stops 5. Close bottom 6. Close darkslide
Ps: I have used the changing bag many times, it is light tight.
I've just tested this with a used negative, and since the film holder is a few millimeters bigger, it is possible that the tilt is just that... the holder has a lot of play an I can tilt the negative even if loading correctly.
I still can't explain the light leak though.
A dry PTFE is probably best as it will prevent most fluff and dust sticking to the rails and cloghing up joints etc. WD40 make a good one. Here it is at Amazon but you can get it pretty easily elsewhere. A little goes a long way too.
You might try:
​
​
They're 100mm x 100mm x 3mm birch plywood squares. Only takes minimal work to get it to work as a lens board.
I have something similar to these, I also have the rodenstock wrench but it's not as good IMO.
OP def rotate the lens, if you are using the cable release chances are you are using bulb or time so being able to see the aperture markings are more important than seeing shutter speeds anyway.
It's kind of clunky and a bit elaborate. I use a DSLR and a copy stand with one of the following copy pads:
https://www.amazon.co.uk/dp/B07KLY84NB/ref=pe_3187911_189395841_TE_dp_1
I connect the copy stand to a raspberry pi, ssh into the pi and then use a shell script to cycle the usb power to flash the light on the pad. I use the T shutter setting on the DSLR and cover/uncover the lens manually. In this way I avoid any effect of shutter vibration but still ensure that the negative is exposed only briefly with the light on the copy pad off. In a dim room, a few additional seconds of 'dark' exposure don't seem to do any harm.
The main flaw in my setup is that the copy pad has its own brightness control that prevents the light turning on immediately when the USB power comes on. So I had to do a bit of soldering to fix that. It might be possible to find a copy pad that has the desired behavior out of the box. I believe others have had more luck using a camera flash plus some kind of diffuser.
If you have a camera with an electronic front curtain shutter, then you should be able to just use the in camera shutter and avoid all of this faff :) Unfortunately the shutter vibration of my D3300 does have a noticeable effect on sharpness.
One non-obvious tip that applies to any kind of digital camera plus light table setup. It's important to mask the edges of the negative. I drove myself nuts trying to fix apparent uneven development before I realized it was flare caused by the absence of a mask.
It's probably relevant to mention that I personally have no artistic issues with editing my scans quite heavily, so the raw scan is not as clean and contrasty as the image I've posted. Photoshop files available here if anyone is interested: https://drive.google.com/drive/folders/1Y4AEScDUKxJGq4RH9DufA4HHHlCebro-?usp=sharing
When I have gone to dry regions I will clean my holders with an anti static brush and place each loaded holder into anti static bag. https://www.amazon.com/Resealable-Antistatic-Anti-Static-Motherboard-Electronic/dp/B07THZPFR7/ref=sr_1_3?keywords=anti%2Bstatic%2Bbag&qid=1576769111&sr=8-3&th=1
Then you have to clean the hell out of your bellows, if there is dust in there the turbulence of inserting the holder into the camera and removing the dark slide kicks up a good deal of dust.
It is an unfortunate part of using large format cameras.