
What are
/r/sleeperbattlestations'
favorite Products & Services?
From 3.5 billion Reddit comments
The most popular Products mentioned in /r/sleeperbattlestations:


The most popular Services mentioned in /r/sleeperbattlestations:
Rainmeter
Open Hardware Monitor
SIV - System Information Viewer
The most popular reviews in /r/sleeperbattlestations:
https://www.amazon.com/gp/product/B07HJ569V9/ref=ppx_yo_dt_b_asin_title_o01_s00?ie=UTF8&psc=1
the dimensions are perfect. 8 inch is just right and anything bigger than that wont fit the screen area. However, if you notice the link on the amazon picture, the metal bezels are weird af. Its not the same on all sides, just buy an 8in screen ips from somewhere else. Because I didn't know what size screen I needed, amazon made it easy to return so I paid up for it.
haha yeah - I was worried about airflow and I didn't want to cut out massive segments of the case. maintaining an innocuous old beater look on the outside is part of the challenge I like, and a whole bunch of new holes with monster fans in would give away what lurks beneath. I like the idea of everyone hating on the machine until they run cyberpunk in 4K then they're like whaaaaat...?
I bought those old skool 5.25 bay drive covers from eBay and took out all the little fans they come with, which sound like a swarm of angry bees. painstakingly replaced them all with these: https://www.amazon.com/dp/B009NQLT0M?psc=1&ref=ppx_yo2_dt_b_product_details
Afterwards I realized I probably would have been better off just putting a single 120 or 140 behind them, as the 3 drive bays are 1 open cavity inside. oh well, still have bragging rights for fan count and shares in noctua :)
You could use the same cable as above and then use something like these to adapt them into USB type c ports. You'll definitely lose the stock look though... And firewire! /s
A 60mm fan isn't good at all IMO.
I'm thinking :
blower-type fan in place of the 60mm at the rear. However, you'll need to get creative on how to mount it (maybe a 3D-printed bracket?). Also, any form of speed control is recommended-- a blower-type fan is loud at full speed. Optionally, you could enlarge the holes at the back where the exhaust fan should be.
120mm fan at the bottom + raised feet (your original idea)
leave the side panel untouched
Thanks :)
I've bought pretty much this floppy to USB adapter https://www.amazon.com/dp/B07WCRF9H3 but under another brand on my country's Amazon store. And you'll also need an internal USB A to 9 pin USB header adapter in order to plug it in.
You could get a server-class 92mm PWM fan coupled with either a fan controller or a SATA to 4-pin adapter. With some trial and error, hopefully you can fine-tune the fan speed to achieve a balance between cooling and noise.
As for the PSU, you could orient it such that its 120mm draws air from the front of the casing. You'll have to replace the drive bay covers with mesh.
Since it's a 4-pin fan with PWM, you just need to find an adapter cable that has +12v and GND wires from one of the SATA power connectors but have the fan RPM and PWM pins still wired to the motherboard's aux/chassis fan header.
Something like this: https://www.amazon.com/XMSJSIY-Adapter-Splitter-Desktop-Computer/dp/B093ST9W5L/
I watched this video and bought this part mentioned in it. Was the right width but wrong height so I cut it to size. Everything pretty much snapped together after that.
You'll also need to figure out the wiring on the front panel power button and LEDs. Check the motherboard if it's labelled accordingly. If not, a multimeter can help. You can then use M to F jumper wires with Dupont connectors.
There seems to be front panel USB and audio ports, but you might need to replace them. The old ones are only rated for USB 1 and AC97 audio (modern PCs have USB 3 and HDA audio).
At 4.5 inches, it will cut a hole large enough to accommodate 120mm fan. This combined with a drill will cut a perfectly even sized hole for your fan.
Those small holes at the bottom aren't doing much.
You need a much bigger hole-- a 120mm hole saw would be ideal (cover it up with mesh or similar), though a Dremel (or any rotary tool) with the right cutting disc (and a bit of practice) would also work.
Note: for some reason, the 2nd link doesn't work for me (Access denied error 1020).
If it's an ATX casing, modern motherboards and PSUs will usually fit right in. If not, bring out the drill, dremel, and riveter. You're going to need them.
Cooling can be a challenge when installing high-powered modern components on ancient casings not designed for them. You'll usually end up cutting holes for 120mm or 140mm fans at the bottom, enlarging existing holes to fit bigger ones, and the like. Also, for a case this big, drilling some holes for cable management would be a good idea.
Beige keyboard: https://www.amazon.com/Ajazz-AK510-Mechanical-Gaming-Keyboard/dp/B07QYRS1WC
Beige mouse (not sure if suitable for gaming): https://www.amazon.com/CHERRY-USB-Mouse-Light-Gray/dp/B000E0VM26/
Are you referring tosomething like this? This is what I used for this project, but standoffs holes in the case were ginormous.
You don't need much tooling to do great case modding. A lot of people use a Dremel for case cutting, I find that too imprecise for many cuts.
I use a metal nibbler a lot: Pro'sKit 900-215 Nibbler, Multi https://www.amazon.com/dp/B000BN60XW/ref=cm_sw_r_apan_i_D073TJKWE9X6RH0V0TKF
You can see the audio ports under the desk. The power button and all USB ports on the case itself are not functional. It’s honestly cooler in my opinion
They have them plastic ones with double sided tape on the back. Screw 100PCS/set HC-5 3mm Nylon Plastic Stick On PCB Spacer Standoff Locking Snap-in Posts Fixed Clips Adhesive https://www.amazon.com/dp/B09WZWY9L3/ref=cm_sw_r_apan_i_TN3741DBMWT4MEVFDVFF?_encoding=UTF8&psc=1
With a Mini-ITX APU-only build, there's enough space for an SFX PSU. TFX or Flex PSUs do take up less space, but are more expensive for their output wattage.
A Micro-ATX motherboard with TFX or Flex PSU could also fit but will be tight, so I don't recommend it. No one's stopping you though. :P
When modding a casing, it's best to have a dead motherboard as a placeholder; this way you don't risk damaging the board you intend to use.
My big concern is the airflow: I don't see any intake or exhaust vents at all. You might end up cutting a big hole at the back and replace it with mesh--this also solves the ITX I/O plate issue because it's easier to see where to cut the mesh.
As for the intake, you might have to install taller feet (at least 1.5 inches), cut holes for two 80mm or 92mm fans at the empty space in this picture, then set up an air duct to direct airflow to the rear of the case. Alternatively, you can get a blower fan but it may need a fan speed controller. Put mesh or fan filters to reduce dust buildup.
I have a nibbler like this: https://www.amazon.com/dp/B000BN60XW/ref=cm_sw_r_apan_i_XYMN23PPKZDZ3ATQNWV2
It allows you to bite small cuts into the metal. I have been able to cut clean 120mm can holes pretty easily. I think it's one of the most underrated case modding tools.
I haven't posted this yet, since I never took a finished pic, but you can see the metal work I did by cutting out the original front and cutting a new one from Home Depot sheet metal using tin snips, nibbler, drill and rivet gun.
That should be fun build! Thermals might be the biggest challenge, so you will have to play around with it. I am not familiar with that exact case, so can't offer any input there.
If you want to make the ps/2 ports internal, it's probably best if you are willing to do some hacking. You could take the external USB adapter and cut the ends off and solder to the connections on the bracket you linked. You would need another adapter to make the USB port and internal connection, like this: StarTech.com 2 Port USB Motherboard Header Adapter - USB adapter - USB (F) to 10 pin USB header (F) - USBMBADAPT2 https://www.amazon.com/dp/B002GNU2V6/ref=cm_sw_r_apan_i_B3SDXD02PRBB36RMH0K4
Good luck!
> You think that I can switch to USB 3.0 ports in the front?
You can get USB 3.0 ports that can be installed in place of a 3.5" floppy drive. https://www.amazon.com/JacobsParts-Expansion-20-Pin-Motherboard-Header/dp/B00D4A94GY/
Or something like this, then modify the existing front panel, or find /fabricate a blank 3.5" cover then cut the needed holes to mount the USB 3.0 ports.
That seems to be an excessive number of fans.
For this type of PC casing, I've been wondering if a 120mm centrifugal fan in the CD drive bay would be a good idea. It will need a speed controller (or at the very least an adjustable voltage regulator), otherwise it would be a howling beast.
PSU cable management could be improved as well.
You could buy a kit like this, so you have the right length and if the screws won't nudge anymore into the Metalplate you can use the other ones with screws to bolt them on.
there are plenty of cheapo adapters to do what you wish :) https://www.amazon.com/Cablecc-Reversible-Housing-Motherboard-Adapter/dp/B0816C3ZV6/ref=sr\_1\_4?keywords=usb+3.0+header+to+usb+2.0&qid=1646144888&sr=8-4
The adapter you are seeking is one of these.
https://www.amazon.com/IYSHOUGONG-1-44MB-Floppy-Connector-Adapter/dp/B07QYYF36N/
But this same adapter is available from a number of sources with different prices and delivery times so shop around. You might need another adapter to go from the pin header to a USB Type A jack inside the case or, if you are proficient with a soldering iron you might take a pin cable from some other device and solder it on this adapter.
(You should have know the job was dangerous when you took it, Fred.)
Have you considered something like this ...
https://www.amazon.ca/Drive-Three-Disc-Chassis-Adapter-Converter/dp/B09HNTYC2B/
The vent grill can be painted to match the beige of the case (well, if anyone gets some spray paint in stock. :-) That's what I'm facing. ), it gives you another fan at the front just behind the grill to keep the drives cool and get more flow through the case. And it leaves you one drive bay still free for the future.
I was able to get the floppy drive working in my own sleeper system using the KOOBOOK 34 Pin Floppy to USB Cable Adapter PCB Board.
I have no complaints about its performance but it does have a few quirks: first, with a disk loaded the drive will seek periodically even when I am not trying to access the drive and second, when the device is ejected it has to be mounted manually to reappear as an available drive.
I assume these quirks are more a feature of the modern Windows 10 operating system and how it handles USB rather than any quirk of the actual drive or adapter.
> Do you think there would be a way to modify the bottom to add some intake fans?
Dremel, or any suitable rotary tool.
120mm hole saw, like this one, or better.
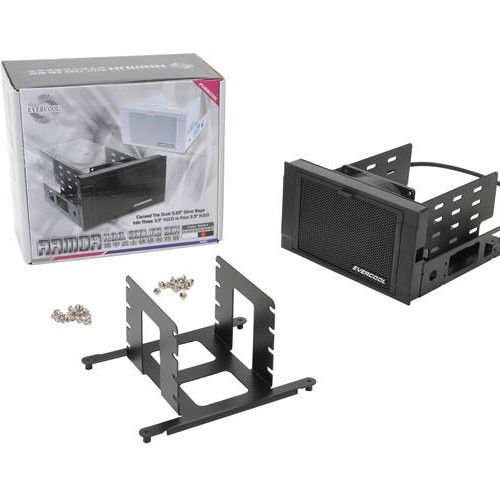
Here you go
EverCool Dual 5.25 in. Drive Bay to Triple 3.5 in. HDD Cooling Box https://www.amazon.com/dp/B0032UUGF4/ref=cm_sw_r_cp_api_glt_i_965A8KB2PX9GGCC1T7WY?_encoding=UTF8&psc=1
It fits perfectly
I think they’re called flex atx? But a psu for a 1u server case will work. this is the one I bought and have installed.
You can find them on Amazon for less than $20. You can get a single height, but they also sell kits that have varying heights.
The linked kit even has nuts for the back side of the stand off so you can secure it in place after drilling
there are very few quality converters around still, but here ya go! -- https://www.amazon.com/Vantec-IDE-to-SATAConverter-CB-IS100/dp/B000Z3K47G
I had the same problem, and that cooler was one of the ones I tried. I eventually settled on a Scythe Fuma 2 that I hammered down. You can see pictures of my build at https://www.reddit.com/r/sleeperbattlestations/comments/kcjm6o/emachines_t5048_sleeper/.
Could use some cable management. IMO you defeated the purpose of having flat PSU cables by bundling them together like that, with the added penalty of partially blocking the air coming from the top fan. See if you could lie them flat on the empty sections of the motherboard tray and hold them with velcro, twist wire, etc.
The top front fan could use some ductwork to ensure that its air reaches the CPU cooler rather than just uselessly sucked out by the PSU fan.
I'm wondering if the casing is wide enough to allow mounting the HDD cage like this. You do lose the ability to mount front-panel peripherals like this.
Not the A50p per se, but on the Thinkcentres casings I've encountered (and built PCs on), you may encounter issues on the front panel connectors (USB, power button, and LED indicators). The USB cable may be too short, and the pinouts non-standard; you can use jumper cables to extend them and correct the pinout (use a multimeter to figure them out).
Unless...
That way could you leave the front panel unmolested, desolder a Firewire port and hot glue that in place. I reckon it would look pretty OEM.
If you saw my original reply, I deleted it because I realized I misread. I actually had a piece of fabric on the sound card where the fan clip is to prevent that from happening. I took it off while I was debugging a problem with the card, but you're right -- I should put it back in.
Overall, the temperatures in my case are reasonable, and the peripheral edges of the heat sink don't get hot enough for me to be concerned about the sound card. The GPU fans usually run at their lowest setting, and the CPU fans are usually only slightly audible. Most of the time the system is under load, I'm playing games, so the fan noise is usually drowned out by sound effects. Reasonable temperatures are the reason I bought the largest heat sink I could fit into my case. The GPU is on top of my M.2 SSDs, and I was concerned about them overheating. They run hotter than what seems to be the norm, but the monitoring data hasn't reported any thermal throttling even when they're maxed out on I/O for an extended time while my backups are running. I plan on cutting holes in the blank 5.25 cover for more ventilation. I bought a 40mm case fan in hopes that I'll be able to squeeze it behind the modified panel for active airflow. If it fits, I'll order two more since I should be able to comfortably fit 3 side-by-side in the drive bay.
You can't use the Turbo button because it's not a momentary-contact switch. But since you have a donor ATX case, you can harvest the buttons and transplant them to the AT server case.
If the wires are not long enough, you can extend them using male-to-female jumper wires: https://www.amazon.com/Multicolored-Breadboard-Dupont-Jumper-Wires/dp/B073X7P6N2
i got one of these, pretty good. also adds a 80mm fan. front is easily removable and painted. seen others do just that
I Dont have the Insides yet as I'm waiting for the new AMD CPUs to drop. I spray painted the parts that I added as they were all black. First time doing spray painting. I added the SSD mounting bracket solely for the 80mm fan that will add extra airflow to my case.
Here are the parts I added:
SSD/HDD Mounting Bracket with Cooling Fans https://www.amazon.ca/dp/B016O036FK/ref=cm_sw_r_cp_apa_i_XfklFbT9Q436D
USB Front Panel 3.5/5.25 inch Bay https://www.amazon.ca/dp/B008FJXGDQ/ref=cm_sw_r_cp_apa_i_giklFbNQW2H9M
Regarding the noise, it could be air turbulence, or simply the fan spinning at such a high RPM. You could try some form of fan speed control.
Another way to improve cooling is to :
put an 80mm fan on the top rear of the casing, blowing upwards
cut a hole on the top cover directly over the fan
then cover it with a magnetized dust filter, preferably white to match the casing
Many years ago I did that mod to a casing with a similar layout, though there were no magnetized dust filters back then, so I used a fan grill like this one instead.
I've been able to attach a PCI cooler like this in that corner once which is pretty similar But it was a bit noisy since I assume those are made to be installed with the fan facing the top of the case and not the bottom. But I can give it a try. Thanks!
In the early days of PC casemodding, vinyl dye was used to color plastic parts. It was good because it seeps into the plastic. I never got to use it though as I never found one locally. Also, from what I remember it really smells, so it much be used in a well-ventilated room. Amazon seems to have it in various colors, though I'm not sure if Satin White is a perfect match to a computer's bezel. Better test on another piece of plastic before using it on the USB panel.
I got these slotted expansion slot covers off of amazon, I’m sure attaching a fan on there wouldn’t be too hard and would help GPU temp
https://www.amazon.com/dp/B001NPEBEC?ref=ppx_pop_mob_ap_share
You can salvage LEDs and power switches from other desktop casings--I keep the LEDs, USB ports, buttons, wiring, and other bits from cheap-ass casings that come my way, then sell the metal for scrap.
You can use hot-melt glue to mount the LEDs to the front panel, though the power button may need a bit of creativity.
These could be bought new as well. I don't know how much they cost though (it shouldn't be crazy expensive though). ~EDIT~ --> found something like this: https://www.amazon.com/Warmstor-2-Pack-Computer-Supply-27-inch/dp/B074XDTVN1/
You can also use the opportunity to add front panel USB 3.0 ports like this one.
wear gloves, spread this on evenly with a brush https://www.amazon.com/Salon-Care-Creme-Developer-ounce/dp/B004OKDW20
wrap up the yellowed plastic in clear plastic wrap
put it in the sun outside, rotating every 30 minutes for even spread, for a few hours depending on temp