
What are
/r/CR6's
favorite Products & Services?
From 3.5 billion Reddit comments
The most popular Products mentioned in /r/CR6:


![Redrex Ender 3 Extruder Bowden Aluminum Upgraded with 40 Teeth MK8 Drive Gear Kit Compatible with Creality Ender 3V2 /Ender 3 Pro/CR-10 Series and Other Reprap Prusa 3D Printers [Right Hand]](https://m.media-amazon.com/images/I/41rxL1V9n9L._SL500_.jpg)


The most popular Services mentioned in /r/CR6:
The most popular reviews in /r/CR6:
You def need those screws. I know they're m2 and believe the length is 12, so m2x12. You can get a box of various sizes from Amazon for like $10 and just pick the right ones. I bought these:
https://www.amazon.com/gp/product/B014OO5KQG/ref=ppx_yo_dt_b_search_asin_title?ie=UTF8&psc=1
Creality's fans suck; pretty sure they are all sleeve bearings, which are slow and loud. Get dual ball bearing fans like these these for the heatbreak and these for part cooling; they are quieter and faster. If you want cheaper or better fans than the winsinns (they are good and I would recommend them), the salient search details would be dual ball bearing, 3010 24v, and 4010 24v.
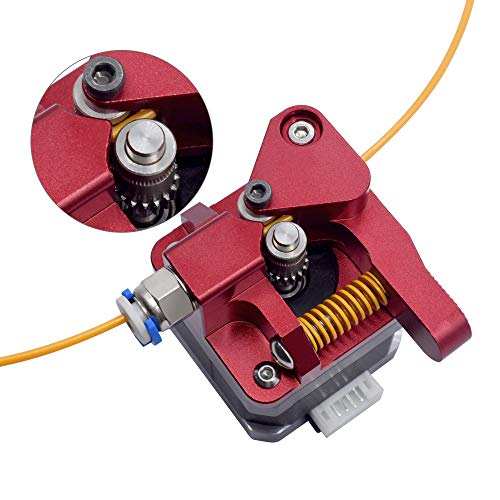
Thanks everyone. I didn't need to switch the polarity on the stepper motor, my e steps ended up to be 410. Just need to figure out retraction but it seems to be ok where it is (6.5mm@30mm/s) if anyone has any other suggestions or tips that would be useful lmk. This setup is super nice now and is printing nylon-x carbon fiber like a dream. I bought this extruder: https://www.amazon.com/dp/B07RBL4CJC/ref=cm_sw_r_cp_apa_glt_fabc_PAADEM29KQ1NQFJ4VHYJ?_encoding=UTF8&psc=1
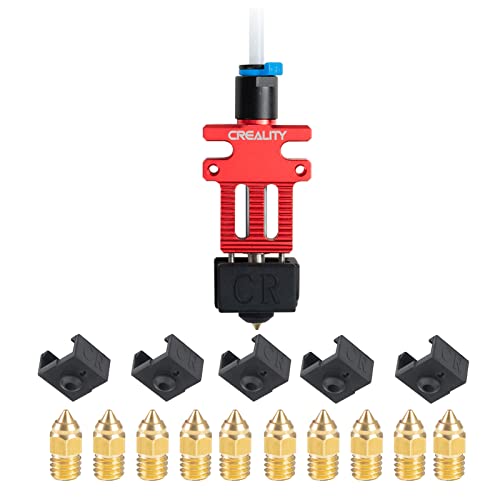
And I'm using the new Micro Swiss all metal hotend for the CR-6 SE: https://store.micro-swiss.com/collections/all-metal-hotend-kits/products/all-metal-hotend-kit-for-creality-cr-6-se
I am not affiliated with either manufacturer.
I have done some prints with this on my CR-6 with good results. I use the Cura defaults for generic TPU and slow it down.
You can find this lube at most department/home improvement stores. (Amazon is out of stock)
Put a good amount of that everywhere two parts make contact. After a few applications, it works its way down into both plastic and metal, and you don't have to re-apply as often.
Do you know Mandarin? Regardless, shit like this just pisses me off and then I end up with things like accidentally free refrigerators. If you do want to give up, a new screen isn't too pricey:
Just don't buy direct from Creality again. I know the KS prices were tempting. I almost fell for it, but I've "bought" like 3 things from KS in my life. All 3 were literal years late and one hasn't shown up yet.
145 is fine. The 130 degrees sustained is for the magnet, not the pex bed.
You don’t need to punch out holes for the screws. You don’t put it on hot, also after you install the magnet, wait 3 days for it to cure so it remains hot when you print, (I only let it cure for a day when I installed it on the Ender 3 and it ended up becoming unstuck).
Creality sells their own version which is powder coated pei which is a bit cheaper but not by a lot.
Pretty sure these work:
https://smile.amazon.com/gp/product/B087TBB8YV/ref=ppx_yo_dt_b_search_asin_title?ie=UTF8&psc=1
But also you can get a whole hotend carriage for not that much, then you have lots of extra parts
Unless you plan to do other stuff with a pi, I don't think you really need a 4, I use 3b+ with a camera and it runs rock solid. I also got - https://www.amazon.com/Smraza-Raspberry-Heatsinks-Supply-Black-Clear/dp/B07BT65FT1
which comes with a case, fans and a power supply with a switch, cheaper ones exist but I liked the design =P
I got this one from Amazon. It's a 2-pack that was available in the US for quick delivery. There are others out there:
https://www.amazon.com/gp/product/B07YYSP5F5/ref=ppx_yo_dt_b_asin_title_o00_s00?ie=UTF8&psc=1
I ended up going with this one;
https://www.amazon.com/gp/product/B08JKCKFWT/ref=ppx_yo_dt_b_asin_title_o00_s00?ie=UTF8&psc=1
Had a 60 dollar off coupon!
This one is 399 and has a 40 dollar coupon:
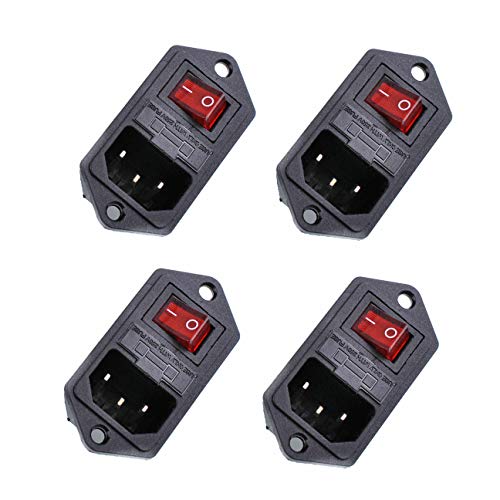
I preemptively took out my power switch because the rocker felt mushy, and the pins had quite a bit of wiggle. Afaik, all of the 4 pin switches that come stock with the CR6 are like that unfortunately.
This is the listing I got from Amazon.ca for replacement switches. Firm click, fits perfectly, no issues thus far. I think all KCD1-104 model switches will fit, as long as it is rated for 125V 10A.
Either bypass the switch, or replace it with a new one (For instance: These are what I bought ).
Youtube video with details: https://www.youtube.com/watch?v=1zgcf3aD1x8
If all goes well I'll be upgrading the extruder with this so I can have easier access when trying to clean it.
Right now it's just a PITA.
I'm not active on any official Creality forum and I have very little faith that I would get a useful response if a question about this were asked anyway.
ST-Link is a USB to SWD/JTAG interface debugging and programming tool made for ST Microelectronics parts. You can buy the clone versions very cheaply from any of the the usual suspects. Here's an example... ST-Link V2 clone . The software utilities to use it can be downloaded from ST Micro for free.
Info about the daughterboard including the microcontroller firmware binary image can be found here... Daughterboard info . The image I read from my older daughterboard matched the image posted there exactly.
I ordered these and the stock screws worked fine. What a game changer. My bed is totally level now if you go by the auto level readings.
Heatbed Silicone Leveling Column,... https://www.amazon.com/dp/B08KY514F3?ref=ppx_pop_mob_ap_share
I got these from Amazon
https://www.amazon.com/gp/product/B094J9CLPR/ref=ppx_yo_dt_b_search_asin_title?ie=UTF8&psc=1
I ordered 3 packs and used all of them so I could level every part of the bed, rather than using 4 like in the YT video.
They are 16.02mm tall and I have had zero problems with them in the last 15 months.
This is a direct replacement.
High CFM 30mm x 30mm x 15mm 3015 Brushless DC Cooling Fan 2-Pack (24V Ball)
The original fan is 10mm thick. I don't think a 15mm thick fan will fit inside the stock hot end cover. A true direct replacement is more like this... 3010 24V fan . This will fit a stock hot end setup. The only thing to be careful of is the position of the wires in the preinstalled connector. They need to be checked to make sure they match the positions of the original fan so the polarity is correct.
The community firmware helps, and I don’t remember cuz I modded mine to the community firmware right when I got the printer but i think it displays the values when you run ABL on the printer itself
You can swap another stepper motor with this one. If the problem persists, it is likely the board or wiring, if not, the problem is the motor. Nema 17 motors are rather low cost and abundantly available, ( https://www.amazon.com/Twotrees-Stepper-17HS4401-Connector-Printer/dp/B07THK76QQ/ref=sr_1_1_sspa?crid=1SG59BMX9G7PX&keywords=nema+17&qid=1660938994&sprefix=nema+17%2Caps%2C90&sr=8-1-spons&psc=1&spLa=ZW5jcnlwdGVkUXVhbGlmaWVy... ) and since most 3D printers use 4-5 of them, having a spare on hand for troubleshooting is not a bad idea.
You can use the Creality Box and Creality's own app. I got this one: https://www.amazon.com/gp/product/B09MWBYSKS/ and it worked, but the Creality software is a bit flaky and I found that with both this and even Octoprint, there is often this weird pause with the printer. I suspect that's why its not too popular. It will just pause every so often as it uploads new commands, and that causes issues if not a complete failure sometimes.
Might be your issue. If you have other uses for them I might recommend that you get some 123 blocks to level your X/Zs you can just put one block under your X on each Z side and lower them down and tighten up. They are precision thickness and I think probably one of the easier ways to do this.
I still have no idea why creality decided to constrain the Z axis' together when they are using sensorless homing and if the firmware was good they could level things out by ramming the top of the z axis like prusa does which works perfectly.
I wish I hadn't spent the money on this printer tbh, but for not I'm not having major issues with it.
This is the cheapest replacement, and it lines up with all the holes:
Creality Upgrade Ender 3 Extruder, Ender 3 V2 Upgrades Metal Extruder Aluminum MK8 Bowden Extruder 40 Teeth Drive Gear for Ender 3 Pro/Ender 5 Pro/Ender 5 Plus/CR-10 Series 3D Printer
Am I the only one whose bed screws are Swiss cheese? Even with wiha hex keys a few were basically stripped from the factory. I have the first kickstarter batch so I wonder if that has something to do with it. I replaced all of my screws with these and they appear to be better quality.
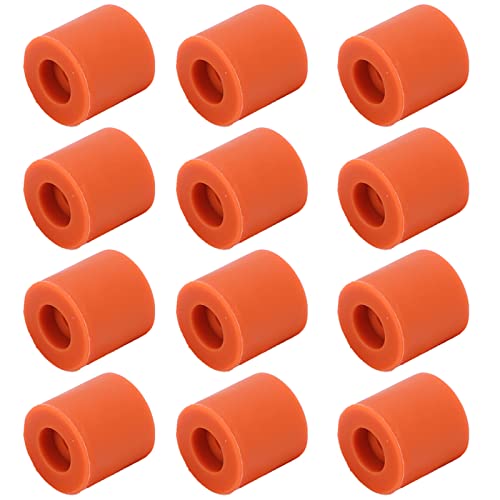
You unscrew the heated bed, remove all the plastic spacers (little black plastic cylinders) and take your silicone spacers and put them at the 4 corners of the bed (no need to put anymore than that).
You can find them here : https://www.amazon.com/Furiga-Printer-Silicone-Column-Leveling/dp/B08FJ6ZVH8/ref=sr_1_8?crid=OHCJL9U2FOST&keywords=3d+silicone+spacers&qid=1651121578&sprefix=3d+silicone+spacers%2Caps%2C204&sr=8-8
And make sure to level the bed the first time by tightening/loosening the screws until the bed almost touches the hotend in the four corners, then put the glass back and do a mesh bed levelling, you'll see similar results to mine :)
Heatbed Silicone Leveling Column, 12Pcs 3D Printer Hot Bed Mounts Column Stable Tool, Heat-Resistant and Wear-Resistant Spring 16mm Silicone Buffer https://www.amazon.com/dp/B08KY514F3/
There’s a link if you live in the US. You need at least 11 16mm silicone spacers.
yes to all the above and also consider, if all else fails, silicone spacers and a wham bam PEX bed.
https://www.amazon.com/Heatbed-Silicone-Leveling-Heat-Resistant-Wear-Resistant/dp/B08KY514F3/ref=mp_
Get one of these before yours cracks. It might not, but it’s a popular piece to break.
Creality Upgrade Ender 3 Extruder, Ender 3 V2 Upgrades Metal Extruder Aluminum MK8 Bowden Extruder 40 Teeth Drive Gear for Ender 3 Pro/Ender 5 Pro/Ender 5 Plus/CR-10 Series 3D Printer
I used a Microswiss hot end, direct drive BMG clone and pancake stepper motor all off Amazon. A bit of experimenting with retraction and other settings in Cura and it prints great.
www.amazon.com/dp/B0993XWGXV/www.amazon.com/dp/B08KP189KN/ www.amazon.com/dp/B07ZD144GG/
https://www.amazon.com/gp/product/B08KY514F3/ref=ppx_yo_dt_b_asin_title_o04_s00?ie=UTF8&psc=1
I needed 23 if I wanted to replace all of them under the bed. Another redditor said he only used 4 on the CR6-SE so I imagine you could go with far less. I'm just a little obsessed with flatness haha
I got these
https://www.amazon.com/gp/product/B08KY514F3/ref=ppx_yo_dt_b_asin_title_o04_s00?ie=UTF8&psc=1
I haven't leveled my bed yet so I'll be sure to follow up after this whambam is fully cured tomorrow. I can tell that these are going to be more adjustable than those hard plastic stock ones, some of which I had almost completely loose and they were still showing up as lower than other places on the bed.
There are lots of choices for these fans available from the usual suspects. In my experience, the most important thing to look for is the bearing type. That is usually much more important than the brand you select. Avoid fans with a bushing/sleeve type bearing at all costs. The ones with hydraulic bearings are usually only slightly better. If you want the fan to last a long time, try to find one with dual ball bearings. Here's a example of a relatively cheap one... 24V 4010 Dual ball bearing blower fan . If the type of bearing is not specified in the description, that usually means it's a bushing/sleeve type.
A word of caution here... regardless of which fan you select, if it comes with a preinstalled connector, don't blindly assume that the polarity of the wires is correct. Just because the connector mates with the one on the printer does not mean that the wires are installed in the correct positions. There is no standard for that and you have a 50/50 chance of it being right. Make sure to verify that the positive lead on the new fan ends up connecting to the same position as the positive lead on the original fan. If you power on the fan with that polarity reveresed, you are almost sure to burn out the daughter card in the hot end.
/u/KGeddon is totally correct. If you want get a replacement fast though, this seems to be the cheapest:
ASHATA Blower Fan 3D Printer Accessories Kit,24V 4010mm DC Fan Blower Fan 2-Pin 3D Printer Accessories Kit DC 40mm https://www.amazon.com/dp/B07RKW9BMR/
Haldis 3D CR-6 SE Bi-Metal Heatbreak, 2 Pack Upgrade Heat Break Titanium Alloy + Plated Copper Bi Metal Throats for Creality CR-6 SE 1.75mm Filament https://www.amazon.com/dp/B09B1KJ8HZ/ref=cm_sw_r_cp_api_glt_i_AKK8NHMV4J3B6S299A2B
To my understanding the micro Swiss is a higher quality product, but for the price I think these are very decent, they look very well machined at least
Haldis 3D CR-6 SE Bi-Metal Heatbreak, 2 Pack Upgrade Heat Break Titanium Alloy + Plated Copper Bi Metal Throats for Creality CR-6 SE 1.75mm Filament https://www.amazon.com/dp/B09B1KJ8HZ/ref=cm_sw_r_cp_api_glt_i_KF940JK3RGRYECQXE9SF
Excellent advice. Definitely inspect the bottom of your bed carefully. You may also consider trying to heat up your bed and use a infrared thermometer/temp gun to see if that is a particularly hot spot .
Regarding Bruno, the policy of 'not talking about Bruno' did not work out well. 🤣Excellent analogy, btw.
Looking through out the other boards for creality and the CR 6 series (as well as other printers) for every vocal opposer to silicone spacers, there are ten or more people who talk about how helpful they are and how it useful they were in solving their problems.
I bought 2 packs of these (Brown,0.63 Inch) https://www.amazon.com/dp/B094J9CLPR/ref=cm_sw_r_cp_api_glt_i_VV6JWZNEDKPRXFBZVZ7G
I didn’t use these yet. Did you replace every spacer? Or just a couple?
I recently finally got around to replacing the switch on my KS CR 6SE, I used these:
Twidec/6Pcs Rocker Switch AC... https://www.amazon.com/dp/B07MTZW2QF?ref=ppx_pop_mob_ap_share
and they fit perfectly. Another tip I remember some folks doing if you don't want to take your printer out of service: if you undo the mounting screws and pull the whole switch/power cord assembly, you can swap around the wires to bypass the switch and connect the power socket directly to the power supply. You'll need to use something like a power strip to turn the printer on/off. However, that will fix the concern--it's only the switch itself that is the issue.
The latest release version of CF (6.1) does use the SD card for storing the progress of prints. From experience, I don't trust ANY SD cards to be 100% reliable so I use the SD Card Formatter (https://www.sdcard.org/downloads/formatter/) anytime I suspect a possible SD card issue. I am also looking at configuring Octoprint to use the printer's SD card for storage and printing so that the resume feature will work. I believe I saw this as an option the last time I was poking around it's configuration.
First bet would be plumbing supply store too. Needed some spares for my tubing as well, bought it here on Amazon (FR/DE/NL sell them within the EU).
Yup! Sorry I should have included it in my original response. I ordered 3 packs. It won’t let me insert the link into a hyperlink but here it is:
BCZAMD Heatbed Silicone Leveling Column 3D Printer Hot Bed Mounts Column Stable Tool Heat-Resistant Silicone Buffer for Prusa i3 Plus A8 Wanhao D9 Mega Ender 5 Plus, 4 Pack Black https://www.amazon.com/dp/B07S2R5C6P/ref=cm_sw_r_cp_api_glt_i_5XK9C4HTPXTYE6C2YPN9?_encoding=UTF8&psc=1
WINSINN 3D Printer Extruder, Works with Creality Ender 3 V2 Upgrades Aluminum RepRap Prusa i3 for MK8 Drive - Red https://www.amazon.com/dp/B07MK139RN/ref=cm_sw_r_cp_api_glt_i_PGZDJ44H4FHPAMTXXXW1
WINSINN Dual Gear Extruder, Works with Creality Ender 3 CR10 CR-10 Pro CR-10S Tornado Upgraded Aluminum Drive Feed for 3D Printer 1.75mm Filament https://www.amazon.com/dp/B07SY745CF/ref=cm_sw_r_cp_api_glt_i_QF1J789TS5MT2C6Y9DZ6
I use the dual winsinn on both my printers. They are pretty much identical to the ones you linked. They look the same because they are the same.
You can wire two 12v led light strips in series from the 24v.
I'm using some of these dimmers as well: https://www.amazon.com/Low-profile-Inline-Controller-Dimmer-Switch/dp/B09BRHTCQN. I think they are cheaper on ebay.
I got mine from Amazon and they came in Creality packaging (though the brand on Amazon says “sqwan”.
No, I got these and they work perfectly. You can just tuck them in next to the power supply.
D-PLANET [2-Pack] LM2596s Buck Converter DC to DC Step-Down Voltage Regulator Power Module 36V 24V 12V to 5V 2A Voltage Stabilizer with LED Display https://www.amazon.com/dp/B07CVBG8CT/ref=cm_sw_r_cp_api_glt_fabc_1GNR73J80BQ5DGZSH43E?_encoding=UTF8&psc=1
Pre-order but won't be proccessed to ship until Aug 30 though. https://www.banggood.com/Creality-3D-CR-6-SE-Leveling-free-DIY-3D-Printer-Kit-235+235+250mm-Print-Size-Photoelectric-Filament-Sensor-Resume-Print-with-Modular-Nozzle-Design-or-Carborundum-Glass-Printing-Platform-p-1713100.html?rmmds=search&ID=47757&cur_warehouse=CN
I ordered two of these, not even sure how many I’ll need tbh.
Heatbed Silicone Leveling Column, 12Pcs 3D Printer Hot Bed Mounts Column Stable Tool, Heat-Resistant and Wear-Resistant Spring 16mm Silicone Buffer https://www.amazon.com/dp/B08KY514F3/ref=cm_sw_r_cp_api_glt_fabc_Z209YR0GJ4VGPQVEX388
PortaPow Cased Power Blocker (Twin Pack) https://www.amazon.com/dp/B094G4P3P4/ref=cm_sw_r_cp_api_glt_fabc_SQ0A4J8Q2PNXJR5ENK4A?_encoding=UTF8&psc=1
These are an easy option to block power through the usb cable. They drop in price to be cheap enough to add to a nozzle or filament order.
I can’t tell if this is a joke… if it is, lol. In case it’s not, then your bed needs some work! Likely your Z axis needs leveling and you need to make sure all the screws on the bed are tightened correctly…
However I highly recommend making your life much better long term and switching to the silicone columns instead of the hard plastic ones: Heatbed Silicone Leveling Column, 12Pcs 16mm https://www.amazon.com/dp/B08KY514F3/ref=cm_sw_r_cp_api_glt_fabc_XPTR84A357T2R9W0A0AW?_encoding=UTF8&psc=1
To install these you just loosen all the screws and remove all of the plastic columns then use these instead. In that process you will end up making sure everything is tightened correctly.
I spent dozens of hours trying to get my bed just right, once I caved and switched to these I’ve had much less issues. I only have to do a minor tweak once a month to keep an all-green bed level.
Additionally I put a G29 to update the mesh before every print. A little annoying some days but it keeps those first layers damn near perfect.
I’m like the king of frying breakout boards lol. So in my last post I did end up frying both, from a mixture of hot plugging things from it and adjusting the strain gauge with a little metal bit and shorting it ( finally got a ceramic screwdriver so I don’t do it again 🥴. As for finding them, I ended up just buying them from Amazon here in US. Creality CR 6 SE/Max Hotend Printhead Daughter Breakout Board Replacement Parts & Accessories https://www.amazon.com/dp/B09MXDKRYQ/ref=cm_sw_r_cp_api_glt_fabc_3SZWYDV0F3MF97HASC1M
And also, just to make anyone feel better about having a smooth brain, I FRIED A THIRD, after arrival I was adjusting the strain gauge and was telling myself to be steady with thy hand and I was not steady enough. I touched the screw right next to it that holds the board down and heard a little pop, and the strain gauge light was flickering and hotend fan stopped working 🤗. So I just ordered an entire hotend cause it came free one day shipping and just took the breakout board from that. Now I have an entire hotend minus breakout board, too bad both have microswiss and noctuas so only spare parts of use are the wheels and a few other things.
Sadly I do not have any extra breakout boards.
- Pretty simple to do, depending which slicer you have. Just remove this from your end g-code:
M104 S0 ;Turn-off hotend
M140 S0 ;Turn-off bed
(Not sure why you'd want to keep them on though, but your preference)
- A lot of ways but not straightforward, since it's not that simple due that the printer has a manual on/off switch and needs to be cut off from the power source:
- Use octoprint and a plugin like this
- Setup a relay to your PSU and send a command whenever print is finished
- Get a Smart-wifi plug
- Set up timer roughly with the estimated time your print is set to finish
- measure power output and put in a "rule" whenever power output is "idle", the smart plug turns off, etc.
- Other ways, such as this, or out-of-the box thinking that will work for your setup. Lot's of ways, just listed a few ideas.
There's a bimetal all metal heatbreak for the CR6 that seems pretty appealing.
https://www.amazon.com/Bimetal-Heatbreak-Titanium-Temperature-Creality/dp/B0971FNCM4
I'm all about the blue capricorn XS tubing because it just works.
WINSINN Dual Ball Bearings 40mm Fan Brushless Cooling 24V 4010 40mm10mm (Pack of 2Pcs) https://www.amazon.com/dp/B08R9L9YR2/ref=cm_sw_r_cp_api_glt_fabc_VQ5F6YC7VPE7HPA3DFWK
Winsinn because I’m cheep, 24v because I’m lazy, dual bearing because they are rated for 24hour work schedules. They don’t seem super silent, (louder than the OG 30mm fan) but I wanted something that would for sure move more air than the original. I have heard great things about the 12v 4020 noctua but that requires buck converters to step down the voltage and that’s a little out of my comfort zone, plus I have a “craft room” that my printers can make all the noise they want in. That said I’m running two of the winsinn fans and both of them at full power are quieter than the stock PSU fan.
Right, I didn't think about the bed movement. Still I think it should fit.
I'm in the UK too and am concerned about the cold. I'm looking at tents but am dubious about the printer fitting with that side mounted filament spool. They said it will but I have my doubts. Are there heat concerns in an enclosed tent with the power supply and electronics in the base?
Here's the tent I'm looking at. https://www.amazon.co.uk/SainSmart-Enclosure-Dust-Proof-Filament-Constant/dp/B089VLHJT6
I replaced the spacers under the bed with these on my CR-6 Max
8 Pieces 3D Printer Heatbed Parts... https://www.amazon.com/dp/B094J9CLPR?ref=ppx_pop_mob_ap_share
I needed 3 packs for mine but not sure how many screws the SE.has.
I tightened ever screw about the same then ran a level and adjusted the screws up or down and did that a bunch of times till it was pretty consistent. Been fine ever since
It should be available at any hardware retailer, many well stocked auto parts stores, hobby retailer, or online supplier.
I personally suggest buying an assortment kit like
https://www.amazon.com/dp/B01J7NM9JA
Or
https://www.amazon.com/dp/B08H75S666/
There are a thousand reasons you may need to have them around, and often a kit of several hundred screws is similar in cost to buying 10 individual screws at a retail store.
You can change the buffers.
BCZAMD 3D Printer Heatbed Silicone Leveling Column 16mm/ 0.63 inch Hotbed Solid Mounts Stable Tool Heat-Resistant Buffers for Printer S5 Ender 5 Prusa i3 Anet A8 A6 Kossel mega i3 Wanhao,4 Pack Black https://www.amazon.de/dp/B07XF9V4XN/ref=cm_sw_r_apan_glt_i_H8APBJ5SCSYERYZ0N6C2?_encoding=UTF8&psc=1
Works really good with my printer.
Some background. Initially, when I got the printer, the Y-axis had a dent in it (the aluminium, not a flat spot on the wheels). So, whenever printing a piece, the wheels would slide over the dent, creating some distortion. Contacted Creality and they just didn't seem to understand the problem so I replaced the sliding assembly (wheels, eccentric nuts, etc.) to linear rails to get smooth prints again.
However, after upgrading I noticed that the rails seem to be a bit crooked, but I couldn't adjust the base plate screws anymore due that I installed the magnetic base (for PEI plate)
directly to the plate instead of on the glass surface (what I did now). Results were way off, a deviation from 0.7 to -0.7, but the ABL made up for it, however still scraping the print sometimes due to the deviation.
Now I finally decided to mess with the printer again, removed the black solid tubes/buffers/pieces and replaced them with silicone ones. Results look great and hope that they'll stay this way. Anyways, hope this helps if anyone has a similar setup. Thanks for reading.
That looks nice. I wonder if they ever did a geared extruder, That would make for a great direct drive.
This extruder looks really promising, the OMG DM1: https://www.amazon.com/Upgrade-Extruder-MY3D-Printer-Filament/dp/B098TZ2PYK/ref=sr_1_2?dchild=1&keywords=omg+extruder&link_code=qs&qid=1635093335&sourceid=Mozilla-search&sr=8-2
I saw a video on it, really does seem to perform well. At first I was totally dismissed it, but still a bit too expensive for my needs atm.
I replaced the cheap Creality extruder with this one from Winsinn: https://www.amazon.com/WINSINN-Extruder-Creality-Upgraded-Aluminum/dp/B07SY745CF/ref=sr_1_4?crid=123IZ03UIMB4X&dchild=1&keywords=winsinn%2Bdual%2Bgear%2Bextruder&qid=1634916713&s=industrial&sprefix=Wins%2Cindustrial%2C173&s...
Very popular replacement for the CR-6's extruder. I used the one with just one bowden fitting, as I created an adapter for the filament sensor that used two of the screws from the original extruder for mounting.
https://www.thingiverse.com/thing:4935136
Definitely recalibrate your e-steps after any extruder change.
I put one of these on my printer two weeks ago and it has been working fine so far: https://www.amazon.com/dp/B08D9CNHVN
That listing doesn't say CR-6 SE but it does work, so you may find the same luck with other Ender 3-compatible options.
You will probably either need to remove the filament runout sensor and disable it in firmware or print an adapter because it won't line up. I have this one bookmarked but I haven't printed it to test fit it yet: https://www.thingiverse.com/thing:4777815
Reddit told me to buy a Wham Bam from their website, but I didn't want to wait a month. So I bought this one. Got it in August, still going strong. Haven't had any issues with it. Hopefully I didn't just jinx it lol.
Wow that's really cheap. Mine's been fairly reliable so far. If only the anycubic vyper could use this as well, they have a failing ABL probe.
Often I see them for around $30-36. I may try to mod this onto an ender 3 if I can find the ribbon cable for it.
Have you seen this part? Looks really interesting considering it' made specifically for the CR6.
The one I found was https://www.amazon.com/gp/product/B09BB99MC7/ref=ppx_yo_dt_b_asin_title_o00_s00?ie=UTF8&psc=1
There is also what looks to be the same one on aliexpress as well.
It is cheap and I already had the extra hotend from the kickstarter which is why I don't mind the risk.
This one? FYSETC 3D motores de impresora Ender 3 extrusora motor 1.8 ángulo paso 0.5A cuerpo redondo de 2 fases con cable de 47.2 pulgadas para impresora 3D Sherpa Mini/Orbiter extrusora Ender3/Pro/Ender 3 V2/CR-10/Voron 2.4 https://www.amazon.com/dp/B099JMJNH2/ref=cm_sw_r_apan_glt_fabc_C5QN4G0DR4EEVQGAF3KQ
Or the dragon fly
BIQU Dragon Fly Hotend 3D Printer Part Dragon Fly BMO All Metal Hotend Compatible with V6 hotend Prusa I3 MK3,MK3S,Titan Extruder BMG Extruder for Prusa I3 Creality Ender,CR10 3D Printer https://www.amazon.com/dp/B08M94C4XG/ref=cm_sw_r_apan_glt_fabc_XNRN89JPV7D2XBDV9HX2?psc=1
It is this stuff: Overture TPU. Says 95A for shore hardness.
I keep assuming the problem is in the extruder itself, likely my assembly of it, because the rest of the setup wasn't changed. Think that first print that failed could have caused some problems? Maybe I should cut off a large section of the filament in case it deformed from the stress of that initial failure?
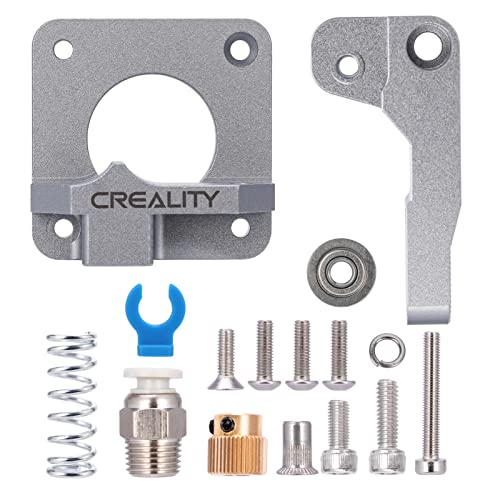
Replace the extruder now while you still have some sanity left: https://www.amazon.com/dp/B08F23ZNTG?psc=1&ref=ppx_yo2_dt_b_product_details
I can understand using plastic parts to cut production costs, but why in the world would you enclose the extruder mechanism?
Not sure about E3D Hemera but got success with Sherpa mini direct drive and Spool3D CR6-SE All Metal Titanium HeatBreak. Ping me if you need assistance with setup and config both. Sherpa is a bit tricky but results are great.
Sherpa got here: https://www.amazon.com/Imdinnogo-Accessories-Extruder-Compatible-Printing/dp/B0967VQY4R
and HeatBreak here: https://spool3d.ca/spool3d-cr6-se-all-metal-titanium-heatbreak/
Mine were way worse than that out of the box. Make sure the eccentric nuts are not loose, then I pulled the bed off and replaced the spacers with silicone spacers. Then I ran the bed level over and over adjusting the screws to squish the silicone until the bed was level.
These are the spacers I used, you'll need 3 packs on the max
8 Pieces 3D Printer Heatbed Parts Silicone Leveling Solid Bed Mount 3D Printer Heatbed Part Stable Hotbed Heat-Resistant Buffer Compatible with CR-10 Ender 3 Bottom Connect (Brown,0.63 Inch) https://www.amazon.com/dp/B094J9CLPR/ref=cm_sw_r_apan_glt_fabc_Q0V1WT0Z7ATS5WY11CC8?_encoding=UTF8&psc=1
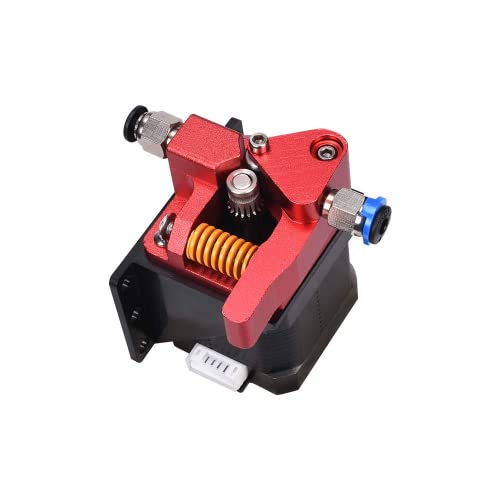
Yup, another cracked plastic extruder! This is a well-known design flaw in the CR-6, with lots of posts online about how they often break in just a few months. It causes the extruder to lose it's ability to accurately feed the filament into the hot end due to slippage. Go for a dual-gear metal extruder. They are not very expensive unless you go for a high-end name brand like BMG. I use this one: https://www.amazon.com/WINSINN-Extruder-Creality-Upgraded-Aluminum/dp/B07SY745CF/ref=sr_1_3?dchild=1&keywords=WINSINN+Dual+Gear+Extruder&qid=1633693073&sr=8-3 After calibrating the E-steps (A must-do for any extruder change) my prints have been much nicer, and much more accurate.
You can get a full hotend kit from Amazon like so:
Generally includes the board, plus you get a bunch of extra spare parts. I didn't shop for prices, so just search for cr6 se hotend and pick your poison.
Sorry been busy. If you haven't already taken action on this front, I am using these.
First day I had mine on it was doing that. Finally replaced the extruder and stock Bowden tube setup https://www.amazon.com/dp/B08F23ZNTG?psc=1&ref=ppx_yo2_dt_b_product_details
I haven't had a lick of trouble with the feed since - just sayin'. Heaven help you if you try taking that stock extruder apart with the intent of putting it back together.
Amazon
It was a dual gear red metal one off and ender I had. Like this one:
WINSINN Dual Gear Extruder, Works with Creality Ender 3 CR10 CR-10 Pro CR-10S Tornado Upgraded Aluminum Drive Feed for 3D Printer 1.75mm Filament https://www.amazon.com/dp/B07SY745CF/ref=cm_sw_r_apan_glt_fabc_EQCWFFCS48G5HRJZQG36
I ended up printing a spacer for the filament sensor from thingiverse since the extruder is higher than the filament sensor. It's much better than it was but still trying to figure out why it's printing like crap still.
Best thing I did was replace that God awful extruder. I was in the same boat, couldn't get a decent first layer and if I did it would quit extruding after an hour or so. Also replacing the bed spacers with these: https://www.amazon.com/dp/B094J9CLPR/ref=cm_sw_r_apan_glt_fabc_6A9AWCQPMDW0K2F85E8B?_encoding=UTF8&psc=1
I put these on and ran auto leveling then tightened/ loosened screws until the bed was level. The whole screen was in the red now it's all green except 2 corners are blue which I'll deal with later. I'm trying to get a decent print in the center 3 inches
Installing metal springs between the Y axis carriage and the bottom of the print bed is a risky proposition. Depending on the diameter of the springs, they could easily be pressing against the traces in the bed heater where they snake around the screw holes. If/when the springs wear through the very thin insulation on the heater traces, they could short the heater voltage (24V) to the printer chassis. This could lead to the same disastrous results as when the print bed glass clamps short to the heater traces (burned out printer and host computer when a USB cable is connected). At a bare minimum, extra insulation would need to be added between the springs and the bottom of the print bed.
For anyone who feels compelled to manually improve their bed leveling, a much safer/better solution is to replace the bed spacers with silicone spacers made for that purpose. It takes a bit of fiddling with the screws to get it just right, but this method delivers excellent results. An example of the spacers I'm talking about is here... https://www.amazon.com/gp/product/B08K3NS525/ .
I replaced all the spacers with silicon spacers. I was concerned with having just the four corners supported since the printer pushes into the bed for probing. Didn’t want any flex in there. Also opted for the silicone spacers instead of springs to eliminate the possibility of an additional 24v short to ground. This was prompted mostly by my Max. The bed there was horrible with a bad dip on the back right corner of over .8mm and on the middle of the left side I had a heave of over 1.2mm. The carriage itself was bent and the hard stock spacers just transferred that up to the bed. After about 15 ABL on the Max, about got that dead nuts flat. The SE wasn’t bad to begin with but now is almost spot on. Here are the spacers I ordered:
8 Pieces 3D Printer Heatbed Parts Silicone Leveling Solid Bed Mount 3D Printer Heatbed Part Stable Hotbed Heat-Resistant Buffer Compatible with CR-10 Ender 3 Bottom Connect (Brown,0.63 Inch) https://www.amazon.com/dp/B094J9CLPR/ref=cm_sw_r_cp_api_glt_fabc_26TQ6R7ENSQVFKGPK9W4?_encoding=UTF8&psc=1
A textured build plate is the best thing I ever bought for my printer. If you don't mind the texture of it and not having that glassy bottom finish, it's amazing. I got this one: https://www.amazon.com/gp/product/B092FHNHGT
I recommend these if your looking for drop-in, plug and play (although the wires are long) replacements; I imagine you can find them on European online retailers. Well reviewed, cheap, quite, and fast relatively speaking. I've been using it (and its part cooling equivalent) for around 2 months without issues.
There are some who like the blue color, but most people seem to really despise it. The voltage powering it is 5V. I swapped it for a small USB light that I mounted to the bottom of the hot end cover. I got it from Aliexpress but you can get them from Amazon or Ebay too. It is similar to these... https://www.amazon.com/INVESCH-Powered-Portable-Keychain-Camping/dp/B01H36HLAK It is quite bright. If I want to control the brightness, I just send the Gcode "M42 P6 Sx" where x is the brightness from 0 to 255.
By 'hot end fan' I assume you mean the one that cools the heatsink as the part cooling fan wouldn't necessarily need an adapter. I've upgraded to a winsinn dual bearing fan, which is faster/more volume and quieter. It's not possible to answer your noise question without a specific model as manufactures make various types of fans (different bearings); but, as a blind guess 'yes' because the OEM 3010 is relatively loud. Normally noise levels and speed/volume are listed in the product's specifications. Also note it's a two pin connection (the first google result for 'sunon 4010' is a 3 pin). As the other commenter said it can't be run slower; it's always on 100% unless you modify things. The real advantage is minimizing the risk of heat creep when printing at high temp and being able to use an all metal hotend (Micro Swiss' is awesome!).
I bought a single gear all metal extruder from Amazon and had under extrusion and skipping. I heard the bmg extruder s are really good so I bought a bmg clone from Amazon. It’ll come today. https://www.amazon.com/Printer-Accessories-BCZAMD-Extruder-Creality/dp/B07RBL4CJC/ref=mp_s_a_1_6?dchild=1&keywords=bmg+extruder&qid=1621785048&sprefix=bmg&sr=8-6
Yes I do use the Capricorn tubing. I got lucky and it came with the printer.
So I ended buying this because my heat block was missing one screw. It came with extra nozzles. The sqwan seemed to me to be the exact same thing. I would feel comfortable buying their nozzles too.
Not sure what country you are in but I’m in the USA and they are prime for me.
I have the patience of a gold fish.
I bought https://www.amazon.com/gp/product/B07YYSP5F5/ which came with a gray and a black one. They're both working fine on my 2 CR6's.
The only hitch was that I had to cut out a notch on the plastic cover that holds the screen pcb to the metal frame. (Took a couple minutes with a Dremel.)
If you buy an SD card extender with a stiff plastic insertion end (such as this one: https://www.amazon.com/dp/B07YHN83NJ/ref=cm_sw_r_cp_apa_glt_fabc_7Y0MW4JZ5PBAVJMB71CB?_encoding=UTF8&psc=1 ), you'll need to take a dremel and cut out a portion of the bottom of the display case to allow it to fit (and also provide a place for the extender to exit the case). Pretty sure that's the top of the back--I'm not near the printer now.
I've been using all Prusament, with the exception of the white creality roll that came with my CR6. With that said, I was just checking out amazon and saw Geetech.
Not trying to hijack the thread, but has anyone used Geetech?
It is this exact one. Took like 5 minutes to install. 5 screws from the OG one. Then 4 for the new one.
I did the e steps calibration from the community firmware. Works like a champ
this one for official creality single geared open designed
I own both, started with the upgrade creality one and tossed it shortly after a month or so because the single gear actually wore out do to poor quality, decided to step up to the dual geared and it solved so many problems for me and was far more accurate. Just be aware that your e-steps value changes with dual geared, also the cr-10 style dual gear requires a step up block for the filament runout sensor to be printed, you can find it easily on thingiverse, it helps align it with the extruder.
this seems to have high marks and I decided to order one.
​
Nope that is the design flaw of that extruder. Replace it with the creality all metal one on Amazon...It will save you a headache https://www.amazon.com/Upgraded-Creality-Printer-Extruder-Aluminum/dp/B07WKTVNCW/ref=sxin_9_ac_d_pm?ac_md=1-0-VW5kZXIgJDIw-ac_d_pm&cv_ct_cx=creality+extruder&dchild=1&keywords=creality+extruder&pd_rd_i=B07WKTVNCW&pd_rd_r=99330a7f-aa98-4015-abe5-3a9df92e79e3&pd_rd_w=9RgXQ&pd_rd_wg=Rdv5c&pf_rd_p=fbf6011c-6632-49e8-9631-4e76f7f44920&pf_rd_r=QKE120PT29YXKV2Q98HH&psc=1&qid=1619379634&sr=1-1-22d05c05-1231-4126-b7c4-3e7a9c0027d0
Creality all metal extruder. https://smile.amazon.com/dp/B08F23ZNTG/ref=cm_sw_r_cp_apa_glt_fabc_K96YPANFSC3Z744ES17E?_encoding=UTF8&psc=1 OEM became a mess to work with and prints we becoming less "perfect". Quick and easy swap with no printed parts to set it up.
Sure thing! I printed this enclosure from thingiverse with transparent filament:
https://www.thingiverse.com/thing:4790272
Please be aware that you will need a new blower fan when printing this! On the other hand... more and better cooling :D make sure to print it out of the filament that you use that needs the highest temperature to print so it won’t deform while printing.
I chose the following one because it has ballbearings instead of the mostly used Oil bearings (still relatively cheap and definitely has a longer life expectancy):
WINSINN 40mm Gebläse Lüfter 12V Doppelkugellager 4020 40x20mm Bürstenlose Turbinen-Turbo-Kühlung - hohe Geschwindigkeit (4 Stück) https://www.amazon.de/dp/B07L2YT1S3/ref=cm_sw_r_cp_api_glt_i_867XC9VDRF9VFSW8BY8Y?_encoding=UTF8&psc=1
(English: WINSINN 40mm blower fan 12V 40x20 with ballbearings)
I fitted a 24pixel WS2812b ring inside which I am controlling with an ESP 8266 via Aircookie‘s WLED.
I am planning to replace it soon with a ring with one that uses SK6812 LEDs so I will have a dedicated White channel, because the white light that is produced by the RGB LEDs refracts on the printed filament and sometimes makes it not that easy to spot problems, overall it ist still a huge improvement to the single LED that came with the CR6 :)