
What are
/r/CafeRacers'
favorite Products & Services?
From 3.5 billion Reddit comments
The most popular Products mentioned in /r/CafeRacers:


The most popular Services mentioned in /r/CafeRacers:
Facebook Marketplace
OfferUp
Vimeo
IGTV
Google Photos
Freepik
Simple
Microsoft Bing
The most popular Android Apps mentioned in /r/CafeRacers:


The most popular reviews in /r/CafeRacers:
It's a Chinese amazon seat I found for thirty bucks...
Watch the purists cry, but if you're super into the café racer style, nothing stopping you from starting with a big bike. Just google "café racer Goldwing" for some examples. https://www.bing.com/images/search?q=honda+goldwing+cafe+racer&FORM=HDRSC2
Make sure that your carbs are synced and cleaned properly first. I bought mine from Amazon. Here is the the link. iFJF Carburetor Intake Manifold...
https://www.amazon.com/dp/B079L2CPCG?ref=ppx_pop_mob_ap_share
It's a 360 Trolley Stand from Alpha Moto. I got it on accident. I ordered a simple wheel chock but they sent me this instead by accident and told me to keep it. It made working on the bike super easy so I was happy with it. He's a link to it, although sorry it looks unavailable.
Amazon! Yes, super easy to wire up and good quality for price. Integrated turn signals and LED were my two goals and this definitely meets that. Just have to play with mounting brackets but I didn't have to get anything extra.
SKTYANTS 7" 7 Inch led Headlights... https://www.amazon.com/dp/B078MVXJBL?ref=ppx_pop_mob_ap_share
you can also use a digital speedo that uses a magnet for speed sensor. Once you get the radius measurement correct you can get a very accurate speed reading. I have GPS confirmed my speed and got it all wired with turn signals and tach too.
they typically go for 60-80 but I've seen some 'brand' name ones go for much more.
this what I installed: https://www.amazon.com/gp/product/B07Q6B5WQS/ref=ox_sc_saved_image_3?smid=AZWVXIVFKUAOK&psc=1
First, you have to use a drift pin or something to bend that tab out of the way, then you either need to get a socket- like this: https://www.amazon.com/Clutch-Spanner-Socker-Wrench-Wheels/dp/B073CM4DL5/ref=mp_s_a_1_1_sspa?crid=1SEIG4AR5XJCY&keywords=24mm+clutch+socket&qid=1665856025&qu=eyJxc2MiOiIwLjAwIiwicXNhIjoiMC4wMCIsInFzcCI6IjAuMDAifQ%3D%3D&sprefix=24+m...
or make your own tool to loosen that nut. You'll also need a way to hold the whole works from rotating while breaking it free.
Yes, its ok to leave it like that for a while.
If you go down to a hardware store, usually they'll have a thread checker mounted in the fastener aisle. A little quicker than trying individual bolts. They look like this:
https://www.amazon.com/Horizontal-Gauge-Thread-Checker-Metric/dp/B00OM1HUJ2
When in doubt, follow Jim’s advice
Install this past the merge point on your exhaust pipe and it will remove all the guess work.
You don't know for sure until you get a fuel/air ratio gauge on there. Or until you burn a hole in a piston running lean at freeway speeds.
You also need to spend about $40 at an independent muffler shop so they can drill a hole in your exhaust after the merge point and weld in that threaded sensor bung it comes with. Be sure and take the bung to a hardware store and get a bolt that fits in there first.
You'll basically do a duct-tape install of the whole setup because you can't shorten the sensor cable without throwing the calibration off. Drive around at different speeds and see what your jetting is really set at.
Once you're done, take it all out and box it up, and use that bolt to seal the exhaust until next time you need to check or tune your jetting.
You CAN do a permanent install but you'll need a waterproof gauge housing and you'll need to hide the extra cable somewhere. But, if you add any kind of dial adjustable jetting to compensate for altitude on the fly, the gauge rocks.
Anyways. This is how you seriously check jetting. You want a 14.7:1 ratio at idle through cruise, 12.8:1 at hard acceleration.
Awesome man! I think I found it on Amazon, is it this one?
Amazon hookup
FREE SOLDIER Men’s Tactical Boots 8 Inches Lightweight Combat Boots Durable Suede Leather Military Work Boots Desert Boots https://www.amazon.com/dp/B07X2PRXHN/ref=cm_sw_r_cp_api_glt_i_T31M3KT5GBSN3D27BG76?_encoding=UTF8&psc=1
Echoing what International You said: you're going to want this screwdriver before you start. JIS screws look like philips, but they're not. They have a small dot off of one corner that's real easy to miss. In any case, JIS drivers work on JIS screws a lot better than philips head drivers do. Interestingly, JIS drivers also work on philips screws better than philips drivers. I've had the most bullshit stripped out trash screws staring me in the face after my JIS impact driver got them out, just as puzzled as me as to what kind of nippon ninja magic just took place. Really, those impact JIS drivers are the single best tool you can get before working on any UJM.
It’s ridiculously bright and well focused for a cheap light. I think I paid somewhere around $70 for it on Amazon. 7 Inch LED Headlight With Mounting Bracket For Touring Street Glide Road King Ultra Classic Electra Glide Fat Boy Tri Cvo Heritage Softail Slim Deluxe Ultra Limited Black https://www.amazon.com/dp/B076KM96M4/ref=cm_sw_r_cp_api_glt_fabc_Z5R2CKATTTWAGWDTTEQB?_encoding=UTF8&psc=1
They do not sell good bullet connectors, they are the same cheap ones that come in the cheap amazon/ebay kits. I've used them... I do not recommend them. They do not fit snuggly and their "insulating sleeves" do not shrink with heat.
I changed out all mine with these. Really prettied it up.
Twippo 352Pcs Waterproof Car Electrical Connector Terminals Automotive Electrical Wire Connector Plug Kit 1/2/3/4 Pin Connectors Male and Female https://www.amazon.com/dp/B092PL9W7K/ref=cm_sw_r_apan_glt_fabc_0NVC0XSN07FMT49AW9KC
these are the extenders I used
https://www.amazon.com/gp/product/B07PGW27L4/ref=ppx_yo_dt_b_search_asin_title?ie=UTF8&psc=1
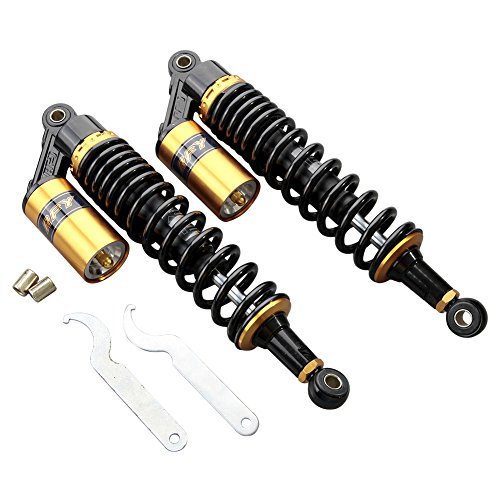
I also ended going to piggy back shock with a stiffer spring rate because it was compressing too much on deep dips.
Amazon, it's a synthetic leather but they work great, are waterproof, lifetime warranty, and made in USA. My cover is the same Dowco brand and I'm a fan. You have to buy a left and a right side which is listed as two separate items just an FYI. Dowco Willie & Max 59777-00 Triangulated Synthetic Leather Motorcycle Swingarm Bag: Brown, 9 Liter Capacity, One Size https://www.amazon.com/dp/B008R0JTBG/ref=cm_sw_r_apan_glt_fabc_EQSBPQAVWGQ5VS21J775?psc=1
If you're looking for something low key, I've got these and they sound great.
It’s an Amazon special. I’m not a huge fan, actually.
7 Inch LED Headlight With Mounting Bracket For Touring Street Glide Road King Ultra Classic Electra Glide Fat Boy Tri Cvo Heritage Softail Slim Deluxe Ultra Limited Black https://www.amazon.com/dp/B076KM96M4/ref=cm_sw_r_cp_api_glt_fabc_8289G599VTBF1PAHM1A6?_encoding=UTF8&psc=1
I just fixed a blinker issue in my 2018 T120. Installed a new led flasher relay, added a fuse for it and redid the wiring to skip the gauges.
Let me know if you want any help.
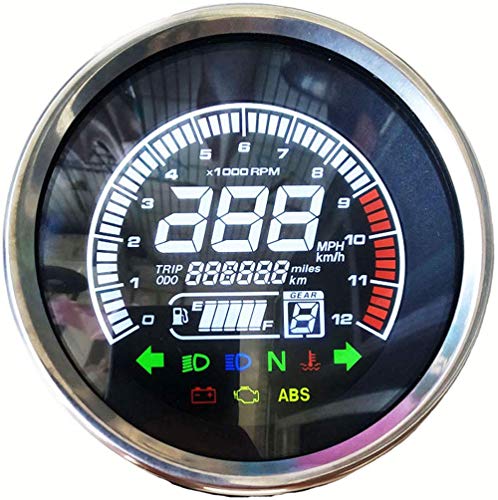
E-Bro 12V Multi Function Motorcycle LCD Digital Odometer Speedometer Tachometer Gauge Solid https://www.amazon.com/dp/B07VJMZXQQ/ref=cm_sw_r_apan_glt_fabc_C5FY1DZDGYCKSFBC73BV?_encoding=UTF8&psc=1
I'm using this one. Very responsive and easy to wire up.
DKMOTORK 0011 Digital Gauge Motorcycle Speedometer/Tachometer/Odometer Universal with Multi-Function Indicator Light Display Black https://smile.amazon.com/dp/B07WW3L3Y8/ref=cm_sw_r_cp_api_glt_fabc_VM5RQRSQYK53D8WP8RXV?_encoding=UTF8&psc=1
This is what I’m using. It was a weekend project to wire it up, and for 35 bucks, you can’t go wrong.
Every once in a while the tach will start getting wonky and bounce around a bit, but it fixes itself if I turn it off and back on again. Even with the qc issues and bad reviews, I figure I can just keep buying replacements and swapping them out if there are issues since these things are so cheap compared to the alternatives. Now that everything’s wired up on the bike side, the gauge can be changed out in 5 min.
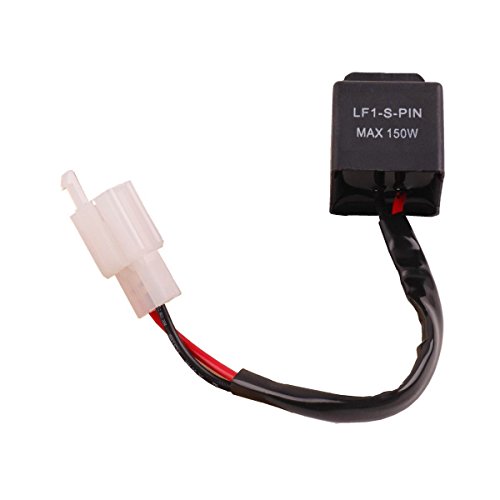
Headlight just slaps on. You need a flash relay specifically for LEDs. I surprisingly didn't need any resistors, but I had bought them just in case. This 8s the relay I bought which is why I think I didn't need resistors. https://www.amazon.com/dp/B073J82PNF/ref=cm_sw_r_cp_apa_glt_fabc_RE6YWNV93RB8AKG3C11J?_encoding=UTF8&psc=1
$10 to replace the whole thing
Wiipro Universal led Harley Davidson Light Strip Tail Brake Stop Turn Signal 32LED 8" Flexible led light for motorcycle https://www.amazon.com/dp/B01GJGCR9U/ref=cm_sw_r_cp_api_glt_fabc_19HH1J017A2RYS2SV2FM
Very fun, it's light and reliable. I actually bought the gas tank on Amazon.. I'm about to post again with progress photos and more info. Sorry everyone for the lame post, I'm posting a better one now. Link to tank: https://www.amazon.com/dp/B07PTNY6RG/ref=cm_sw_r_cp_apa_glt_fabc_ZPG0YDM067C2GJVVP4A4?_encoding=UTF8&psc=1
amazon sells this battery in a bunch of different sizes.
I bought these : https://www.amazon.ca/gp/product/B071WFQ4X6/ref=ppx_yo_dt_b_search_asin_title?ie=UTF8&psc=1
And they're very good quality. Basically vortex knock offs. Generally I prefer to pay once cry once but these are cheap enough they're worth a try.
the seat is one of the things that the previous owner gave me. I do believe it's the generic amazon cafe racer seats and it has the same mounting pattern. here's one of the seat that I found that looks pretty similar to mine.
It’s a shorai battery and my electronics tray is really messy and cramped😂I’m planning on redoing the placements once I find a new seat that I like
Shorai LFX14L2-BS12 Extreme Rate... https://www.amazon.com/dp/B005FIUJ0S?ref=ppx_pop_mob_ap_share
To follow-up on the suggestion for hooks, another idea to use instead of springs could be the rubber battery hold downs used on ATVs like these straps.
I laid out five "basics". Don't do them all at once!
I forgot to mention that. Space them at least a month apart, in this order:
Fork brace
Rear shocks (unless you run 1" over-length, then do emulators first!)
Emulators
Aluminum hoops (can be order-swapped with emulators)
Carbs
You're cooking in more stability before doing stuff that reduces stability. Aluminum hoops are a slight stability downgrade - very slight.
At each step you're pushing the bike's capabilities further out. This also narrows the edge between "feels good!" and "why did I just crash owww!"
Every bike has an edge. In stock form your bike's edge is really broad - you can feel it you get close and back off.
Each mod will move the edge some, in terms of cornering ('cept for the carbs!). You need to get used to exploring each new edge. You're learning to dance on that edge.
The guy who buys a brand new supersport will never be able to explore it's edge because his is razor sharp from the factory.
You also need a book:
https://www.amazon.com/Twist-Wrist-Keith-Code/dp/B002ITGWS0
OH MY FUCKING GOD I had no idea prices on that fucker had gone so outta control.
Holy shit.
Lemme see if anybody pirated it into a PDF?
Ha!
http://users.auth.gr/~sv2qp/Download/Docs/Advices.pdf
Yup. That'll do. Second edition. Good shit.
Yeah or cut them off and weld something like this in it’s place.
I thought about it some more and I think white light will grow on me. I was looking at this headlight in Amazon and I think I'd like it.
The specs say it will work with 12V, which is what my headlight voltage is. My power is 60/55W while the replacement one is 80W for the fixture.
I'm guessing this wouldn't work with my bike?
$15 Amazon Specials.
https://www.amazon.com/gp/product/B07HG6K9TK/ref=ppx_yo_dt_b_asin_title_o02_s00?ie=UTF8&psc=1
Checked the construction internal and external, all looks pretty good, might need resoldered at some point but they'll work for the time being pretty damn well it looks like. The blade switch for the turn signals is actually connected with aluminum instead of a solid plastic shaft like on the other cheap set I ordered and destroyed almost immediately that were twice the price. The switches all have a nice tactile click, the only thing I'm not too keen on is the pass light's pressure which is a problem that's easily fixed by cutting a spring if I decide to do so.
Can't beat them for the price and I'm doing my own custom wiring so I don't really care about the quality of the original connectors, but they do look pretty solid for the price.
Get new brackets, they suck. But housing and light is nice. Also get an LED flasher relay for turn signals
I would use something like this . So long as it is able to power the light (won't know till you try) I would just chop the current connectors off and soldier and tape those type of connectors in. Just go from 1 to 2 wires, it would look like Y
Hi its a seat from Amazon but I got it reupholstered to match my handle grips. Here is the link: https://www.amazon.ca/TUINCYN-Motorcycle-Solo-Square-Pattern/dp/B081VBP1SP/ref=sr_1_5?dchild=1&keywords=solo+seat&qid=1598477168&sr=8-5
According to the m.Switch manual, it's an M3 (3mm metric) screw. If you can't find 'em at your local hardware store, Amazon sells them too. Not sure about the length though.
EDIT: Nope, sorry, I Was wrong. That's referring to a different screw. The manual actually doesn't contain any clues...
I got the heat wraps on amazon https://smile.amazon.com/gp/product/B01KVYH66U/ref=ppx_yo_dt_b_asin_title_o06_s00?ie=UTF8&psc=1 I bought the grips at Revzilla. https://www.revzilla.com/motorcycle/biltwell-torker-78-tpv-grips
Something like these turn signal brackets would be a simple way to move them out of your way. Might be worth checking out turn signal brackets on Amazon
The ideal solution would be to simply replace the whole carburetor with a brand-new example, second best an official rebuild kit. You might have some luck contacting a company like Parts Unlimited for the second option, or perhaps a local bike shop can order it for you.
But yeah, assuming that neither of the above approaches pan out, you could look into replacing the carb with a Chinese knockoff.
DISCLAIMER:
Generally I'm not in favour of supporting companies that steal intellectual property or products that earn money for regimes guilty of human rights abuses, but you might be less of a SJW than me.
That said, the carb of any similarly sized four-stroke engine should do the trick. See for instance this lovely product ($63 on Amazon) specifically designed for (or copied from) the Suzuki GN250. You could either install it as is or strip it for parts to rebuild the original.
Good luck and don't hesitate to ask if you have more questions.
I don't know the brand, but they're just basic tracker bars, like these.
I believe the 400 has 7/8 inch bars, here's a cheap pair on amazon (though, for that price they're probably lightweight, so you'll feel the vibration of the bike more)
Sorry I don’t know how to do the short quick link thing but I got...
Renthal street bars from revzilla- I did the black ultra low for mine:
https://www.revzilla.com/motorcycle/renthal-street-handlebars-78
And all the mirrors on bike sites were wicked expensive (to me) or had garbage reviews so I went to amazon and really liked the look and reviews on these ones- it seems most of the bad reviews were people who bought the wrong size for their bars. I’d also check out the pics posted in the reviews for what they look like on bikes- the stock photos don’t do them any justice:
Listen, I know you're going to want to go with the $10 amazon special mirrors, but I beg of you not to. I went cheap one time and they broke the first time I tried adjusting them. I've purchased these for 3 of my bikes now. They are MUCH more sturdy than those cheap $10 pieces of shit.
Okay, I'm going to give you the strangest recommendation you've ever heard of.
You know all these "idiot's guide" kind of books on every subject imaginable out there? Ever wonder where that all started?
It started with the single greatest car repair manual ever written, end of discussion, ain't no doubt about it:
https://www.amazon.com/Keep-Volkswagen-Alive-Step-Step/dp/1566913101
That book is vintage 60s counterculture turned into a car repair manual. It's one of the huge reasons that volkswagon bugs and buses were such a huge part of the hippie culture.
Your average 1970s motorcycle shares a lot of technology with a Volkswagen bug, including how the cylinders and heads are put together, how you do valve adjustments, how you do carb cleaning and adjustments and a lot more.
By pure dumb luck the first vehicle I ever bought and modified with my own money was a VW Baja bug. That manual was beyond invaluable. It's also the ancestor of the entire concept of an "idiot's guide" and none ever did it better.
I shit you not, buy that book and read it cover-to-cover. Grok the fullness of it.
THEN when you buy a cheap running motorcycle and a normal repair manual for it from Clymers or whatever, you will have the ghost of John Muir looking over your shoulder and guiding you because you'll remember the concepts he preached.
Tackle box trays are a great way to keep your bolts organized and together. [They are cheep too](https://www.amazon.com/gp/product/B011ZXGU68/ref=s9_acsd_top_hd_bw_b8MQkwF_c_x_w?pf_rd_m=ATVPDKIKX0DER&pf_rd_s=merchandised-search-3&pf_rd_r=TB6WNX2R4NJVRJAK7JDV&pf_rd_t=101&pf_rd_p=93e89f90-57b9-5aa1-942f-f54bf2e0d29a&pf_rd_i=7660519011)
Now I'm confused because this spray says to spray on after the wrap is on. https://www.amazon.com/dp/B000MY3ML8/ref=cm_sw_r_cp_apa_jSPoBbKZNWJEC
If there are two types of sprays, should we use both?
I installed these on my CB350. The brake worked just fine after bleeding.
You can probably find a set that has hydraulics on both sides similar to these. The reservoir will mount on either the top or bottom of the levers (they're reversible).
Buy a multimeter and start going through each connection. Check continuity throughout. You said you changed the ignition coils? Try putting the old ones back on and see if that works. If it still doesn't then check to make sure the new spark plugs aren't the problem.
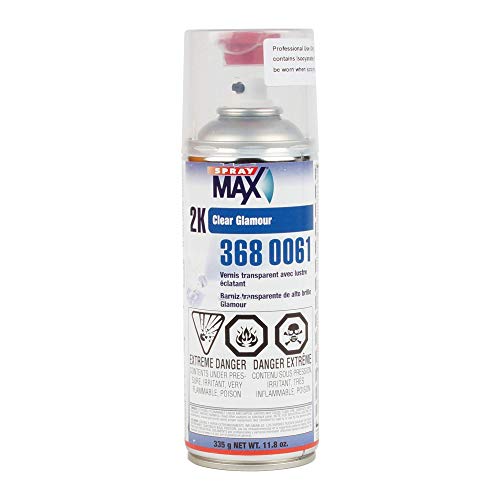
Yeah it's Autozone automotive color in a can and Eastwood 2K epoxy two part clear in a can. https://www.amazon.com/Spray-High-Gloss-Clearcoat-Aerosol/dp/B0043B7UQY To be honest, I didn't do enough prep on my first effort and you could see some imperfections in the tank so I stripped it and started over. With the right amount of primer/filler and careful sanding, I'm amazed how good the finished product looks. A little bike tank and covers is easy. I can't believe people paint whole cars with rattle cans!
I own a 79 CB650. I bought this lithium battery for my bike:
https://www.amazon.com/gp/product/B00DX891FG/ref=oh_aui_search_detailpage?ie=UTF8&psc=1
Kicks over the bike just fine, has plenty of CCAs. Be aware that the capacity is much smaller than the lead acid batteries. So if you're turning over your bike a lot, it won't last very long.
I'm using the original wiring harness (including charging system) from my bike without any issues. However, I should note that I haven't used the battery for very long, so I can't speak to the longevity of the battery, but for now it charges and discharges just fine.
this a a very good one, I've bought it for others that were interested in vintage motorcycle repair. ITS CHEAP AND EVERYONE SHOULD OWN THIS ONE https://www.amazon.com/Chiltons-Motorcycle-Repair-Manual-1945-85/dp/0801976359
there is an engine basics section at the beginning, that may be useful to you. it is a big fat book that has service manuals for a lot of popular bikes. at the very least it will teach you how to disassemble and re-assemble a bike.
the clymer "vintage collection" manuals are good reference material
For some reason the link is gone, here you go
Wiipro Universal led Harley Davidson Light Strip Tail Brake Stop Turn Signal 32LED 8" Flexible led light for motorcycle https://www.amazon.com/dp/B01GJGCR9U/ref=cm_sw_r_cp_api_V0Q5xb7N4RAXW
street legal needs a headlight, taillight, horn and a mirror. stock has no lighting output. you need an updated stator, and lights, horn, mirror. https://www.amazon.com/ElectroSport-ESG122-Stator-Honda-XR100/dp/B003172796
check out amazon, they look like some cheap chinese army bag.
Yeah, with proper padding and some cam action clamps, that would be a good move. Am looking at buying a couple of clamps like this, given the recurring problems I've had with this and similar jobs.