
What are
/r/Creality's
favorite Products & Services?
From 3.5 billion Reddit comments
The most popular Products mentioned in /r/Creality:


The most popular Services mentioned in /r/Creality:
Odysee
GoDaddy
PrusaSlicer
Cults.
The most popular reviews in /r/Creality:
creality3dofficial.com is their official store. I know for sure because this is their official account that contains source code repositories for their firmware and it links to creality3online.com, which redirects to creality3dofficial.com. A simple Whois also turns out what seems to be their actual company's data. Any other website you order from that uses their name has no real incentive to give you a good experience after you've given them your money because they know you'll think you're dealing with the actual Creality...
I usually just go on amazon to find the little parts like this.
https://www.amazon.com/dp/B00AXBVOZ6/ref=cm_sw_r_cp_apa_glt_fabc_4ZV02JC1JXK824H80J8A
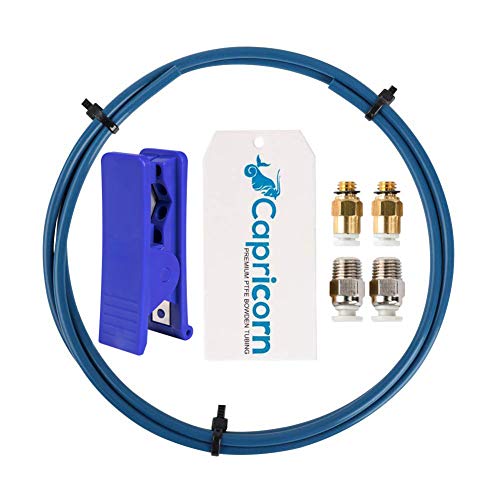
Though, honestly, would highly recommend taking this opportunity to switch to Capricorn tubing. They sell a pack of it that comes with the fittings.
Your extruder, if it is not the all metal dual hobbed gear type, not if, but when (now?) you will have some kind of feed failure!!! At MINIMUM, I recommend this upgrade if at all possible!!! Yes, it does look like your temp is low...definitely do your temp tower BUT also do the extruder upgrade especially if you have the junk OEM plasticky one!!!
I avoid flexible base. I have one that makes a great refrigerator magnet. I say get a PEI sheet for the glass bed. I have something like this on my glass bed and love it https://www.amazon.com/Gizmo-Dorks-Sheet-Printer-Surface/dp/B074XG1NDM/ref=sr_1_4?dchild=1&keywords=PEI+sheet+ender+3+max&qid=1617915619&sr=8-4
This is what I bought (I live in the UK) https://www.amazon.co.uk/dp/B08HMXBF88
On an unrelated note, I recommend the YouTube assembly and calibration videos because the instructions aren't very clear in places.
Enjoy!
This is in my garage, in my shop area, so I bought a fireproof enclosure to keep the dust out and keep the potential fires in. https://www.amazon.com/dp/B0865KZW5J It’s worked out well, and really insulates it too.
Ender 3 Spring Steel PEI Bed Plate,Heat Resistance, Removable,Flexible,Magnetic Build Surface, with 235mm×235mm,Upgrade Replacemnt Parts for Creality Ender 3/Pro,Ender 5/Pro https://www.amazon.com/dp/B08B4CBY9C/ref=cm_sw_r_cp_api_fabt1_FgVSFbHY59C0R
Ok. I found what looks like to be the same switch/power socket assembly on Amazon: https://www.amazon.com/dp/B07PHBW969/ref=cm\_sw\_em\_r\_mt\_dp\_bfBMFb0B11WBD?\_encoding=UTF8&psc=1
The people that are replacing it, are they replacing the whole unit or are they replacing just the switch with a better one? I guess I'm asking because I'd be willing to help find a better replacement because this just sucks and is wrong it's not being dealt with.
While Amazon search didn't help (not uncommon these days) Google (surprisingly) did find a seller on Amazon who has the heat break for sale. Not cheap... hopefully Creality does right by me. https://www.amazon.com/Creality-Printers-Bimetal-Clogging-Eliminate/dp/B0B14BVCQS?source=ps-sl-shoppingads-lpcontext&ref_=fplfs&smid=A2PZLM3EM3WR9X&th=1
Hello, Your issue is where the Arm of the extruder is broken, you unfortunately cannot get a replacement part, but if you can get a full metal extruder on amazon (Link)
Or if you don't have the money to get a Metal extruder you can use this 3d model and print this! (link2)
Have fun on your adventures with 3d Printing!
For anyone that sees this post, I found another similar post and a user mentioned these things and they work great.
https://www.amazon.com/dp/B00N3UO7C6?psc=1&ref=ppx\_yo2ov\_dt\_b\_product\_details
Hmm I have been setting it up between conference calls but because... I don't know everything.. I just went to Klipper and installed how they recommended (Octoprint then install Klipper). Then I decided let's see what people are doing with S1 Pro's since there is probably more documentation and I see everyone is recommending using Mainsail.
So now I'm starting over again with Mainsail. I have this 7.9 bar LCD I've never used on a project that has a RPI mount on the back but is only 400x1280 and I've always been sad I bought it because it's 400 and not 480... and I think it would make a great screen and PI holder for this project.
I'll probably find out that with this screen and because of X I need to start over again from scratch but that's life.
I should be printing with Klipper by midnight at this rate
I bought the Two Trees Air assist,
https://www.amazon.com.au/dp/B0B5KKWMWT?psc=1&ref=ppx_yo2ov_dt_b_product_details.
I had to print a 40x40x26mm hollow spacer to mount the milled aluminum head to the laser unit in order to get the correct heights so the air outlet was close to where the cutting was happening. It works fairly well.
I did see this video a couple of months back. Creality may be coming out with one sometime soon.??
https://www.youtube.com/watch?v=gwF7cI1e4qI&ab_channel=CoffeeandTools
Take your allen wrench and slightly loosen the 4 front screws holding the heated metal plate to the bed to raise those values closer to 0.
For a more thorough approach you can replace the 11 plastic spacers under the bed with silicone ones, which will allow you to tighten/loosen those screws much closer to 0. https://www.amazon.com/Heatbed-Silicone-Leveling-Heat-Resistant-Wear-Resistant/dp/B08KY514F3
I am also looking to buy this printer when I see a dip in price. Currently Amazon has one listing (17 left) at $439...
Good luck!
yeah, it's this one: https://www.amazon.com/ChowThink-GlassFiber-900dOxford-Cloth%EF%BC%89Fireproof-Temperature/dp/B09JG2RT8F
glad i bookmarked it, was hard to find searching on amazon showing other ones instead.
I use Cura (Currently using v5.1) almost exclusively and have always used the CR-10 S Pro profile. It's worked great for me. I change very few settings in the default profile and got some amazing prints.
My filament sensor was flakey right out of the box though and would sometimes stop an overnight print with a no filament error. I'd have to jiggle the filament until the light came back on and I could resume the print (sometimes). After about 2 months of that the sensor died completely so I just ordered a new one from Amazon for like 13 bucks. Bolted right up, took 5 mins to install.
You can contact Creality support and they'll replace it but it will take a couple weeks as they only support via email and can sometimes take a week or more to reply. You can also just unplug the sensor too and just make sure you always have filament. Which I also did for a while before installing my replacement.
Personally, I'd just buy a replacement from Amazon then email Creality support and wait for them to send one under warranty so you have a spare. Replacement instructions are here.
Let us know how it goes!
your nozzle clogged and the extruder managed to keep pushing until the fitting broke. i would just order one of those Capricorn bowdin tube sets that comes with fittings from amazon. or this one if you still have your plastic extruder
I bought this brand from Amazon because it was on sale at the time. Both sides are rough and it's reversible. So far it's very good, but time will tell if that holds up or not.
When I first got the glass plates with the gray coating, they worked really well, but over time (maybe a few dozen prints) the surface became almost non-stick, forcing me to use glue stick every time.
I'm OK with using glue stick, but am not going to tell others to go out and buy glass beds!
I would try finding the next size up and try to fit the slightly larger one if the hole is stripped and opened. Otherwise needle nose Vice Grips are going to be your best friend. You have enough clearance to get the vice grips onto the screw. Also you can try a Screw Extractor Set .
This guy has the bit I was thinking of that will remove. Worth watching.
Any easy out like these will probably work better on smaller things. https://www.amazon.com/Ontel-SpeedOut-Damaged-Screw-Extractor/dp/B00IRL3WP4?source=ps-sl-shoppingads-lpcontext&ref_=fplfs&psc=1&smid=ATVPDKIKX0DER
https://www.amazon.com/gp/product/B08BF4BQWQ/ref=ppx_yo_dt_b_asin_title_o04_s00?ie=UTF8&psc=1
These are the ones I bought for my Halot One, and LD-002R
But yea, invest in either an off the shelf dehydrater or one of the ones made for the spools, I got 2 off Amazon, they are actually created to print from the dehydrator box while it keeps the filament in the dehydrator box
3D Printer Filament Dryer Box,... https://www.amazon.com/dp/B098D366R3?ref=ppx_pop_mob_ap_share
Dry it 4-6 hours at 65-70°C.
Food dehydrator that goes to 90°C for nylon. You don't want any bigger. These things heat the room.
Septree Food Dehydrator 4... https://www.amazon.com/dp/B09MCHTXHW
I just used the Creality Slicer software, which is just a branded version of Cura that also has profiles for all of their printers, including the Ender 3 S1 Pro, so I just use that profile. In that software I made copies of the standard 0.2mm and low 0.3mm quality profiles, and I've just been tweaking those as I go. I only have a 0.4mm nozzle atm, so I can't print reliably any smaller than that, and I think I read that you shouldn't be going lower than half the nozzle size for your layer height.
This is the glue that I got.
https://smile.amazon.com/gp/product/B003ULCZ7M/ref=ppx_yo_dt_b_asin_title_o05_s00?ie=UTF8&th=1
I have one of these, COSORI CO165-FD Food Dehydrator... https://www.amazon.com/dp/B07MPC7C8G?ref=ppx_pop_mob_ap_share, it’s a beast.
I can easily fit 2 in it. I’ve checked the temp with a nice IR gun too and it is accurate.
I unfortunately don’t have a answer but I’m in the same predicament as you.
Fulament Fula-Flex 2.0 Spring... https://www.amazon.com/dp/B09C8YRLY1?ref=ppx_pop_mob_ap_share
I got that and ran into the same issues. Even removing the top half of the plate from the magnetic base doesn’t give you enough clearance with the stock glass.
I hope you figure something out and come back and share with the rest of us.
Loosen the screws on the this thing maybe
MK8 is the correct size for the threading. As for plated nozzles, most of them I've seen are just the standard 0.4. I picked up a couple packs of plain brass nozzles at 0.6 and 0.8 for relatively cheap. They should work fine, the plating is more for printing abrasive materials. If you're just doing regular PLA or PETG, brass should be fine. I guess it does also help keep filament from sticking, supposedly... it still sticks just fine to mine.
These are the ones I bought. I haven't actually got to try them out yet.
do you have any unopened new spools? retry your temp tower with a freshly opened spool if you can. that should tell you if it's wet filament. otherwise, store spool in sealed container with desiccant (I use this stuff), warm gently to 60°C and hold for a day or so, or buy one of the commercial dryers (which is just a food dehydrator).
One of my printers is an Artillery Sidewinder, that printer does not time out if manually set the bed temp. i made a box out of Styrofoam insulation that covers the bed and is tall enough for a spool. when i need to dry filament i just set the bed to 60° and put it in the foam box overnight.
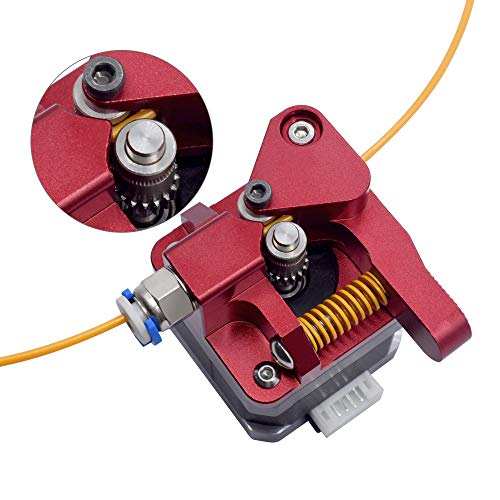
Yeah, these generic metal Creality extruders will fit. But IMO they're as good as stock, unless yours is cracked/broken. If you want an upgrade like this, get one with dual gears, these work better with flexible filaments. The one you linked is more or less the same as the stock one in terms of how it works, it has one filament gear and an idler bearing.
If you get one of these you'll need to recalibrate your e-steps and raise your run-out sensor.
This is the extruder I upgraded to: https://smile.amazon.co.uk/gp/product/B07VG7CK17
OP, you can buy replacement cables on Amazon. Just search for "stepper motor cable" and you should see results like this one https://www.amazon.com/OUYZGIA-Stepper-XH2-54-4-PH2-0-6-Motors-5PCS/dp/B09JVKTQW1/
yes, the metal spacers are GARBAGE. what a flawed design... typical chinese trash. You will want to swap for springs, and get knobs as well so you can manually adjust.. let me find the amazon link for what I bought 2 years ago.. it's still working well. (you may find something cheaper/better now, but this will give you an idea of what you need to buy..) Sorry to hear about damaged rollers =/
"Creality Upgraded 4PCS Aluminum Hand Twist Leveling Nut with Hot Bed Die Springs"
https://www.amazon.ca/gp/product/B086HYJ1MR
​
Good luck.. sorry for late reply, I do not go on reddit much any more
Yep. I had the same exact issue. Had to replace the fitting. Here is an amazon link for them. I can not stress enough how handy the tube cutter is.
​
I managed to find some on Amazon eventually. They're official Creality ones so more expensive than buying for the Ender 3. But at least I got some. Here's the link if you want to get some too.
3-Pack Original Creality CR6 SE... https://www.amazon.co.uk/dp/B099WXQSHJ?ref=ppx_pop_mob_ap_share
By the way… these are the fans I installed on my E3 Pros:
WINSINN 30mm RGB Fan 24V, LED Colorful 3D Printer Micro 24 Volt Fans 3010 Hydraulic Bearing, Brushless Cooling 30mmx10mm 2PIN (Pack of 4Pcs) https://www.amazon.com/dp/B087TBB8YV/ref=cm_sw_r_cp_api_i_24J4TW13D2J10193JTWM?_encoding=UTF8&psc=1
You were right about the airflow… my next prints turned out shitty. I just bought these blower fans (same size as original), but brushless and quiet AF!
2Packs Wathai 30mm 24V Blower Cooling Fan Brushless Exhaust Fan 2pin 30 x 30 x 10mm ¡ https://www.amazon.com/dp/B07RMHH74G/ref=cm_sw_r_cp_api_i_HK92TTQBCW0ZFHBGJHGF
Correction: THESE are the blower fans I got:
2Packs Wathai 30mm 24V Blower Cooling Fan Brushless Exhaust Fan 2pin 30 x 30 x 10mm ¡ https://www.amazon.com/dp/B07RMHH74G/ref=cm_sw_r_cp_api_i_HK92TTQBCW0ZFHBGJHGF
I think you were right about not enough airflow/power from the “standard” fan. I just bought a 2-pack of 30x30x10 brushless blower fans, so they’ll fit right in with no mods… and these are quiet AF!
Gdstime 30mm x 30mm x 10mm 12V Mini Brushless Cooling Blower Fan Dual Ball Bearing https://www.amazon.com/dp/B075R2CJH8/ref=cm_sw_r_cp_api_i_KW8J24KND0J27WKK5K9B
Well, now I’m doubting it… extrusion went from PERFECT… to… well, not that great. I went ahead and just bought a 2-pack of the 30x30x10 Brushless double bearing blower fans (same look and size as the original, but ultra quiet). I’m returning the standard led fans and getting these now instead: Gdstime 30mm x 30mm x 10mm 12V Mini Brushless Cooling Blower Fan Dual Ball Bearing https://www.amazon.com/dp/B075R2CJH8/ref=cm_sw_r_cp_api_i_KW8J24KND0J27WKK5K9B
Forgot I gotta cut the wires and re-tape them (or solder). The fans are basic, I got these on the last go-around and they are quiet as can be… also super cool with the changing LED’s. Super simple swap: MakerHawk 40 40 10 Fan 24V Hydraulic Bearing Brushless Cooling Fan RGB LED DC 4010 40x40x10mm 0.05A for 3D Printer, PC, Case, CPU https://www.amazon.com/dp/B08FR4DV4G/ref=cm_sw_r_cp_api_i_Z8QR7K1Y5NW1X99SVJ9E?_encoding=UTF8&psc=1
get a new one. I got one from amazon, (this one)
If you're referring to the POS Jack-In-The-Box extruder that comes with the 6 do yourself a large favor and replace it with something that will let you see what is going on: https://www.amazon.com/Creality-Official-Upgrade-Extruder-Filament/dp/B08F23ZNTG/ref=sr_1_1_sspa?crid=TUQUZHZY03IQ&keywords=cr6+se+metal+extruder&qid=1652806421&sprefix=CR6se+%2Caps%2C89&sr=8-1-spons&psc=1&spLa=ZW5jcnlwdGVkUXVhbGlmaWVyPUExSzFEV0FCTjVKSjU3JmVuY3J5cHRlZElkPUExMDQ0MDg1MVFNS1ZBMFk4TUpZTCZlbmNyeXB0ZWRBZElkPUEwMjA5MzA4RTREWUM5NEZVWlpGJndpZGdldE5hbWU9c3BfYXRmJmFjdGlvbj1jbGlja1JlZGlyZWN0JmRvTm90TG9nQ2xpY2s9dHJ1ZQ==
You can buy it from Amazon Creality Official Ender 3 S1 3D Printer Sprite Dual-Gear Direct Drive Extruder CR Touch Auto Leveling and Filament Detection Sensor DIY FDM 3D Printers, Build Size 220x220x270 mm https://smile.amazon.co.uk/dp/B09QWW3SPF/ref=cm_sw_r_cp_api_i_ZS3YCN8SR07KXPA4TVCY?_encoding=UTF8&psc=1
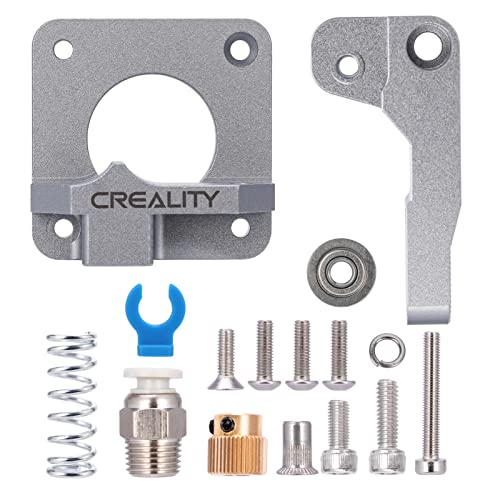
Official Creality 3D Extruder Feeder Drive MK-8 Aluminum Upgraded 1.75mm Ender 3 Pro, Ender 5/5 Plus/Pro, CR-10 Series, CR-10S, CR 20/20 Pro https://www.amazon.com/dp/B07TWQFT7J/ref=cm_sw_r_apan_i_B3FYNFK9BD41Z98V9K7N
That's not too bad for the usb cable. It's weird that they didn't expose a connector directly though.
When you say extruder, you mean the filament pushing gear, right, not the hotend itself? I've already got a few bulldog I used on older machines, so that's not a problem.
So no issue with the autolevel and getting prints level?
Along with u/Summers633 I also got the sprite pro upgrade kit for my Ender 3 Max. As of now I'm running the original BLTouch cable along the back of the extruder and zip tied it to the cable that comes with the extruder but I'm looking for a better option. I am going to try this out from amazon, I think it will work: https://www.amazon.com/dp/B07S18D3RN?ref\_=cm\_sw\_r\_cp\_ud\_dp\_2801Z7YHP2MDCNMZ1SBA
Yes there should be two. One of them must have unscrewed itself and fallen out already and is likely to never be found again. You can probably buy a replacement at a hardware store. It should be M4 x 4mm. If you have trouble finding one, you could also buy another pulley which comes with the grub screws in it. Here's an option that includes some spare belt and pulleys... Timing belt and pulleys .
I use this tent with my CR-6.
3D Printer Enclosure, Creality Fireproof and Dustproof Tent for Ender5 Plus/5/5 pro/3 Max,CR-10/10V2/10 V3/10S/10S PRO/10S PRO V2/10MINI,CR-X, Constant Temperature Protective 3D Printer Cover https://www.amazon.com/dp/B08594HX86/ref=cm_sw_r_cp_api_i_MKJK4ZW8NEJK36G8TEG5?_encoding=UTF8&psc=1
I’d recommend going with the large model. I bought the smaller one first. Everything fit, but not well and I had issues with the cutouts lining up. The large one is probably too big, but I like having the extra room to store filament and keep my filament roll inside the tent.
I can post a pic later tonight when I get home, if that would be helpful?
As far as the extruder - definitely go with a better extruder. I purchased the micro swiss one. It’s been money for quite a while now.
Creality Upgrade Ender 3 Extruder, Ender 3 V2 Upgrades Metal Extruder Aluminum MK8 Bowden Extruder 40 Teeth Drive Gear for Ender 3 Pro/Ender 5 Pro/Ender 5 Plus/CR-10 Series 3D Printer https://www.amazon.com/dp/B07WHYBVJ5/
It’s a drop in replacement.
>I don’t see one but I might as well change if I’m goi by to get this problem eventually >Do you know a good replacement on Amazon or anything like that?
Creality Official Ender 3 Extruder Upgrade Metal MK8 Bowden Extruder Drive Feeder 3D Printer Parts for Ender-3 V2/Ender-3 Pro/Ender-3 Max CR-10/10S Gray Aluminum 1.75mm Filament Extruder https://www.amazon.com/dp/B09LQKN5WG/ref=cm_sw_r_apan_i_BDDAKDFX5N2ZMP2TRDEK
That's what I use. It's cheap. It works. There's probably better.
Like this one ? Capricorn PTFE, this could be my problem I recently changed the PTFE with a basic Sienoc one 🧐
No idk this is wha tf my printer looks like Official Creality Ender 3 3D Printer Fully Open Source with Resume Printing All Metal Frame FDM DIY Printers 220x220x250mm https://www.amazon.com/dp/B07D218NX3/ref=cm_sw_r_awdo_N4AVA6ZK7Z152B33WBAF But the pamphlet that came with it says Ender 3 V4.1. Yeah the mainboard says 4.2.2, and i downloaded the firmware for ender 3 printer with 4.2.2 mainboard with cr touch kit. And yes I removed everything from the sd card before reinserting it for printing from media.
Here’s what I found on amazon. There should be more offerings as the supply increases.
Creality Spider Hotend Nozzle, 2pcs 0.4mm Nozzle and 2pcs 0.6mm Nozzle, High-Speed Nozzle Kit for Spider Hotend Kit https://www.amazon.com/dp/B09T969QVC/ref=cm_sw_r_cp_api_i_MPSVKKJGM3KVGNQNG50J
Maybe this?
Creality Official 3D Printer Extruder, Upgraded Aluminum Drive Feed Extruders Accessories for 3D Printer 1.75mm Filament Works with Creality CR-10 Series, Ender 5 Series, Ender 3 Series https://www.amazon.com/dp/B092HKZMQM/ref=cm_sw_r_cp_api_i_0A15ECA3ARBV194GH1MN
Yes I found one that worked. I bought a NEMA 17 from Amazon.
https://www.amazon.co.uk/dp/B00PNEQKC0/ref=pe_27063361_487055811_TE_dp_1
It had a different connector but the same number of wires so I just needed to solder a new connector. It's a little taller as well but does the trick nicely.
Creality 4Pcs Metal Leveling Nuts and Springs Upgraded Set for Ender 3/3 Pro/3 V2/3 Max, Ender 5/5 Plus/ 5 Pro, CR 10 Series 3D Printer Bed Staying Level https://www.amazon.com/dp/B082PC59BP/ref=cm_sw_r_cp_api_glt_i_TA4ZNE498GDY0E28CAX0
Just cut the old one off and solder the new on one...don't need to buy a long one...otherwise... this one worked good for me on a micro Swiss hot end...just screws I to the retainer screw hole the original used.
[Gulfcoast Robotics] HEX EPCOS Thermistor Upgrade for Creality Ender 3 Ender 5 CR10 3D Printers (1.5M Extension Cable) https://www.amazon.com/dp/B094GJXFY5/ref=cm_sw_r_apan_glt_i_QBRWBHM76Q3724S91GX6?_encoding=UTF8&psc=1
Glad to hear - I'm looking forward to it. I paired mine with: One of these but I don't really *need* a direct drive at all. I'm brand new to 3D printing, this is my first printer (got it on sale for $299) and I don't think I'll be printing anything flexible anytime soon - I don't see much of a reason to go DD otherwise... right?
One more quick question - do you think your mount will work for the CR Touch?
​
Do yourself a favor and trash the stock plastic extruder and replace it with a metal one like most people do as soon as they have problems with the original one. It can be replaced with most any MK8 style extruder and there are numerous choices available. The simplest, cheapest, and most straight forward replacement is one like this... Creality MK8 metal extruder . It will bolt right on and no estep calibration is required although I would recommend doing that anyway. There are also dual gear versions available (also shown in that link). The dual gear version may not perfectly align with the filament runout sensor and will definitely require estep calibration. Both of those issues can be easily addressed.
If nothing else, this type of extruder will at least allow you to see what is happening with the extrusion process and allows you to adjust/maintain/clean it without taking anything apart and having parts/springs flying off into space to never be seen again.
It appears that you've ripped out one of the thermistor wires. You will either need to find a new thermistor and replace it or buy a new hot end assembly like this... CR-10 Smart Hot End Assembly
The stock extruder is hot trash. Mine failed after only 10 hours of printing and couldn't grip the PLA anymore.
Do yourself a favor and spend $16 on this extruder: WINSINN Dual Gear Extruder, Works with Creality Ender 3 CR10 CR-10 Pro CR-10S Tornado Upgraded Aluminum Drive Feed for 3D Printer 1.75mm Filament https://www.amazon.com/dp/B07SY745CF/ref=cm_sw_r_apan_glt_i_Z3RYJ25XGEY19S4WMHN2
You'll have to adjust your E-steps after the fact to account for the differing circumference of the gears, but it applies a ton more force, and they're geared so it pulls in the filament from both sides instead of just one with an idler.
Fuck that item. It's going to keep breaking. I've delt with it for some time now. I have 8 of these printers. That part repeatedly failed on everyone one.
Replace it with this item: Creality Upgrade Ender 3 Extruder, Ender 3 V2 Upgrades Metal Extruder Aluminum MK8 Bowden Extruder 40 Teeth Drive Gear for Ender 3 Pro/Ender 5 Pro/Ender 5 Plus/CR-10 Series 3D Printer https://www.amazon.com/dp/B07WHYBVJ5/ref=cm_sw_r_apan_glt_i_RN9MGTGCHVYMKFMB04YM
It's cheap, and better than that plastic garbage you're searching for. This item will fit on your printer.
Most of the creality printers take micro sd cards. These are a pretty standard size and should be available many places.
Not many come with a USB adaptor but you can get a decent SanDisk one for about $10 (depending on where you are might be cheaper).
I've been using one of these for the past few years and it's never missed a beat https://www.amazon.com.au/Sandisk-SDDR-B531-GN6NN-MobileMate-microSD-Reader/dp/B07G5JV2B5
I have a very similar character problem with ears on my cr10smrt. I have mitigated it by working on flow and temperature. Reducing temperature really helped.
But when I still get it, I remove it with a mini heat gun on my soldering station (https://www.amazon.com/gp/product/B07SCPZJYS/ref=ppx_yo_dt_b_search_asin_title?ie=UTF8&psc=1). Using the smallest nozzle (about 6mm) and the heat set to PLA temperatures. Those thin wisps just vanish before a surface can be heated up with the tiny heat gun set to the right temp.
I just got my replacement extruder in and it fixed this issue immediately. Here's the link to the one I got:
WINSINN Dual Gear Extruder, Works with Creality Ender 3 CR10 CR-10 Pro CR-10S Tornado Upgraded Aluminum Drive Feed for 3D Printer 1.75mm Filament https://www.amazon.com/dp/B07SY745CF/ref=cm_sw_r_apan_glt_i_NBYY9Z1DMFCBNYECMTKC?psc=1
It's a dual geared feed knob with a much much stiffer spring. As such I couldn't even move the filament by hand when it was stationary like with the OG extruder. And it's working beautifully! Best $16 I've spent on the printer yet
Any glue stick should work fine. I personally use Elmer's purple glue sticks and it works great.
https://www.amazon.com/Elmers-Disappearing-Purple-School-Washable/dp/B003ULCZ7M
I'd still check the leveling even though you're auto leveling the bed. From the pic it looks to my eyes like the left side is lower than the right, so the filament isn't laying down properly. It could just be a bed adhesion issue though which the glue stick will help with.
Creality 3D Printer Accessories Kit with Capricorn Bowden PTFE Tubing 1.75mm, All Metal Extruder, Pneumatic Couplers, Bed-Level Spring for Ender 3/End https://www.amazon.com/dp/B081DN6RM2/ref=cm_sw_r_apanp_9rUQdrlvMm3Kv
Befenybay 2PCS 5mm to 8mm Aluminium Plum Flexible Shaft Coupling D20 L25 Connector Flexible Coupler for 3D Printer CNC Machine and Servo Stepped Motor https://www.amazon.com/dp/B07RMZCLZ3/ref=cm_sw_r_apanp_MiZJqMwFAFTsm
the ender 3 v2 is a good printer but some upgrades will make it better but as a start, if this is ur first printer there is a lot to learn first
I recommend that u starts learning how the printer works and getting to know it better and then work from that
the more you learn the more you realize how little you know
​
but some upgrades to do later when u ar comfortable with ther printer would be
Disclaimer: I am not a Creality owner, mine is on its way - but I am a bit of a hardware hacker.
From the looks of it, that's a serial debug port, not a programming port and as such will not be tied to the pins required to flash code to a completely empty chip.
Typically, the system on a chip (SoC) will run linux, and will send and read raw serial data from its serial console TTY to it. You can see the kernel messages etc, and if it's an interactive terminal you can send commands to it.
They are generally not programming ports. System on chips either have a pin pulled high (or low, depending on design) that throw them into programming mode. If you put a piece of bootloader code on the chip at that stage, you can set it up so it can read the rest of its OS from another location - typically an area in on-chip storage, EEPROM. It may be set up to look for code with a specific name on an SD card and copy that to EEPROM. The bootloader is the "BIOS" of an SoC, for want of a better term.
For example: Arduino's use stock Atmel ATMega chips, but you can't just put a new one into an Arduino board, you need to flash the small loader onto it first.
A bootloader may have code on it that says "monitor this serial port and update the EEPROM if you get the following commands", so it may be possible to program the EEPROM via that port if you already have a working chip
If you are talking about soldering on a new chip sourced from a vendor onto your broken board it will either not have a bootloader on it, or it will have one that doesn't match what you need.
If you want to program a completely chip with the required bootloader you will need to get a hardware chip programmer and a copy of bootloader Creality use
Honestly, it's going to cost more and be far far more work than just buying a whole replacement board: https://www.amazon.co.uk/Creality-Upgrade-Mainboard-Ender-3-Customized/dp/B07TQ2NYXY
take apart your extruder, make sure its not jammed or has broken filament. imo i upgraded my extruder anyway, the stock one is garbage. im not sure which printer you have but i have a CR-6SE and this one fits fine i just needed to print off a filament sensor riser pad to keep everything leveled. https://www.amazon.com/dp/B08D9CNHVN?psc=1&ref=ppx\_yo2\_dt\_b\_product\_details
Yes, the bed is at 60 that's what I printed on when it was working, I even bumped it up a bit. I'm using https://www.amazon.co.uk/gp/product/B07HNWFQPN/ref=ppx\_yo\_dt\_b\_asin\_title\_o01\_s00?ie=UTF8&th=1
Aokin 5 Pcs PC4-M6 Pneumatic Fitting and 5 Pcs PC4-M10 Pneumatic Fitting for Creality Ender 3/3 Pro/3 V2, Ender 5/5 Pro/5 Plus, CR-10/10S, etc https://www.amazon.com/dp/B08FYVHVFX/ref=cm_sw_r_apan_glt_fabc_4S9W9DSS0NPQ87GZA9EA
I just ordered these:
HOPEFULLY, these are the correct ones.
This is the only one that remotely works well. It's still really choppy and there is a delay. But if you just want to check in on stuff, it's the way to go.
EWETON 1080P Webcam with Microphone, USB 2.0 Computer Web Camera with Auto Light Correction, Plug and Play, for Windows Mac OS, for Video Streaming, Conference, Gaming, Online Classes (Black 104) https://www.amazon.com/dp/B08DNQGHWQ/ref=cm_sw_r_apan_glt_fabc_FXKH7TENJG5JY1NDXTCJ?_encoding=UTF8&psc=1
The CRTouch and BL touch cables are unshielded and are susceptible to electrical interference, especially if you have direct drive or if those cables go too near one of the motors. If you are seeing random failures, this is almost certainly the cause.
Recommended fix is to buy a roll of EMI wire sheath for those wires and ground the sheathing to the frame. https://www.amazon.com/gp/product/B01BIBQ940
It is not an immediate upgrade actually. My extruder's plastic casing just cracked after using it for 3 months. But if you want to upgrade it after buying the printer it costs about 17 dollars which is very cheap. There are a bunch of adapters in Thingiverse to align the filament sensor's outlet with the inlet of the new extruder (Because the height of the extruder inlet changes you need to heighten the filament using a 3D printed heightener).
No, It looks awful. Anyway, here is a link to a new cable.
This is what it looks like, they're yellow springs by default:
I myself have opted for these silicone mounts as an upgrade, after having the springs jump sideways a bit during printing: https://www.amazon.com.au/gp/product/B09D3SVM3Y/ref=ppx_yo_dt_b_asin_image_o02_s00?ie=UTF8&th=1
Yes MK8 parts will work. I have a cr10S which is the same as yours but upgraded in some areas. I bought this one in red and works great.
Creality Official Upgrade Extruder, MK8 Extruder Alloy Block Bowden Extruder 1.75mm Filament for Ender 3 Series, Ender 5/5 Plus/Pro, CR-10 Series 3D Printer https://www.amazon.com/dp/B08F23ZNTG/ref=cm_sw_r_cp_api_glt_fabc_EDMRD3P589W5T0BCN4XB?_encoding=UTF8&psc=1
Nope. Microswiss direct drives are trash. I can't stand them. You need one of these https://www.amazon.com/dp/B098TZ2PYK/ref=cm_sw_r_apan_glt_fabc_M0VAPNQC1FDJX1PMZ50E.
This is all I run on my machines. They are incredibly strong and especially if there is a jam. It seriously will pull filament out of a cold hotend. (I have my extruder_min_temp set to 0)
Don't even waste you time with the micro.
The omg is the ONLY system that is available that doesn't require any extra bits. The micro system requires you to print and entire fan assembly to go with it. It's a pain. And it's bulk. The omg unit mounts directly on top on your heatbrake. No additional parts required AT ALL. It is slick as all get out. Plus it has a gear reduction that gives you far more resolution than the standard 1:1.
Please trust me. Don't make the mistake of getting the micro. You will regret it. The omg is by far 10x times better.
lol, didn't mean to give you a research project! I'm not impressed with them at this point, but for reference, here's what I've got:
https://www.amazon.com/dp/B08LZ1V56T?psc=1&ref=ppx_yo2_dt_b_product_details
They may work just fine, and I probably should have installed one on the single Z and run it a bit....instead I installed dual Z and these at the same time. I probably have something else going on, and these probably could have worked, but they added enough resistance to give me an issue so I'm done with them.
> All Metal Extruder Aluminum MK8 Extruder with Capricorn Tubing
If not would you mind linking the product? I opened mine up and I can't figure out how to put it back together...
Thanks for the mention u/inanimateme. You're right I will gladly help.
Firstly,
Take your carbon glass bed off the machine, if it is hot let it cool glass likes to shatter with violent temp changes.
This is a legit bed if you ever ruin yours
Creality Original Self Release https://www.amazon.com/dp/B08N6ZNZ34/ref=cm_sw_r_apan_glt_fabc_EBTKT02W2ZZPFRM21PEH
I have purchased several from this retailer, they are good.
Then scrub it thoroughly with dawn dish soap if you have it, don't need Dawn specifically but I prefer. Scrub your little heart out and then when you rinse you will notice there it seems like the soap bubbles are kind of stuck in the he'd. This is good. Continue to rinse cleanSet up your slicer in the bed adhesion category to run a skirt and set it for 8-10 laps. Hit print and go scroll in to the tune menu. Turn your print speed down to something silly like 30. This will buy you A LOT of time. As your hotend makes its laps, adjust your z-height in the menu, (a few scrolls to the right, meaning "down" in menu) and start dropping your height by .02 at a time or even up if you are digging.
You will get it. Feel free to turn the hand wheels to adjust as well. I don't know what the hell is going on lately but the bltouch isn't doing what it used to.
This bed was specifically designed for PLA. There is literally no reason at all to need glue or hairspray or any of that other stuff. You bury your nozzle in the bed enough it will do the task swimmingly
I’m a noob but it looks like your having a problem with your filament adhering/lifting up from to the bed when you are printing. I bought some bed weld from Amazon and it helps really well keeping the filament stuck to the bed through the complete build.
Ok, from my own experience the mainboard will not detect through USB without a bootloader. Flash the bootloader with the ISP programmer, then it will detect through USB. It's pretty easy once you have the hardware to flash it with.
Heres another flashing kit:
https://www.amazon.com/Printer-Leveling-Accessories-BL-Touch-Creality/dp/B07V4SLSMH
I have not tried this one.
I've been running 2 months so far (several 7 - 8 hour prints) with this: https://www.amazon.com/dp/B08F23ZNTG?psc=1&ref=ppx_yo2_dt_b_product_details
Just having the ability to see what the heck is happening to the filament is a long shot improvement over that plastic POS that came with your printer.
https://www.amazon.com/dp/B098TZ2PYK/ref=cm_sw_r_apan_glt_fabc_P8SKJM6EFSEK9YPHE9YP
This extruder is far better than the micro swiss. You don't have to change the carriage or anything. It mounts directly to the hotend. It's an incredible unit. I have 3 of them.
When the filament comes out it shouldn't curl back up. If it curls back up it might be a clog. I use a cleaning filament and has helped me.
I upgraded the board to an SKR Mini E3 V2.0 and the BTT TFT70 v3.0, it works like a charm with Kersey Fabrications' custom firmware. The biggest issue I had with the control board was manufacturing flaws (and a scammy amazon seller), I had to return the board twice before I got a good working model. So if you are patient and have time to wait for a board directly from BTT, I'd do that.
Sadly, I have posted to fixmyprint several times and came up with nothing that fixed the issue each time. I just found an E5+ post with similar issues that I'm going to look into but otherwise I've gotten pretty fed up troubleshooting and getting no results.
the pneumatic coupling is probably broken.
Get some new ones, search for PC4-M6.
You can also go and upgrade the extruder with a metal one, these are using PC4-M10, the same as the hotend so that is more convenient
I’ll link the ones I bought but they’re generic chinesium ones but they’ve been working ok for me.
However if you care about quality Amazon isn’t really the place to look for it. I’d recommend someplace like microswiss directly.
Good idea, I'm thinking pvc pipe would work, too. They have 90 degree corners and are pretty cheap.
I think this will just fit my ender so I am going with this: link