
What are
/r/DIYUK's
favorite Products & Services?
From 3.5 billion Reddit comments
The most popular Products mentioned in /r/DIYUK:


![Brennenstuhl Moisture Detector MD [BN-1298680]](https://m.media-amazon.com/images/I/419tsWHBRCL._SL500_.jpg)


The most popular Services mentioned in /r/DIYUK:
The most popular reviews in /r/DIYUK:
That looks like a wood screw / self tapper. You need to first drill a hole, put a rawl plug in suitable for the screw size you are using and then screw into that.
Something like these (you can buy them pretty much everywhere)
Rawlplug Uno Plug (Trade Pack of 288) - Red https://www.amazon.co.uk/dp/B000Y8NO0Q/ref=cm_sw_r_cp_api_glt_fabc_KXAJEXY3KPN91PY3C1X6
These handles look like they are Mila ProSecure handes which come with either a 5 year or 10 year surface finish guarantee (depending on the finish).
I'd contact the manufacturer first to see if they will honour the guarantee if they are only 2.5 years old. Check the tech specs to make sure you get the right sizes.
My bed that size has two sets spanning from the edge and meeting at a centre support in the middle. Beech is good for bed slats and ideally with a slight bow. There are readily available sprung slats you can buy. Just search for “sprung bed slats”. One example out of many is:
https://www.amazon.co.uk/dp/B009T4SIDY/ref=cm_sw_r_cp_api_fabc_jG0cGb2VSNCY7
I have the original model of this and swear by it for cleaning rollers and brushes. I've probably used expletives by many inventions over the years but the dandy has been the dogs undercarriage for changing colours in seconds in the family for two decades now.
Looks like I mispoke, they do do combination ones. That should do you.
You want the AD Foam Lance.
This: Snow Foam Lance Karcher Connector with 500ml of Magifoam - By Autobrite Direct https://smile.amazon.co.uk/dp/B00GU1YYA0/ref=cm_sw_r_apan_glt_fabc_JK9W1TEJ65D658J5432M
Make sure it's the correct connector for your pressure washer
You will want to get a Nilfisk or kärcher pressure washer if you want to be compatible with snowfoam lances. I would say to get a cheap one by either of these manufacturers.
As for snowfoam, not sure what's best. I normally buy whatevers cheap tbh, as the foam Lance eats through it super quick. Buy it in 5l bottles online.
Hope this helps
Ah. I see. Would this be any good as a temporary fix without having to pull the bath out?
These tools are great for finding the mitre cut angle
Yes it appears to be mould. First port of call would be to get a good mould removal spray and give it a good clean. It could just be on the surface, how it looks after a good clean will dictate if you take any further steps. Looking at it the mould probably has penetrated the sealant and will be discoloured without replacing it.
If you aren't happy with the look after a good cleaning, the only real option would be to re-mastic the area with a good mould resistant sealant for bathrooms (you'll generally want to get the tool to apply it too as I have seen people try it without).
The above isn't a recommendation, just the first google result for the sort of product you are looking for. You want mould resistant for a bathroom all day long. The two main options are white and clear, the images look like a shower tray so it's likely white sealant on the bottom and clear (it's more opaque but that's another topic of discussion entirely).
Doing the job DIY is pretty easy, there are great tutorials on youtube if you google 'replacing bathroom sealant' and I'd advise watching a video or two in full before you set out on the journey but it's a one * our of five in terms of difficulty.
If this is a rented property, then I'd be of the plan of just leaving it and keeping it cleaned on a regular basis so it doesn't get worse. Sealant wears out, it needs replacing over time, some landlords can be very bad at caring about it and eventually it ruins the grout and all the sealant. If it really worries you then you can try these sorts of pens but I will say from what I've seen they are generally pretty rubbish.
https://www.amazon.co.uk/Sealant-Pen-Silicone-Whitener-White/dp/B07K1FCZNN
Is the tap hose a small European size (3/8")? If so and if the shower hose is standard 1/2" then this might work https://www.amazon.co.uk/dp/B007JWZRFU/ref=cm_sw_r_cp_apa_glt_fabc_KC23BATF7CX99HYFGH4Z?_encoding=UTF8&psc=1
It might not be a decent 'spread of light' but Charlie DIYte recommended this runners headlight and it's been the bee's knees for me.
Even with such a directional beam, the strongest setting is so powerful I've blinded poor Mr Adhara with it!
I don't think you should be paying him so maybe give him a chance to repair the damage first.
If he refuses to correct it, you're stuck with these tiles now so they need fixing.
What I'd be doing is using this 3M headlight restorer kit that attaches to a cordless drill. It should have everything you need in it to be abrasive enough to take the scratches out with T-cut-like paste, then gradually polish back up to a shine using various stages of wet sanding pads and buffing pad. The reason I'm suggesting is that in my head it needs to be quite delicate and I know this kit brings a headlight back up to a crystal clear transparency with no markings as I've used it a few times.
In another similar thread on here someone recommended Sweet Home 3D which is free.
I've had a play with it and planned our future kitchen with it. It's nice and simple to use IMO.
I have this type of shower drain and have replaced the trap a couple of times with one of these after the chrome starts tarnishing: https://www.amazon.co.uk/Mcalpine-ST90CPTOP-Replacement-Shower-Cover/dp/B00KGE7F1W/ref=mp_s_a_1_3?dchild=1&keywords=shower+trap&qid=1629473932&sr=8-3 Edit: spelling
They will work with concrete, as long as anything isn't buried deep, but you should only need to drill 40-50mm into it for a rawlplug fixing and screw. also if you are only hanging pictures, consider these also Picture Strips we use these for some quite large pictures and they are great, you can also easily remove from the wall. Also agree with Nicknoxx comment also, but if you are only wanting to drill a few holes an ordinary hammer drill will do, just keep the drill straight to get a clean hole.
I bought this which has a flexible and pivoting attachment about 5 years ago, and still going strong. Used on lots of furniture and DIY inc. power tools.
Use these fixings
Or similar, you can get them from screwfix or toolstation as well.
They won't have any issue holding your monitor.
Do you have an immersion heater in the hot water tank? If so, check it's not permanently switched on.
Otherwise, it's just a process of elimination to find the culprit. If you can go around the house with one of the plug in electric power meter (like this) and checking everything to see what's consuming a lot of juice.
There's a very minor chance someone not in your property is using your electric supply or if you have a lodger, check they're not crypto mining.
I have a pair of these. pliers
They're an excellent way of pulling nails/staples out of things as the curves head allows you to lever sideways once gripped onto the nail.
This is a good investment book. There are secondhand copies available:
Or this, which has broader scope. Again, there are secondhand copies:
Sounds like you want to do something like this but with a longer cable? I used this in my last house and it was great. But it was only a meter from the house.
BG Electrical WP22KIT/3 Outdoor Weatherproof Double Switched Socket Kit with RCD Plug and 3 Metres of Cable, IP66 Rated, 13 Amp, Black https://www.amazon.co.uk/dp/B004KL0A8W/ref=cm_sw_r_cp_api_glt_fabc_G4BEY21TVGNDE020PPVA?_encoding=UTF8&psc=1
Following this thread as I want to do something similar but I’m thinking of getting a circuit wired in properly to have a few sockets in the garden back to the main fuse box.
HAFELE Duo Standard Flap Lid Stay Lift Support System for Kitchen Wardrobe Cupboard Cabinet Door Open Upward and Downward Self Closing Hinges Germany Brand Silver Pack of 1 https://www.amazon.co.uk/dp/B07DQRM5P5/ref=cm_sw_r_cp_api_glt_fabc_H37WV45RB5WJXDH59DNY
I got one of these for a similar job. It’s an excellent piece of kit.
OX OX-P531030 Speed Skimming Stainless Steel Flex Finishing Spatula - Multicolour - 300 mm https://www.amazon.co.uk/dp/B071D8GM4S/ref=cm_sw_r_cp_api_glt_fabc_GEFGV9DFNCSTYWGTXPPZ?_encoding=UTF8&psc=1
You'll need some basic tools like screwdrivers and get your self a voltage tester like this https://www.amazon.co.uk/Kewtech-KEWSTICK-UNO-Non-Contact-Voltstick/dp/B00H50R85I/ref=mp_s_a_1_3?dchild=1&keywords=Volt+Stick&qid=1619503147&sr=8-3
You hold it against a wire and it'll beep if the wire is "live" (flowing with electricity). As a rule you should always test with a volt stick (when live to check volt stick is working), switch off at fuse box then test again with a volt stick. Electrics are reasonably simple but it'll hurt like fuck if your shocked or possibly even worse, just be careful don't rush and check out YouTubers or online guides as others have mentioned.
Wet & Forget - You have to be patient but it does work https://www.amazon.co.uk/Wet-Forget-Mould-Lichen-Remover/dp/B005IW4GWI/
https://m.youtube.com/results?sp=mAEA&search_query=wet+%26+forget
Personally I've always used these type of fixings.
They pump up into the plasterboard and I've not had any fail.
I hang 85 inch displays off of these with the work I do.
Use something like Zinsser ZINGS1L GS1L Gardz Sealer Primer 1 Litre, 1L https://www.amazon.co.uk/dp/B00I8MK34A/ref=cm_sw_r_cp_api_fabc_zTRbGbQDYVXX7 this will seal the flaky paint and prime the bare plaster, it won’t make the wall smooth but fix the issues your having applying the paint
You need Zeebo...https://www.amazon.co.uk/Stovax-Black-Woodburner-Graphite-Polish/dp/B0035XHWPA Mix half the tube with white spirit until you get the consistency of a thick paint. Wipe down the fireplace with a damp cloth and allow to dry prior to painting on the Zeebo paint mix... Don't ask me how the actual box states how you should apply it. My first job from 14 to 18 was in a fireplace shop and I have painted Zeebo on hundreds of old cast iron stoves and fireplaces and the white spirit mix was how I was taught to use it. if you want a Matt finish after its dry just leave it if you want a shine use a big shoe polish brush and buff it up. The Zeebo paint will have a slight smell but will not last long, don't get it on anything else other than the fireplace as it will not come out... Once dry and on the fire it doesn't come off so only an issue whilst still wet ʘ‿ʘ
I'll add, get a set of these (or at least the blue square one in the middle). They make getting a neat line a whole lot easier.
https://www.amazon.co.uk/Silicone-Sealant-Finishing-Tools-Applicator/dp/B077RRXVMV
We've got one of these down that we use to dry the dog on, take wellies off before getting to the carpet. Doesn't move around and is pretty sturdy.
https://www.amazon.co.uk/dp/B06Y6C76ZK/ref=cm_sw_r_cp_apa_fabc_Y9D3FbQMK1F97
They look like Torx headed screws. You will need Torx screwdrivers or bits as normal Phillips screwdriver won't grip/have enough traction to unscrew them.
Like these: https://www.screwfix.com/p/magnusson-tx-screwdriver-set-6-pcs/7554v
Or these: https://www.amazon.co.uk/dp/B01GZWT5FW/ref=cm_sw_r_cp_apa_fabc_-Zr1FbP5NC90E
I'm not sure if mine is the HR2630 specifically, but it's near identical from same family and price point. Like I say, got it 4 years ago now (actually nearly 5) and it's been through two house renovations and a DIY extension build so far.
Realistically, I wouldn't be shocked if it died soon - the original 18v Combi Drill I got at the same time did a few weeks back, but it really doesn't owe me a penny. I mean, I have absolutely beasted this thing both for drilling and sheer destruction.
Edit: Just checked, and it was the 2630 from here, specifically: https://www.amazon.co.uk/dp/B01636IZ0G/ref=pe_385721_51767431_TE_dp_1 - I paid £115, and tbh, if it broke I'd probably just buy the same one again.
If I did have to find a criticism, I'd say it's not very compact compared to some. But it's got hammer only mode and a clutch which, for £105 makes it an incredibly versatile piece of kit IMHO.
The other advantage of corded is, of course, it can do everything a combi drill can. So if you do run out of charge on your 18v tools, you've always got an immediate backup - though to be fair, they charge stupidly fast anyway nowadays.
Top tip: send a drone up there first to see exactly what you're dealing with. Someone in the building might even have one. EDIT: Just seen you're thinking about it, but use a person not a company. Lots of kids and some adults have drones these days, no point paying a pro for a quick look.
Next, phone some pressure washing companies, they might have some extra long tings to get in there. I know my mate can do at least 3 storeys.
Finally, you can get gutter snakes (gutter brushes) to leave in, which stops leaves clogging.
Yes, you want a cheap box spanner to deal with them. I did the job on my bath tap at the weekend. This bad boy will have them off in minutes.
I did use a basin wrench for the flexis though. This style.
FLASHBACK CENTRAL!
also known as PTSD for those who've had to deal with hand held showers in baths.
If you've got something to hook it to, this looks like a much better version of what I had to put up with.
https://www.amazon.co.uk/Croydex-Removeable-Universal-Connectors-Retaining/dp/B000TAN37S/
Remember, you'll probably need a shower curtain too.
Sorry, no just offering an option, I haven't used this product. Really, without significant work, your only other option is to swap the tap out for a mixer with a shower outlet, like this.......
Hi,
You could use some Insulated blanket stapled to the underside, that would make a difference.
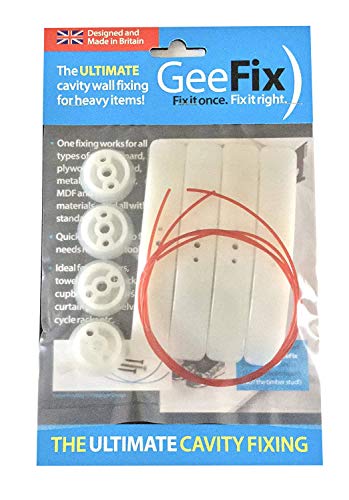
I would use some Corefix fixings, the come with a steel sleeve which bridges the void between the plasterboard and the blockwork
You can buy it from your local plastic place, look online they sell fascias and gutters as well.
It will look nice!
I got these for my mum, as her house is on a corner with no light near the door number, and no light where her bins were, they light dimly until someone gets close them ramp up a bit for a short period before dimming. https://www.amazon.co.uk/dp/B089KCWSZR
What about "lift off" door hinges, that lift the door as you open it.
I’d suggest this, would look really good I think. https://www.amazon.co.uk/Rabbitgoo®-Privacy-Frosted-Sticker-Protection/dp/B077FH25JH/ref=asc_df_B077FH25JH/?tag=googshopuk-21&linkCode=df0&hvadid=310816600988&hvpos=&hvnetw=g&hvrand=6957871885257266043&hvpone=&hvptwo=&a...
I’ve used milliput putty to cover over a candle burn in a uvpc window before! This is bigger, but worth a try perhaps. Lightly sand to level it out then pop some of this on. Would take a close inspection to notice on the one I did.
https://www.amazon.co.uk/Milliput-Epoxy-Putty-Superfine-White/dp/B07VDWZ9PJ
Not sure about plastic ones exactly like the image, but I've found this plastic one and a few other ones that can be tiled to match in.
https://www.akw-ltd.co.uk/products/shower-niches/
https://www.amazon.co.uk/Nassboards-Shower-Niche-Installation-Improvement/dp/B08TP9LHB8
this is the tape i used, as needed between the upvc and existing black rubber, and doubled it in the worst corner. most of my diy supplies are from amazon, sometimes they'll have a near perfect chinese item that can't be found elsewhere https://www.amazon.co.uk/fowong-Adhesive-Weatherstripping-Draught-Excluder/dp/B087P8LSD5
It looks like a 12v unit fed from a transformer possibly on top of the cabinet.
This sort of thing:
You need to vent the room … mould > try HG Mould remover … it’s strong & kills mould … be careful using it as can stain or damage clothing
Do the windows have vents ? You need passive vents … slide them open
Dehumidifier… can help … you can get different sized units … gumtree or eBay > used one to save £ etc
Walls should dry out if you heat the room … dry it out then try remove the mould … get the balance right between heat / ventilation
If it’s flats the it’s probably a riser cupboard and would be a square T Bar
Stippled painted ceilings use a textured paint with something like plaster blended through
I don't envy picking the adhesive off. I'd scrape it smooth and try matching it.
There are textures smoother and coarser to try and match however.
There's probably a trap around the lip of the drain, hard to tell from the photo. The design is rather annoying though and gets clogged with hair and whatnot pretty quickly, which is nasty to remove because it's just sitting in water. I got a hair catcher to replace the cover like this one: https://www.amazon.co.uk/gp/product/B06W2MPGZV/
This looks like the product on amazon, may have some sort of instructions?
I recommend (if you can) purchasing a hygrometer https://www.amazon.co.uk/ThermoPro-Thermometers-Hygrometer-Temperature-Humidity/dp/B07P996ZKJ/ref=mp_s_a_1_29?adgrpid=140800684549&gclid=EAIaIQobChMI59uCzLfq-wIVV-vtCh36Zg6cEAAYASAAEgJp-fD_BwE&hvadid=621635744331&hvdev=m&hvlocphy=1...) and placing in the most problematic rooms to understand your humidity levels. As others have stated - lack of air circulation so as counter intuitive as it is in winter make sure you open your windows. Secondly, again as someone has mentioned, where is moisture being added to the house? Open windows and switch on vents when cooking, keep your bathroom door closed and window open when showering etc.
A window vac is useful if you can afford one- clean down the shower after use, clean down the windows in the morning.
Heating will help as well, but given reduced usage this is leading to increases in mould etc.
So in short- open your windows and ventilate, Reduce the moisture volumes in your home.
You will want to get that mould cleaned and cleared- so get some decent mould spray and get that cleaned down and ventilated asap.
Report to your landlord in case you can claim some of your costs back. They should be checking windows and heating systems to mitigate this also.
Lots of handy stuff info here:
I would suggest buying a dehumidifier to suck all the moisture out of the air. Really do try to avoid drying clothes indoors if you can or if you have to, try to run a dehumidifier.
Another tip is don’t bother using bleach and water to clean the mould as it won’t kills the spores. You need proper mould killer such as HG mould spray from Tesco. Or screwfix do a no nonsense mould killer. These products have fungicide in them so will kill the spores
Might also be worth buying a couple of cheap hydrometers from Amazon to measure your humidity levels
Make sure loft insulation topped up and see if you can get cavity wall insulation. Draught proofing can also have a really big impact on heating demand and thermal comfort. I have done the following:
Draft proof external doors and windows using foam tape and brushes (~£40)
Fill in any air vents in wall which are not needed (e.g. for fireplace) and close any trickle vents above windows (free)
​
Get heated clothes airer and dehumidifier for drying clothes (£100-150)
As others have said, a new shower bar mixer is easy to fit with the water off and cheap.
A bit bodgy, but you can get inline valve for showers that go on the end of the hose.
I got one so I could use a normal head on a camping shower - now that's it's not outdoor shower season, it's back in my house as a second head, which I keep on, but switched off with that.
Edit: this - https://www.amazon.co.uk/dp/B01767Q1VQ
At the front and back of your house at the eaves (where the brick meets the gutter) there might be loads of tiny vent holes.
The insulation can be pushed right up to them reducing airflow over the attic.
https://www.amazon.co.uk/Suregreen-Plastic-glazing-insects-entering/dp/B00H0KBE4E
Look at the fourth picture they might look something like that
Hi there, thanks for the very detailed reply!
The wire appears to go into the bottom of the hot water tank, maybe there is a heater in there that can heat the tank instead of boiler? Not sure.
We do have solar panels but not sure if they are linked with the hot water system.
Do you think we would be able to install something like https://www.amazon.co.uk/tado%C2%B0-Radiator-Thermostat-Universal-Mounting/dp/B098B2XP8C/
Into the system, I have emailed on CheckaTrade for getting a boiler service and for possibly fitting a smart thermostat.
Thanks
Put in some lower wat ones (i'd put in LED personally)
Plenty.
The bulbs are a G9 fitting
Yours are 220 Lumens) (19 Watt)
These, for instance, are 145 Lumens (10 Watt)
(I think Diall are a B&Q Brand, but the brand doesn't matter, just the fitting)
Foam gap filler then seal https://www.amazon.co.uk/Everbuild-Sealant-Joint-Backer-Metre/dp/B006PFYMLM/ref=asc_df_B006PFYMLM/?tag=googshopuk-21&linkCode=df0&hvadid=309876590586&hvpos=&hvnetw=g&hvrand=845863302888771095&hvpone=&hvptwo=&hvqmt=&hvdev=c&hvdvcmdl=&hvlocint=&hvlocphy=9046574&hvtargid=pla-697929978906&psc=1 ? Or can you get some insulation to stuff in then seal so you prevent having a cold spot?
These may also help
The screw goes into a threaded sleeve rather than trying to bite into wood (which isn't there)
maybe one of These the get inventive connecting it :)
British conservatories - too hot for 4 months, too cold for 6 months. They'd be better with an insulated opaque roof (a sunroom - now that is a good idea) to keep it cooler in summer and warmer in winter.
I'd fit a horizontal layer of lightweight foil insulation at ceiling height.
You could try using hooks like these https://cpc.farnell.com/rolson-tools/61331/adhesive-metal-white-hooks-35x31mm/dp/FN03775 just poke the hook part through a small hole in the foil from below - the hook base will hold up the foil layer. Duct tape would work too but then you'd have to remove it all afterwards. Long bungees? Guy ropes? It just depends how your conservatory is constructed. Probably just a stupid idea ... like conservatories in the UK.
>We’ve been told this is because they don’t have an off state
Minimal opening for frost protection?
However, if they can't be turned off then you would have to drain the system to remove any radiator i.e. if they don't fully close then you cannot isolate the radiator for removal.
>if one is totally off why are some warm to the touch and 2 feel like they’re half on.
No experience with these TRVs, so this could just be a balance issue: some radiators receive a flow because of their location in the circuit? If so, you can turn the lockshield on t'other side of the radiator to restrict the flow further.
How about Einhell Power X-Change 18V Cordless Chainsaw With Battery and Fast Charger £99 at Amazon?. Not going to be chopping down any forests with only 1 18v battery, but should be good for general garden jobs - according to Camel Camel Camel it seems the cheapest it has been this year .
I've got this Makita one, nice bit of kit for home use... had an older one, not sure what model that got nicked so I got this one this year
https://www.amazon.co.uk/dp/B00ID86YVK/ref=pe\_27063361\_487055811\_TE\_dp\_1
Note - that power adapter has a 120v input. Not 230V.
Replace the lot with:
https://cpc.farnell.com/powerpax/sw4366/ac-dc-power-supply-24v-500ma-2/dp/PW02775?ost=pw02775
You'll need to cut the wires on the old one and the new one and connect them. It's low voltage.
Terminate the cable in a junction box. Connect from JB to light.
>not sure how to lift and hold the brick back in place while the mortar sets.
2 bits of wood screwed together .....
Don't these brick arches work under compression? The minute one brick is removed your relying on the mortar adhesion ........
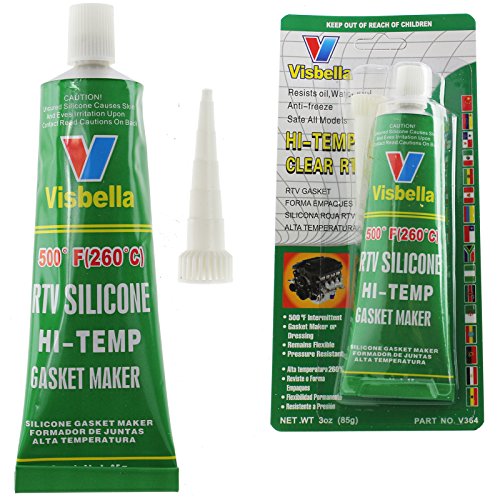
God sorry I was putting my 1yo to bed when I typed this. Yeah mastic a good quality one used properly should hold it.
Something like this would do as well. https://www.amazon.co.uk/Visbella-Silicone-Gasket-Temperature-Resistant/dp/B00XLO2LTK/ref=asc_df_B00XLO2LTK/?tag=googshopuk-21&linkCode=df0&hvadid=255708777834&hvpos=&hvnetw=g&hvrand=13223585332736075116&hvpone=&hvptwo=...
Buy a heated over blanket?
https://www.ebay.co.uk/itm/143004672776
https://www.amazon.co.uk/dp/B074TJBV7P
Probably less costly than any DIY solution against the cold as this shed sounds a little like it's going to be expensive to keep the heat in without some serious work. I use one in my home office so I don't have to use the main heating.
Putting up some soft furnishings on the walls can help insulate out the cold, just runs the risk of mould.
https://www.amazon.co.uk/VIPITH-Remover-Cleaning-Kitchen-Bathtub/dp/B0749MVS7F
If it's unblocking u-bends of crud I find a drain snake works wonders for unblocking all that hair and ick.
You can get them in smaller pack sizes on places like eBay for less money, probably can on Amazon too but that was the first link that loaded up for me. It's just moulded plastic so if you're not in a rush aliexpress etc can be even less again.
I'm a new homeowner/new casual DIYer and I got this Bosch drill from Amazon for £45 on sale. It's so close to Black Friday that I'd wait to see what deals pop up if I were you. I also got this Bosch accessories set which has contained everything I've needed for a variety of projects.
Personally I wouldn't spend £150 on a drill as a first time DIYer. For shelves, furniture etc that seems like overkill. My drill almost certainly isn't the most powerful on the market, but it's fine for my needs, I've used it for masonry drilling with no issue. If my DIYing gets to the point where I feel a better drill is necessary then I'll get one, but until I know I need one I'm not going to shell out that money!
There are fans with humus that’s built in, or you can get a separate box.
This is the one I have: https://www.amazon.co.uk/Manrose-MAN1361-Remote-Humidistat-Controller/dp/B00GZ6EYSC
It can be wired up so that it turns on when the pull cord is pulled, and comes on when humid. Or you can leave the timer unwired, and then it will just come on when humid - this is good when you are using the bathroom for a minute and not having a shower and don’t need the fan to turn on.
If cleaning/lubricating doesn't work, you can replace the pop-up mechanism; note that there seem to be a few different types so be careful what you order. I used these ones, but your plughole may need a different kind: https://www.amazon.co.uk/gp/product/B0787ZJLS9/ref=ppx\_yo\_dt\_b\_search\_asin\_title?ie=UTF8&psc=1
That looks like your ring main on the floor which should be fixed above ground via some clips. Id get some 2.5mm clips and maybe some steel band and clip both up.
Be tempted to say those pipes should be suspended from the joists with some steal all band also just to keep them away from the ground. Being in-contact with the ground will increase the risk of freezing
https://www.amazon.co.uk/Galvanised-Steel-Fixing-Perforated-Builders/dp/B08M3L7YYZ/ref=sr_1_5?crid=3KOJL92SR2RT4&keywords=all+band&qid=1668283880&sprefix=all+band%2Caps%2C332&sr=8-5 https://www.amazon.co.uk/Hardware-BH02511-Earth-Cable-2-5mm/dp/B00OBFRBXE/ref=sr_1_4?keywords=cable+clip+twin+%26+earth+grey+2.5mm&qid=1668283969&sprefix=2.5mm+clip+twin%2Caps%2C139&sr=8-4
If that’s a plasterboard wall I’d just stab through it and drop them down inside, if you are unlucky you’ll have to open up an extra gap and cut through a noggin. If it’s plaster over brick chase it it with an angle grinder for the edges and a 40mm SDS chisel bit then put in trunking.
Then make it good, tile it and finish it with brush plates
I would use one of these - runs on Diesel and can easily be fitted to a log cabin. Lots of heat from one of these.
https://www.amazon.co.uk/VEVOR-Control-Silencer-Parking-Motorhomes/dp/B08MZJ9YGF/
No idea if it is any good, meant for a tent I think
https://www.amazon.co.uk/Portable-Outdoor-Efficiency-Convenient-Operated/dp/B0BGGGXZX4/
In which case it should have it's own RCD on the end if it's just plugged into a normal socket inside the house.
​
Something like this
What kind of sander and sand paper are you using? Ideally you'd want something low grit (60 would work nicely) and a belt sander for doing a room/wall
Top tip is don't press too hard, let the sander do the work and you can actually clean sand paper off believe it or not but its not usually worth doing if your technique is there you wear out the grits before its worth cleaning them - https://www.amazon.co.uk/Sruhrak-Abrasive-Cleaning-Sanding-Sandpaper/dp/B0B2RMB3QQ/ref=sr\_1\_6?keywords=Abrasive+Cleaning+Stick+for+Sanding+Belts&qid=1667384281&qu=eyJxc2MiOiIxLjI5IiwicXNhIjoiMS4zMyIsInFzcCI6IjAuNzIifQ%3D%3D&sr=8-6
Goo Gone, or this cheaper version from Amazon I’ve been using for years, works amazingly!
Yes, do you have a power socket in the loft? Passive splitter (which don't need power) are a bit rubbish and only properly work if you are close to the transmitter.
Passive splitter...
https://www.amazon.co.uk/Passive-2-Way-TV-Splitters/dp/B075W9NCQB
If the box is the same size you might get away with using a repair clip or similar. The sides look a bit chunkier than a regular box, but something like this might work. https://www.amazon.co.uk/Replace-Damaged-Installed-Electrical-Pattress/dp/B08BLNR3K6/ref=mp_s_a_1_4
I currently have this extension tower due to a lack of plugs on one side of my living room.
PS5, PS4 (admittedly not use at the same time as PS5) TV, Laptop charger, IHD, PC and phone dock all on at the same time.
Nice, thanks for replying. So something like this:
https://www.amazon.co.uk/Gunpla-Groove-Adjustable-Multi-Grips-Spanners/dp/B07CYYP41M/
Regarding the hose, I can't just refit the old one? Are the attachments at either end of the new hose standard? So no issue attaching to my existing fitting and shower head?
It's a brass terminal. My guess is it would be for wiring a push for an electric bell so the occupants could have a bell push near their chair or on the dining table or similar. There should be / have been another one close by, maybe it got lost in the past. The whole thing would have run off about 6 volt battery.
You can still get them.
https://uk.farnell.com/deltron-components/351-0000-01/binding-post-30a-2ba-panel-nickel/dp/1101093
Probably not, unless you inted to glue it to the lense. I've had luck with this: https://www.amazon.co.uk/Visbella-Plastic-Welding-Anything-Ceramic/dp/B07PN2N47N/ref=sr_1_5?crid=3VT1XH6JRW4EQ&keywords=uv+glue+pen+and+light&qid=1666757246&qu=eyJxc2MiOiI0LjYzIiwicXNhIjoiMy44NSIsInFzcCI6IjMuNzEifQ%3D%3D&sprefix=UV+glue%2Caps%2C2658&sr=8-5 But results can be hit or miss
If you are staining rather than painting, then no. A primer will seal the wood and may prevent the stain from soaking into the grain.
The most important piece of prep you need to do before staining is sanding the wood fully. Applying a stain can make previously invisible imperfections from milling jump out.
If you are staining a soft wood like pine or fir you could use a stain conditioner first ( something like this ) which will allow the wood to stain more evenly. Otherwise you can end up with streaks and blotches.
That said, I find that wetting the wood before the final sanding (to raise the grain) is sufficient and stain conditioner is not really needed.
either a deeper back box as already advised here of a spacer surround like this https://www.amazon.co.uk/Schneider-Electric-Lisse-1-Gang-Spacer/dp/B07FJ9C8J8/ref=sxin_15_pa_sp_search_thematic_sspa?content-id=amzn1.sym.4126c873-2fc2-4af4-a461-de9124226761%3Aamzn1.sym.4126c873-2fc2-4af4-a461-de9124226761&crid=2WZMFIF2MFOGE&cv_ct_cx=light+switch+surround+riser&keywords=light+switch+surround+riser&pd_rd_i=B07FJ9C8J8&pd_rd_r=78ff4bcd-8cdd-4c7f-a27e-da68f8f230a2&pd_rd_w=6YNrS&pd_rd_wg=GuWcx&pf_rd_p=4126c873-2fc2-4af4-a461-de9124226761&pf_rd_r=M4NN0EAMGFWPRGYS82QE&qid=1666641489&sprefix=light+switch+surround+raiser%2Caps%2C81&sr=1-3-b75715df-0cbd-4312-a971-de5362256967-spons&psc=1
Depends on your work vs eisthetics. I couldn't be arsed to chibble out and sink a deeper box for the sake of a couple pounds and minutes to sort :)
Felt it properly over the top of the existing felt, then pin it down with clout nails in the prescribed manner. Pick the size of nails based on how thick the roofing material is.
Some clout nails like this is what you are after, pichttps://www.amazon.co.uk/GALVANISED-ROOFING-FELT-CLOUT-NAILS/dp/B007OC4BB6/
Basically do exactly as shown in this video over what you have currently. It will help protect the structure more than removing what's already on the shed and starting anew.