
What are
/r/LegendsUltimate's
favorite Products & Services?
From 3.5 billion Reddit comments
The most popular Products mentioned in /r/LegendsUltimate:


The most popular Services mentioned in /r/LegendsUltimate:
Retropie
JoyToKey
Wimi
ImgBB
BlueStacks
spacedesk
The most popular reviews in /r/LegendsUltimate:
This one I used is back in stock.
https://www.amazon.com/gp/product/B08YZ2XH5T/ref=ppx_yo_dt_b_asin_title_o09_s00?ie=UTF8&psc=1
You'll have to do the ribbon cable on your own, but this one is slim and barely protrudes from the backbox ledge above the playfield.
I would definately use a widescreen monitor. DMDs are 4:1 ratio, so it would probably look off if you used a 4:3 monitor.
​
Edit - it says in stock soon, but delivery by July 6-15
Read this first: https://www.reddit.com/r/LegendsUltimate/comments/m6km3z/legends_ultimate_11gamer_pro_hardware_info/?utm_medium=android_app&utm_source=share
Take apart the control panel. There are 8 screws on the bottom side. Be very careful when you pull the bottom off because the plate for the USB/Power/Control wires will snag up and the pinball wires inside are very short. Don't just rip up on it like an ape.
Inside is the button/joystick encoder. Look on that for any loose wires or connections. For a quick look at what I'm talking about, see this: https://imgbb.com/0ftHSrY
Folks have already offered up suggested glass cleaning products so I won't add to the list; for the plastic backglass however, Plexus may be a decent product to use:
https://www.amazon.com/Plexus-Plastic-Cleaner-Protectant-13-Ounce/dp/B00092CKN4
Apply with a microfiber cloth, keeping in mind that not all microfiber cloths are created equal.
Any 4-port 3.0 hub should be good for under 20. I’m using https://www.amazon.com/Sabrent-Individual-Switches-Included-HB-UMP3/dp/B00TPMEOYM with my ALU but you might want more ports - for under $30 you could get a 7-port powered.
Just look for something with lots of reviews and close to 5 stars.
I'm gonna give the beelink sei8 mini computer a shot. Worried that the gpu won't have enough juice but will just return it if it doesn't work out.
https://www.amazon.com/dp/B08SGCQRYX?psc=1&smid=A3L6XUY0XY9LG1&ref\_=chk\_typ\_imgToDp
Appears there is some interest in this so I am posting pics of mine. Got them from Amazon. Very easy to install, if you figure out how to remove the existing spinner top you can figure out how to install these.
Here is a link to them on Amazon:
Enjoy
Will something like this suffice?
​
Thanks for your help
I am using an hdmi SPLITTER (not switcher) to split the signal from PC to PC monitor and the legends pinball. Both must be the sam4 resolution of 1920X1080
https://www.amazon.com/gp/product/B07ZRBDR4R/ref=ppx_yo_dt_b_asin_title_o06_s00?ie=UTF8&psc=1
I bought this and it works perfectly:
Monoprice 6ft USB 2.0 A Male to A Male 28/24AWG Cable (Gold Plated) - Blackfor Data Transfer Hard Drive Enclosures, Printers, Modems, Cameras and More! (105443) https://www.amazon.com/dp/B002KKZRYM/ref=cm_sw_r_cp_api_glt_fabc_GWHWWAZ43TB6RPWM4K1B?_encoding=UTF8&psc=1
That and HDMI and all set.
If you buy a low profile card it will not stick out so much.
mine is on order so I haven’t been able to investigate, but I want to find taller screw levelers. How tall are the included feet? TOVOT 4 Pack of Adjustable Furniture Leg Leveling Glides/Screw On Adjustable Furniture Table Chairs Levelers with Nut- 1.96" Dia Base,5/16-60 Thread Size,3.15" Thread Length for Furniture https://www.amazon.com/dp/B07R57CHSP/ref=cm_sw_r_cp_api_glt_fabc_8YHV7CBR5ZDC4W51WDRA
I got this from Canadian retailer BuyStuff Store that AtGames has a retail partnership with. I’m from the US (Michigan), but was surprised that I got free shipping. It’s $75 Canadian, which equates to $65.21 US. I ordered last week Monday, it shipped Wednesday and Delivered today (7 days total from initial order).
It was easy to assemble. I like the matching black and chrome. It also has little plastic feet on the bottom (see one of the pictures) which definitely help in sliding the machine away from the wall. So far, I’m digging it. The cabinet is secure and doesn’t wobble in it.
I chose the 3” riser (which raises the control deck to the level of an Arcade1Up with riser), but they have a 5” version as well. They also make them custom for whatever version of ALU you have (one for 1.1 and two types for the 1.0). make sure you know what type of machine you have. They have a picture that helps identify between the two ALU 1.0 machine builds (Sam’s Club and Walmart apparently).
Those stools are new too. Seem nice so far. Here’s a US Amazon link to those.
my pc is upstairs, my legends is downstairs. I stream from my pc upstairs and zen pinball works great. But NOT on wifi - I had to get a line adapter kit - I bought this one here:
​
​
After i got this, the latency has been really good (on wifi it made game play impossible).
You can buy the exact same hardware on Amazon right now for $118 US dollars
VSDISPLAY 14.9" 14.9 inch 1280X390 LCD Screen LTA149B780F with HDMI DVI VGA Audio LCD Co... https://www.amazon.com/dp/B07QGBL568/ref=cm_sw_r_sms_api_i_bcxsFb...
Hi, So that was about two years ago -
The speakers I put in as I recall were "High Quality" but I eventually took them back out because they really didn't make much of a difference. I mean sure they were a little clearer, but the overall impact wasn't that great of a difference and the speakers were kinda expensive, so I sent them back and got a refund.
Then I got these, which are cheap, but wow, made a huge difference - https://smile.amazon.com/dp/B07XWX2ZN8/?coliid=I3LKMPEZVPPO0U&colid=2062X0QBLCUUK&psc=1&ref_=lv_ov_lig_dp_it
There is a whole lot of back and forth on the 4 Ohm vs 8 Ohm, ultimately I stuck with the 8 Ohm as that what the speakers I took out were.
I also ultimately just stuck with the default amp and didn't add anything fancy, as 90%+ of the sounds are simple beeps and explosions.....
Hope that helps!
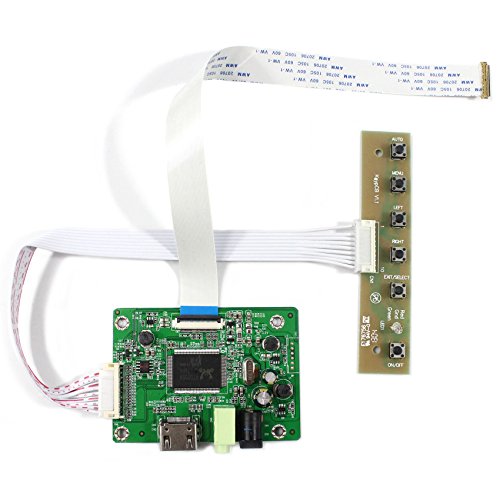
If you no longer want to have the stock games and just want to hook your PC up, this is what I used for the backglass monitor: https://www.amazon.com/dp/B06W5DTGKC
Note if you buy this, the stock cable is not compatible and you have to connect the included cable to the display which requires removing the plexi on the front of the backglass. Requires 12v power as well.
Similar thing I did. I used 3"speaker replacements with a much bigger magnet then used small peices of high strength velcrow to attach new bigger grills after painting them black.
uxcell Speaker Grill Cover 3 Inch... https://www.amazon.com/dp/B082ZQNQZX?ref=ppx_pop_mob_ap_share
3" Tweeter Speakers HiFi Full... https://www.amazon.com/dp/B07CRP7YBT?ref=ppx_pop_mob_ap_share
I’ve been running the full build not including the most recent game add-ons without issue. Initially I had overheating issues with a crappy housing but switching to the unit below has been working great for me.
https://www.amazon.com/dp/B07MNFH1PX?ref=ppx_pop_mob_ap_share
If you decide to do the later updates then you’ll need a 2TB NVMe.
If it's anything like the Legends Gamer Pro, the main circuit board probably runs on 5V, or it uses the same power switch board. Look at both and see if either one of them have a pin on one of the connectors marked 5V. If so, you can get some of these:
https://smile.amazon.com/gp/product/B09PBKKGFJ
...then solder the white wire to the 5V and the black wire to the GND pin (there will be one) and there's your USB power. You DO want to make sure you're taking it from someplace where you have amperage to spare, though, so that the board is still getting enough power to function.
I mean something like these, not these ones specifically just shop around. You'll need a USB hub to connect both, or one of them encoders in that listing has two inputs.
You might need to rewire with the included cables, it's just unplugging the stock cable, and plugging the new one in.
https://smile.amazon.com/dp/B07CKN59L9/
Note that this just handles the joysticks and buttons. I'm sure there's something to convert the trackball and spinner, but I can't find one right now.
Thanks for all of your help!
I found something that works PERFECTLY.
https://www.amazon.com/gp/product/B001925P6W/ref=ppx_yo_dt_b_asin_title_o00_s00?ie=UTF8&psc=1
You can remove the inside toggles and it fits the entire power button panel PERFECTLY.
It leaves plenty of room for your fingers to mash buttons. I am going to use 3mm screws to install them without damaging the board underneath since the top of the controller is pretty thick.
While looking through his inventory, I ended up buying one of these with a small lock: https://www.amazon.com/gp/product/B001925P6W/ref=ppx_yo_dt_b_asin_title_o01_s00?ie=UTF8&psc=1
I'm hoping it's big enough and if the button can't fit, I'm just going to rip apart the inside until it fits haha.
If you decide to go this way I would suggest adding a single Noctua NFP12 120mm fan blowing into the cabinet on the bottom front. These fans are 12v, move a large volume of air and are very quiet. Noctua NF-P12 redux-1300, Quiet... https://www.amazon.com/dp/B07C5L4QGN?ref=ppx_pop_mob_ap_share
I have my ALP in a corner next to an entertainment center. The PC is in the cabinet under the TV.
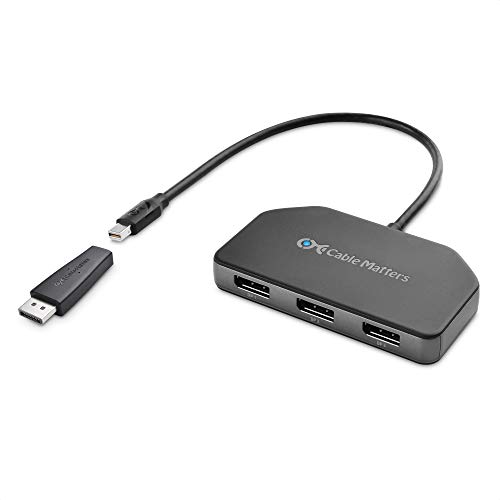
To simplify cabling I purchased a Display Port hub which converts a single DP cable to three outputs, as well as installed a USB hub in the ALP. This makes it so I only have two cables going to the PC, one DP, and one USB. I also installed a small power strip on the back of the ALP. The DP, USB, and power cable are all zipped tied to a back leg and then run against the wall to behind the TV cabinet.
This is the hub I used: https://www.amazon.com/Cable-Matters-DisplayPort-Featuring-Resolution/dp/B07T8BPZG2/
I have a mini DP extension cable going from the PC, to inside the ALP. I have two DP to HDMI cables, and one regular HDMI cable connected to the DP hub. The hub is inside the ALP, with all the cables internal except the OTG cables routed to the front, and two others routed there for a DMD.
The USB hub is connecting the OTG cable, and an internal USB external 7.1 sound card is being used for SSF audio. I also have a Pinscape controller, and USB relay installed. I also have an 8" LCD taped between the backbox speakers to use as a DMD when using the PC. And there are two speaker amps mounted to the bottom front which control the SSF volume.
IIRC it's just a standard PC power cable, they're like $5-10 on Amazon or Best Buy if there's one near you.
The link was in the photo description:
https://www.amazon.com/dp/B0BC9CTPTC
It was on sale for $7.99 but now it went back up to $9.99. Camel camel camel tracks the items as a group so it does not show price changes for individual styles but I expect it will drop in price again.
I’m not very handy either generally but I found I’m good at doing this kind of stuff! It was really easy honestly. This drill bit makes the perfect size button holes for the front of the panel. NEIKO 10189A Titanium Step Drill... https://www.amazon.com/dp/B000RP82F8?ref=ppx_pop_mob_ap_share
I apparently spent a bit under $20 for my pair.
I got longer cables that would better reach into the box where my PC lived. The BSA cables are 9", I got the 50cm (about 19") cables.
Only down side, the cabled don't caps to make it look pretty.
https://www.amazon.com/gp/product/B07R8KB5FK/ref=ppx_od_dt_b_asin_title_s00?ie=UTF8&psc=1
https://www.amazon.com/gp/product/B0953MZHTR/ref=ppx_od_dt_b_asin_title_s01?ie=UTF8&psc=1
Hmmmm, yeah. Does the main control board use 12v? Maybe I should break out the multimeter and do some exploring; I feel like there's already got to be a stepdown circuit I can take advantage of here. I wouldn't want to pull off of anything prior to the power switch since a constant draw would drain the battery and that's pointless. But if I can chop the end off of a MicroUSB cable, and just take the GND and +5v wires and put them somewhere sufficient to power the board, we'd be set because honestly I run the thing through USB 99.9% of the time anymore because of the Bluetooth input lag.
This actually might be the solve:
Run a couple of wires with single-pin connectors off the + and - and just plug it into the GPIO GND and 3v3. Boom.
This is the one I’m using. FX3 on Steam runs really well.
I picked it up for around $350 a couple of weeks ago. Currently there’s a $50 discount if you click the green box under the price. That would make it $410, but they may drop the price some more for Black Friday.
Unfortunately AtGames hasn’t released the VIBS board for the Micro yet so I can’t test how it performs on two screens.
This is the Mini PC that I picked up. It currently has a $50 off Amazon discount if you check the green box.
I think this is the cable you need: https://smile.amazon.com/Screen-Signal-Cable-1366x768-1920x1080/dp/B07CLTW68K/
Make sure you tell them you need the eDP cable. Did you try replacing the HDMI cable with one of your own?
"Right Flipper is slow to respond or intermittently responds – I encountered this issue as well. In my case, I swapped the button for the right-nudge with the right-flipper until a replacement can be located. Remove the 3 side bars using a philips head screwdriver, slide the top control panel to the side, unscrew the nuts to the button. Press in on the middle clips and gently slide each connector out. Swap/replace the buttons, re-attach the nuts, re-connect button wires, re-install the control panel and side bars. (*Note: If you encounter a good replacement button set, please let me know)"
​
https://www.amazon.com/gp/product/B01MS1GZ5J/ref=ppx_yo_dt_b_asin_title_o02_s00?ie=UTF8&psc=1
​
I had this issue with the right flipper, and I had some of these laying around from a prior project. I had to take a pocket knife to resize the holes slightly, but I've not had any issues.
This might work… https://www.amazon.com/dp/B0B2ZV1YQS/ref=cm_sw_r_as_gl_api_gl_i_XT63M5C5KJYCP2VWVGNN?linkCode=ml1&tag=difmbut-20 if you’re savvy enough, you could probably even route the remote leds and buttons to the top panel.
Doesn’t sound like you would have any issues with the controls. You would probably just have to configure all the controls in the emulator settings. The Xbox one controllers don’t need to be paired to the ALU to work with the emulator. I would connect them to the computer.
If you need your pc displayed on your tv, you will need to move your pc near wherever your tv is. You could get a computer cart so that it’s easier to move around if everything is on the same floor.
Something like this
If you plan on using as PC as well. You could get a VIBS, or use a driver board to pass in a signal directly from HDMI. This would let you determine if it's the panel or main board that's the problem.
Correct, joy2key or any other “translation” software will introduce some lag. Wiring the buttons to an encoder will eliminate that lag. If it were me, I would plug the IPAC and the trackball into a USB hub. Then you only have one USB wire to connect.
I’ve had good luck with these breakouts: https://www.amazon.com/Poyiccot-Terminal-Connector-terminals-Converter/dp/B08Y8PT3BH/ref=mp_s_a_1_5?crid=2BXHPFRQKGTIF&keywords=usb+breakout&qid=1664648789&qu=eyJxc2MiOiI1LjE3IiwicXNhIjoiNC44MSIsInFzcCI6IjQuNjAifQ%3D%3D&sprefix=usb...
When you have the ALP turned off the displays will show as disconnected. Only the monitor will be used.
How about something unconventional, but still cheap? For $14 you can get a USB to HDMI adapter, so you could use that instead for the VIBS. With the backbox you aren't doing complex scenes, at most it's video playback. Then you aren't using splitters or anything else.
https://smile.amazon.com/dp/B087PD9KSZ/
Would that work for you?
I'm not outputting to a second monitor using my splitter but I do have a HDMI dummy plug in one output so i can remote in to my machine via Parsec. It didn't work at all with the previous splitter I tried, but this one https://www.amazon.com/dp/B0B2R3GXL9?psc=1&ref=ppx_yo2ov_dt_b_product_details did the trick. In all I have 3 output devices - the other HDMI cable on the splitter is going to the ALP OTG port, and a DVI port on my video card is going to the VIBS using a DVI to HDMIM cable.
If you are OK with building, an ITX case would probably work just fine. Just measure before you buy anything.
https://www.amazon.com/dp/B00DJ6A88G/
Your other option is to skip the case altogether and mount things directly to the cabinet. People use Nylon standoffs for the Motherboard, and metal strips for things like the PSU.
After see the lock type posted by OP, I looked on Amazon and found this. https://www.amazon.com/Operated-Non-Locking-Compartment-Mounting-Replacement/dp/B0B5GMYCM5/ref=mp_s_a_1_11?crid=1V078OPUGWHNM&keywords=7%2F8%2Bcam%2Block%2Bthumb&qid=1660763335&sprefix=7%2F8%2Bcam%2B%2Caps%2C89&sr=8-11&th=1&...
This is just what I’m looking for.
So I "lost" my ALP key and needed to open the back box and ended up drilling out the lock. The first picture is the drilled out lock (it is a bit chewed up looking because I tried to twist it off with channel locks without success :).
I did this by drilling a small 1/8" hole in the center followed by a 1/4" hole. Due to the slot for the key the second hole went off center but once it cut through the lock pins the lock turned open. After that I unscrewed the latch and then the lock and it slide right out. I then installed the new lock. The second and third pictures are the new lock installed. I bought a lock a bit too deep so used the offset latch turned around as shown. The lock I used was the EG STARTS 5X 7/8" Arcade Lock from Amazon. This is a set of 5 identically keyed locks so I replaced both my locks and have 3 spare should I lose the key again. ;)
You can find the locks here https://www.amazon.com/dp/B01NANVZ10?psc=1&ref=ppx\_yo2ov\_dt\_b\_product\_details
Been meaning to post about this actually. Will eventually do one but for now you can look at this. It's a Zotac Magnus E51050. Great little box with a mobile GTX1050. The BuyStuffArcade backbox monitor has a VESA mount on the back so I attached the PC directly to the monitor using this VESA mount from HumanCentric.
Forgive the rats nest of wires. Still finalizing modding plans so just leaving it as is.
Yeah, some way to mount it close to the screen is a must. I tried with it angled down at the top of the cabinet, but I had to stand like 8 ft away to play anything.
I just ordered a little command script shelf thing that should be able to stick to the plate just fine. Then I'll use blue tack to get the angle correct for the bar itself on top of that shelf.
Now to find a good way to holster it...
In my setup, the right (white) USB on the ALP is used exclusively for OTG (USB A male-to-male cable) to the PC. No other cables or connections.
In the left (blue USB 3.1) connector, I have a non-powered USB hub. Plugged into that, I have my Flashdrivex and Coinopsx drives. I have another male-to-male cable from that hub plugged into one of the two inputs of the USB switcher. I have another male-to-male cable from my PC to the other input of the USB switcher. The output of the switcher connects to the Bitpixel.
Think of the switcher like one of the old KVMs. The Bitpixel is the monitor output of the switch. Here is the switch I'm using: https://www.amazon.com/gp/product/B09KWNY4WB
Thanks. That's a cool idea but I lack the workspace, talent and patience. The good news is this was really simple to do. I had no experience and figured it out as I went. The only tools I needed were screwdriver, drill and 1-1/4" hole saw. The only parts are a joystick, buttons, some scrap or jumper wires and adhesive contact paper. You can reuse the existing panel which has the joystick cutout and mounting holes and just cut holes for the buttons. From there its just a matter of wiring the buttons which are all simple 2 wire. I'm still working out the best way to do that (usb encoder vs direct wiring) but for now I just moved the d-pad/front control wires to the new panel (which is much more intuitive on top) and wired the flippers/nudge so they are duplicated by the 4 action buttons. The joystick and menu buttons all work without any remapping while the action buttons could be remapped in coinops.
Almost any monitor or TV you buy nowadays will be VESA mount compatible. Figure out the stand you end up getting, and buy whatever screen you want.
For example, this rolling stand can go from 100x100mm to 400x400m so anything such as 150x200mm, etc will work. https://smile.amazon.com/dp/B09CT7P4FC/
Does your laptop have a display port out? If so you could use a Display Port hub/splitter. https://smile.amazon.com/dp/B0874V968M/
Else they have USB-C to triple display outputs. https://smile.amazon.com/dp/B07667D37V/
I use a desktop, and I use the Display Port Hub, and a separate powered USB hubt I have mounted in my ALP. That way I just have a single Display Port cable and USB cable running from the ALP to the PC.
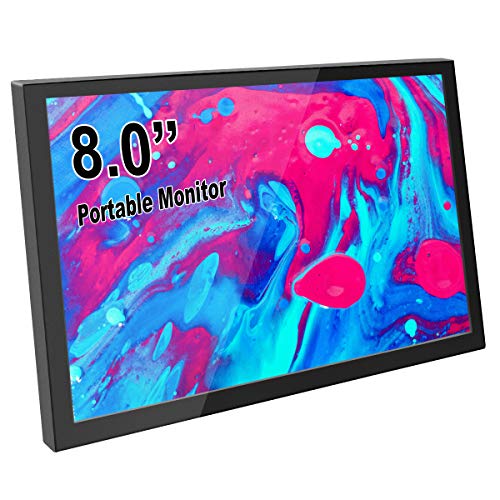
i was looking at those portable monitors. More expensive that an Fire Tablet, but not dealing with space desk and apps like that was a plus. I was hoping for a too good to pass up deal last week during Prime Day, but didn't find anything.
Plus the idea of redoing all my tables/backglasses to support the DMD screen just didn't motivate me to spend the money.
If money is no object, something like this might give you a better experience (first hit on amazon, shop around) - https://www.amazon.com/Portable-Monitor-Upgraded-1920X1080-Computer/dp/B07TWGBG3P
I use a TrickleStar TS1104 power strip, so when you shut off the ALU, it powers off the BitPixel. It works really well!!!
while you wait, you can just put a monitor on top of the backglass.
one user used a mount to be able to raise/lower the monitor when in OTG mode versus native. He called it the ROSS mod.
/r/LegendsUltimate/comments/ni4624/this_is_what_im_going_with_until_more_rachel/
he used this mount - https://www.amazon.com/gp/product/B079LNWB52/
I have not tried these yet, but have my eye on them:
They were supposed to be available on Amazon by now, but unfortunately still aren't. The listing is here, not sure if it's awaiting stock or if Amazon needs to activate it.
CoreMax gives you 60fps pinball play. In your situation, I'd highly recommend it.
For pinball, I really would try to get the screen vertical. There are TV mounts out there that do it.
I think at this point they're likely waiting on Amazon to show stock. I've been checking their products periodically and many do show up on Amazon (Example). But, they show no current stock. I recall from a conversations with another Amazon seller that it took Amazon over a month to show his products available. I have no idea the status of the other retailers though.
BuyStuffArcades makes a pedestal for the Gamer Pro control deck. https://www.buystuffarcades.com/products/pedestal-stand-for-atgames-gamer-pro
You could pair this with either a wall-mounted TV or a TV cart like this. https://smile.amazon.com/dp/B09CT7P4FC/
Unless you have the tools and know-how for woodworking to construct your own cabinet, you are very unlikely to get cheaper than an ALU if you want it to look like an arcade cabinet.
- Gamer Pro (sale $99) $250
- Pedestal $119
- TV cart $60
- 30" TV $150
Bare kits like you are looking for generally come with their own controls solution and don't allow a Gamer Pro to be dropped in without modification. These also come as bare wood you'll need to paint and supply or own graphics and they start at $300 or more before shipping.
I'm doing this now, you can use a KL25 pinscape board and it will handle all of the button inputs and tilt function. You can use one of these from amazon.
https://www.amazon.com/dp/B07HNY7VWC?ref=ppx\_yo2ov\_dt\_b\_product\_details&th=1 I mounted it to the left of atgames plunger and attached it via wire ties to handle plunger to the KL25. I replaced the playfield monitor with a LG 1440p 144hz monitor. The KL25 will also take care of any outputs like contactors as well. You may have a hard time getting a KL25 right now but I ended up getting this
Not to discredit or "but actually" your post or anything but here is a cheaper USB A to USB A cable that will do the job however it is White if that matters to anyone
I did this for a friend using a speaker to line converter and it worked great. Here's a line to the part I used.
https://www.amazon.com/gp/product/B000ES9QNA/ref=ppx_yo_dt_b_search_asin_title?ie=UTF8&psc=1
You feed the speaker wires into the line converter and the line converter into your amp.
This is correct. It is missing the USB OTG cable. This one should work: https://www.amazon.com/Mediabridge-USB-3-0-Cable-SuperSpeed/dp/B00D8JFNO8/ref=asc_df_B00D8JFNO8/?tag=hyprod-20&linkCode=df0&hvadid=416662839115&hvpos=&hvnetw=g&hvrand=15571613175943083229&hvpone=&hvptwo=&hvqmt=&...
Is $600 your max limit, or are you willing to go a bit higher?
For $600, you’re getting this desktop PC. It’s not much, but it’ll definitely play pinball (FX3 and VPX) just fine as long as you aren’t playing VPX in 4k or VR.
But if you’re willing to spend just a bit more ($900), you can get this beefy boy here. And it will play anything you throw at it, I promise.
They are not connected to the IPAC encoder. I cut the original connector off and wired these on: https://www.amazon.com/Poyiccot-Terminal-Connector-terminals-Converter/dp/B08Y8PT3BH/ref=mp_s_a_1_5?keywords=usb+breakout+board&qid=1650706201&sr=8-5
That effectively makes them USB. While you got the end cut, extend the wires as much as you need before putting on the USB breakout connectors.
The ohm difference is a non-issue. I've been using the same kenwoods for a year too. They sound so much better than the stock speakers which went directly to my city's e-waste dropoff. I also used this wire terminal crimping tool kit and there's no need to solder
Hi, can you please share more details on the wiring? I'm not quite sure how to connect the wires coming from the ALP speakers to RCA. I'm looking at these RCA cables - https://www.amazon.com/dp/B082DPQ8WD?ref_=cm_sw_r_cp_ud_dp_ANQY8H00Y3DK215YP5M8
i'm thinking it would work like this. i would snip the ALP speaker wires and then connect them to the RCA cables, then plug RCAs into AMP, and then connect new speakers to the AMP. if this is correct, which wires from the ALP connect to which RCA wires?
These work well for stripping your wires. I used T tap quick connectors. MulWark 3 in 1 Automatic Self Adjusting Wire Stripper/ Cutter/ Crimper, 8 Inch Multi Pliers For Electrical Wire Stripping, Cable Cutting, Crimping Tool from 8 AWG to 30 AWG https://www.amazon.com/dp/B08W44T2XJ/ref=cm_sw_r_apan_i_ZGCGC7JFBRB3V4E7B7X9?_encoding=UTF8&psc=1
Sorry I thought I posted the link here it is. Just plug and play through USB! I have my puck connected to a USB hub. No extra software needed
Thank you.
It was indeed a faulty display port to HDMI cable.
I bought this one which was a bit more expensive and it worked.
4K DisplayPort to HDMI Cable, WARRKY 10ft [ Gold-Plated Connectors, Aluminum Shell ] Uni-Directional 4K UHD High Speed DP to HDMI Cable Compatible for Lenovo, HP, DELL, GPU, AMD, NVIDIA, More https://www.amazon.com/dp/B087Q92JCQ/ref=cm_sw_r_cp_api_i_NATJ1YFWR6FQ3VQG2TRX
I bought this for $10 to hold my drink or mini keyboard.
Master Magnetics Magnetic Cup Caddy, 3.25" Inner Diameter, 4.625" Height, Red, 07582 https://www.amazon.com/dp/B00KIW0LKE/ref=cm_sw_r_cp_api_gl_i_HCZQJPKTJ2Q1HXPCCYST?_encoding=UTF8&psc=1
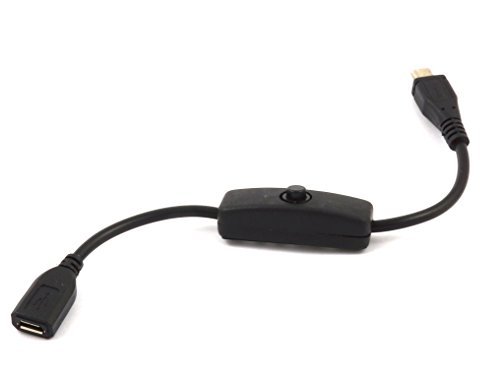
ANDTOBO USB Switch Extension Cable, Upgraded USB Extension Cord with On/Off Power Switch Cable for LED Strips, iOS System, etc https://smile.amazon.com/dp/B07T9BRNHW/ref=cm_sw_r_apan_glt_i_HB1SPR5QZ50YWSY2D4KT?_encoding=UTF8&psc=1
Check Amazon for a 12V LED strip and the wrire connector, simply clamps on. Here is a set of 1ft 12vdc strips with bare wire power connections. HYADA DC 12V Waterproof 1Ft 12 LED Strip Underbody Light with 6 inches Wires for Motor (White,Pack of 6) https://www.amazon.com/dp/B01N4OPLUF/ref=cm_sw_r_apan_glt_i_SYMAM1YBNS7MGRKF4K6J
Yep. Bluetooth will pair with headphones (in my experience) but will not put out any audio. You’ll need a HDMI audio splitter like this one: https://www.amazon.com/Extractor-NerdEthos-Optical-Splitter-Converter/dp/B098XCX4VW/ref=dp_prsubs_1?pd_rd_i=B098XCX4VW&psc=1
So I've returned the 4-inch hand wheels. I bought the following on Amazon instead because the post on my GRS USB buttonhole spinner is 8 mm in diameter. The 4-in hand wheels would not attach to that post without wobbling.
https://www.amazon.com/Othmro-Premium-Handwheel-Tailstock-Revolving/dp/B082YPWF19
These fit on that spinner almost perfectly and you don't even need a screw set.
This seems more “proper” then a 3D printed guide just my opinion though.
The main kit (does one joystick)
ThunderStick TOS GRS Switchable... https://www.amazon.com/dp/B09R3SDY8G?ref=ppx_pop_mob_ap_share
The expansion to add the second joystick in
ThunderStick TOS GRS Switchable... https://www.amazon.com/dp/B09R3V158M?ref=ppx_pop_mob_ap_share
Yeah, I use electronic wipes that you can buy from Wal-mart on all of my electronic screens.
HEre's a similar brand fromAmazon, but most major retailers carry them in the electronics section.
If you want to retain stock you need the VIBS.
Otherwise, you can use an HDMI to eDP converter. This is the one Cooltoy used in his modding video. https://smile.amazon.com/gp/product/B06W5DTGKC/
If you want a bigger display, you'll need to replace the front plastic and do significate modding to the backbox. It's better to just build your own at that point and you'll be able to integrate a DMD into the design.
If you never want to use stock again, you can also get a different control board for the main display, I don't have a specific model that works. This should be able to remove the lag in OTG mode as it doesn't have additional processing from the ALP. You'd also need to get a control board to handle the input controls as well.
Technically the only legal way to add commercial ROMs are to purchase the original software/hardware and rip the data yourself. A more grey area is to rip it from a purchased software or hardware emulation package (think NES classic and retro collections you buy on steam).
The other legal alternatives are the AtGames "Blast" dongles.
Some more information here:
https://retropie.org.uk/forum/topic/10918/where-to-legally-acquire-content-to-play-on-retropie
Edit:
A common misconception of the laws regarding this are that simply owning the software/hardware is enough. You must actively make the copy yourself, not obtain it from a 3rd party.
I recommend Samsung USB sticks with metal housing around the ports. I can't remember ever having an issue and I've bought at least 8 of them. To fix the problem, power off the machine and perhaps try using these tweezers: https://www.amazon.com/gp/product/B073R91241 Be careful not to put stress on the USB port itself or the problem could get worse. Just an idea, never had the issue myself.
Yeah. It wan an impulse buy. I didn't realize it was plastic at first. I should have not used it when I saw how weak it was.
I do have this one in my ALU -> SAMSUNG MUF-256AB/AM FIT Plus... https://www.amazon.com/dp/B07D7Q41PM?ref=ppx_pop_mob_ap_share
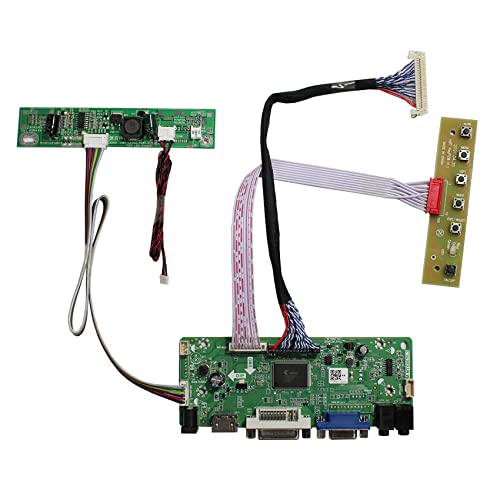
This adapter board on Amazon seems to fit the model. I I used these for Arcade1up mods but a diff adapter model for “17. Can’t confirm it works for AtGames 32”.
VSDISPLAY HD-MI DVI VGA Audio LCD Controller Board M.NT68676 Compatible with 32" 32 inch 1920x1080 HV320FHB N00 N02 N10 N80 N4K F40 LVDS Interface LCD Screen https://www.amazon.com/dp/B09F5T5LJC/ref=cm_sw_r_cp_api_glt_i_NCG3H5VNT38EBMKAFA5A
I had the same 1st impressions as you. Fortunately there are fixes. In addition to playing around with sound/haptic settings, I used double-sided foam tape to secure the plastic panel of the control deck to the wood frame, and cut and fit strips of the tape along the sides of the exciters. Fixed 90% of the vibration for me.
Others have had success replacing the stock exciters with these:
Dayton Audio DAEX25 Sound Exciter Pair https://www.amazon.com/dp/B001EYEM8C/ref=cm_sw_r_cp_api_glt_fabc_JQFVT30YPWE3921442S2
Sure, so to power these things up, you'll need 2 of each of these 2 items:
Power Supply: ALITOVE 12V 5A 60W Power Supply... https://www.amazon.com/dp/B078RY6YY3?ref=ppx_pop_mob_ap_share
Power cable to tie into PSU: Pinfox 10ft 18 Gauge 3 Prong... https://www.amazon.com/dp/B07QYRMD6D?ref=ppx_pop_mob_ap_share
This is what Philip sent as far as instructions on connecting the pigtail to the PSU: "Any pigtail power cord will work, or if you have an extra power cord you can just cut the ends off -- the black wire connects to line (L), white to neutral (N) and green to earth ground (G)"
And then of course you connect the two wires from the solenoid, included in the kit, to the positive and negative terminals and boom, you've got a power supply. There's no on and off switch so I guess I'd suggest running them to a dedicated surge protector power strip, that also has the ALP connected to it, and when you are done and turned off the ALP, you just hit the off switch on the surge protector.
Shite, I linked you to the wrong monitor. That's not the one I bought.
​
I could return it to stock at this point. The rails are technically damaged at this point but that wouldn't cause much work to put everything back in a secure manner.
The plunger is a proprietary piece of hardware specific to this product. If there's any mod to make it work some other way I don't know of it. If you look at the plunger kits for vpins on the market you will see they aren't simple things. Best yo buy one of those kits or just install a launch button in my opinion. You couldn't just plug it into a input board. The the signal needs something to process it and turn it into something usable. That's why the kits usually come with a KL board with pinscape on them.
Anything the built in console can do can be done better on Mame or VPX/FP. Pinup Popper has a Mame section in it I'm eager to learn about.
An IPAC2 works perfectly, however you cannot use it for the trackball and spinners. Ultimarc IPAC2: https://www.ultimarc.com/control-interfaces/i-pacs/i-pac2/
Next you need some USB breakout connectors. These worked nicely for me. You’ll need two. One for the trackball and one for the spinners. USB male breakout connectors: https://www.amazon.com/Terminal-Connector-terminals-Pluggable-Converter/dp/B07H53X194/ref=mp_s_a_1_8?crid=NLXYGB6Z1FRR&keywords=usb+male+breakout&qid=1641069748&sprefix=usb+male+break%2Caps%2C104&sr=8-8
Take apart your control panel and remove the original encoder. Mount and install the IPAC2. You should be familiar with this.
The spinners and trackball are wired identically. Pay attention to the plugs on the original encoder. It identifies “pin 1” for each harness. The pins are as follows…
- Pin 1: 5v.
- Pin 2: Data+.
- Pin 3: Data-.
- Pin 4: GND.
Then just plug them into a USB hub. Done. Everything except the power button works. Congrats, you have no way to turn it on or off!
I haven’t figured that part out yet.
I have been looking for the same thing. Want to gut the board and playfield. Somewhere I saw a post of video of a person that used a 32 inch LG monitor. I had asked for the model and they did a thumbs up to this one. I still want 1080 but at least 120 refresh rate. I have not done it yet but it is my cart. Let me know if you find any more information, They said this will drop right in.
​
I just now seen this. I was new to reddit and didn't know about notifications and messages. So here's the amp I used from Amazon. I incorrectly put 300. Its 200 watt with 50w each to the left and right channels and 100w to the subwoofer. Sorry for the 8 month late response.
AIYIMA DC12V-24V 2.1 Channel... https://www.amazon.com/dp/B07R4RKXHK?ref=ppx_pop_mob_ap_share
First, what's the problem you're trying to fix. By "upgraded" audio, what do you want to upgrade? Is it not loud enough? Do you want more bass? Are you looking for more treble/clarity?
The simplest would be to replace the factory speakers with quality automotive parts.
If that's not enough for you, you could probably splice off the stereo L&R speaker inputs and use a line-level converter to give yourself line-level outputs. Then you can feed that to an amp that drives whatever speakers you want. If it were me, I'd use a 12v power supply to run a car audio amplifier, car audio speakers and you could even put a car audio subwoofer in the bottom of the cabinet. You could use a 15A power supply and I think there's even a way to use a PC power supply to do it, but I've never messed with that.
Because you'd be using direct connections, I doubt there'd be any audio lag... and it would get loud.
I had a similar issue but mine was not intermittent. Issue ended up being the USB cable that was supplied with Legends Pinball. Ended up buying a new one, and no issues since then. I ran into the same issue with my BitPixel as well.
Here's the cable I've purchased twice now, if you're interested: https://www.amazon.com/dp/B002KKZRYM/ref=cm_sw_em_r_mt_dp_2ZPP1MC58NA5WAC9SMXD?_encoding=UTF8&psc=1
The signal is dropping when you try having both cables plugged in at once, or picture #1 is with both plugged and it drops the image when you enabled OTG mode?
What firmware is your ALP on? The released on 11/11 is v5.58 and had OTG breaking issues. v5.59 was released on 11/18 and fixed the issues.
You might want to get a DP->HDMI adapter to try. https://smile.amazon.com/dp/B017Q8ZVWK/
DVI "should" work the issues you are describing is very odd. I have the same card DVI, HDMI, DP, but I haven't tried DVI off it at all. I've used the HDMI and as well as both a DP->HDMI and the DP Hub I linked earlier.
Your VIBS is working fine then. I just re-read your original post.
The only control for VIBS is that button it's bundled with to switch it between the two modes.
OTG mode on the ALP lets you display the computer screen on either the main playfield or back glass.
To use both screens you need two cables, one will run to the OTG HDMI port on the top of the playfield, and the other will plug into the HDMI port on the VIBS. Choose to enter OTG mode and have the display go to the main playfield, and then switch the VIBS input with its button to enable your PC on the back glass.
This guide goes over the setup. You just have both cables going into your graphics card without a separate USB HDMI adapter. http://wagnerstechtalk.com/alppcsetup/
We do have the same PC, once you get everything setup I simplified wiring with this DisplayPort Hub. I have a single DisplayPort cable and a USB cable running into the back of the ALP. I then have cables out of that into the front HDMI, VIBS, and a small USB power monitor I have mounted to the front for a DMD.