
What are
/r/klr650's
favorite Products & Services?
From 3.5 billion Reddit comments
The most popular Products mentioned in /r/klr650:


The most popular Services mentioned in /r/klr650:
Facebook Marketplace
Ride With GPS
Trustpilot
AllTrails
Walmart
The most popular Android Apps mentioned in /r/klr650:

The most popular reviews in /r/klr650:
The speedometer system on the KLR is extremely simple.
The only usual point of failure is the cable. Take it out and have a look. Bet you the little prongs are broken off of the end that go into the front hub. It may also just be loose and have backed itself out. Assembling the front hub incorrectly is also a possibility, but check the cable first.
You can test if the cable is broken in the middle somewhere by spinning the end that goes into the hub with a drill and watching the needle on your dash. The bike does not have to be on for it to work. If you have the front wheel lifted and the hub and cable end assembled correctly you can also just give the front wheel a good spin and watch the needle instead. (This is how I verify if I've gotten the end of the cable slotted back in there right e.g. after a tire change.)
If replacement of the cable is necessary they are not expensive. Getting at the rear of the dash cluster on the Gen 2 bikes is a little bit of a faff, but not too bad. I have seen people with nimble hands get at it by only removing the windshield.
When you reassemble everything, take a moment to remove the front wheel and pack the entire inside of the speedometer hub assembly with grease. This is one of those once-a-season jobs you're supposed to do (along with repacking all the bearings in the rear suspension) that no one ever actually does...
I bought this one off amazonand it has worked great. It’s compact and inexpensive.
High-Pressure Radiator Cap with Thermometer Provides Fit for Honda, Kawasaki, Suzuki, Yamaha, Polaris, Husqvarna Off-Road Vehicles, KTM and More Motorcycle ATV Models 1.8 Bar, 25.6 Psi https://www.amazon.com/dp/B08YRKP4SH/ref=cm_sw_r_cp_api_glt_fabc_RSSPMHT847CDRBW3WDVR?_encoding=UTF8&psc=1
You're having problems with the croquet hoop cable retainer on the stock bars? Just clip it off with stout wire cutters. It really has no reason to be there. You could hacksaw or dremel it, too, but it's hella weak and I chopped mine off ages ago with a pair of these.
After that the Tusk (and probably also the Acerbis) guards will fit right on. If you have a Gen 2 bike you also need the short Tusk handlebar risers to prevent the inner mounts from whacking the corners of your front fairing.
That's. Literally. It... all you need to do.
The Platypus collapsible water bottles are made of the same plastic as fuel cans. I've had a 2L bottle half full for 3 months now, no degradation, no smell, still holding fuel. They're $13 each on Amazon right now. Fill a couple up, toss them in a tail bag, tank bag, or a number plate bag across the windshield, and store them flat when empty.
I get asked every time I post a photo of this bike! I stole the idea from Everide, but I mounted it a little differently than him. Here’s the light on Amazon
https://www.walmart.com/ip/Coleman-ATV-Comfort-Ride-Seat-Protector/16777864
This is what you need to get some airflow between the legs and improve comfort. The next step up is buying an aftermarket seat.
Changing tires/tubes isn't difficult, last one I did took about 30 minutes on the trail..
Do mark the tire/rim so you get it back in the same spot.
Make sure to check inside the tire to make sure the pokey thing isn't still there.
Check that your rim strips (in rim channel & covers spoke ends) are in good shape, and covering the spokes. If not replace them.
Getting the stem back through the rim is a huge pain, I recommend getting a valve stem fishing tool. Tire Valve Stem Fishing Tool Puller (With Valve Core Remover) SAVE YOUR KNUCKLES While Installing Inner Tubes, Rim Locks & Off Road Tires on Adventure Motorcycles & Dirt Bikes https://www.amazon.com/dp/B01GT8FTRK/ref=cm_sw_r_cp_api_glt_fabc_MQEVQAPP83RDVAN50T5G
If you don't want to balance you can use this goo to auto balance & fill future punctures: Ride-On Motorcycle Tire Balancer & Sealant 8oz https://www.amazon.com/dp/B00GA9XJ9Y/ref=cm_sw_r_cp_api_glt_fabc_6YQ6P6E0QJNF5Z40T3CN
Been running that in both my tires for about 6 months, no issues.
When putting the front tire back on, be careful & take your time. Make sure the speedo washer key is aligned correctly in the hub, and isn't bent. And make sure the key on the side of the hub goes into the fork correctly.
The lights are here: https://www.amazon.com/dp/B07H3VBF5Z?ref=ppx_pop_mob_ap_share
I ordered the round white ones, but I might add a pair of yellow as running/fog lights. The current set is hooked up through a switch and relay setup I got with a pair of lights years ago. Those lights are long gone, but I was able to reuse the wiring.
Windshield is great, but I've had it for years and have no idea where I got it. Possibly a Happy Trail?
YITAMOTOR LED Light Bar 2PCS 18W 6 Inch Flood LED Work Light Pods Single Row Off Road Led Light Driving Light Fog Light Boat Light Waterproof SUV ATV 4WD Car Truck Golf Cart 12V 24V, 2 Year Warranty https://www.amazon.com/dp/B01A6TNWHW/ref=cm_sw_r_cp_api_glt_fabc_1PX6VTGYGZKRXHD0Y60B?_encoding=UTF8&psc=1
Nice light, though I cannot recommend the bucket I got for it, the fitment was bad and I had to modify the crap out of it to get it to work.
https://www.amazon.com/dp/B00T62RK1U?ref=ppx_pop_mob_ap_share
Those are the side floods, they do not come with mounting brackets for the forks, just a bracket that provides a bolt to use whatever mounting to the chassis you like.
Headlight came with more than ample wiring to plug right into the factory h4 plug. Side floods are just wire pigtails.
I have honestly never found the rubber insert thingies to be necessary, or even a help, for street riding. Maybe I just have really bodacious boots?
I put these on my KLR to replace my worn out factory rubber pegs and I have no complaints. They fulfill the usual KLR owner requirements which are A) cheap, B) functional, and C) cheap.
Yup! I've been using the Hozan brand from Amazon and have had good luck with them so far. Not the highest end out there but I haven't had any issues.
Another thing you could try: when I used to work in aircraft maintenance, My techs used to grind a millimeter or two off the tips of their Phillips heads. I did it to all of mine and it helps a ton - - night and day difference really...
He sells them on Amazon with free next day delivery if you have Prime.
Eagle Mfg. Doohickey - Balancer Idle Lever & Spring Upgrade KAWASAKI KLR650 https://www.amazon.com/dp/B004FST92I/ref=cm_sw_r_cp_api_n9nZBb28CBTPW
They look great. Here's what I ordered, but they don't look like they'll fit, even though Amazon said they would.
Hey yeah its just a backpack i ziptied on, its all i need for trips to the store. Yeah saddle bags are a small fortune im in the same boat lol. This is the bag i use but anything should do https://www.amazon.ca/HAOMUK-Tactical-Military-Shoulder-Backpack/dp/B07PY1DLS4/ref=asc_df_B07PY1DLS4/?tag=googlemobshop-20&linkCode=df0&hvadid=341773285129&hvpos=&hvnetw=g&hvrand=13343474398547940494&hvpone=&hvptwo=&...
I put one of these in my pannier. If i'm ever in doubt about how safe it is, I arm it.
https://www.amazon.com/gp/product/B01KTL6940/ref=ppx_yo_dt_b_asin_title_o00_s00?ie=UTF8&psc=1
Surprisingly good quality for the price. Has held up about 7 months with no problems.
It’s trash I wouldn’t use it on the street. Literally only bought it for the cool factor off road.
ScorpionEXO EXO Covert Helmet.
https://www.amazon.com/dp/B01N3XIV8P?ref=ppx_pop_mob_ap_share
Thank you, the tundra is my first truck that I actually enjoy.
Saw this one on facebook, don't know if that's the style you want. I don't know if you can swap body panels or not, somebody on here will know.
I'd be very wary of an electrical problem. If it's just $200 to fix, seller should do it themselves and get more money for it.
I use balance beads in my bike that is tubeless. No complaints, been great. Zero complaints.
That being said I have seen videos of tires filled with glassy powder that were supposedly balance beads, but I think they were a cheap knock off So they weren't as sturdy. So if you go with beads, buy the real thing.
When I swapped my KLR tires recently I put in Ride-On. it's a liquid that is designed to be fluid enough to balance the tire (like the beads do), but also will fill small holes in the tube if you get a puncture.
So far very happy with that for balancing, very smooth, I only hit issues above about 60, due to having knobbies. And that's not like an out of balance wobble, just a rough knobby ride.
I got this thing, originally intending for it to go on the handlebar. I didn't think it would clamp down on that little center bar above the speedo but sure enough it does. Over 1,000 miles and no problems yet.
I just used one of these splice connectors, drill the little plastic wall out so it fits right over both wires. Done.
Just got this from Amzn, couldn't get myself to spend 60-75 bucks on one from the ADV stores. Not installed yet, but it's a big old chunk of aluminum and seems like it will do the job? (time will tell) Just under 4"x3.5" and sort of trapezoid that seems like it fits the need. Was the only one with reviews that I could see confirmed pics of it being installed! :) They did have some cheaper ones that looked like they'd work, but reviews were iffy.
Never know, could be a cry once buy once situation and I should have paid more. But seems like one chunk of metal should work as good as the next?? :)
​
https://www.amazon.com/dp/B098NK99D7?psc=1&ref=ppx\_yo2ov\_dt\_b\_product\_details
I saw a video of someone using soda bottle preforms to store their JBweld. I just happen to have some. Here is an amazon link to see them, but they are cheaper elsewhere online.
https://www.amazon.com/Soda-Bottle-Preforms-Caps-30/dp/B008MB1QNY
The thermo switch connector is not the fan connector.
The thermo switch controls a relay which sends power to the fan through the fan connector.
See the little ramp protrusion on the thermo switch? https://www.partzilla.com/product/kawasaki/27010-1443
That ramp catches on a plastic tab in the connector that you have to lift up and over to remove it. I find a set of these mechanic's picks is very handy for grabbing those sort of connector lock mechanisms.
As for the oil pump, this is a much smaller version of what I used but it'll do the same job. The important thing if you're going to pump the oil out, though, is that you need to measure how much you pump out. That's how much you need to put back in. My pump had a canister with markings so I could see how much I took out, you might want to find a jug or something, mark the jug after pumping out the old oil, and then pour the new oil into that jug up to your mark. Do this once for each fork obviously.
> So I’d like to be able to go 65-ish without completely pegging the engine, and want to be able to navigate technical terrain at slower speeds.
Then the stock front 15T sprocket sounds good for you. Best balance of low speed grunt and not too high RPMs on the highway. In my opinion, of course.
If you ride primarily on the street and don't plan on riding offroad except for gravel roads, keep the 16T on the front.
If you ride primarily on the street but want to do occasional off road jaunts on most trails, 15T.
Primarily off road including technical trails and staying off 60+ mph highways, maybe the 14T. I did two weeks 2000 miles off road on my '06 with the 15T and there was never a time when I really needed a lower gear. I admit there were times when I should have goosed it more, earlier, where a 14T might have helped slightly. But if you're like most KLR650 riders, you're going to put a lot more street miles on than trail and that's where the 15T is the sweet spot.
JT Sprockets are high quality and not expensive and are widely available.
https://www.amazon.com/JT-Sprockets-JTF511-15-Steel-Sprocket/dp/B002OJZ9BA
FYI, there's also an SAE to cigarette lighter adapter which is very handy for plugging in all sorts of 12V accessories (including USB chargers).
From their deals page. Today only %44 off stainless steel looking milk crate. Looks like it will slice you up nicely in an accident.
If I had to ride it away from the depot, instead of trucking it to some other location, #1, I'd make sure I had all the tools I needed, either shipped with the bike or I'd bring them when I picked it up.
People change tires out on the trail and most of them aren't carrying a jack with them. If you're sure it's going to be crated in such a way that the axles are secured down to blocks, and having a jack (bottle? Scissor?) would make it easy to attach the wheels, sure, why not bring one, assuming it's something lightweight that you can carry with you on the bike.
I would not be bringing one of this jack or this jack, (although I do own one of each).
If worst came to worst I'd jury rig what I needed out of lumber from the crate. If it was my '06 I'd just lay it on its side and put the wheels on that way.
Probably one of these https://www.amazon.com/CrampBuster-Wide-Motorcycle-Cruise-Assist/dp/B000VYXZ8Y
They make is so your palm is what's pushing the throttle. With one of these it takes essentially no grip strength to use the throttle.
As far as vibration you can get bar end weights to reduce vibration, you can get Rox vibration dampening risers.
Yes the relay socket is already there. Just buy one and plug it in. Then you’ll need the 12v/usb plug, whichever works for you(I put a dual usb on mine). You’ll also need bullet connectors as well as the flat connectors, not sure what they’re called. this is what I ordered from Amazon.
Watch this video from OnTheBackWheel He did a pretty good walkthrough.
The brass inserts are not needed. I just use them for projects that calls for embedding threads in plastic prints to increase the longevity and provide a better mechanical connection. Here is a link to what I am talking about. They are handy for 3d prints.
https://www.amazon.com/gp/product/B0784VYCYY/ref=ppx\_od\_dt\_b\_asin\_title\_s00?ie=UTF8&psc=1
Also, buy these spoons. Look around for the best price, but it is imperative to at least get the 12/13 wrench which includes the little lip to help prevent pinches. https://www.amazon.com/Motion-Pro-08-0541-Combination-Wrench/dp/B00CU8ZJWE/ref=sr_1_11?keywords=motion+pro+tire+spoons&qid=1650601252&sr=8-11
Makes sense. If you're good at welding maybe you could make a portable tire changer out of some clamps or vice grips or order something like this
Worth more than every penny. Have saved my hands already.
I just ordered this
https://www.amazon.ca/gp/product/B00JF5LRN0/ref=ewc_pr_img_1?smid=A76IUWBQEDWBF&th=1
If I put the bike diagonally, I think it will *mostly fit.
DB Electrical 410-54177 New Starter Compatible with/Replacement for KAWASAKI 650 KL650 KLR650 KLX650 Motorcycle (1987-2012) KS-11 KS-11A 464254 18690 21163-1108 21163-1217 https://www.amazon.com/dp/B00SHU8W0U/ref=cm_sw_r_apan_i_VGY167K8HG1E0GK1XTW3?_encoding=UTF8&psc=1
Been using this for months. No issues. Easy install.
Motorcycle Fog Lights, 2'' Inch 27W Spot CREE Mini Cube Work Driving Pod Lights for Offroad Trucks ATV UTV SUV 4x4 Pick Up Car Boat https://www.amazon.com/dp/B07JD8P1VV/ref=cm_sw_r_cp_api_glt_i_ECEX9VFKK5HWZPHMKDEA?_encoding=UTF8&psc=1
Xitomer Motorcycle Auxiliary Light Bracket, Fit for KLR650 2008 2009 2010 2011 2012 2013 2014 2015 2016 2017 2018 KLR650, Motorcycle Addition Light Bracket KLR650 https://www.amazon.com/dp/B08F9ZDNR8/ref=cm_sw_r_cp_api_glt_i_4FK2SHBN7BSC8AH64RWX?_encoding=UTF8&psc=1
The doohickey change was an important thing to do in the 1st Gen KLR's but not so much in KLR's built in 2008 and later..
(I have a 2003 with close to 65K miles and did the the Doohickey at 17K and found the original part to be broken)
KLR's starting in 2008 had a slight upgrade to the Doohickey so it was less likely to break, but the spring that keeps tension on the doohickey was not improved and is still likely to break or just wear out and go slack. Not a big safety issue.
Just FYI, a lot of the original screws on a KLR look like Phillips screws, but are actually JIS screws (Japanese Industrial Standard). I imagine the OP already replaced most of the original screws with Allen head screws as many KLR owners do, but if not, you might want to consider getting a JIS screw driver kit. I got this one: https://www.amazon.com/Hozan-JIS-4-JIS-Screwdriver-3rd/dp/B00A7WAHTU
It will save you from stripping out the top of many screws when working on Japanese bikes.
You gotta get the metric equivalent to these to complete the look!!
SMT-Skull Flame Black Side Mirrors Compatible With Harley Road King Electra Street Glide Ultra [B00RUDY8IA] https://www.amazon.com/dp/B00RUDY8IA/ref=cm_sw_r_apan_glt_i_1CACWER9128J5AFCBE1S
I've just used engine ice in all my bikes, nothings blown up yet
Link: https://www.amazon.com/Engine-Ice-TYDS008-Performance-Coolant/dp/B000H01NFY?th=1
Couldn't give you an exact figure on how much the bike takes. Just add coolant to the radiator until its full. Shake the bike a bit to get air bubbles out. Turn it on with the cap off and let it circulate through the bike and to work any extra bubbles out of the system. Turn the bike off and top of the radiator.
Its not rocket science, it will let you know pretty quick if something is off. KLR's are pretty beefy bikes
Enricher, not a Choke. Another option is a cable eliminator kit. The kit come with a new needle valve, brass nut and body and a push pull knob to operate the Enricher when needed. Here one merely as an example. No affiliation with this product.
There are photos of it installed in a KLR Carb
Carb Choke Enrichner Cable Eliminator for Kawasaki KLR 650 CV https://smile.amazon.com/dp/B07QV5RK5N/ref=cm_sw_r_cp_api_glt_i_YR4H40M1WW3E83G3N433
Honestly start at Kennedy Meadows and you'll have a hard time avoiding forest roads and single track runs. The whole area is 4x4 and ADV heaven, there's almost too much riding area to try and give you a recommendation but if I had one I'd say do the sort of technical ride to Monanche Meadows from Sherman Pass Junction.
Hope this helps. It's not the EXACT route I did, because I doubled back on myself and missed several turns while rambling. But this should be pretty close, plus I added a trip up Short Mountain.
I have this cheap camo one from Amazon. Or near as I can figure one identical to it, because these things are all word salad non-brands from China that change with every passing minute. It's, uh "waterproof" (not really, if you allow rainwater water to pool on it you'll get soak-through eventually bit it keeps the morning dew off of your seat and gauges) and it serves its purpose for me which is keeping sundry crud from settling on my bike and making it a lot less obvious in whichever bush I've thrown it in around the campsite. If your use case is preventing passers by from noticing you have an expensive bike rather than a cheap bike I'm sure it'll serve for that purpose as well.
The material is quite thin and shitty, which is a plus for me as it allows you to, with practice and a bit of dedication, cram the thing down to about the size of a paperback novel. I will say that the included stuff sack blew its seams pretty much instantly, so I reinforced the shit out of it on my sewing machine and it's been holding up fine for about three years so far. A little faded, got a small hole or two in it, but it's still kicking.
MOTO4U Motorcycle Race Fasteners Quick Release 14mm D-Ring 1/4 Turn Fairing Fastener Clip Style C x10 Sets in sliver color https://www.amazon.com/dp/B07C3QQ64R/ref=cm_sw_r_apan_glt_fabc_0SCTS147VV2XXYC3BYCF?_encoding=UTF8&psc=1
It behaved just like a too tight cable, but i made sure there was some slack on the lever just to make sure the clutch was fully engaging while trying to confirm the issue
From what i read on the other forums the yellowing steel plates is pretty common, and people were wire wheeling them to restore, or even to add more friction. They looked 100% new when i finished. I didn't get the idea that the steel plates were a super wearable item, just the friction plates and springs. My inclination was to replace the steel rings also, but took a chance this time to save the $70
For the drivetrain i just installed lighter sprockets and chain. This one for the rear with aluminum center bonded to steel teeth
https://www.amazon.com/dp/B017A8D6UA?ref=ppx_pop_mob_ap_share
And a front sprocket with more holes drilled out for weight
https://www.amazon.com/dp/B07PWMP3DV?ref=ppx_pop_mob_ap_share
They were pretty expensive. Was it noticable on this bike? Not sure. I'm going back to cheap steel sprockets soon so I'll try hard to spot any changes. I think i will buy them again later on though
Those levers look like these ones. I’ve been debating snagging a set myself. Look great and stellar reviews for the price.
This is my first time mounting anything to it but I will say the angle that it moves the windshield to is much better for riding on the street much better wind protection
Xitomer Motorcycle Rally Dash Kit, Fit for KLR650 2008 2009 2010 2011 2012 2013 KLR650 2014 2015 2016 2017 2018 KLR650, Height Adjust Lifter Windshield https://www.amazon.com/dp/B08VJBQNWH/ref=cm_sw_r_cp_api_glt_fabc_8DXVYKV1N5VHS87BFK97
I've got them (Or, at least, similar) on my SV & CBR. Love them. My fronts have white running lights and the rears flash red before lighting up solid red when I brake. (Amber sequential turn signal takes precedence over the white/red.)
$18 at Amazon. They've got some other shapes / styles as well. Super happy with them. Both bikes needed the blinker relay changed to an LED one, but the lights didn't need resistors wired in.
Kinstecks 4PCS Motorcycle... https://www.amazon.com/dp/B07KBXYBQG?ref=ppx_pop_mob_ap_share
In case anyone is curious, I just decided to buy a new gasket and take the whole outer cover off as it’s the perfect time to re-spray the paint and check the status of the doohickey. I also found some cheap hex aluminum side plugs on Amazon to try out and replace the plastic ones to make it easier on myself in the future. Link to plugs are below. Thanks for all the suggestions.
https://www.amazon.com/NICECNC-Engine-Compatible-KAWASAKI-1987-2022/dp/B095SMV758
I use this one, works well, light, kinda fits the KLR "lifestyle "
It would seem I was waaaaay off with the price...... this is what I have though, sorry to have mislead you
Paraurti Paramotore Per Kawasaki Per KLR650 Per KLR 650 1987-2016 2017 2018 Side Crash Bar Moto Motore Guard Paraurti Stunt Cage Telaio Posteriore Carenatura Protector Barra Anticaduta Protezione Tela https://www.amazon.it/dp/B09C4LBTKS/ref=cm_sw_r_apan_glt_i_EH7BQ8HPZB95H9KKESMF
I cannot understand where i should screw them though
I have the genuine Kawasaki tank bag, surprisingly it wasn't that expensive, and I love it. It sits perfectly, can hold alot if required via expandable zip, has a optional hard top (I don't use this), and well placed access for running out cables for phone or go pro battery charger on longer trips. https://www.amazon.com/2008-2017-KAWASAKI-KLR650-STORAGE-K57003-116/dp/B00JS9E58C
Edit: added words
How much stuff do you intend to carry in a tank bag? That will be a big factor in what you choose to use. This is the one I opted for:
amazon.com/Cortech-XF-10-8230-0605-10-Super-10-Liter-Profile/dp/B01HFLO0DY/ref=asc_df_B01HFLO0DY/?tag=hyprod-20&linkCode=df0&hvadid=344005222927&hvpos=&hvnetw=g&hvrand=8345503224835543474&hvpone=&hvptwo=&hvqmt=&hvdev=c&hvdvcmdl=&hvlocint=&hvlocphy=9057160&hvtargid=pla-726808124811&psc=1&tag=&ref=&adgrpid=70731225353&hvpone=&hvptwo=&hvadid=344005222927&hvpos=&hvnetw=g&hvrand=8345503224835543474&hvqmt=&hvdev=c&hvdvcmdl=&hvlocint=&hvlocphy=9057160&hvtargid=pla-726808124811
Actually in my case a paid a bit more and got the one with the detailing in hi viz green (it more closely matches my bike and my riding gear). I have found both Cortech and Tourmaster gear (same company) to be of excellent value and very well made.
Got both of Amazon, pretty good price for the quality
The windscreen is this https://www.amazon.com/dp/B00GA3BA28/ref=cm_sw_r_cp_apa_glt_fabc_GCHDPNPY4BXVBDY52NV3?_encoding=UTF8&psc=1 And the headlight is here https://www.amazon.com/dp/B01M63N6PJ?ref=ppx_pop_mob_ap_share
Sure thing!
So the pictures only give a rough idea but it's pretty easy any way. What you'll need is a 10mm deepwell socket + ratchet, a 3/4" drill bit (metric equivalent works), 1/4" drill bit, and these guys: https://www.amazon.com/dp/B07HFXR4W7/ref=cm_sw_r_apan_glt_fabc_EBR263M2FDGTXZ461GFE?_encoding=UTF8&psc=1
They come 2 to a pack, I used 3 total so you're looking at $40. I used a cheap aftermarket rack but it works on the stock one just fine. If using the stock rack you'll need to drill 1 hole in it (that's the 1/4" bit). Mark your drill holes on the Pelican by lining up the two holes on your rack closest to the seat with the first fully flat spot on the inside of the pelican. You may need to smooth the bottom out,, I used a razor blade. Then take the threaded ball-end studs from the kit and use them to replace the front two screws in your rack, and for the third come up through the rack with a nut underneath and a nut on top. Then a washer, then the spring from the kit, then the spring retainer (put those on the studs first, since they don't fit over the ball). Put the press button releases through your pelican, tighten them down, and check fitment. Once everything is tightened down just press the case onto the studs, you'll hear a click as each retainer connects, and viola, you're good to go.
Interesting. It looks like a used horn is cheap to buy.
I bought this pack of diodes that are probably overkill.
The horn circuit is completely separate from the turn signals. Common points of failure there are the spade connectors coming off of the blades on the horn itself, or the wires getting yanked out of the spades, or crud buildup in the horn switch itself.
I always just use regular old largeish diodes I have lying around for this sort of thing. Any type of "rectifier" diode will work, for instance. For this application the properties don't matter as long as you don't exceed the maximum forward current rating of the diode. The titchy little 194 type bulbs used in the KLR's dash are only 3.78 watts, 12 volts / 3.78 w = 0.315 amps, so anything up to and including the crude and very inexpensive/readily available 1N4001 will work as these are rated to pass up to a full (1.0) amp.
I use one of these collapsible crates...it has two configurations, which I call "pizza mode" and "beer mode". It's held down by two thick rubber tie down straps. Works GREAT!!!
Do you still have stock footpegs? I bought some cheap MX style footpegs off Amazon and they provided more room for my boots to shift because they aren't as thick as the stock rubber ones Not the exact ones but I've spent ~30 hours standing on my cheap Amazon footpegs without any problems so far.. you just sometimes have to file them a bit to get them to fit https://www.amazon.com/dp/B07BF4S6L8/ref=cm_sw_r_cp_awdb_imm_X2T5JR54CKFTZDJ9ENC4?_encoding=UTF8&psc=1
Are you positive you got the slide diaphragm completely seated into its groove with the detent in the slot? If not you have a vacuum leak and limited/slow throttle response. Also, was the diaphragm in good condition? You could either replace the Enricher nut with another plastic one or an aluminum aftermarket copy. You can also get a cableless all brass push/pull version like this >> Karbay Carb Choke For Kawasaki Klr 650 Cv (Enrichner) Cable Eliminator https://smile.amazon.com/dp/B07H9DPYVP/ref=cm_sw_r_cp_api_glt_fabc_V78VE5C22TKEJTBTPFDM?_encoding=UTF8&psc=1
Try this one: https://smile.amazon.com/Techmount-4-Techgripper-Universal-Phone-Gripper/dp/B00M063RC0
You can also search for "The Techgripper."
You will still need a way to mount it to the bike. I recommend the RAM mount that attaches to the handlebars.
I have a rubber one that came with my KLR but I have to be careful with where my side buttons line up. I bought this one for my Harley and I like it a lot better. The side "fingers" can be moved so they don't interfere with buttons. It's spring loaded on one end so the phone just pops in without stretching a rubber band over four corners. Much faster and more secure.
They are a wear item and will break after some amount of time. You can make them last longer by lubing them whenever you have your wheel off with something like PJ1 Cable Lube. That lube also smells really good, like cinnamon, :D.
Any time I have the wheel off I lube the cable, and also grease the speedo gear down in the hub. Definitely make sure that stays greased, because if that seizes like it did on mine from lack of grease then you are either: 1. buying another complete wheel (expensive), 2. getting a different digital speedometer (doesn't look good imo), 3. buying a used hub and truing stand and learning how to re-lace a wheel (a pain in the ass, but what I did to fix it)
The one I got looks just like this and it's really solid
https://www.amazon.com/dp/B07DN9F97Z/ref=cm_sw_r_cp_apa_glt_fabc_005TYXMV4V7WB3N7ZER3
Mine came with like 20 different attachments instead of 4, i don't really use them but I'm sure you can find that exact one of you search on Amazon or eBay
I’m really happy with this one from Chase Harper for 2 yrs now. $65. Has its own mounting straps and I added a small steel cable and padlock for safety. Very water resistant and can easily be covered for a downpour. I built a simple unglued 1/2” pvc box frame inside the main compartment to keep it standing up full size when empty (and it won’t crush a load of bread) Chase Harper 4200 Hideaway Tail Trunk - Water-Resistant, Tear-Resistant, Industrial Grade Ballistic Nylon with Adjustable Bungee Mounting System for U https://www.amazon.com/dp/B000GTTXOE/ref=cm_sw_r_cp_apip_OdjHeaG9QdMVU
What size screen did you get? I'm looking at the National Cycle VStream Windscreen (20.75") and I'm hoping at my height I'm short enough to stay in the air pocket. I've read multiple posts about the buffeting from a too-short windscreen and wouldn't be a fan. Wind noise has been a problem for me.
I'll look into the sprocket change.
I have a Stop & Go electric compressor and power it with my aftermarket USB connector's 2 pin lug cable. If your bike doesn't have a tender cable like this, you can add one to the battery. If you're not sure if it has one then take the seat off to see if there's a cable like this wired to the battery.
^this. Hate to support the Overlord Bezos, but paid about $15 and it works.
Here's an Amazon link for the type of valve stem tool I was talking about. It makes seating the valves stem so much easier.
I'm not sure what your plan is for the sealer TBH. It may just be my lack of imagination, but I can't picture doing any kind of gasket repairs road side without being able to refill fluids. I've heard of people using gasket sealant incorrectly and getting the sealant where it doesn't belong, resulting in a costly repair. I know I'm incompetent enough to do this. If I needed to make a gasket, I'd go for a sheet of gasket material and trace out what I needed from the part. Still can't picture doing that on a road side though.
Fair enough, you can either swap to ATC (Blade style) fuses, or keep with the glass tube ones you have.
For each of the wires (white to white, blue/white to brown I think?) clip them from the little fusebox, strip a little back and splice in-line the new fuse. for reference, use a technique like THIS to join the old wires to new, and use something like THIS as your fuse holder)
Hope that helps! let me know if you need any clarification or help!
I'm not endorsing this specific product but everyone who owns a wrench should also own something like this. Be aware that they eventually break due to being flexible and metal, but they're cheap and sometimes last years and usually save your ass in situations like that.
There’s a weird rhombus shaped pair on Amazon for 20 bucks. Work great.
you can drop and destroy them six times before you’ve spent more on $120 pair.
And I found an identical pair for 13.99. I’d honestly just ride with a spare pair for that cheap.
MICTUNING Universal Hawk-eye Motorcycle Convex Rear View Mirror - with 10mm Bolt, Handle Bar Mount Clamp Compatible with Cruiser, Suzuki, Honda, Victory and More https://www.amazon.com/dp/B06Y2RH6WG/ref=cm_sw_r_cp_api_glc_fabc_tI-5FbPQAGKKQ
I have the "Neverlandback" mirrors on mine and they look cooler, have a considerably wider field of view, and vibrate less than stock. They're not perfect and still get pretty fuzzy above 2000 RPM, but you can't have everything.
I think it's one of those nonsense Chinese fake brand names for cheap shit manufactured on speculation as the Chinese do. There are myriad models that look identical on eBay/Amazon/AliExpress and probably are. Mine have hit the ground repeatedly and still haven't busted.
no, I have these
the LED H7 bulbs are a little different than a regular H7, so when you install them there is too much play and the metal clips won't hold the bulb tight. I cut a ring of PVC pipe (3/4" I think, but not sure as it's been a while) and sanded one side flat so that it makes the LED H7 fit tight with the metal clip.
​
I should note this is for a Gen 2 (2013) KLR
Amazon has them for $136 which is a pretty good price. You can also find it at Babbits:
SWITCH-ASSY-IGNITION 27005-1129 $136.26
This happened to me a few weeks ago. Cable was like $13 bucks on amazon. Idk what year you have but this is what I got. 08-10 KAWASAKI KLR650: Motion Pro... https://www.amazon.com/dp/B0065743JQ?ref=ppx_pop_mob_ap_share
​
I got rid of my front fairing and put a new headlight on. It was super easy. i just used some headlight brackets like these: bracket You can just search headlight bracket on amazon. Just look through the reviews and make sure they are the right size to fit on the forks.
​
I'm still in the beginning of all the mods I want to make (i have a similar list to yours) but this one is easy, not too expensive and makes a huge visual difference. Feels very streetfightery from the cockpit. I love it. The other things that were mentioned earlier are super good things to do to of course.
I used these ones here: amazon mounting bracket . Those particular ones are a bit big so it doesn't fit the greatest without a collar or something on the forks. But very very easy to do!
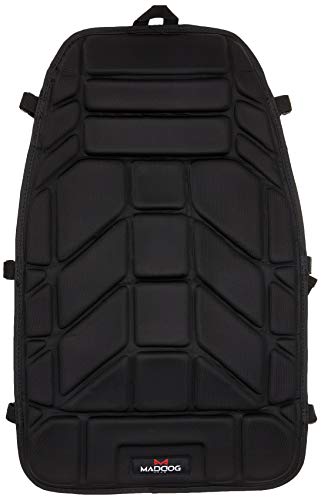
I can't say for sure but it looks like the standard ATV one that a lot of us have. ~$20 on Amazon. It improves my comfort for sure, but it's still not a great solution if you're uncomfortable on the stock seat.
MadDog GearComfort Ride Seat Protector https://www.amazon.com/dp/B006JMK7N8/ref=cm_sw_r_cp_apa_i_NfUqDbWACFVJA
That color is eye popping...in a good way. Beautiful! When it comes time to add the milk crate I highly recommend this one from Amazon:
https://www.amazon.com/gp/product/B078Z3KG6V/ref=ppx_yo_dt_b_asin_title_o06_s00?ie=UTF8&psc=1
I really like that it folds down so it is less conspicuous and less wind resistance when you don't need to carry anything. Also makes a very sizable flat surface which you can set your helmet and gloves on safely. Pair it with a good elastic cargo net and you can easily carry two full bags of groceries in it and more. They make an even larger size but this one has been quite adequate for me. I use it pretty much every day for errands and grocery shopping around town.
Bracket for the forks. The bracket was to mount one light below the other, as there isn't enough room to mount both off the arms.
Harness is easy, it's completely separate from the stock lights system. Connects straight to the battery, has its own fuse and everything.
You mentioned a cheap torque wrench, and that very well may be the culprit. Over or under tightened bolts can cause leaks.
https://www.amazon.com/dp/B07WTSRZKH
I have this one and it's great. I've checked it against multiple other torque wrenches and it's very accurate. I still prefer a click-type torque wrench but this one takes out all the guess work.
This is all you need:
https://www.amazon.com/dp/B01N7UI82Y
I have big feet and wear MX boots while riding. I have no trouble shifting at all after installing this lever and going up one notch on the lever position. I wouldn't advise lowering the pegs.
I think you might be interested in this.
For your exhaust. I did mine in this color and it looks great. Would go a lot better with your bike though
The cowling plastics were green when I bought the bike earlier this year and I painted them black. I did a poor job and the paint was uneven and recently has been chipping off in some parts so I bought some new black ones and they look waaaaaaay better. These are the rear bars I got: https://www.amazon.com/COPART-Crashbars-Protectors-Kawasaki-1987-2018/dp/B07MTD5N7N/ref=sr_1_2?dchild=1&keywords=klr+650+rear+crash+bars&qid=1595469469&s=automotive&sr=1-2
keep in mind that instead of an electric pump you can get a hand pump(just an example) like for a bicycle. I've been using them for years even for full inflations. I prefer not to have another electronic to possibly go wonky.
This is the ones ive been using. Been great in 85ish temps in oregon. Using it in traffic so not just with wind on me. Pretty happy for the money. It is definitely heavy and im a bit moist in the butt and crotch. https://www.amazon.com/dp/B002BDU3O2/ref=cm_sw_r_cp_apa_i_VBNdFbT07AC6R
Got a Samdo Tach and got everything labeled on it and on the KLR correct (I think).
I ordered a bare 9 pin plug (male/female) and wired it today but wires are not quite matching up (def not plug n play). It looks like I need to tap into a few other harnesses possibly.
Question would it be best to just run butt connectors as direct connects then shrink wrap or electrical tape them?
When wiring my new led turn signals I only have a left and right wire coming from the tach and have a pair coming from each turn signal (8 total) how can I pair these down and maintain the correct load? I have resistors as well if need be.
Here's a link to the Speedo. https://www.amazon.com/dp/B078R1TN12/ref=cm_sw_r_cp_apa_i_clQcFbQMEB91X
Appreciate any insight you guys can offer. This is a cluster f*ck ha..
I got these ones off of Amazon (can get them on Amazon US too, probably cheaper) but I got tired of my feet slipping off of the stock ones. Some people say they had to cut a notch into them because they hit their mounts, but on my 2011, I didn't have to do a thing other than remove the bolts holding the OEM footpeg on and replace the pegs with these. They've held up well. (also tested a lot)
https://www.amazon.ca/gp/product/B00C306H0W/ref=ppx_yo_dt_b_search_asin_title?ie=UTF8&psc=1
As far as the blinker goes, that's really just how they are on bikes. You'll get used to it though. Turning off the blinker becomes as natural as turning it on. I would however like a much brighter dash light to let me know when I've left a signal on. It's really hard to see in bright light for me.
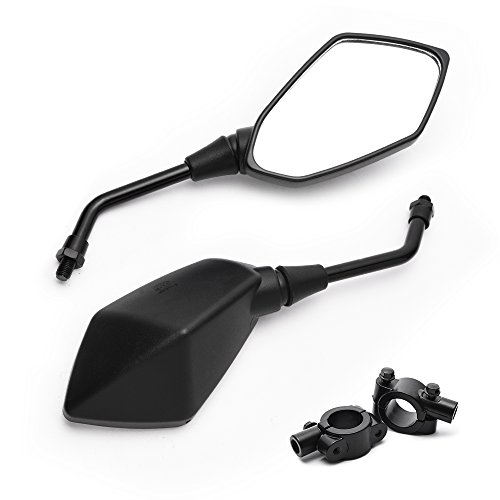
Mirrors...If you have the stock round ones, I'd recommend that being your first upgrade. I hated those mirrors and couldn't see a thing, especially when they were vibrating at any speeds higher than 45mph. I've owned two pairs of these now and they're perfect for the KLR. No modding or adapting. I want to say these are aftermarket mirrors for the Versys if I remember correctly. you can find them from different sellers on eBay and Amazon. Here's the Amazon link I used for the most recent pair I bought.
https://www.amazon.com/dp/B06Y2RH6WG/ref=cm_sw_r_cp_apa_i_PIo7Eb3N00AEP
For grips, I'd go into a moto retailer and try out different ones. Bring your gloves with you so you can get a feel for them. Replacing them is as easy as cutting the old ones off and gluing the new ones on. You can also get ones that lock on if you don't want to glue.
These!
https://www.amazon.com/dp/B01FFBQVBK/ref=cm_sw_r_apa_i_BgDYEb1SNTKK7
I cut them down the middle, and bolted them to my Happy trails su rack.
I even used the straps to prevent sway, and the ones on the top to link the two bags together.
There's a waterproof pouch on the inside, and so far they have been good.
The top rolls like a lunch bag, and the Velcro holds it in place. The strap locks it down.
There is a video on Amazon where some dude stuffed 4 Gallon water jugs on both sides
OP, can you confirm that these are the correct ones? I found them on O'Reilly's site and looked up the Amazon page. I just want to make sure it is the 2" ones linked here. O'Reilly's also sells a 3" version but that seems too big and I'm not with my bike right now to check.
https://www.amazon.com/dp/B001DKT0DO/ref=cm_sw_r_sms_apa_i_CLwzEb5MVW5AB
I bought this one because it folds down. I have been very happy with it, though it is a bit pricey for a milk crate.
https://www.amazon.com/gp/product/B078Z3KG6V/ref=ppx_yo_dt_b_asin_title_o07_s00?ie=UTF8&psc=1