
What are
/r/polymerclay's
favorite Products & Services?
From 3.5 billion Reddit comments
The most popular Products mentioned in /r/polymerclay:


The most popular Services mentioned in /r/polymerclay:
wikiHow
Quora
Etsy
Creative Commons
American Science Surplus
The most popular reviews in /r/polymerclay:
Thank you! And yes it is! I used a clay extruder gun(this). After using one of the circle shaped discs to make a rope of clay, I then cut the clay to a length I liked and wrapped it around a circle cookie cutter, and finally baked the clay while it was on it. I hope this makes sense!
Sure thing! There are various tier number options available (you can link more together if you buy multiple sets and maybe toss the extra lid), I have the 7 but I can’t seem to find one larger than 6 at the moment.
SGHUO 6-Tier Stackable Storage Container Box with 60 Compartments: https://www.amazon.com/dp/B08MQGKSGL/ref=cm_sw_r_cp_api_glt_fabc_1REJN88AZ2K4M77V2VYF?_encoding=UTF8&psc=1
Etsy has a lot of stuff, but it might be a bit pricey. I've found a lot of good stuff on amazon but you need to search around a bit. Try adding "resin" to your search. Just make sure that you'll be able to cram clay into the mold.
Sculpey, the company that makes Premo, has a line of mini cutters and push molds and such. These are intended for clay so they should be easy to work with. I would also suggest checking out local craft stores.
Really, i don't think you need molds to begin with clay. But if you are dead set on them, you can make your own. I haven't had the chance to play with stuff like this yet, but i've been liking ~~Amazing mold putty.~~ Nope, nevermind. Maybe this? I dunno.
Thank you so much! I have a wide array of tools that ive collected over the years, but probably a majority of the detail in this piece was achieved with more precise metal sculpting tools. Similar to these and easily found on amazon: https://www.amazon.com/dp/B000SVRSRY/ref=cm_sw_r_cp_tai_YqwcCb4YFKK2R
Oh I love using polymer clay with molds! (see proof below, lol) --molds made from silicone (homemade or purchased ones), polymer clay, or any other potential mold-making material that works well enough for a particular situation).
Will you be using bent eye pin findings for the dangly-connector, or using something else?
Might be fun to create the white icing squiggle on the top piece with a teeny rope of polymer clay or with white-tinted liquid polymer clay instead of paint, too.
(my article and site:)
https://www.wikihow.com/Make-Polymer-Clay-Molds
http://glassattic.com/polymer/molds.htm
If you were using the clay to make a special shaped container for the balm, craft stores often sell small plastic bead containers, like these https://www.amazon.com/dp/B00YQ8DEVE/ref=cm_sw_r_cp_apa_glt_fabc_1F3NK9WFZC7S78N8MW5P?_encoding=UTF8&psc=1 which you could use to safely store, and the clay around to make it cute!
Nice work! 😊 And I'd definitely recommend getting a clay extruder if you wanna make lots of coils in your designs! I got mine for less than $20 off Amazon, and it comes with different mini discs for various coil thickness and even fun shapes to extrude your clay!
For reference, this was the one I got from Amazon.
I personally use Fimo clay and love it, though I know sculpey souffle is popular, and premo as well. Depends on what you want to make. Souffle has a more matte finish, so if you prefer that then that might be the best choice.
I would recommend getting an exacto knife, rolling pin and a thin blade (https://www.amazon.co.uk/Sculpey-Super-Slicer-with-Handles/dp/B0047VG296/ref=mp_s_a_1_2?dchild=1&keywords=fimo+blade&qid=1605535377&s=diy&sprefix=fimo+blade&sr=1-2)
I would also recommend sanding paper (wet and dry automotive), 100% acetone and maybe IPA. These are used to sand, polish and clean clay.
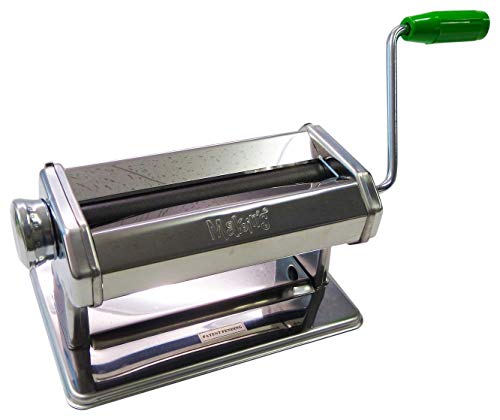
Many people get a lot of use, myself included, out if a pasta machine. This is used to condition and also create a consistent thickness of clay.
I bought an inexpensive clay tool set (can't find it anymore, sorry), but thats been helpful. It contains sculpting and smoothing tools.
You also want a good surface to work on.
100% the most important tool for me has been a thermometer for the oven, so you can actually check you are baking your clay at the correct temp and not undercooked or burning. I put my clay on a piece of paper in a baking dish and then cover the dish in foil, which resolves a lit of baking issues.
I'd also recommend storage! Tbh, I lot of these won't be necessary for beginner, but having some inexpensive tools makes a massive difference. :) most of all just have fun and there a lot of YouTube videos to help
You're welcome! :) Sure, here's the link: https://www.amazon.com/dp/B01F8S11EM It was prime eligible when I got it, but they did arrive late. They're not prime eligible now, but any "half round" glass cabochons should work fine!
I also have 6mm, 10mm, and 12mm. The 8mm are my favorite for the size of the things I make, but it's good to have a little variety!
Will any of these suit your needs?
http://www.sciplus.com/s?sStr=glass+bottles
http://www.sciplus.com/s?sStr=glass+jars
This place has been doing business online for quite awhile and hey have some pretty good prices.
I used this storage case! I guess its a "photo case" but its so great for my clay. I have each case labeled by shades of colors or categories, example: fall colors, christmas colors, shades of purple, etc.
I’ll paste the links below. Sorry, my phone isn’t letting me insert an actual link so you’ll have to copy and paste.
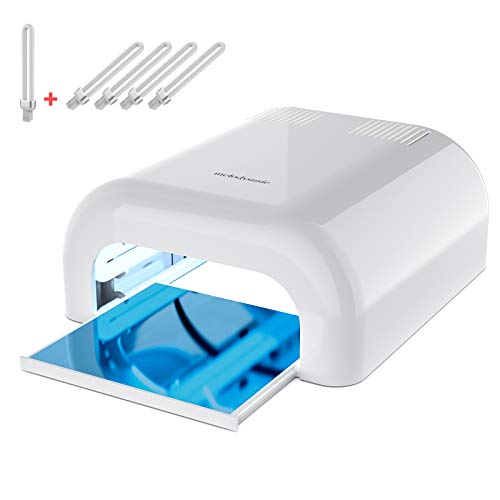
Nail lamp
MelodySusie 36W UV Nail Lamp Dryer, Professional UV Gel Nail Polish Curing Light with 3 Timer Setting, Sliding Tray for Manicure Pedicure Gel Polish, UV Resin, Acrylic, Polygel, White https://www.amazon.com/dp/B012MEZP2E/ref=cm_sw_r_cp_api_glt_fabc_DD66ZWC77Z7M53XX8VGM
Resin
Epoxy UV Resin Clear Hard,ONGHSD UV Jewelry Resin Glue Sunlight Ultraviolet Curing Resin Crystal Liquid for DIY/Kids Craft Jewelry Making Supplies Mold Not Included (60g/2.12oz) https://www.amazon.com/dp/B07RLJG3P4/ref=cm_sw_r_cp_api_glt_fabc_V62F82B1MS9K5NZNCXT2?_encoding=UTF8&psc=1
I have also heard good things about a brand I believe is called Sophie and Toffee for resin, but have not tried it.
I just started playing around with clay and ordered this pasta maker on Amazon that arrived yesterday so I've only had a couple hours use of it so far. It has 9 thickness settings, from .5-3mm. Ideally, I'd like to be able to make some thicker slabs, but a quick browsing of what's available on Amazon are pretty similar in slab thickness.
The one I bought is cheap. The handle came out a few times while I was rolling. The clamping mechanism works fine but doesn't look great. I guess if I get six months use out of it I'll probably be satisfied.
This is great! Thank you so much for the tips!
For the cutters I use these which are stainless steel: https://www.amazon.com/dp/B07T7HGVQF/ref=cm_sw_r_cp_api_glc_fabc_8voaGbHWZ2GT4
I use this for my clay: https://www.amazon.com/dp/B07F68L2DW/ref=cm_sw_r_cp_api_glc_fabc_PxoaGb9KJR6VX
Its definitely too soft, I’m more just using it for experimenting for now. I bought fimo soft clay but it has way fewer colors - I’ll try using it for my next project to see how it compares.
Thank you for all the links as well, I will definitely look into them!
No problem at all, I love clay model making so anything to get someone else going as well is always great! The Sculpey Premo might actually be the best option, it comes in little 2oz packs so you don't have to have a massive block and it's nice and easy to shape.https://www.amazon.co.uk/dp/B004BPPY4W/ref=cm_sw_r_cp_apa_i_G3k.Fb1K9VXJ1
Yay! It's a fun hobby and makes me feel super creative.
I would not recommend Michael's for tools. They are overpriced. There are a lot on Amazon. I got this set and it's only 5 bucks right now!
The clay kind of depends on what you want to make. I started out with a few Premo colored clays from Michaels. The vibrant color is nice. Now I use just a grey Super Sculpey and then paint over it after baking.
Thanks for this informative reply! I bought Fimo Soft, which I thought was pretty highly recommended after researching and it doesn't say it's for kids, but maybe I picked up the wrong one.
I definitely heard of the paper method, but because it was a little tough when I initially worked with it and then conditioned it afterwards, I didn't think it was an issue of too many oils.
Appreciate the help!
I can be a bit clumsy, so I seal mine with UV resin. It coats the clay nicely and gives it a gloss finish. I like this hard type one because it doesn't yellow over time. https://www.amazon.com/Resin-Ultraviolet-Decoration-Transparent-Activated/dp/B07CWQ1FHQ
The customer reviews and ratings for "Classic Arteza acrylic paints" at amazon seem good in general, so it's probably a decent quality acrylic paint and should work ok.
https://www.amazon.com/Acrylic-Classic-Water-Based-Projects-Ceramics/dp/B08H5KLJL7
Your other steps are fine too (e.g., coating first with gesso for better tooth and a white background).
If youre looking for a recommendation, this is the lamp I use, probably better ones out there but it hasnt let me down yet 😊
This looks great! You'll find polymer clay holds shape and detail better than play-doh, so you'll be able to create these shapes more easily.
One thing you can do is start with a really cheap pack of generic craft store polymer clay like this. That way you can practice without worrying too much about wasting money.
I use a nail lamp. The one I have you can set for 30 minutes at a time, and I do have to turn it back on and do it a few times for it to fully cure.
This is the one I use - MelodySusie 36W UV Nail Lamp... https://www.amazon.com/dp/B012MEZP2E?ref=ppx_pop_mob_ap_share
Silicone mats. If needed, you can pick up the mat and peel it off, otherwise it's pretty easy to take it off after without distorting the shape too much. I've attached the amazon link to the ones I bought. They're really great!! And probably cheaper than a slab of wood or marble.
https://www.amazon.com/gp/product/B083TS5VJW/ref=ppx_yo_dt_b_asin_title_o01_s00?ie=UTF8&th=1
Maybe you are looking for something like this: acrylic paint pens?
not sure if they will indent the clay base, but I find them to be pretty inky, so they probably won't so long as you have enough patience.
Wow, that's a loaded question, and not easy to answer. In fact, that's a very hard process and not one I've actually done, in spite of my years of working with polymer clay. There was a period about ten years ago that it was very popular amongst the more "artsy" polymer clay crafts people, and a lot of tutorials (mostly paid) popped up around the internet. Unfortunately, as I said, most required you to buy them. In fact, I bought one on Etsy (I think) but never got around to doing it, because once I looked at the instructions, I thought, "Nope, I don't think I'm going to go through all that just for a hollow bead!" I believe the big "secret" to that process was forming the clay around a wad of sugary substance; when baking, the "candy" made from the sugar melted away like magic, leaving you with, ta-da, NOTHING in the middle! However, you had to clean away a bunch of residue, and that part seemed a bit, well, messy, IMHO, and I was not going to have any of that. Nowadays, however, I do believe there are easier methods, as people WILL find easier ways to do just about anything with time (thank goodness). Sculpey also makes a hollow bead making "kit" you can buy in craft stores like Hobby Lobby (I've seen it there; have not seen it at Michael's or Joann's in the States; you CAN find it on Amazon: https://smile.amazon.com/Sculpey-polymer-oven-bake-jewelry-different/dp/B00KC09E50/ref=sr\_1\_2?crid=HI11R1XKJF4A&keywords=hollow+bead+maker+dome&qid=1652245672&sprefix=hollow+bead+maker%2Caps%2C116&sr=8-2 ) I think overall it is much easier to do it with a kit unless someone else can tell you an easy way to do it without one - which is entirely possible! It's just not my specialty. Hope someone out there can give you a better answer than me :) And I apologize for not answering this particular question sooner; I've been swamped with other projects lately. Good luck with YOUR hollow flower petal top!
FEVERWORK 120M 48T Polyester Silk Screen Printing Mesh Fabric Sheet https://www.amazon.co.uk/dp/B07FDYN196/ref=cm_sw_r_cp_api_i_MWBMJR8CJTD3JX6GT70T?_encoding=UTF8&psc=1
This is the exact one I used. I’m sure you can buy the same in America or whether you may be based
Similar to you, I had trouble with different finishes until I stumbled upon this uv resin that I love. It cures pretty quickly (~10 minutes) under sunlight and you can touch it without too much fear of messing up the resin, but I normally leave it under UV light for much longer to make sure it's fully cured. I pasted the link below, feel free to message me if you want an example of how it looks on polymer clay :)
https://www.amazon.com/dp/B08F7SBVBB/ref=cm_sw_r_sms_apa_i_FRK8FC3G8WDW83V0KB9X
The spiders were made with black FIMO Kids. I've read is supposed to be super soft to facilitate use by children. The packs we used were not soft, not like Sculpey III and the lot. Maybe it was old.
It is crazy durable once cured.
Do they still make it?
maybe this or products like it. it may dry quickly, but the products should say how long.
I bought this ring light. The height and angle can be greatly modified and the light source is awesome! If she ever upgrades to a better camera, she can screw off the phone holder and still use it. The light colour can be switched between warm and cold light and it's powered by USB.
Those suckers are really convenient for what I use them for anyway. And cheap, and last a long time... yes!
These are the ones I bought. Are these what you're referring to, just to be sure? Confused since you mentioned wires, which these don't have but do have a switch on the bottom of the "candle."
...steady (and brighter): https://www.amazon.com/dp/B008TLZT08
...flickering: https://www.amazon.com/dp/B07WLLRVMD
I don't think you would have an issue with an eraser head sticking, polymer clay isn't really sticky (if it is you can mix some of the older clay with the newer clay). I personally don't know what the type of tool you're looking for would be called, but when in doubt use what you have around the house and experiment! I have used these in the past, but they're not completely flat: shorturl.at/rRU07
UV Resin - 100g Crystal Clear... https://www.amazon.com/dp/B08YMTFM7D?ref=ppx_pop_mob_ap_share
I used this one! Tbh tho it’s not that great 😅 it took like 5 coats and lots of cleaning up / re glazing to get them this smooth!
Nice job!
If you want more info about sculpting faces, google something like how to faces miniatures for lessons and tips. And do that at YouTube too.
You might also want to check out the Heads & Masks page at my site:
http://glassattic.com/polymer/heads_masks.htm
That page will also have info on using molds to help with faces of any size, molds you can even make yourself from other figures/toys/etc, and can then "distort" while still raw to make them look different if you want or for variety.
My tutorial on making polymer clay molds at Wikihow shows a bunch of face molds (and casts made from them), some of which are quite small:
https://www.wikihow.com/Make-Polymer-Clay-Molds (scroll down to the large pic in Part 1, Step 11)
I started with
Eletorot UV Torch LED Black Light Flashlight Ultraviolet Torch 395nm Lights, 3-Modes Light, Find Pet Urine Stains on Clothes Floor Carpet Rugs and Authenticate Currency https://www.amazon.co.uk/dp/B072MGHYH2/ref=cm_sw_r_cp_api_glt_i_4X226DK8SCHHRQT5HCNS
And then my husband built me a curing cupboard with a uv lightbulb inside of it.
Blacklight 13W UV ES/E27 CFL Fly Killer Light Bulb 368nm https://www.amazon.co.uk/dp/B07PHTH766/ref=cm_sw_r_cp_api_glt_i_XPP25X9TKJ9PT1Y25NC1
Takes a little while to cure so if you need them doing quickly the best thing to do is resin a load of your stuff on a tile and stick them outside in the sun for 10-20 minutes
Thank you
I use 500g Clear UV Resin Hard Type New Formula One Minute Ultraviolet Solar Quick Curing Epoxy Resin Glue for Casting & Coating/Molds/Jewelry Pendants Earrings Bracelets Making/DIY Crafts, Bulky Pack https://www.amazon.co.uk/dp/B082X8JB3J/ref=cm_sw_r_cp_api_glt_i_786DWY6HR8AP9RXCAJ0E
Absolutely!
500g Clear UV Resin Hard Type New Formula One Minute Ultraviolet Solar Quick Curing Epoxy Resin Glue for Casting & Coating/Molds/Jewelry Pendants Earrings Bracelets Making/DIY Crafts, Bulky Pack https://www.amazon.co.uk/dp/B082X8JB3J/ref=cm_sw_r_cp_api_glt_fabc_C1JF6WFFH5AARHHC3T5V?_encoding=UTF8&psc=1
UV Resin - 200g Hard Type Crystal Clear Glue Ultraviolet Curing Epoxy Resin for Jewelry Making Crafts - Transparent Solar Cure Sunlight Activated Resin for Resin Mold, Casting and Coating https://www.amazon.co.uk/dp/B07SDDW3Y1/ref=cm_sw_r_cp_api_glt_fabc_XW6STP7WVPFXA95H051R?_encoding=UTF8&psc=1
I use these two interchangeably- make sure you research the uv wavelength needed to cure or you’ll end up with a tacky finish. Or if all else fails, cure outside in the daytime sun (even if it’s cloudy!)
I wouldn't recommend Mod Podge. It's very finicky in areas with higher humidity and it will stay sticky.
Make a thinner circle of polymer clay. Then make a donut shape of polymer clay and use the hole to place the photo there. Or make a wreath like tiny sculpture. Or even a frame. I find that the "bar" polymer clay molds work wonders as frames.
Then you can use resin to cover it, or even a varnish like Minwax.
Do NOT place the photo there and then bake. Depending on what was used in the ink to print the photo, it might discolor in the oven.
You can find glass eye cabochons with the back of printed paper on Amazon.
https://www.amazon.com/dp/B01MRL6ZDF/?ref=idea_lv_dp_ov_d
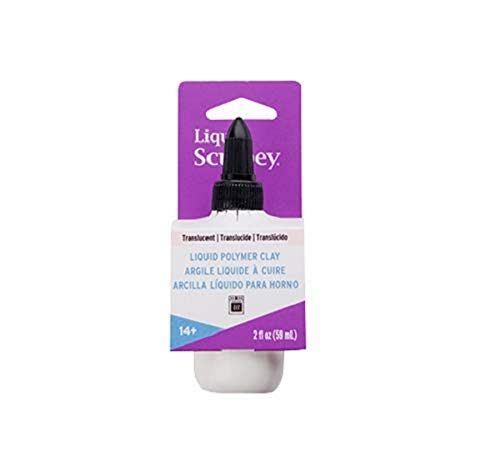
You can make an iris cane. You can also print irises on transparency paper. Then cover with resin or Kato liquid Polyclay or Fimo gel.
In my experience all Chinese-manufactured UV resin can be baked up to 300F.
My wife creates with polymer clay too.
Resin molds can be used for polymer clay.
Does she have any sculpting tools?
There's tons of things once you start digging. You'll find something.
I don’t know how to know if they are kids but yeah I meant pastels. Does this look too cheap? chalk
I use a dremel for drilling, UV Resin - 200g Hard Type Crystal Clear Glue Ultraviolet Curing Epoxy Resin for Jewelry Making Crafts - Transparent Solar Cure Sunlight Activated Resin for Resin Mold, Casting and Coating https://www.amazon.co.uk/dp/B07SDDW3Y1/ref=cm_sw_r_cp_api_glt_fabc_AQ33HDYNF0SRB1Q5WBCT
That’s the resin I use and if your uv light/lightbulb leaves it sticky then try curing outside. Check also the uv light stats of the resin and also the bulb to make sure they are all within the correct wavelengths
I use uv resin a bit and it does have a scent so probably best to stay away from it for your health. I did find fimo liquid gel on Amazon but it looks like it is unavailable at the moment due to the polymer clay shortage. Here is the link so you can check it out anyway though. I have never used keto and don’t know much about it, I will have to look into it!
- You can buy the primary colours, white and black. That's all you need. You can mix many colours using colour theory.
- Polymer clay is more durable than air dry clay imo. You need to bake polymer clay in the exact temperature that is written on the package (invest in an oven thermometer and stick it in the oven until it has reached the temperature. Then you put the clay in the oven and bake it) Bake it for the given time, not much more as clay can be brittle if overcooked. Also, thinner pieces can break, so a bit of thickness may be needed. I think glaze is for protecting the colour, any powder you've used on top of it, foil etc and not so for the durability of the clay. Although resin may make it more strong.
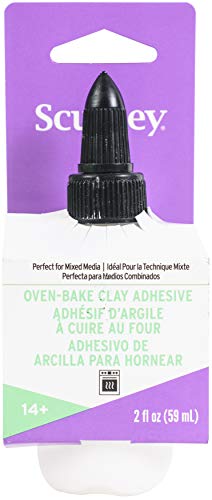
- You can use Oven Bake Adhesive to ensure that clay pieces will stick together
I am also an amateur so I hope these tips help you. Good luck!
I totally understand that struggle. I ordered some aluminium wire but sometimes even that wire with the least width was too thick. So I got thin copper wire (the kind used for electrical stuff), but it was wrapped in plastic, which i had to remove manually. That wire can be a bit too thin, so if i needed increased strength and width i twirled it around itself. I got it from a hardware store, but online maybe this is similar: https://www.amazon.in/ART-IFACT-Meters-Bare-Copper/dp/B07LBTGV9T/ref=asc_df_B07LBTGV9T/?tag=googleshopmob-21&linkCode=df0&hvadid=397047704800&hvpos=&hvnetw=g&hvrand=4677100699743648849&hvpone=&hvptwo=&hvqmt=&hvd...
Sounds like you're asking more about smoothing the joins of added pieces more than smoothing the wider expanses of clay anywhere.
In that case, there are various ways to smooth joins; here are many of them:
... just stroke over the joined area repeatedly with a finger (alone, or perhaps with something like water or something oily on the finger), or with a silicone-ended tool (those are often used as "paintbrushes" too), or with a metal or smooth-plastic tool of some kind (e.g., a suitable metal dental tool, back side of a cuticle tool like this one https://www.amazon.com/Revlon-Stainless-Steel-Nail-Groomer/dp/B01N0D4C5O, etc).
... roll back and forth, or in one direction repeatedly, with some kind of smooth rod (for example, the long side of a paintbrush handle, a knitting needle, a small-diameter acrylic rod, etc, etc)
...for wider areas, place a sheet of thin paper, deli paper, etc, (or sometimes a thicker sheet of plastic) over the rough area, then rub your finger around on top of the paper
...use one of the solvent or physical-abrasives methods mentioned in the first 2 links of my original comment above if those are suitable for the area you're interested in
("cutting" away with blades, or even cutting with wires, won't work as well for polymer clay as for earthen and maybe plasticine-type clays as the tools and methods above --nor as well for smaller items, or for tinier areas where clay has been joined at steeper angles)
I'm sorry. I'd missed this. I use https://www.amazon.com/BLACK-DECKER-TO3210SSD-Convection-Countertop/dp/B00LU2HVDQ We got at an Ollie's. But it's a convection toaster oven.
Thank you! Not sure why you're getting downvotes 😄
I got these tools previously but I'm not hugely impressed by them, most of the rubber tip tools seem to end up making extra marks I don't want when I try to smooth anything, and the most useful one (the most rounded pointed one) seems a bit flimsy?
Do you have any suggestions for different tools? I'd be happy to spend a bit more on a rubber smoother if I knew it came recommended!
Awww no, I'm not sure they were really PBT if that happened :(
It miiiight have been because of spikes in temperature? Maybe try again something tenting them in the oven?
The resting time shouldn't have altered the result
TheseThese keys are an affiliate link, but they're from a person who has been teaching others how to do this, so they should be PBT
These make great eyes, too, if you ever want to venture outside of clay. I can never get mine symmetrical, so these are a lifesaver. And don't require any glaze or gloss!
Thank you! I used a triple thick glaze spray paint from Rust-Oleum
I do 3-4 really thin coats and allow them to dry in between (like 15 minutes) so I don't cause pooling or drips. So far it's creates a beautiful shin and isn't sticky!
I've something similar to this - the exact one is no longer available - but if you're ordering from Fire Mountain for your earring findings, check there as well. I've bought some single tools from there that I'm also happy with. Just be sure to check sizes. I got one set that looks like it was intended for a toddler! Definitely too small for my fumble fingers!!!
You can salvage your old clay by putting a bit of baby oil on it and letting it sink in overnight. The exterior might be a bit...gushy-looking, but once it's kneaded and the oil is mixed in more uniformly, you should have an easier time.
I've never used super sculpey so I can't speak to whether you had a bad batch, but given your arthritis and desire for a softer clay, I'd say give Sculpey III a try. There are a few multipacks available (like this https://www.amazon.com/Sculpey-III-Multipack-Classic-Collection/dp/B000XAUKZM ) so you can get a bit of each color and see how you like it. Fair warning, it's REALLY soft and isn't the best for detailed work. I don't like to use it, I much prefer Premo, but if softness is what you seek, that's some of the softest there is.
Thank You! and Yes! I don't have much experience with Fimo, I've always felt it was too hard and would hurt my hands. IM WEAK so I use Super Sculpey. I brush with rubbing alcohol before baking to get rid of my fingerprints and kinda smooth it out. I paint with Delta Ceramcoat acrylics. There are nicer paints out there but for the price these are pretty dang good. You can usually get them in craft stores. The newer ones I've bought do take 2 coats for a solid color. They make "opaque" primary colors that only take 1 coat, but they are really hard to find I only see them on amazon now a days and they are like $13. Covid hit the factory pretty hard. So I usually do 2 base layers and then just a ton of dry brushing. With delta ceramcoat you do really have to wait for a layer to dry before going over it again because the brush WILL just wipe of the first layer.
If you have trouble getting paint to stick, and sometimes I do depending on how smooth the surface is, I use Mr Super Clear Matte Spray. It is seriously MATTE and will add a little tooth to the surface making the paint stick a little better. (texture almost feels like paper) I also use it to seal my pieces it doesn't change the color much I feel it actually brightens/saturates colors. BUT Please PLEASE if you use it use a gas mask and do it outside it is no joke. If you can smell it then it's affecting you. If you use that Honey add-on for your browser you can watch for a price drop on amazon. The lowest I've seen it is $10-11. It always fluctuates. (jeez I feel like I should get sponsorship money for all these name drops!)
Sorry that was a long answer ^_^; But I hope it helped. Just keep at it let me know if any of that worked for you!
i typically use Amazon.com: Polyform Sculpey Glaze, 1-Ounce, Glossy (456564) they are a pretty good brand in my opinion
Bake and bond glue I have found really useful, it sticks both soft and baked clay together. Just add a little dab and use it as normal glue before baking and while it's in the oven it will seal and stick nice and tight! https://www.amazon.co.uk/dp/B0047VHRLS/ref=cm_sw_r_cp_apa_fabc_wPE4FbY5N8Z9Y
Thank you! It's an unfinished wood panel canvas, I flipped it over and used it as a shadow box. I got this one from Walmart, but here is a link to some on Amazon.
YoleShy 6 Pcs 8'' x 8'' Unfinished Wood Cradled Painting Panel Boards for Arts & Craft - Wooden Canvas Panels https://www.amazon.com/dp/B07XYP29VL/ref=cm_sw_r_cp_api_fabc_YjSPFbBSC7MM6
I can't find the pins on Amazon, but would something like this work to make them?
I bought a few things off amazon including an acrylic roller (helped me get even layers), a long cutting blade (to cut long straight lines as oppose to the exacto knife I was using), a needle tool for the cake texture (before I was using a pin which is harder to hold and a much finer point), and some dotting tools and soft silicone tipped tools (much easier for applying the frosting, fixing mistakes, and blending the clay). Here’sa link to the set of tools I bought, only $13.
Thanks!! Yes, i have Fimo and it is easy to work. So, do you think i keep working with fimo/premo? Because I have been looking and amazon does not have single blocks from other brands, they have a lot of stuff like this: https://www.amazon.co.uk/Polymer-Creations-Modelling-Nontoxic-Accessories/dp/B07HB6LTVZ/ref=mp_s_a_1_2_sspa?keywords=polymer+clay&qid=1566162374&s=gateway&sprefix=polymer+clay&sr=8-2-spons&psc=1&spLa=ZW5jcnlwdGVkUXVhbGlmaWV...
And i can't choose the colors. So, maybe, i will just keep buying Fimo.
Would a clay conditioning machine be easier for you to use? Something like this?
Makin's Professional Ultimate Clay Machine https://www.amazon.com/dp/B001GS4SAI/ref=cm_sw_r_cp_api_fab_JNrHFbNFPWH3D
I bought a little silicone attachment that has a loop which goes on the pencil itself, and a cap which goes on the.. well, cap, with a connection in between them so if it does slip off or you remove it to charge the pencil you don’t lose the twiddly cap :) linking the one I got here —> MoKo Pencil Cap Holder for Apple... https://www.amazon.co.uk/dp/B01HCGYZHS?ref=ppx_pop_mob_ap_share
thank you!! do you happen to know if little glass jars like these are oven safe? I was also thinking about making little earrings in them, like food and drink related, by adding some liquid sculpey to these jars and then baking
> Hey! I use acrylic paint and I found what works best is using a wider, softer brush instead of a small, compact one. I actually switched from my nice brushes to a really cheap soft one that came in a pack, and I find I get fewer brushstrokes that way. Also, using higher quality acrylics can help, but I use cheap stuff mixed with nicer and that works well.
I had bought some decent brushes from a stationary store to try and see if the cheap ones that came with the acrylics I had at home. They use a more softer bristle and the paint did seem to be more smoother (albeit some parts uneven). That's very good to know that paint quality isn't a huge limiting factor! I'm fairly certain the paint I have are on the cheaper range, ahah.
​
>The other thing that helps smooth everything out is gloss. I do 3-4 coats of varathane polyurethane on every piece, and it makes a HUGE difference. Here’s a before and after, you can really see how well it cleans it up.
This is the one I use. That is definitely not the same type of gloss, but I have to assume both will more or less achieve the same glossy finished look? I hadn't thought about putting on more than 1 layer of gloss, but I will certainly keep that in mind for my future clay creatures.
​
> A lot of my pieces looked like this before I got the hang of it
Your examples are so very beautiful! Those were one of my favourites when I was scrolling down the subreddit. It's actually quite relieving to know that the first layers of paint do look a bit awkward and then much better after a couple of layers.
Thank you so much!! I used different colored clay! And it’s this cheap clay from amazon actually, nothing fancy! Though I did have to mix some colors to get the gingerbread color like this. Oh and I used a toothbrush on the gingerbread part to give it some texture!
This isn't a clay, but it works like one. I like to use Milliput Yellow, since it's cheap, self hardens, and can be used for fixing things around the house. You'll only have a few hours of work time with it once you combine the two sticks, but once it hardens it becomes a plastic-like material. I used to sculpt with actual clay when I was in school too, and the consistency is like wet clay. The nice bit about it is that it's also an adhesive so if you make a bunch of pieces separate, you can stick them together with more of the epoxy blend and just smooth it all out to make everything look like one piece.
If you're looking to paint over it acrylics and spray paint work and you don't even need to use a primer (but you still can if you want). I can usually make about two pop figurines per $10 pack, but depending on your scale you might want to look into something else. I used to pick up my 'clay' irl from Home Depot but they stopped carrying it around me.
I only called it a kiln because it was inspired by this:
Efcolor Kiln Set by Efcolor https://www.amazon.ca/dp/B004KT2JOW/ref=cm_sw_r_cp_apa_i_djnzCbA0NCY34
An artist I follow uses it to bake her pieces.
The other simpler ovens use Teflon, and I have birds. I love this set up because it keeps everything enclosed for me, I can take it out to air out after bake time is over.
Yes I just put it over a stove burner. I used an oven thermometer. I did a bunch of testing to see if it held the temp over long periods of time and it was very consistent, once I found the right distance and setting on the burner. I have taken to baking my smaller pieces for 45 min, regardless of size. Nothing has burned or even changed colour. There seems to be a lot of residue inside the lid after, so I'm feeling pretty confident that they are thorough baked.
Thank you so much for that link! Further reading of the baking info, the science behind it, and other points makes me feel like my pieces are being baked properly with this as well! I really appreciate it. And yes I do leave the thermometer in. So that at the end of baking when I take the lid off, if the temperature is lower than expected I can readjust, and bake at the right temp. It has yet to happen however.
Good idea to email them, I know in the past some of the things from their subscription boxes turned out to be duds and they sent everyone replacements. Hopefully they get back to you! I use this nail light, it’s cheap and effective, just in case you can’t find one another way. Good luck!
You're definitely a natural. They look great!
One thing I've found is that the zig-zag-y blades you get in sets of polymer clay blades like this - https://www.amazon.co.uk/dp/B0013E0RQ4 - are really useful for cupcake cases. If you press the texture on the case part instead of cutting the grooves in, you get a really great effect that looks like a real cupcake case.
Hehe I’m still relatively new too. And I too make polymer clay things, the tiny stuff really does hurt your eyes. I bought one of these things as it helps for the tiny stuffs: head mount magnifier
thanks for this! the website recommended Helmar Krystal Kote Matte Varnish as a sealant for clay. Do you have experience using this sealant over spray painted clay?What were the results? I have the rustoleum rock texture spray.
https://www.amazon.com/gp/product/B00EZTD5B8/ref=ox_sc_act_title_2?smid=ATVPDKIKX0DER&psc=1
Agree about "The Polymer Clay Techniques Book" by Sue Heaser. An oldie but goodie, and always a favorite of mine because she just covers so many different things in one book, and simply. (I wouldn't use some of the same colors or necessarily make the same things, but that won't matter for techniques. That book isn't primarily about sculpting although that's covered a bit.)
https://www.amazon.com/Polymer-Clay-Techniques-Book/dp/1581800088
(paperback is fine... eBay may have used copies cheaper if you're interested in it)
Re painting on baked polymer clay, there are just a few things to know about preparing the surfaces, paints to use and not use, etc:
http://glassattic.com/polymer/paints.htm
And btw, temperature and time are interdependent for the type of plastic that polymer clay is, although too high for a particular brand/line will create more darkening than you might want unless the clay is protected (and it will actually burn at 385), and too low will take much longer than you might want for thoroughly polymerizing all the way to the center.
Re bulk brands/lines of polymer clay usually sold for "sculpting," original plain Sculpey will be very brittle in thin or projecting areas. Super Sculpey-flesh will be better but still brittle in those areas. Super Sculpey-Firm will be strong, and Super Sculpey-Medium will be halfway between SS and SS-Firm.
Other brands of flesh-colored bulk polymer clays will be strong but each will have its own handling characteristics (e.g., Fimo's Doll/Puppen clays and Cernit's Doll Clays).
Yeah also called rubber shapers, though they technically aren't rubber anymore. They do tend to "pull" on the clay if used dry, try dipping them into some water or baby oil for better results. This is the set I have. Works well but one of the tips has gotten beat up since I used it on clay that was too dry. Derp.
Yep! I followed a couple of examples on the penguin. The left foot got wrecked a bit, it did look like the one on the right. I made the penguin flat as well, which most of the example penguins out there are not. I added a few cog charms that I picked up from Amazon and glued them on the penguin once it was done. I've included a link to what I got as an example. I don't think you'll have much trouble. Just look for example hummingbirds on Youtube or on this subreddit and make it your own.
https://www.amazon.com/gp/product/B0185MCNZ4/ref=oh_aui_detailpage_o00_s00?ie=UTF8&psc=1
There's the eraser stuff. And you can make your own sugru if the price is your issue.
The glue I'm using is a gap-filling cyanoacrylate, specifically this: https://www.amazon.com/Insta-cure-filling-Bob-Smith-Ind/dp/B0000DD1QQ
What I've been doing is applying it to the cracked areas, and smoothing it down. Once that's dried, I've applied more, and smoothed that. Repeating until the crack is filled, and I will sand that after. I have a pretty solid array of fine grit sandpapers, as well as a pretty extensive array of dremel bits. I think some fine grit buffs will help me with these cracks as well as some other rough spots I was hoping to smooth over. Hoping it goes well. I'm actually having some success re-texturing the hair where it cracked by using the same metal bristle tool on the glue as it dries. Gonna need to soak this tool in some acetone when I'm done, though.
I just got the standard push pins you find on a bulletin board. Picked them up at the dollar store.
I haven't tried it yet, but the artist who I've been following most closely as I learn about sculpting uses Krylon matte finish spray (this one I believe: https://www.amazon.com/dp/B001HWCLK2/ref=twister_B004JLA2OU?_encoding=UTF8&psc=1), and her stuff doesn't seem to be shiny. Her name is EmilySculpts if you want to check her out.
I ended up getting this one. I found about 3-4 of the tools useful (still learning how to use them though), but i really like my exacto knife. The thin blade helps a lot and I end up using it about 80% of the time.
Cool, I'm new too. I used my hands for most of it. I have some bendy wire a little thinner than a paper clip (that I used inside this mini's rod, cuz I was afraid it might break otherwise) — I cut a piece a few inches long and used that to scratch some lines (on the rod, beard, hat, feather).
Which tool set did you get? I saw this super cheap one on Amazon, but you're right, it seems a bit large. I think I'd be happy with a pointy thing, small chisely shaper thing, and a loop of some sort. If you find a set you like, let me know!
Hi, there are excellent tutorials both for creating faux bone clay pieces and using paint to create an antique bone effect in the book The Polymer Clay Techniques Book. I really like her recipe for faux bone / ivory and have used it to sculpt tiny animals that look like they were carved from tusk, so hopefully it's helpful to you.