
What are
/r/resin's
favorite Products & Services?
From 3.5 billion Reddit comments
The most popular Products mentioned in /r/resin:


![TinyHippo [6 LBS] Silica Gel Flower Drying Reusable Cystals with Color Indicating, Bead Size < 1mm (User Manual Included)](https://m.media-amazon.com/images/I/41S3YPERjTL._SL500_.jpg)


The most popular Services mentioned in /r/resin:
The most popular reviews in /r/resin:
I wish I would’ve bought more when they first came out because I buy resin by 2 gallons & it was only $60 they have obviously bumped up the price now but it’s worth it. (I put the resin & hardener in separate 8oz bottles & let them sit in warm water for about 10mins) https://www.amazon.com/dp/B08HSHVKTS/ref=cm_sw_r_cp_api_glt_fabc_43DZ636R2W1T2Q835HJT?_encoding=UTF8&psc=1
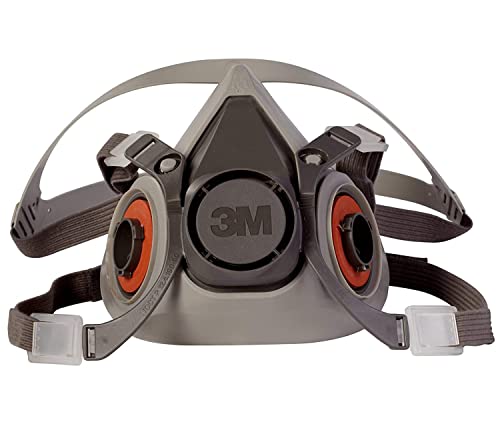
You need a respirator with organic vapor cartridges. N95 masks and the masks being used/recommended for covid protection DO NOT PROTECT FROM FUMES. Those styles protect against particulates but do NOT filter out fumes or gases. The concerns with resin are the fumes so you need something that is actually capable of filtering out fumes.
I have a half-mask respirator like this one.
Straight up regular saran wrap from my kitchen:)
- Pour clear resin into mold about 3/4 of the way to the top.
- Cut a piece of saran wrap that is maybe like 2 inches wider on all sides than your mold.
- Place it right on top of the wet resin and kind of bunch it a bit to make it look like fabric that is crinkled.
- Let resin cure.
- Peel of saran wrap (amazing that it comes right off!)
- Take a cheap eye shadow brush, like the kind that come with cheap eye shadow, or a regular brush or q tip, and dap a powder all over the cured resin (which is still in the mold. Get into the crevices.
- Pour black dyed resin on top of the powder until mold is full and let cure.
- Unmold and be amazed!
Just Google "velvet resin tutorial" and you can find videos on it:)
Here's the powder i used, its holographic color shifting.
Nail Powder WENIDA 8 Jar Holographic Chameleon Chrome Mirror Laser Synthetic Resin Pigment with 8 False Nails and Silicone Nail Brush for Manicure Decoration https://www.amazon.com/dp/B0839H5YRS/ref=cm_sw_r_apan_glt_fabc_TN29KVYVB1CG6V3673HW?_encoding=UTF8&psc=1
ZYTIN Chess Mold for Resin,16 Pieces 3D Silicone Chess Resin Mold,Chess Crystal Epoxy Casting Molds for DIY Crafts Making,Birthday Gift, Family Party and Outdoor Games https://www.amazon.com/dp/B0926S84RV/ref=cm_sw_r_cp_api_glt_fabc_93K0962GTKB7TEMF2YMN?_encoding=UTF8&psc=1
Limino Resin! Stuff is the best!
On Amazon. It comes in a set of three. Two dragons and one egg with a dragon poking out! Here!
Small elk Resin Mold, Epoxy Resin Mold for Making Mobile Phone Holder Desktop Mobile Phone Holder Fixing Frame, Desktop Decoration Resin Crafts https://www.amazon.com/dp/B08XX56BZS/ref=cm_sw_r_cp_api_glt_fabc_TXH9KE9TMJZ1T7HNER1Z?_encoding=UTF8&psc=1
Only certain white alcohol inks have enough weight to sink the ink.
This one I know for sure works. Pinata White Alcohol ink
Yes, you can do this technique with UV resin. I do use a mini heat gun to thin the resin, and get the bubbles out first.
Was the flower fully dried before putting it into the resin? Did you coat it with anything before putting it in the resin?
Based on the pictures I'm guessing the issue has more to do with the flower than the resin. Pouring in layers may help but it's not going to completely prevent those big bubbles because they come from the flower. I know putting a flower in resin seems like it should be an easy/simple project but there are a few variables that make it more complicated than it looks.
As the resin cures the heat can cause the moisture and air in the flower to steam and expand which creates those large bubbles around the flower. This is something that most of us who have tried casting flowers have experienced at some point, usually fairly early on because it seems like such a good starter project.
In general you want to make sure any flowers or plants (basically any organic matter) are fully dried before casting and it's often a good idea to coat them in something first in case there is any air trapped between the petals. There are a lot of methods for drying the flowers or you can purchase them already dried or pressed. What I typically do is put them in silica powder or beads (links are for example purposes, there are other options and you may be able to find some locally) for a few weeks (or months if I get distracted by other projects). The powder helps preserve the color and shape while the beads usually do a fairly good job at preserving the color but can flatten the shape some.
alcohol colours and gold leaf. They are all the same though, these are the ones I used.
Thank you! I bought this mold. It worked decently. My only complaint is that, even though I used plenty of mold release, there were a couple spots on the edges that stuck and ripped.
Hi - I know the item you describe is more of a "kit", this is currently the cheapest at $35
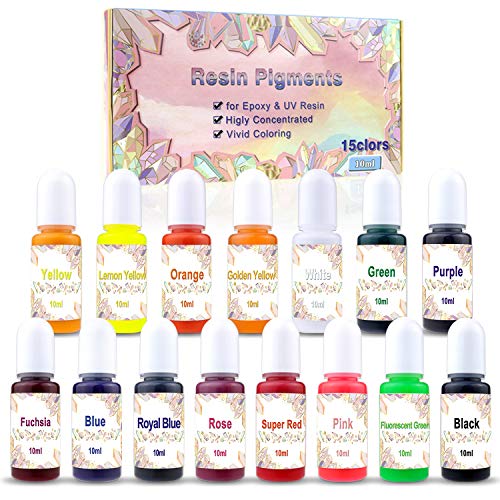
15 Color Resin Pigment ,Resin Dye Resin Color Translucent Epoxy Resin Color Pigment for Resin Jewelry DIY Crafts Art Making-0.35 oz/10ml Each https://www.amazon.com/dp/B07XJJ9V89/ref=cm_sw_r_cp_api_glc_fabc_Ost6Fb1T5TVAT?_encoding=UTF8&psc=1
You really just need a lamp and the resin for working with UV resin. I use a lamp like this and this resin (the same price as the 2oz bottle they sell at the craft stores here and works even better imo)
You could add a clear top coat with fine iridescent glitter in it--I love the white color in this set. It won't mimic the mica look but is still really pretty in its own way! Additionally, mica powder is not that expensive if you want to redo! The link is to 36 really beautiful colors, of high quality imo--it looks like you're not getting a lot per baggy, but you use so little per project that it takes a long time to run out of any one color.
Look for molds that are gem shapes not pyramids. A google search for 'diamond shaped cone mold' produced several similar looking options including this one.
These mats are really good for pours like that. They are also good for doming things so you don’t get resin on your table.
3 Pack Extra Large Silicone Sheets for Crafts, Liquid, Resin Jewelry Casting Molds Mat, Multi-Purpose Food Grade Silicone Placemat. 15.7” x 11.8” (Blue & Rose Red & Green) https://www.amazon.com/dp/B07XFJ5YKN/ref=cm_sw_r_cp_api_i_kfvDFbBDFXQR4
I use this resin dye when I want opaque white. It’s very concentrated and has never clumped for me before. I have yet to find a white that’s as good as this one!
Have you thought about mica powder? A little bit goes a looooooong way, so if you haven't worked with it, I encourage a couple test runs! Might give you the effect you're looking for though. Good luck!
On Amazon. Here’s the link: Silicone Resin Molds for Hair Clip Making, LEOBRO 4 Pack Hair Barrette Epoxy Resin Casting Molds with 30 PCS Gold Hair Clips, Silicone Jewelry Molds for DIY Resin Hair Clips Barrettes Pin Making https://www.amazon.com/dp/B08CGHS2F2/ref=cm_sw_r_cp_api_i_MmpDFbSK8632R 😊👍
Different resins have different safety requirements so the specific resin you are using should give you the MSDS info so you can see what specifically is needed. Some resins do have lower and/or less toxic fume levels so it may be ok to not use a respirator as long as you are in a well ventilated space.
As far as where to get a mask I got mine at one of the big box hardware stores last year. Depending on current restrictions in your area and how restocked your local stores are you may be able to find one there. Otherwise yes they can be found on Amazon or various other online retailers. I think this is the one I have but Amazon has a lot of options that will work. One thing to keep in mind is that the filter cartridges and mask are generally sold separately and not all cartridges will work in all masks.
I use vinyl sticker printer paper. I can stick the image down and can pour resin right over it. It doesn't run or get an damage. I buy it on Amazon. https://www.amazon.com/dp/B07NX2VK6K?psc=1&ref=ppx\_yo2ov\_dt\_b\_product\_details
i use these little glue bottles. they're amazing. just add a little water to your acrylic paint, shake it up and you'll never have to clean up the excess again. they also work great in a mold before you pour the resin. https://www.amazon.ca/gp/product/B076LWFV8K/ref=ppx\_yo\_dt\_b\_search\_asin\_image?ie=UTF8&psc=1
Here is the link to the mask I bought very close to it, great price and it has goggles with it... You will need to wear goggles also because the fumes can get in your eyes and cause damage. Especially use it when you're sanding etc or mixing. https://smile.amazon.com/Reusable-Painting-Polishing-Staining-Protection/dp/B08S6XR46X/ref=mp_s_a_1_5_sspa?crid=IJE4W84D4TAC&keywords=respirator+with+filters&qid=1668108925&sprefix=resoiraror+with+cartridges%2Caps%2C315&sr=8-5-spon...
Assuming your molds are similar in size to these ones it should be fine in most cases. The temp in your space can also affect how quickly the resin cures so if it's too hot you may wind up with some issues.
Art resins are often a bit softer than casting resins which can result in stuff like coasters or trays being more bendy than they should but that shouldn't make a big difference for a little sculpture type piece like this.
I put a top coat of matte uv gel nail polish on any piece I want matte. I also use high gloss uv gel as a finish coat on the majority of my pieces. Been doing this for about three years now, it works great. I find good quality UV nail top coat is more durable and scratch resistant than standard UV resin. It's actually formulated to be tough to last long term on our hands that can get lots of abuse.
Only had yellowing issues with cheap knock off brands. I have no issues with my favorite brand. Venalisa UV coat
I’ve been using this and it’s $16.70 right now. I went to Michael’s and they wanted 39.99 for the same size bottle.
Most of us are making them ourselves. Get some tiny glass globes like these, fill it with the shimmery liquid (or whatever else you want to use that fits), seal the opening, then place in the dice mold and go from there. While I have messed around with making them I got distracted and moved on to other projects. I really should give it another go.
u/intothepretend Rybonator has a YouTube video making these. There are several threads on making these over in r/dicemaking and other dice making communities.
I bought a gold leaf pen for drawing on top of resin. It's not actual gold leaf, but it will give the same effect without affecting your thickness.
This is a great one. It has a low heat mode so your projects won't cure too fast and warp. It's extra wide so can fit multiple items or larger items in. uv lamp
Thank you! I haven't done it yet. I did order this though - https://www.amazon.com/gp/product/B09N3C8Q91/ref=ppx_yo_dt_b_asin_title_o02_s00?ie=UTF8&psc=1
Don't think it's meant for exactly that propose, but thought I'd try it. Looks like it has multiple purposes.
Sadly you would be correct. I have about 20 different brushes with different sized heads.
I tend to brush excess mica powder off, on the top of the pot. I don't have much on the brush as I have the same problem as you with it going everywhere.
I use very thin/sharp headed brushes (see examples https://www.amazon.com/Synthetic-Paintbrush-Artists-Loft-Multi-Purpose/dp/B07SLP4NFT) it would be the ones on the far right. As you can pick up a tiny amount of mica and put where you need to and it doesn't go everywhere.
I'm still experimenting with different techniques. If I find any more I'll let you know 😊
No need to apologize😊 i used a container/storage container but it depends on the size of your projects like small or medium (from trinkets to hand held molds) i use food containers even a cake container from the dollar tree store. If you're doing larger projects, storage containers and just cover.
Sometimes I have make converings because my projects are either oddly shaped or out of containers so i take plastic baskets and cover them with drapes tape (the blue painter's tape with the extra drapes attached) and maneuver them to not touch my projects.
Sorry for the confusion on the "alcohol misting" lol but i used misting spray bottles from Amazon: TANSHINE Water Spray Bottle for... https://www.amazon.com/dp/B09NJKT24Z?ref=ppx_pop_mob_ap_share
Fill it with 91% alcohol and spray the freshly wet top coats or help to release bubbles out of my casts. Sorry this is long but this how i fight unwanted stuff happening to my curing projects.
Thank you! I got it here: https://www.amazon.com/dp/B092T7DSJD/ref=cm_sw_r_api_i_DW29QJJEY268Z7TCEJTW_0?_encoding=UTF8&psc=1
I’ve come to the conclusion that it has to be due to the small working time once you start curing, but who knows. I’ll say I’ve had some beautiful colors come from these powders, but one little trick I think is always forgetten is that UV resin is essentially like nail builder gel, so conventional gel nail polishes that require a light to cure can also serve as a fun color selection to choose from! And with pieces like yours that you do within a bezel, you can do 2-3 nice coats of gel polish and seal it off with the UV 👍🏻👍🏻
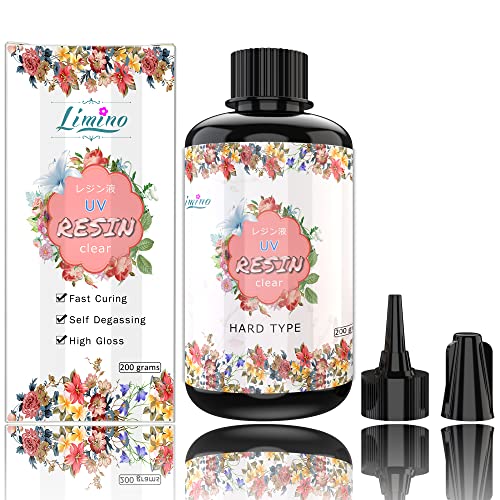
I use Limino UV resin. I've always had good results with this brand.
I’m not sure but maybe modge podge the flowers on then use something like this
My favorite brand is Limino UV Resin. It's a Japanese import that I've found is consistently good quality.
Any cheap resin and cheap mold would work- try dollar store silicone ice cube trays, the one that are for summer parties. Dollar stores also have glitter, and probably paint (a little drop of cheap acrylic can make a piece a solid color most of the time), popsicle sticks for stirring, etc.
The only thing I would say is important is ppe. Resin gives off crazy fumes as it cures (hardens) and it's gotten a lot of people sick when they aren't using proper ventilation and/or a good respirator mask, and wearing nitrile gloves (might get those at the dollar store as well)
Make your jewelry. Most of it is made in molds like everything else and it's pretty because people create neat patterns with resin mixed with glitter, mica, food coloring, acrylic paint, etc.
There is specific archival sprays designed to protect art. They are also uv resistant to help preserve the art longer. Designed to not run ink, paints, and dyes. I use this on any images I put in resin.
Top coating typically only works when dealing with flat, level surfaces like coasters and trays that don't have rounded/beveled edges. It doesn't work very well for surfaces that aren't flat specifically because gravity means it's going to run down the sides.
I agree with the others that you need higher grit sand paper and/or polishing paper. Typically if you aren't getting back to the shiny surface it's because you either didn't go high enough in grit or you tried to rush through the process and moved up to the next grit before you were actually done. If you want to avoid sanding/polishing a deburring tool (something like this) is probably the best option although it may take a few tries before you get the hang of removing what you want without accidentally removing too much so I would suggest practicing on some scrap projects before trying to use it on an important project.
Sure. Bought it in a bundle with some sanding paper
N|A Woohome 38 Stück Silikonform Gießform Resin Form Schmuck Werkzeug Harzpolierset, Sandpapiere, Poliertuch, Schere, Bürsten für Schmuckzubehör, Polier Epoxidharz https://www.amazon.de/dp/B091TPRK25/ref=cm_sw_r_cp_api_i_RJYX4G9VRHFNFYSA3G78?_encoding=UTF8&psc=1
I use cellophane to make this effect. This looks like a solid piece pushed into the resin with toothpicks. I also cut it up, or crinkle it up for different effects. cellophane
If you have some type of embosser like a sizzix machine, you can make really cool images that look 3d. I have a friend who hand embosses hers, but I can't even draw stick people. Lol
Perfekt idea! Use TFC Silikon Kautschuk Typ 1 I PREMIUM Dubliersilikon weich I 500 g (2 x 250 g) https://www.amazon.de/dp/B01MT5O3IW/ref=cm_sw_r_cp_api_i_0NX65ZVQ5884TJCP9K1P?_encoding=UTF8&psc=1
Making a Silikon mold of your existing one and you can make as many gems 💎 as you like 👍
I've been using this one with good luck. Minimal bubbles (most I can pop with my heat gun). Takes the mica powders well. Haven't tried alcohol pigments with it yet. And I have a different brand I use for food safe projects (like my spoon rest)
Hey, thanks. You're a little late; I already did it, and mixed the lavender oil in. Only a tiny little bit, mind you. But I still had to cure that one way longer than the first.
And you'll laugh: The mold is supposed to be for necklaces. They do have holes, but they're finicky, and I broke them on this one. So I just cut them off.
I'll probably buy a heat gun at some point. Apparently, that can be useful to fix some electronics stuff, too. To soften up glue, mostly. Also, I might get another UV lamp if I stick to this hobby, because the lamp that came with the kit feels incredibly cheap and turns off automaticalls after 30 seconds.
Yes, that's a crappie UV light. But you can make it work by leaving the item under it for 10-20 min. If it still is sticky, try putting it in direct sunlight for a couple hours. Still not cured? It's bad UV resin.
If your going to be doing more of this, a UV lamp for nails works great, and are pretty inexpensive. Look for one over 35 watts, but under 100 watts. They can cure too fast and hot. I look for ones with a cooling mode if possible.
I am not familiar with the brand you mentioned. There are so many junk brands out these days. I use Limino UV Resin.
If your just doing small coating projects, get a clear no wipe UV nail polish gel top coat. These are formulated to be extra long wearing to withstand being on fingernails for a week or more. But can be pricy if your doing lots of items. I reserve using it for a final top coat on small jewelry pieces.
I hate Amazon, but they carry it.
RESIN GO Rectangle Carved Storage Box Mold, Large Container Epoxy Resin Silicone with Lid Set for Casting, Large Storage Gift Box Resin Molds for Dominoes Jewelry Napkin Candy Trinket Crafts https://www.amazon.com/dp/B09KPMNDTP/ref=cm_sw_r_apan_i_C17HAQE5V1K89W6KJ12V?_encoding=UTF8&psc=1
Pinata Alcohol Ink Blanco Blanco 1/2 Oz https://www.amazon.co.uk/dp/B004BNHT8I/ref=cm_sw_r_apan_i_YPBZRG60Z4BD1J435AS8
Thats the one ya need.. practice makes perfect, also.. always allow like 45 mins in the cup before pouring.. sinks slower, especially with the blanco white, it will still sink don't worry, just slower
It's artistic. Not everyone enjoys that look, it would have bothered my oldest son when he was younger. But if you like how it turned out, you didn't ruin it. Personally, I love it. My friend bought me a "whatever clock" on etsy similar to this one on Amazon. It suits me.
The embossing gun may work depending on how big it is. Put your mask on before doing this btw - there’s fumes.
Try heating up small bits of the surface for 30secs - 1 minute starting from the edges scrape immediately with a metal grouting spatula- put ‘a cut’ in the resin when it’s still warm to separate the resin scrape it off. All epoxy gets soft when heated this works with all resins I’ve tried.
If you’re doing resin you’re better off with a heat gun they’re maybe like
I get mine off of Amazon but you can also get them at office supply stores, though I’ve never been to look in stores, I always buy mine online. Here’s the link for the ones I always gethttps://www.amazon.com/dp/B077762QK5/ref=cm_sw_r_cp_api_i_N9Z7R2HF27VNY11E1SQG
This was the first keychain kit that popped up when I searchedhere is the link
It was super reasonably priced and I think a great starter! I’ve only had a couple of my pieces mess up and be careful for some reason the letter K is really sharp 😂
If you are feeling the effects from inhaling fumes either your respirator isn't seated correctly (possibly due to needing a different size) or you are not using the correct type of respirator/filter cartridges. The n95/p100 style masks people have gotten used to in the last couple years are not adequate for resin work because they only filter out particulates.
You need a respirator with organic vapor cartridges. I have one like this but Amazon UK does appear to have several other options (both half and full face styles) most of which should be fine as long as you can use organic vapor cartridges and it actually fits well so that you have a good seal. You can test the seal by putting the respirator on, covering the air inlet valves with your hands, and attempting to inhale. If it has a good seal the mask should suction to your face and you won't actually get any air.
Resin Molds for Large Round Jar and Spice Grinder, Silicone Epoxy Casting Mold for Herb Spice Crusher, Jewelry Container Storage Spice Bottle https://www.amazon.com/dp/B08R95B3Q1/ref=cm_sw_r_cp_api_i_BYNSRFBXB0AT7R8RKBV5
https://www.amazon.co.uk/dp/B074PQG3XB/ref=cm_sw_r_apan_i_FWDVPCEGKH8JNBM2HRZ4?_encoding=UTF8&psc=1 that's the torch I have it's 5w but works well just a pain cos you have to hold it although I did rig up a hook to hold it in place.
If still sticky I find multiple goes with the lamp helps that jdiction lamp in the video has options for both 2 minute and 1 minute cycles
> QBIX
Btw, the QBIX brand of polymer clay is one of the low-quality brands similar to others sold in kits of 25+ colors at places like amazon, etc. It'll have some of the negative characteristics I mentioned above.
And looking it up, the manufacturer is confused or something, since it says things like:
...it's a polymer clay but also an air-dry clay (impossible)
...it bakes in 15 min, but "It takes 22 hours for the clay to fully cure. So leave it stand for one day after baking the clay." (absolutely untrue, and ridiculous)
...etc.
https://www.amazon.co.uk/QBIX-Polymer-Clay-Starter-Set/dp/B08LZR41W8
This is so nice!! The coloration is just gorgeous 🤩
I happened to have come across a kit for a kalimba, however I'm skeptical ill get ideal sound with it.. impressive to be done without a kit!
(Link, should anyone else be looking) https://www.amazon.com/gp/product/B09DYS8H7N/ref=ppx_yo_dt_b_asin_title_o00_s01?ie=UTF8&psc=1
I agree with the razor blade idea. I bought these, Double Sided Scraper. They are amazing as the plastic blades are great for surfaces that scratch easily. They are so handy to have around.
I'd have to say I agree with the razor blade. Just requires patience.
I just recently spent $14.99 for an oversized silicone mat on Amazon. I haven't used for resin yet but I'm excited to. https://www.amazon.com/gp/product/B0834NHDPK/ref=ppx\_yo\_dt\_b\_asin\_title\_o00\_s01?ie=UTF8&th=1
Another option might be to just paint the rainbow in with mica/pigment powder first and then pour in a base color, that would be the quickest way, but for what you’re talking about, you can pull this off with a cut up sheet of some shaker plastic, taped around the edges with masking tape. Or if you want to use a clay, I’ve seen people using several kinds, but personally I’d do it with the Japanese plastic clay that you heat up to shape. It’s got a very smooth non porous surface so it’s less likely to stick and leave behind bits of clay residue in your cured resin.
Here’s what I’m talking about, it’s also used to make temporary molds: HinodewashiOyumaruMonochromaticOO-250CClearhttps://smile.amazon.com/dp/B00MG5PYPI/ref=cm_sw_r_cp_api_glt_i_QMKAA2Y49M0PJBBD5NKC?_encoding=UTF8&psc=1
Are you talking about with mica powder swirls, glitter, or other small/lightweight inclusions moving as the resin cures? That happens because the heat of the resin curing causes convection currents within the resin and those currents move the mica/glitter/stickers/whatever around. For the mica powder and glitter there really isn't a way to prevent it because it's inherent to how the mica/glitter behaves within the resin as it cures. For stickers, pictures, and other similar inclusions the way to prevent them moving is pouring in thinner layers and not adding the item until that layer is almost cured. With the metal and wood trays the surface is usually a bit more textured and grippy so they may be able to hold those items in place better than the smooth surface of the silicone molds.
The only other thing I can really think of is that your silicone tray mold isn't on a flat and level surface the entire time which can result in part of the mold sagging under the weight which causes the resin and everything in it to move to the lower area. This sagging is very common with the silicone molds for trays with raised edges like this one. Picking up the mold and moving it while the resin is curing can also result in sagging and/or the inclusions moving around due to jostling or tilting of the mold.
These clear bumpers
It could also be a weak UV lamp. I had the very same problem until I finally sprung for one of the really good ones:
Here's the mold I Have that makes the big oval one, maybe same as yours?
ScivoKaval Cabochon Gem Jewelry Silicone Mold Oval Teardrop Square Heart Round Shapes for Polymer Clay Crafting Resin Epoxy Pendant Earrings Making Casting DIY Craft Mold 29 Design 58 Cavity Large https://www.amazon.com/dp/B07G57CX7S/ref=cm_sw_r_apan_glt_i_ARHBKW2A5P24PC4KQVXW?_encoding=UTF8&psc=1
And here's the oval bezel that fits it sooo perfectly.
Julie Wang Assorted Antiqued Bronze Silver Setting Bezel Tray Pendant Blanks 10 Sets Oval 40x30mm https://www.amazon.com/dp/B07G33X9QF/ref=cm_sw_r_apan_glt_i_YZXTXXZ1D5XR6ZZJJ4TF?_encoding=UTF8&psc=1
I include Jewelry Care Card like these to help my customers avoid these issues.
Epoxy Resin Pigment - 16 Colors Epoxy Resin Transparent Colorant, UV Resin Pigment, Concentrated Epoxy Resin Liquid Dye for Resin Jewelry, Paint, DIY Crafts Art Making https://www.amazon.co.uk/dp/B082SVR1WM/ref=cm_sw_r_apan_glt_i_G0VBCT3NJVQWYGSGJZQN
As long as there are no imperfections in the finish, I use Renaissance Wax. Stuff is amazing! I also include a polishing clothwith all pieces I sell. Helps customers keep that gorgeous shine at home.
If the resin itself is scratched, or I had to sand off an imperfection, I brush on a thin coat of UV no wipe gel top coat nail polish. This will return the natural resin shine before I do the polish step.
I use something like this and I use a cut up silicone mold to put between the metal and resin so that the metal does not stick or imprint the resin.
TANJIN Mini Jeweler Table Clamp Small Hobby Bench Vice Jewelers Hobby Clamps Craft Table Repair Tool Portable Work Bench Vise https://www.amazon.com/dp/B07F67MR52/ref=cm_sw_r_cp_api_glt_i_2CDJDMRTY6STV60XXJQB?_encoding=UTF8&psc=1
I used a small UV LED flashlight for like a full year, struggling.
This was a GAME CHANGER.
Limited-time deal: UV LED Nail Lamp, SUNUV Gel Nail Light for Nail Polish 48W UV Dryer with 3 Timers SUNone https://www.amazon.com/dp/B078NTG1V5/ref=cm_sw_r_apan_glt_i_dl_2P7YPY0ZPN7KXRN6C0KD?_encoding=UTF8&psc=1
That might be her problem.
I use a 168W.
This one specifically:
Limited-time deal: UV LED Nail Lamp, Gugusure 168W Nail Curing Lamps for Home & Salon, Led Nail Dryer for Gel Polish with Automatic Sensor/4 Timer Setting, Professional Nail Art Tools for Fingernail and Toenail Nail https://www.amazon.com/dp/B08H24FH1V/ref=cm_sw_r_cp_api_glt_i_dl_F375TSPWKVFNBMS1RVY1
Much cheaper if you make your own, but you can buy them here https://www.amazon.com/TCP-Global-Gallon-Pressure-Casting/dp/B08G5BTH74/ref=sr\_1\_5?keywords=pressure%2Bpot&qid=1644628717&sr=8-5&th=1
Resin Molds 3Pcs Vase Resin Silicone Mold,Craft Makeup Brush Holder Organizer Epoxy Mold Cosmetics Brushes Pen Storage Mold Silicone Mould Flower Pot Silicone Mold for Home Table Decoration https://www.amazon.com/dp/B096RKQS87/ref=cm_sw_r_cp_api_glt_i_J6QVA0Z557C74FXK70K4?_encoding=UTF8&psc=1
I've been looking too.
I think you should look into the components of the kits, might be much cheaper just to buy the parts separately.
Like, I for one do not want to use disposable cups and sticks, so I only look at kits that use plastic sticks and cups.
But then I saw that I could get these super cheap at the dollar store near my house!
As far as mold go, look at whatever local online used goods you might have available in your area.
Where I am I can use Offerup.com and find countless super cheap molds.
When you settle on one, please say in the thread so I can check it out
I am a fan of this one
I almost never buy the same resin twice and only what is on sale because I’m half convinced there isn’t actually any difference and any perceived difference is my own handling and temperature variance. But this one has had me buying it again, it’s very thin from a heated water bath, so maybe I am half wrong.
I have used a lot of different brands by now and Unicone is another one I remember being very thin. This might be the best one I’ve used but it is pricier than others.
OOoOo thanks for some insight. I have been trying out different ones and like u/Freckles_of_Sun I am not a fan of Dr. Crafty.
I did however try a generic brand on Amazon and really like the outcome, here's the link: https://www.amazon.com/gp/product/B09CGVWXW9
It is a little hit and miss, I made two batches back to back and half of it set up the other half did not.
I use Zona Papers and Plastix for things like this.
Zona papers are good for polishing that area up. I attach them to a cheap pottery wheel so there’s less work on my end. Then polish the whole thing with Plastix and shop towels
Cofe-BY Sea Turtle Silicone Mold 6pcs, 3D Turtle Chocolate Candy Fondant Tortoise Mold Making Mold for DIY Baking Kids Birthday Cake Desserts Decoration Tools, 1.9X1.9inch (Same Size) https://www.amazon.com/dp/B08F5HPV67/ref=cm_sw_r_apan_glt_fabc_QHZF3V3E4TX6N7H27K2Y
Thank you so much! Here’s the link to the leaf mold: JeVenis 2 PCS Tropical Leaves Coaster Resin Molds Palm Leaves Mold Geode Silicone Molds Epoxy Resin Molds for Faux Agate Slices Cups Mats Coasters Home Decor https://www.amazon.com/dp/B08D6BKHKJ/ref=cm_sw_r_cp_api_glt_fabc_WYE4BCK3Z91W0MT3XP5B
Also many folks wouldn’t think to look here but SHEIN surprisingly has some cute and inexpensive molds too!!!!
To make your own, you'll need to purchase a notebook cover mold and resin. Then you could embed your own MLP pieces into the design. The mold and/or mold kits can be purchased on Amazon. The following is a good example of a kit to use to make your own notebook.
You could probably find planner paper inserts to use instead of the lined paper. Just make sure you get paper that is sized the same as whatever mold you buy (A6 paper for an A6 mold).
Here's a video showing someone making an MLP themed notebook cover:
Epoxy resin tutorial - DIY notebook
I hope that helps!
BTW, I use this silicone for casting. WIth this size you could make about 10 of these molds, just to give you an idea how much is in there:
I don’t know if this is a popular brand but I have used Dr Crafty multiple times when making my ouija broad rolling trays and have been happy with the results. DR CRAFTY Clear Epoxy Resin https://www.amazon.com/dp/B07XHL2TFL?ref=ppx_pop_mob_ap_share
Also - this https://www.amazon.co.uk/dp/B08ZXDVSMQ?ref_=pe_27063361_487867291_E_304_dt_1 is the protective mask that I bought, is this ok?
Scott Clark Woolley Large Spotted Toadstool Mold https://www.amazon.com/dp/B072MKRLS3/ref=cm_sw_r_apan_glt_fabc_23Z52MRF1T84SW1GFDZD?_encoding=UTF8&psc=1
It says large but it fits the palm of a hand
I bought a bench lathe. It has a working area of 12 inches. The one I got is the WEN. This does not come with a chuck but it does come with... I don't remember what they're called. Two pokey ends.
For resin, the guy at the store sidestep negative rake tools.
WEN 3421 3.2-Amp 8" by 12" Variable Speed Mini Benchtop Wood Lathe https://www.amazon.com/dp/B07ZG9VTT2/ref=cm_sw_r_apan_glt_fabc_K3VH274QF8857QWM2HS0
Shadow box is an oldie but goody. Then there’s the pressed ones. You also have the option of those glass terrariums…. I’ll post a link to one (this is what I recommend people do when they message asking me now, it can also be changed, if need be).
Deco Glass Geometric DIY Terrarium (10”x6”x8”), Succulent & Air Plant- Large House Shaped for Indoor Gardening Decor- Create Your own Flower, Fern, Moss Centerpiece- Amazing Holiday and Wedding Gift https://www.amazon.com/dp/B07DTWJXM1/ref=cm_sw_r_cp_api_glt_fabc_43DZRGEQB86RE5S5QCQ7
A lot of people are doing the epoxy; which is great, I LOVE the medium, but I just don’t do anything outside of artwork anymore because I feel bad about the block of someone’s wedding bouquet turning yellow after a couple years, and they’re not cheap to do.
Good luck either way, it does look beautiful for a couple years if you can keep it away from too much light and smoke!
https://www.amazon.com/gp/product/B083NLSWXN/ref=ppx_yo_dt_b_search_asin_title?ie=UTF8&psc=1
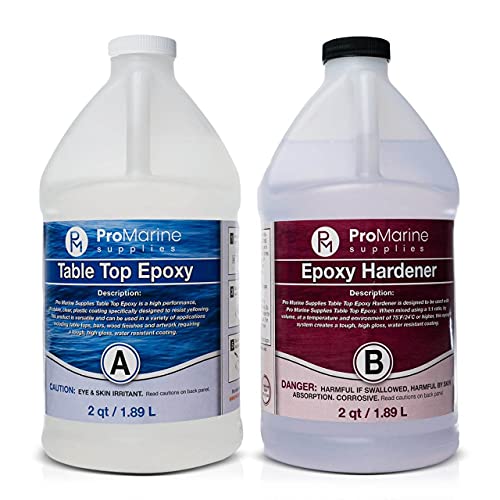
That is what I use, I love it, it isn't as expensive as some and it is easy to work with.
Part A is thicker so warming it up makes it easier to mix well and it helps keep the bubbles down. You can heat up both, I've never found it necessary. As long as Part B has been in the warm house it shouldn't need to be heated. I choose not to because heating either does reduce the work time you have and I mix rather large quantities at a time and need as much work time as possible. With the 2:1 pours, generally speaking you have a lot longer work time and it does take 3-7 days to cure completely, but in my opinion it is well worth it. (You don't need as much as the link above if all you are doing is your bouquet but that is what I use).
There are benefits to both, if you take it slow like in the video and mix small amounts at a time, use a torch to get rid of all the bubbles often, you shouldn't have to wait 4-6 hours till the next pour. But I would practice on something less important than your bouquet first to see how the resin works with you. I am a firm believe that once you get a resin figured out you should stick with that brand.
It's chameleon powders. I poured clear resin then dripped color shift in and swirled it. I have a video of it on my twitch or YouTube channel I can clip out for you if I didn't already.
This was the specific link I bought mine off or but the Colors have changed since then. Mine didn't come with the orange for instance.
LANBEIDE Chameleon Mica Powder 5 Colors https://www.amazon.com/dp/B09BCZ9MVH/
Definitely recommend drilling a hole after. There’s a man powered hand drill which I prefer or you can get an electric one
I prefer the first one because it’s a lot easier to keep from drilling too far in and it doesn’t take that long to do.
Okay gotcha! I have the same mold. So i recommend just leaving the mold alone, casting your letters, then once cured you can drill a tiny hole in it. I recommemd investing in a dremel! 1.2 mm dremel bit is a good size for making keychain holes.
Then once you have the holes made, i recommend putting a dab of UV resin or E3500 in the hole and screw in an eye pin screw. If you use the UV resin to add extra security, be sure to cure it lol. I hope this helps. Here are some links!
Dremel 1.2 mm bit: YAKAMOZ 0.7-1.2mm Mini Micro Electric Aluminum Hand Portable Handheld Drill with 15pcs Drill Bits, 2A Power Supply Included https://www.amazon.com/dp/B06XGV1FYH/ref=cm_sw_r_apan_glt_fabc_9NT3FPQ8FHJ1Y132NCMM?_encoding=UTF8&psc=1
Eye pins : Small Mini Screw Eyes Pin Tiny Screw in Hooks Jewelry Metal Ring (250 PCS) https://www.amazon.com/dp/B07MZ81BJR/ref=cm_sw_r_apan_glt_fabc_WP17PY2G9AY7V6RRFFB8?_encoding=UTF8&psc=1
The only ones I've seen are in a torso bust like these.
If you are willing to consider more expensive options, these kind of things exist too. Not sure how effective they are, but a lot of people use them for airbrushing indoors.
Get yourself one of these. We use it in the bathroom next to our bedroom because it has a litter box and we don't want to smell it when our cat poops in the middle of the night.
As far as words you can use a paint pen and they are fairly inexpensive, you don't have to buy the highest price ones to get a good write. Plus they come in lots of different colors so they can be versatile. Getting an alphabet stencil and sponging on paint will work as well but is more time consuming.
​
As for resin I find that the slower setting resins set clearer than the faster setting ones. If you are using color in resin it doesn't matter much but if you want something clear something like this...
https://www.amazon.com/gp/product/B07RM9FRM4/ref=ox_sc_saved_title_2?smid=AWNIMR5FR1N5J&psc=1
works wonderfully. Mind you I am not saying use that brand or get that much. But that is the type I would recommend. It is a slower setting resin, you have more time to work, and it cures very clear. I highly recommend getting an inexpensive torch as well. Nothing removes bubbles better and if you are going to be using the same mold over and over using demold spray for it, the mold will last a lot longer if you do.
Yes you should put a layer of resin down, torch it to get the bubbles out, using tweezers or something like that do your lay out of flowers gently patting it down. You don't have to wait for it to be completely cured to pour the last layer over it, just make sure it is set enough that the flower arrangement isn't going to move. If you are writing on it with a paint pen you don't want it hard to the touch, not tacky at all before writing. If you have more questions I can try and help you answer them if I know them if you want to message me. But I warn you I am not an expert, I just have some experience.
I'd use UV resin as well as some others have mentioned. Don't use the stuff from your 3D printer (unless someone else has experience in this?), I'd think it's too thin. I just started using this UV resin, and it is very thick when cool (my office is cold in the winter), but when warmed up it's pretty thin. Which works for a variety of things, not just coating the waterfall.
PXLYWLTZL 6 Pcs/Set Piggy Coaster Resin Molds, Large Silicone Mold DIY Epoxy Mold for Cute Pig Coasters Resin Casting, Stand Pig Resin molds,DIY Crafts Ornaments ,Christmas Resin Mold https://www.amazon.com/dp/B09C2PBNRM/ref=cm_sw_r_cp_api_glt_fabc_PR3PZSA3WQN0PJKAWHHN?_encoding=UTF8&psc=1
I found these
Wooden Light Base Stand Colorful LED Lights Display Base with Remote Control for Home 3D Laser Crystal Glass Resin Art (4) https://www.amazon.com.au/dp/B08YZ3S3XX/ref=cm_sw_r_cp_apan_glt_fabc_ADDZJ5C125GQV9EW2TM4
No, I have different kinds of chameleon flakes as well as powders and I rub them onto the mold itself and then I take the most prominent color and mix the resin with it as well but add a touch of black or whatever else fits that's darker to give it some contrast.
This one I made with these chameleon pigments. I used so far only pigments and flakes from solarcolordust.com but they are kinda pricey. These here I find even better.