
What are
/r/upholstery's
favorite Products & Services?
From 3.5 billion Reddit comments
The most popular Products mentioned in /r/upholstery:


The most popular Services mentioned in /r/upholstery:
The most popular reviews in /r/upholstery:
If you use a subframe, here are my thoughts.
Make the subframe.
Weave with red stripe jute webbing, (Several videos on YouTube showing how to do this.)
Buy a webbing stretcher to stretch it correctly,
Optional: Put a 1" piece of foam on top of the stretched webbing,
Cut away the old webbing.
Attach the sub frame to sofa. (Make sure the jute webbing is on the top of the sub frame against the sofa when installed.)
Post a picture of your handiwork.
edit: If you do not have a pneumatic staple gun there are videos on Youtube showing using tacks.
Gooseneck webbing stretcher is a lot better than the alternative webbing stretcher. The other type is just a nightmare with the spikes pointing toward you. If it slips you're likely to stab yourself. The gooseneck is dope and you can even press the handle with your body to free a hand.
Spitting tacks is really old fashion and isn't really something modern shops use. A nail gun would just be overkill. Even old day tacks blow holes in the wood and really destroy it overtime. Staples have great holding power and are the way to go and is what modern shops use.
Depending on how much you plan to upholsterer you can get a hand powered stapler to do a single project. You could get a pneumatic stapler, but I would only suggest that if you already have an air-compressor. If you don't have an air-compress you could also get an electric stapler and side step the noise and space requirements. Normally you'd want 1/2" wide staples 22 gauge thick and for general use 5/16" long should cover about everything you upholsterer.
Dull dykes pliers and a tack lifter. I often file down the tack lifter to make it easier to get under the staples if they are too thick. To dull the dykes you just file a the cutting edge a bit, but make sure they close even by shining a light behind it to look for gaps.
The wool fabric I've used has come with a backing.
With any stretchy fabric, or any fabric where I am sewing a bias cut edge, you can staple (desk stapler) the two pieces of fabric together then sew them. Take the staples out after you sew. I use these.
I use Gorilla Grip gloves for this sort of thing. They're thin enough for me to keep my dexterity while thick enough to handle a bit of heat. I use them for teardowns, too. You can get them at the big box home improvement stores.
https://www.amazon.com/gp/product/B01G461HEG/ref=ppx_yo_dt_b_asin_title_o02_s00?ie=UTF8&psc=1
This is what I ordered for the customer.
I didn't really have anything in my sample books that was red velvet. Oddly, I think I've really only upholstered two pieces in red fabric. I've done a few slip seats and cushions, but next to nothing in red fabric out of the 1500+ upholstery jobs I've done.
Get one of these and shave your couch. Trust, they work great.
Based on pic 2 I would guess there’s staples down in the crease between the seat and bamboo. That’s why there’s a thin line of cut fabric around the edge like that. Make sure you are careful to protect the wood around the fabric when you try to pull them out. this style staple remover will probably work best.
What you are running in to here is exactly why you had trouble finding a shop that wanted to touch the job. I detest dash work in all its forms, but I do have a couple of tips that could help.
​
Acrysol is a body solvent that works great to remove all sorts of adhesives without damaging plastic or foam, you'll take all the hard stuck spots and dab acrysol on with a brush or rag, let it do its thing for a bit, then continue to try to peel.
You will also want some sort of paddle or trim tool (I use one like this) to slip under the edge, slide it back and forth where the cover is stuck to try to weaken the hold. Take care not to dig in to the dash itself when you do this.
Make sure you get everything really smooth before you try putting the new cover on, you will see every little edge or bit of debris that you leave on the dash.
I've never seen staples used to fix plastic no sag clips before. Nor have I seen plastic no sag clips. I recommend buying replacement repair no sag clips. The process is very straight forward.
Oh yeah, something dramatic. What about two tone where the back is a solid color and front is over the top like this or vice versa
Reminds me of the wire rope looping sleeves. Not a direct answer, but might put you on the path. McMaster Carr or others might have them in brass.
But here is an ugly hardware version:
You could also just sew it: open the rope at that point and run the other rope through it. I'd do each through each at that point, if that makes sense.
These two products were recommended to me, but I'm not sure which one, if any, would be good to use.
An alternative repair would be using elastic upholstery webbing.
Best of luck with your surgery and recovery.
That hardware is not really appropriate for the piece. It’s not historically or aesthetically relevant to the period and style of the piece and looks really out of place. something like these or maybe these would look more appropriate. Or search for another art deco style set. You could also spray paint the existing hardware gold if all the hardware is still there. The metallic spray paints look quite good. Do a coat of clear over the metallic to seal it and it will last forever.
For fabric, I like option 3 best, but I would really recommend a nice velvet instead. Something in black or dark chocolate brown. Get a velvet with a bit of depth and sheen as opposed to a matte velvet.
https://www.amazon.com/Osborne-Co-Pneumatic-Decorative-76286/dp/B078ZHLV31
This guy is a lifesaver for putting nailheads on. I don’t use the tray very much, I like to hold them in my hand, but not having to hammer in every single nailhead makes the application so much easier.
Threaded nail buttons. Not sure what size you need, but this should get you moving in the right direction.
Depending on your need you may be able to use different buttons.
It's a flexible ruler often used in drafting.
I mainly use it for pattern drafting accurate curves for T cushions or anything with a curve. For example, I use it to pattern draft the inside arm of a wingback to sew to the inside wing because it's easier and always looks better. As an extra benefit there is also no chance of the inside arm ripping down the arm from the release cuts. Which is something I've seen happen to about a fourth or fifth of wingbacks I have re-upholsterer.
Like this?
Usually a tool like this:
​
But that is one crazy spring clip mounting. And since it going to be done from underneath (keeping all the cushion and such on) not sure if that tool will work per directions. Be careful, springs can be dangerous. Especially when you are struggling to get that last 1/8" to hook them in. Not a pro here, but I'd make a tool based on a threaded rod and wrench it over. (but I got all sorts of cool fab tools/machines)
I'm not sure what you mean by weighed down, you do take them off once you've sewed through right?
These are what I'm talking about... 100PCS Colorful Sewing Clips for Quilting Crafting,Multipurpose Quilting Clips for Sew Binding Sewing Craft https://www.amazon.com/dp/B086V6J6LY/ref=cm_sw_r_apan_glt_i_0G89E4YG2VD218W72PC7?_encoding=UTF8&psc=1
Hi, sorry it took me a while but it looks like you had some other help too!! I wanted to find mine somewhere online and only found one of them, but also found another one that looks good. I hope we've helped you!!
One of my favorite reference books on fabric patterns is called The Complete Pattern Directory. The 600-page behemoth's patterns are cataloged by style but you can find an index by date as well.
The 1930s saw a wide variety of fabric patterns, from florals to geometrics to pictorial to abstract images. This was the Art Moderne/Art Deco age, and many of the fabrics reflected the style and shapes from that period.
The fibers would have been all natural (the first synthetic fabric wasn't invented until 1935) - and included silks, cottons, wool, linen, etc.
Modern weaving processes were already in use, so you also found a wide range there. Jacquards/damasks were popular, as were chintz, velvet, frieze, mohair, and plain weave.
The colors varied also, depending on the style. Art deco patterns often had bold colors, while some florals were more muted, perhaps with delicate pastel colors.
If you have trouble sourcing an authentic fabric, you might consider using a modern fabric with a vintage pattern (which might be a synthetic or synthetic blend). They are easier to find and often a fraction of the price of their historically-accurate counterparts.
Hope this helps.
https://www.gumtree.com/p/freebies/piano-stool/1391857857 The pictures won't upload so I'll just attach the listing for the item I'm picking up
Not sure about the dryer. MLMLANT Steam Cleaners,Handheld Steamers Cleaning, Multi Purpose Portable Grout,450milliliter Tank Capacity, for Upholstery Sofa Curtain Shower Carpet Window Car Tile Kitchen Patio Home Use Machine https://www.amazon.com/dp/B07F85G7WB/ref=cm_sw_r_cp_api_glt_fabc_C33F8ZD5BPFNMW4WNA4B
This is what I have. It's super fast to heat up, which is really convenient.
Jiffy J-2 Gray Garment Steamer w/NEMA 5-15, 120V Cord Set https://www.amazon.com/dp/B00IIV112Y/ref=cm_sw_r_apan_glt_fabc_AP6RTXMJZBNQDT7ACV3R
Both are very viable, just make sure to flatten your whetstones. The main advantage to diamond stones is they are perfectly flat and they stay that way. You can also get courser grits. I actually use that 180/600 one a lot. Which has saved me a lot of time sharpening the harder Wiss scissors.
I recommend getting getting a courser grit soon. That 1000/6000 grit is more for putting the finishing edge and a polish on a cutting edge. I normally don't put anything higher than 1000 for my scissors. Just enough shine to keep the rust off.
I will take a look but may I ask why you think leather paints would be suited for microfiber?
I was thinking this would might be ideal: https://www.amazon.co.uk/dp/B08W5BGJPR/ref=cm_sw_r_apan_glt_fabc_5T1CQHDH38MDY3TD8FHG?psc=1
I took a leap and ordered from Amazon
I searched for embossed crocodile (or alligator) vinyl fabric.
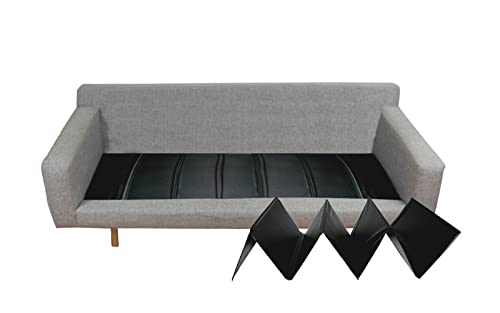
Thanks for replying, that's a bummer though. The seats are already pretty firm (they have springs inside) and the sagging is still substantial. I've found some fairly inexpensive cushion support pads like this:
Would something like that work?
The only advise I got from another upholsterer was to put the time into learning how to sew boxed cushion covers. He said that will be the most difficult thing I will need to learn. I think he was correct.
The way to learn is the Ivan Iverson technique: "Practice, practice, practice. We're talking about practice." I did not have an upholster mentor or someone I worked for. That would have saved me a lot of time in my learning process. But I did succeed because I was willing to put the time in to learn and actually do upholstery. I got hold of every video and book I could find. The only videos I bought were Merv Knutson's DVDs.
Buy a compound sewing machine. If makes sewing much easier for all types of fabrics, vinyls, and leather.
I went through the program at SCORE and got a mentor (a retired business person) to learn about running a business. Even if you are a one person business the skills and knowledge needed to upholster are totally different than the skills and knowledge needed to run a business.
I bought and read several times the book The E-Myth Revisited: Why Most Small Businesses Don't Work and What to Do About. If you fail in your business you can read this book and find out exactly why you failed. Really! This book is that good. I am very grateful that I read this book at the beginning of starting my business.
Check out your community colleges and adult education facilities. I took a class where I stood and watched a guy reupholster a club chair for 10 Wednesdays for 2 hours each time. This was very helpful for me.
Best of luck.
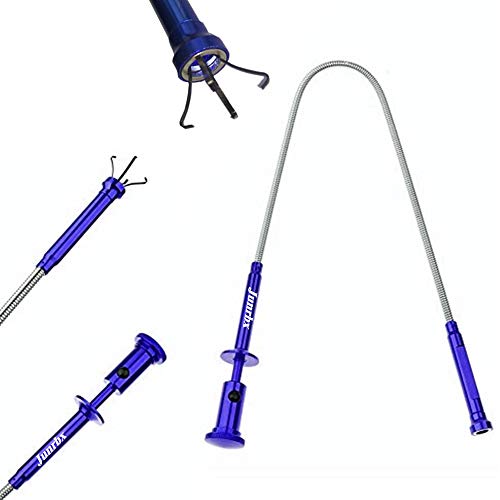
I use this staple removerstaple remover To help get the staple out then use carpenters pliers to pull the staple out when risk of snapping
Thanks! I've been doing this professionally for about a year now. Sailrite has amazing videos (and their tools are some of my favorite). I often point people to The Funky Little Chair on YouTube, as well - her videos are well done, and I like her personality.
I also use books as a reference - here are two that I really like. https://smile.amazon.com/dp/0865733198/ref=cm_sw_r_cp_apa_fabc_0WXX02PKYRXYQ8QC6CWP
https://smile.amazon.com/dp/0946819416/ref=cm_sw_r_cp_apa_fabc_V1F9N8GMB8Y77Y9SSMAN
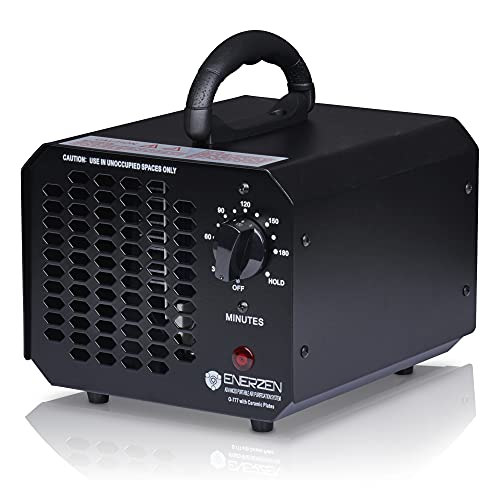
If you don’t have success with the variety of enzyme cleaners, your sure-fire last ditch effort should be an Ozone generator. It will remove that smell for sure
https://www.amazon.com/dp/B00JAP7388/ref=cm_sw_r_cp_api_glt_fabc_wTgdGbRQNHBDN
TAZEMAT 50PCS Crystal Rhinestone Buttons Sofa Decor Sewing Upholstery Buttons DIY Crafts Clear Crystal Glass Round Button with Metal Loop for Home Headboard Decoration https://www.amazon.co.uk/dp/B082DZKG6Q/ref=cm_sw_r_cp_api_fabc_jS.YFb3JYKJGH
These were the buttons!
A CS Osborne Staple Lifter and a pair of Channellock 336 pliers are my go-to (although needlenose pliers work, too). HIGHLY recommend investing in the staple lifter. It will make for much easier work than a claw-type staple remover. I like diagonal-style pliers because you can carefully grab hold of the loose staple and rock it out sideways. I find it more ergonomic and easier to control than some of the other plier types (YMMV).
My first wingback chair took me 28 hours to strip. It was a personal project so I did small chunks over a period of time. Don't worry - you've got this.
Thanks so much. Mine are three 26x22x6 cushions so I found this on Amazon:
GoTo Foam 6" Height x 24" Width x 84" Length 44ILD (Firm) Upholstery Cushion Made in USA https://www.amazon.ca/dp/B07S9281K9/ref=cm_sw_r_cp_api_i_pIAnFbRAV0MS5
I called an upholstery store in my area and they quoted around $290 total. So DIY definitely seems cheaper.
I’ll just need a bread/electric knife, an adhesive spray and new Dacron like you said. Hopefully I can do it right without messing up.
What do you think?
Yes, that thought crossed my mind. I haven't figured out what material to make the frame from to avoid adding too much bulk. But, they make these guides to attach the grille frame to the box. Or I could use magnets which may offer a more flush mount. https://www.amazon.com/dp/B0002KR7ZE/ref=cm_sw_r_cp_apa_TpI2zbKFFM47C
Oh, yeah. Not enough. I'm 6'2" 255lbs. I eat staples for breakfast.
I've used ones like this before. They work pretty well because the lever is over the staple which puts your force right over it, rather than you trying to squeeze the handle on the opposite side of where the staple is-- which is a pretty poor design.
If that doesn't do it, you need to get something with power. The air powered or pneumatic nailgun-like staple guns are going to be the best but I assume you don't have an air compressor. There are plenty of electric upholstery guns on there but they're quite pricey.
Or you could get the staple as far as possible, then hit it with a hammer and try to not fold it over or crush it-- but that's tough.
As a professional, I despise hand staplers, they're more work than they're worth. Even an electric would be better. However you should test it out to see if it will penetrate the plastic. Just have the 'Depot guy show you the shortest, like I said <1/8", staples.
If you're going to be doing this a lot get a very small compressor and a pneumatic staper. I use this brand, Fasco, http://www.amazon.com/Fasco-7C-16-Fine-Wire-Stapler/dp/B003WSI7IY/ . They're powerful, you can remove the safety easily, they're easy to repair yourself and even when you abuse them they last FOREVER!
Ok, as for vinyl and leather distributors you can look up 'upholstery supplies near me' in google and call some of the places. Fabric stores like JoAnn's sell vinyl too but it's super expensive in my opinion! Many will be wholesale but may still sell retail to you, just ask. You're going to want to get a thinner vinyl or leather as it will make the work sit and generally be easier on small and tight applications like these.
EDIT: I just wanted to add most electric and hand staplers are flat faced don't have a 'nose'. That nose is a great help getting in to tight places on a bike seat!