
What are
/r/AnetA8's
favorite Products & Services?
From 3.5 billion Reddit comments
The most popular Products mentioned in /r/AnetA8:


The most popular Services mentioned in /r/AnetA8:
Banggood
Cults.
Trustpilot
Tresorit Send
Gofile.io
The most popular reviews in /r/AnetA8:
I'm surprised that nobody has said this yet - but that website is almost certainly a scam.
The domain is registered 3 weeks ago, and looks and feels like a scam. An almost identical web site, solfemarket [dot] com, is reviewed as being a scam by all the comments on trustpilot
Don't order anything there, you're going to loose your money, and possibly much more than $30, becuase those sites exist to harvest card details.
DO NOT USE WD-40, i made that mistake. It has too much residue buildup and not for oiling. Use Superlube or anything that is strictly PTFE
3D Printer Linear Ball Roller Bearing Slide Block Comgrow https://www.amazon.com/dp/B0728J3J9K/ref=cm_sw_r_cp_api_fMhMBbRK4R04A
But before you buy try again with what you have, only slightly hand tighten all the bearing blocks and then while sliding it back and forth, slowly tighten them to make sure it still slides beautifully
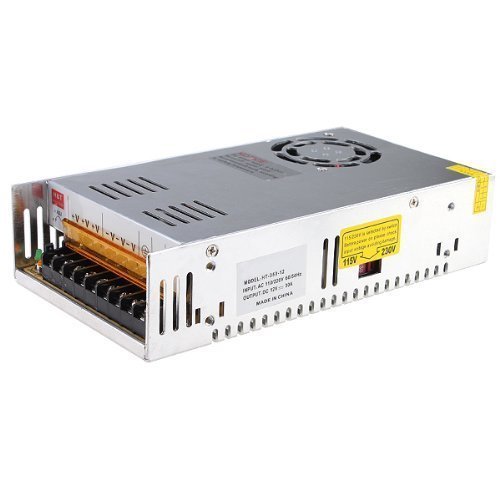
This. My power supply was dead on arrival and wouldn't fire up. The ones that ship with the kit are kinda crap.
Bought this one on Amazon and it's been great for 1.5 years.
eTopxizu 12v 30a Dc Universal Regulated Switching Power Supply 360w for CCTV, Radio, Computer Project https://www.amazon.com/dp/B00D7CWSCG/ref=cm_sw_r_cp_apa_i_Gmb4Cb8FSPKHQ
I made almost all of the upgrades as listed by LearnNewTech. I printed larger knobs and they are a lifesaver but I will be buying the aluminum ones (Thanks for the link).
The rods will absolutely get grooves in them. I had to replace my rods when they were too bad to use and I added the Drylin bearings. I wish I would've know to swap the bearings when I first bought the printer. They are essential.
I also had to replace my glass bed as my glass was actually warped when you put a straight edge on it. I replaced with Amazon.com: 11.81”x11.81”x0.22” (300mm X 300mm) Tempered Glass Better Than Borosilicate Works W/Prusa, Mendela, AO Series: Industrial & Scientific
I have been thinking of swapping my board for the SKR 1.4 turbo as I have that board on my MPCNC and love it. Introduction to The MPCNC - V1 Engineering Documentation
I also have a dedicated raspberry pi running OctoPrint and a dedicated camera on the pi
Good luck and happy printing
I noticed that my new nozzles are much smaller than the original, both overall and in the space around the hole at the tip.
I'm thinking that maybe that's the cause of the problem. Maybe instead of creating flat lines, it's creating U-shapes where it squeezes out past the sides.
I'm going to pick up one of these: https://www.amazon.com/dp/B083W4FRW2 They cost a lot more than what I have now, but they look like they have more meat around the openning in the nozzle.
I'll report back if it works.
I've used tri-flow with PTFE because it's what I had lying around for bicycle maintenance. It worked fine to cut down on noise, but I can't say whether it reduced wear.
They're fairly cheap parts and good to have on hand.
If you have a voltmeter on hand you could check that there are 12 Volts across the terminals for the heater when it is supposed to be heating. If there are, then your board is probably okay, but the easiest solution is then probably to buy a new heater.
Sorry about taking so long! I have a glass bed on it, that I bought from Amazon. It was pretty cheap and works great! On one of the comments below I included the extruder design, and I have two fans, one to cool the motherboard and one to cool the power supply. I also have a Frame Stabilizer installed too. I would totally recommend changing out the belts too, I currently have these installed. Honestly, that’s about it, I plan to upgrade to an AM8 soon and get the extrusions for it, because the frame isn’t the best and sometimes if you are printing at high speeds, a little bit of wobble is noticeable but not much. If you guys have any questions about setting I use I would be happy to answer those!
Is your y axis belt itself stretched out? My x axis belt did that and kept skipping/skewing at one area on the build plate. The belts that come with the kit aren't the greatest.
To check, pull the belt off and see if it interlocks with itself, if it's stretched that bad in a spot, it should be pretty easy to see.
If that's it, you can get replacement belts from Amazon for pretty cheap. Be sure to get the reinforced ones like this.
Spiral cable wrap. You can find it all over the place. Home Depot, MicroCenter, and Amazon for example. Out of curiosity I looked it up on Amazon and it's not too expensive. I opted for 1/4in(6mm) personally. You can measure your bundle to see what all you need. I'd offer, but I have a lot of aftermarket stuff so my diameter will be off from stock.
I bought a similar one on Amazon and it's worked just fine for me. Had to upgrade the heat break fan to a larger one to print with PETG though.
Wangdd22 3D Printer J-head Hotend with Fan for 1.75mm 12v V6 Direct Filament Wade Extruder 0.4mm Nozzle+Volcano kit https://www.amazon.com/dp/B01ESTJUL8/ref=cm_sw_r_cp_apa_i_9BakDbCX71MH9
Update I finally just went with The ramps board a little more expensive but I figure it's versatile enough it will allow for more upgrades in the long run, thanks for all the help guys!
So you don't have to solder you can use some new pins and connector and make your own.
I'm at work now but can post pics when I get home. Here is what I bought:
​
https://www.amazon.com/dp/B0894GW1R9?psc=1&ref=ppx_yo2ov_dt_b_product_details
​
Last night I desoldered the wires from the board and used the old connector plug and was able to get the wires in there. Still no luck. If I go and try to print, it will just start the print immediately.
I had the -NEG wire coming from the power supply melt and smoke. [connectors were never loose and the wire crimps connectors were actually soldered]. The components they use are on the cheaper side, so I would highly advise on getting external MOSFETS. I installed these after purchasing a new motherboard and haven't had any issue since - https://www.amazon.com/gp/product/B078S6221G/ref=ppx_yo_dt_b_asin_title_o04_s00?ie=UTF8&th=1
The issue is going to be to connect to the Display. The Anet display is wired kind of special.
​
Your best bet is to look into replacing the board and the display at the same time and install Marlin.
​
I purchased this. I upgraded my A8 to 24V, rebuilt the extruder assembly with a genuine V6, new springs, rods, mainboard, upgraded to Klipper, spring steel build plate and prayed a lot. I still hate this printer with a passion, after it made me quite 3D printing for nearly a year when it first came out.
I had a wobbling bed and fixed it with stiffer springs. I got something similar to this (they were too long so I cut them to length):
uxcell Compressed Spring,8mm OD, 1mm Wire Size, 22.75mm Compressed Length, 35mm Free Length,35.3N Load Capacity - 65Mn,10pcs https://www.amazon.com/dp/B08X693VSY/ref=cm_sw_r_apan_i_9Z23KZQ6B1YPRM33T514?psc=1
No, the other primary cause of fire is the bed connector wiring due to design choices it has no margin. The way the wiring in the original design is made is that it overloads the connector. They made a new design that increases the margin of safety by 100%.
Install a Mosfet and install this upgraded bed harness:
https://www.amazon.com/gp/product/B07B1TF3YT/ref=ppx_yo_dt_b_search_asin_title?ie=UTF8&psc=1
Other improvements that you should do is install Marlin 2.0 (or revise your anet software) so that you have thermal runaway protection.
Well if that's the case then go for it. It is actually sturdier, but still wobbles a bit. The hard part for me was getting it squared. Printing the parts is not hard at all.
P.S. A pipe cutter will make the process a lot easier. Something like this https://www.amazon.com/RIDGID-32920-Tubing-Cutter-16-inch/dp/B00018AFG0/ref=mp_s_a_1_16?crid=2EFCR7PISLB59&keywords=pipe+cutter&qid=1647597398&sprefix=pipe+cu%2Caps%2C159&sr=8-16
Amazon has lots of them. Search "Anet A8 sock". I bought these and they fit perfectly.
Changing it is easy if you use the steel sheet system. Just buy a replacement when the original wears out.
Supposedly This is the thermistor inside the stock Anet A8 Bed
im having trouble finding any more info
Supposedly This is the thermistor inside the stock Anet A8 Bed
Im having trouble finding any more info
Squared and ground die springs.
8mm OD 20mm Long Light Load Compression Mould Die Spring Yellow Compression Mould Die Spring for The Ender 3s Bed 20pcs https://smile.amazon.com/dp/B07FY47BX7/ref=cm_sw_r_apan_glt_fabc_YX91D45MQA9TEJX18J9S?_encoding=UTF8&psc=1
I just found some extra parts by a user from Cults3D which can be useful for the overall reinforcement and rigidity of the printer.
This one: Although I do not like the visual of it, I must admit it is probably the most efficient way of getting the Z axis in place.
This other one: I don't like the idea of disassembling everything to use those parts but they can be of some help as well. I am just missing thar corner brace taht is in the picture but I cant find in the files.
This is the product I replaced the metal bearings with :
3D Printer Solid Polymer LM8UU Bearing 8mm shaft - Igus Drylin RJ4JP-01-08 for Anet A8 Prusa i3 3D Printer RepRap https://www.amazon.ca/dp/B06XPRCMJS/ref=cm_sw_r_apan_glt_i_R7YBY0YT8Z2H5SPYXTAZ
Here's another, complete assembly](MK8 Hot End Extruder Nozzle Kit 0.4mm for 3D Printer,Assembled Extruder Brass Kits 1.75mm,30mm A8 Throat Tubing Aluminum Heater Block for RapRep i3 Anet A2 A8 3D Printer Part Replacement https://www.amazon.com/dp/B0894GW1R9/ref=cm_sw_r_apan_glt_fabc_C3XQAM8HMEKZBA2FM0W5)
These are a couple options I found on Amazon with a quick search.
Ok, in this case you can call your local hospital and offer shield, like this one: https://cults3d.com/en/3d-model/various/newshield-visiere-anti-eclaboussures-covid19-tibus-2 Good resource: https://www.fda.gov/medical-devices/3d-printing-medical-devices/faqs-3d-printing-medical-devices-accessories-components-and-parts-during-covid-19-pandemic
That's something I've not seen before. I would probably just be patient for another few days and use the real thing.
It ought to have it on the bed itself already, most of the time they even come with a connector, of which I recommend adding silicone adhesive to where the wires crimp into the connector, as the constant bed movement causes too high stress on the wires. Some connectors come with white adhesive, I've received some that dont. Look to the center of the under side of the bed, there should be a thermistor on it already... Heres one example of what I found, hopefully at least for reference for you. Usongshine Heatbed 220x220x3mm Aluminum Substrate Heating Platform 12V Welding with Terminal Interface for Anet A8 A6 3D Printer https://www.amazon.com/dp/B08BFBCNB6/ref=cm_sw_r_cp_apan_glt_fabc_W9XX9778XFVS4FMJ7G4A?_encoding=UTF8&psc=1
I also got a heatbreak with the gap. They looked like this, but still have the tube on the inside.
(Sorry, I can't find the specific one I bought.)
I don't know if it helped or not because this was also when I discovered I had the aforementioned part in backwards.
Dude I have a 300mm build plate lying around that I wanna build a printer around, saw your post and it reignited that venture, found this board, cheap dude- says has auto level too.
Anet V1.0 Replacement Self Assembly 12V Control Board Mainboard Mother Board for DIY Auto Levelling Anet A8 Plus 3D Desktop Printer RepRap i3 Kit - 1PCS https://www.amazon.com/dp/B088WBKRF9/ref=cm_sw_r_cp_apan_glt_fabc_QMW8HK7P6S5KQ1EVYMY3
Any of those 30 amp PSUs you see an amzon will work fine. Make sure to get a 12 volt one, such as this one with good reviews: https://www.amazon.com/dp/B01EWG6YT8/ref=cm_sw_r_cp_apa_glt_fabc_BJR4RXKMG7D4CEH0EWWX
https://www.amazon.com/dp/B083W4FRW2
I just finished my first long test with it and I'm not seeing the problems I was having before. https://www.reddit.com/r/AnetA8/comments/mvl4n4/infill_taller_than_walls/
This is just my experience, but I had first layer adhesion problems when trying to level to a 0.1mm with a piece of paper or even with feeler gauges, at least when using the Creality Ender flexible magnetic base. I ended up going with a 0.06mm feeler gauge instead.
I forgot to put this in there too- https://www.amazon.com/gp/product/B000PW5UWG/ref=ppx_yo_dt_b_search_asin_title?ie=UTF8&psc=1
​
This is the absolutely best thing you can do for your printer. Put one of these above it. Early warning + a fire extinguisher could save your life. (Make sure you get a photoelectric one, catches smoldering fires better)
I found that on amazon ill be doing the am8 conversion in the next couple of weeks .I picked up my ctc a8 for £25 on Facebook its has the rubbish plywood frame but I was looking at building a project 3d printer to back my ender 3 pro up .
Ok, then using something like this might work with what I said above if you don’t already have them.
I agree with everything that was said. You see the tear drop shape formations in the print? That’s typically formed where the filament beads up before rubbing off onto the build plate. Adjusting the height will almost certainly fix this issue. The second issue is adhesion. As has been stated, use hairspray or glue sticks to ensure adhesion. I personally installed this listed below and it works wonderfully.
CHPOWER for Creality CR-10 Bed Surface, CR-10S Ultra-Flexible Removable Magnetic Build Surface 3D Printer Heated Bed Cover, 310x310mm https://smile.amazon.com/dp/B07J69T6SK/ref=cm_sw_r_cp_api_fabc_K8vWFbSEWD3TD
I bought these anti vibration pads from Amazon. Diversitech MP4-E E.V.A. Anti-Vibration Pad, 4" x 4" x 7/8" Pack of 4 https://www.amazon.com/dp/B00BVEMLR4/ref=cm_sw_r_cp_apa_9dFNAbVYKVG1H
I put them under each clever if the base. THEY ARE AMAZING. I can sometimes not even tell it's printing. I often find myself now checking to see if it's still for some reason. Before you could hear the vibrations through the walls in other rooms.
For the $10 they cost I would recommend them to everyone.
Just a cheap one from Amazon. Someone did a video about how much power the various parts of the A8 pulled, I think the bed was 11watts, the hot end 4watts and one watt per stepper. And that the stock psu struggled to put out 20 watts. So the one I got was 30 watts and both the bed and hot end heat up faster. I went ahead and set up dual mosfets, because why not? They cost 10 bucks for 2 and potentially divert 15 watts from passing through the notoriously prone to melting motherboard.
eTopxizu 12v 30a Dc Universal Regulated Switching Power Supply 360w for CCTV, Radio, Computer Project https://www.amazon.com/dp/B00D7CWSCG/ref=cm_sw_r_em_taa_Bs8uCbH65ZK0T
I bought the "3D Printer I3 High Precision Large Size Desktop 3D Printer Kit Reprap Prusa I3 DIY Self-Assembly LCD Screen PLA/ABS Filament 1.75MM DIY 3D Printer 200x200x180 (i3 3D Printer)" from Amazon https://www.amazon.com/dp/B07KG1YXB1?ref=ppx_pop_mob_ap_share
Borosilicate glass is your best bet. It's a game changer in my opinion.
You can buy them precut on Amazon.
GO-3D PRINT 220mm x 220mm Borosilicate Glass Plate/Bed w/Corner Cut for Wanhan i3 Anet A8 MP Maker Select 3D Printer https://www.amazon.com/dp/B07BHG5HCV/ref=cm_sw_r_cp_apa_i_aG8jDbDWMBTCK
Yes of course!
But thats the us amazon, didnt found it on the au-amazon. And obviously, as always, you will pay more for it. ;-)
> So I should be able to pick some of those up at Lowes or Home depot?
Maybe.
You'll probably have better luck at a proper hardware store where they sell them individually. Especially for metric screws.
Option C is Amazon. Just buy a box and never worry again: https://www.amazon.com/VIGRUE-300Pcs-Assortment-Internal-Stainless/dp/B07M7CLTLT/ref=mp_s_a_1_1_sspa?keywords=set%2Bscrew%2Bassortment%2Bkit&qid=1568084041&s=gateway&sprefix=set%2Bscrew&sr=8-1-spons&psc=1&spLa=ZW5jcnlwdGVkU...
Stock unplug it. I upgraded my power supply and printed a cover to add a power switch like this https://www.amazon.com/URBEST-Socket-Module-Switch-Terminals/dp/B06XNMT3WL/ref=mp_s_a_1_8?dchild=1&keywords=pc+power+plug+switch&qid=1602043306&sr=8-8
Good job!
If you stick with this spool holder, you can easily upgrade it by getting a pack of 608 bearings and grab (or print!) a couple of M8 washers.
Then you fill up the space in between the two inner nuts with the bearings, separating them with washers.
Is this the BLtouch? Dude sick I just saw it's on amazon that you just posted.
​
https://www.amazon.com/ANTCLABS-BLTouch-Leveling-Premium-Extension/dp/B076PQG1FF
I'll add that you can order it from Amazon from the manufacturer and the shipping is way faster. https://www.amazon.com/BIGTREETECH-Control-Integrated-TMC2209-Upgrade/dp/B088CQJWRP/ref=sr_1_4?crid=2F4C8WG70EY4L&dchild=1&keywords=bigtreetech+skr+mini+e3+v2.0&qid=1593655252&sprefix=bigtreetech%2Caps%2C163&sr=8-4
used this kit from amazon. Since it's magnetically attached and bendable it has been really awesome. Even handled some bad leveling abuse without a problem.
Thanks! Those are silicone spring replacements. The idea is that they don’t show as much up-down bed motion, and also damp vibration from loosening the wing nuts. This results in a bed that stays level for far longer between prints. They work great and you can get them on Amazon here..
This might be a bit pricey but it has everything you need and I can confirm that it works as advertised. this does the auto level sequence before every print. You configure this behavior when you follow the instructions for the setup of the ABL system. I comes with an older version of cura because it has the pronterface add on.
https://www.amazon.com/gp/product/B07BPNCNXN/ref=ppx_yo_dt_b_search_asin_title?ie=UTF8&psc=1
Knowing this type of event was probable with the stock Anet board, I pre-emptively replaced mine with a MKS Gen L 1.4
Yea, took a bit of reading 'n effort to get it going, but in one evening she was up and running.
Board and drivers https://www.amazon.com/gp/product/B0756T3F57
Display, controler https://www.amazon.com/gp/product/B076WQQX5K
I wonder how well Liquid Green would work for smoothing that out.
https://www.amazon.com/Games-Workshop-Citadel-Liquid-Green/dp/B01BPHPS9E
I've been meaning to pick some up, but haven't gotten around to it.
I use a LJ18A3-8-Z/BX sensor and used this guide to set it up. I made a custom bracket that fits onto my custom entruder carriage. I find myself having to adjust the z-offset regularly and I'm not sure why. I don't know if my sensor is moving in the bracket or if the sensor is just that sensitive to temperature/humidity. Overall I like it and I think it is better than manually leveling the bed.
I am ordering the usbasp device for flashing and I wanted to get the bearings you suggest. Are these right? https://www.amazon.com/Anet-Bearing-Aluminum-Bushing-Printer/dp/B07CXNP98P/ref=sr_1_15?keywords=Igus+drylin+bearings&qid=1568124682&s=gateway&sr=8-15
I would order this:
Igus AM-RJ4JP-01-08 Drylin Bearings, Polymer - Replacement for LM8UU.92" Width, Iglide J4, 8 mm (Pack of 12) https://www.amazon.com/dp/B071RSDYW4/ref=cm_sw_r_cp_apa_i_Ye7DDb9B2WB4N
Also you shouldn't need the usbasp unless you want to flash the micro version of Marlin as that requires a different bootloader. The regular version you can flash with just a USB cable (which is what I did).
I have a set of 7 picked out on amazon and my free trial expires in 3 days I'm gonna order them soon, just waiting on a link to something else I am supposed to order for my dad.
Here are the ones that I have chosen what do you think of them? https://www.amazon.com/dp/B06XPRCMJS/ref=cm_sw_r_cp_apa_i_5IjoDb99E75FN
Do yourself a favor and get this guy: Anycubic 43188-247109 Ultra Base 3D Printer Platform with Aluminum 12V/24V Dual Power MK3 Heatbed, Tempered Glass Plate, Durable Build Surface for Prusa I3 220x220mm https://www.amazon.com/dp/B075375HBY/ref=cm_sw_r_cp_apa_i_EleeDbQ2XTPM9
It’s a two pack off amazon. Not too impressed since one of them was DOA. Need to reach out to customer service about a replacement.
Cool-See 2pcs Cooling Blower Fan... https://www.amazon.com/dp/B0757V1JT9
This is what i have on my now. Its actually a circuit breaker. But i think i have the 20a version. Ill have to check when i get home. Just replace it with whatever size fuse you have. Or whatever the wire is rated for. Pretty sure 20a
this has a length of wire with an attached fuse holder, so you can replace the bad one completely, and pick the size fuse you need. You may just need to extend one wire enough to make the run between ps and main board. This is what I was thinking of, if that helps. Any 14 ga wire should work. I used 14 ga speaker wire on my hotbed, for example.
I had the exact same issue with a board I bought from Amazon. I bought one of these: https://www.amazon.com/dp/B00AX4WQ00/ref=cm_sw_r_cp_apa_i_5XmmCb8H8RQ14 to flash the bootloader, but ended up not doing it and just buying a ramps kit.
Are you using the belts that came with it? They're plastic and are terrible and will cause all sorts of abnormalities in prints due to stretching and slippage. Get a roll of this instead, it's a cheap upgrade, but it probably won't be your last. :) :
Mercurry 5 Meters GT2 timing belt width 6mm Fit for RepRap Mendel Rostock Prusa GT2-6mm Belt https://www.amazon.com/dp/B071K8HYB4/ref=cm_sw_r_cp_api_lsKQBbB5MHDW2
just ordered this now realizing not sure if fiber glass, what are your thoughts on this belt??
So I'm using this bed https://smile.amazon.com/gp/product/B07B2B7777/ref=oh_aui_detailpage_o00_s00?ie=UTF8&psc=1 and relocated the y motor outside the frame. I then had to modify the y stop switch by moving it forward so it triggers on the bearing block before the carriage hits the motor. I think that is causing some of the issues. Can someone with a stock ANET tell me teh nozzle position when the bed goes all the way back and triggers the switch? How far over the bed is the nozzle in this position?
I bought this one last week, installed it Monday and it's working just fine.
https://www.amazon.com/gp/product/B071SDSBSQ/ref=oh_aui_detailpage_o04_s00?ie=UTF8&psc=1
I ended up breaking the connection on the old one and it was shorting out mid-print, causing a temperature drop and triggering the termal runaway in Marlin.
Mine did the same thing the first time I tried to clear a jam. The little threaded tube is so thin it doesn't withstand a lot of torque and breaks with ease, as you have seen. I would recommend just spend a few bucks and get a pack of replacement hotends to get it back up and running, rather than messing with a screw extractor. https://www.amazon.com/Anet-Printer-Extruder-Nozzle-Makerbot/dp/B078MX2FYK/
For my setup I didn't want to bother with the crappy hotend so I installed an e3d V6 hotend.
This is the PSU I bought: https://www.amazon.com/gp/product/B00D7CWSCG/ref=oh_aui_detailpage_o02_s01?ie=UTF8&psc=1
I printed these belt tensioners on my other printer so I could put them on during the build: https://www.thingiverse.com/thing:1784375
I do have some better belts on the way and actual idler pulleys since this thing doesn't have them. I was considering doing the AM8 mod as well, but I'm impressed with the rigidity of the lexan(?) frame, so I may try to do an AM8 build from the ground up, instead of upgrading this guy.
Do you have a photo of the issue you're seeing? Do the stock gcode files the SD cards come with do it too? It sounds like a slicer issue or the rear end stop isn't getting hit.
THIS sensor works great for me. I had to wire it to the power supply instead of the 5 volts from the original port, but I haven't had any issues with leveling since. You will need to print a piece to hold it tho. I used something like this to attach it near the hotend.
I ordered these https://www.amazon.com/gp/product/B01E91Q6OE/ref=oh_aui_detailpage_o00_s00?ie=UTF8&psc=1 and they work fine. They look to be the same as the ones you linked. The outside part is smaller than the stock one so you have to use a smaller wrench but they work the same.
These are the ones I've been using, so far is about 1 in 5 are DOA. WAHHING 5pcs 6X20mm 1M 12V 40W Ceramic Cartridge Heater Wire For 3D Printer Reprap Prusa https://www.amazon.com/dp/B06XYXDDK7/ref=cm_sw_r_cp_apa_Bk6rAb45Z36HG
Just the thermistors and heating element
Ivelink 12V 40W 620 Ceramic Cartridge Heater and NTC Thermistor 100K 3950 for 3D Printer(Pack of 10pcs) https://www.amazon.com/dp/B073TVBJVY/ref=cm_sw_r_cp_api_VhZrAbC5CKQ5S
Hot end and wires
KKmoon DIY Hot End Kit for 3D Printer https://www.amazon.com/dp/B0718WYN5R/ref=cm_sw_r_cp_api_FiZrAbP0M5N1J
I have not used any of these myself so I don’t know if they will work but they look right so... try st your own risk.
http://www.amazon.com/gp/product/B00U1X3XLY
Lifetime supply of 8" wide Kapton tape. Then use hairspray - Aquanet Extra Hold is most popular.
The tape is ~1 cm short on the sides, but I almost never print there. It can be tricky to put on while avoiding bubbles. I stuggled mightily with all other surfaces before this combo worked like a charm.
It almost sticks too well. Water can help loosen stubborn prints. Mostly just remember to put a 0.4mm chamfer on the bottom so you have something to pry against.
I used these buildtak-like sheets. It comes with 5, which is nice because I melted through 2 sheets before finally getting my nozzle distance right. I recommend that you use a gluestick to make the prints easier to remove. I've been using these sheets for a month, and they show no damage so far, not counting the first two that I destroyed. My only issue with them is that they are near impossible to remove, and leave a thick layer of glue residue after it finally comes off. Rubbing alcohol seems to help with this.