
What are
/r/Atomic_Pi's
favorite Products & Services?
From 3.5 billion Reddit comments
The most popular Products mentioned in /r/Atomic_Pi:


The most popular Services mentioned in /r/Atomic_Pi:
Retropie
Debian
TightVNC
Kubernetes
Google Photos
Ubuntu
WireGuard
Arch Linux
Lubuntu
Hiren’s BootCD PE
PaperMC
Cults.
AV-TEST
The most popular Android Apps mentioned in /r/Atomic_Pi:

The most popular reviews in /r/Atomic_Pi:
There is no very good looking case but you choose. If you got the baby breakout board this is the case and if you have the large breakout board I didn’t found any case. And if you want a good looking case this is it . 🙂have a good day
There have already been a few formal verifications, and the Linux kernel folks have been reviewing the core code. No security issues yet, which is to be expected considering who wrote it.
You installed mainline Ubuntu which is a great OS but a little taxing for the ultra-low-power processor from 2016 that is in the Atomic Pi. The pre-installed OS is an official Ubuntu flavor called Lubuntu, and the latest version with its new desktop environment (19.04) is pretty slick. You note a few performance issues, like Firefox, and I believe that if you install Lubuntu again rather than full-fat Ubuntu, you'll have a much better time.
Note: the ONLY official Lubuntu website is https://lubuntu.me. You'll probably see a lot of references to Lubuntu.net, which is NOT official. Like every open source project, there's a history of drama there...
I'd recommend using one of my Windows images for the best performance and most resources available along with tightvncserver. You can get those at http://electrohaxz.tk/atomicpi and https://www.tightvnc.com/download/2.8.59/tightvnc-2.8.59-gpl-setup-64bit.msi
22 AWG sounds a little small. I am using 18 AWG copper wire from my power supply to my pi via a barrel connector I soldered to the wire. I had power issues as well trying to use a buck converter rated for 3A... the converter would heat up and efficiency would drop off. I switched to a 10A Meanwell power supply and successfully booted into primeOS for the first time today. The supply is probably a little overkill but I figure it might be needed for accessories like an HDMI 7" touchscreen, keyboard, mouse, etc that I will be using.
For a 1080p try a dummy plug like this one https://www.amazon.com/Headless-Display-Emulator-Headless-1920x1080-Generation/dp/B06XT1Z9TF
Baby breakout board uses a 5.5mm OD and 2.1mm ID plug.
This one from Amazon works:
https://smile.amazon.com/gp/product/B0745BZV6T/ref=ppx_yo_dt_b_asin_title_o03_s00?ie=UTF8&psc=1
Board only on amazon, it just took a little more looking. A good option for those currently with kludgy solutions but have a good PS. Will add to original post.
all the same voltage? basically it looks i could desolder one of those male connectors off an old motherboard and then wire up a PSU to several of the pins for each (-) and (+)
https://www.reddit.com/r/Atomic_Pi/comments/ama7af/powering_your_atomic_pi_megathread/efzv7r5/
One thing to keep in mind is that the vast majority of powered USB hubs will backfeed +5v up to the host as well as downstream to the peripherals. I have this particular hub and verified that it does NOT backfeed to the host. https://www.amazon.com/gp/product/B07BBLL3MJ/ref=ppx\_yo\_dt\_b\_search\_asin\_title?ie=UTF8&th=1
The CMOS battery is bad.
Source: I bought a pile of them, brand new with Enchiladas, and every single CMOS battery was bad.
I replaced them all by soldering SMT CR2032 holders onto the prototype area on the Enchilada boards, and connecting JST P2.0 pigtails back to the battery connector. Fresh name-brand CR2032s, and all of them work flawlessly.
Yep, i would have to agree with Electrohaxz....that is too much since Amazon is $40 with free shipping and includes big breakout board plus the camera. But i guess you might get lucky. Here is that link:
https://smile.amazon.com/gp/product/B08CGFM2B1/ref=ox_sc_saved_image_1?smid=A3D4241373L385&psc=1
I would think it should be closer to $20, but then i wouldn't sell it, i would put Retropie on it or something.....or one of Electrohaxz' great versions of Windows or a more unusual Linux OS like Haiku or Elive or something.
I'm having good luck with a 12vdc internal Xbox one psu (had 3 laying around from dead consoles) and a 12-5v dc to DC converter (BINZET DC Converter Step Down Regulator 5V Regulated Power Supplies Transformer Converter (5V 10A 50W) https://www.amazon.com/dp/B00J3MHTYG/ref=cm_sw_r_sms_apa_glt_i_5HK95KPDF97B3HWK43ZG?_encoding=UTF8&psc=1)
Powering everything I need in a confined space. So far there is the atomic pi, 12v PC fan, USB hub, USB hard drive, and status Leads in a sealed enclosure
I was thinking of buying this power chargerhttps://smile.amazon.com/dp/B0782JXQNP/ref=cm_sw_r_tw_dp_U_x_hSy3Cb5XG4TPC! to use with my atomic pi and attaching it using the large breakout board. Would this work?
Amazon, link below
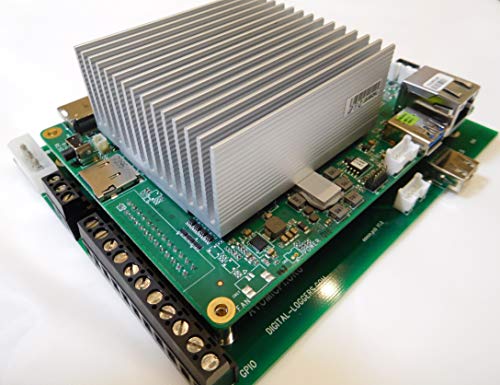
Atomic Pi Developers Kit
comes with whole enchilada breakout board and camera module, boots linux out of the box.
In stock as of 1/11/2022
$39.95 + your local sales tax
If you watch new episodes of "The Expanse" for free, so is delivery in the USA.
I mean.
You should try upgrade a kernel to 5/5.1/5.2 or install Arch Linux or Manjaro(if you not power user) https://bbs.archlinux.org/viewtopic.php?id=218172 On gui arch based system type: sudo pacman -S pamac-manager The run pamac-manager and find best driver from AUR or GIT https://www.archlinux.org/packages/community/x86_64/r8168/ these drivers and newest kernel should fix problem
Hah, well, I actually didn't really have to do anything. In this case only the master is running on ARM so the only thing that tries to run there are things like plugins. I actually do need to modify my plugin deployment so it stops trying to schedule on the master but it doesn't effect any of my application pods.
Adding a selector to deployments is pretty easy
Select x86
nodeSelector: kubernetes.io/arch: amd64
Select Arm
nodeSelector: kubernetes.io/arch: arm
https://kubernetes.io/docs/reference/kubernetes-api/labels-annotations-taints/#kubernetes-io-arch
I've run multi-OS clusters before without any issues as well.
While I feel more comfortable picking and choosing the components that will make up my Windows 10 "lightened" installation (see my post in this forum), it can produce a light and quick version of Windows 10 Pro or Enterprise that fits your needs and leaves up to 7.2GB of eMMC free.
Personally, I am not comfortable with promoting or using "hacked" software that defeats the Windows registration (especially when a working Win 10 Pro license can be bought for $4 USD off eBay). Further, if you explore that "Windows.10.Lite.Edition.v6.x64.2018.iso" you will find that the Group Policies have been permanently changed to leave the OS open to attackers -- it cannot be changed to re-instate Windows protection at all and some of us know that Windows is the worst OS for being hacked. On the subject of the "HackTool.Win32.AutoKMS.GA", how do you know it has not been modified to broadcast, "Here's an open computer! Come an infect me" message. Those who use the Kuri board as a un-connected stand alone SBC may not feel this way.
The current versions of Defender are now considered by AV-Test Institute "https://www.av-test.org/en/antivirus/home-windows/windows-10/august-2019/microsoft-windows-defender-4.18-193116/" as having a "usability score of 6.0 out of 6.0". The Kuri board may be inexpensive, but it is connected to my home network to which I don't want open access.
I use these antennas for them:
https://www.amazon.com/dp/B07JFZDYVS/
​
The antennas can be hot-glued to the board (right under the wired LAN port).
I have a bunch of these cables.
But if you wanted, you could just solder the pins to wires, or buy a $17 cam on amazon, and cut the USB lead in 2, and solder that to a USB cord.
I've done the same. 2 pins are ground, 2 data leads (+ and -) and 1 lead is positive.
​
Thanks for the link, however I'm using Amazon to get things faster with Prime shipping. I've bought this one instead for $17: https://smile.amazon.com/gp/product/B00Q4WQ7XW
Oh interesting, I wonder if with that many you just couldn't get good connection? Maybe use something like this: https://www.amazon.com/Battery-Cables-iGreely-Inverter-Motorcycle/dp/B07XBRXTLM/ref=sr_1_15?dchild=1&keywords=8+awg+wire&qid=1620233178&sr=8-15
​
I believe any 8 AWG or larger wire will do.
Odd, the default DLI installation has the audio over HDMI enabled and working; you can bypass the HDMI with a USB sound dongle (https://www.amazon.com/Sabrent-External-Adapter-Windows-AU-MMSA/dp/B00IRVQ0F8/ref=sr_1_3?) that is needed for Android installations.
The software solution requires editing the directory /etc/pulse/default.pa to allow editing. First you need to get into the Terminal to use the Command Line Interface; it is a menu item or can be brought up by pressing: "CTRL+ALT+T" then type "sudo chmod 777 /etc/pulse/default.pa" I believe. Then you should be able to edit the file. I don't routinely work in Linux either and use guides on how to do things
[Breakout Board]
Was not looking to use a big atx pc power supply with the molex pins so I searched Amazon and found this $5 adapter:
https://www.amazon.com/gp/product/B07FK5XDY6/
I plan to pair with one of the 5.5x2.1mm barrel 5V 3A wall power adapters mentioned in this thread.
​
I have a small (~$100) 12" monitor (https://www.amazon.com/Eyoyo-Monitor-1280x800-Resolution-Security/dp/B072N2YGXN/ref=sr_1_16?) from Amazon I use with a RaspPi running OSMC. It works well, although it may be a bit much for a $40 SBC
Sure looks like it. I see the camera alone is now listed on Amazon. https://www.amazon.com/Digitial-Loggers-Atomic-Web-Camera/dp/B07SYJJKBP/ref=sr_1_11_sspa?keywords=atomic+pi&qid=1560807442&s=gateway&sr=8-11-spons&psc=1
I don't know of any posts where someone has tried to use an SD card for an installation of Windows; you could be the first to try it.
Inexpensive Powered Hub https://www.amazon.com/Protronix-Port-USB-Power-Adapter/dp/B00REX6DRK/ref=sr_1_47?
I have bought a couple of cheap 12v to 5v buck converters, rated at 3A. To make it function successfully, I doubled up on them, essentially using a small bolt to bolt inputs of both units, as well as their outputs together. But only AFTER carefully adjusting each unit to operate at 5.10V at idle individually. That is when plugged in to the gpio pins. When plugged in the daughter board (with barrel connector), you'd have to do 5.20-5.25V, as the daughter board sips 0.10V off of the power.
A single buck converter can power a pi under full load, but with 2 in parallel, there is redundancy.
I haven't seen any serious issues after a few months of use. You can also glue the buck converters to a heat sink.
The buck converters do say to not run them without load, so I haven't tried what happens if I would run them like that...
https://www.amazon.com/MP1584EN-DC-DC-Converter-Adjustable-Module/dp/B01MQGMOKI/
I got these off amazon: DIYmall 2.4G WiFi Antenna with SMA Cable 3DBI Gain Antennas U.FL to for Arduino CC3000 ESP8266 ESP32 ESP-072pcs https://www.amazon.com/dp/B00ZBJNO9O/ref=cm_sw_r_cp_api_i_kMlcFbBVCDHG6
I connected one to WiFi and one to Bluetooth. Works fine for both.
The Atomic pi was sold both separately and with the camera/mini power board as two different listings on Amazon. The bundle isn't currently available.
https://www.amazon.com/Atomic-Pi-High-Speed-Peripheral/dp/B07N298F2B/
https://www.amazon.com/gp/product/B07DVYDDV8/
Yes sorry I wasn’t clear enough. I know where it’s at on the board... but what type of plug do I buy to plug into it?
This is the closest I have found... but it’s only a 4 pin. Will it work if I just offset it one pin?
StarTech.com 6in USB 2.0 A to USB 4 Pin to Motherboard Header Adapter F/F - USB cable - USB (F) to 4 pin USB 2.0 header (F) - USBMBADAPT https://www.amazon.com/dp/B000IV6S9S/ref=cm_sw_r_cp_api_i_68uODbKNB19J1
Strange... I tried installing it again from a USB flash drive and this time it worked. For my other attempts I was booting the flash image with DriveDroid and it always crashed at the end of the installation. DriveDroid has never failed me before. :( Maybe it just doesn't work with BSD? It had no problems booting Mint Linux on Kuri. Thanks
>https://www.amazon.com/SMAKN-Switching-Supply-Adapter-100-240/dp/B01N4HYWAM/ref=sr\_1\_3
Yes, I ran it for a day or two with Brave browser running as well, but it did shut down by itself without any indication.
I have measured that the voltage IS 5V even after loading. Is it possible to connect two power supplies in parallel to Atomic Pi for higher Amp and stability?
I'm looking to make a small cluster as well and using a power like the one above. The LETOUR DC 5V 30A Power Supply 150W to be exact https://smile.amazon.com/gp/product/B01HJA3OUG Do you think it would be necessary to add the power filtering to the output? If I did add some power filtering could I up the values and current of the capactiors, diodes, and inductor you suggested and use it to filter the power for all the APIs in the cluster?
Anyone found a good source for a connector cable?
It looks like a JST PA-type 5 pin, 2.0mm connector, which is a little unusual. Id like to just get a mating connector with prewired leads to attach to a USB port, but eBay/Amazon/etc haven't turned up much.
There is a JST type PH that's also spaced at 2.0mm that seems more common: https://www.amazon.com/dp/B07F8GDYPK/ref=cm_sw_r_cp_apa_i_LmX5CbQ9Y237R
It looks like it doesn't lock in the same way...anyone know if it would fit?
Having access to the port would be nice...would let me hook up a kybd/mouse and a USB 3 HD without a hub.
Anyone thought of just unsoldering the JST off the board and putting in a std usb header? Would it even fit? (Sounds way risky given my crappy soldering skills)
AK
Very close to what i landed on:
Yohii 40 Pin Single row 2.54 mm Male Right Angle Pin Header Connector 50pcs https://www.amazon.com/dp/B07C89T16T/ref=cm_sw_r_cp_apa_i_9zA3Cb3A3DPE2
I did 3 pins for + & 3 for ground
Solder to gauge wire other end screwed in to this:
LEDupdates 10x Female 5.5mm x 2.5mm DC Connector adapter Jack Plug for LED Strip CCTV 12 24v https://www.amazon.com/dp/B07QM9W3G7/ref=cm_sw_r_cp_apa_i_4CA3CbJ1X425G
Super low profile, stays put reasonably well.
Most USB battery packs will only give you 2.1A at best.
So what you could do is take 2 of them, and get some of these cables which connect to the baby breakout board. You'd hack 2 of those cables to wire the USB ends in parallel.
Then plug them in to 2 matched battery packs to get 4.2 A (in theory).
I bought these feet to lift my board off the pins. They came in a set of 40, unfortunately, but I figure it doesn't hurt to have some extra around for future projects.
Pins 1 & 2 are etched into the board, if you point the tab on the bottom 26pin header towards your self use the holes to the left of pin 1(3 & 5) for 5v and use pin 2 and the one to its left for ground(2 & 4).
3,5,7,9,11,13 +5v
2,4,6,8,10,12,14 and 17 ground
so i used pin 3 & 5 for positive to power supply +5v
and used 2 and 5 for negative to power supply grnd
for wire i used arduino/bread board jumpers i had laying around.
and i used this powersupply because it was cheep. https://www.amazon.com/gp/product/B074YHN8D1/ref=ppx_yo_dt_b_asin_title_o09__o00_s00?ie=UTF8&psc=1
not sure if that is what you where asking but that's what i did.
​
**I wrote this from memory, so double check me/correct me if i made a mistake.