
What are
/r/Darkroom's
favorite Products & Services?
From 3.5 billion Reddit comments
The most popular Products mentioned in /r/Darkroom:


The most popular Services mentioned in /r/Darkroom:
Onshape
Instructables
GIMP
MacUpdate
Banggood
The most popular Android Apps mentioned in /r/Darkroom:


The most popular reviews in /r/Darkroom:
Photograms are fun!
The chemistry that you need isn't expensive and is pretty easy to mix up, just buy the smaller amounts so you don't have to worry about batching it out.
also:a very minor thread from instructables that might give you some inspiration.
oh, this is so professional.
a bit expensive, what do u think about that? https://www.amazon.it/ARCTIC-Breeze-Mobile-Ventilatore-silenzioso/dp/B003XN24GY/ref=sr\_1\_21?\_\_mk\_it\_IT=%C3%85M%C3%85%C5%BD%C3%95%C3%91&dchild=1&keywords=ventilatore+usb&qid=1620996453&sr=8-21
I'm giving this post the misinformation alert! Some bad advice here, read carefully and follow at your own risk!
Best advice I can give you - find a used copy of this book, it's fantastic. Should be out there for $20-$30.
Just be careful to understand that 1+4 does not mean 1/4 (as in a quarter or 25% chemical and 75% water). 1+4 means 5 total parts, or 20% chemical and 80% water.
The Massive Dev Chart (just google it) has a nice dilution calculator where you plug in the dilution and total volume you need and it will tell you how much (in mL) of each ingredient.
Amazon has cheap plastic chemistry sets with beakers and graduated cylinders that work really nice for precision measurements. https://www.amazon.com/dp/B0882WS7MG?ref=ppx_pop_mob_ap_share
>potassium dichromate is from amazon
Oh! Is it labeled "0.100 Normal" like this one: https://www.amazon.com/Potassium-Dichromate-0-100-Normal-Quart/dp/B072VPXLT2/
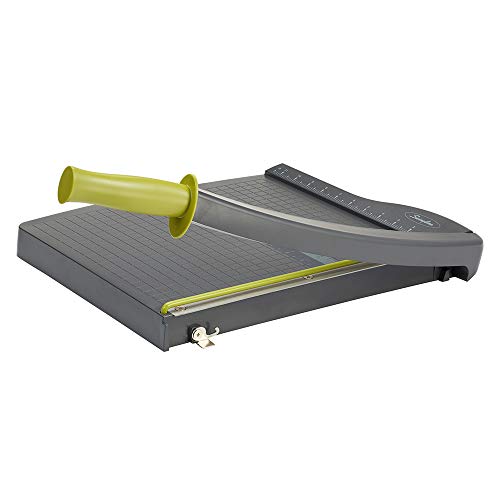
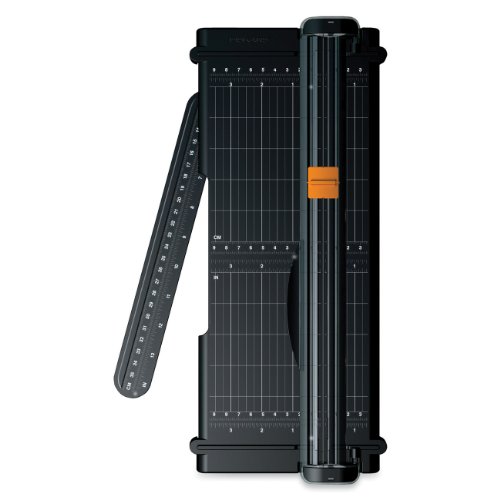
Just print with a little more border, and trim it off. Really the easiest, most reliable way - printing's busy enough without obsessing about paper you can't even freaking see under the easel blades. If you have access to a drafting table and t-square that's optimal, but here's a good method:
Place a steel ruler along the left vertical edge of the image area; make a pencil mark, say 1" down from the bottom of the image (if you want a 1" border). Repeat this on the right side of the image area. Draw a line through the 2 marks, and trim it on a guillotine style cutter (like this kind, a photo or art dept. should have one). Now using your nice bottom edge as a guide, cut the other three sides on the guillotine. You can also use a rotary cutter.
Seriously, don't sweat it in the darkroom if you have a way to trim it. (I do have a set of plastic drafting triangles I use to make sure images are properly vertical within the easel blades though, don't want no leaning image!)
Check out this book about making Handmade Silver Gelatin emulsions (mostly on paper) by Denise Ross
https://www.amazon.com/Handmade-Silver-Gelatin-Emulsion-Print/dp/0815349912/ref=asc_df_0815349912/?tag=hyprod-20&linkCode=df0&hvadid=266058510895&hvpos=&hvnetw=g&hvrand=9437289114969830934&hvpone=&hvptwo=&hvqmt=&hvdev=c&hvdvcmdl=&hvlocint=&hvlocphy=9033324&hvtargid=pla-526609239821&psc=1
It's a good book, although the editing is a bit lacking in a few places is my only complaint.
I also work with wood. Bloxygen Preserver, is a spray that displaces air from a container. it stop air from forming a skin in finishes that are applied to wood surfaces while they are in open sealed cans. some of the oil finishes are air cured. it also prevent oxidation of chemicals too.
https://www.amazon.com/Bloxygen-Preserver-Spray-Store-pack/dp/B0002088O8
link to the product on amazon. feel free to get in contact with the manufacturer for other uses. it could be of use if using part of a container and not letting the rest from going bad.
If you really like the look of cyanotypes I reccomend this book titled: “Cyanotype: The Blueprint in Contemporary Practice” by Christina Anderson. It does read like a text book so it can be boring but I reccomend it if your looking for a deep cut book about this type of alternative process.
You can find it here: Cyanotype: The Blueprint in... https://www.amazon.com/dp/1138338834?ref=ppx_pop_mob_ap_share
For about $45 but it’s well worth the price for the info.
Hope this helps!!!!
just a FYI if you're in the states. You can get a ice table which is a 4x2 foot plastic table with a drain in the bottom. Trays and chemical bottles can go in that with the drain running into a 5 gallon bucket - so any spills are contained. They're about $150: https://www.amazon.com/Organized-Fishing-FTFC4-122-Folding-Catering/dp/B07CRYH2KG
i like a magnification flip up visor. something like this. that lets me keep my hands free https://www.amazon.com/Magnifier-Professional-Head-Mounted-Binocular-Magnification-1-5X/dp/B09YTTY577/ref=sr_1_1_sspa?keywords=magnification+glasses&qid=1662422574&sr=8-1-spons&psc=1
i did most of my color spotting with Marshall retouching dyes. the kits i just found on line were only 1/2 oz. and over priced i had access to 6-8 oz bottles. i made an error in turning down an open set from Yuki, one of the top re-touchers in the company. including brushes
Carbon transfer printing. Ok it's not as easy as lumen prints but it's an extremely fun process once you get in the grove. The most archival permanent printing process there is because it's all made with pigments and hardened gelatin. You can transfer to basically any fixed-out B&W photo paper, as long as it's not discolored it's fine to use.
>Sorry but what about the Cinestill TCS-1000 is unappealing?
For starters, the price. Then, i don't need the process timer; I use The Massive Dev Chart app in my phone. It comes in flavours for Android and iPhone. Since I agitate by hand I don't think I need the extra bells and whistles. The TCS-1000 is not unappealing, but I don't need the dedicated bottle holders and the timer function. Ditto, they don't sell it in Mexico so shipping and duties would elevate the expense to $150, whereas the one I got took only $16 from my wallet.
Thanks for the explanation of split-grade printing with the scale! I didn't know how to do that.
If you want to save yourself the math on stops, I use an app called FADU F-stop Enlarger Timer .
You can put in your starting time, set a stop increment, and it will add or subtract for you. The strip mode is super useful for generating all the test strip times. I've found it a great help for thinking about my printing in terms of stops, and moving away from doing test strips at fixed time intervals, since that's not the most useful.
The interface is a little odd, I think because the app is actually designed as a remote enlarger timer if you have the right device. But you just tap on the upper or lower half of each digit to increment/decrement.
I would have bought brown glass kombucha bottles with screw on lids. I have been using these with excellent results for over 5 years. Keep in mind that you should be keeping the bottles in a warm bath of water to keep the chemistry up to temp so using cork is not a good idea. if any water gets past the cork your chemicals will be ruined. https://www.amazon.com/gp/product/B07CSFBMXB/ref=ppx_yo_dt_b_search_asin_title?ie=UTF8&psc=1. .
Big brain move is a wine bag
I'm doing C-41 which requires the same level of temperature regulation, and I am using this Sous Vide cooker and a 2 gallon plastic tub:
It's pretty much the same as the one the Cinestill is based off of, but without the added timer functions or bottle holders.
Also, get a good and accurate thermometer which is graduated down to half degrees at least. Probably more important than a heater. You can do this with a bucket of cold and boiling water if you have to by adding cold or hot to your water bath to keep everything at temperature.
Right! I thought so much. Current rate is about 20.30:1. Getting it much cheaper from B&H in 100ft spools and consigning it to a friend in TX who's married to a local lady and comes every so often. 3~4 times a year.
>3'45" as standard at 20°C sounds awfully short.
I usually develop using minimal agitation - useful for extending developing time if you don't want to change the dilution. You take the 'standard' time, add 50% to it, then agitate continuously for the first minute, then 10 seconds every 3rd minute after that.
So, 3'45" would become 5'30" (rounded to the nearest 15"), with agitation from 0-1', then 10" at the 4' mark. I guess I've been doing every roll this way for at least the last 10 years or so. I learned about it in The Darkroom Cookbook, and have just been doing it ever since...
Well, many of us have hard calluses or dry skin between our fingers from holding pencils or tools; and when emulsion is wet, it's pretty delicate so that's the worst time for anything to touch it. Even a perfectly smooth surface can get a bit of dust.
I always have a pack of Kim Wipes around, great for cleaning lenses, optics, monitors, scanner beds, glasses... if I'm testing film and in a hurry (for roll film vs. sheet film), I'll take the wet film from the reel and dry the top-end with a kim wipe (so water isn't trapped behind the clip) and clip it. Now the wipe is damp, and I'll gently wrap it around the film and do one gentle pull, top to bottom, make sure the bottom end is dry, clip it, and toss the wipe. Kinda seems like the safest way to squeegee I can think of.
I think one thing people can miss is if their water is really full of minerals (or in my case, rust - our neighborhood is 100+ years old so you're always having to scrub the bathtub and clean shower heads from orange deposits and stains). So your wash cycle could have a lot of crap in it; but then we do a Photoflo/distilled final rinse. I suspect in dirty-water cases, that's not enough, probably safer to do a tank of distilled and really agitate the reel, drain it, and do a 2nd tank with distilled + Photoflo to make sure to wash the film of any leftover junk. that would be more of a case of "I'm doing everything right but still getting water marks".
A water filter is really handy if you do a lot of film; we have a big under-sink filter with a little drinking water faucet (due to the rust), so as long as that's there, I'll pour a pitcher of it when developing film. In my experience, it's as good as distilled water.
I use this static-adhesive window blackout film for my darkroom. I cut it to instruction so that there's a 2mm gap around the whole thing. I then used electrical tape to get the rest of that gap. With the blinds dropped, you can't tell it's a blacked out window.
I know this isn't a new thing but my safelight died on me last week and it's been difficult getting a replacement bulb in Canada. Thought I'd try out the red light headlamps and this particular one from canadian tire works pretty well.
Decided to try out the headlamp after getting a red led bulboff amazon that didn't work out. Some said they use this one for their darkroom but it didn't workout for me. The test strip was from 2m away for 2 mins.
As for the headlamp, very very minimal fogging. I tried to include an edit where you could see the slight fogging caused by having the headlamp on my head, looking directly at the paper about 1ft away for 2 mins. Its a very faint line. When I put the paper right against the light for a few seconds it obviously fogs a lot.
I normally have the headlamp facing up onto the ceiling to illuminate the whole (bath)room so I'm not worried about fogging even with longer exposures.
I might just go this route with the headlamp moving forward because of the very minimal fog and easy of use.
This is what I use. In fact, if you look at the first review you will see it's by another photographer who used it for the same thing. It requires a little bit of wiring but that photographer included directions in his review and even a diagram. I can tell you from experience it's not too hard to do.
It also has a backlit display that is conveniently red (and wouldn't be bright enough to effect anything anyways). It works on it's own but I 3D printed a little case for mine and at that point it's just as nice as any timer you would buy online for a literal fraction of the cost.
Putting the word photography in front of something is just an excuse to double (or triple) the price.
I bought an anti static brush. Mine is Kalt brand, but looks exactly like this one; I expect they're exactly the same brush. I hit both sides of the negative with it after it's in the carrier, then a quick shot of canned air on each side of the neg. Then into the enlarger.
Compose, focus, test strips, etc. When I'm ready to make a full size print, I'll pull the negative carrier out of the enlarger and repeat the anti-static brush + canned air treatment one more time. A quick check of focus after recomposing and I almost never have any dust spots on my prints anymore.
I used this to control the enlarger light.
https://www.amazon.com/dp/B07P4MFK3R/ref=cm_sw_em_r_mt_dp_EET92WXSZN9GR282G035
He shows other ones in the docs and gives step by step instructions. It doesn't control the safelight.
Washing depends on RC paper vs. fiber. RC washes pretty quickly, fiber you 100% should HCA (or just buy sodium sulphite by the pound), and there's really no way I'd print fiber without Residual Hypo Test (RHT), one bottle lasts years and it will save a lot of water and washing time. Either way, a good bet is have a way to give the prints a solid rinse, and then put them in a holding tray of water. take your keepers inside and wash 'em in the bathtub.
With some tubs, you can rig up a PVC pipe over the drain - the idea is to get the draining up several inches so the tub will hold some water and it overflows over the pipe into the drain. the tub's overflow drain will work, but that means you're filling the tub up. You can also do things like rig a couple boards across the tub to hold a large tray and let the shower dribble into it. In the US, most showers are a 1/2" NPT thread, so you can very quickly unscrew the shower head and screw on a barb fitting with something like 1/2" flexible poly hose, run the hose down to the tray and clip it to the side. When you're done, take the hose + fitting off and coil it up and stash it in a cupboard, and stick the shower head back on - you'd want an adjustable wrench handy for that, but it's actually very quick and works well.
I just used some 3" rubber weather tape - it's sticky on half of one side, so I can just put a layer around the door to cover the cracks. Door still opens fine, and it's relatively unobtrusive.
I just use a shotgun bore alignment laser tool from amazon that costs way less.
You can easily test that the laser is in fact perpendicular to its base by placing it on something that spins aimed at the ceiling and moving it towards the center until the dot on the ceiling appears stationary.
This, plus a few cheap make up mirrors were how I aligned my enlarger and scanning setup.
Or a wash bottle.
Get a 50mil syringe like this and just wash it off at the very end. I even use regular water with fotoflo and then use this method for the final rinse. No water spots.
This is an Osram Led RGB lamp (8,99€). This with the normal remote control and then simply dimmed to red and something.
The best suggestion I have is that your girlfriend may have accidentally put some oil based liquid on to your film. If you re-washed your film it may not come off easily.
You could try a solvent based cleaner, which would remove oil very easily. Pec-12 is one I have used in the past. https://www.amazon.com/Photographic-Solutions-PEC-12-Emulsion-Cleaner/dp/B00SYHWAJK
Y'know, every holiday season I tell people. "Put Way Beyond Monochrome on your xams list"! But man, the hardcover is like $140 now!
I just got a 100W 12V power supply
https://www.amazon.com/gp/product/B07557XMDQ/ref=ppx_yo_dt_b_search_asin_title?ie=UTF8&psc=1
Note that this PS have some load delay that could affect timing if you are using a timer to power the PS. I suggest put the timer between the PS and the enlarger.
I bought https://www.amazon.com/gp/product/B004JK9P5I/ref=ppx_yo_dt_b_search_asin_title?ie=UTF8&psc=1 and taped it over the basement windows in my previous apartment. It worked well. I used duct tape, so you'd want to choose a way to adhere that won't damage the paint.
Do it! I did a few analog related prints. New lens board for my Crown Graphic to fit a Size 0 lens. A new switch for the timer on my enlarger. And a new swirly stick for my plastic dev tank. Try https://www.onshape.com it's free CAD software that's relatively easy to learn.
Ok I had to double check my order from Amazon. I bought it August 2019 for $40. I can't believe it is now $75 in Oct 2021. This is crazy.
Good job on your first print! I do agree with the image bleeding into the border. Flashing the print will help a lot and split filtering is a great way to pull images out a dense negative (the negative will scan really well too). Check out the darkroom series of books by Ansel Adams, the famous photographer and darkroom master called The Negative and The Print. These will help you out more than you know!
Start with the least hardcore process and work your way up.
An air blower or canned air is a good start, but with canned air make sure it's not so full that the freezing liquid comes out!
You can look at the film under an illuminated magnifier and turn it so you're seeing the reflection, not "through" it. Dust specks will jump out at you. If a speck won't come off with compressed air, a soft watercolor brush is the next step, see if you can gently sweep it off.
Next from there is wet the brush in a 99% alcohol and try to lift stuck-on bits.
Wiping an entire neg is a last resort - the slightest bit of dust on the cloth or film can turn into a big scratch. If you decide to wipe it, make sure to get all the dust off. I would generally re-wash a neg before wiping it, then a distilled/photoflo rinse and hang in a dust-free space.
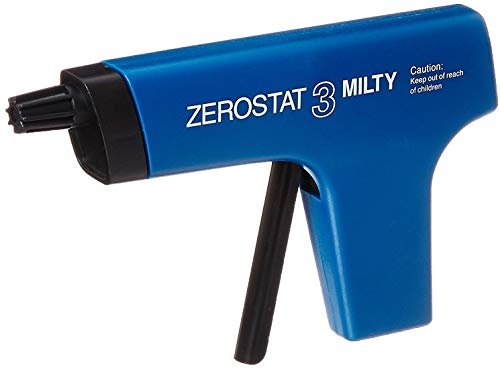
If you print big or are really hardcore about dust a zerostat gun is fabulous, it's impressive how the dust just falls off the negs.
And try not to lean over your negs - human beings are dust machines, most household dust is just our dried up skin, supposedly.
The Film Developing Cookbook (Darkroom Cookbook, Vol. 2) https://www.amazon.com/dp/0240802772/ref=cm_sw_r_cp_api_glt_fabc_M6Z2A54HY2NDCDMT27XF
The Essential Darkroom Book https://www.amazon.com/dp/0817438386/ref=cm_sw_r_cp_api_glt_fabc_DMMR1BEKJMVECWQCQSNA
These are both great and can be picked up used or often at the library! There are others that go into building out darkrooms and others yet that focus on scanning. These two should be good refreshers.
Storage container here too - they work quite well for heating up and then storing all your stuff afterwards. I like to think of it as a portable lab as it fits everything. I use this 18L one from Bankers Box
I have seen YouTube photographers develop with those, though that does have me interested in testing those red Fiet Electric lamps you can find at Home Depot. ...though, for some reason, the ones on Amazon are double the price. It looks like they may use a blue exciter, so they may need to be in a safelight.
I think vaguely-maybe I recall a thread on Photrio where someone had converted a 23C to print 4x5, or at least had tried - but you're probably better off looking for a 4x5 enlarger. Finding one locally is luck + regional issues, like east coast/big city they may come up more often. I'm in Dallas and got an MXT for $150, and a short time later a friend spotted an MX at an estate sale for $65, so after a year of searching for one, I ended up with two. There's a camera store in Ohio that always has several posted on eBay, my plan was fly up there, rent a car, drive one home, so I'd budgeted a grand or so - I was just at a point where I was kinda desperate for one.
One thing you can do in the interim is get some static cling sheets - it's clear vinyl that "sticks" to glass without an adhesive and peels off without damaging the surface. Cut a piece to fit your ground glass, and use a sharpie to draw the smaller neg size on it. You can still shoot 4x5 but you can trim the neg down to fit your carrier. It'll be essentially like shooting with a longer lens, like a 135mm lens for 4x5, you'll only be using a crop of the neg that might be more like a 210mm.
With a revolving back 4x5 camera, you can often make a black cardboard mask and mask off half of the frame; so you shoot one half of a sheet, revolve the back, and you can shoot a 2nd shot on the same sheet of film. The mask has to be on [art of the camera that doesn't revolve, usually like where the bellows attach in back. With a monorail camera it's pretty easy to do that, not sure with a press camera.
The lens board depends on the size of the rear of the lens itself. Many are 39mm, so you just take your old lens off and stick the other one on if that's the case. A lens spanner is recommended to get the retaining ring off and on. If the rear of the lens (where the threads pass through the board) is bigger or smaller, you'll need a different board - and if you go back and forth between formats, it's nice to have each lens on its own board.
23C boards are just simple squares with a hole in the middle. I think they're the same board as the MX 4x5 series, too, and eBay is full of them. You can also get a square of 1/8" aluminum or thin plywood and a hole-saw kit and drill the hole size that works.
Google these phrases: "portfolio backpack", "studio backpack", etc - you'll find someone's already thought of this.
After you open fix and stop (not stopper), you mix a diluted mixture from those bottles. Just put the lid back on the full-strength solutions. The diluted solutions (stop and fix) are very acidic and they're not really affected by oxygen like developer is, so just put them in some sort of storage bottle and store them out of the light. You don't need to be concerned with squeezing the air out of a stop or fix solution.
Indicator stop will start to turn a purple color when the mixed solution is exhausted; you need to test the diluted fixer solution before use.
If you use a film developer that you dilute and then re-use the diluted portion, that chemical does need to be protected from air and light.
Don't use a film squeegie or anything re-usable on your film. It will eventually hang onto a bit of dust or dirt and scratch your film. If you use your fingers, check them first for callouses or scratches or dry patches of skin. I really recommend disposable lab wipes like Kim wipes for this though. Unlike tissue in your house, they're lint free (and great for cleaning lenses or scanner glass).
Consider this workflow: when your film is in the final photo flo rinse, figure out where you'll hang it to dry - you want a dust-free space, so often running a hot shower in your bathroom for a couple minutes will settle any dust down. Take the film from the reel, and dry the top end (where you'll clip it) with a Kim wipe; this way, no water will be trapped behind the clip. Hang it up, loosely wrap the now-damp wipe around the top of the film, and gently pull downward, just one time, from top to bottom. Use that same wipe to dry the bottom edge of the film, clip the bottom, and toss the wipe. Leave the room and close the door, and stay out for a couple hours.
Ho safelight are useful for paper development, just not for (most) film. As soon as your film is set up in the tank, it's safe.
You can also use some kind of special bags to load your film in case you want to be sure, something like that : https://www.amazon.com/Darkroom-Bag-Film-Changing-Anti-Static/dp/B077N4DQ2S
Pure alcohol is often way superior to a re-wash, since it dries very quickly and the emulsion returns to its full hardness. If you're in the middle of a print (or scan I guess) and find some hair or dust that won't blow off, you can nudge it free with a fine artist brush dampened in alcohol. If you use water on the neg, you're out of business for a couple hours.
If you get a little cosmetic spray bottle, good alcohol (I have iso, methanol and everclear - grain alcohol) gets crazy-useful - lenses, computer screens, glass neg carriers or scanner glass, framed pics, etc.
If you print fiber or make darkroom masks, methanol is the shizz. It's part of dry-iodine bleaching which can let you bleach out very tiny spots on prints, or lighten up things like strands of hair or details in plants or textures - pretty immense control with some practice. You can use it to fine tune masks or even bleach out or lighten parts of negatives - and it will redevelop if you screw up (though on a print, the tone may be very warm). It's been a game changer for me (but I do a lot of lith printing where sometimes you just get a black spot for no reason). You can retouch prints to remove actual details and then use spotting dyes to correct the blank spot.
It's my understanding that ISO HEET - the fuel-line de-icer - is 99% iso, and that the regular HEET is 99% methanol. I use the regular stuff for iodine "dry" bleaching and it's just fine - F me, methanol was hard to find until someone on Photrio pointed me to the auto parts store. (The MSDS docs for these products state 99% for each).
You can get 99% at Frye's (in the US) in the PC building dept.
If your state sells 190 proof grain alcohol, that's 95%. I use it for liquid emulsion projects from time to time, and it's another good one for cleaning film, optics, etc.
Pro tip - get a little cosmetic spray bottle for whatever alcohol you use. Freakishly handy! Great for glass like computer screens or (big-time!!!) glass negative carriers or scanner glass.
Pencil just won't work on glossy or RC paper. Most gallery-type shooters get a fine-point carbon-ink pen, which won't fade and is "archival ink", vs. a sharpie which can spread and fade and has god-knows-what in the ink. The Sakura pens are really popular. whatever you use, test it on a scrap or test print. I do wish I could find something like this in a gray color, the black kinda leaps out at ya.
I have sloppy handwriting and my signature is different every time, so I do stuff like tape a strip of paper gently to the print as a baseline to not cross, and I sign a scrap of paper like 5 times to "practice" before signing.
This is what I got. I replaced my UV Flourescent lights with these. I haven't used it yet, I just made a new box for it. But people printing Platinum/Palladium have been using it.
I will use it for PT/PD
https://www.amazon.com/gp/product/B071NT6189/ref=ppx_yo_dt_b_asin_title_o07_s00?ie=UTF8&psc=1
Hm okay, that sounds like it's it. I don't have a multimeter unfortunately but a new transformer (not the exact one, but one that should be working according to a german photo website, https://www.amazon.de/dp/B000SIFF2C?linkCode=ogi&th=1) is already ordered and I will try and use that. If it works, I have to find a way to replace the old one with it though :D Thank you for your help!
The best advice I can give you is track down a copy of this book. It's discontinued but widely available used, and takes you from pure beginner to very advanced techniques, all starting with basic darkroom setup. Best B&W printing book I've ever seen, by a mile.
After that, you can look up a copy of Way Beyond Monochrome - it's a big pricey book, but if you want to take B&W to the next level, from the neg and development to printing and presentation, it's killer.
Lightproof bag, $30 amazon Or you could use your bathroom if there’s no windows and stick a wet towel under the door.
You’ll need chemistry (best source, bhphoto.com) look around in your city, some photography shops stock some. Ilford, cinestill, kodak. You’ll need a developer, stop bath and a fixer. Probably the most cost consuming thing in your kit. About $60-70
a film retriever
a pair of scissors
something to hang the film up(just use a coat hanger from a hook in the ceiling or your shower frame)
PhotoFlo, you dont need it but it helps take off the water stains.
Hey quick question: Have you actually tried those lights to confirm that they work for safe lights? I bought these and tried them out and it didn't work, It completely exposed my paper. Thankfully I only took out one sheet at a time!
Thank you!
I’d really recommend Quinn Jacobson’s new book. It takes you through everything from mixing, storage, and handling of chemicals to making tintypes, ambrotypes, and negatives- and even the basics of some printing-out-processes like albumen and aristotype. Not to mention the book has login credentials to let you watch the tutorial videos online that show you everything step by step.
As far as chemicals I recommend Bostick’s starter kit. It comes with a lot of hardware like bottles, goggles, a graduate, and hydrometer I still use today; not just the chemicals.
I have a darkroom in an outdoor shed without running water. AMA.
For water I found a lot of 6 gallon "water-cooler" containers on craigslist. I use a Primo hand pump for clean water. I fill the containers every so often with water from the hose (I do the final rinse of film/paper with distilled/de-ionized water). I use the 6 gallon containers with a large funnel as a waste, then dispose of them inside or at the proper waste disposal sites. I have an electric tea kettle I use to get hot water.
For a table I use an old solid door on saw-horses. Drying racks I use sweater drying racks on amazon. It works alright, I may just get some wood and staple on screen mesh though.
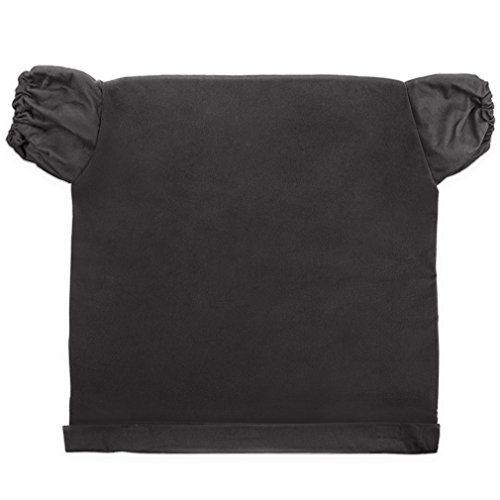
I bought some of this Roc-Lon black out curtain from amazon to black out the basement windows to make a dark room.
Yes, there was a Darkroom Handbook on Amazon: https://www.amazon.com/Darkroom-Handbook-Michael-Langford/dp/0394724682/ref=sr_1_1?keywords=darkroom+handbook&qid=1578483460&sr=8-1
Thank you very much for explanation. Cookbook sounds useful for BW experiments. Do you know about a book about color printing?
I use an old Nexus 6 to control the safelights in my darkroom (Philips Hue), as well as for timers.
I use the Twilight App to reduce as much blue/green light, and dim the screen quite a bit. The Nexus 6 has an OLED screen, so each color subpixel creates its own light, rather than pushing white light through a bayer array. So if a pixel is just red, the only light that comes out is red.
Never had an issue with black and white papers, or green-speed x-ray film with the display on and sitting about a foot away.
I have an different edition of this book (https://www.amazon.co.uk/Darkroom-Handbook-Michael-Langford/dp/0852231881) , and it is very well written. I am a big fan as well.
​
The good thing is that a lot of darkroom related books can be found used.
I've been using this one, and it's working just fine.
The link is from the German amazon page, but I'm sure you'll get the same model or something similar in the UK.
I've been using this, https://www.amazon.com/gp/product/B003SLC3IU/ref=oh_aui_detailpage_o02_s00?ie=UTF8&psc=1
only problem I have with it is measuring 4" is a pain as it's right where the main body falls off.
The 67CP is actually the Printmaker 35 with a 6x7 condenser kit - kind of entry level but probably fine up to 8x10 or maybe 11x14.
To get the lensboard out - IIRC - you push it towards the back of the enlarger, away from you. There's a metal spring towards the front. You don't unscrew anything.
The Beslars are 4-element cheapies - probably Roganar rebranded, entry level, likely just fine for smaller printing though. The Componon lenses are good performers, Componon-S are the higher end, both are 6-element glass. The 80mm Componon will cover 6x6 but possible not 6x7 - I believe the EL-Nikkor 5.6 is the only 80mm that will do 6x7/6x8?
Componon enlarger lenses are all over the place with thread sizes; good chance it will fit though. You'll need a lens spanner wrench to remove the retaining ring from the lens to get it off the board. If your Componon came with a retaining ring, you just need a board with a properly sized hole. Good chance you can use your existing board, but I have lenses with a crazy range of thread sizes.
For your enlarger, boards and neg carriers for 67c and Printmaker 35 enlargers should all fit. Usually plenty of boards on eBay, with various hole sizes or blank (undrilled, just a pilot hole in the center - you'd need a machine shop to cut the hole, or maybe tear up a hole saw on it).
No prob - this book is the absolute shizz - out of print but still out there and affordable. By far the best darkroom printing book I've ever seen, from beginning to really advanced stuff. Rudman is a great teacher and makes it all understandable.
Not sure why you're using TMaxRS developer. HC-100 Dilution B would probably be a better choice. I'd expose the Acros at ASA 50 and develop in HC-110B for about 5 1/2 min @68F.
Pretty much no film (or very few) will give you full ASA speed if you want to preserve shadow detail. (The only example I've found in he past 25 years or so was the Efke 100 which did just fine at rated ASA.) By rating the film at ASA 50, you get lots of shadow detail. Then you UNDER develop just a bit to make sure the highlights don't blow out. Hence my recommendation above - which is just a first estimate to get you going.
But you want to push - i.e., You want to severely underexpose the film by pretending it's faster than it really is. You can do this, but at a cost of grain, typically. See, development mostly affects the highlights (and exposure the shadows). So, since you are really underexposing the shadows, you REALLY have to OVER develop to get anything to show. The longer the film sits in the developer - usually - the more grain you build up. So, in this case (and I don't have times for you), I'd use HC-110 1:7 and see if you can figure out the required time.
If Kodak products are super expensive, you can get Ilford's ID-11 - which is just their own version of Kodak D-76, probably the most used developer in film history. It can be used 1:1 for full strength (which might be a good choice for your push).
For more details, see if you can find a copy of:
https://www.amazon.com/Film-Developing-Cookbook-Darkroom-Vol/dp/0240802772
I will repeat the most important rule here:
- Shadow detail comes from EXPOSURE.
- Developing mostly affects HIGHLIGHTS.
P.S. If Kodak stuff is expensive, you might also see if you can get the Ilford Delta films more reasonably and/or HP5+.
This is just one of the many useful plans to be found in Blueprint Series Vol. II by Petersen's Photographic. Highly recommended.
May I ask what film you will be developing with the XTOL? The Film Developing Cookbook states that: " XTOL is now the developer most highly recommended by Kodak for Tmax films. It has been observed that dilution increases speed and sharpness with XTOL. Dilutions of 1:3 or more are frequently recommended. At these dilutions XTOL is effectively a nonsolvent developer, but because of its careful buffering, grain is still fine."
Michael Covington also has an informative page on XTOL including its use at dilutions higher than 1:1
Passing along links and info I find, in case anyone else is interested. I've looked into this before, buy my interest is currently sparked thanks to finding 4 new Sylvania QHE 2x32T8/UNV ISL-SC ballasts for $3 each at a local ReSTORE. Those are enough to power 8 T8 tubes.
See also: Another good tutorial on building a UV light table
PS... these UV light tables are also useful if you are interested in learning to screenprint t-shirts, etc.