
What is Reddit's opinion of
Instructables?
From 3.5 billion Reddit comments
➔ Instructables website
By popularity on Reddit, this Service is:
100 reviews of this app found across Reddit:
This. This guy - Come on Reddit, we have the technology, we have the resources. There has to be someone with a Geiger counter near Michigan/Indiana border. Make one if you don't have one.
Let's put this stupid thing to rest.
The Trucker's Hitch is by far the most practical thing you can learn. A double pulley system made out of nothing but rope. NEVER worry about tying anything to your car or truck again. You can tie a load down so tight the rope twangs like a ~~taught~~ taut guitar string.
You'll need OP to grab a blue light, a microscope, or perhaps just a scanner to detect the dots from the printed paper, assuming it's a color printer printing them off. Not sure if black and white ones do it.
Anyway, from there, we go to manufacturer to find out about the printer and to which distributor it went. Then the distributor to the local store, then to the receipts to figure out who it was sold to. If we have to, we'll bring in a cool beverage to find out the whereabouts of the printer.
BAM! He who has the printer, is the culprit.
I like to tape down the sprayer thing on a sink with black electrical tape, so when the person turns the faucet on it sprays them.
They do not think it's as funny.
I am 36, a father of two young girls, and have spent money in the past year on:
Glass blowing classes (on my to do list for 15 years)
A half pipe lesson (skiing). I don't have any friends who do the half pipe and I thought it'd be cool to learn.
I bought a 4-string stunt kite and am teaching myself to fly it (with the aid of YouTube videos). I also bought a mountain board - a skateboard with inflated knobby tires - so I can pull myself using the kite.
I bought a unicycle 2 years ago (cheap on Craigslist) and have been slowly learning how to ride that.
I taught myself to knit from Youtube and made a couple small blankets for my daughter's dolls.
I don't do these things to boast - I just like learning new things. Youtube is awesome for learning. I approach new things with a 'why not give it a shot' attitude and I encourage my daughters to try new things too. I stress that we're probably NOT going to be good the first time we try things but that's not the point. The experience is the important part.
Edit to add this link: If you want to get ideas for new things, look here: instructables.com
My son just had his science fair and he made batteries out of nickels and pennies. http://www.instructables.com/id/Penny-and-Nickel-Battery/ we got a cheap LED from radio shack which he connected and it actually lit up! fYI use pennies made prior to 1983, they have more copper then those made after 1983. The earlier minted pennies worked better. There is tons of stuff online that is cheap and easy. Good luck!
I looked at random bleach tshirt designs on the web, here's an instrucable http://www.instructables.com/id/T-shirt-Designs-with-Stencils-and-Bleach/
all the directions are the same basically. The only thing i recommend is Freezer paper for the stencil and iron it on wax side down. makes it like tape and you get nice edges
I believe there articles on all 3 of those.
http://www.instructables.com/id/How-to-Get-Pregnant/ http://www.instructables.com/id/Deliver-Kittens/ http://www.instructables.com/id/Reclaimed-Wood-Magnetic-Knife-Rack-1/
On of those should suit you.
As a lifeguard, if I had to interact with any kid and their mother was present, there was about a 1 in 3 chance I would get yelled at. Twice I was called a pedo as I helped kids regain the use of their lungs (We don't do mouth to mouth, we use these).
I just remember that it's the moms who are shits, not the kids, and having a less than exemplary mother at times, I would never want to punish the kid because of the mother.
Please understand that the kid knows you helped and will remember it. The vast majority of rescues where I got accused of whatever the mother stopped bringing their children there. And yet the kids made an effort to try and call, send letters or even sneak back to the pool by themselves to thank me. Feels good man, and helped make it worth it.
>'how do I make my own'
I think that section is fine. If it were $50, yeah some people who would have otherwise bought it might go through the trouble of making it on there own. At $5, however, it's so cheap that the vast majority of people would rather pay you than DIY it.
I would definitely use the DIY angle as a marketing tool. Make a page on http://www.instructables.com/ and other DIY sites and then tell people were they can buy it if they'd rather not take the time to make it.
Put it up on Pinterest, sell some on Etsy.
That's some great work! If she's that handy then she should try taking it a step further and making those bottles into lamps or something. I think that would look amazing and she could probably sell something like that on Etsy or the like.
Obligatory link to the Instructable on how to make Oogoo, a Sugru substitute, with materials readily available in your local area. It's a silicon clay, people.
-Pop this in the comments next time, OP. Not everyone knows about instructables! I just happened to remember seeing this not too long ago.
The guy that made this is actually a redditor.
http://www.reddit.com/r/gaming/comments/c5y92/megaman_found/c0qcjcn
He's also got instructions on Instructables.
Everybody always bitches about there being a paywall, but there's not. You sign up for a free account and you get EVERY FEATURE except the ability to download the article as a PDF and the option to see every step on the same page.
It's from instructables. I would pair it with the mouse-mouse someone else posted there.
If you like carbonated water, don't buy one of those store-made gizmos (e.g., SodaStream), that tie you to a subscription of Co2 in their proprietary canisters.
Purchase a Co2 tank, a regulator, some food-grade tubing and a specialized top that screws onto 1- and 2-liter bottles. Fill the Co2 tank (All Co2 is the same, there is no "food grade" co2) at your local liquor store or fire extinguisher supply place, they charge roughly $1 per pound.
I can make roughly 1100 liters of soda water from 20 pounds of Co2, so each liter is just under .02 cents.
My Initial investment:
- 20-pound Co2 tank $75 (cheaper if you find a good deal on Craigslist, but I got mine from Ebay)
- Regulator, food-grade tubing, special cap, tube clamps $90 (got mine from morebeer.com)
These two articles helped me build my setup:
http://www.instructables.com/id/DIY-Soda-Water-%26-Home-Carbonation---Pays-For-Itsel/
Or you could mod a Staples Easy Button into a one button keyboard that you could then map to a play key using AutoHotKey.
I run a small hydroponic setup in one corner of my 1000sqft. apartment.
Tomatoes, Peppers and Chard were my last crop, total cost about $200 in gear, but that has a life-span of about 5-10 years, so it all evens out in the end.
MY setup is 2 2'x2' ebb&flow systems allowing me to run 8 plants (roughly) at a time. I'm looking at building a bigger setup out on my porch. Total cost estimate of that one is about $50-100 and should handle 16-24 plants.
EDIT: So I don't have to continue to answer the same questions multiple times:
I run a single 125W CFL Growbulb in a light hood suspended from the top shelf of a wire bookshelf I bought from walmart (go figure). The hood has a small fan just to keep the air around the bulb moving. The system is comprised of 2 2'x2' trays, each with it's own 7 or 8 gallon reservoir for nutrient. There is a single pump in each reservoir and a single air pump that has 2 hoses (one to each reservoir).
The entire rig consumes less than 2/10ths of a KW per hour when it's all on. (All being the light, fan, both pumps, and the air pump).
I got most of my information from the website Instructables.com, my local hydroponics supply house (Homegrown Hydroponics (the Phoenix shop)) and the local library.
EDIT 2: No, I do NOT grow any of the other non-legal crops.
This seems to be what you're looking for although it does appear to be quite an involved process, not something you can do in ten minutes.
You might be able to make some sort of cardboard periscope-type arrangement, although it may not be as sturdy.
Oh, and putting on normal glasses upside down doesn't work.
For anyone else who wants to make one: http://www.instructables.com/id/Sleek-word-clock/
I got the link the last time this was posted. Seems like the best way unless you want to pay 1000 for the original version or 200 for a ready make knockoff.
Scientist here, some of my favorites:
Measure the speed of light in a microwave with marshmallows. http://www.physics.umd.edu/icpe/newsletters/n34/marshmal.htm
Extract DNA from strawberries. http://diybio.org/2009/03/20/extract-dna-from-strawberries/
Get a cheap telescope. Jupiter, Saturn and Mars are all up right now. See the rings of saturn and the moons of jupiter pretty easily. Also look at Orion nebula and andromeda galaxy. Tell him the galaxy is as big as three full moons in the sky and contains as many as 1 trillion stars.
Make sterno from home materials. http://www.instructables.com/id/Make-quotSternoquot-Flaming-Jelly-from-Antacid/
Good luck!
Hey all you people that are so freaked out by insects/spiders...
I'm always amused to see giant cans of insecticide for $4-$5 that are mostly propellant. I've got news for you... the most effective bug spray in the world:
Isopropyl alcohol, it instantly draws the moisture out of their little exoskeletons and kills them. It will drop whole swarms of mosquitoes out of the air like a weapon of mass destruction on the mist setting.
Put it in a spray bottle and have at it. Of course do not spray it around anything that can light it on fire. Or do, that can be fun too... as long as we're not talking about your water heater or a breaker box or something like that.
Ok, so I should have put together a how-to guide before posting. I promise it'll come later.
The basics came from this guide. And since your starting with a paperback, you can pretty much skip to step 7. Downsides to my current process are long construction times (72 hours of glue drying) and destruction of the original cover. Looking for ways to improve both.
Or just do this, which is free and actually solves the problem.
One of these can greatly help if you have long hair. It can also unclog a tub drain – use it like you would a plumbing snake.
Great to know this subreddit helped.
Also.
Weird tip (unless you already know) you can iron the plastic bags you get from the grocery store to make a stronger bag. This creates a strong leather-ish substance that can be used to make other things (laptop case, guitar strap, easy clean baby bibs, apron, wallet, decorative items, etc.) Some people like to cut the bags up and braid them into rope for leashes and such. Hope this helps you!
How I made it:
Illustration board (heavy) - 1.5' x 2' - $5 (need 1 per volume) Cloth - 1 yard x 2 yards was what I got - $5 approx (enough for the whole project) Spray adhesive for cloth to board binding - $15 Rubber cement for paper binding - $3 Blue ribbon for main text bookmark - $3 Red ribbon for footnotes bookmark - $3 Cardstock for inside lining - $1/page (need 2 per volume) Hobby knife - $5 The biggest expense*: Mylar Dust jackets - $20/jacket (need 1 per volume) *most normal print shops can't handle paper that large, so I had to go to an architectural print shop and use their color plotter. So I don't really want to total how much I spent, because it was a lot. :P It's not cost effective for any book other than one that you love. It's a pretty simple process, though. I used this as a guide. And I learned a lot since I made so many. The two volume set I did last and those look fantastic compared to my first attempt. Not too terribly time consuming. I think it took me a Saturday afternoon/evening and Sunday afternoon to bind 5 copies and then rebind the first one I did (so 6 total bindings).
Good luck if you decide to do one on your own!
edit: added link to referenced DIY.
The worst thing that usually happens in medieval costuming is the cheap chain mail that is often used. It looks like it's knitted yarn, painted silver. I haven't noticed that sort of thing in GoT. If it's there, it isn't used where it's noticeable.
$500 for the "components"? Screw off.
You can usually try something like this for cheap:
http://www.instructables.com/id/Belkin-Tunecast-II-FM-Transmitter-Mod/
Or this for hilarity: http://sonic.net/~n7moe/BelkinMod.htm
As someone with a decade of medieval reenactment experience I can tell you right now, if you're serious about using chainmaile to protect yourself, ONLY BUY RIVETED. Seriously.
Actual maile back in the day was made this way for a reason. If you get cheap maile where the rings are just bent together to form a ring, that shit will fall apart. It happens so often we called it "metal moths". Also, bent rings will separate instantly if stabbed. Riveted maile holds together much better and offers at lot more real protection.
Here's what riveted maile looks like. (Check ebay or just search around, it's out there)
Lastly, maile will only protect you from slashes and a limited amount of thrusts. If someone hits you with a blunt object, it's still going to hurt like fuck and possibly break your bones. Only plate protects against that. Outside of wearing plates, the next best thing is to wear as much padding under the maile. A gambeson is a type of padded coat worn under maile for this exact reason.
Unless your penis is long and thin enough to dilate her cervix, reach up into her uterus, and then scrape the baby off the side it's attached to...
Does your penis look like this?
Hey, with any luck, if they find absolutely nothing of interest on them, you might get your stuff back after 10 or 15 years, with no more than $10k spent on legal fees.
I recommend this
I'd be far more inclined to do this rather than the OP's link. Maybe not as part of a Leatherman, but just the portion the keys are in.
"Synthetic aperture photography" or "computational photography" can do some freaky things, like see through obstructions or allow the plane of focus to be selected after-the-fact.
You can even do it yourself with a single ordinary camera, provided you're shooting a static scene.
I have ZERO technical skills when it comes to electronics, and will gladly pay someone to build this.
Anyone?
Anyone?
Link to Instructables Build Page
Bueller?
Oh sweet Jesus thank God I'm dicking around on the Internet on a Friday night.
No, do not use sandpaper. First remove all the oil with rubbing (isopropyl) alcohol and take the grips off. Then give it some electrolysis.
http://www.instructables.com/id/Electrolytic-Rust-Removal-aka-Magic/
Afterwards dry it completely (alcohol again) and lube it correctly.
None of you guys use an air compressor for powering tools? What?!?!
┌─┐
┴─┴
ರ_ರೃ The hell are you going to buy an expensive multipurpose tool if your not going to utilize it's multiple purposes.
I've been replacing the pen part of the Pilot G2 with montblanc refills for the last two semesters of college, and it's been the best writing experience I've had. You can get the refills for around $12 for a pack of two, and they'll last you for a fairly long time (I've been using the same ink refill since Novemberish for notes for all of my classes). Also, if you do this, an easier way to remove the millimeter or so of extra plastic at the end is to use a cigarette lighter on it for a second or two and mash it into a table or something.
We call them "prison Pjs"
http://www.instructables.com/id/How-to-Keep-a-Diaper-on-a-Toddler
TLDR: cut the feet off zip-up footie jammies and put them on backwards so the kid can't unzip them without help.
I like it. After checking it out on their website I went to instructables to see if I could make one myself, and sure enough this was on the front page lol.
edit: You can get 50 ft of paracord for around 6 bucks (100 ft for $9) on Amazon, so you can make a couple of them for cheap.
What you have here is a high security bolt, shown here:
And here is a link to the key mentioned in the text:
You can make a little square ninja star pretty easily that will fly very far and fast. It takes about 20 seconds to make. They are also a lot of fun to throw at people. Like so
It will easily go further than a ball of paper. Also, it's fun to throw because you hold it between your ring and middle finger and toss it with a flick of the wrist.
/r/sewing ? Maybe you could ask around there. Instructables has some cool stuff. Here's the sewing stuff.
http://www.instructables.com/ Making stuff.
http://www.bodybuilding.com/exercises/ Staying in shape
http://www.economist.com/ Good news err bad
And everyone else has the porn already covered.
While I have not tried it myself, I have seen videos of eggs scrambled in the shell. here is a little tutorial
The ideal way of doing this is to do fading by PWM instead of in analog.
If you're trying to do some sort of RC-like circuit, it won't work properly because an LED will behaves like drastically different "R" depending on the current through it.
edit: maybe this circuit: http://www.instructables.com/files/deriv/FD3/A777/F6B7W7XI/FD3A777F6B7W7XI.MEDIUM.gif
found by googling led fading analog
I truly don't understand this comment. I bought a macbook pro but only because I honestly couldn't find a better alternative.
I looked for a solid aluminum body with a magnetic tip charger (never wanted to deal with this shit), back-light keyboard, 6+hr battery, and a massive mousepad. I couldn't find one anywhere, for any amount of money.
The most overpriced component is memory but the manual gives you instruction on how to upgrade it yourself. And there are some small benefits, like getting the OS discs with your purchase and not dealing with these
I'm probably just feeding trolls and throwing reason in the face of fanboy/hate idiocy, but if there is a $400 equivalent machine (not just a few internal specs), I want to know where I can buy it.
I used this as the starting point. I'v learned quite a bit in the process though, and was thinking about making a more in-depth how-to if people are interested, including where to get some of the materials and mistakes I made that could be avoided. Lemme know if you really want a walk-through, and I'll type one up. :)
Before I started DE shaving I was able to get months out of a single Fusion razor cartridge using the blue jeans sharpening trick. I think I went a year before I used up a full 4-cartridge pack before I switched to DE.
Brand new blades were sharper, but after about a week of shaving and keeping it "honed with blue jeans" it reached an equilibrium where the shave I got was pretty much the same every time as long as I was using it. The main reason I would switch to a new cartridge is because the little rubber bit on the bottom of the cartridge would wear out and start to break apart.
Tineye revealed this: http://www.instructables.com/id/LeGummies-brick-shaped-gummy-candies/
Brilliant idea. With some effort you could remake every build that exists in the lego world out of gummi legos.
This was originally posted on Instructables and reposted by Lifehacker two days ago. Instead of linking to either article, Makanguru uploaded the picture to Imgur without giving any credit to the original source. Fuck you M.A. Kangaroo.
Something like this, except with a wireless mouse.
Would it be hard to create some type of plug and play drivers/software, that allow an option in the 'right-click' drop down menu allowing the user to paste files/folder from a specific location from the built in drive?
This seems like a really dumb idea, but, you know, non-tech savvy people would love it.
My brother and I were also this kid. When he finished one of his AP exams two hours early (and checked his answers twice already) the test proctor wouldn't let him leave the room, read a book, etc. after he turned in the exam. So he built a pyramid out of those jumping paperclips and dropped one on top of the pile from about a yard up. Paperclips went flying everywhere. The proctor called him a little hellion. He got a 5 on the exam. It was awesome.
You could always make one for around $50-70. The process is simple enough if you know a bit about electronics. Here is the best tutorial I was able to find.
Google truecrypt and you'll have plenty of information on almost unbreakable encryption.
there are plenty of gun forums where you'll find books, videos and guides on proper gun handling
Security measures information is everywhere, try some DIY websites such as instructables
And bomb making... well I wouldn't want to make this to easy for you would I?
The point I'm making is that all the information you could possiblly want were you inclined to be a "danger to society" is as easy as googling.
It seems rather complicated, but this would do the trick.
This tutorial seems less tricky, and this stand might work for it.
Saw this on [/r/frugal](/r/frugal) http://www.instructables.com/id/How-to-extend-the-life-of-your-Razor-Blade-keeping/
- Get an old pair of jeans
- "Strop" the blade
- ???
- Prophet!
Been doing this on my mach3 blades and I tend to get at least 6 months out of them and they shave just as good if not better than the day i bought them.
The NES advantage was hands down the best controller for NES imo.
I was so in love with it that I bought the "SUPER NES ADVANTAGE" sight unseen. It was a giant piece of junk. We called it "the factory" & used it to balance games:
Friend: "Not Ryu, I don't want to play against your Ryu"
Me: "How about I take Ryu with the factory?"
Friend "OK, fair..."
I don't quite understand this. Explain please?
edit: Nevermind : http://www.instructables.com/id/Make-a-Passive-Network-Tap/#step1
THIS MASK IS CONVENIENTLY SIZED FOR SILK SCREENING AND TRADEMARKED BY WARNER BROTHERS - they aren't paid when you create 'pop art' by putting it on a bandanna wrapped over your face.
These two instructables will give you a general idea.
This is one on developing film:
http://www.instructables.com/id/Developing-Black--White-Photos-at-Home/
And this is one on printing in black and white:
http://www.instructables.com/id/How-to-Print-BW-Photographs-in-a-Darkroom/
Compiled list of materials from those two (not including the camera)...
Developing tank
Measuring Jug
Thermometer
Developing solution
Fixing Solution (Fixer)
Clothes Pegs/Film Clips
A film to develop
Film extractor (possibly optional)
A pair of scissors
A clock
A negative to print
100% Cotton cosmetic pad
Rubbing Alcohol
A light tight room (Must be well ventilated) (Bathrooms with towels shoved under the door can work well)
Running water
Safe light
4 Trays for chemicals
Enlarger with a condenser head (and bulb)
Paper easel (holds the paper in place under the enlarger)
Timer
Squeegee (Technically optional, but highly recommended)
Drying rack/clothes line and pins
Grain enlarger (optional)
Emulsion paper - doesn't matter much what you use. I prefer fiber paper.
Gloves and apron are optional.
Chemical storage bottles
Developer - I use Kodak Dektol
Stop bath - I use Kodak Indicator stop bath
Fixer - I use Kodak Fixer
Hypo clear - I use Kodak Hypo Clearing Agent
I do that for magnets(which I use for projects like this), but when you need some strong concentrated force, 2 or 3 of those little round ones serves the purpose.
Instructions to make one are here
I was thinking about making one a while ago, there are also specs for one with a rechargeable lithium ion battery and a small solar panel to charge it floating around somewhere
For $10 you can buy a glass gallon of apple cider($6), an airlock and stopper ($3) and some yeast (<$1). In 2 weeks you'll have some hard cider!
Here's roughly the recipe I follow. I dont bother with the yeast nutrients, and I use store brand cider from whole foods. Gotta use cider without Potassium Sorbate, the ingredients will just say "apples". For something a bit sweeter only ferment for 10 days. http://www.instructables.com/id/Home-Brew-Hard-Cider-from-Scratch/
Here's another good link. http://www.instructables.com/id/How-to-make-cider/
Here's the apple juice I use: http://i.imgur.com/GUB0P.jpg
If you plan to make a bunch, home brew stores sell the tool to re-cork wine bottles for like $15 and it's always fun to custom make labels :). Men always like booze and they'll be impressed you made it yourself!
To Americans this is a torch, this is a flashlight. Hence the confusion.
Well, this was yanked straight off of instructables.com. The intent was for people who were hiking and have to carry a lot and help lighten/minimize the load. The smaller packs are easier to pack. The more items you can compress, the better.
I would look at existing designs of laminar water jets. A laminar jet will stand up to distance better. A laminar jet is basically designed to stay cohesive longer because there is little internal turbulence in the jet. Here are some tutorials that may help: http://www.instructables.com/id/Laminar-Flow-Water-Jet-for-Under-25/ http://blog.makezine.com/2008/07/03/how-to-laminar-water-jet/
There's also a lot on the Laminar Project Forum http://laminar.forumotion.com/
Actually, I use the double wrap method I learned from the Klutz Book of Knots. Never slips, easy to untie. I'm not kidding. This knot made every day of my life since a little, tiny bit better. This page has a video: http://www.instructables.com/id/Worlds-Best-Shoe-Knot/
This. Changing your blood type is easy and relatively painless! What you need to do:
Read this book
Then what you'll need to do is build this
After that last step all you need to is watch four seasons of When Things Were Rotten. Only one half season was ever made, ignore that.
And there you have it! Changed!
I hope you're not throwing away those brown bananas. Cut them up when they're brown and freeze them, then throw in smoothies or make two-ingredient ice cream.
If there is maintenance that you can do yourself, do it yourself unless you know you are going to irreparably fuck up. You will save yourself a lot of money and gain some useful life experience to boot.
Trim your damned pubes. If she(or he!) is going to keep their bush tidy for you, you'd best be doing the same. The same thing goes for anything in a relationship. You get out of it what you put into it.
I know skybike said it, but it's worth reiterating. Surprise your SO with gifts! Don't wait until the big holiday to give her a gift, she's half-expecting it and won't be as thrilled as if you gave it to her out of the blue. Also, A good gift can be expensive, but just because it is expensive does not mean it is a good gift.
EDIT: Don't buy gifts so often that they're no longer a surprise. If your SO says "oh I like this", don't go on Amazon that night to buy it and overnight it to her house. That's creepy and she will feel like she is being bought. Note her comments of interest, but don't always act on them immediately.
Strop your razors. I just got done with a disposable razor that I had been using for four months. Every week, I would strop it with an old pair of jeans. It kept my razor nice and sharp until it just wouldn't hold an edge anymore.
If you don't have $1000 to buy an original, you can make your own for under $50, or buy a really nice rip-off for $270.
I was given a Nike+ sensor as a gift recently. Seeing as I don't own a pair of Nike+ shoes I did a little research to see how much they would cost. With everything tailored to my feet and running style I was looking at shoes in excess of $130!
That's not an option so I decided to scour the web and see if anyone had DIY instructions and found a few on Instructables. Go figure that the instructions sucked on each entry so I ended up busting out my Dremel and did it freehand in about 10 minutes.
Descriptions are under each picture and I guess AMA about the process if you'd like! Results are awesome so far, I don't notice the sensor while walking and running and it stays put. Everything reads nominal in the Nike+ app!
EDIT: Link to the Instructable that I used as a template to get the job done. Credit where it's due!
My birthday is in July and all I wanted every year was a watermelon basket, not a cake.
For those who don't know, this is a watermelon basket.
As requested, i'll try and give as much information as I can. But to be honest, I found a plethora of great resources for this build all over the internet.
Items needed:
12v Class T Amp (http://www.parts-express.com/pe/showdetl.cfm?Partnumber=310-300)
12v Sealed Lead Acid Battery (Mine is 9ah, for approx. 8-10 hours of runtime depending on the volume)
Speakers (4 ohm) I used Alpine Marine speakers, but the options are endless.
Box material (MDF, plywood, fiberglass, etc.) I used scrap pieces of 5/8" plywood.
Various lengths of wire, fuses, straping, etc.
Finish (I used rocker guard coating from a spray can. It worked very well and gives a tough looking, waterproof finish.)
Total cost: approx. $80
Here is a great resource for your build: http://www.instructables.com/id/DIY-Portable-Boombox-Audiophile-Quality/
Spend some time doing research and planning to make this project simple and fast.
That link just takes to to their front page. Were you trying to link to this? It's nice that there's a different angle, but taking the photo in a kitchen doesn't turn the mask into a cake. Nosir.
EDIT: Just found more pics of the "cake" here. In one of them he's gone so far as to fill the mask with cake and slice it open. It's pathetic, really.
You can still find him here:
http://www.btinternet.com/~billericay.nw/site/SHEEP.HTM
How to hack him here:
http://www.instructables.com/id/Hacking-Esheep---The-Lovable,-Slightly-Annoying-Sc/
Here is an instructable about screenprinting I made a few years back:
http://www.instructables.com/id/Screen-Printing%3A-Cheap,-Dirty,-and-At-Home/
Try some t-shirts or tea towels or something first, get the hang of it. Then, to do a pair of tights, what I would do is cut out some vaguely leg-shaped pieces of cardboard and stretch the tights onto them before printing. I've never tried anything like that, but I think it just might work.
>However, correct me if I'm wrong...
Sir, you are mistaken.
This is a real thing that is different from a high-DOF picture with fancy processing. "Synthetic aperture photography" or "computational photography" can do some freaky things, like see through obstructions or allow the plane of focus to be selected after-the-fact.
You can even do it yourself with a single ordinary camera, provided you're shooting a static scene.
I second r/Homebrewing as a fantastic resource.
For a basic mead you only need water, honey, and yeast. If you spend a few minutes looking around on Google you can find many articles on harvesting your local wild yeast for breadmaking and fermentation.
My recommendation is to pick up a glass gallon jug of wine or apple juice and enjoy that while you grow up a wild yeast culture. Build a simple air-lock for the jug. Mix up ~3lbs of honey in to ~1 gallon of room temperature water, add the yeast, seal it up in the jug with the air-lock, stick it in a closet and forget about it for a few months.
It's pretty much that simple :)
*EDIT for clarity
Sixth, even scummier
...is that even a word? Eh, whatever.
make your own copier and sell it for profit.
Books for my major is kinda non-existent on teh intarwebz, i had to live with buying used books or borrowing.
You could consider converting an old ATX computer power supply (~$20 from a used computer parts store) into a bench power supply. That's what I did. Here is a useful guide. You can also google 'ATX pinout' to determine the voltage of each wire and wire up additional plugs if you want them. Mine has 12V, 5V, Grd, -12V, which gives me a range of -12V to 24V.
I love repurposing old tee shirts! I have a ton that I get for free on campus, so I like to make them cuter.
This is one of my favorites to do. Make a cuter racerback tank out of a baggy tee (or not so baggy...I made one out of a fitted one!) This one looks a little complicated, but it still looks cute even if it's a little sloppy.
Here's another that's fun for summer. I did mine as a V in the back, I think it's more flattering.
This being said, unless you take a lot of time do DIY (which I have no patience for), the tees come out very casual. Great for gym, hanging around, etc....but nothing quite nice enough for an evening out or something. If you put a lot of effort into something, I'm sure you could make something awesome!
You can refill those.
Disclaimer: I am in no way encouraging dangerous or illegal action, just bringing to OP's attention that it can be done.
So, plenty of comments on the bench legs, all pretty much correct.
Overall, great first table! The one thing I would point out is that the longer cross piece on the table support is secured to the bottom of the cross piece. This may be more comfortable as a foot rest, but it will eventually (probably sooner rather than later) get enough downward pressure from feet that it will become loose or break off of one end. Consider putting a thinner piece (2x4) on the top side f the cross braces, or even better, replacing it with shorter pieces that angle up to the center of the table, like so: http://www.instructables.com/files/deriv/FUM/06M9/GQWFFEGY/FUM06M9GQWFFEGY.MEDIUM.jpg
For that price range, avoid IKEA. They have all the beds out there to test out, and almost all of the ones at that price point, when I sat on it I could feel the slats underneath.
The best advice I can give you is to try out all the mattresses in your price range at a local mattress store. If you can get or build an underbed (Like this one here), you can buy just the mattress itself and not the boxspring, which is usually extra.
Outside of that, I think buying a foam topper for an existing mattress, if you have one, will be cheaper and just as good as a new mattress. I've also heard of people buying two twins, strapping them together, then getting a king topper to cover them. They even have a little foam insert you can place in between the twin beds to stabilize the crack. This works really well if one person needs an extra firm bed (back sleeper) and the other needs a softer mattress (side or tummy sleeper).
Guys, you might want to save this for reference: screw head types.
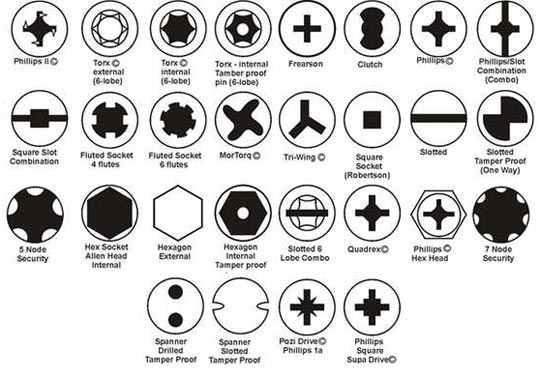
Each screw head is driven by a corresponding screwdriver bit; the combination ones accept multiple types of bits.
In case you want to know more about screw heads this is a very nice writeup.
I used this instructable when I originally learned it. I've been doodling around with the more advanced stuff but everyone seems to want money for those how-to vids. Kinda lame. I've been painting everything I can get my hands on.
(sorry about the video quality -- I used YouTube's editor to combine 3 clips and it looks like it chops everything to 1990's tech when you do that...skip to 1:52 to see a closeup...).
I'm almost done building a CNC mill based on Tom McWire's EasyMill (http://www.instructables.com/id/Easy-to-Build-Desk-Top-3-Axis-CNC-Milling-Machine/). I used some enhancements, like teflon tape to reduce friction, from the RepRap McWire Cartesian Bot (http://reprap.org/wiki/McWire_Cartesian_Bot_1_2_(Death_March:_Do_not_build!!!)).
Most of the hardware is from Home Depot; the plexiglas, threaded rod, and teflon tape are from Small Parts, the stepper motors, Big Easy Drivers, limit switches and emergency kill switch are from SparkFun, the 24V 6.5A power supply is from Amazon, and the Dremel power relay a PowerSwitch Tail from AdaFruit.
Right now it's all controlled by an Arduino Duemilanove interpreting commands from the IDE serial monitor and sending them to the AccelStepper library. I haven't decided yet if I'll add a G Code interpreter on the PC or Arduino, add an LCD, buttons, and SD card reader to the Arduino to make it standalone, etc.
As you can see near the end the AccelStepper library doesn't handle interleaving very well so X and Y don't finish diagonal movements at the same time.
I used a 1/16th" bit (0.0625") and the routed slot varies from .085" to .1" so there's still some vibration that needs to be eliminated too....
Camping foam (the blue kind you lay on) are like $7 for a 2 1/2x6 foot sheet. They can be cut and glued using an exacto knife and hot glue gun, you can make all kinds of crazy shit out of them. Grab some plastidip from a craft store (it's a paint on plastic hardener) and you can add any texture you want then paint it. Walla anything you want.
People do all kinds of crazy things with them:
Some flowers are better for pressing than others. If they're too thick in places (roses, etc) they don't lose moisture evenly, and they begin to rot in the thick parts. However, wildflowers ought to do just fine!
It's best to have a flower press (two thick boards tightly sandwiching layers of cardboard and paper) but you can make do with layers of cardboard and some very heavy books. The basic idea is to lay out your flowers between pieces of paper and then sandwich between layers of cardboard. Then put things on top that will smash the heck out of them and drive their moisture into the surrounding materials, leaving them flat and dry.
This is a great visual explanation of how to do it:
Multiple recipes online. Sent it to one of my friends, she's already planning on making some. Score!
http://www.foodsnots.com/2011/10/oreo-and-peanut-butter-brownie-cakes.html
http://www.instructables.com/id/Oreo-and-Peanut-Butter-Brownie-Cakes/
> I'll point out that a Mobius strip is a mathematical construct, and not something you could make out of a real material.
Then is this not actually a mobius strip?