
What are
/r/Ender3Max's
favorite Products & Services?
From 3.5 billion Reddit comments
The most popular Products mentioned in /r/Ender3Max:


The most popular Services mentioned in /r/Ender3Max:
The most popular reviews in /r/Ender3Max:
Yeah sure, i am in the Netherlands so not sure if everyones able to order the same one but internationally i suspect amazon to have identical parts available just search ender 3 carriage 😊 Link: https://www.amazon.nl/dp/B085LK3JDH/ref=cm_sw_r_cp_apa_glt_i_RBNYYE00S6ZQ79K146FV
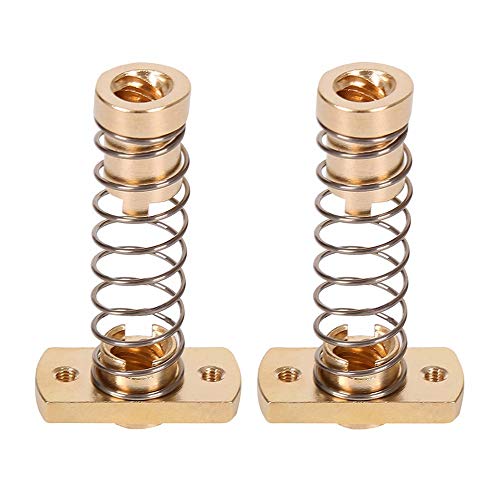
I recently bought the HICTOP Dual Z-axis Upgrade Kit for Creality CR-10 and 2 Pieces of T8 Anti-Backlash Spring nut in hopes to Micro Swiss will update their direct drive kit to support Max fan housing
I had to cut a couple inches off of the lead screw, and I have not had any issues with it
The kit i bought came with two metql brackets for the psu. It allows it to sit just behind the second z motor and had to drill out a hole in the other side to get access to the other screw hole but works. Will take a pic when i get home.
Creality Ender 3 Accessories Dual Z Axis Kit Lead Screw Upgrade Kit for Ender 3, Ender 3 Pro, Ender 3 V2 3D Printer https://www.amazon.com/dp/B08RJDW5W6/ref=cm_sw_r_cp_api_glt_fabc_MATKG7SNED9C6K4ENY4P?_encoding=UTF8&psc=1 is the kit i bought.
Very true! You'll need to print a shroud prior to doing so, but there are plenty out there. Then you could opt for the MGN12H rail with this option off of amazon: https://www.amazon.com/UniTak3D-Upgrade-Conversion-Carriage-Included/dp/B09M73XRBH/
I know about the cheaper extruders but tbh I've heard very bad things and about cheap upgrades in general for 3D printers, I truly want to get one that is great and I wont have to mod for example as I've heard that for some models like this you need to mod it cause the gears rub against the aluminum if not.
I've tried higher temps tho, rn I'm in a long print (has been printing for more than a day and there is more than 50% left) and the tensioner screw was tightened all the way, I thought that would help, just loosened the screw a little and all of a sudden it is better now, does not make a lot of sense in my head but I guess it helped for now. I work from home and I have the printer by my side and throughout the day I head the extruder skipping, now it has been printing for about half an hour and I have not heard anything
Hey, yes, I did buy one BUT got the wrong one. It "fit" but required I enlarge the holes ont the machine. I don't recommend it for that reason. Here's the WRONG one so you don't purchase it: https://www.amazon.ca/gp/product/B07MDH6VV9/ref=ppx\_yo\_dt\_b\_search\_asin\_title?ie=UTF8&psc=1
Temp: 200°
Filament: AMOLEN Glow in The Dark Multicolor PLA
I'm hoping I can get a print out of this, because it's printing. But, I know this issue can't be what it's supposed to be doing. Any reason it may be feeding faster/more than it should for the extruder head?
I lot of people have had good results with the BMG knock off extruders like this: https://www.amazon.com/dp/B07TZ3Z83S
I have one but I ended up going direct drive before I installed it. I used a cheap dual gear extruder for a long while before that. It was similar to this: https://www.amazon.com/dp/B08PBWJW7F
I think the 2 setting you want to adjust in Cura are "maximum retraction count" and "minimum retraction distance". Try not to drop the count too low or the distance too high or you'll get more stringing.
This one, right?
200/60. Been using this stuff exclusively and I love it.
Check your bed level is my only recommendation. Does yours have a self-levelling function? I find a lot of people don't pre-level the bed properly before doing a self-level, and it has to compensate for too much unevenness.
My printers are in my basement, which is sitting at 60% consistently and drying helps with stringing, but I've never had problems with bed adhesion even on old rolls that have been sitting out.
Maybe a good clean of the bed with IPA? Some filaments leave a bit more residue than others, and that might be stopping it from adhering properly.
Honestly when I bought my machine I bought a box of random metric hardware and it works great. Here's the link to the set I bought.
​
You mean the bracket that comes with this? I have it on my ender 3 and seems to work fine.
I got tired of breaking those things because I have bricks for hands so I ended up getting this that just screws right in. Bought one for each printer and it works perfectly. Upgrade M3 Hex Screw in Fixing Thermistor 104NT-4-R025H42G (104GT-2) High Temperature 300℃ for 3D Printer Extruder Hotend Heater Block (104GT-2) https://www.amazon.com/dp/B08YNXZMGK/ref=cm_sw_r_cp_api_i_8QDFRZT8GWGZ1P2193H8?_encoding=UTF8&psc=1
Amazon has a decent bmg knockoff: https://www.amazon.com/Upgrade-Extruder-Transparent-Anycubic-Printer/dp/B094HRCSYF I used this on my Max but used it for a direct drive setup. It’s worked quite well. Just printed some TPU yesterday and it printed really easily.
Befenybay 2pcs 2GT Open Timing Rubber Belt Length 1.2Meter Width 6mm with 8pcs Copper Buckle for Ender 3 3D Printer (Open Belt) https://www.amazon.com/dp/B08P5FYFZ6/ref=cm_sw_r_apan_i_3JV1X4V95QP1PVQ3FQ3X?_encoding=UTF8&psc=1
The 480mm lead screw won't stick so far out above the top frame.
https://www.amazon.com/gp/product/B08H4C24PT
I did use the 500mm though, and it works. Gotta find something silly to print to put on the tip of it.
You need to turn those eccentric nuts really slow. After each SMALL adjustment, try and turn the wheels by hand until they cannot be turned easily.
I love my e3 max but it really should have come with dual Z axes out of the box. Your going to need to pick one up to have much success. Any ender 3 pro/v2 dual z axis kit will work but you'll also have to buy an additional 500mm lead screw. I bought this 2 pack: https://www.amazon.com/gp/product/B0981XVFB6/ref=ppx_yo_dt_b_search_asin_title?ie=UTF8&th=1
Do you have the 4.2.2 board? Or the 4.2.7 board?
If it's the 4.2.2 board, you should purchase the ender 3 V2 color LCD screen, and install Jyers UI. It is massively better than stock Marlin and opens up what you can adjust and makes better prints.
Plug and play LCD:
Creality Original Ender 3 V2 Screen Kit, Intelligent 4.3" Color HD LCD Display Screen Replacement Screen Upgrade Kit https://www.amazon.com/dp/B09SW9LZ93/ref=cm_sw_r_cp_api_i_9MHTD8XVDASDK8JZGJDS?_encoding=UTF8&psc=1
Jyers UI - E3MAX Pre-Compiled .bin file:
Actually you will have to extend the wires on all of those for an ender 3 max. Here is a link to a 1.5m length thermisistor . https://www.amazon.com/SIMAX3D-Thermistors-1-5Meter-Compatible-Creality/dp/B093RVF516/ref=sr_1_7_sspa?crid=2MJ2PNPE6BSX1&keywords=3d+printer+thermistor+ender+3+max&qid=1650324592&sprefix=3d+printer+thermistor+ender+3+max%2Caps%2C182&am...
I got this pack off amazon and have had great results with it, fixed a lot of my stringing issues. Also have printed multiple things with the .2mm nozzles and they work amazingly well https://smile.amazon.com/gp/product/B07L5KJB59/ref=ppx_yo_dt_b_asin_title_o06_s00?ie=UTF8&psc=1
I put this on and lifted corners are gone, no more brims or corner pucks. Prints stick like magnets and if it you let it cool to room temp the prints release themselves. I'm impatient so I lift and flex just half the plate and drop it again and most are loose then. https://www.amazon.com/dp/B09KLFYCQ6?psc=1&ref=ppx\_yo2\_dt\_b\_product\_details
Both the hotend and main boards fans are the same crap fans. These are plug in replacements and are slightly quieter but still loud, but the best you can get in 24v. https://www.amazon.com/dp/B08R9L9YR2?psc=1&ref=ppx_yo2_dt_b_product_details
If you want very quiet you'll need Noctua's and a buck converter to drop the voltage.
These worked for me:
https://www.amazon.com/gp/product/B07NQ2B11H
They were the correct voltage and size for a direct swap on mine. You might want to double check the sticker on your current fans, just to be safe. One caveat with these is wire length, they are rather short. So you will need to crimp, splice, affix connectors, or otherwise deal with that.
As for being better? Well, considering my stock hot end fan was dead less then a month after getting the printer and this has worked the 4 months since, I would say 'yes' :P
Here are the ones I got; the biggest benefit is that they literally NEVER move. They stay solid for so long—I've had mine for like 2 months and haven't needed to relevel :)
I have an Ender 3 max that is perfectly dialed in here are a few suggestions
Get This PEI sheet and slap it on your bed. Then wet sand it down with some 800grit sand paper till you get a nice cream color across the build plate. This will help with adhesion like magic.
Get the Creality auto bed leveling and sleep that onto your printer. This is extremely easy to do. There is already a mount built in for it and all you do is format an SD card, download the firmware for it off the creality website, put it onto the SD card, then pop it into your sender 3 Max and it’ll update and that’s it. Run some auto leveling (there will be a new menu for it) and you are golden my friend!
If you need a profile just pm me. I use prusa slicer with prusament
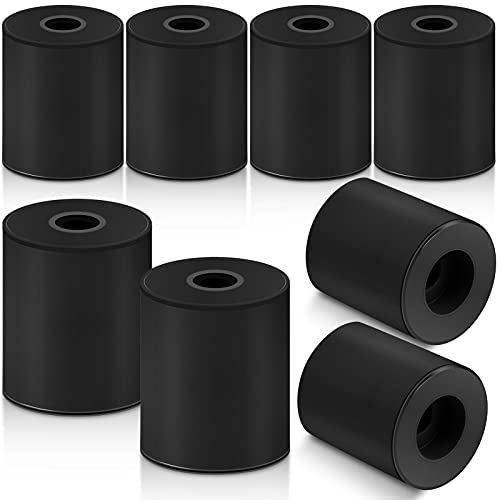
Pretty much anything like this 8 Pieces 3D Printer Heat Bed Leveling Parts, Silicone Solid Column, OD 0.63 Inch ID 0.16 Inch Stable Hot Bed Tool Heat-Resistant Buffer Compatible with CR-10 Ender 3 Bottom Connect, Black https://smile.amazon.com/dp/B093Y89KS9/ref=cm_sw_r_apan_glt_i_F0YJ22Y1N9B0JV1RR38D
>flexible coupler to the z rod/motor
Thanks again for the tips, I'm going to get that one : https://www.amazon.ca/gp/product/B07P6N8CCV/ref=sw_img_1?smid=A3PXMK7WTWSTOW&psc=1
Do you have by any chance links to the prints you used for the right side?
I purchased this about 6 months ago and it's worked great for me since. The glass bed that came with mine was fine but I've always been a big fan of the flexi plate. I installed mine about half a cm from the back since it's just a little smaller than the actual base. https://www.amazon.com/dp/B08Z85TXM6/ref=cm_sw_r_apan_glt_i_MTRHRM31AW5H0ATXXEAS?_encoding=UTF8&psc=1
I modified one I found on Thingiverse, but honestly it isnt a great solution. The arms are to thin and pick up lots of vibrations.
Here is a link to my tinkercad file.
Note 310x320 is the actual size of the Max’s bed
Gizmo Dorks PEI Sheet 3D Printer Build Surface 310mm x 320mm Compatible for CR-10S Pro or Pro V2, Made in The USA https://www.amazon.com/dp/B0866BV7KJ/ref=cm_sw_r_cp_api_glt_i_E2H188BQD7QEZ71SZG67?_encoding=UTF8&psc=1
WINSINN 40mm Fan 24V, Ender 3 Fan Upgrade 24 Volt Fans 4010 Hydraulic Bearing, Works with Ender 3 Pro 3X CR-10S (Pack of 5Pcs) https://www.amazon.com/dp/B0757RPCN9/ref=cm_sw_r_apan_glt_i_RQ56MHR52JYNARGMBVW8
I bought this kit when my hot end fan started to fail. I replaced all the fans. I now have no bearing failure sounds. WINSINN DC 40mm Fan Blower 24V for Cooling Ender 3 / Pro Series, Dual Ball Bearing - 40x10mm 4010 Brushless Turbine Turbo with Air Guide Parts (Pack of 4Pcs) https://smile.amazon.com/dp/B07R97ZSF6/ref=cm_sw_r_apan_glt_i_XFY3DK5DYCZNDJ571MYH?_encoding=UTF8&psc=1
I also have a CR-Touch.
I had similar issues and ended up buying a PEI magnetic sheet. I had no more problems with PLA sticking on the bed!
https://www.amazon.ca/dp/B09DCX6DJK/ref=cm_sw_r_apanp_7j1HgVGoVptjv
There are lots of things to upgrade.
I started with the noisy fans. For the power supply I printed a new cover from thingyverse and put in a 80mm Nactua that's silent. Main board and hot end both got Noctua's running off a buck converter at 13v.
Dual Z kit off Amazon, Z rod is a little long at 515mm vrs the stock 480mm, cut it off or leave it alone. https://www.amazon.com/dp/B07529LXTQ?psc=1&ref=ppx_yo2_dt_b_product_details
CLTouch or BLTouch upgrade is nice.
Some people swear by the PEI magnetic spring steel bed plate.
All metal hotend or an extruder all in one like Mircoswiss, BIQU H2, E3D Hemera, or others.
Linear rails, hard to find complete kits for the Max yet but they are out there. You may have to change the length of the rail as the Max dimensions are somewhat unique. The X is a problem as the hot end plate mounting holes are 44mm apart vrs most Ender 3 series at 40mm. I like the Max dual fan setup and would like to keep it. Wish I had a machine shop.
Mainboard upgrade to all silent drivers and separate drivers for dual Z traming.
Raspberry Pi Zero 2w or better for running Octoprint and talk to your printer via WiFi.
Then there is the firmware upgrade for more functionality like more speed and image shaping, i.e. Klipper. Then Klipper interfaces like Octoprint, Fluidd, and Mainsail.
By the time you get all this done you will be a seasoned 3D printer veteran and will use this printer to print parts for Voron core XY you want to build. Hopefully you're not married.
I actually added CR10 Z axis Anti Backlash Spring Loaded Nut at the same time and have not pushed anything out of sync
u/dragontoller is correct, I installed the HICTOP Dual Z-axis Upgrade Kit for Creality CR-10 on my 3 Max a couple months ago without any issues, and the install is really easy
You will just need to relocate your PSU
If you can return the kit you already bought I would suggest that you do that, I purchased this kit a couple months ago and have not had any issues HICTOP Dual Z-axis Upgrade Kit for Creality CR-10 3D Printer 515 mm Lead Screw 34 mm Motor https://www.amazon.com/dp/B07529LXTQ/ref=cm_sw_r_apan_glt_i_F59YDQ5X4DHMJXSJBBJC?_encoding=UTF8&psc=1
This is the extruder i got from amazon (US) but honestly any full metal extruder like it with the two gears as opposed to the gear and bearing like the stock one should help it. It seems to have a much better time gripping the filament without smooshing and cutting it.
I almost always use a brim, which has largely solved that issue for me. Cleaning up the edges then becomes a bit of a pain but I find it to be a necessary evil compared to corners lifting. I use a de-burring tool to clean up the edges much easier than with a normal blade. Something like this: https://www.amazon.com/AFA-Tooling-Deburring-Blade-Blades/dp/B01L2XR4P2/, though I'm just using a cheap one from Home Depot
This one works on the max: Original Upgrade Ender 3 V2 Adjustable 4040 Profile Y-axis Synchronous Belt Stretch Straighten Tensioner Compatible with Creality Ender 3 pro CR20 Ender 3S 3D Printer https://www.amazon.com/dp/B08DCT6Z65/ref=cm_sw_r_apan_glt_i_7AF8T6TH41F9GM4VBC0A?_encoding=UTF8&psc=1
It is quiet-ish... no super quiet, but quiet enough. My hot end fan was failing, so its hard to compare.
>Do you have the ASIN for the spring you bought?
Any of these type you find that have three 18mm and one 16mm (16 for the back left obviously)
From your selection this one has the better tension adjuster. The extra length will mean it is able to be fitted at the back of the upper extrusion over the short one of the other listing that would need to go in front of the upper extrusion limiting clearance and robbing height if you ever go the direct drive route https://www.amazon.ca/gp/product/B09DC9VR63?th=1
I get pretty much everything off amazon.
480mm is the correct length. Watch carefully for pitch. 8 pitch and 8mm diameter. ReliaBot 480mm T8 Tr8x8 Lead Screw and Brass Nut (Acme Thread, 2mm Pitch, 4 Starts, 8mm Lead) for 3D Printer Z Axis https://www.amazon.com/dp/B08H4C24PT/ref=cm_sw_r_cp_api_glt_fabc_C459G8Y95J80XP52CM2D?_encoding=UTF8&psc=1
Yes they do here’s the one I bought and everything works perfect. HICTOP Dual Z-axis Upgrade Kit for Creality CR-10 3D Printer 515 mm Lead Screw 34 mm Motor https://www.amazon.com/dp/B07529LXTQ/ref=cm_sw_r_cp_api_glt_fabc_SG952DDZ1RTVS66CF7ZT?psc=1
I used this kit, the lead screw is a little to long, but it still works fine. The printer runs amazing after this install (along with the BL Touch) HICTOP Dual Z-axis Upgrade Kit for Creality CR-10 3D Printer 515 mm Lead Screw 34 mm Motor https://smile.amazon.com/dp/B07529LXTQ/ref=cm_sw_r_apan_glt_fabc_66PW87G7FVTPMY89JJ0Y?_encoding=UTF8&psc=1
I purchased this one on Amazon: PEI Magnetic Flexible Heated Bed 310x320mm Spring Steel Plate for Creality CR-10S Pro/Pro V2/Ender 3 Max/CR-X https://www.amazon.com/dp/B09F6NRXMN/ref=cm_sw_r_cp_api_glt_fabc_JF9ZQN92K2HEYPR85ZWP it has a smooth surface, not textured. Whatever you decide on just make sure it’s 310x320
Here you go you have to order the one for the CR 10 so you get the right length lead screw. HICTOP Dual Z-axis Upgrade Kit for Creality CR-10 3D Printer 515 mm Lead Screw 34 mm Motor https://www.amazon.com/dp/B07529LXTQ/ref=cm_sw_r_cp_api_glt_fabc_8EJFHDYGM0T6TBRVNG47
I did it on mine I used this kit: HICTOP Dual Z-axis Upgrade Kit: https://www.amazon.com/dp/B07529LXTQ?ref=ppx_pop_mob_ap_share
And this antibacklash nut: 2-Pack CR10 Z axis T8 Anti... https://www.amazon.com/dp/B08LZ1V56T?ref=ppx_pop_mob_ap_share
The screw in that kit is a little long, but it works fine. I relocated my PSU inside the frame in the rear
Here’s the one I used nothing needed beside the kit. I have one on my ender 3 max.The lead screw is right length. Just make sure you order for the ender CR10 so the lead screw is right length. HICTOP Dual Z-axis Upgrade Kit for Creality CR-10 3D Printer 515 mm Lead Screw 34 mm Motor https://www.amazon.com/dp/B07529LXTQ/ref=cm_sw_r_cp_api_glt_fabc_0NBS1PE0BFCHKC3M5VFV
https://www.filemail.com/d/cqiyhdjhotevmpb here is the filemail link with the firmware and the STL file for the cr touch mount
​
EDIT: the filemail says Ender 3, but it is indeed for an Ender 3 Max
On my experience, I was able to install theHICTOP Dual Z-axis Upgrade Kit... https://www.amazon.com/dp/B07529LXTQ?ref=ppx_pop_mob_ap_share and added the anti backlash nuts 2 Pieces of T8 Anti-Backlash... https://www.amazon.com/dp/B091MZTCL9?ref=ppx_pop_mob_ap_share and have not had any issues, maybe the anti backlash nut helps
I ended up getting this one, but it didn't really fit my requirements, so I ended up just getting a Printermods MDD backplate!
So, you're saying I can buy this Ender 3 V2 Intelligent Screen Kit flash the firmware and still be able to use my runout sensor, bltouch and no issues with my 4.2.2 board?
From what I can tell as long as you have the updated 4.2.7 board you can use the v2 screen. You can get upgrade kits on Amazon. That listing has the board, the touchscreen, and BL Touch combo options but just search around and find what you need. A link to the firmware should be included but it looks like the default 4.2.7 firmware should recognize it.
One thing to note while I was looking into it however is that if you do upgrade the screen you might not be able to modify the firmware for it since it's proprietary? I haven't done the upgrade myself so I'm not sure if that's true or not but hopefully this at least gives you a place to start!
I would do static bed mounts (https://www.amazon.com/dp/B093Y89KS9?ref=ppx_pop_mob_ap_share)
You will need 2 t nut and 2 10mm or 2 12mm m4 bolts so you can move the z stop. Also set the z offset to 0
This should make it perfect but you might still need to use a glue stick. If that does not work you should get a bl touch and if the bl touch does not make printing perfect WITHOUT using a glue stick then your glass bed probably needs to be replaced.
I just did static bed mounts, with them you do need to move the z stop down a bit so you will need a t nut but it has made bed adhesion not an issue. After I did the static bed mounts I have not even had to use glue on the bed while printing pla/petg
Looking into a kit like this which seems to be reviewed as compatible with E3M
​
How does this work? Does it simply duplicate the Z axis stepper motor signal to another identical drive? Or is there some other automagical way that the two motors drive in sync?
Pi powering the board. I did not like that either. Amazon has this: https://www.amazon.com/PortaPow-USB-Power-Blocker-Only/dp/B0937B95QK It's easier than taping the power contact. One of the 3d printing shops sells one of these too.
I've had a max for a couple of months. After some persuasion it has agreed to give me good prints. I'm still trying to fix the sensor though.
MakerHawk 40 40 10 Fan 24V Hydraulic Bearing Brushless Cooling Fan RGB LED DC 4010 40x40x10mm 0.05A for 3D Printer, PC, Case, CPU https://www.amazon.com/dp/B08FR4DV4G/ref=cm_sw_r_cp_api_glt_fabc_35K40FX1ZKDBEHFSF3WM?_encoding=UTF8&psc=1
It turns out that the included test filament and bed leveling was to blame. I was using the test filament that came with the printer, and I realized it wasn't always perfectly 1.75mm thick.
I just switched to a better filament (not anything super special, just cheap Voxellab PLA) and it printed much better.
On the topic of bed leveling, I couldn't figure out how to use my ABL until I got a new firmware and wrote more changes in the starting gcode (included M500 just to be safe)
I MAY have fixed it on purpose or by accident. I changed ALL of the wheels on the X axis including the Hotend wheels with these:
https://www.amazon.com/gp/product/B092MMFZ6G/ref=ppx_yo_dt_b_asin_title_o02_s01?ie=UTF8&psc=1
They either fixed the problem or by me changing them I put 'Something' into the right adjustment. So far the last couple of prints look much better. There may be a 'Slight Hint' of the issue. But you have to turn the part at an angle and during certain angles you can see a faint hint of the picture above. I will keep you posted if anything changes...
I used this Amolen wood PLA, I used a larger nozzle (0.6mm) and printed it at 210 with the build plate at 50 and print speed of 50 (wall and top/bottom of 25). I had to set the retraction distance to 0.8 and the retraction speed to 15.0 (it tends to break or grind away when it's pushed back and forth a lot). I was printing at a layer height of 0.28.
I got a set for my MAX and they work well. I did have to add some WD-40 to smooth out some grinding in the bearings which left layer lines. It came with little instructions. I'm also interested in the dual z lead screws. Anyone have a link for that? Ender 3 MAX Linear Rails
I think as long as you get a board with 5 drivers you can do the g34 z. Im going with the SKR E3 Turbo board and putting dual z on mine with a generic kit. I believe it does the other items your trying to do but unsure on the linear advance. Cheers.
I got the 60mm.
https://www.amazon.com/gp/product/B009NQMESS/ref=ppx_yo_dt_b_asin_title_o06_s00?ie=UTF8&psc=1
I had to print an enlarged housing that I found on Thingiverse.
Pretty happy with it.
HICTOP Dual Z-axis Upgrade Kit for Creality CR-10 3D Printer 515 mm Lead Screw 34 mm Motor https://www.amazon.com/dp/B07529LXTQ/ref=cm_sw_r_cp_api_glt_fabc_FJ2P0PJH0REYWZPHNCKM?_encoding=UTF8&psc=1
This kit is a little longer than the max so you’ll have a bit poking out the top one side, but it does work.
Hi! I ran into a similar problem as you I saw everyone on r/ender3 raving about the Capricorn tube so I bought one. I bought my printer used however so when the printer came in I tried installing the tube but the coupler (thing that holds tubing to extruder) wasn’t there. And wasn’t taped to accept the coupler that came with the Capricorn tube. What your missing should be a little black plastic piece that slips into the slot where the coupler should be once you slip that piece in put Capricorn tube in as far as it will go and then put the blue little C shaped piece on the black plastic piece that sticks out. The printer I bought didn’t come with the blue or black piece so I bought thiskit. sucks I had to waste that much money for two tiny pieces of plastic I could’ve printed if my printer was working but it is what it is. Good luck hope this helps. P.s. before you ask apparently this extruder is better that one with an actual coupler because there is no gap between the metal piece and the coupler which is why i just replaced it and it’s fairly cheap.
Here is one I was planning to get for my max here soon
FYSETC 3D Printing Buildplate Steel Spring Sheet Bed Printing Hotbed Parts 300x300mm/11.8x11.8 inch Steel Plate with PEI + Magnetic Sticker B Surface for Lulzbot TAZ 6 https://www.amazon.com/dp/B08C77H5JZ/ref=cm_sw_r_cp_api_glt_fabc_7FBG0FKEEXE5H3GTARXJ