
What are
/r/centuryhomes'
favorite Products & Services?
From 3.5 billion Reddit comments
The most popular Products mentioned in /r/centuryhomes:


The most popular Services mentioned in /r/centuryhomes:
Ecosia
Ancestry
Photopea
Sweet Home 3D
Autodesk Homestyler
myNoise
Open Culture
The most popular reviews in /r/centuryhomes:
Dropping my story to maybe save you some headache down the road. I had a very similar door knob on my front door when I moved in that was broken, so I had to replace it for safety concerns. It’s a “mortise” style door knob and lock, there essentially is a giant single mechanism inside the door. Converting it to a new lock was pretty difficult, but looks like you might be able to replace it with a new version of a mortise lock.
Ah ok, well then someone has essentially closed off the fireplace,and since ventilation needs to be provided to the chimney to avoid moisture collecting on the soot and smoke deposits within the chimney and forming damp areas, they built an air-brick structure, while maintaining the decoration of the fireplace.
I think if you could get that panel open, you might see an air-brick set up, that allows for the draft you are feeling, but isn’t a “fireplace” anymore.
If you really want to see what is behind that panel, get the flexible camera scope tool, (that you hook up to your cell phone), and feed it through that vent. They are pretty cheap on amazon, like these.
I have a house built in 1904. I found the original deed and even some documents on the original mortgage. My search started on Sandborn maps, which I had to use many times in NYC for work doing research on property lines vs deeds. The other place I used, that surprised me, was ancestry.com. You can find census records and in my area they are done by street and house number with the names of all those living in the home. That lead to many more discoveries.
You might want to leave the carpet on the stairs for now, until all/most of the upstairs work is done. The carpet will protect the stairs while you're lugging tools and supplies up and down.
And take a look at Sweet Home 3D, it's free and will let you redo your floorplans accurately.
Great point, but you can get a perfectly serviceable endoscope on amazon for 20 bucks. I got this one and I've been very happy with it.
What about “interior door key”? The screwdriver part works on modern knobs, but the handle part is bent such that it might work on yours.
If you decide to strip it, get a set of scrapers designed for just this job. You can get a handle with a variety of different shapes or buy them separately. Something like this-
Yes, people can be dumb about windows, they probably still work fine! The sash cord you need is the one with red diamonds: https://www.amazon.com/Samson-Rope-001016001060-Spot-Cotton/dp/B002C3NBDQ
It's actually pretty easy to restring a window, especially since you've still got the weights in there attached to the other end. Once you get a hang of it, you can do it pretty quickly.
ENEACRO 1-1/4 Inch SDS-Plus 12.5 Amp Heavy Duty Rotary Hammer Drill, Safety Clutch 3 Functions with Vibration Control Including Grease, Chisels and Drill Bits with Case https://www.amazon.com/dp/B07ZQY2XVQ/ref=cm_sw_r_cp_api_i_Ve5JFbB33A8N7?_encoding=UTF8&psc=1
Thank me later.
Since the house was built in 1871, it likely has a foundation made with limestone mortar. Which means you might get seasonal water leaking (our 1891 Farmhouse in Maine did during the spring thaw). This wasn't too much of an issue- as long as the floor is sloped towards the sump pump/drains and you don't keep anything directly on the floor itself (we did metal shelving whose bottom didn't need to be right on the ground (we used edsal's industrial welded steel framed shelves) and a couple metal/plastic Dunnage Racks (same kind restaurants use to keep stuff off the floor) for things like the bags of salt our water softener needed).
Check if your basement has any additional steel/wood beams to support the floor- you want to make sure they aren't slanted and still in good shape (not rusting/decaying).
"Renovating Old Houses" by George Nash is a good resource.
Edit: added link.
Find a nice credenza that matches the space and use something like this on it. We have one cause we have ship lap that won’t hold a TV, and it’s barely noticeable.
Universal Swivel TV Stand/Base... https://www.amazon.com/dp/B07MT66CH1?ref=ppx_pop_mob_ap_share
I only learned how of these the other day. I went to a new friend’s house and she had this one. Artscape Magnolia Window Film 24" x 36" https://www.amazon.com/dp/B000Q3QWRG/ref=cm_sw_r_cp_api_glt_fabc_Q655E5DKHFKSS7CBT47P
I thought it was really nice looking, and I just assumed it was real stained glass. You can also get something more simple, that’s just frosted, for privacy. I can’t say if it’s easy to remove, but people might mention that in reviews if you choose one. There’s tons of different options. Wayfair had nice, but more expensive ones. 3M makes them too.
I started this project last year but paused it based on other work. I was using a box cutter but it’s too flimsy. I bought a special window tool, like this, which seems like it’d work better: Hyde 45200 Window Opener https://www.amazon.com/dp/B00PD9FIP0?ref=ppx_pop_mob_ap_share
Good luck with this project, it's great to see it being preserved and restored instead of being torn down for new construction! I grew up in the area, I know how unlikely it is to be practical to buy land there for the donor building, but maybe there's some possiblity of finding a barn someone wants removed somewhere between the Hudson Valley and the Capital Region? I used to watch Barnwood Builders on Discovery, but I don't remember if they ever disclosed their methods for finding the donor buildings/barns they harvested.
When you're ready to take a break and let your muscles recover, I think you might enjoy this book: Hudson Valley History and Mystery
Please update us on your progress!
This is a photo from We Got Steam Heat by Dan Holohan. Totally essential book if you’ve got steam heat. It will change your relationship with your heating system.
If it's just like one spot, you can try white vinegar: get the floor really, really wet with the vinegar, and then wet some paper towels with the vinegar and leave them them on top of the spot for several hours. Let it dry naturally, and sometimes the cat smell will evaporate with the vinegar smell.
As someone else mentioned, you could also do the same thing with an enzyme cleaner. I like this brand.
Obviously, you risk damaging your floor (though mine did fine), but it's something to try if you're at the point of thinking about getting rid of your floor or doing a major refinish anyway.
I have some cleaning suggestions in case this is helpful. Unfortunately, I'm not sure how to fix cracks. I have the same floor tile as you and pink tile walls and have grown to just love the cracks and accept the flaws.
For the floor, I got really great results with getting the tile to look cleaner by first deep cleaning with a scrub brush (like for dishes) + floor cleaner and then scrubbing the heck out of it with a magic eraser. I might have even used soft scrub but this was a long time ago at this point.
Our tub was disgusting and had a terrible paint job over it. Getting it reglazed was 100% worth the cost. Did that 7 years ago and it's holding up extremely well and it's our main bath so it's used a lot. Just a few small chips from our detachable shower head falling off the hook. For a gentle cleaner, I use dawn soap + vinegar or scrubbing bubbles spray and wipe with a soft cloth.
I clean the tiled walls with windex to give them a nice shine and makes a huge difference.
This stuff is AMAZING when it comes to cleaning silicone grout. I had some tough stains and it whitened everything up. It doesn't drip so you can easily use it on a painted tub: https://www.amazon.com/dp/B08CR4ST1G?ref=ppx_pop_mob_ap_share
I actually just refreshed the silicone around my tub. I followed a YouTube tutorial from See Jane Drill and used this silicone tube: https://www.amazon.com/dp/B0000DI7XA?ref=ppx_pop_mob_ap_share
This smells awful so keep a window open and turn on the vent. It was super easy to work with and the finished result looks great!
I've just gone through this, and bought these to go on two fake trees on the front porch - https://www.amazon.com/Christmas-Operated-Waterproof-Automatic-Decorations/dp/B07H77JZ9S (warm white)
I was concerned they would be really dim, being battery powered, but they seem fine. I am still waiting to see if they use a lot of batteries. They have some solar options as well.
I have an outdoor outlet in the back and did not want to run an extension cord around to the front. Getting an outlet in the front is on the list of things to do.
We got this summer infant one for the stairs in our house.
Summer Deluxe Stairway Simple to Secure Wood Gate, 30-48 Inch Wide https://www.amazon.com/dp/B00L2BMPRW/ref=cm_sw_r_cp_api_i_bPoEFb4N82E1H
It’s not quite as dark as the wood on the stairs but blends nicely and we got a thing so we didn’t have to drill into the bannister.
> The set screw (the screw on the side of the knob in the brass bit) recommendations are correct, however if the knobs wobble at all the threads in either the knob or the stem it’s on have worn away. The only real solution is to replace one or both
That's what I thought until recently. The spindle is relatively easy to replace. The knobs don't have to be replaced however. You can buy a replacement spindle and a set screw that is smaller than the set screw for the knob, but correctly sized for that spindle. You screw the set screw through the knob (it doesn't even engage with the knob's threads) and all through the spindle until it pushes through to the other side of the knob. Then your knob will be on tight and the only threads you have to worry about are on the new spindle.
https://www.amazon.com/gp/product/B07DM8DG1B/ref=ppx_yo_dt_b_asin_title_o02_s00?ie=UTF8&psc=1 - Until I moved in here I would say no. But it has come in real handy now. Not the best but at least it works.
An example would be our kitchen. When I pulled a tile off above it was a HUG mess. All I could feel is cold wind hitting me. Grab the cam found the biggest cold spot was above the lowered ceiling coming from the hall way. So I did the same in the hall way and it pointed me to the first floor bath room. In the bathroom when they ran the pipes for the bathroom above the one on the first floor it look like they put it in with a chain saw and was poring cold air in. But the first floor bathroom was warm all the air was headed to the kitchen before it came out into the living space. With out that cam I would prob never of found it. (you would have to see the size of the kitchen) LOL
The cam is moody, hard to use some times, and requires a iphone. Still beats trying to use the back of your hand. :D
i hear you. but i would instead scrape the paint near the cracks, vacuum them well, then put in some Liquid wood epoxy, wait 2 hours, then use the woodepoxy with a putty knife pushing it into the crack.
https://www.amazon.com/gp/product/B00JWRLO7A/ref=ppx_yo_dt_b_search_asin_title?ie=UTF8&psc=1
it will harden up stronger than the original wood.
sand, repaint, good as new.
Unless they stairs are poorly built, and creak a lot, that is what i would do, and save the money to go on a nice trip to the Florida Keys!
Do not forget, a skilled carpenter will cost you a lot too, and its not the sort of DIY job unless you have done a few staircases already. there are important tricks to get it all to fit without hideous gaps.
Congrats!!!!! Now begins the best years of your life!
That looks like some kind of adhesive that was on someone’s shoe. There are big strong flat scrapers that work great. About 4” across with razor sharp edge. Also there are adhesive removing sprays.
Beautiful floors by the way! Is it oak?
Please consider using the traditional solution - Picture Rail molding.
Install picture rail molding throughout your home, and then you can hang, move, . . . pictures at will. You wall will thank you, and you'll hang a lot more stuff on the walls because it makes it so easy.
In case picture rail is new to you: Example of Picture Rail (buy it from a real lumber store)
I’ve used this stuff called BioClean. https://www.amazon.com/Bio-clean-Drain-Septic-Bacteria-2/dp/B001N09KN4/ref=mp_s_a_1_5?crid=2PJQ4653E800Y&keywords=bioclean+enzyme+cleaner&qid=1670423516&sr=8-5
It’s for septic tanks and drains and the like, but it’s made of friendly bacteria that eats the organic material which causes the smells. I discovered it after much searching on line. Products like natures miracle claim they do what this stuff does, but this stuff actually works. Natures miracle was bought out many years ago and they no longer use live enzymes or bacteria
The way to use it for your problem is dissolve it in water, in little batches, and then pour it over the offensive wood. You have to mix up enough to really soak into the wood. Let the mixture go exactly where the pee would’ve gone. Let it soak in for a couple hours, until it dries. You will see it change a little as the bacteria eat the stuff. Vacuum it up. Rinse it with water and immediately use a shop vac to suck it up. Be really thorough. Let it dry. Then repeat the process several times. It will take at least 2 days for the whole process, but most of that time is drying time.
It’s great for areas like this closet because you want it to soak in, you don’t have to try to get in their and scrub. The bacteria does that work for you.
I would expect to go through the entire $50 container on this job.
After it’s all done and you’ve done really good shop vacuuming and put a space heater nearby to help it all dry out, THEN use the BIN sealer if needed.
Before I clicked on it, I was thinking your link would be one of these. We had one in our bathroom when I was a child in the early 70's. I'm stunned they still make them. Ours usually had my dad's blue aluminum cup in it, like the one in this picture.
It’s literally just the 1800’s version of one of these.
I've used these for smaller objects Wing Nut Bolt and you can get them Home Depot, amazon. all over fairly cheap.
The Snap Toggle are great for shelves and heavier things.
For really small frames, I've had success putting a small screw into the lathe boards. Using a small pilot drill to locate the lathe vs the keys (gaps between lathe boards) and then just gently screw in and hang off of that. I wouldnt use nails here because you dont want to push the lathe back and snap keys off. If you know where your studs are, those are find to nail into.
We have scary narrow, slippery stairs so I bought these (mostly) clear non-slip treads. They made a huge difference and are overall pretty invisible. Also they keep the dog from falling down the stairs.
Yes, I have removed them and there is no residue. They are almost like window clings, not like post-it notes.
CELION 15PCS Stair Treads Carpet... https://www.amazon.com/dp/B09L18H6KZ?ref=ppx_pop_mob_ap_share
We used these on all four of our staircases:
CELION 15PCS Stair Treads Carpet... https://www.amazon.com/dp/B09L18H6KZ?ref=ppx_pop_mob_ap_share
Here are pics of two staircases:
They achieved exactly what we wanted. No more slips and falls. They are not permanent, but they stick pretty well. If you pull them up, you can clean the side that goes against the wood and they will stick well again. I recommend them.
I am a carpet hater so I got these https://smile.amazon.com/gp/product/B07X4TW3FH/ref=ppx_yo_dt_b_asin_title_o00_s01?ie=UTF8&th=1 they work great, I installed them a year ago and they are still perfectly stuck in place even though I have dogs. They've probably saved our lives multiple times already. I can run up and down in socks!!! The only concern I have is they might be really difficult to remove but that's a problem for future me. You can see them especially if you know they're there, but they are mostly transparent. I have light yellow wood floors, not sure if they will be as invisible on dark finish wood.
There are carpet pieces that stick on the treads - they aren't taped down. They have the same sort of grip that cling wrap has. We used them on our stairs after my sister fell down the stairs holding our daughter! They were cheap, easy to put on, easy to clean, and were easily removed years later with zero damage to the polyurethane underneath. I didn't want to install a runner or anything else not easily reversible. These were the ones we used. https://smile.amazon.com/gp/product/B07DR57GDR/ref=ppx_yo_dt_b_search_asin_title?ie=UTF8&psc=1
Krylon makes a non skid spray. I would do some research on the effect on such high gloss finish. But this is used in outdoor snowy climate all the time.
I think old floors are worth saving and these will turn out great (but I'm not an expert). I'm pulling carpet right now and have really enjoyed pulling staples with this puller instead of pliers: https://www.amazon.com/dp/B000X8U4KU? [links out to amazon, Swingline 37201 Heavy-Duty Staple Remover]. No hand cramping for me, though your mileage may vary. I'd also advise paying for a decent pry bar/trim puller. You can get the carpet tack off with any nu ber of tools, but buying/renting/borrowing the right one sure makes the job more fun.
The game ends when there are no holes into your house. Achieve exclusion.
We have a circa 1990 townhouse and studfinders are useless for us. To hang a 40 lb wood-frame mirror, I drilled into our plaster and used these heavy duty anchors: https://www.amazon.com/gp/product/B08KZR4K1M/ They are similar to toggle bolts. Using these, the plaster alone is strong enough to hold. (We broke one and lost a couple others in the process.)
That's for a full lockset for a front door, with a fancy handle and stuff. Or you WAY overpaid. A simple deadbolt like this, with the smartkey system that lets you re-key the lock yourself, is $16. So yea, I suppose it depends on what you get, but if you get what OP has, it's $16.
doors, i use kerf bulb weatherstripping. it can handle warped or ill fitting doors.
https://www.amazon.com/gp/product/B07GTB32NH/ref=ppx_yo_dt_b_search_asin_title?ie=UTF8&psc=1
​
it comes in differnt bulb sizes.
for windows, i use that on the bottom of the sash too, but spring metal weatherstripping on the side edges.
is the porch unheated, and you need better insulation?
i like kerf bulb type of weather stripping for doors like that. if you notice, the gap between the door and frame varies, and the door seems a little bit tilted too. the kerf/bulb silicone weatherstripping will handle this much variation.
https://www.amazon.com/gp/product/B07GTB32NH/ref=ppx_yo_dt_b_search_asin_title?ie=UTF8&psc=1
​
add a door sweep at the bottom, and away you go
Oh I know, that's why I apologized for hijacking your comment.
As for my pterodactyl, no, he comes with me everywhere
if you put rockwool up against the roof without a thermal break condensation will form and mold will follow shortly. Closed cell spray foam gets recommended because its a thermal break (no need to worry about condensation forming) as well as a good insulator. if you go with rockwool you'll need to create a air space from the eaves to the top of the roof.
use something like the below then put the rockwool up.
You'd be 100% correct. But I'd add one additional step. If you do create a moist/damp environment between the concrete and the foam, you may want to take the step of killing and controlling any spores that happen to be there. You may want to look at Concrobium.
https://www.amazon.com/Siamons-International-025-326-Concrobium/dp/B000UVGHQK
Sold all over. Even Walmart has it. Mist the walls before the foam goes up. Should keep things under control.
They were constantly eating holes into my house. I fought them and made expensive repairs for years.
Finally, I bought a couple of these and baited them with peanut butter.
https://www.amazon.com/dp/B00K6JKVK4/ref=cm_sw_r_api_i_2Z98EB9YTBP0EYFGVAJ0_1
After the squirrel genocide was over (9 squished squirrels later), I had a good 5 or 6 years of peace.
We have a bike rack that mounts between the floor and ceiling just with pressure, no drilling required. It's sort of like this: https://www.amazon.com/Bikehand-Quality-Bicycle-Parking-Storage/dp/B00FLTZ6AO
Maybe something like this would let you mount the TV close to the wall at any height without needing a piece of furniture to set it on.
Seeing the type of radiator you have, single pipe steam heating, I'm going to recommend a book.....
It helped me a great deal with my system.
I can confirm. Liquid gold lives up to it's name.
Apologies in advance if this breaks any sub rules, but this is the link I have to get it on Amazon https://www.amazon.com/dp/B0795P3F7X?tag=mirth-20&ref_=cm_sw_r_apan_dp_RYAZ09PFY45PSWKXRNY1
they DO make a prefabricated "hatch seal", that allows you to get up in there.
i do not do that because my HEPA vacuum is dry only. once it is sprayed, i could not vacuum it up.
test it first. if it is not lead paint, just scape away!
I've had good luck with these Irwin SPEEDBOR auger bits for routing electrical/network cables through beams and studs. My 12v drill could not handle it, but upgraded to the 24v Kobalt drill/impact driver combo at Lowe's and it's been pretty smooth sailing.
I can't stress this enough: back the bit out frequently when boring through a beam. You'll burn your drill out or break a bit easier if you're fighting all of the wood chips.
it is HIGHLY unlikely that Toll Brothers would have used a lead painted door in 1999. too much liability.
but if you are concerned, why have you not tested this paint for lead???
​
if i were you, i might try out something like this:
https://www.amazon.com/Krack-Kote-Repair-Drywall-Plaster/dp/B014VI5TRA
also, if that is soft gypsum board, drywall screws on either side of the crack might keep the board from falling/moving. the trick is to find some wood to screw the drywall screws into!
Those are amazing OP! If you want to make them shine a bit but keep the aged patination you could apply a product like Renaissance Wax to protect the metal :)
does not mean anything.
i would get a three prong tester and test every outlet in every room.
if you are lucky, they check out. This is all you need:
​
Yes, so far I have only read the first chapter, but it's very informative. It's calledA Building History of Northern New England.
if the trim on the jamb is thin, you might pick up the latch plate half way up with a magnet on a string or a metal detector.
these things are pretty handy in old houses, for finding metal, like buried nails:
​
Two tools that will be paramount to your efficient success in this endeavor.
tool number 1 and the best tool for the job
tool number 2 and one of my favs to just have handy for every project
you probably have already learned this, but find EVERY nail.
get a powerful small magnet on a string, and drag it along the board surface to find nails.
also these help a lot too:
​
planer blades are very expensive.
also you probably noticed that a big planer will NOT take out a bow/cup in a floor board. that is because the intake rollers temporarily "flatten out the board", so the cutters do not improve it. I use a small hand-held planer to take down the high middle of a board, then flip it over and take down the high two edges. THEN i pass it thru my big planer machine.
This might be a good book for her to get more general knowledge of historic architecture in GA. I haven’t read it. https://smile.amazon.com/Guide-Architecture-Georgia-Tom-Spector/dp/0872498565/ref=mp_s_a_1_1?crid=1VVG1SE3OE3WV&keywords=The+Guide+to+the+Architecture+of+Georgia&qid=1661381062&sprefix=the+guide+to+the+architecture+of+georgia%2Caps%2C2...
I have an older edition of this book and it is helpful for me because houses built by regular people hardly ever totally conform exactly to the definition of one style. https://smile.amazon.com/American-Vernacular-Buildings-Interiors-1870-1960/dp/0393732622/ref=mp_s_a_1_1?crid=2DY6OAAPFRYJJ&keywords=american+vernacular+buildings+and+interiors&qid=1661381314&sprefix=american+vernacular+buildings+an%2Ca...
This is my bible on the topic: Renovating Old Houses: Bringing New Life to Vintage Homes (For Pros By Pros) by George Nash - can go wrong with this as your reference.
https://www.amazon.com/Renovating-Old-Houses-Bringing-Vintage/dp/1561585351
I reattached more plaster than any sane person would consider doing with these.
I had (and still have) no idea what I was doing, but I then mudded/taped/mudded, skim coated the entire room, sanded, primed, and painted. Totally looks like a DIY job, but it has held for more than five years...
I know from the house sales around me that the place will be completely gutted when I sell it so the improvements I make are really just for me. I try to make the house nice to live in, but I try not to spend much money on things that will have no effect on the sale price, which except for the roof, is pretty-much everything...
This. If you use a drum sander on pine, it rips off 1’ long splinter shards everywhere.
An orbital floor sander with moderate grits and lots of sandpaper changes (far more gentle, and lots of passes) will definitely restore this floor to bare wood.
Then I’d finish with a nice water-based poly (I love Bona Sealer, followed by a light buffing with a square buffing machine using 150 grit mesh screen, followed by 2 coats of Bona Traffic HD) and it will look AWESOME.
Make sure to have a good dust collecting vac hooked up to your sander, put some box fans blowing out in those windows when sanding, and feel free to use a construction air cleaner like this and dust won’t be too big of an issue.
I love those little WEN air cleaners. I have one running in every room during a whole home reno. Well worth the $100 they cost.
That would be an easy fix. Just tap into the nearest water line https://www.amazon.com/Watts-K-1-Polyethylene-Icemaker-25-Feet/dp/B000BQUF44
I recently bought a water powered backup pump after I redid my sump setup. For every 2 gallons of water pumped out, it uses 1 gallon of water from your water line. Between this and a battery backup I have on the pump, I feel like ill be okay.
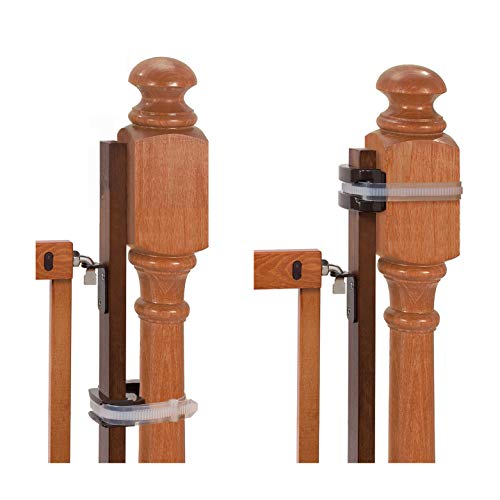
We did something like this but instead of zip ties we found these metal brackets at the hardware store. No idea what they are called but look something like this https://www.amazon.com/WEBI-Stainless-Mending-Bracket-Joining/dp/B01HGT9NEG but with just one hole on each end. Used those with some large screws and bolts to hold a 4x4 in place against the existing ballister, then screwed the baby gate into that instead of the nice woodwork. Didn’t look super but also not horrible and it was temporary. When our child got older we were able to remove it with zero damage.
I see you’ve already received plenty of helpful comments, but I’ll just add my 2 cents in case it can be of anymore help: We have the Hauck pressure mount gates, and they’ve held up well to two boys aggressively pushing against it trying to get it open in frustration. We only have them at the tops of our stairs, and that may be enough depending on your child’s personality/temperament. My kids definitely explore but have always been cautious about stairs, so I haven’t felt the need to install them going up the stairs.
Gate link You can also get Y adaptorsthat hook onto your baluster for added stability which I very highly recommend.
this is what you need
Same boat. I ended up using a small hole where the cabinet would cover and put in a camera from my endoscope. Gave me an idea what was in the wall and where the studs were.
I couldn’t find my exact model.
My daughter painted the risers a slightly lighter color than the treads and that gives enough contrast to help navigation.
At our house we used individual carpet treads:
Runner treads
https://www.amazon.com/gp/product/B07RGC5VLM
Tape to hold it down
https://www.amazon.com/gp/product/B0141L81GS
They have been installed for a year and have stayed in place.
My sister has a 3 year old and a 3 month old and she has these over the radiators in her house from 1890. She's never had any issues/incidences with them.
​
I used my grandmother's upholstery tack remover with paint stirrer to remove hundreds of nails tacks and staples in my floors when I got my house - best tool ever
like these https://www.amazon.com/Lifter-Staple-Puller-Remover-Screwdriver/dp/B0828XDBCK/ref=pd\_lpo\_3?pd\_rd\_i=B0828XDBCK&psc=1
I suggest you spend a few hours experimenting with a nail punch and hammer and variations. One variation would be to use a slate removal tool like and cut the top off the nails then set the remaining piece a bit down into the wood With a nail punch.
you hook the nail with the end bit and then hit the vertical edge back towards yourself with a hammer to cut the nail off.
Yes! Get some household canning wax and rub it everywhere the wood comes in contact with other wood.
You can use a white candle, but canning wax comes in blocks about the size of a stick of butter. With the square edges you can get into corners.
It also works for wood windows.
I live in a similar age house surrounded by a 300-acre wheat field, mice are a constant problem for us. Here's my advice:
These are the best mouse traps. You can also get them on Amazon. Just dab a bit of peanut butter into the reservoir, it's almost impossible for them to eat it without setting off the trap.
The best method I have found to catch a LOT of mice is to set out traps in several locations, bait them but DO NOT set them. Do this for several days, re-bait them as needed, the mice get accustomed to a free meal at the trap each day. Then, one day, bait and set them all, and you'll get a mouse in every single trap.
I have absolutely no idea what I’m talking about or any experience whatsoever, but I’ve heard they use Renaissance Wax to restore or protect paintings in museums… may be worth looking into?
https://www.amazon.com/Renaissance-Wax-Polish-200-ml/dp/B0012S1XBO
Hi OP. I think what you're describing is called "neo-traditional architecture." I strongly recommend reading Virginia Savage McAlester's Field Guide to American Houses (a classic). That is the best starting place for researching this. McAlester was an authority on preserving and recreating traditional architecture.
The magazine “Old House Journal” produces an annual edition (at least, they used to) on this topic called “New Old House”.
https://www.oldhouseonline.com/web-exclusives/new-old-house-winter-2020/
The book “Creating a New Old House” is about exactly this. It’s available on Amazon and can be found as a free PDF elsewhere on the Internet.
https://www.amazon.com/Creating-New-Old-House-Yesterdays/dp/1561586153/
We have a similar setup as you. Along with the oval curtain rod, we also got this shower curtain liner that can go around the entire oval and this hanging shower organizer that you can attach to your curtain rod and put your shampoo and soap in.
The Old House Journal Guide to Restoration has a big section on wood trim and how to tell what finish is on there and how to clean it up. Very handy book.
Look at this Etsy shop for furniture onlays - lots of Art Deco styles. I don’t know the sizes of the framed pieces on your vanity, so I don’t know which specific ones to choose, but just match basic size-for-size of the pieces you’ll be taking off. Onlays will be more expensive than stenciling the piece, but not by much, and it will have more of a furniture look and feel when you’re done.
When you do remove the existing curls and floral pieces from the vanity, you may likely leave a few bumps. No worries, just use wood putty and sandpaper to smooth the surface. Then prime the whole piece, paint it (I like the idea of black, to go with a green, gold, black, and white theme in your bathroom), and then afix the (preprinted gold) onlays.
To tie in the curved shell at the bottom of the vanity, I’d go with rounded gold knobs like these. Definitely keep the vanity bottom painted black so it doesn’t stand out, but picking up the curve in the knobs ties in the piece together.
And then using a coordinating stencil on the wall, with the same gold, will be really cool.
Also a gilded framed Art Deco mirror on that vanity.
Similar issue with my house trying to find a stud. I ended up drilling a hole, using a camera, and patching the hole.
Used this to look inside the wall:
DEPSTECH Wireless Endoscope, IP67 Waterproof WiFi Borescope Inspection 2.0 Megapixels HD Snake Camera for Android and iOS Smartphone, iPhone, iPad, Samsung -Black(11.5FT) https://www.amazon.com/dp/B01MYTHWK4/ref=cm_sw_r_awdo_4EF7DXERCXE8YGJCE2QE
Bummer, you can either splurge on a deep scan stud finder, start making holes in the wall to find the nearest stud or buy a box of these bad boys.
Swpeet Assorted 24 Pcs Toggle Bolt and Wing Nut Kit for Hanging Heavy Items on Drywall - 1/8 Inch, 3/16Inch, 1/4Inch https://www.amazon.com/dp/B07DL9MVN7/ref=cm_sw_r_cp_api_i_2NH4Q245M55PRE1CWR6V
Maybe a latch cover with a 3M hook on the outside would work? Adults could then remove it when they wanted to lock the door.
My other thought was maybe using a stove knob cover over the lock.
Does it lock when you turn the knob? There are child proofing devices that you have to squeeze to get them to work. A search for childproofing door knobs pulled it up https://www.amazon.com/EUDEMON-Pack-Safety-Covers-Locks/dp/B01K3SOW98/ref=mp_s_a_1_1_sspa?keywords=child+proof+door+knobs&qid=1654007908&sr=8-1-spons&psc=1&spLa=ZW5jcnlwdGVkUXVhbGlmaWVyPUEyS043MlJFMzJNV0ZPJmVuY3J5cHRlZElkPUEwMDEwMT...
Could you replace the hallway/outer side with one that's got a coin slot to turn it? Modern bathroom locks have those, and have been easy to use when the kids have temporarily forgotten how to open the lock. (like this).
Either than or pop the lock off and remove the square bar that the knob connects to, but that means you can't lock they kids out when you want a few minutes of peace.
We have slippery wooden stairs (fun fact: my husband fell down them THE MORNING OF OUR WEDDING and broke his foot). I bought these stair treads and we haven’t had any issues since. I didn’t want anything obvious because the steps are beautiful and these fit the bill.
I recently did one using a "pour on" type paint from amazon that you even out with a comb. The key was just tons of prep work. I spent about 40 hours sanding and smoothing because of the rust, so the pour was scary but it came out very nice!
It doesnt compare to a professional spray job of course, but its been 3 years without and issue!
I love the mirrors! What about window decals made to go on glass like this Lemon Cloud Window Privacy Film, No-Adhesive Static Decorative Window Film, Frosted Stained Glass Window Cling 3D Leaf Design (17.5 by 78.7 Inches, 3D Leaf) https://www.amazon.com/dp/B071RCT8XP/ref=cm_sw_r_apan_i_5952RZRT05YJQ7DC3E48?psc=1
You'd be able to make the mirrors not so directly reflective, but still get some translucent light reflected out. There are hundreds of different kinds of that film and it would be easy to put up and take down
I am not sure if someone already posted it but there’s some awesome peel and stick wallpaper on Amazon recently that’s very period authentic and cool. NextWall Morris Flower Botanical Peel and Stick Wallpaper (Denim Blue & Salmon) https://www.amazon.com/dp/B094174Z9Q/ref=cm_sw_r_cp_api_i_DJ0Q3GBZQX95EAK29BQH?_encoding=UTF8&psc=1
Holy Moly, that was rough. Folks were living in a treasure and didn’t even realize it. Your updates are perfection and en pointe for the era which still retaining a modern, livable sensibility. Just glorious! Have mercy, that mirror. 😳 I will say that it’s actually shockingly easy to paste paper over window glass using simple starch, so I’m sure the same could be done with a lighter weight wallpaper. They also have some surprising nice peel & stick these days. Your style is impeccable so I trust your taste. Id go with a muted Craftsman style that plays well with your color scheme. I trend slightly ornate, and so would go with a William Morris vibe, but I’m sure there are some nice textural neutrals. I really love this one: https://www.amazon.com/NextWall-Stenciled-Floral-Stick-Wallpaper/dp/B09RKQD3PN/ref=sr_1_9?crid=1FDYA1U03346O&keywords=William%2BMorris%2Bwallpaper&qid=1652031014&sprefix=william%2Bmorris%2Bwallpaper%2Caps%2C80&sr=8-9&th=1
What a great idea to cover it until you can get to it properly!
I am thinking something that won’t compete with your amazing stained glass, that looks sort of “timeless.” Like a simple cream grasscloth look or something like this
https://www.acehardware.com/departments/paint-and-supplies/specialty-paints/glazes/18469?store=14923
Prime-Line Products PL 14856 Steel Sash Window Glazing Clip,(Pack of 50) https://www.amazon.com/dp/B000BQLQZ6/ref=cm_sw_r_apan_i_M96YAR8XHEDMJ1AHVW4P?_encoding=UTF8&psc=1
Just search YouTube for videos about glazing steel frame windows. It will show you how it all works together.
Get yourself a copy of the "A Field Guide To American Houses".
https://www.amazon.com/gp/product/0375710825/ref=ppx_yo_dt_b_search_asin_title?ie=UTF8&psc=1
It'll answer your question and then some. Assuming you have more than just a passing interest.
My local hardware store and Menards has these too.
We have a regular old hanging shower caddy thing. Rather than having it hang directly over the shower head, though, we have it hanging on a shower hook tucked into a corner. Claw foot showers can feel confined, so finding a corner or area that doesn't impede more of the space is helpful. For ours, having it right under the shower head just projected too much into the shower itself.