
What are
/r/elegooneptune2's
favorite Products & Services?
From 3.5 billion Reddit comments
The most popular Products mentioned in /r/elegooneptune2:


![[Gulfcoast Robotics] All Metal Hotend Conversion Kit - Polished Titanium Heatbreak for Creality Ender 3 Pro and V2, Ender 5 Pro and Plus and CR10 3D Printers](https://m.media-amazon.com/images/I/41Pxw9aASWL._SL500_.jpg)


![[Gulfcoast Robotics] HEX EPCOS Thermistor Upgrade for Creality Ender 3 Ender 5 CR10 3D Printers (1.2M Extension Cable)](https://m.media-amazon.com/images/I/41b+W1g7R2S._SL500_.jpg)

The most popular reviews in /r/elegooneptune2:
Using the Capricorn XS Bowden Tubing, Cutter, Hot Bed Die Springs and M4X35 bundle here. The springs are a bit long but did get it leveled down pretty well.
Don't take this as gospel, I'm pretty new at this myself, but...
I think the clicking is happening because the extruder is trying to push filament down the bowden tube faster than it can come out of the nozzle.
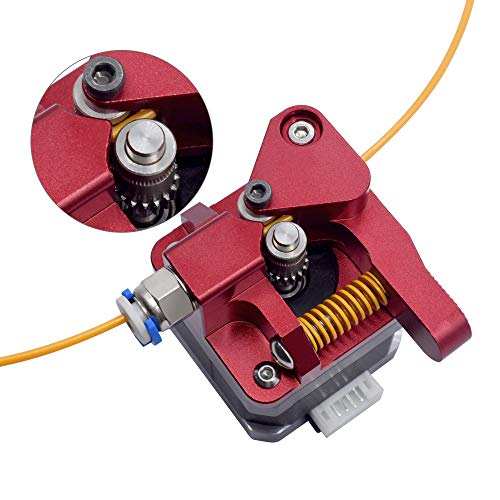
I replaced my extruder for a dual-gear all metal one, here: https://smile.amazon.co.uk/gp/product/B07SY745CF/ref=ppx_yo_dt_b_asin_title_o09_s00?ie=UTF8&psc=1
...but I still got the clicking.
I also went through teachingtech's printer calibration tutorial here: https://teachingtechyt.github.io/calibration.html
I discovered that my flow rate was pretty high and that I should dial it back to about 80. I usually set it to 90 for first layer, and 80 from layer two onwards. I now find I get a little clicking on layer one and almost none from layer two.
Also, calibrating your e-steps from TeachingTech's guide may well help.
One final thing; feed rate may be affected by a partial blockage of your bowden tube at the hot end. I found mine was really blackened and replaced it with a capricorn tube. Make sure the tube is properly cut and properly inserted if you do this. Youtube is your friend here.
I just ordered these…8mm OD 20mm Long Light Load Compression Mould Die Spring Yellow Compression Mould Die Spring for The Ender 3s Bed 20pcs https://www.amazon.com/dp/B07FY47BX7/ref=cm_sw_r_cp_api_glt_fabc_B2ERZS99ZGH1D17T7F14
that sounds more like your z rod is squeaking. if it's happening when the bed is moving up and down you want to get an anti back lash nut. if it is specifically coming from the extruder, then maybe try loosening the screw the for the arm a little.
https://www.amazon.com/BIGTREETECH-Direct-Backlash-Elimination-Threaded/dp/B083JW8RH8/
if you just need a hotend this one should work.
https://www.amazon.com/Assembled-Extruder-Hotend-Metal-Printers/dp/B09ND6HSBF/
the neptune is basically an ender 3 clone, so pretty much anything that works for the ender 3 will work on it.
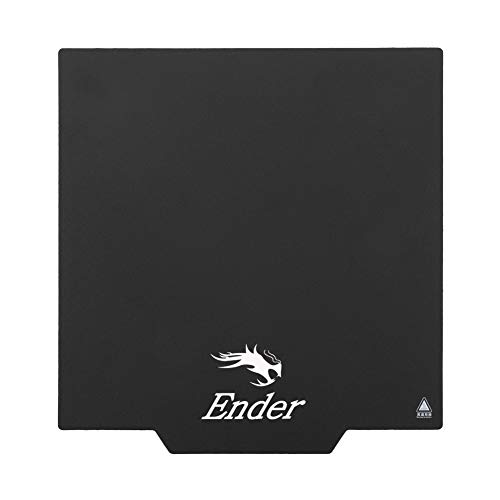
The magnetic flexible bed the stock 2S comes with is fantastic. Every print comes off like butter. I ordered a knock-off brand to replace another of my beds and that one works amazing too. Here the link.
I got this one because I do other electronics projects, but it's probably overkill for this purpose.
You might be better off with something like these. Soldering onto the pin connectors is a bit annoying so something like this where you just have to cable splice will be easier.
Yes I want to plug the two blowers 5015 together, I bought these ones : GDSTIME Blowers 5015
And I'll probably use a duck converter to lower the speed to 50% and can change the speed depending of the project.
it should work fine. it's basically the same as the stock hot end. if you just want to replace the terminator though, these will work just fine https://www.amazon.com/Printer-Thermistor-Sensor-Reprap-Comgrow/dp/B0714MR5BC/
I found that upgrading the original bed springs to the yellow ones and adjusting the Z-axis limit switch with the springs compressed about half way has meant that I seldom need to adjust them. Good luck!
I actually love this, but I believe that the SKR Mini 3 I linkedinclude the TFT35 that is similar to Ender3. Can you help confirm? I apologize, I'm definitely still getting used to things but gotta make sure first time around. :)
Which screen would be the appropriate fit if it is wrong?
Amazing, really appreciate the advice here. Found this screen and will partner with the same board. Any other cables or things recommended when doing the full swap?
hmm, I found a clear ones here that are actually cheap. I might try it instead, not much to loose at $10. https://www.amazon.co.jp/-/en/Fontsime-Leveling-Accuracy-Improvement-Translucent/dp/B099DBXJXR/ref=sr\_1\_22?crid=33B1M3952WACX&keywords=bltouch&qid=1658875982&sprefix=bl+touch%2Caps%2C274&sr=8-22
i got this one it works fine https://www.amazon.com/dp/B08B4CBY9C?psc=1&ref=ppx_yo2ov_dt_b_product_details
I just picked up This bed and it has been amazing so far. I also decided the stock plate wasn't good enough
May not be a genuine extension cable for your version V3.1. The blue cable is green on mine. And both the short and long cable matched that came with the BLTouch. This the link to the one I purchased to compare. https://www.amazon.com/dp/B087CQ3RLG/ref=cm_sw_r_apan_i_HWSMYPEFKHPRA75QG1W7?psc=1
The default build plate is good, if it's the Neptune 2 it is made from Garolite, aka G10, which is actually a really good surface, the smooth side can be a really nice surface, I believe there are some tricks to getting prints to stick to it though I haven't actually tried, the top textured side is really good too but as you've already learned it can stick too well if your nozzle is too close. If you have damaged it you can contact elegoo and they will send you a new plate, also if you ask they might even send you the 2S plate as an upgrade along with the magnetic sticker. The 2S uses a PEI coated magnetic flex plate which is really good for most filament types, it needs to be really clean to get good adhesion, a hot soapy water scrub periodically will save you a ton of headaches with prints not sticking, avoid touching anything other than the edges as much as possible if you get fingerprints or oils on it from your skin you will have adhesion problems. If you don't want to wait for Elegoo to ship you a replacement my recommendation would be a double sided hictop pei build plate, it has a textured side and a smooth side both of which can be useful for different types of filaments or surface finishes on the bottom of your print. Make sure you get one that is 235x235, the nominal build size is 220x220 but the actual dimensions of the plate are 235x235. https://www.amazon.com/dp/B08PFJKW5J/ like this 1, I cheaped out and got a single sided plate but wish I had spent the extra for both sides. You might also consider adding a leveling probe to help you out with getting your first layers dialed in better with this.
Yes and no, you have to be really careful about making sure you have the pins in the correct order or you will blow the voltage regulator on the control board like I did trying to do that the first time lol, I ended up returning it and ordering the version with the correct wiring just to be safe. Elegoo is great about warranty replacements though and I managed to replace the chip myself while I was waiting on the slow boat from china. https://www.amazon.com/dp/B09M9V8Y4Y/ I think this has the correct wiring, though I haven't bought it yet to verify but the pictures look right, and the sensor itself is exactly the same without the extra cost for the bltouch name. The pinout is labeled on the sensor and the board also so you can verify the correct wiring order.
Creality BL Touch V3.1 Ender 3 V2... https://www.amazon.de/dp/B09JYRVKWC?ref=ppx_pop_mob_ap_share
Just be careful about the wiring. It is the other way around. If you have a close look at the schematics you will have no problem to figure out how to wire it :) elegoo has a great tutorial for that :)
I can’t really tell, but it’s probably your extruder. There aren’t really relays that make noise. Is that silk PLA? If so, that stuff needs to be printed hot and slow.
Make sure the spring tension on the extruder isn’t too loose or tightened all the way down, you want a medium tension.
https://smile.amazon.com/dp/B08W9KX12F/ref=cm_sw_r_cp_api_i_85KPQ3QVGPF29Q0GB518
Check those out, eliminating that crazy travel path the filament needs to make can really help reduce a lot of the friction from feeding filament. A combo of correct settings, proper extruder spring tension, and smooth filament feeding fixed that same issue for me!
To make things clear. The aluminium heated bed is perfectly flat. I only replaced the printing surface. I am using this one now: https://www.amazon.co.uk/gp/product/B08H7FV8BM/ref=ppx_yo_dt_b_search_asin_title?ie=UTF8&th=1
https://www.amazon.com/dp/B095PCJHQ1/ also I saw this, it wouldn't be a direct fit since it's for a different brand of printer but it might be a good source for parts, the only thing I'm not sure about is if the hotend would mount to the Neptune hotend carriage. And you would probably want a dual gear extruder to match your 2S extruder.
For anyone still having bed adhesion issues, might a (shamelessly) suggest my new product 3D Print Stick please check it out and let me know what you think! Should help a ton with bed adhesion! https://www.amazon.com/dp/B09YKZF1P3
I ordered from the Elegoo ebay store which has lower prices than Amazon. There the 2 is $180 and the 2S is $240 (vs $200 and $245 on Amazon). So that's a $60 difference (fwiw, I did a best offer and they accepted it, so I actually paid $160+ taxes, but I assume I could have done the same on the 2S). Assuming the dual extruder on the 2S is the same red one I've seen all over Amazon, its like $15 and new springs and knobs are about $10, so that leaves around $35 to spend on a new bed surface. I was thinking of getting this dual sided one from Comgrow: https://www.amazon.com/gp/product/B09TVGDJYP/ref=ox_sc_act_title_2?smid=A2ALB3RMNIRLH8&th=1. And that's $25.
So unless the parts the 2S adds are super high quality, it seemed the better value was to get the base model and upgrades separately.
That said, I think right now I'm going to hold off on updating the extruder because I think what I might want to do is a big upgrade after I'm more comfortable with the printer where I add a dual z axis, all metal dual gear extruder, and convert the printer to direct drive (my understanding is that the dual z axis is needed to support the extra weight).
So right now I'm thinking new springs, maybe knobs, and the dual sided pei sheet. Some of these combos also seem to throw in a capricorn tube as well.
https://www.amazon.com/dp/B08J7J6GG8/ I got these for Christmas, I think I was so focused on mounting it from the back I didn't think about mounting it from the front. I will take a look at it again.
Here is the one I bought: https://www.amazon.com/dp/B09B94CC92?ref_=cm_sw_r_cp_ud_dp_7MP69T93XFQY7N5X3539
I looked at a few but this one was inexpensive and like I said, I originally planned on replacing the entire extrusion so I could just use the T-nuts. This was a far easier mod, two holes drilled and tapped and done.
Not really? You get a mount adapter and use that.
It’s 2 screws that replace the original mounting screws, then 2 more as it’s a “sandwiching” mount
Then remount you fan/replace with new fan shroud (I did the second and got a duel fan set up for like $35 with the volcano hot end)
3Dman V6 Hotend Bracket Parts, Upgrade Bow den Extruder Aluminum Mount Compatible with All 3D-V6 Volcano Hotend 3D Printer Accessories https://www.amazon.com/dp/B09C1WGLWB/ref=cm_sw_r_cp_api_i_00JGEP5WDQ0G4DCS7TVK?_encoding=UTF8&psc=1
The springs need to be pretty tight, then level your bed and set you nozzle height after that.
The springs can tend to still work loose over time. I’m a big fan of silicone bushings instead of springs, they aren’t as affected by heat. Even the “upgraded springs” on the 2S work loose.
https://smile.amazon.com/dp/B08LYRBRYL/ref=cm_sw_r_cp_api_i_3E9WXCR3FVB9XH32ESJN
https://www.amazon.com/dp/B095NTK3XF/ I ordered this for mine and trimmed it down, I wasn't sure if the 220x220 was actually 235x235 like we need for our beds or not so I got the 300x300 and just trimmed it with scissors. They're super affordable.
https://www.reddit.com/user/mlee12382/comments/prql0h/3d_printer_control_board_with_a_blown_chip_from/ here's my post with the picture if that helps you find it easier, and these are the buck converters with the correct chip, MP1584EN is the IC number.
These spool holders solved my issues. Rather than tugging the filament down and at a weird angle off a stationary holder, these let the filament feed straight-in from the side.
Zeelo 1set CR10 3D Extruder Back Support Plate with Pulley Extruding Backplate for Creality Ender-3 Ender 3s Ender 3 Pro Cr-10 Cr-10S S4 S5 Series Aluminum Extrusions Frame 3D Printers https://www.amazon.com/dp/B08SMCHFVC/ref=cm_sw_r_cp_api_i_NGWYS5HJYQWB6330K8T9?_encoding=UTF8&psc=1
Get the Creality Borosilicate glass bed. Love mine. Ive only used the backside of it which is just glass.
Dawnblade Creality Ender 3 Glass... https://www.amazon.com/dp/B07RD6D2ZQ?ref=ppx_pop_mob_ap_share
I had that happen when I was trying to get things figured out. What I ended up stumbling on by accident was I have VERY hot water out of the tap and was just using a plastic dish scrubber on it with some dish soap to clean it. I found that the combination of the hot running water with the dish scrubber allowed me to get all the plastic off the plate. It was a brush like this https://www.amazon.com/Amazer-Bathroom-Comfortable-Odourless-Bristles/dp/B06Y5JW8NY
Are you using a sheet of paper to level? For me the results were always hit or miss, I switched to 0.2mm feeler guages and adjust until the nozzle just barely touches and both adhesion and quality improved there is an amazon link below if you're curious what I mean.
Also it might be beneficial to start at the beginning with leveling.
Loosen the z stop switch screws that hold it just enough so it can slide down a little.
Now tighten all of the adjustment wheels completely snug, make them equally finger tight, then turn them back (loosen) 2 complete revolutions.
Now bring the gantry down using the move function for the z axis at the 0.1mm setting until it just touches but doesn't put any actual pressure against the bed, just kissing.
Gently slide the z stop switch up until it just clicks and tighten it down.
Then level as you normally would. This helped me immensely when I got my bed all out of whack a few days after getting my printer.
Good luck, don't get discouraged.
[0.2mm Feeler Guages]
https://www.amazon.com/dp/B07QWLVRG3/ref=cm_sw_r_sms_awdb_imm_SZF8NNT1YJNC4S8H4RRA?_encoding=UTF8
Take the power supply off the machine and open it up with it unplugged and make sure all of the wire connections are secure, you can also buy a better socket and replace it, seems like elegoo may have had a bad run of sockets as I've seen a few people with that issue though mine fits great. https://www.amazon.com/dp/B08CDSXWXF/ I think it might be 1 of these but you can compare it to what's on the printer.
As for the Z and extruder stepper drivers they're not silent only X and Y are silent, that's the way most inexpensive consumer 3d printers with "silent motherboards" are. There are a few exceptions but not the Neptune. As long as you're not doing long or fast movements up/down it's not usually that noticeable during printing, you can look at adding a tl smoother in-line and a stepper damper to quiet it down if it really bothers you though.
Check the reviews when you buy them, the nice thing is they're so cheap if you get 1 that's bad for some reason you just change it out. You can go with higher quality nozzles like the micro swiss nozzles but you're gonna pay extra for the quality. I ordered these and they've been working for me so far.
u/ThatBrien Do you have a .4mm pin? Something like this? If so that should tell you if you have a clog or if the nozzle isn't .4mm. If none of that works I would suggest a cold pull, I had a really bad clog with some glitter filament that took 2 hours to clear and I had to do it with a few cold pulls.
I used all new fans, Winsinn dual bearing 4010s, 2x Radial and a new axial fan
Hotend Fan
WINSINN Dual Ball Bearings 40mm Fan Brushless Cooling 24V 4010 40mm*10mm (Pack of 2Pcs) https://www.amazon.com/dp/B08R9L9YR2/ref=cm_sw_r_cp_api_glt_i_WJHXQNYYJ6V7Z3QZ6K2Q?_encoding=UTF8&psc=1
And two of these
WINSINN DC 40mm Blower Fan 24V... https://www.amazon.com/dp/B07RNPJ1YS?ref=ppx_pop_mob_ap_share
is it this one https://www.amazon.com/Gulfcoast-Robotics-Conversion-Polished-Heatbreak/dp/B0811NWV2F/ref=sr_1_3?keywords=Gulfcoast+Robotics&qid=1646003913&sr=8-3? is it going to fit the neptune 2?
Mine does not start heating on startup. Also, it's now stuck at 55C for both thermistors.
I tried to do a PID tuning, but it gave me a thermal runaway after failing to go past 155C (ish).
I bought a MKS Robin Nano V3. It looks like I'll have to cut some holes, but whatever.
Nope. Not installed. I have an all metal hotend from Microswiss, but I dont installed it yet. But I use this Nozzle its hardened Steel and you can also print easily Carbon Fiber mixed or Wooden Filaments 👍
I like Sunlu and Ziro some of Ziro are translucent. That can be pretty nice for Lamps. And Diamon Red is the best looking Filament I had for over 5 Years of 3D Printing.
Elegoo has been on holiday they should start getting back to replying soon. Fans are a cheap component and unfortunately they do fail and the QC isn't always that great, if you want to buy some yourself it's a 24v 4010 blower fan like this.
You can also split the single z output to 2 steppers, a lot of setups do it that way for other printers and the stock firmware has settings for enabling dual z and dual z endstops, not sure if they are splitting the single driver or using 2 though. Something like this uses 1 driver, not sure if it's a direct fit on the Neptune printers though. Also if you want to do marlin and keep remote access get a raspberry pi zero 2w and run octoprint, you gain a lot of quality of life upgrades that way.
ZIRO PLA Glitter Filament 1,75mm 3D Drucker Filament PLA 1,75mm Diamant Serie 1KG,Dimensional Accuracy +/- 0.05mm,Diamant Rot https://smile.amazon.de/dp/B08697F697/ref=cm_sw_r_apan_glt_i_CKGSEQD3CY9M4X5GMB6M?psc=1
Sorry forgotten 🤣
You're welcome 😅
I had thought the router could be the issue, or my wifi name, so I tried changing that, turned firewalls off, port forwarded, nothing changed. I reseated the chip but that didn't help. I installed cura on a Windows partition and it still couldn't detect the printer.
I didn't buy the Makerbase wifi module, but one like it: https://smile.amazon.com/gp/product/B095CBTTHD/ref=ppx_yo_dt_b_asin_title_o00_s00?ie=UTF8&psc=1
I'm thinking it might just be defective as I feel I have exhausted every other option.
this is the one I just started using but seems to be out of stock, I tried the Creality ender version but it ended up ripping apart.
When you still have the problem, try thisthis hotend kit from creality, they come with everything you need and fit perfect into the neptune 2(s).
Found it on english(?) amazon
As far as I can tell Neptune hot ends are identical to Creality hot ends.
This seems like a perfect time for you to upgrade so I recommend this all-metal hotend:, https://www.amazon.com/dp/B0811NWV2F/
This is the 1 I am currently using and you can always go this route to refresh whatever build plate you have if you want.
https://www.amazon.com/dp/B08BJD3W4X/ something like this is very useful, they come in different sizes, also some screws can work directly if you have enough wall counts and the hole is small enough that the threads actually dig into the plastic.
Not to knock the BLtouch, as I have two of them, but after putting glass beds on both of mine, I’ve got 0 issues, perfect level every time.
FWIW, I’m at a point where I’ve considered going back to good old fashioned paper leveling with the glass bed.
Definitely contact elegoo they will send you a replacement, they're on holiday is China right now so they won't get back to you right away since everything is shut down but do it anyway, you can order a replacement psu this one is really high quality and exceeds the requirements of the stock unit.
it likely happened due to a jam.
if you start printing too close to the bed (read: nozzle literally at the bed, pressed into it due to poor levelling process), then this happens.
If you need a new hotend, it's only 20 bucks: https://www.amazon.com/gp/product/B082PGCF2B/ref=ox\_sc\_rp\_title\_rp\_10?smid=&psc=1&pf\_rd\_p=eb95af39-ca87-47ba-a46d-0bbbab297fd0&pd\_rd\_wg=BNX2f&pd\_rd\_i=B082PGCF2B&pd\_rd\_w=qH3l2&pd\_rd\_r=25e7ff7e-733e-4cf7-8a4a-7...
I had this happen with silk PLA. My solution was to ditch the overhead spool holder. Even with a filament guide, the filament makes a nearly 180 degree bend just to enter the extruder.
I got a set of spool holders that have bearings and allow the filament to feed directly off the spool into the extruder in a straight line. The downside is it takes up more room now that the spool sits next to the printer rather than above it, but it fixed my issues!
My first filament was this, I just said that roll was a learning roll and didn't make myself have to get great prints. That being said I was able to print an articulated facehugger with that first roll. My advice as being new to this as well is to just use that first roll to see how things work and fix any issues you might find starting out.
My plate has the yellowish PEI film on the back smooth side as well. mine is just like this "generic" version, which has PEI both sides.
Dual vents will definitely help! I’m looking forward to seeing what some more powerful cooling can do with upgrades fans.
I have this: [Gulfcoast Robotics] HEX EPCOS Thermistor Upgrade for Creality Ender 3 Ender 5 CR10 3D Printers (1.2M Extension Cable) https://smile.amazon.com/dp/B094GK6P1M/ref=cm_sw_r_cp_api_glt_i_GQQ51Y05N2Y2F2ZT4NYD?psc=1
It’s not installed yet, but should be straightforward and much more robust than a couple of tiny wires and a glass bead!
https://www.amazon.com/dp/B08HN39GSK/ this all metal heatbreak fits the 2D I just installed it on mine with a pice of Capricorn for good measure, on case you were looking for something a little better than just Capricorn.
I have one arriving tomorrow actually! It’s this one
I’ve read good things, and it’s a drop-in fit. It claims to do to 300 degrees reliably, so I have a Marlin firmware built that allows the hot end to go to 285. Just make sure you get the EPCOS version if you want plug-and-play.
Be warned, I’m almost certain this thermistor will not fit under the stock fan shroud. It apparently sticks out the side a bit, so that can interfere with box-type shrouds. Additionally, you’ll need an all metal hot end if you want to take advantage of the higher temp range.
I’ll let you all know how it works!
I kept hearing mine squeak after about a month of solid printing and tracked it down and there's a massive groove in the bushing from the filament rubbing on it lol. If you go the bowden guide method you'll need a PC4-M10 that doesn't allow the tube to slide all the way through like a lot of them do I found these and they work perfect.
This is what I use. It’s bright, works from 12 to 24 volts and has a switch. They come in packs of 2, so I gave one to a friend for his printer. The leads are short, so I had to solder on longer wires. They connect directly to some free terminals on the power supply, so the lights turn on with the machine.
They are pretty bright, one of them can throw enough light to get a good Pi camera video feed in a pitch-black basement. There’s a big shadow under the print head, there’s no way to fix that when the lights are directly overhead like this. I’ll be adding an LED to the print head eventually. Still, very satisfied with the results!
https://smile.amazon.com/dp/B08W9KX12F/ref=cm_sw_r_cp_api_glt_fabc_51CM2TCS05FQP6T2RKJ6
I use these and they work super well. The filament feeds straight in versus needing to bend more than 90 degrees. Has definitely helped when printing TPU or silk PLA!
I’ve been itching to try Trey’s custom firmware but wanted to wait for Neptune 2D confirmed working since this change is using the E1 socket. May not be an issue, but rather wait a little longer.
Here’s the link to the stepper drivers I ordered off Amazon: Makerbase MKS TMC2209 Stepper Motor Driver StepStick for 3D Printer UART Ultra Silent https://www.amazon.com/dp/B08PPD4CSF/ref=cm_sw_r_cp_api_glt_fabc_96J37YHE8BTK83XCPRMF?_encoding=UTF8&psc=1
I’ve got some coming also from Makerbase’s official store on AliExpress.
I set it in the slicer to start on layer 1 and did a quick test at this point I am in the middle of printing and it's on 384, higher when you read this and the fan is not moving. I grabbed these as a replacement so they should work. What kind of connector are they and do you need a crimping tool for the connectors?
If you're adding connectors in line you can use whatever style you want, something like this for instance I could be wrong but I think the connector on the control board is a jst-xh, I haven't seen any male ends other than header type connectors for that style so not sure if you can do that in the middle of a cable easily. Alternatively you can just cut and splice the wires with solder and heatshrink.
Yup, PLA. I've tried using brim and still have warping. I'm toying with switching to rafts if I can't figure out what's going on. I have noticed that the adhesion is better on the smooth side of the build plate rather than using the textured side.
Like I mentioned before, my house is very cold and I think the problem is the material is cooling down too quickly. I've tried running with bumping the hot end up to 205 and the bed at 70 and noticed slightly less warping. However, I've also noticed my calibration cube printed fine at 200/50 in a warmer part of my house.
I'm in the process of building an enclosure to help control environmental temperatures but until that gets done, whatever settings I can adjust will have to do.
Sure, I was wrong about the size, I ordered 350mm but they have 300 also which would work better if a bit long
HAWKUNG 2pcs 350mm 8mm T8 Stainless Steel Threaded Rod Lead Screw with T8 Nut for 3D Printer Machine Z Axis https://www.amazon.com/dp/B07P8P6J5V/ref=cm_sw_r_cp_api_glt_fabc_8R36XJG9Q5XAH6E10F9P?_encoding=UTF8&psc=1
Wanted belt tensioners for my Neptune 2, ended up buying a load of different ones to see what would work best. This Unitak3d Ender 3 one works with a bit of Dremlling and a quick 3d Print. I also found the genuine Creality one for the Y Axis bolts straight on and is nicely made
X Axis - UniTak3D X axis Belt Tensioner Upgrades for Ender 3,Ender 3 pro,CR 10,CR 10S,Tronxy X3 3D Printers(Black) https://www.amazon.co.uk/dp/B08DRHFJ7V/ref=cm_sw_r_apan_glt_fabc_NMT95DWGYHGMFST2JE9G?_encoding=UTF8&psc=1
Y Axis - Original Upgrade Ender 3 V2 Adjustable 4040 Profile Y-axis Synchronous Belt Stretch Straighten Tensioner Compatible with Creality Ender 3 pro CR20 Ender 3S 3D Printer https://www.amazon.co.uk/dp/B08DCT6Z65/ref=cm_sw_r_apan_glt_fabc_J8HVE03Q3BNB5N2K6W4H?_encoding=UTF8&psc=1
Thingiverse link for X Axis plate - will sort out tomorrow.
The issue I am seeing is the plastic is leaking from the nozzle and heatbreak so I don't think it's the bowden tube. after the first leak I did replace the bowden tube with a capricorn because I couldn't remove the original to clean the parts.
So if I do replace the hotend should I go with something like this?
I’m using Gulfcoast Robotics, they’re on Amazon (at least in the US) for about $35 shipped.
https://smile.amazon.com/dp/B0811NWV2F/ref=cm_sw_r_cp_api_glt_fabc_2DSQMZR36KG77FDA18TE
Take the stock hot end off, then bolt the new one on. Level the bed and set your retractions to 3.5mm. Print 5 degrees hotter than usual. Bam, done.
For good measure, run a PID auto tune. It’s not completely necessary with this mod, but definitely helps.
I haven't gotten around to installing them and seeing if they actually work but I got a set of stepper dampers similar to these not 100% sure if they will work with the Neptune printers or not yet.
That I don’t know, in that situation they make “universal” mounts that have like 30 holes that all can be used to for bolts that act as the mounting hardware.
Things like this make life easier when doing these custom stuff
Befenybay V Wheel with Plate and 6mm Belt Buckle for 2020 Aluminum Profile 3D Printer Parts for CNC Kossel Black Wheel (Big Wheel with Buckle) https://www.amazon.com/dp/B08M3JKKZY/ref=cm_sw_r_cp_api_glt_fabc_22Z63H9JZ6670XC8B6YP?_encoding=UTF8&psc=1
They aren’t at all because the carriage is only held on by the wheels and the belt
You might need a new belt to match the new carriage but it’s not hard at all.
I’ve swapped between like 4 carriages on one of my Enders
The Enders aren’t special at all really and the only major difference is the fan shroud mounting is different and the carriage shape is different.
But the one you want would be like this
SHEAWA 3D Printer Accessories, Metal Aluminum Alloy Direct Drive Extruder Plate for E3D Hemera Ender-3/V2/CR-10/10S https://www.amazon.com/dp/B093T4B193/ref=cm_sw_r_cp_apip_BqiY7zTFRbewm
Feel free to ask for assistance if you run into any issues, once thing to look out for is the left side spool needs a guide to feed extruder 1 otherwise a couple months in it will start squeaking, there's enough of an angle on the natural filament path that it will wear into the brass bushing feeding the filament run-out sensor. I printed this 1 and bought some pc4-m10 fittings that don't allow the bowden tube to pass through since the "spares" I had were pass-through fittings and didn't work too well. These are the fittings I got for it and they work great. You'll also probably need slightly longer screws for the filament sensor to install the lower fitting cover.
Yes you still want to start from a manually leveled bed and then let the bltouch compensate for any surface irregularities or warping, it can do quite a bit but if your bed is way off it can only compensate for so much. I generally started with the bottom of the leveling knobs flush with the end of the bolts and then leveled from there, it's a bit clunky once you have bltouch installed since it removes the option for manually leveling. I have mine connected to octoprint so I use a plugin but I think you can home Z and then disable steppers and manually move the head over each knob to adjust your level, remember to go around several times. For the 7x7 you're going to open the elegoo.txt file and search for GRID_MAX_POINTS_X and GRID_MAX_POINTS_Y I believe they were towards the bottom of the file you can go up to 15x15 but that just takes a lot of time so unless you really need the extra precision I wouldn't go much more than 7x7. The printer is really quite most of the time, if it moves really fast it's louder but most of the time it's pretty good, the fans are the loudest and they're not terrible. I've been really happy with the reliability so far, the only real problems I've had were user error lol. Another thing you might want to consider is this you'll need to source a PC4-M10 that doesn't allow the bowden tube to slip all the way through for the top but it will keep the filament from binding and also keep it from wearing through the filament detector housing and squeaking a couple months in. I got thesefittings and they work great, you'll need supports and longer bolts for the filament cover.
The 2S is absolutely worth it, great first time printer too though that doesn't apply to you. The Neptune's biggest downside is the locked boot loader on the main board which makes it very difficult if you want to change to other firmwares; klipper/rrf/etc; most casual users don't need to worry about that though. As far as bltouch be very careful which version you get and how you install it, the first ender 3 compatible bltouch I ordered fried my board. This version works great and this guide is what I followed and everything is working smoothly, I modified the default 4x4 probe grid to 7x7 when I did the firmware, takes a little longer but better results for prints.
I opted for a glass build plate, works perfectly fine!
235mm x 235mm Borosilicate Glass Plate for Creality Ender 3, 3 Pro, Ender 5 3D Printer https://www.amazon.co.uk/dp/B07D6J92KB/ref=cm_sw_r_apan_glt_fabc_790921HX1XZTNS9ZE2S4
You can buy a new heater block. These work with the Neptune 2. Ender 3D Printer Parts Silicone Socks/Aluminum Heater Block/Stainless Steel Throat for MK7 MK8 Extruder Kits Ender 3/Ender 3 Pro/Creality CR-10 /CR10S /S4 /S5 (3 Packs) https://www.amazon.com/dp/B07PLWG94W/ref=cm_sw_r_apan_glt_fabc_HWNBQ0FP1FAR59KH1AJ2?_encoding=UTF8&psc=1
Im printing on this one Geetech magnetic Printbed
I bought this one:
Redrex Dual Drive Bowden Extruder... https://www.amazon.de/dp/B07Q5RNRR6?ref=ppx_pop_mob_ap_share
It works great! Not any underextrusion problems anymore… no slipping of filament.
The one on the right was my first print. The bottom was nice and smooth. My more recent prints have a bit of zig zag patterns with some gaps between the lines which makes the bottom a bit rough. I’m pretty sure the settings are all the same.
The first print used the filament which came with the printer. More recent print (left) uses this filament from Amazon..
Is it the filament? Or does my bed level need to be readjusted? I started using a business card to level my bed at someone’s suggestion because my extruder was skipping steps.
Step skipping seems to be minimized now but there’s this issue.
The Neptune 2 specific videos I watched on YouTube use this version of bltouch and cable which isn't what I initially had so hopefully I won't run into the same problem again since it's been tested by others. https://www.amazon.com/dp/B076PQG1FF/
If yours is the same chip it's an mp1584en and the bare chip wasn't available on Amazon and where I could find it was $3 each plus $8 shipping but I was able to find complete buck converter boards with the same chip on Amazon and I just scavenged 1 off and reattached it to my main board. This is what I ordered. https://www.amazon.com/dp/B089GV88DK/
I have used this magnetic PEI spring steel build plate https://www.amazon.com/gp/product/B08B4CBY9C/ on my Ender 3 for almost a year and just bought another for my new Neptune 2. The PEI surface on my Ender 3 one is starting to wear a bit, but I was happy enough with it to get one for the Neptune. I originally had the Creality glass bed on my Ender, and really liked the convenience of the magnetic plate over that. I mostly use PLA and PETG, if that matters.
Sorry for the delay!
Here's the m2 screws I used to attach the parts cooling fan to the cooling duct. You'll need these since Elegoo used hotglue in the stock cooling.
You'll need some M3 screws to hold the cooling duct onto the printed mount, this is what I got. You can obviously find something smaller, but I had some more projects coming up and needed the hardware
235 mm x 235 mm
I was starting to have to use glue for every print so I decided to start experimenting with replacement build plates.
For my first one, I went cheap and bought this one - https://amazon.com/gp/product/B084YSZFXL - for $12. It's not great but it's been consistent so far. It's a cheap magnet so it can't handle build plate temps over 60 C.
For my next one, I want to get something equivalent to a WhamBam
ANTCLABS BLTouch : Auto Bed Leveling Sensor/To be a Premium 3D Printer (With 1M Extension Cable Set) https://www.amazon.com/dp/B076PQG1FF/ref=cm_sw_r_cp_api_glt_fabc_JK3ECGKQ51X0BH5GBR4C?_encoding=UTF8&psc=1
I believe the one you posted is the knock off version, it might work it might not. Will depend if you get a good one or not.
The real ones actually say bltouch on the side and are a little more expensive. link I think that’s the real one or you could go to the antclab main website to make sure you get an authentic one
When the clicking noise occurs, does the filament retract a little?
If this is occurring the teeth on the drive gear might be dirty or jammed. You can use a toothpick or an X-Acto knife to clean in between the teeth. Then add a small amount of lubricant to ensure smooth motion.
If the issue is still there, you can email Elegoo (The customer support is amazing.) or you can just purchase another extruder set. There are some great ones on amazon that are all metal, and some are even dual gear. I have this one (https://www.amazon.com/Authentic-Creality-Printers-Capricorn-Pneumatic/dp/B07ZMFP2L8/ref=pd_sbs_6/137-6714064-4332107?pd_rd_w=RQmmF&pf_rd_p=180628c6-6f13-4dbf-9213-f09cdedc7815&pf_rd_r=0A8A7XZ0Q9AVM7KC0XJQ&pd_rd_r=c3a76cff-5edf-4ae5-a65f-7a1c638594c8&pd_rd_wg=G9dcK&pd_rd_i=B07ZMFP2L8&psc=1) on my printer, and it works great.
Came here to say this also. I bought this kit
I had to get the pins out of the red connector and put them into the original Z stop connector, white cable went into the outside & black cable on the inside.
For the black connector I had to swap the red(?) (I’m colourblind) & the blue cable so it goes Yellow/Red/Blue, basically the same order as it is on the BL Touch connector, then that plugs in as per the instructions provided by Elegoo.