
What are
/r/AnalogCommunity's
favorite Products & Services?
From 3.5 billion Reddit comments
The most popular Products mentioned in /r/AnalogCommunity:


The most popular Services mentioned in /r/AnalogCommunity:
darktable
GIMP
Meetup
Socinator
Ecosia
VirtualBox
Google Podcasts
NUKE
Affinity Photo
digiKam
VSCO
ImgBB
SmugMug
Google Nik Collection
VueScan
The most popular Android Apps mentioned in /r/AnalogCommunity:
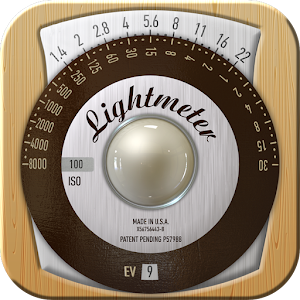
LightMeter (noAds)

Exif Notes
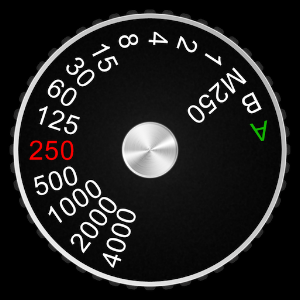
Shutter-Speed

Snapseed

Exposure Calculator

Dev it - darkroom timer

Light meter for photography

1 Second Everyday: Video Diary
Old - Light Meter Tools - Paid
The most popular reviews in /r/AnalogCommunity:
Borrowed a Wolverine film scanner from the library just to see how it would compare against a DSLR scan.
This is the Wolverine model.
The image from the DSLR was edited and shot in RAW - its the bottom image. The Wolverine file was an 8 bit JPEG and is the top image.
The resolution was technically higher on the Wolverine at I think 20MP but I suspect its not actual data compared to the Nikon's ~12MP.
No surprises here. For processing, the Nikon's RAW file is infinitely more flexible where the JPEG simply falls apart with any adjustment. The biggest issue I had with the JPEGs was the artifacts in the shadows. It seemed uniform unlike the dust spot on the scanner itself.
What I did find surprising with the Wolverine is its speed. Since the image is converted for you as you pass the film through, a literal button press was all it needed to save a JPEG onto the SD card - took about 1-2 seconds. The Wolverine is a complete standalone unit so going through a roll would be rather quick. I think the Wolverine performs more like a standalone DSLR scanner except instead of an APS-C sensor, it uses what appears to be a point and shoot sensor from the early 2000s. It takes one shot of the entire frame. It's much faster than a dedicated 35mm scanners like the Pacific Film or Plusteks that scan one line at a time and take about 2-5 minutes per frame.
Personally I'll stick with DSLR scanning but I think the Wolverine might be handy for quick and dirty scans where image quality is the lowest priority. I see potential value in it perhaps just making a digital contact sheet. Anyways, it's going to the library ASAP...
Hope this helps someone !
Agreed - the film is the output of the camera, not the scan. You can learn a lot by looking them over carefully, and a lot of scanning issues can be traced to the scanner struggling with something inherent in the negative, like it being too thin, or too dense, or improperly fixed.
I'll also take this moment to suggest that people check out "Way Beyond Monochrome" from the library to get a better idea of all the things that can happen between the exposure and the scan, and how much of it you have direct control over.
(ok GenXr)
I bought these a couple years back. I use them in 5 gal storage bins for my oats and legumes. They have performed very well.
I use one of these, but that's a great idea if you don't have anything else handy!
You should read this book.
https://www.amazon.com/Magnum-Contact-Sheets-Kristen-Lubben/dp/0500292914
You have real contact sheets of real photographers, with some of the most famous images in Magnum's history along their neighbours in the film that didn't make the cut.
I'd be happy with a roll with one or two keepers. Three or four, that's fucking great and rare.
In reply to u/cmazmanian and u/malamodon, it is a fully manual instax wide camera mad by MiNT camera in Hong Kong. You can view information through this search. A few people have done review videos of them.
It is the first "professional" instax wide camera with all manual settings.
I just shot a roll of Rollei Infrared with some friends the other day and metered for 12 on a bright sunny day, the pictures came out properly exposed. One thing is that infrared film really likes bright sunlight to get its full effects, and tends not to work as well on cloudier days.
Also, your filter, “Greene IR72”. Is it like this one? If so, that’s almost certainly your problem. Your shots are overexposed because you were using the specs from the Hoya filter, which is more powerful and filters more stops of light than your filter. If you want to shoot more infrared I would really suggest you invest in the Hoya IR72 filter. Cheap filters will never be able to accomplish the job properly.
Tip for the focusing, if you shoot at F8 or above you do not have to focus shift. We found shooting at infinity to be the least hassle.
It looks like some of the really low end film scanners that are a waste of money. Often the film holding system is key to get getting film flat and having a good scan.
However I’ll be curious about the software and how accurate it scans color negative film. Color correction is a pain and having software that works well with it may be worth it.
Overall wait until someone reviews it and tests for the effective DPI. All scanners lie about DPI and give a higher number than the real results.
Edit: I'm pretty sure it's a rebrand of this scanner: https://www.amazon.com/Magnasonic-Resolution-Converts-Negatives-Impressive/dp/B0185Z8HME/ref=pd_sbs_421_4?_encoding=UTF8&pd_rd_i=B0185Z8HME&pd_rd_r=RVEZ1FJPCGKS2E9CCNN2&pd_rd_w=LoJ0U&pd_rd_wg=GLYrA&psc=1&refRID=RVEZ1FJPCGKS...
There seems to be several rebrands of this scanner on Amazon already.
This is an excerpt from "The Art of Photography: A Personal Approach to Artistic Expression" by Bruce Barnbaum.
While the rest of the book is fantastic, I'm skeptical of the accuracy of this statement.
https://imgbb.com/ doesn't compress AFAIK
Anyways, if it's 12 rolls of awful results, you're either the #1 worst photographer alive, or your lab sucks. Do you have the negatives? I'd find some other lab with a better track record and send them your negs.
Any 6v 4LR44 or PX28 battery will work.
If possible, try to get a Lithium or Silver Oxide version, like the Duracell 28L as it will last much longer than the inexpensive alkaline ones that are common online:
https://www.amazon.com/Duracell-28987-Lithium-28l/dp/B000CSK8FM
I use the app exif notes, mostly because I like having the times, lens used and locations of my photos but I record the aperture and shutter speed as well.
This is what I used. Fixed my squeak and it never came back. It also has a few needle tips to choose from. This is way more than you need, but I figured it might come in handy for something else.
Not sure where you live, and where you've seen it for so expensive, but here in the US it's less than $35 for the book, $29 for Kindle version.
Yes i use exactly the same setup with an XT30.
Things i added to make it better are those rails and clamps to get rid of the tripod: smallrig clamps
And i ended up with using a macro lens attached to a nikon to fuji converter that has a tripod mount.
And the cool thing is, because the lens is mounted on the rails via the adapter, it can stay there while i use my fuji and when i want to scan a film, i just put the body on take the photos and i am good.
You can get cheaper ones on amazon that will do the exact same thing. In fact, it looks a lot like a rebadged version of this machine, which is $30 cheaper. I guess with the cinestill machine you get those holder things, but I can't imagine they provide any real convenience.
Edit** Actually, it looks more like this one.
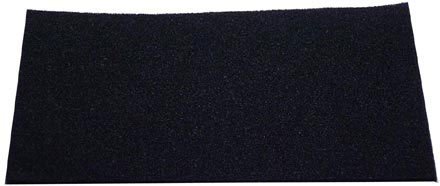
This stuff works well and comes in a variety of thicknesses.
https://smile.amazon.com/Camera-Light-Seal-Form-1-5mm/dp/B0014YUWF4
If it's a seal down in a groove I prefer using a 100% cotton or wool(not acrylic, it gets gooey over time) yarn instead of trying to stuff that foam down in there. The sticky backing on the foam makes it really hard to work with in that situation.
If you're testing it, I would try to buy one of the weincell batteries that are the correct voltage. The meter only works if the shutter is cocked and the advance lever is pulled out from the body, which can be a bit odd to get used to. I would also test the rangefinder calibration if I were you, though it isn't too hard to adjust yourself (from memory). If you have an android phone, theres An app that you can use to test your slow shutter speeds (1 second to 1/60 or maybe even 1/125 are fairly easy to check with the app). If your shutter times are incorrect it's quite difficult to adjust them from what I know, so you would have to send the camera for a CLA, which could add a couple of hundred dollars to what you spend
This might a blasphemous suggestion but shoot with almost any black and white film. Scan the image, and then edit again with Silver Efex Pro using one of their older film stocks or tweaking it to your liking. Then push it through Analog Efex Pro to make it look more filmy.
It's a free download and integrates into LR. https://www.google.com/nikcollection/
TLDR - shoot analog, post processing digitally to apply an even more analog look.
I got a macro extension tube set for about $20. I use it with a 50mm prime on a Canon T2i. I've been able to get great results.
I highly highly recommend this book for breaking out of the box in terms of photographic thinking! Everything from practical to philosophical exercises.
https://www.amazon.com/Photographers-Playbook-307-Assignments-Ideas/dp/159711247X
Well the fact you live in Canada might be a problem. I seem to have forgotten that America wasn't the only country in the world haha.
The speck is likely on the mirror or focusing screen.
Don't blow it with canned or pressurized air!
Take off lens. Use a soft brush blower bulb like this - https://www.amazon.com/dp/B00LV01BT2/ref=cm_sw_r_cp_apa_glt_fabc_M2NBWCPCS089V1HPMCX6 - and brush the mirror and the bottom of the focus screen.
I am not familiar with that exact camera but thr manual at https://www.butkus.org/chinon/yashica/yashica_tl-super/yashica_tl-super.htm did not say anything about a removable focus screen, so you can't take it out to clean the top.
If cleaning the mirror and bottom of screen don't work, I wouldn't worry. The dust is an annoyance but it won't show in pictures.
This is a Ricoh Singlex TLS - Here's the manual for it. It looks like a very simple camera to use. The battery it requires was outlawed in the US decades ago so you won't find it, but you can use this WeinCell MRB625. I'm sure it's only for the meter and you can operate the camera without battery.
It looks pretty cool and that lens might be nice.
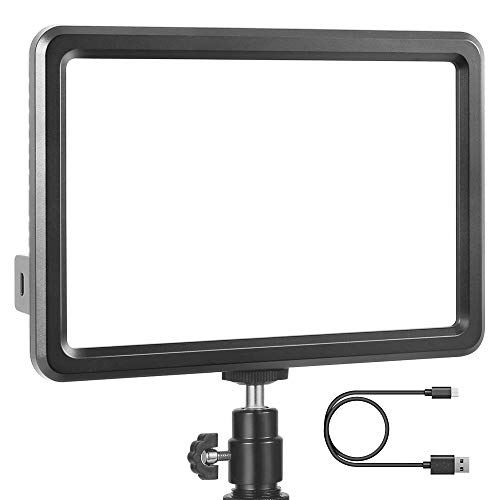
https://www.amazon.com/Photography-Brightness-3200K-5600K-Ultra-Thin-Portraits/dp/B07PMSBLTH
This is recommended a lot, it's super bright, even, and 95+ cri. drawing tablets are generally not recommended as the wb can be uneven, low cri, uneven lighting, banding etc.
I just got a cheap one from amazon, similar to this one. So far it worked great, no damage on the tips and the bent tips helped me a lot (i often need them bent outward when I'm somewhere in the lens).
As promised... I use a couple of these.
The receiver has a hotshoe so you can slip it right on the foot of your flash.
For the transmitter I have a pc sync to hotshoe adapter similar to this.
My only issue is that when I tested it on digital it didn’t sync properly at faster than 1/125th so... be aware and maybe do some test shots on digital first. I just don’t know how it would work with a leaf shutter so I shoot at slightly slow speeds on my LF camera.
The camera arrived with the bubble level already attached, no clue where it’s from. The L-bracket is the 3-Legged Thing QR11-FBG in Grey:
I'm guessing that if you had an incident light meter, you would use that. But this is definitely a situation where that would be the best tool for the job. The light meter application I use on Android has an incident mode. It might be worth experimenting with that as well.
I haven't done it with photos but throughout 2019 I've been using an app called 1 second everyday and capturing 1 second of video each day. Every month I re-watch that whole month and I'm excited to watch my entire year on New Year's! Some of my seconds are boring as fuck but in the context of the whole video it works.
My guess would be that it would be even easier with photos than video, because you don't need to look out for interesting movement necessarily. I think it sounds like a cool project!
Try metering the scene first, and don't forget the film reciprocity failure, you can calculate using app like this or try quick googling fuji pro 400h reciprocity failure chart.
Have you installed the Virtualbox Extension pack? It's a separate download (depending on your distro it might be in the repos or you can get it from the download page). Either way, I had all sorts of issues with USB before installing that but once I did it enabled USB 2.0 support and I was able to just assign the vendor ID of my scanner to always be claimed by virtualbox and used in the VM. No problems since then.
Looks like your scans are decent, just gotta sort out your white balancing!
I've had a V500 for years and I use VueScan (paid license). Even with the V500, properly white balancing (and color balancing if you're a masochist like me) is difficult. Just watch a bunch of youtube videos on other people's processes and you'll get the hang of it. BE PATIENT! There's plenty of folks just like you out there taping their negatives to flatbeds and making it work.
If the V500 is out of your price range for now, perhaps you can purchase or DIY something like this. Newer smartphones have camera sensors plenty capable enough to make a decent scan.
I also highly recommend a post-processing software like Darktable (free). I'm a lazy mfer and often just post-process my photos in Google Photos, but Darktable affords you an excellent amount of control over your scans, and can even allow for some automation.
Japan Hobby Tool on Amazon sells mixed packs of 5 sheets where you can choose the thickness of the packs.
This one. Fits in and lasts ages, as long as you remember not to leave it in A mode!
It uses little 8x1 mm magnets. I went for those instead of a spring because they're more consistent and much easier to source than adequate springs of this size. You can get 100 pcs on Amazon for $9.50, which will be enough to make 25 of those clips (or 50 if you only use 2 magnets per clip, but I prefer using 4 to get a really nice click and stronger closure).
My lab sends 'em back in sleeves and in a paper folder with the prints, so I just keep them in those. My parents' box full of folders kept photos of me safe, so it'll last at least 25 years!
I store them all together, ordered and numbered on the front to identify them, in plastic boxes like this. I got one for B&W and another for colour, and they hold about 35-40 roll's worth of negatives and prints judging by how I've filled them up so far.
For my self developed rolls I cut em in to strips of 4 for my scanner, and then slide them into these negative sleeves (7 strips of 6) I bought online, and put those in a binder in a shelf. I haven't printed any of those but I'd probably get a lab to do that, and they'd go into the boxes with the rest of them.
Yea, I'll hopefully be able to send it off to Oleg for repairs by December or sometime after sending off the Kiev 3/Zenit E. After finding some older disassembly manuals with my limited Russian, sweet jeebus are Leningrads a nightmare of a camera inside.
The Mir-1/Helios-44/Jupiter-11 trio on a Zenit C are what I tend to bring out when I go shooting film; it's light and does pretty much everything I'm after, though I'm hoping that Zenit E makes it a bit more pleasant of an experience.
Know the feeling with good quality foam; a shop ~40min from me had some foam, but it wasn't the best quality and lost its form pretty quickly when I repaired my Pentacon 135. Not sure if this is what you'd be after; it came up after a quick search in Japanese about mirror foam replacement for a Canon FT.
There’s this amazing accessory for the Contax Rangefinders, Leica owners will hate it! https://www.amazon.co.uk/dp/B00M1HSUFM/
Jokes aside, this are beautiful looking cameras and I’m jealous.
I have had my eyes on a Contax 645 for some time but that would mean parting with probably my 500 ELX as I have too many cameras now.
I have my eyes on a Bessa R as my first rangefinder.
I have the same lens, got this 6 months ago and have liked it so far.
Fotasy Metal 52mm Lens Hood for... https://www.amazon.com/dp/B0031CS83U?ref=ppx_pop_mob_ap_share
It’s metal, and comes with its own cap that fits on the front, which isn’t as nice as the canon one but it does the job.
I’m not sure if this is helpful but there are plenty of cheaper action cams out there if you don’t want to spend big bucks on a GoPro! Here’s a Kodak one for $80.
I just picked up one of these so I leave my camera on there and not have to set up all the time. https://www.amazon.com/dp/B08P3J3KY6/ref=cm_sw_r_cp_apa_glt_fabc_N9JZ60SXR33AM3JRRPJ5?_encoding=UTF8&psc=1
TIL there is a book called "Avedon at Work: In the American West" which will be an interesting companion to this book.
>Photographer Laura Wilson worked with Avedon during the six years he was making In the American West. In Avedon at Work, she presents a unique photographic record of his creation of this masterwork―the first time a major photographer has been documented in great depth over an extended period of time. She combines images she made during the photographic sessions with entries from her journal to show Avedon’s working methods, his choice of subjects, his creative process, and even his experiments and failures. Also included are a number of Avedon’s finished portraits, as well as his own comments and letters from some of the subjects. Avedon at Work adds a new dimension to our understanding of one of the twentieth century’s most significant series of portraits.
Nice! Great pickup! It's a marvelous camera and I adore mine, which I've had for almost two years now. They feel like real, proper cameras, you know? Sturdy, reliable, and ready for anything.
If you want to keep the paint nice around the lugs, try these, I've heard they're good at preventing scratching.
yes its a screw-in rubber hood
It's that one.
I had a vented lens hood on mine which slightly blocked a viewfinder corner but had no effect on the IR focusing mechanism UNTIL I used it with a rotating polarizer. In that case there seemed to be a certain point of rotation that would throw the focus off and gave me a couple blurry frames.
I got this straight hood on Amazon just last week and am testing it now but nothing blocks the focusing mechanism in general.
Something like that one, didn't order it myself so i don't know which it is exactly
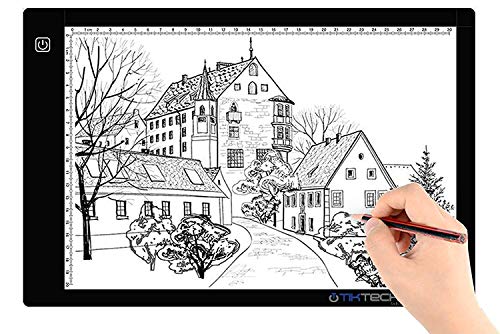
ust make sure it doesnt have those microdots on it like some of those boards have, especially the smaller ones. They have a raster of small dots over the whole surface, i guess to spread the light better when tracing drawings, but you dont want that for scanning for obvious reasons :)
Yeah, I'm gonna have to see what the photos look like on this roll. I went with this battery and this adapter but I know there are even better adapters that will limit voltage exactly so I might have to experiment. At 1.4 voltage for the batteries though that is closer than the 1.5 out of most LR44 batteries, so maybe it will be close enough.
I've never, ever seen fungus on the outside of a lens. Can you actually feel it with your fingers, or is it under the front element? Almost all the fungus I've dealt with is on the back side of the front element - usually you can get the element off with a spanner wrench and clean it. The notches on the black ring that surrounds the front glass are for a spanner wrench.
That said, I use a Canon 70D and opted for the Vivitar 55mm f/2.8 auto macro lens, because it comes in a variety of lens mounts like M42 which is easily adaptable but also because it natively achieves 1:1 magnification without extension tubes. You can usually also find this lens around $100 and it performs very well... almost indistinguishable from the Micro-Nikkor when stopped down past f/5.6.
This answer is correct. If you live in the US, you can buy LR44 batteries for much cheaper at Amazon than your local drug store.
I use these in my cameras and they work quite well.
https://www.amazon.com/Polaroid-Extreme-Alkaline-Batteries-Compatible/dp/B076GS29SK
Here is a link to a 8-pack for $16.99. It also comes in a 3-pack for $9.99, but this is a better value:
https://www.amazon.com/Sugru-Moldable-Glue-Original-Formula/dp/B007VXJM58
I use exif notes, which yes is geared towards recording data for every shot, but it does have space for things for the whole roll.
So I did a bit of googling - I think you're looking for filters with what's called a "Bay 1 Mount" or maybe easier to get a Bay 1 <-> standard thread adapter. Then get some regular thread filters.
eg: Bay 1 -> 49mm adapter:
I’ve heard you can use a usb light pad like the one I linked, but I have no personal experience. From what I have read those who have problems are those who are setting their negatives directly on the light pad/light box/et cetera. The trick is to elevate the negatives enough off the surface that DOF smoothes out any irregularities in the light source.
my camera’s light meter is still pretty accurate so that helps a lot, but i recently got an ND filter and it’s made getting a perfect exposure sooo easy.
I use a Matin Multiple Format Slide cutter that I got for $30. It’s translucent plastic with metal blades but very effective. It has white windows that let light from a light box or something through the bottom and cuts clean. I got mine on ebay from a seller that calls himself Dr.T ebay name: 3d-drt-3d
They also have them on Amazon for $35. https://www.amazon.com/Matin-Multiple-Slide-Cutter-format/dp/B00DMR8OII
It’s one of those products that just works and does nothing more. It’s priced so that if it breaks you can afford another.
At the advice of my seller I wear my lint free gloves and feed the film in, use the little roller to get it started, then pull the five frames I cut my strips into through with my right hand while holding the device with my left.
I got a set like this Neewer Professional Spanner from Amazon, not great but worked well for me so far. Also used it on a few lenses with success.
I've found my QL17GIII a bit weird when I put in a new/different battery. Try moving the dial from 'A' to an aperture settings and see if the meter starts behaving correctly. Also, pop the battery out, and reinsert. I also found that my Canonet doesn't like the battery adapter with those zinc hearing aid batteries. It flat out doesn't work. I bought these from Amazon, and they work, but if I take them out when set on 'A', they seem to be dead. Then I pop battery out, set aperture to like 1.7 (so meter is off), put battery back in, move dial to 'A', they work! So try set on aperture, pop battery out, back in, then back to 'A'. Good luck!
Good question. I tried to look it up on amazon and couldn’t find anything. Maybe I was wrong and it was Tiffen? I could have bought this set and then added blue later. I’ll let you know for sure when I get home and check.
00 (that's zero zero). I think 0 is too big.
This is the set I got and it's the best for this stuff. I got another "high end" set of something else and the flatheads twisted on the two smaller ones.
No issues with this set.
https://www.amazon.com/VESSEL-precision-screwdriver-set-TD-56/dp/B000CED236
if they’re dense/opaque, that means they’re more toward the side of OVERexposure...which is not what I’m seeing on the scans you posted. I’m starting to think maybe they just did a shit job of scanning, or they were so overexposed that it threw the scanner off (unlikely)
if you have a tablet or something laying around you can try this app with your phone to get a rough scan and compare it to what your lab gave you
It screws into your filter thread on your lens, and allows you to compose with the filter off for darker filters, then you can flip it down to expose
https://www.amazon.com/dp/B07W3YYSMS/ref=cm_sw_r_cp_api_i_Y3sCFb1F38YWH
> Well I only know these very precise kitchen scales from Görlitzer Park :D
Lol, I actually started using a drug scale, but then I bought those (3 kg version). I’m very impressed, the built quality is plasticky, but precision wise I have no complaints and at that price point you really can’t make a mistake.
I never understood why people measure stuff with a beaker, it’s so cumbersome. Unless you’re working at weird temperatures or densities, 1 ml = 1 g is way more precise
> which powdered developer do you recommend? I really want to find some alternative to Rodinal
I haven’t used Rodinal yet, so I can’t compare. Until recently I only used FX-39 II and was quite happy with it.
Then I had a workshop for developing & printing, and the teacher brought some Adox Atomal 49, and boy that stuff is just brutally sharp compared to FX-39, even the teacher was amazed (I’m shooting 6x9 so there’s plenty of details).
You can use it stock or one-shot (I too am a one-shot person), so I bought the 5l powder kit (because it’s much cheaper that way), ignored the huge “dO NoT MAKe pArTiAl SOlUtIoNS!!1!” warning since I weighed everything precisely (at that point the drug scale came in handy again because it’s 0.01g) and that works out well so far.
> I also used to use that thingy
I recently saw some video where someone cut one film with a single scene in several pieces and compared it using different techniques and except for stand development it was basically impossible to say what method yielded what results
I made a mostly digital one with a chapter of analog photos documenting abandoned places along the east coast. Amazon
I also enjoyed @bradmbaldwin zine of the cascade mountains from blurb but I liked amazon’s print quality better.
any model in particular? Amazon has a V500 with 1 left in stock currently
I would love to see how yours came out, I just got the frame for the photo today and am going to print it soon.
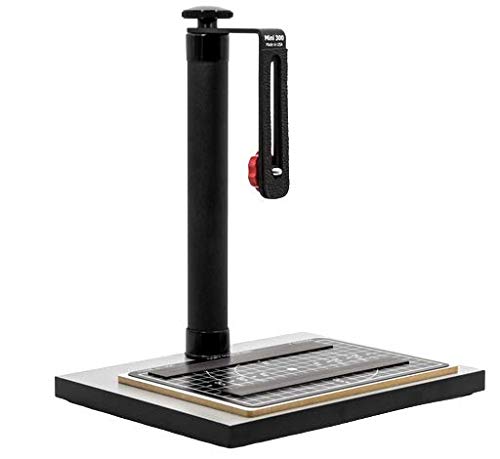
For scanning this is what my setup looks like. The camera is a Canon 5Dmk3 with the 100mm 2.8 macro lens. I got the film holder off amazon for like $35. didn't use the glass or tube, just taped the holder to a cheap light table.
EDIT: For 120 film, I just use a different holder and tape off a whole the size of the frame on the light table. I either move the camera back so I can see the whole frame, or If I want stupid large file sizes I take multiple shots and stitch them together like a panorama.
Fotasy M39 to Sony mount adapter under $9 and free shipping with Amazon Prime. Can't you return the M42 adapter and buy the correct one?
I have the M39 to Fuji x-mount and Minolta MD to Fuji x-mount adapters from Fotasy and they work great.
For landscapes, Ektar is a very solid choice. Bold contrasty saturated colours, which will make the autumn colours and the sky pop.
Otherwise Delta 100/TMAX 100/FP4/Acros 100 will give nice sharp black and white results, if you like BW landscape shooting
As for testing the camera, you should check the rangefinder accuracy. Turn the lens to the infinity stop and look at something at least half a mile away, and see if the rangefinder patch is lined up. Then put the camera on a tripod, and put it 1m away from something (measure the 1m with a tape measure, you need to be accurate to within like 1 or 2 cm) and turn the lens to the 1m mark and check whether the rangefinder is lined up on the object 1m away. You can check the slow shutter speeds on your camera using an app, I've used this app, I assume there are similar iOS apps. I found I could measure up to about 1/125 on my M3 I think. If your rangefinder is off, you can fix it yourself, it's not too hard, provided you have the right tools, or buy them off of eBay. The shutter speeds would need to be fixed by a professional though.
This one looks pretty close to what I see in the image: https://www.amazon.com/gp/product/B01M26S3VY/ref=ppx_yo_dt_b_asin_title_o00_s01?ie=UTF8&psc=1
I actually just had this delivered today for the same purpose. I haven't used it yet but my initial impression is good. The light is mostly soft and doesn't have a dot grid most of the other cheap light boxes have.
Not /u/macotine, but the KEKS EM-01 light meter is a most excellent one. Currently retails for $112.
My QL-17 has always metered extremely well though, so I've never felt the need for a cold shoe meter. I've been using cheap 1.5 volt LR44 hearing aid batteries, which is .02 volts more than the original mercury battery, but it never seemed to affect the metering that I could tell, and this was shooting side by side with a DSLR at times that had dead accurate metering.
I was using a bit of small copper wire rolled into a spiral as a spacer for four or five years, as the LR44 battery is a bit thinner than the mercury battery the camera was designed for, but I splurged for this $10 battery adapter off of Amazon, which is superior in every way.
I'd test your meter with a cheap roll of C-41 color film and a fresh LR44 battery and go from there before getting a cold shoe meter that's a third the cost of the camera.
I have a very similar setup. I'd recommend picking up something like this to secure the tripod head to the post: https://www.amazon.com/gp/product/B01FETT3FO/ref=ppx_yo_dt_b_search_asin_title?ie=UTF8&psc=1
It will bring the camera closer to the post, reducing leverage and making the camera much steadier and less prone to sagging and vibration. (I used a similar clamp as you initially before I tweaked by setup.)
Pretty much, but if OPs using a 2016 MacBook then they might as well get a USB-B to USB-C cable and not require an adapter. Something like this:
Solvent might work - don't use acetone, and I'd try an alcohol before WD-40. Dribble some 99% isopropyl or some grain alcohol ("Everclear" type stuff) and wrap it in plastic wrap to keep it from evaporating. Might take several applications.
If the cap and the camera bottom plate are metal - if the alcohol doesn't work, you can try touching a hot soldering iron around the circumference.
If that doesn't work, you may need to buy a lens spanner wrench and drill two tiny holes in the thing and crank it loose, but do a good alcohol soak before, like a day or two wrapped in plastic and re-applying every few hours. Chances are it's full of rotten battery, you'll need to get the remains of the battery out, clean it all up, clean the corrosion from the battery contacts (probably very fine-grit emery paper, like 1000 grit) and test it. Battery corrosion loves copper wire, it can travel up inside wire insulation and eat the wire up while ignoring the insulation, so the wires can look fine but there's no connection.
I learned a lot from this. Great breakdown of how iso, shutter and aperture affect the image creatively and technically.
Something along these lines will help with the battery issue https://www.amazon.com/FASTROHY-Battery-Adapter-Antique-YASHICA/dp/B08BRV1G3V/ref=sr_1_1_sspa?gclid=CjwKCAiA-dCcBhBQEiwAeWidtZn0Z69afaTUJJZtNkOjsrZZO4DtVNmw4nOq2UwPBcVl-QPdwwbqyxoC6qIQAvD_BwE&hvadid=323606615182&hvdev=c&hvlocphy=101358...
So you seem to enjoy doing and buying what we say? :-) Perfect. I command you to donate all of your gear away and buy this book immediately.
I put them in these
I ended up grabbing this Colorado Company plate. It's 1cm deep and the screws can come off (including the tiny lip that has two small balance bars in it) so you then can sit your camera upright and balanced. Looks good! That's for the tip of using a tripod plate!
Peak Design 6L sling is my favorite around-town bag. Comfortable fits an SLR, second lens, some cannisters, and even room for misc things. Under $100 on eBay, Mercari, etc..
I had a bit of difficulty with the Paterson spirals jamming, even if I was very thorough in making sure the ball bearings were clean. I then found it very frustrating to have to remove the film and try to start again.
I bought a spiral with a longer guide tab to help get the film onto the reel in the first place. I haven't had any issues since making the change.
This is the one I ended up going for. It's much easier to get the film aligned.
Mine was given to me and I love it. I found that this battery adapter
FASTROHY 2Pcs MR-9 Battery... https://www.amazon.com/dp/B08CSMCQ4G?ref=ppx_pop_mob_ap_share
Along with LR44 Silver Oxide batteries like these
10 357 / 303 Energizer Batteries... https://www.amazon.com/dp/B000RB05LG?ref=ppx_pop_mob_ap_share
Work the best for me. I typically don't have to do any adjustments for correct exposure levels.
No prob, we all want to succeed at this stuff - and failing gets pricey - OTOH, Tim Rudman (in his "Master Printing Course" book, which you should 100% get, it's freaking killer and out there used!!) lists darkroom equipment and includes "a really big trash can - if you're not failing, you're not trying".
You definitely need a longer lens for 6x7 - the EL Nikkor 80mm will do up to 8x8, but I'd look for the 105, it's less known and a great lens. I find with the 80, 6x7 negs need to be perfectly centered to not vignette a bit in the tall corners when printing big. To swap lenses, find the instructions for your enlarger or do a post here with the specific model. You may need a cheap spanner wrench to get the retaining ring off, if it uses a ring. (Cool print, too, I seem obsessed with ruined things!)
Pro-level enlarging glass has 6 elements, generally El-Nikkor, Rodenstock "Rodagon" and Schneider Componon-S (the "S" is important, non-S may be cheaper glass). Hobbyist lenses have 4 or 5 elements but you may not see a huge difference in smaller prints. Some Minoltas and Fujis are 6 elements, but the three brands I listed are a little easier to know you've got a good one.
You're right. Totally forgot it. They have different sizes of kits depending on your needs. Here's the basic one : IFIXIT on amazon
The selfie stick concept was used in 1983 by Minolta with the Disc-7 (see pictures #5 in this listing). I don't know if it was created by them, just throwing it out there that this preceded the book referenced by about 10 years.
My absolute favourite regarding photography and history (which is kinda the closest you get the subject) is Photography: A cultural history
It's basically a encyclopedia of different photographers and their style. From Daguerre to Cindy Sherman and Andy Warhole. Discusses different impacts of photos and the cultural meaning and context of their work.
if you want cheap negative clip/hangers try these and just take the rubber slip-on covers off. I use these, works great, but I added some stainless steal washers to make them heavier so my negs dry straight.
There are always the classics: "The Negative" and "The Print" by Ansel Adams. But that may be too much to start with. I quickly looked at TOC of a few books on Amazon, and this one appears to have great structure. Chapter 4 talks specifically about exposure. This one is also good, again based purely on its table of contents.
That's one of the most popular cameras ever made. There will be plenty of web and youtube intro guides specifically for the K1000 showing how to load the film, etc.
You could consider a general photography book, like an old used copy of this book for a few dollars.
This article should help!
Basically you want a Minolta SR to MFT or M4/3 adaptor, something like this.
I can't comment on the quality you'll get, but since the adaptor doesn't add any glass it should be the same quality but with a x1.5 magnification because you're adapting a Full Frame Lens to an APS-C format camera, i.e. A 50mm Minolta lens will look like a 75mm lens on your Lumix.
I use the Sekonic L-208 for my analog photography.
It works fine for me, because I have the possibility or incident and reflected light metering. This helps to perfectly expose the subject in difficult situations.
I also really love the analog design of it. That might be different for you.
you need a spanner wrench, something like this Spanner wrench
Sorry new to scanning don’t really know what I’m doing, but the back of the plustek calls for a 15V power adapter which I bought on Amazon. It came yesterday, plugged it in, downloaded silverfast, all that. Boom. Not turning on. I’m pretty sure it’s the power adapter it did feel kinda loose when I plugged it in but if it’s not I have no idea why it isn’t turning on. this is the power adapter I bought. idk.
In general I do highly recommend the Bronica ETRS - I love mine. I don't mind the WLF and it comes in handy a ton for low angles. If I only could use the WLF I could see it getting frustrating but mine luckily came with an AE prism as well.
I take back what I said about the ergo/bulkiness of the ETRS too, especially if you were considering something like the pentax 67 instead. The grip on the Bronica does make it a bit larger but it greatly improves the ergonomics, so imo it's worth it for the comfort. Plus you can always take the grip off. I actually leave mine on all the time though and can fit my ETRS, 3 lenses and a spare back all in the main compartment of a fairly small camera bag.