
What are
/r/BIGTREETECH's
favorite Products & Services?
From 3.5 billion Reddit comments
The most popular Products mentioned in /r/BIGTREETECH:


The most popular Services mentioned in /r/BIGTREETECH:
Git Bash
Visual Studio Code
PlatformIO
CircleCI
Meld
Gofile.io
DeepL Translator
Autodesk Tinkercad
imgbox
SD Card Formatter
Cults.
Notepad++
The most popular reviews in /r/BIGTREETECH:
White lithium would be my next choice
My ender 3 board used the same USB Mini A connection, same with my Wanhao i3
SD cards are still very relevant in the market,( old and brand new) DLSR cameras use them, all sorts of devices do.
Best buy should have everything, Microcenter has everything, Walmart may them, Target may them....Walgreens/CVS may even have one
I'm using this to extend my TFT35 for a SKR mini E3 v2 printer that I put together a couple of months ago. Not sure if this would work or not.
To help u/Byrnes9 out: did you purchase drivers separately? They would look similar to the ones in this listing here which are TMC2209’s. Several different stepper drivers out there, but have to know which in order to compile. I’m using the same board on Ender 3 Pro, but I’ve added quite a few things that you probably don’t want (Relay for power shutdown, sensor less homing on X/Y, BL Touch, and TFT35 E3 V2.0 I believe). Good luck!
2.54mm JST-XH, and 2.0mm JST-PH JS.
The 2.54mm pitch connector has the same pitch as the gpio on a raspberry pi.
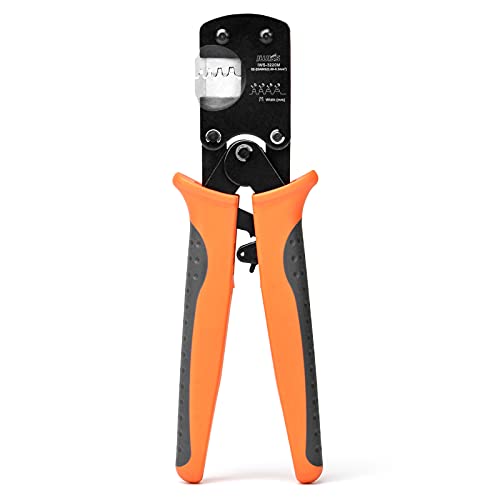
yes, https://www.amazon.com/IWISS-Crimping-AWG28-20-Terminals-Connectors/dp/B078WNZ9FW
External Mosfets are like $10 on amazon. It’s a good idea.
Mini Heat Bed Module, FYSETC Hot Bed Power Expansion Board High Current Load Module MOS Tube Hot Bed Mosfet with Cables for 3D Printer - 2 Pack https://www.amazon.com/dp/B07C4PGXFK/ref=cm_sw_r_cp_api_i_MjGgFbPQA8J9P
One of the pictures in this link show where to plug in "dual Z axis" I only noticed E0, but nothing more than that, ie, E1, E2, etc.. You might be able to configure something in your firmware to give you independent control, but I have no clue how you would go about doing that. Have you tried Encyclopedia YouTube??
Do you have your heater connected to an SSR or just straight to your PSU??
​
If your fuse looks like these, they're pretty cheap, and you can use them in most automobiles as well. https://www.amazon.com/Fuses-Blade-Style-Circuit-Protection/dp/B07X32L7B4/ref=sr\_1\_7?crid=OMMKQZZUHS8H&keywords=jf+15a+fuse&qid=1670927099&s=hi&sprefix=jf+15a+fuse%2Ctools%2C105&sr=1-7
When plugging in the fan for the hot end, you'll need to salvage or purchase a connector so you can plug it into the board. If you doin't have an extra, wire it directly into the main power input along with the positive & negative wires. This will keep it on all the time but will keep it running.
I had purchased an electronics kit for a rPI and it had the connectors in it. Keep in mind that if you wire up a terminal jack for the hot end fan wires, you may need to connect them in reverse or swap the pins in the connector so red and black are in opposite positions. The 24v brushless fan on the ender3 doesn't work when polarity is reversed. I had used these: https://www.amazon.com/gp/product/B07RRSG321/ and ended up taking out the wires and swapping the pins around as it seems either these connectors are backwards or the board is.
Also, if you don't do it now, learn to compile your own firmware. Can be tedious but you have full control over your printer if you do that.
I just did this conversion. It's not difficult, as most of the connections are 1:1 as others have indicated.
You can find the various manuals here. The one you'll be interested the most in is the ...PIN.pdf.
The only thing I really struggled with was the fans...
- FAN0 = part cooler/blower
- FAN1 = mainboard
- FAN2 = hot end
As far as the JST connector for the fan, I ended up using this kit from the Amazon with crimper and connectors. It also includes Dupont connectors as well. There are also versions with just the JST's for less as well.
It throws some error in VSC when I click the checkmark to begin compiling. See below.
> Executing task: C:\Users\shane\.platformio\penv\Scripts\platformio.exe run <
Processing STM32G0B1RE_btt (platform: ststm32@~14.1.0; board: marlin_STM32G0B1RE; framework: arduino)
----------------------------------------------------------------------------------------------------------------------------------------------Tool Manager: Installing git+https://github.com/stm32duino/Arduino\_Core\_STM32
Error: Please install Git client from https://git-scm.com/downloads
The terminal process "C:\Users\shane\.platformio\penv\Scripts\platformio.exe 'run'" terminated with exit code: 1.
Terminal will be reused by tasks, press any key to close it."
Not without some additional hardware, but it's easy to add a small buck converter to reduce the voltage to 12V for fans, and they're cheap. You can run several fans off a single buck converter like one of these; small ones are typically rated for 2A-3A and a fan typically takes 50mA - 100mA. You just need to be aware that for PWM controled varible speed fans, such as the part cooling fan, you need to wire it in a particular way. You can still run that and the always-on heatsink fan from the same converter. Plus a few 12V LEDs if you like.
I had issues compiling with VSCode/Platformio. Here is what I did. 1. Uninstall VSCode. 2. Reinstall VSCode, download the latest from Visual Studio Code 3. Select platforms on the left. 4. Select uninstall Platformio. 5. Select install Platformio. 6. Close VSCode. 7. Restart VSCode. 8. After Platformio shows, find the run tasks icon in the ribbon lower left, click on it. 9. At the bottom of the box that drops down, click on show all task. 10. In the box at the top of the drop down, type in Platformio: upgrade then click on the item showing. 11. After the upgrade is complete, repeat steps 8 & 9, in the box at the top type in Platformio: update, click on Platformio: update (all... 12. After the update is complete click on the trash can icon at the bottom lower left. This clears the build for a clean compile. 13. Compile.
I hope it works for you.
You can use a better antenna. I didn't look closely but the wifi module looks just like an ESP32 with external antenna (could be ESP8266 too), for example this one on amazon (there are many like it).
The Pi4B adaptor does allegedly support the official Raspberry Pi CM4, so it's got ports on it that the CM4 can use but which the CB1 apparently lacks - DSI particularly. The BTT site notes the DSI connector is NOT usable with CB1 but works fine for CM4, and makes no reference to the CSI connector not being usable so I am going to assume Pi cameras work fine. The CB1 has two Micro HDMI connectors, so beware if you want to hook something up, you'll need appropriate cables.
So far, I'm a bit miffed that I can't throw standard Debian on it, but currently slogging through getting the BIQU image loaded and see if I can SSH into the thing via wired. Here's to hoping there's no secret "foreign nation" code in this ... I speak slightly tongue-in-cheek here. Only slightly...
​
a pt1000 sensor would be the one needed to read ~500c without going to the pt100 with an amplifier board
https://www.amazon.com/BIGTREETECH-Graphic-Display-Controller-Printer/dp/B082YPF5YV
this is the plug and play option I know of and used without issue-
the display who show youre gonna need a pi for
Like /u/DrBannerHulk said, a DC-DC buck converter is the easiest option. Just buy one of these and power your RPi from the same PSU as the Octopus. This is typically how it's done for Vorons, but the idea is applicable anywhere.
Short answer is probably, if your SKR firmware supports using the TFT 35 ports as a bootable device (the serial port is a serial port). This probably isn’t coded in the Marlin firmware from BTT. I have an Octopus board that I broke the USB C port off of… Ultimately bought a pro just to keep using Octoprint. And I don’t power the pi from the board. Instead, it has its own power and I use this:
https://www.amazon.com/dp/B094G4P3P4/ref=cm_sw_r_apan_glt_fabc_5AV73KQ53FRP37KM2VD9?_encoding=UTF8&psc=1 to block power to the pi from the main board. This also allows me to keep the pi up even if the board is off, and removed the low power error Octoprint gave.
Here’s an article to go directly to the board… https://techoverflow.net/2022/04/03/how-to-flash-marlin-2-x-to-btt-skr-1-4-using-platformio/
I can’t imaging printing without Octoprint! I can even flash the board from the pi now!
Which one? I have a standard lcd screen, like the one here (https://www.amazon.it/ZkeeShop-Display-Controller-Compatible-Printer/dp/B072PRDRNZ/ref=sr\_1\_8?keywords=lcd+screen+3d+printer+module&qid=1662475119&sr=8-8)
This is what I bought.
All the cables associated with the hotend plug into a little board behind the cooler, and outputs to a USB-c. that usb-cable runs down to the breakout board you see in the pic. This makes everything nice and neat going down to the board (as its one cable). that little board needs power, and has a spot for DC in... I don't know where that comes from on my btt octopus. I can't use my printer till I figure that out. I was successful to a degree using my printer running long cables from the hotend all the way down to the octopus, but would rather use this usb-cable to make it look neater.
When I installed the mini e3 v3 on my ender pro, I also had heater problems and got the heating failed error. In my case, it was when I tried to get above 235. Even after PID tuning with sequentially increasing targets I couldn’t get it hotter than 235 before it would throw up that error, saying it took too long to reach the target temp.
I never figured out why it was doing that, it I fixed it. Suspecting it was cooling the hot end too well, I replaced the heater cartridge with a 60w cartridge ([5-Pack, 4.92ft] 24V 60W Heater... https://www.amazon.com/dp/B09SXZ5MYT?ref=ppx_pop_mob_ap_share) and never had that issue again.
They're JST XH connectors. They use crimp contacts, so you'll need a crimp tool. You can't solder those connectors. It's often easiest to buy a kit which contains a number of housing sizes, a number of contacts, and the crimp tool. If you can't find a kit with the crimp tool as well as the housings and contacts, you can buy the crimp tool separately. The two most popular are the IWISS IWM-3220M and the Engineer PA-21.
There are lots of JST XH kits, and you'll find some of them described as 2.54mm (0.1") pitch connectors. Genuine JST XH are actually 2.50mm, and in fact most of the kits labelled 2.54 seem to just be mislabelled. Even if they weren't the difference over 3 or 4 pins is insignificant.
Ferrule Crimping Tool Kit - VENJSEN AWG23-7 Self-Adjustable Ratchet Wire Crimping Plier with 1250PCS Wire Ferrules Kit Wire End Terminals https://www.amazon.com/dp/B09KGTRXV6/ref=cm_sw_r_cp_api_i_ZG3AJJ0K13KY34377ZEJ
Na, I just got it on Amazon. I’m not sure if the pin out is exactly the same but here’s the one I got. https://www.amazon.de/dp/B08L5DT8RK/
It’s been a month since I posted the explosion and yesterday I finally had a free kid free day to work on connecting up a new board. So far I have the steppers, temp sensors, fans and heaters all connected up and working. The only things left are the end stops and BL Touch. So I guess the breakout board works.
I’m starting to think it was the dodgy off brand stepper drivers I bought because everything is connected the same as before so far except now I have the bigtreetech drivers.
Id get closest to. this is what i used for similar application Just make sure the red and black wires are going to correct leads. You might have to flip the wire. You can do that by pushing the pins out and re inserting them into jst connector. Theres plenty of YouTube tutorials on how to do that.
- Yes
- I would use this: https://www.amazon.com/Ksmile%C2%AE-Female-2-1x5-5mm-Adapter-Connector/dp/B015OCV5Y8/ref=sr_1_3?keywords=female+barrel+connector&qid=1652805923&sprefix=female+barre%2Caps%2C78&sr=8-3 Just make sure the current rating of your power adaptor can handle it.
- The Octopus has a Motor In, I think you could just supply that with a separate 5V supply. Stepper motors operate more efficiently at higher voltages, so 24V would be better because it would draw less current(Amps). Is there a reason your going with 5V steppers? Also my above approach does not work if you want to mix and match different voltage steppers. My suggestion seeing as you are running Klipper is to run two boards(Not octopus), run one set of steppers off from 5V and the other 12V.
- Yes. Power and ground. The other two are : PWM +5V and Sense.
- I don't see a question.
- I'm not sure but I would suggest that you give it a shot and find out. The worst that happens is that it doesn't work.
After all that, I think the octopus is too much board for what you are trying to do. They way you described your use case you are not going to utilize a quarter of the capabilities.
Are any of the USB cables you tried shielded with a ferrite bead? I had this issue when I used a long, thin, unshielded, micro-usb cable. I now use these cables and haven't encountered a similar issue since. Any length under 6ft should work.
You may also want to cover the contact on the +5V line (or snip the wire) in the USB cable. I think the SKR2 can attempt to power itself from USB and that can cause instability too.
These are what I used, unfortunately they are out of stock but you can use their stats at least to source a 3rd party version.
https://www.amazon.com/gp/product/B08VFQF284/ref=ppx_yo_dt_b_search_asin_title?ie=UTF8&psc=1
If it is a version 1 (no slot opening to access the set screws holding the heatbreak), it is a Phaetus Dragon; version 2 BIQU made its own heat block; see link below. V2 should work on both versions.
Yes, I have the Octopus, BIQU Hermit Crab CAN, BIQU Hermit Crab Pi CAN HAT, all communicating together. On the ID the device you are adding needs to be the only new device on the bus. Also, if you are using a Pi Hat with the Octopus board you will need to match up the CAN-H to the other CAN-H & CAN-L the same, it is not like UART. You will also need these
Hey there. After a while I managed to mostly get rid of VFAs.
Switching to these motors fixed the issue for me. https://www.amazon.de/-/en/Nema17-Stepper-17HM5417-1-7-0-90-40-N-Printer-Stepper/dp/B01FFUQ8R8
Before these I tried some 0.9 step LDOs but the VFAs were still there and the motors were extremely loud.
I think you’re asking if it’s npn or pnp, definitely npn
Here was the link to the probes I used
Yeah I made sure to double check the wiring diag to figure out which pins where what between the board and the connectors for both the BL touch and the inductive probe. The BL touch was more confusing but I’m still confident the wiring was correct on both. I tried swapping between just using the probe pins and using the z stop pins with the BL touch. Configured the pins properly in marlin whenever I swapped the connectors between them too. I even tried both with the inductive probe as well.
I also definitely flipped the logic on the inductive probe in firmware just to be safe since I wasnt 100% clear on how to distinguish the two in firmware, pnp/npn. But neither worked so that was cool. Definitely used different wires for both. The probe only needs 3 wires while the bl touch uses 5
TEMP_SENSOR_0 is what you need to update. I purchased This sensor
And had to update to
TEMP_SENSOR_0 13 to get it to work
You should do this for your hotend and bed as well. I used the same size for my bed and power. My hotend was smaller. I bought this one
Ferrule Crimping Tool Kit - Sopoby Ferrule Crimper Plier (AWG 28-7) with 1800pcs Wire Ferrules Kit Wire Ends Terminals https://smile.amazon.com/dp/B07PJK2VNT/ref=cm_sw_r_apan_glt_i_59MDYW6RXMN3X8THYCXS?_encoding=UTF8&psc=1
Does it have to be ferrules or will spade connectors like this be OK... Electrical Terminals, 400PCS Crimp Connectors, Eventronic Electrical Crimp Terminals with 18 Sizes Insulated Terminal Set https://www.amazon.co.uk/dp/B06ZZRPK6V/ref=cm_sw_r_awdo_HJ8734R18CV5G0YW5PJR
buck converter on some 12v noctua fans will do it....
I run these goofy LED fans on my ender 3 and it works fine, they are pretty quiet too, I got them super cheap back in Jan 2021 and have been running 24/7 since I installed it. May try those and see if they are quiet enough for you
These may be a bit more quiet and not RGB
I'm still waiting for my CR to arrive in the mail, but I bought some 5 pin "Dupont" connectors to re-do the connector when it arrives.
These are the connectors used at the back of the Biqu.
Here's a link to some on Amazon:
i thought i posed a pic but it didn't load. hrm.
​
this is what I bought.
No, that would be back powering the pi through the SKR. Your (newer or modified) pi is designed for that but the SKR isn’t. The pi can draw more current than the SKR would be able to provide and still remain stable. Get a 5v, 3a buck converter and hook that up to your power supply instead. I use one of these. I soldered some wires to it and mash them with the screw terminals. https://www.amazon.com/dp/B01HXU1C6U
To protect against backpowering I use these between my 3d printer and pi, though my intent is to prevent providing power TO the SKR from my pi. Old habit from the creality board that didn’t have a jumper for that. https://www.amazon.com/dp/B094G4P3P4
2 relay board is just a board with 2 relays on it. I'm controlling the relays with the pi to turn the SKR 2 main power and a light on/ off through octoprint. https://www.amazon.com/SainSmart-101-70-100-2-Channel-Relay-Module/dp/B0057OC6D8/ref=mp_s_a_1_3?crid=1OPSU6GGA3GND&keywords=sainsmart+2+channel+relay+module&qid=1644586608&sprefix=sainsmart+2+%2Caps%2C214&sr=8-3
The mosfet board is a standalone mosfet chip. I'll be using it to provide a higher power pwm signal from one of the fan ports to power a laser. Still trying to figure out i good board for this.
I was having troubles with stringing and blobs as well. No amount of retraction settings were changing it. In fact, It got so bad, I jammed every time I even explored any settings for retraction. My problem was my extruder system. I switched to a direct drive, and switched to the settings for it, 1mm. with 27mm/s as speed, it went away.
I installed the Dawnblade/Creality Direct drive system. Found it on amazon for 49$+Shipping.
https://www.amazon.com/dp/B08NZQJD4V?psc=1&ref=ppx_yo2_dt_b_product_details
with it, I used the Dual Z rod kit by HICTOP. I find it was not necessary, but it has its benefits.
I suppose you can upgrade your extruder with the bowden tube, perhaps to a dual gear extruder. That might solve it as well.
I don't believe so, no. VS Code is free... Then you install the Platformio IDE plugin to manipulate the code and compile.
https://code.visualstudio.com/
Edit: Example vid... https://youtu.be/W6zYvRgGr3Q
I got one of these have it mounted to the side of the printer.
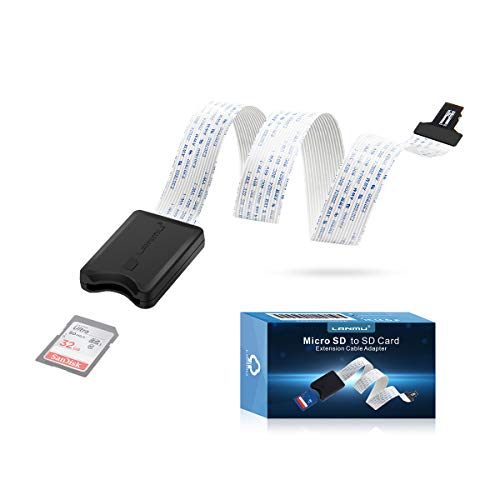
LANMU Micro SD to SD Card Extension Cable Adapter Flexible Extender Compatible with Ender 3 Pro/Ender 3/Ender 3 V2/Ender 5/Monoprice Mini 3D Printer/Anet A8 3D Printer/Raspberry Pi/GPS(18.9in/48cm) https://www.amazon.com/dp/B01D9JIUU0/ref=cm_sw_r_apan_glt_i_2D30NX8BXM6THRV133KE?_encoding=UTF8&psc=1
There isn't anything in Marlin to set an upper limit on fan speed. You really need a buck converter - but you only need one for several fans. Most can provide at least a couple of amps, and most fans only take 100mA to 200mA. Example (not necessariliy a recommendation): https://smile.amazon.co.uk/dp/B077VW4BTY/
Do read up how to use a buck converter to power a PWM fan. You don't connect the input of the buck converter to the original PWM fan port, but to the 24V power rail. You don't connect the 12V fan negative to the buck converter output either, but to the negative connection on the original fan port, since that's what carries the PWM signal. All the buck converter does is provide stable 12V, so it can do that for several fans at once.
I bought the btt one because it was less than $20. This is the exact one I purchased: https://www.amazon.com/BIGTREETECH-Mini12864-Graphic-Display-Prusa-i3/dp/B08P5LXR86/
Any of them should work though. I wouldn’t spend more than 20-25 on it. People have seemed to have a lot of luck with the TFT35 at the $40 price point. It’s closer to the size of the Ender3V2’s original screen. For simplicity’s sake though, the 12864 is about as simple as they get. Any decent manufacturer’s product should work. The BTT one definitely works.
Good luck with everything!
If you want touchscreen that something like the BTT TFT35 E3 V3 (more connections for various printers)
If not bothered by touchscreen then something like this
BIQU LCD 12864 Version Graphic Smart Display Controller Module with Adapter and Cable for RAMPS 1.4 Reprap 3D Printer Kit https://www.amazon.com/dp/B01FH8KTZU/ref=cm_sw_r_awdo_navT_a_0J85W01EFM60EFA9H2XC
> “clone/generic” RepRap Full Graphic Smart Controllers
Is this one ok? I mean, I should be able to find Marlin settings that will work for it.
https://www.amazon.com/dp/B07VWF4W3J/ref=twister_B082YPF5YV?_encoding=UTF8&psc=1
Np so it's exactly like the instructions say and you need this wire (the left one in the photo} BIGTREETECH 2 Types BLTouch Extension Cables + Mount Compatible with Ender 3, Ender-3 Pro, Ender3 V2, CR-10, Ender 5 Proand and Normal Controller Board https://www.amazon.com/dp/B08G8B23L7/ref=cm_sw_r_apan_glt_fabc_R09KWT7YXPA9S6B73YZ6?_encoding=UTF8&psc=1
Depending on the thermistor that you get, you just edit configuration.h and let it know which type of thermistor you have installed. If you're wanting things to be simple, just buy the same model of thermistor. So, if the old one was a HT-NTC100K, buy another one. I personally like the new ones that screw into the hole where the grub screw is located for the thermistor like this one https://www.amazon.ca/Thermistor-104NT-4-R025H42G-104GT-2-Temperature-Extruder/dp/B08YNXZMGK/ref=sr_1_4?keywords=thermistor+screw+in&qid=1639624872&s=industrial&sr=1-4 , note that they give info on how to define it in Marlin, type 5. The biggest advantage of this type of thermistor is that it doesn't break so easily and isn't so finicky with placement.
Here you go, print it in the orientation that it is on the photos for a stronger print, also if the bracket is mirrored please tell me, I kinda just copied this off of a dampener bracket and threw on a Nema 23, but oh well.
Also, please don't destroy this model, I have a backup but rn I'm exhausted and can't deal with people that just mess up other people's stuff, so yeah don't mess up the model.
I feel pretty much the same way but for several weeks now.
​
Before the SKR 1.3 board upgrade, everything went well. I could print everything without any problems and the leveling was no problem.
​
Since the update, I just can't get my bed really leveled by hand anymore and BLTouch doesn't work at all.
I have tested Marlin 2.0 and BTT Marlins.
​
Not helping, so I am thinking about buying another board.
Or maybe even a complete firmware upgrade.
​
Translated with www.DeepL.com/Translator (free version)
FYI I use Notepad++ to compare and copy settings. Here is how to use it. If you need to download Notepad++ use this link Download Notepad++ Open the source file, press Ctrl-Alt-1 Open the destination file, press Ctrl-Alt-c The differences will be highlighted, make sure not to copy anything that is not in the destination file unless you are 100% sure, bad settings can drive you crazy. When done copying, save and close the files.
Here are some 1.5 meter 6 pin to 4 pin stepper motor cables... if the direction is wrong just swap the wires on the 4 pin end. https://www.amazon.com/RuiLing-Stepper-Motor-Cables-HX2-54/dp/B07QHTG82K/ref=sr\_1\_3?keywords=stepper+motor+wire&qid=1637339256&sr=8-3
I had to flash it the first time via microSD card, I believe.
First thing I would do is make sure that you have your microSD card formatted correctly - need to be FAT and not exFAT that Windows like to use for large cards. Use can used the SD formatting utility to make sure it's properly formatted https://www.sdcard.org/downloads/formatter/
Yes, it did trigger a build.
#!/bin/sh -eo pipefail # No configuration was found in your project. Please refer to https://circleci.com/docs/2.0/ to get started with your configuration. # # ------- # Warning: This configuration was auto-generated to show you the message above. # Don't rerun this job. Rerunning will have no effect. false Exited with code exit status 1
Ahh, They are cheap/greedy, I see now, They make one for 2V only, and one for 24v only, You can get a silicon heater and use that or a new bed for 30 bucks.
https://www.amazon.com/Aluminum-310x310mm-Creality-Printer-Accessories/dp/B08B4H97MN/
I got this 6-pack from Amazon. This may not be the cheapest option but they have been working just find in my SKR 2 for a couple of months now. Very quiet.
Be sure to follow the instructions in the manual for the jumpers.
https://www.amazon.com/BIGTREETECH-DIRECT-TMC2209-Stepsticks-Motherboard/dp/B08WZFK9KT/
Hope that helps.
First, Did you check out your power supply before hooking your new stuff to it? If you old board fried then it may have taken out your power supply.
Second: The most usual cause of death of a main board is the heating elements on the extruder and heated bed shorting... If I was replacing the board I would also offload the heating to external Mosfets. just good insurance... if the heater goes awry it will take out a 5-7 dollar mosfet instead of a 40 to 75 dollar main board. just my thoughts.
here's an example on amazon:
Mine is from ebay as an open box but still sealed board, so it's just coming with the board inside its ESD bag and none of the usual extra bits.
Very helpful, thank you very much! Would these work for jumpers you think?
It should have come with heatsinks and jumpers. It definitely needs heatsinks on the stepper drivers. Here's an example from Amazon so you can see what to look for, but anything of a similar size should do.
The jumpers are standard 0.1" (2.54mm) pitch types, widely used in electronics. If you have any left over from other SKR boards, they'll be the same size (except the extra small ones used for some 2.0mm jumper positions on an SKR2).
I got mine from Amazon (ordered on September 7, 2021 https://smile.amazon.com/gp/product/B08QRX5CH9) and it seems to be working well. Can you please elaborate on what's changed in the upgraded version?
You need to check and see if your printer is running a hot bed mosfet. For those temps around 110-120+ you really need a mosfet. It takes the power from the PSU and the mainboard power to the bed is only used as a switch to get that power. So it doesn’t pull a ton of amperage through your mainboard and fry it. Also make sure the wires to the mosfet are thick enough. Make sure it’s the right voltage mosfet and it’s definitely worth it to get one with a fan on the unit.
ReliaBot Hot Bed Power Expansion Board Heating Controller MOSFET High Current Load Module 25A 12V or 24V for 3D Printer https://www.amazon.com/dp/B078S6221G/ref=cm_sw_r_cp_api_glt_fabc_5DPZRJM8AQJC2N195BFS?psc=1
You need to get rid of all of the PTFE (Teflon) parts in the hot end. This means the tubing that goes to the nozzle, and the PTFE lined wires of the thermistor.
Parts for an Ender 3:
https://www.amazon.com/gp/product/B077GRX256/ref=ppx_yo_dt_b_search_asin_title?ie=UTF8&psc=1
DuPont connector crimper, and a box with all the various white DuPont connectors I believe they are JST-XHP. Hilitchi your best bet https://www.amazon.com/Hilitchi-Housing-Connector-Adapter-Perfectly-Compatible/dp/B015Y6JOUG/ref=mp_s_a_1_4?crid=2YP8UHRNKUT8M&dchild=1&keywords=jst-xhp+connector+kit&qid=1632492929&sprefix=JST-XHP&sr=8-4
And one of these. I’d practice doing quite a few before actually doing them it’s very important you get the crimp perfect and on the insulation and not the wire itself otherwise it will drive you made with them coming off especially if using silicone wiring like I do, but worth it. I really only got good with crimping these type of connectors after about 100 of so many years ago they are very small and finicky.
If you can find an IWISS ratchcheting type there are pretty good. You want it to ratchet you it locks down bit by bit and can hold the tiny metal connectors on it’s own then you insert the stripped wire very very carefully as far as you can (it’s usually sort of hard to see visually) and that seams to always end up at the perfect spot.
Hope that helps.
Thanks! That link didn't work for me, I suspect due to the \ instead of /. But I think this is what you were linking to: https://www.amazon.com/gp/product/B078WPT5M1
I appreciate it. The crimper, plus the previously-linked assortment, would be somewhat pricey, at about $45. But they would help add or replace connectors as-needed, which would be nice.
I ended up buying a set of extensions, I think, for the connectors I needed. Then cutting them and soldering them onto the wires in question, which was a pain.
Not the person you asked, but I've been using the below for a few months without any problems (besides learning how to properly crimp!)
Ah sorry! Not sure what happened to my link, but that is the correct crimper. I wouldn't buy the previously linked cable assortment as that doesn't include the heads needed to crimp new heads. I bought this kit along with the crimper and have replaced many heads with many connectors still left over.
Thanks! Though something weird seems to be going on with Amazon links, and \ vs /. I think this is what you were trying to link to? I changed it to the US site, as well.
I just ordered these 2.54mm XH Connector Socket Kit With pre-crimped cable wire 2/3/4/5/6/7 Pin Housing JST Adapter Cable Male and Female Compatible with JST-XH Connector (Connector&Socket) https://www.amazon.com/dp/B08G188ZQ8/ref=cm_sw_r_cp_api_glt_fabc_V7QH0F118DETJ5DBBHSK?_encoding=UTF8&psc=1
Yeah its just the BTT ESP-01
Ill warn you however that its a PITA to set up initially and the transmission speeds are not fast enough to run gcode. I mainly use it for troubleshooting through gcode since my machines too far from a usb connection for pronterface.
Thanks for the link, I did see this before but the SRK does not have the dial unless I missed it. Some images here:https://www.amazon.com/gp/product/B08XXNFZ4Z/ref=ppx_yo_dt_b_asin_title_o00_s00?ie=UTF8&psc=1
I believe it has to be set through marlin. Or connecting through the printer.
I think I'm into it just under $500 U.S., or there about.
This is the dual Z axis kit I used. I'm sure they make them for the Ender 5. At some point, I'm also going to get the kit that belts the two Z axis lead screws together to keep the motors in synch all the time.
My titanium heat break did show up yesterday. Didn't have a chance to install it yet, though. I'm a bit worried, honestly, as there have been quite a few guys that have reported problems with the all metal heat breaks for the H2.
Yup, I lost about 8mm on my Y axis, too. I haven't bothered with trying to get it back yet, though. Teaching Tech has a video where he covers the different ways of getting your build volume back after you've made some upgrades to your printer. Hopefully, one of his techniques will work for us H2 guys. It would be nice to get the full build volume back, as I like to completely fill the print bed up with small parts for every print run.
Have you guys seen these. I want to get one and I don't even own a creality. Throw this thing on my prusa or lulzbot. Must be new since there aren't any reviews besides 1. https://www.amazon.com/dp/B0979F7RWN/ref=cm_sw_r_cp_apa_glt_fabc_TQ72P4QMN2QWXVS8471T?_encoding=UTF8&psc=1
https://www.amazon.com/dp/B019I3C4MQ/ref=cm_sw_r_cp_apa_glt_fabc_BDRF7JPTMBMFX3PGWYH1?_encoding=UTF8&psc=1 I also replaced the bearings in my bmg clone they were the same size. That mod after running it for a while I can't recommend. It fixed mine but I'm going to replace gear when new one arrives. It adds stress to the motor. If yours is messed up contact biqu send a video and include your order information. They are really good at getting back to you. They will recommend the fix in the video above but if that doesn't work they will send replacement parts.
As Adrutu had mentioned there is thermal cement that you can use. I bought some to mount heatsinks onto my steppers a while ago since the preapplied adhesive always seems pretty terrible. I also used these on my heatsinks for my 2209's. Yeah, its relatively permanent in that it takes a lot to get them off, but I figured there isnt really a reason that I'd ever take them off so its fine by me.
This is what I used. You can probably get it cheaper from AliExpress but I didn't want to wait that long when I bought it. That one tube will last me pretty much forever.
https://smile.amazon.com/gp/product/B07B8W2KHZ/ref=ppx_yo_dt_b_search_asin_title?ie=UTF8&psc=1
You can also use them to set up Octoprint to shut down the printer after a print is finished. I forgot the plugin but I'm sure you can find it if you search for it. I generally don't go to sleep with the printer running though so I just check from Octoprint on the laptop and once the hotend temp gets below 40c I turn off the outlet from my phone.
DC-DC buck converters are ~$2 or less if you buy them in a multipack even from Amazon. You just need to wire your fan's input power through something like one of these to drop the voltage: https://www.amazon.com/gp/product/B0758ZTS61/
I would think that trying to fade normal LEDs on that port would be a bad idea. Two of the pins are power and ground, (I assume 5V..), and you could put lights on there that would always be on. The third pin sends a digital signal that the computers in the neopixels listen to so they control themselves. The only way to fade normal ones would be to try to run them off the digital pin in PWM, if you can program it, which might be a big if. And that pin is not meant to drive much of a load.. so other ways are strongly recommended.
Actually, neopixels are the same as the cheap 3 wire ws28... strips on Amazon, and you can get them quite cheap. Each light can be told to do something completely different. They are super cool. I don't know if the plugs are the same, but the three wires do the same three jobs. (Same chips run neo pixels.)
You can have independent control of all 3 stepper motors by adding the EXP-MOT daughtercard and another 2209. One motor into ZA or ZB, the 2nd into E1, and the third into one of the 3 EXP-MOT expansion ports.
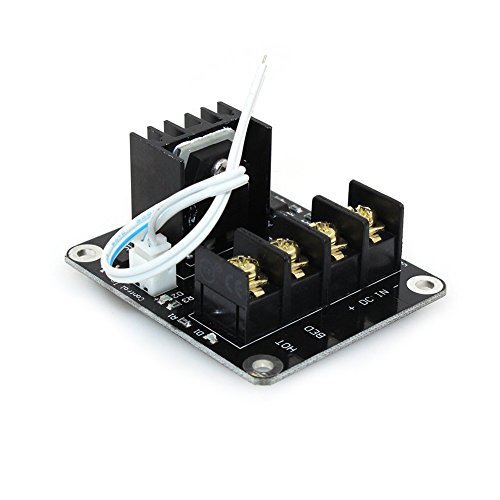
Others have mentioned running an AC bed and a relay, but most beds that require more current can be handled with a larger PSU and an external MOSFET. The MOSFET is connected directly to the PSU but is controlled by the bed terminals on the SKR, and draws only milliamps from the board. Here's an example of an external MOSFET that will handle up to 25A.
Installation is very straightforward. 12V PSU wires to DC IN, bed wires to HOT BED, and bed connection +/- wires from the SKR to CONTROL IN.
Which fan? The one I added? Here’s the one I added:
WINSINN 50mm Blower Fan 24V 5015 Dual Ball Bearing 50x15mm Turbine Turbo Brushless - Quiet (Pack of 4Pcs) https://www.amazon.com/dp/B07WFKPLWY/ref=cm_sw_r_cp_api_glt_fabc_8QYVW5DRC9A8RWPFMC9R
I got this pair: https://www.amazon.com/gp/product/B077GPZZS6/ref=ppx_yo_dt_b_search_asin_title?ie=UTF8&psc=1
​
Work fantastic!
I have tried this firmware and it does not work. The guide the provide as well does not show the same color wires I have.
read the comments for the device on Amazon https://www.amazon.com/ST-Link-Emulator-Downloader-Programming-Random/dp/B00RYVLN4U/ref=psdc_172544_t2_B01J7N3RE6
the diagram on the device is not correct in some cases and looking at the pub will get the correct pins.
Thank you for your reply. Please take nothing going forward as argumentitive in any way. I'm an old dog, trying to learn. Values, 24v+ 18, 4.7, (Ω, kΩ, mΩ)= ~4.969v, by my calc. ~300mA load .... so... mΩ??... I agree it wouldn't be an elegant solution. I have some DC-DC converters here, that, according to spec "should" work. I probably won't have time untill the wkend to experiment. Another option I am seeing are these https://www.amazon.com/Optocoupler-Isolation-Converter-Voltage-Translator/dp/B07YJL3MQQ/ref=pd_di_sccai_6?pd_rd_w=u1zNV&pf_rd_p=c9443270-b914-4430-a90b-72e3e7e784e0&pf_rd_r=MTECHHQGM26V54R4Y121&pd_rd_r=8f632b1a-89d0-4034-986d-27d67c83c... Wired this way. https://content.instructables.com/ORIG/FVC/B0ND/JJEK4N9I/FVCB0NDJJEK4N9I.jpg?auto=webp&frame=1&width=525&height=1024&fit=bounds&md=7402ed95ff4093f9a2485077c3eb6a40
A reviewer states that they need a resistor changed to work @24v
R1, R2..??? value???, again, my electronics ineptitude shows itself. This seems like the best solution, they're cheap 5/$14. If I kill some xperimenting, no biggie. I'm ordering a pack. Any suggestions on R values? as I'll have to order, RadioShack WAS my only local option. A multi-turn trimpot would SEEM cool, but, I wouldn't know what to order Thank You for your time, ... Any input IS appreciated...........
Once you decide how to repair your build surface (I recommend just going with glass), consider this...
It helps a lot with adhesion during printing while the bed is heating, and once cooled the part pops off effortlessly. I know the price tag seems high but one bottle lasts a remarkably long time. After a print I just spray the bed with water and put on a nitrile glove to even back out the coating.
It does leave a film on the bottom of your part, but that can be easily removed with water and a soft sponge.
I'm not affiliated with the company that makes it in any way, I just love the product. It has totally eliminated the most frustrating aspects of 3D printing for me (initial layer adhesion and part removal).
Got the picture sorry: https://imgur.com/gallery/5DHr7Ka
Also here’s the link to the Amazon page for exactly what I got: BIGTREETECH Direct 2 Types... https://www.amazon.com/dp/B08G8B23L7?ref=ppx_pop_mob_ap_share
Hi, if you still have a problem with BigTreeTech SKR Mini E3 V2, please contact [email protected] & our technical support will help you further from there.
You can get the BTT-EXP-MOT board which will add 3 more drivers to the SKR 1.3/1.4/1.4 Turbo boards.
https://www.amazon.com/BIGTREETECH-EXP-MOT-Expansion-Printer-TMC2209/dp/B08DTQYDB1
I have ordered it so I can upgrade my Ender 5 plus to dual extruder and dual independent z.
https://www.amazon.com/BIQU-Printer-Stepstick-TMC2208-Heatsink/dp/B07RL62JMC.
Here are some tmc2208 drivers.
https://www.amazon.com/Screen-Display-Controller-Compatible-Printer/dp/B082X8WG69.
Get the tft35 e3 3.0 option
Well I found your problem, it didn’t come with stepper drivers, you will have to buy some. Also a tft24 won’t work. You need a tft 35 e3 v3.0.
here you go https://www.amazon.com/dp/B082X9TXPH?ref=ppx_pop_mob_ap_share
And it's funny you should ask me about that because i ordered the volcano hot end as a kit from the guys over at materhackers for 80 bucks and when it came i was excited and opened it up and went to install my 1.2 volcano nozzle that i had ordered up ahead of time and it didn't fit. Here they accidentally sent me an e3d hotend and i emailed them about it and they immediately send me a volcano replacement and paid for the return shipping.
But here is the link for that
https://www.matterhackers.com/store/l/e3d-volcano-hotend-kit/sk/M0CUD3W1
Just make sure you get the bowden tube 24v setup, you can save like 20 bucks if you order it as a kit but i didn't feel like messing with all those tiny little parts on it so i got it fully assembled.
Hmm, I'm hoping there is a pin that I could use with a mosfet such as this https://www.amazon.com/IRF520-MOSFET-Driver-Arduino-Raspberry/dp/B07F7SV84V/ref=sr_1_6?dchild=1&keywords=mosfet+pwm+12v&qid=1604510022&sr=8-6
all this talk about the sd card slot going out, im thinking about getting something like this
Honestly not that much. I got this $26 set with the crimpers and the connectors to make extension cables. The other nice thing about this one is the jaws are replaceable so I can get different jaws for different connectors if I need
https://www.amazon.com/gp/product/B07YXY415S/ref=ppx_yo_dt_b_asin_title_o08_s03?ie=UTF8&psc=1
BIGTREETECH SKR Mini E3 V2.0 New Upgrade Control Board 32Bit with TMC2209 UART Driver 3D Printer Parts Cheetah for Creality Ender 3 https://www.amazon.com/dp/B0882QGFZR/ref=cm_sw_r_cp_api_fab_TVdBFbSHM6F5A