
What are
/r/FlashForge's
favorite Products & Services?
From 3.5 billion Reddit comments
The most popular Products mentioned in /r/FlashForge:


![[UL Listed] HKY 24V 65W Universal Power Adapter with 6 Extra Tips,AC to DC,2.1mmX5.5mm Barrel Plug,24v 2.73a (24V 2.7A,24V 2.5A,24V 2A,24V 1.5A,24V 1A Compatible) Power Supply Cord Cable Charger Plug](https://m.media-amazon.com/images/I/41weVIn9JZL._SL500_.jpg)


The most popular Services mentioned in /r/FlashForge:
Blender
Gofile.io
DeepL Translator
Smash
Autodesk Tinkercad
SD Card Formatter
Google Groups
The most popular reviews in /r/FlashForge:
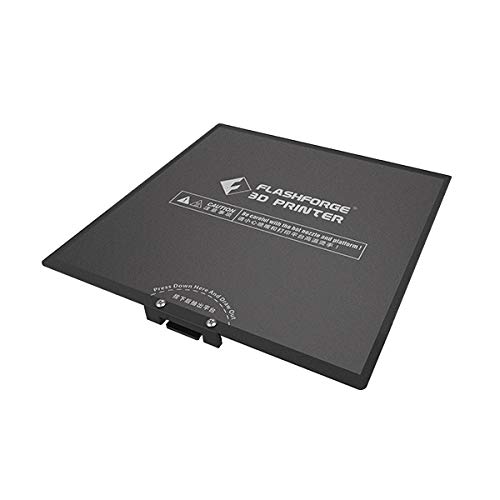
Heated bed or cold bed? Either way aside from replacing the actual plate I'd recommend applying one of these: https://www.amazon.com/dp/B077KDCRL5/ref=cm_sw_r_cp_apa_glt_fabc_SJQ8WQY87X5T11BW32SS https://www.amazon.com/dp/B077KDD8P6/ref=cm_sw_r_cp_apa_glt_fabc_F3SRJJ02EMG8Q9155CDX
One is for a hot surface, the other for a cold surface. GeckoTek is fantastic for a build surface, you don't have to use any other method of adhesion so say goodbye to glue, hairspray, tape, etc. If you're careful the GeckoTek is good for a lot of builds before it needs replacing.
160mm is probably closest. This is essentially a sticker though, you can easily trim it down to size with a pair of scissors. That's what I do with mine. https://www.amazon.com/dp/B079SPW5NT/ref=cm_sw_r_cp_apa_glt_fabc_83J02BE95X639SHPV8MF?psc=1
I had excellent luck using Eryone PLA in Carbon Black - it was a 1kg roll, but I have 3d printed out the spindle extender to accommodate that and it worked great. I have a roll of green and gray on order from this brand as well, hoping this works and maybe resolves my skipping issues (or whatever is happening). This Eryone black worked with the factory settings and no needed settings modifications in Flashprint.
https://www.amazon.com/gp/product/B08G8R5RVM/ref=ppx_yo_dt_b_asin_title_o03_s00?ie=UTF8&psc=1
if you haven't got these already these are great for when the clog is in the nozzle and you cant use the tool that comes with the printer, there called nozzle needles and there like 20 bucks and are a life saver. here's the link to the ones that i bought
I use PLA, but the printer also supports ABS. Amazon search for 1.75mm filament. The printer takes half KG spools so you’ll need to print a spool holder for the standard 1kg sizes. Thingiverse has lots of these you can print.
The PEI sheet I bought was https://www.amazon.com/Gizmo-Dorks-Printer-Laminated-Adhesive/dp/B07FVL1SYF
As an alternative and because I had the same issue, a removable glass bed is another option. Here's how I did it. The glass is ordinary "replacement window glass" from the local big box hardware store. They sell 10"x12" sheets that I cut (or have them cut) into a pair of 10"x6" sheets. Perfect fit front to back with a little overhang on the sides to make it easy to remove. Use 0.5mm thick thermal pads cut to 1" squares and distributed over the surface. The pads stick really well to Kapton so the glass doesn't shift during use but it can be easily lifted off when the print is finished.
Most times the print will self release when the glass cools. Stubborn prints may need a few minutes in the freezer after the glass has cooled to room temperature.
Keep the glass clean. For adhesion I prefer All Weather Unscented Aquanet Extra Super Hold. ABS juice, glue sticks, etc. also work well.
Okay, let's take a step back. When you turn on the printer, go to the Utilities menu option and then Monitor Monitor mode. The temperatures for the two Extruders should be close to room temperature. The Platform temperature will be around that, as well, but it's not really accurate down around room temperature so it is usually off a few degrees. That will give a baseline condition of the sensors and is worth a quick check.
Replacements aren't terribly expensive. Here are some from Amazon that should work. Be sure they're Type K and have an M4 threaded thermowell.
Pro tip: The ANSI standard insulation color code for Type K thermocouples is yellow (+) and red (-). For some reason, printer thermocouples tend to use red (+) and white (-). You can check with a magnet; the (-) lead on a Type K is slightly magnetic. Before you wire it all up, connect the thermocouples at the mainboard and check the reading on the Montor Mode screen. The temperatures should be reasonable and they should go up if you warm them.
Just regular hobby glue stick from your drugstore or hardware store or https://www.amazon.com/Elmers-Disappearing-Purple-School-Washable/dp/B003ULCZ7M.
Or Layerneer https://www.amazon.com/Printer-Adhesive-Layerneer-Original-Filament/dp/B079984GV5
It’s a bit counterintuitive because you think of glue stick as a bonding agent but in this application it creates a separation layer that keeps the filament from bonding to the PEI sheet.
You could print an adapter to exhaust through some organic vapor cartridges (one example). Not sure how controllable the fan speeds are on the Adventurer. On an FFC I rigged up an exhaust fan similar to this setup and run the fan quite slowly. It's only necessary to maintain a very slight exhaust flow so that vapors go out through the cartridge.
https://www.amazon.ca/gp/product/B08FCK2QX7/ref=ppx_yo_dt_b_search_asin_title?ie=UTF8&psc=1
The Bowden tube snaps in and out of of this fitting way better with this fitting i bought off amazon.
Yep, I bought the one above and it didn't work.
This one does in case anyone is looking: https://www.amazon.com/gp/product/B077GQB5N8/ Not the native plug, but it comes with a set of adapters, and one of those fits.
Yep, I bought the one above and it didn't work.This one does in case anyone is looking: https://www.amazon.com/gp/product/B077GQB5N8/
Not the native plug, but it comes with a set of adapters, and one of those fits.
How much is it? Theyre on sale right now on Amazon. Creator Max is even cheaper i think.
​
Going to take everything apart tomorrow and check wire connections as well. Looking for a new PSU, I can across this on Amazon. Would this be a suitable replacement ? Thanks
My tube started coming loose about 7 months in.. I bought these from Amazon and now it works perfectly
https://www.amazon.com/gp/product/B07MTHGF7R/ref=ppx_yo_dt_b_search_asin_title?ie=UTF8&th=1
I also had a very clogged nozzle, but the fitting holding the tube was just bad and broken.
When this exact thing happened to me first I changed the PTFE tubing, which at first it didn't seem to do anything. Then I did a couple of cold pulls and actually was able to pull out a LOT of gunk and old filament.
I am not sure exactly what worked in the end. I think the PTFE tube was a separate issue because the tubing was coming loose since filament wouldn't feed through. 90% sure the mega clog was the main issue. Everything has been working perfectly now.
Link to the fittings just in case
​
I find the huge hole at the top is a bit of a stumbling block - I have tried to fully enclose one of my CP2s in the past but could only get to around 30 degrees after about an hour of the bed at 100.
I recently completely enclosed a creator 3 because I wanted to fit passive heating, the difference between 50 degrees and 70 degrees was plugging a tiny hole where the door handle is, so the gaping hole where the filament tubes and cables go in is definitely the biggest issue on a CP2
if I was doing it again I'd use an external enclosure, creality's is good and you can put it on it's side to fit a creator (and cheap)
Step 1: Replace alarm battery
Step 2: Clean rod with soft cloth and add grease to printer rod: https://www.amazon.com/FYSETC-Multi-Purpose-Industrial-Lubricants-Transmission/dp/B07L2P441W
Step 3: Sleep soundly
this is pretty good with a decent 1/10 split with wood/pla
I've gone through about 10 spools of it and it does well
Use a 0.6 nozzle and just treat it like PLA and it'll print fine. Never use a 0.4, the wood dust will build up eventually (ie: about every 300 meters/kilo) and block a 0.4, it'll be ok for a while but you can't avoid it eventually blocking a 0.4 nozzle. Also recommend steel unless you enjoy replacing nozzles every kilo.
Also use a nozzle just for this filament, it'll print 5-10 degrees above PLA and eventually lead to a blockage if you print anything cooler through the same nozzle.
Unload the filament each print, wood filament has a habit of somewhat violently popping out of the nozzle if there is a slight blockage.
I have a FlashForge Creator Pro. I had terrible problems with prints not sticking at all or detaching. Playing with the temps didn't do much for me. Things I did to solve it:
- Level bed.
- Focus on first layer settings: Slow and over-extrude.
- Use a raft (helped a bit, but slow, wasteful, and print surface is compromised.)
- Glue-stick the bed. This helped me the most! (I'm using a coated, spring-steel plate: https://www.amazon.com/gp/product/B088ZGTPGB/ ) I just used some glue sticks we had laying around the house. Put a light smear down. Don't need to re-apply every print. Every few prints, or before a big important one I'll wipe down the surface with a damp paper towel to "re-activate" and smooth out the surface. Every once in a while i'll start completely from scratch by cleaning off the old glue entirely and putting down a fresh, light layer.
- Other people use hair spray. I've not tried it, but might in the future to get a more even coat.
You can absolutely remove the glass bed from the plastic tray. I use this to pry the bed off of the tray. Remember to be gentle so you don't snap the plastic clips. AD3 Glass bed
Hello and thank you for the response!
Let me apologize, I was not clear enough in my initial message. The fan did not really "break", rather it just has become incredibly noisy and I wanted to replace it. I am having the same issue with the fan that is pointed at the motherboard; it has gotten incredibly noisy and I tried to replace it with a fan with the same specs but the new ones never began working. When I re-plugged in the original fans that came with the machine they started to spin again (albeit very loudly).
So again I apologize I was not very clear in my first post, but to just summarize: the original fans continue to operate but they have just become too noisy and I have been unable to fix the noisiness. I tried to replace them with new fans with the same specs but it seems the Creator Pro 2 does not want to accept them. I made sure all of the specs from the voltage to the amperage were the same. I will provide a link to the new fans that I bought. Unfortunately, you will have to forgive me as I am not too electrically inclined and I may have missed/ misunderstood something along the way.
I hope this helped clarify things and thank you again for the response and help, I greatly appreciate it.
​
I just use something [like this](https://www.amazon.com/Warner-ProGrip-Putty-Knife-90133/dp/B09FR2G8KX/ref=sr_1_13?crid=186B1T3IH1S8I&keywords=flexible%2Bputty%2Bknife&qid=1654894174&sprefix=flexible%2Caps%2C57&sr=8-13&th=1) and really pry at an accessible corner, the thinner the putty knife the better. I usually try to hold the platform with one hand and pry with another.
​
I also try to use the smallest rafts possible generally.
Authentic Capricorn PTFE Bowden Tubing (1 Meter) XS Series for 1.75mm Filament with PTFE Teflon Tube Cutter and Upgraded PC4-M6 and PC4-M10 Pneumatic Fittings with Metal Teeth and 2 Blue Collet Clips https://www.amazon.com/dp/B07PS3NH82/ref=cm_sw_r_cp_api_i_CB8RJKQ6RC7NRXN09NJM?_encoding=UTF8&psc=1
This is thermal runaway. The extra crud on the hotend is making the heater send more and more current to heat up until failure. There's no thermal runaway protection on that printer, afaik. You have to keep it completely clean.
It should be a standard screw in 100k thermistor, gulf coast robotics sells them.
Just get a whole new hotend for $30 https://www.amazon.com/dp/B0928C83NM and keep it clean from now on.
This is what I get.
HICTOP Double Sided PEI Surface and Magnetic Bottom Sheet with Adhesive 310x310mm for CR-10 CR-10S Artillery SW-X1, SW-X2 3D Printers https://www.amazon.com/dp/B08PFH3G82/ref=cm_sw_r_apan_i_FNE17C1JW5QR4CKR0QPY?_encoding=UTF8&psc=1
New bed is ~$16 if you don't want fuss with it.
Otherwise you will need adhesive remover, replacement sticker, a scrapper...and about 30min of scrubbing. A blow dryer can help speed things up as well. Replacements about 5 for $18
I ended up doing both the first time I messed up the surface that way I had a spare to continue printing with while I refurbished the original.
Theyve all been coming out thready. Have calibrated it perfectly fine. Occasionally I get a turd nugget after an hour of printing. This is the filament I am using Link to filament
https://www.amazon.com/gp/product/B08VRM8KZJ/ref=ppx_yo_dt_b_search_asin_title?ie=UTF8&th=1 FYI this is the filament
I got these on Amazon: https://www.amazon.com/gp/product/B07MTHGF7R/ref=ppx_yo_dt_b_asin_title_o00_s00?ie=UTF8&th=1
They are compatible with Adventurer 3. pretty easy to install, but I had to guide it through the hole(kinda) the first time. The hole inside is a hexagonal shape instead of a circle.
Right off the bat though, the quality is much better right of the bat. I def understand why they are called pneumatic fittings now.
My advice is if you've already printed a temperature tower and found the best temperature, use the default profile for PLA for your printer in flashprint, the retraction speed and length of the default profiles in FP are spot on - if it's still causing you trouble, increase by 1mm and 5mm speed while printing a retraction test until you get where you need to be.
The dryer boxes everyone sells are essentially just a box with a heating element that will get the enclosure to around 20 degrees and a fan with no exhaust, sadly they're confined to the laws of physics and not capable of dehydrating - they're essentially a scam and I have no idea how they still exist considering how many people have put days of their lives into youtube videos proving they don't work.
The only ones that do work are ones that are capable of heating the enclosure to 60-70 degrees, and they still take around 8-12 hours to dry out a full 1kilo spool.
The cheapest one I've seen that works is this one (I have 2 for printers that are too heavy for drying drawers to go under them) the enclosure goes up to around 65 degrees when set to 70 which is warm enough to get rid of moisture in PACF, so you'd have to set it lower for PLA.
Buy a new Bowden coupler. This is a common problem. I have a bunch i keep on hand.
Are you still using the push connecter that came with the printer? I've had the same issue and had to replace this part. Apparently the standard ones from FlashForge aren't the best. Here is a link to some which I have seen recommended multiple times and using myself on my printer: https://www.amazon.co.uk/gp/product/B07N6H43FW/ref=ppx_yo_dt_b_asin_title_o02_s00?ie=UTF8&psc=1
Thanks! Do you have any recommendations on a fan? I purchased an 80x80x10 mm 24v and it’s failed to work (link, 24v option not available anymore though).
Should be any generic IEC C13 cable for your country.
I bought this recently as a replacement so I could fit my printer in a smaller space.
Monoprice Left Angle Power Cord - 6 Feet - Black | NEMA 5-15P to Left Angle IEC 60320 C13, 18AWG, 10A/1250W, SVT, 125V https://smile.amazon.com/dp/B07BBYRTL8/ref=cm_sw_r_cp_api_i_PV8HDGEZRPK5QF9EZGZS?_encoding=UTF8&psc=1
Just going to chime in for anyone else who comes across this thread. The listing for the fan linked here is now unavailable, but this one looks like the same fan, except now it’s sold with the JST controller! No hardwiring :)
Are you using an ABS juice to coat the glass the print sits on? If not, give that a go. It is just scrap ABS and acetone. A few ounces of acetone and maybe 6" of ABS. Still runny but enough ABS that you cannot see through the mixture. Give the bed a few coats with drying in-between. Re-apply a coat or two after each print. If it gets lumpy, or every few prints, scrape it off with a razor blade and re-apply.
Make sure the bed is level and at the appriopriate distance to the nozzle. Feeler guages for spark plugs work well for this. I use .06mm with just the tiniest hang pulling it under the nozzle. https://www.amazon.com/Hotop-Blades-Feeler-Imperial-Measuring/dp/B06XHXJG31/
I use 230 for the nozzle and 110 for the bed with ABS and it works well.
Print some bed tests. Write down the settings and results. Once you get that coming out perfect every time, print a taller test piece. A lot less frustrating! I use this. https://www.thingiverse.com/thing:40482
Keep and eye on it until you get the process worked out.
ABS takes a lot of trial and error in the beginning. But once you get it dialed in, life is good.
I just changed the fitting (tube comes tomorrow), cut back a bit of the original tube to get rid of any damaged section, and fired up a print. It's already getting further than the past 3 tries and it hasn't popped off yet.
Looking good. 10 minute job for this temp fix and I'm back up and running. I'll fix it proper once I get all of my bits.
​
Also going to install a coupler to make it easy to swap in-out the last few inches of bowden tube when it gets damaged. Ordered these: https://www.amazon.com/dp/B07C79R8F2?psc=1&ref=ppx_yo2_dt_b_product_details
​
Plan is to install that 2-3 inches from the hot end. That way when the inevitable wear causes this failure again, I can just disconnect the 2-3 inches closest to the hot end, put in the new short 2-3 inches of bowden tubing, and pop it back in. I've heard getting the bowden in/out of the extruder can be a pain, so this will bypass that fully.
I appreciate the pun. :)
We're in a pretty arid climate, so humidity isn't an issue. I like the idea of a printed roller, and the scissor mechanism is a nice touch. I went ahead and ordered one of these from Amazon for now:
https://smile.amazon.com/gp/product/B083RTMJS1/ref=ppx_yo_dt_b_asin_title_o00_s00?ie=UTF8&psc=1
Looking forward to trying a failed print again tomorrow when the roller arrives.
UPDATE: I tore things down and placed some phone repair tape (https://www.amazon.com/Eco-Fused-Adhesive-Sticker-Phone-Repair/dp/B00BXYWXY8) , sticky side to the fan, and I left the backing on the outside so it didn't actually STICK to anything besides the fan.
​
I did it on all 4 sides. Noise is just fan noise now, and is what I would deem acceptable for a fan this size.
I think it just has enough play in the housing to vibrate a bit, and this small layer of padding quieted things up.
​
Easy fix for anyone else experiencing the issue.
Yeah, FlashForge know they can get away with it!
‘FlashForge sell a pack of 5 for £19 on the UK Amazon, maybe they do where you’re from? Still riiiidiculously overpriced, but better than buying direct - https://www.amazon.co.uk/gp/product/B096TVFVXT/
It isn't flashforge branded, but it fits great. I use silicone pads underneath so that it lifts off easily for washing, but strongly resists and horizontal movement. This is the one I bought:
GO-3D PRINT 155mm x 235mm Borosilicate Glass Plate/Bed for Creator Pro Dreamer 3D Printer https://www.amazon.com/dp/B07DFRFT9J/ref=cm_sw_r_apan_glt_i_KGFGAT8X1WR0ANWX5600?_encoding=UTF8&psc=1
I recently had this issue and purchased this one amazon: SIQUK 4 Pieces Teflon Tube PTFE Tubing(1 Meter) with 8 Pieces PC4-M6 Fittings and 8 Pieces PC4-M10 Male Straight Pneumatic PTFE Tube Push Fitting Connector for 3D Printer 1.75mm Filament https://www.amazon.com/dp/B07L8R4SMG
I ended up only using the M6 fitting and didn’t really need to replace the tubes.
Filament Friday 3D Print Tool Kit - 38 Essential 3D Print Accessories for Finishing, Cleaning, & Printing - Removal Tool Included - 3D Print Tool Set https://www.amazon.com/dp/B07CY15LYR/ref=cm_sw_r_cp_api_glt_i_ES2GMMD8S86047Q65883
Cam : Wyze Cam v3 with Color Night Vision, Wired 1080p HD Indoor/Outdoor Video Camera, 2-Way Audio, Works with Alexa, Google Assistant, and IFTTT https://www.amazon.com/dp/B08R59YH7W/ref=cm_sw_r_awdo_navT_a_8Z9N34GZ3TP7CVVSWXX8?psc=1
Mount : Wyze Window Mount for Wyze Cam v3 https://www.amazon.com/dp/B092K4GWH1/ref=cm_sw_r_awdo_navT_a_TEZ0W83MCG58MZWB3XAK?psc=1
I realize that this is a 2 year old post, but I just had the same problem with the card reader and found a replacement for the whole control panel on Amazon.
Just wanted to drop a comment in the event that anyone else has the same issue.
https://www.amazon.com/gp/product/B07YHFGCBJ/ref=ppx_yo_dt_b_asin_title_o00_s00?ie=UTF8&psc=1
I'm fairly sure this is what they're talking about: Flashforge Adventurer 3 Series and Adventurer 4 Upgrade Hotend, 3D Printer Parts with 0.4mm 265°C High Temperature Nozzle Assembly https://www.amazon.com/dp/B08ZMWYTRL/ref=cm_sw_r_apan_glt_i_J8EE3K62VEZBE73W7SKG
Insane... must be a frustrating experience. Your link looks different from where I bought mine. Here is the link to the one I got but will only work if you are UK based ofcourse.
FLASHFORGE Adventurer 4 3D... https://www.amazon.co.uk/dp/B098JLN3PM?ref=ppx_pop_mob_ap_share
Yeah. Amazon issued me an instant refund so I don’t have to wait for the return before ordering another one. I just want to make sure the “Flashforge store0 on Amazon is actually them this time. I think it is because the contact info is in China and says they are FlashForge. If anyone wants to confirm this, that’s be helpful here’s the link. FlashForge Adventurer 4
I got this one (now out of stock) that works great for me. I imagine there's another generic brand selling something similar.
I peeled up my old bed, stuck the magnet bed to it and my prints have been so much better.
Do make sure to calibrate to a high point before trying to calibrate the new bed or use it. Speaking from experience. Mistakes were made.
Sorry! I completely forgot about this.
I looked at the file, it's not a dual duct like I thought, it's more of a surround- hope that's ok.
I used Steadytech white ABS, I found the settings I used worked well for that.
Here is a picture of the finished piece.
Also, the .gx file contains two pieces, one vertical and one horizontal. I found the horizontal to have worked better and be stronger. Both will need some cleaning up.
Here's the GX file:
Let me know how it goes!
Some tips
The knocking sound is the extruder motor skipping under increased load. This can come from various sources, like the filament roll not spinning freely, a clog...or most likely in your case the nozzle tring to force material through the bed. For 0.2mm layers heights try calibrating at 0.2mm for PLA and 0.6mm for PETG (caution, PETG can permanently to bed if calibrated too low). For reference a piece of paper is abour 0.1mm, suggest getting these:
Eastyard Stainless Steel Feeler Gauge 32-Piece Blade Tool for Gap Width/Thickness Measurements (Measuring Range: 0.001"-0.04") https://www.amazon.com/dp/B0887VDRTK/ref=cm_sw_r_apan_glt_i_4SNN0EFBQ1AJ2DVWXJRS?_encoding=UTF8&psc=1
First layer is critical. Sometimes using thicker first layer helps with adhesion. Thicker layers are strongers as well.
You can get good results down to about 0.12mm-0.15mm on 0.4mm nozzle, but for finer detail (especially in x-y plane) this machine also has a smaller nozzle available:
Flashforge Adventurer 3 Series and Adventurer 4 Upgrade Hotend, 3D Printer Parts with 0.3mm 240°C Nozzle Assembly https://www.amazon.com/dp/B09BFRDSFK/ref=cm_sw_r_apan_glt_i_PEVRSZAMV3HJWZ8H0XMV?psc=1
Eastyard Stainless Steel Feeler Gauge 32-Piece Blade Tool for Gap Width/Thickness Measurements (Measuring Range: 0.001"-0.04") https://www.amazon.com/dp/B0887VDRTK/ref=cm_sw_r_apan_glt_i_4SNN0EFBQ1AJ2DVWXJRS?_encoding=UTF8&psc=1
Nice job, looks great! Hope your still having fun.
So the reason the raft is usually not preferred, but obviously do what works for you... is that with model spaced off the raft for easy removal, the fillament sags making for a surface that does not look good. With proper calibration you get a nice clean surface which also makes it great for joing the pieces together.
So will you see a seem? Maybe...can you see the layer lines of your print? Is the seem for joining two parts together more noticable then those layer lines? When calibrated correctly with no raft it will be very minimal. I personally would rather have more detail preserved with a more optimal orientation.
Take a look at 3d printing spheres and you will see much of the same discussion.
As far as removing supports I use a small set of pliers and cutters followed up with hot air to it clean up: https://www.amazon.com/dp/B07QL3CLRS/ref=cm_sw_r_apan_glt_i_QNZ6PRDRMM9VV1HYZX0H
In expert mode you can increase the distance from the model to the supports to make removal easier. Also best support removal tool:
Hakko-CHP-170 Micro Cutter - Red https://www.amazon.com/dp/B00FZPDG1K/ref=cm_sw_r_apan_glt_i_ZMZ8WXTBFHG7WBTS0SVS
Monoprice Voxel is the same as the FlashForge Adventurer 3 (Rebrand)
Monoprice Replacement Flexible Build Plate - Black for Use with All Models of The MP Voxel 3D Printer https://www.amazon.com/dp/B07RCMGYP7/ref=cm_sw_r_apan_glt_i_SYF5NQA1GDAXT272Y61W
I bought GO-3D PRINT 165mm x 165mm Borosilicate Glass Plate/Bed w/Flat Polished Edge for Creality Ender 2 3D Printer https://smile.amazon.com/dp/B07BHG37PX/ref=cm_sw_r_apan_glt_i_6CNQKDMS20VVQCN3EN9K?_encoding=UTF8&psc=1 then used double sided thermal tape to keep from plate moving. You can print clips from thingiverse and they work. I just use mine in the classroom and wanted more security. Sprayed glass with hairspray. Recalibrated, and I preheat bed. Seems to be doing better. Still dialing in.
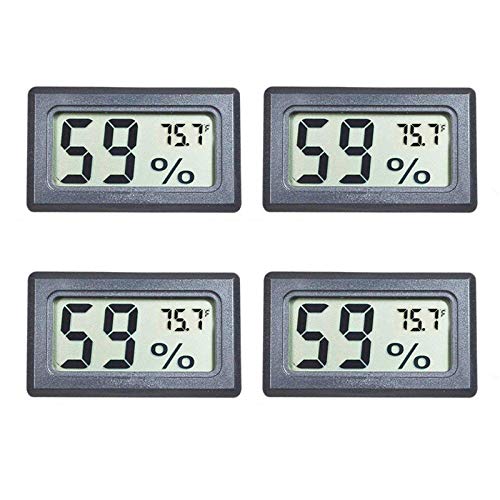
Yeah, I store and print from these
I put desicant pouches in the bottom and monior humidity with these
Works great....unfortunately I fogot to cap one of them and didnt use it for a while. Also I don't think I refreshed the desicant so the humidty was at about 45%. It printed ok but would like to dry it. I have a gas oven that I don't think can hold the temperature accurately that low.
Saw these go on sale and was hoping that it being purpose built would be better, but that doesn't seem to be the case.
This is the one recommended to me that I am going to use. GO-3D PRINT 165mm x 165mm Borosilicate Glass Plate/Bed w/Flat Polished Edge for Creality Ender 2 3D Printer https://smile.amazon.com/dp/B07BHG37PX/ref=cm_sw_r_apan_glt_i_NRHYV8CXPZ24A8E6WK0Q?_encoding=UTF8&psc=1
Flashforge does make their own version but this one is a little bit less expensive.
Not necessarily. It's just best not to leave it out for long periods of time if you are in a high humidity environment.
Sunlu makes a spool holder that also doubles as a filament dryer for around $50. It works really well at allowing your filament to flow freely into the machine while at the same time, if you ever did need to dry, it it would work well for that function.
https://www.amazon.com/Upgraded-Filament-SUNLU-Filaments-Compatible/dp/B08C9RZPMN/
I've also this which is already cut to right size:
GO-3D PRINT 165mm x 165mm Borosilicate Glass Plate/Bed w/Flat Polished Edge for Creality Ender 2 3D Printer https://www.amazon.com/dp/B07BHG37PX/ref=cm_sw_r_apan_glt_fabc_VHTVZW60XY7YKGH827AZ
Make sure to also use a high quality grease. I believe silicone with ptfe is recommended. I apply it with a small paint brush or acid brush with short. Stiff bristles (wipe the brush between applications).
For grease:
Super Lube 92003 Silicone Lubricating Grease with PTFE, 3 oz Tube, Translucent White https://www.amazon.com/dp/B0081JE0OO/ref=cm_sw_r_apan_glt_fabc_WHHVDM8X8AD6RYBS9FXA
Or for an oil:
Super Lube 51004 Synthetic Oil with PTFE, High Viscosity, 4 oz Bottle,Translucent white https://www.amazon.com/dp/B000UKUHXK/ref=cm_sw_r_apan_glt_fabc_ZMR71KGMW63S2K1GZDZP
In the "cooling" tab I turn off the cooling fan to a preset height of 1.3 mm. And I set the speed for the first layers to max. 30 mm/sec. . In the tab "additions" I set the pre-extrusion very slowly: 10 mm/sec. When I use a raft, I select a low speed of 5 mm/sec. In this way any blobs are "ironed" by the hot nozzle and while the cooling fan is still turned off. In general, my first layer speed (tab general) is always 10 mm/sec., and the travelling speed up to a maximum of 20 mm/sec. because of the same "ironing" effect. All this for PLA where I keep 210 degrees and the platform at 55 degrees.
At the start, I make sure the bottom of the nozzle is clean (I gently brush it with a copper soldering wire brush when it's halfway down and waiting to reach the set temperature), and I keep an eye on the buildup during the first layers. If I notice a mistake, I stop the print and start again. If it turns out to be a repeating problem, I work on a solution in the design or placement of the object. In my case it is worthwhile to rotate the body of the work 45% on the Z axis and slide it forward on the building board. The result is that the line orientation of the inner lines in solid layers follows the rail direction of the extruder carriage, which is just a little smoother.
I have my AD3 for 8 months and about 200 hours of print, and have yet a lot to learn!
Translated with <em>www.DeepL.com/Translator</em> (free online version)
First, Get a dial indicator like this or similar.
Second, print out a mount for it like this or whatever fits your machine.
Third, follow your machine’s manual leveling procedure, slide the mount along the x-axis rails, and adjust your leveling nuts until the dial indicator displays the same distance around your bed.
Works better than auto leveling for me sometimes and I don’t have to second guess myself on if I need to tighten or loosen a leveling nut.
Thanks, I finally got it working well. First, I stuck on this PEI sheet which solved the issue where my prints wouldn't come off the plate. My issues with clogging got fixed after I used a proper filament spool (instead of the sample) with a retraction distance of 3mm, though perhaps that would've made the sample work also.
What worked for me sticking on this PEI sheet which stopped the sticking. I tried lower the temperature but that didn't really work. I found that reducing the retraction distance to 3mm did the trick (though to be fair, I started using a new spool of filament so maybe the retraction distance change was only necessary for that).
I finally got it working well. First, I stuck on this PEI sheet (it's cheap and easily sticks onto the build plate) which solved the issue where my prints wouldn't come off the plate. My issues with clogging got fixed after I used a proper filament spool (instead of the sample) with a retraction distance of 3mm.
Filament not sticking can, frustratingly, be because you're either too close or too far from the build plate.
https://all3dp.com/2/3d-printer-bed-leveling-step-by-step-tutorial/
I use Kapton tape to improve adhesion on the FFCP build plate. You can get slightly oversized sheets on Amazon (example) and trim them down.
The printer is framed to accept the .5 kg spools, the spool holder allows you to use the standard 1kg spool. I have been using spools from 3d Solutions without issue.
Example:
Try letting it cool like mentioned above and I’m not sure but if you have the flexible build plate that could be quite useful it might pop off with a combination of those too. I use these knives to get prints of my printers (I don’t own an adventurer) CONDA Palette Knife Painting Stainless Steel Spatula Palette Knife Oil Paint Metal Knives Wood Handle (Red 5 Piece) https://www.amazon.com/dp/B01G176P6I/ref=cm_sw_r_cp_api_glt_fabc_Y57Q0J530RVJX2VYNX7G?_encoding=UTF8&psc=1 But be carful they can tear the some surfaces. I use them because they are so thin they can slide under the print
Check that the ribbon cable is as far as you can get it from any high current wiring, like the stepper wires.
Consider shielding the ribbon cable with a wrapping of aluminum foil. Obviously be very careful not to short the foil to anything else. Ground it to the case.
Speaking of grounding, ISTR some people isolated the display/SD from the case (plastic washers and screws) and ran a fat ground wire back to the main board. I think the argument was to get rid of ground loops. May have been a placebo.
Format the SD card with the SD Association's formatter instead of the operating system.
Yeah you can use PC fans. It takes a little more effort though. Since the voltage output from the printers motherboard is 24v. And most PC fans runs on 12v. So connecting a 12v fan to the 24v output on the motherboard will destroy the PC fan. So you need a Buck Converter, that steps down the output voltage to 12v.
But, there are also fans that runs on 24v, but they are not as common.
If my printer is still too loud after I’ve mounted the stock fan with double sided tape instead of the screws I will get 40mm Noctua 12v fans. And hook them up with the buck converters I linked. Cuz I’ve built countless computers using noctua fans, and know that they’re really quiet. Rather than buying a 24v no-name fan, just to find out that it’s as loud as the stock fans 😂 So the extra hassle with the buck converters is definitely worth it, at least for me 😊
I had the very same problems, especially with small parts on my Flashforge Creator Pro. I use Bed Weld (https://www.amazon.com/Printer-Adhesive-Layerneer-Original-Filament/dp/B079984GV5/) directly on the original print bed surface and one coating lasts me for about 6 prints before I recoat. Cleans up with isopropyl alcohol (70%) if needed. The only problem I have with it is that it sticks parts too well on large footprint prints. So now I use a magnetic sheet, apply blue tape, and then this Bed Weld stuff for all of my parts, large or small. Not sure if this is the most ideal solution but works perfectly in my case. As a note, I have no ties to the link above; just a product recommended to me by another 3D print person a couple of years ago.
Yes. That's why I definitely recommend the razor, very thin and square. Works fantastic. https://www.amazon.com/40-Piece-Printer-Tool-Kit/dp/B098GJZRNT/
https://youtube.com/shorts/BNslq-8tyYQ?feature=share Here's a short I made recently demonstrating it
The coupling for the hose to the head breaks easily https://www.amazon.com/gp/product/B07PLFZKKY/ref=ppx_yo_dt_b_asin_title_o06_s00?ie=UTF8&psc=1 this should do the trick
okay i just came right off the print bed. I have this one: https://www.amazon.fr/dp/B07DFRFT9J/ref=cm_sw_r_apan_glt_i_SFF27MHFMY7GMQ5NMDHK?_encoding=UTF8&psc=1 but how do I know what temperature to set
Easiest is using a torsion spring. There are better ways though and you can search for "belt tensioner" on thingverse for some ideas.
Sure buddy, this is what I installed:
micro swiss M2559-04 MK10 All Metal Hot end Kit, 0.4 mm https://www.amazon.co.uk/dp/B01C3HEQZC/ref=cm_sw_r_apan_glt_fabc_5QQ70BPZFW5DN16P58SH?_encoding=UTF8&psc=1
Nothing wrong with that homie. I actually only run a single extruder/hotend on my FFCP.
Here is the metal plate/magnetic bed upgrade I ordered..
https://www.amazon.com/dp/B088ZGTPGB/
It had some decent reviews with a 4 star rating so I figured it was worth a shot, especially since a replacement Pyroceram glass was going to cost $45 at least ($70 if delivered)
So a user here by the name of woolyninja made up some replacement clips for the glass bed, they did a writeup that they took down for some reason. I guess they did the same for their stuff on thingiverse.
https://www.reddit.com/r/FlashForge/comments/mu44s6/adventurer_3_glass_bed_made_easy/
https://www.amazon.com/dp/B07BHG37PX/ is the borosilicate glass that is sized for the adventurer 3.
It is a good mod for the adventurer 3, and as long as you have aquanet hairspray (purple can, extra hold) or purple glue stick it is a worthy replacement for the flex sheet. Let the glass cool and things pop right off.
Another alternative is a PEI sheet.
OK, found something interesting.
When I unplug the little leveling servo the temperature warning icon goes off, and it heats up properly.
The servo says SG90 on it, when I look it up on Amazon I found these.
​
They look similar.
But my question is; is there anything on the servo that would cause a heat warning error?
I purchased this glass bed - GO-3D PRINT 165mm x 165mm... https://www.amazon.com/dp/B07BHG37PX?ref=ppx_pop_mob_ap_share
I printed these “holders” - https://www.thingiverse.com/thing:4768045
Before you put the glass bed on you want to calibrate the Z. When calibrating, raise it up to somewhere like +3 mm so the glass bed can slide under the nozzle.
Put the bed on using those corner holders you printed and then lower the nozzle down to where a post-it can slide under with a little resistance from the nozzle.
That’s how I did it. If I were to buy a new glass bed, I would buy a larger one so there is less play when it’s sitting on the bed mount.
But one of these and apply it to the build platform. You'll have to score it to resize it to fit the Adv3. I did the same with my Creator Pro; got a 10"x10" square and resized it. Works great, nearly indestructible.
https://gizmodorks.com/pei-sheet-3d-printing-build-surface/
EDIT: saw you're looking for Prime shipping.
https://www.amazon.com/Gizmo-Dorks-Printer-Surface-Adhesive/dp/B074XF3NGP
Without spending money on a Bowden clipper Like the one seen in this pack
https://www.amazon.com/dp/B086YPDHMF/ref=cm_sw_r_cp_awdb_imm_1DCX5GNFJC6MQKVCG94N
I have put a razor blade tip point in first and than worked slowly through the tube you don't want the scissors to deform the shape of the tube. It's important it can create drag on the filament.
Like the cable?
Its a standard power supply cable and should be found everywhere.
I had pretty good luck with this plate: https://www.amazon.com/gp/product/B07NZ6P31X (Amazon US link but you should be able to find something similar)
And what I did was unscrew the bed clip from the factory plate, then peel the sticker, and I used the leftover adhesive to stick the glass to the plate, and superglued the bed clip back on. It still shifted from side to side a bit so I printed some spacers for the sides to keep it centered, and have been really happy with it for about a year.
*edited to fix a spelling mistake
This is what I use, I just have them in a grid on the bottom of the glass. What you linked might look better, admittedly, but so far these have worked a treat!
Ok set it for E= 0.6 for oxidized brass and scanned very close the nozzle and heater block. I picked up temps of max 238C when the preheat temp was set for 200C so maybe its running about 40C to hot or 16-20% hotter than what its set for.
Burnt up my 3rd PFTE tube. Ran this one @ 200C which means it was probaly running much hotter.
Now I either need to try and run it at much lower than 200C.
I'm gonna change back to the original Nozzle which is bigger and maybe that will even out the temps. (had replaced the nozzle with the 0.4mm version off of Amazon)
https://www.amazon.com/gp/product/B072PT7F9T/ref=ppx_yo_dt_b_asin_title_o00_s00?ie=UTF8&psc=1
​
Not really sure what to do next.
Gizmo Dorks PEI Sheet 12" x 12" (305mm x 305mm) 1mm Thick 3D Printer Build Surface Ultem 1000, Made in The USA https://www.amazon.com/dp/B074XG1NDM/ref=cm_sw_r_cp_api_glc_fabc_lAQ9FbXJ0FHH7 Something like this you’re saying?
On a Facebook group I was told to level it my self with a piece of paper and to make sure it has slight resistance so I’m going to try that. Not sure what’s went wrong it was working fine at first.
Also, I’m dealing with a lot of like little wisps from the filament? Is it just bad filament?
I use the Creator Pro, and I'm not entirely certain that it uses the same size screws as the Finder, though I believe it does. A while back I purchased this assorted set with various lengths, and it's fixed every part on the printer and is still going strong. They're also the perfect size for most printed models that need screws as well. I thoroughly recommend the set.
For now I'll try increasing the z offset. Do you know why this helps?
Also I realized that I forgot to link the glass bed I was looking at on Amazon!
https://www.amazon.ca/Borosilicate-Flashforge-Creator-Dreamer-Printer/dp/B07DFRFT9J
Does this look good to you?
Also, if you don't mind, how does the glass bed compare to the BuildTak Flex Plate that some other commenters have suggested?
You have an electrical fault or faults somewhere. With the variety of symptoms it's not possible to say that it's this or that -- time for some troubleshooting.
Check all your connections, that they're tight and don't show signs of wear or heating.
If it's the X stepper doing weird things then you probably have one of the stepper wires which has work-hardened over time and flexing and now it has an intermittent open. FF used regular stranded wires for the X stepper and end stop. If yours are original issue, there's a good chance that's at least one of the faults. I'd replace those wires with something that's more flexible like this kit.
Verify that none of the extruder heater or thermocouple wires are shorting at the hot block. The brass caps on the thermowells can easily cut through the insulation.
I'd also reset the EEPROM after installing the new Sailfish.
I have an Adventurer 3 Lite, which is almost the same printer. I've used Flashforge's own filament (0.5 kg spools) in several different colors with good success. I've also used Mika3D (link) with no problems. The Flashforge brand is most costly than most other brands I see on Amazon.
I purchased my printer relatively recently, so I would assume I have the V2 nozzle, but haven't pulled it to verify.
The bulk bowden ptfe tube is what you need. I bought it from Amazon for my Creator Pro. It seems the ones I purchased precut were a little short so this my best solution.
https://www.amazon.com/gp/product/B01CUPV90M/ref=oh_aui_detailpage_o08_s00?ie=UTF8&psc=1
You’re absolutely right on the bed being crap. I just glue/taped a PEI sheet to the flex bed and after the 9 point calibration update and some tape wedges, I got it pretty good. I don’t take the plate out after a print because I don’t want to spend another 2 hours leveling it, so I just pop the prints off the bed, wipe with alcohol and get ready for the next print. The prints come out great, but I am not posting any first layer porn pics on any subs, since my first layer is good but not great. My bed warps in the middle as well.
I was going to try glass but then I didn’t want to use hairspray or anything like that. So I sent the glass back. This was it on Amazon and it fit perfectly on the flex plate.
GO-3D PRINT 150mm x 150mm Borosilicate Glass Plate/Bed w/Flat Polished Edge for 3D Printer https://www.amazon.com/dp/B01IB2CC7W/ref=cm_sw_r_cp_api_i_vaNKFb0YKN2SG?_encoding=UTF8&psc=1
As for your plan, keep us updated. Sounds like a lot of work, but you have the tools so why not. I saw some guy on Facebook that redid his entire build plate with adjustable screws and whatnot and it looks insane in an A3 but it seems to work.
Which FF would come up with someway to upgrade it for people. It really is the Achilles heel of this machine. Next machine will be a Prusa, I am ready for the big leagues lol.