
What are
/r/audiorepair's
favorite Products & Services?
From 3.5 billion Reddit comments
The most popular Products mentioned in /r/audiorepair:


The most popular Services mentioned in /r/audiorepair:
Super User
Audacity
Clyp
Aliexpress
The most popular reviews in /r/audiorepair:
Clean all the knobs and switches with Deoxit D5
There is an internal switch called the "record/play" switch which will also need to be cleaned; with the cover off, watch what happens when you set it to record and back again. The long slider switch that gets actuated, here, will need to be cleaned also.
If this doesn't do the trick, then you will need some advanced skills and the schematic to diagnose it further.
While it is possible (and even likely, since I believe most CQ57's use a realtek hd audio chip) that the mic jack is wired to selectable ADC/DAC pins, it would require either tricking an alternate driver for that chip with a different pin assignment to load on your computer, or possibly needing to hack together a modified driver on your own. I'm not aware of any easy solution for changing the output mappings under windows, which I assume is what you're looking for.
If you can provide specifics for which audio chip your laptop has, in the form of the PCI Vendor and Device ID numbers, I might be able to provide more help with this. There is a description for how to get them in windows on the following page: http://superuser.com/questions/230139/where-should-i-find-drivers-for-my-laptop-if-it-didnt-come-with-a-driver-disk It would be under the sound devices for you though, not under "other devices" as described there.
Otherwise, to remap the port you're left to cutting traces on the mainboard and rewiring them over to the port you want to use. Also probably not an option for you, since you didn't just do this yourself to start with.
Realistically, all things considered, I'll have to agree with the comment that says to buy a USB sound device or a set of headphones with a USB plug and integrated DAC in them. This is, /by far/, the easiest solution for your troubles.
I just ordered this, (FM Antenna for Indoor Stereo Receiver, Ancable Universal 75 Ohm/300 Ohm FM AM Radio Antenna Kit with Antenna Gender Converter for Table Top Radio HiFi AV Stereo Receiver Mini https://www.amazon.com/dp/B07Y7ZXCGV/ref=cm_sw_r_cp_api_glt_fabc_MDG15EVCJSNYN6D8PNAS) sorry for long ass link. There really is no antenna at the end of the antenna wires. It’s just bare cables. This kit has tons of converters for the 300 ohm plug so it’ll actually plug into the back of the old receiver which doesn’t have the standard 300 ohm port.
There is no reason to assume that just replacing all the capacitors will somehow magically bring this thing to life.
It doesn't sound like you have a proper diagnosis, at all. The right output going out could be any number of things.
The first step is to clean all the knobs and switches with deoxit D5.
If that doesn't change anything, then there are further steps you can take.
Recapping an amplifier just because it sounds like a good idea is a wasteful way to go about things.
Start at the beginning.
It depends on what you intend to do. A multimeter, screwdriver set (at least one with a long shaft) and soldering iron is the most basic starter kit you can have but further down the road you'll understand what you really need. I'll advice some very cheap for what they do tools, what's very good about them is that you can try them for some time and if you think it's not enough you can put more money into professional equipment
This or one of the clones are good to know if a capacitor, transistor or zener diode is good or even to just see polarity of a component. Their values shouldn't be trusted 100% but a high ESR or Vloss is a good start https://www.eevblog.com/forum/testgear/$20-lcr-esr-transistor-checker-project/
Cheap chinese oscilloscope or old analog one. If you don't see an oscilloscope as necessary it's normal considering if you are starting you don't even know how DC and AC differ from one another.
Imagine this scenario: a broken amplifier with preamp built-in with no audio output, you can put a 1kHz sinusoidal signal as audio input (you can do this with app like this or a dedicated function generator https://play.google.com/store/apps/details?id=com.luxdelux.frequencygenerator) and check with the oscilloscope if you receive the signal as intended (meaning watching on the oscilloscope if you are getting a 1kHz sinusoidal wave) and find where it stops, after a potentiometer or a transitor? then you can test/replace the component and see if that is what was wrong with the circuit
It's hard to say what's in the volume control, or what's in the mic boom, or what the problem is. Your mic might not work if you simply remove the controls, it's hard to say. Though I believe they just add certain extra resistance or capacitance to the mic line so it could be fine.
What's the model?
A) It's worth a shot, might as well try fixing it. I'd do exactly as you describe - cut it at both ends, re-solder ensuring you keep track of what wire connects to what. Cover with heat shrink wrap.
B) If that doesn't work, consider getting a whole new cable and splice that in. Might not be too expensive to find a standard headphone cable with mic controls. This one might work: https://www.amazon.com/StepOK-Replacement-HyperX-Headphones-Control/dp/B08HQPWFK1
C) If that doesn't work, I'd just get a new headset.
I'd go something like an SMSL AD18 for like $150. Small yet powerful desktop amp that will connect over USB or Bluetooth. Plenty of power for a set of desktop speakers and you'll get a remote to adjust the volume etc. Perfect for a small computer set up if you're not looking to spend a lot of money.
You could also buy a cheap second hand AVR that has HDMI in and get the sound from your computer that way by plugging the HDMI out from your graphics card into the AVR then connecting your monitor to the HDMI return from your AVR. Downside is that an AVR like that is like 10 times bigger than the little SMSL amp so you'd need to have tons of space to want to go with that option.
That is switching noise, which is interference generated by all of the digital components in your PC.
Thanks for posted all of your components including the cables. Right away, the cables stand out as an issue. You are using an instrument/speaker cable, but what you really need is a balance audio interconnect cable. They look almost identical, but will have 3 conductors (TRS) on the 1/4" plug, instead of 2 (TS) that you have now. Some additional info if you are interested.
I prefer and recommend cables with XLR connectors. I use a pair of these cables between my digital audio interface and JBL LSR305's.
Potential issue #2 - make sure you set the input sensitivity switch correctly on the JBL monitors. It should be set to +4 dBu when connected to pro audio devices, such as your Scarlett. The -10dBV position is only for compatibility with consumer-level (E.g., RCA outputs from stereo, etc) audio, and you will amplify noise and get distortion if this is set incorrectly.
This is why I always use something like "tacky glue", it is water soluble and very easy to work with.
For most cone / surround combinations it works extremely well.
Just in case you haven't realized this - hook the woofer up to a test tone (something like 40 or 50 hz) and play that tone at low volume while you center the voice coil / surround.
I have a 100% success rate with this method. The tacky glue allows you to get it close and then dial it in.
Get a passive preamp like this to put between your phono pre and the speakers:
https://smile.amazon.com/Nobsound-Precision-Passive-Controller-Preamplifier/dp/B07GRLV7XG
Clearly your speakers have plenty of power, so all you need is a volume knob to dial it down.
Use This. It can be hard to find locally.
Alcohol or any other type of solvent or cleaner is not recommended.
hey cnobilski- I had a similar situation with my dad's old Technics SU-8088. Initially I was running it through a vizio 42"- which had the 1/8" out jack. Then i bought a samsung 55" 8000 series (for a steal of more than 50% off/$400 total @costco) but the 1/8" jack no longer worked for audio out.
After a LOT of rabbit-holing i bought a D.A.C. for $25 that allowed coaxial or tosilink in and has aux/headphone and rca out, and ended up working perfectly. The DAC also has a volume control - it needs to be plugged in, and does not amplify per se, but great functionality overall.
I'm not certain this is necessary for you specific situation- but may be useful if you need more choices for connectivity. 1/8" to tosilink cables are also available. I feel like the optical (tosilink) out provides good sound, but am unsure if adding an extra stage in the signal path (the DAC) lowers the quality and or optical source to analog improves the sound quality. There many more DACs that focus on HDMI in/out as well- but i was using the only HDMI out to feed my soundbar- not necessary now since I upgraded to Wharfedale Denton 80th speakers (not budget friendly, but...so worth it- i promptly returned my ELAC Debut 2.0 B6.2 Bookshelf Speakers- not even close)
Good luck and i hope this is somewhat useful or at least interesting to you. I love the warmth and overall sound of my 2.1 channel system now. It's incredibly satisfying and to echo what so many others newish to "upgraded" audio listening have said- I'm hearing all of my favorite music for the first time again.
PS- because my 8088 was always static-y and due to my ignorance, I wrongly assumed that technics was a bargain brand. Once i did a little research I realized what a monster HQ amp i had. Were you aware that you had such a HQ piece before you hooked it up?
I would start with another sound source than the turntable to diagnose your issues. Get a stereo 3.5mm jack to cinch/RCA cable to connect you phones headphone output to the tuner input of the amplifier. Then you can play some music and see if the amplifier is working.
If one channel is not working, then switch the speakers at the amp, to see of the problem is with the speaker or the amp.
You say just one channel is working at very low volume, are you sure that you did connect the turntable to the phono input ? The turntable signal is very weak and the phono input has extra amplification.
You could add a power resistor in line with each speaker. One of these between a wire on the speaker output and the speaker input (one per speaker) should knock the volume down a bit. You can add more resistance (ohms) to attenuate more. Note that this will result in two side effects:
- It is going to cause some effect on the sound in that it won't universally attenuate all frequencies equally
- It is going to dump all the extra 'volume' as heat through the resistor
Not that I know of. Do you mean some sort of wall plug to micro usb power cable? It has the optical, usb B, micro usb
https://www.amazon.ca/gp/product/B07V7D6QXK/ref=ppx_yo_dt_b_asin_title_o00_s01?ie=UTF8&psc=1
Niles Audio had a switching unit for this. Not the random part others have mentioned, but definitely the two amps to a single speaker setup.
https://www.amazon.com/Niles-Black-FG00003-Amplifier-Selector/dp/B00006HOFR
Assuming you don't see any discolored or failed components, a cold solder joint would be a good explanation for that issue. If you can take the board out of the enclosure, and look closely, see if you can find any solder joints that have rings around them like this. If you see any that look suspect, hit them with your soldering iron so they are good joints again.
I would also check the small signal caps if you can. Caps are the components most likely to go first, so see if one of them may have failed. If you can temporarily remove them (or any other components) you can easily test them in a unit like this.
Try to identify the tweeter amplifier section and focus on that. Don't remove or replace any components in the woofer amp section especially since it works correctly.
Small rivets in electronics are very easy to remove and replace. To remove them you gently drill them out with a 1/8th or 3/16ths drill bit, perform your fix then re-rivet the piece back into place.
You can get a rivet kit at most hardware stores. The rivet gun runs around $15-20, and a box of assorted rivets of common sizes is about $10.
Here is an example.
Once you get it off, send some pics of the driver so we can take a look at it.
Any stripper that can do up to 30 gauge wire should work for you, I use this one for guitar pickups and wiring etc. Can't go wrong with Klein.
Unfortunately it looks like Genelec builds the power supply "per region" and is not a wide-range input. In order to power these active monitors in the US, there are 2 options:
Get a step-up transformer. Something like this: https://www.amazon.com/SEYAS-Transformer-Converter-Continous-Protection/dp/B06WRN1FR3/ Connect the existing EU power cords to the 220V ports.
The US does have 220V power, but usually only used for large appliances. An electrician can add a 220V receptacle. You will also need the matching US (NEMA) cords.
You can buy the whole thing you unscrewed, with connector, fuse and switch. Maybe it's not necessary but it's a good way to get the right switch. Move the fuse over so you have the right value fuse.
Like this, avaliable from a few sources. https://www.amazon.com/URBEST-Module-Switch-Socket-IEC320/dp/B00ME5YAPK
I don't have an answer, but perhaps these ideas could help.
First, review the schematics (there may be clearer ones elsewhere--this one is a bit rough). How does what you're experiencing compare to what's on the block diagram? Are you able to rule out any particular sections? Left or right only, or both? Does it happen when only headphones and no speakers are attached (no speaker wires connected at all)? That should help get you into the right zone to test components.
If you have an oscilloscope you can feed a signal into the amp and trace it (don't just grab a scope and do this arbitrarily--there are things inside that can really zap you or the scope!). I recently scoped a Kenwood KR-3060 that was making a buzzing sound only on the right speaker after about 1/4 volume. Things sounded fine up to that point with speakers, and no issues at all when only using headphones. Perhaps the speaker impedance caused a bigger pull through the circuit compared to phones-only? This narrowed the issue down to the first even-numbered (right channel) transistor in the power amp stage. (I'm still new-ish to debugging and haven't actually tested the transistor yet.)
If you want to get more into electronics debugging, How to Diagnose and Fix Everything Electronic could be useful. It's not a perfect book, and it's long, but it's a pretty easy read and you could skip the sections on video, cameras, MP3 players, etc.
Those are 2 din....you can find 2 din plugs on Amazon
Du kannst es mit einer Handy-App messen. (Z.B. Spectroid - https://play.google.com/store/apps/details?id=org.intoorbit.spectrum )
Oder du hörst dir die Töne (mit Kopfhörern) an und vergleichst mit dem Geräusch, das dein Gerät macht. Einen online-Tongenerator gibt's hier: https://www.szynalski.com/tone-generator/
What driver should I use to drive it? Is this too weak or too strong? https://www.amazon.com/Kinter-MA170-Channel-Digital-Amplifier/dp/B007TUSXEY/ref=sr_1_3?crid=C0UVE5BBVRM5&keywords=Mini+audio+amp&qid=1650855013&sprefix=mini+audio+amp%2Caps%2C77&sr=8-3
Awesome thanks! Dumb question, but do I solder it and THEN run some hot glue around the edges?
I just ordered this soldering iron and this practice kit
They sell tiny sample bottles:
But the truth is that it is expensive everywhere. You are paying for the 'secret' juice that makes it work so much better than anything else. You can try an electronics cleaner with lubricant in it, but anything you get will have to be an entire bottle and the price isn't going to be significantly better for one use.
it is like buying a whole bottle of a spice you only use on one dish -- it isn't economical but if you need it, you need it.
If you still have them lying around, one solution I've found is to turn the left into a passive speaker (the right one already is) and use another amp to power them both.
Using something like this:https://www.amazon.com/AIYIMA-A07-TPA3255-Amplifier-Digital/dp/B08CJZGT6H/
I always prefer electronics suppliers, as eBay might be old stock, and the caps might have gone bad just like your original.
If you are in the UK, I know Farnell is one option. Here, I would buy this: https://uk.farnell.com/roxburgh/re120033/cap-0-033-f-275vac-20/dp/2336107?st=rc%20network
This is common and quite simple - the volume knob potentiometer is dirty and needs to be cleaned with a good quality contact cleaner like Deoxit D5.
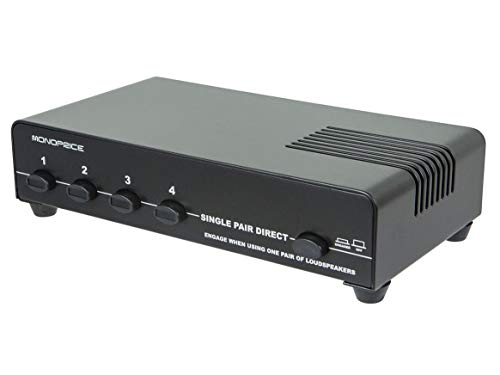
I highly recommend this switchbox. I'm using it with my vintage Pioneer and a Schiit phono pre (plus a Sonos, CD player, etc). Much better than the plastic boxes.
TC-7240 4-Way RCA / Phono Line Amp Router Audio Switcher Selector Splitter https://www.amazon.com/dp/B00KDQXITG/ref=cm_sw_r_apan_glt_i_5K7K39TBYKMK34AFM7Z4?_encoding=UTF8&psc=1
Personally I would cut the cable you have at a few inches and solder one of these on the end. Then pair it with a TRRS 3.5mm extension cable and never worry about it again -- just replace the extension if you need to.
Hifiengine is free. Just sign up.
We can help you if you come up with the right questions.
You need some Deoxit D5. Use this to clean the record / play switch, and every other knob and switch in the unit.
After that, if it's still not working, we can help you try and come up with the next step.
Not bad! Practice makes perfect.
I usually use Tacky Glue because it is so easy to work with and so forgiving.
Don't bother with the shims and the dust cap removal - just hook up the woofer to a bass tone as you glue down the outer ring and you'll be able to center it quite easily.
Yes. Get a universal component checker. Here is a typical unit. There are many variations.
RGEEK 24pin PSU 12V DC Input 150W Peak Output Switch DC-DC ATX Pico PSU Mini ITX PC Power https://www.amazon.com/dp/B07WDG49S8/ref=cm_sw_r_cp_apan_glc_fabc_664GPWH8ZYMT28589P4W
Syba USB Powered 3.5mm Audio Laptop Speaker CL-SPK20138 Clip-On Soundbar - Portable Compact Travel Stereo Speaker Bar Design Uses USB for Power 3.5mm Jack for Audio Black. https://www.amazon.com/dp/B00AOD7MYK/ref=cm_sw_r_cp_apan_glc_fabc_87N0DVJK46PT1SXRQT4K
These are the parts
It might be random noise on the channel. Ideally, the RCA input to the amp should be shorted when adjusting the bias. Here is an Amazon product for this:
You may be able to accomplish this in a different way, just showing you this link for context.
I would try this and see if things settle down. (Do not short the output, obviously.......just the input)
You should be able to find lamp holders pretty easy. I think they are 10mm T-5 lamp holders. I do not have my Fisher near me. It is at the beach house so I can't look. But they are a common car/dashboard type lamp holder. Will be much easier than making something. Quick google search lots of results.
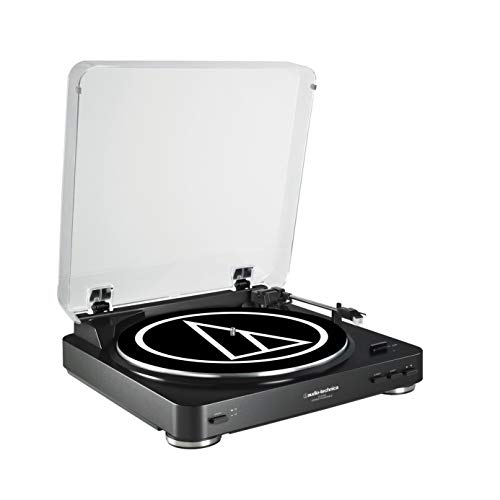
Your turntable uses a headshell mounted cartridge. For an entry level cartridge and stylus, I would recommend the AT95.
You can buy a generic replacement stylus (needle) for the OEM cartridge but they're half the price of a brand new Audio Technica cartridge and it comes with a stylus. It will also probably be much nicer than the stock stylus, unless the previous owner installed something else.
I pulled up the service manual but it was scanned in black and white so it's hard to see any of the unit diagrams. It shows speaker sockets which I assume are just regular speaker terminals. Could you provide a photo of the speaker terminals? No matter how they connect, you can use any speakers you like. By this, I mean any unpowered speaker that connect to a power amplifier.
Micro blasting is the universal method to strip all types of conformal coating. You could invest in one of these. Further reading here.
It definitely sounds like you have worse problems than just dirty pots and switches - but you won't be able to tell what those problems are if it's still dirty and oxidized.
Deoxit D5 is the first step, every time.
What about the Edifier S350DB's then? They're pretty much right around your budget and they come with a subwoofer. Zeos reviewed them and liked them.
You can have a look at the 1 star Amazon reviews and see some of the problems people have with them but keep in mind they only make up 5% of the total reviews.
I'd be tempted to save up a bit more and get something like the Edifier S2000 MKIII for $499
It is probably caused by the potentiometers (volume, tone, balance controls).
Get some De-Oxit D5 in the spray can, pull the knobs off, and spray inside the controls, then work them back and forth a bunch of times and let sit for a few mins, then turn it on and try it out.
https://www.amazon.com/Hosa-D5S-6-DeoxIT-Contact-Cleaner/dp/B00006LVEU/
https://audiokarma.org/forums/index.php?threads/the-idiots-guide-to-using-deoxit-revisited.207005/
Note -- there are other products which can work as well as de-oxit but it helps to have a go-to product to recommend in these situations (e.g. recommending Windex to wash windows).
Checking as in taking the mech out? There’s going to be more than one and you need to get a belt set and replace them all because they’ve likely perished by now being nearly 40 years old if original.
If you want to get into the hobby, get decent tools. Don't get the cheapest multimeter you can find....it not only helps you troubleshoot, it keeps you safe.
Learn to use your multimeter well before making repairs on expensive gear or anything that could shock you.
Getting a meter with "True RMS" capability is not only useful for audio work, it weeds out the vast majority of unsafe trash meters that aren't worth the plastic they're made of. True RMS actually samples the incoming AC wave instead of blindly assuming the signal measured is a perfect sine wave. This makes for more accurate readings in the presence of noise or distortion. Decent models start in the $35 range. (https://www.amazon.com/AmazonCommercial-Count-Compact-Digital-Multimeter/dp/B07W1BL1W6 is a decent place to start and doesn't have questions as to if the safety features actually work!)
You'll want an expanded set of test leads for various situations. The lead set costs as much as some meters but crap leads can cause issues with tests and are unsafe as well. I own these and I like them. https://www.amazon.com/Meterk-Electronic-Multimeter-Replaceable-Accessories/dp/B07BDF6CVT
https://www.amazon.com/SMSL-Audio-M3-Powered-Decoder/dp/B019Y5TR6O
Ive been using this one for the past 4 years and never had an issue with it. Granted, ive only used it for headphones but it does hav RCA output so should work perfectly for that aswell. Youre also likely to get better sound!
So I checked on amazon a bit. This device costs as much as a Bose 2.1 system in my country. Maybe this will work?
Amazon has the used service manuals for around $7 delivered to your door if you are in the US. This won't give you a schematic of the amp but the wiring diagram will show you the connections.
That 3-way R/W/Y plug would carry stereo sound and composite video altogether. Your outputs, probably because it’s also supposed to serve as a portable CD player, appears to have the signal outputs separated for audio (via headphone, perhaps) and video. So, like, one of these and the male version of the yellow cords you linked. I don’t know if the 3-way would transmit audio or video, actually.
Sorry my bad been a long day but here's one with 7 pin: https://www.amazon.de/-/en/zdyCGTime-Compatible-iPhone-Android-Olufsen-0-5-m/dp/B07ZCQPXP9/ref=mp_s_a_1_3?dchild=1&keywords=7+pin+din&qid=1611263949&quartzVehicle=93-256&replacementKeywords=pin+din&sr=8-3
Didn't understand the rest of your comment though. Each speaker has its own power lead so I was under the impression that they are active speakers. If this is the case any reason why it wouldn't work?
Thank you so much for the reply mate very much appreciated!!
Yess didn't know the name for it but it's a 7 pin din socket on either speaker. I'd rather not mess with the rewiring myself if possible as I'm liable to destroy the whole thing. But found adapters on amazon. So I'm thinking of using two 7pin din male to 3.5mm jack adapters and running them through a Jack splitter into my laptop, audio interface and/or bluetooth transmitter if I pick one up. You think that could work?
This is the adapter, would it pay to spring for higher quality?
+1 for cleaning the pots as mercuryvapor suggests using tuner-renew or any other electronics cleaner with lubricant. NEVER USE WD40!
As far as trying repairs on your own, if your not afraid of using a soldering iron and have decent google-foo, then searching for the most common problems for whatever your working on should get you started down the path of enlightenment! Or over-judging your abilities could lead you down a dark path littered with the carcasses of failed repair attempts, ending with the electronic gods naming you as the place where music gear goes to die. In other words, know when to say when, and if you feel as if you're getting a little too deeply over your head STOP and ask the right questions before diving deeper. Just remember that if you take the challenge You may just win, but it's a FACT that you WILL FAIL at some time! But that's what learning is all about, and I've learned a TON more from failure than success. Probably because it sticks with you longer! Good luck in whatever you decide to do.
Microphones put out very small signals that can require amplification by a factor of 1000 or more. Part of the mic jack includes a little contact that closes when there's nothing inserted, and it's purpose is to short out the signal so noise doesn't get in. This contact isn't closing properly and the mic input is acting as an antenna, picking up internal electrical interference or radio interference with a long antenna (the mic) plugged in.
Full solution is to find a nerd to desolder and clean or replace the mic jack. If the jack in on a small daughterboard in your particular laptop it may be a cheap part swap, but it's often soldered directly to the motherboard.
Temporary fix would be to mute and/or disable the mic within the OS and use a cheap USB soundcard (~$8US) as your mic input instead.
Hope that helps!
You could use a rechargable lithium-ion 9V battery such as this.
Because lithium ion cells operate at 3.6V nominal voltage there are two cells inside in series to operate at 7.2V. When fully charged they are 8.4V but this drops pretty quickly.
Just make sure that the battery is of the lower voltage kind -- some of them are 9.6V. This is a decent guide.
Bear in mind that these older devices were designed with transformer PSUs (linear) which naturally fluctuate voltage depending on load. For instance that heavy power brick from the 1980s would be at least 2V higher when unloaded, but as soon as you start pulling some amps it goes down to its rated voltage. Thus, most all circuits pre-90s can handle a few extra volts without problems.
Get a decent soldering set up, it might cost a little but the power of having to make/fix things on your own is astounding.
You mentioned that the jack was damaged, just visually check if the cable above it is also damaged or squished. Maybe go a few inches above, cut the jack and replace it with something like this - https://www.amazon.com/Timibis-Repair-headphone-Soldering-Spring/dp/B01AYBBZV2/ref=sr_1_4?crid=2YWMDMOMGMSRJ&dchild=1&keywords=trrs+male+plug&qid=1599904815&sprefix=trrs+male+plu%2Caps%2C374&sr=8-4
Though I'm pretty sure your local electronic shop can have it for much cheaper, and if it's not under warranty/denied warranty (as the error was on your part, not a manufacturing defect) you could ask them to fix it instead.
​
I learnt soldering to make my own cables for my instruments, and it's not very hard to do. You just need little bit of patience.
Youtube has tonnes of instructional videos, watch a handful and compile the common info.
Search a board with PAM8403 chip, with or without a volume control: https://www.amazon.com/s?k=pam8403
Or PAM8406, more power https://www.amazon.com/dp/B01EJ8S6FO
Both will run on 5V supply, tiny tiny class D power amplifiers
Something like this. Make sure to check the length of the fuse. The 2a one in this kit is 30mm which is usually the standard length. If you instal the new fuse and it blows immediately you likely have a short circuit somewhere. https://www.amazon.com/dp/B07552SD84/ref=cm_sw_r_cp_apa_i_e7boFbXV7E6TT
it was the main fuse. By same value you just mean purchase 3A fuse like this one I found on amazon?
https://www.amazon.com/gp/product/B07ZP9MCCF/ref=ppx_yo_dt_b_asin_title_o00_s00?ie=UTF8&psc=1
Well you can take off the current drive belt and measure it, typically they are sized in mm. When I was fixing VCRs back in the day, Napa o-ring gasket material worked well. Try Amazon; they’ve got kits of square drive belts etc in mm increments.
GoldenTrading Mixed Square Cassette Tape Machine Recorder Rubber Belt for Repair Maintenance - Black (Packs of 30) https://www.amazon.com/dp/B01CZSU6K8/ref=cm_sw_r_cp_api_i_KlEBDbNND91PR
Checking the ION site they have parts for their turntables but not for your gear. May want to contact them direct to either get new part or at least specs. Mileage may vary. Good luck.
>Silicone Seal & Glue
something like this? https://www.amazon.com/Permatex-81158-Silicone-Adhesive-Sealant/dp/B000AL6WLA/ref=sr_1_15?keywords=electronics+adhesive&qid=1552575755&s=gateway&sr=8-15
clean the sliders with Deoxit.
We can be very confident that this will fix the problem with the output level control; hell, it may even clear up whatever ghost is haunting the display.
This same product can be used on all the pots and switches throughout this gear; it is the first step.
Does it sound good? Everything working?
I'd avoid paying a shop for service unless it's actually malfunctioning. A full recap is pretty much always a waste of money, especially if the unit is functioning well.
Most I'd do at this point is open it up and give it a good once-over with some Deoxit on the pots and switches. While it's open you can clean out the interior and inspect for any obviously leaking caps, burnt resistors, or bad solder traces.
But it's exceedingly unlikely that you'll find anything.
Unfortunately no. I'd suggest finding the warranty or any proof of purchase and try to get a replacement. However, what I did, and what you could do, is just buy a cheap mic from amazon for like around 15-20$ and keep the headset. It'll still work and the mic will serve its purpose for what it is. This is the one i used:
https://www.amazon.com/gp/product/B0779PKLV9/ref=oh_aui_detailpage_o00_s00?ie=UTF8&psc=1
Well in that case I think I'm going to just go ahead and order these from Amazon:
From what it sounds like that should work, I believe.
Thanks for the help!
Amazon would probably be my best bet.
I've always used banana plugs to plug the speaker wire into the speakers.
Would this item work?
The pillar inside the copper shaft looks like it is jammed to me. This happens when old grease solidifies. If you take off the C shaped clip that’s holding the spring on (be careful not to lose the spring or clip) you might be able to get the pillar out and clean out all the solidified grease. WD-40 or isopropyl alcohol might help with that but make sure to clean all the WD-40 off afterwards. You can then dip the pillar in silicon oil (Kyosho 500000 Silicone Oil, 40cc https://www.amazon.com/dp/B0037Y5P74/ref=cm_sw_r_cp_apip_EUfzKkICfbnMb) and put it all back together. I did the same with my Technics SL-1650 when the arm was dropping too quickly. There’s a more in-depth article on this on either Audiokarma or Vinylengine, I can’t which but I can try to find it for you later. Even after all that you may need a new top plastic part as it looks like yours has snapped in two. Try eBay as the part will be shared across multiple Technics models. Vinylengine might have the service manual that will tell you the part number.
As an aside, I think I'm going to order some of this 30 AWG wire instead. The kind I got is just too thick/bulky. This 30 AWG wire should be fine, right?
I am new to replacing capacitors. Looking in my receiver they are 50V 10000uF Negative Black.
Are these the right capacitors or do they have to be the same height? Or is V and uF all that matters? https://www.amazon.com/10000uF-NOVER-Audio-capacitor-Negative/dp/B00N5TGOGW
I also saw These that actually say negative on them also. But they look half the height of my current caps
I can pick up a half decent multimeter (Amprobe AM-510 perhaps? 50USD on ebay), then learn/do the troubleshooting. Then if it turns out I need to replace the power transistors I could pick up something like this Hakko digital soldering station? Would those potentially be sufficient for the job?
I've done some amount of soldering, but only with a cheapo iron. I replaced a dead capacitor in a LCD monitor and have mended several wires.
Thanks for response.
I can't think why you'd be getting a humming due to the headphones having a 4 pole connector; it's supposed to be designed so that if something can't use the mic it's just bypassed. more likely that you're getting a hum due to the tv having a not-great DAC (digital to audio converter). Any 3.5mm male to female extension should work fine, and you shouldn't need to worry about it being 4 pole on either end.
I really appreciate you took the time to help me.
I'm in the basement wich is about 15feetx15feet, sitting approx 1.5meter away from the speakers. I'm not looking for front row concert loud sound, haha. Also, I don't want something that will let me tear my eardrums as I have two daughters that are surely going to be cranking the volume quite a bit.
Would something like this be sufficent for my needs? https://www.amazon.ca/SMSL-TPA3116-Digital-Desktop-Amplifier/dp/B00PXRRM5G/ref=sr_1_17?ie=UTF8&qid=1487095180&sr=8-17-spons&keywords=50+watt+2+channel+amp&psc=1
You sure? Someone on head-fi said my readings had to be wrong. So I meant 40 mV, not mW. It looks like my DC mW on my right driver was only 0.5-3.3 which is incredibly low for any amp out there according to almost every guide.
The user manual for the multimeter literally says "DC CURRENT MEASUREMENT"
"1. Red lead to "V(ohm)mA". Black lead to COM 2. RANGE switch to desired DCA range"
So it legit states I should go to the DCA range to test DC current, not DCV. If I'm not mistaken the DCA is top right and DCV is top left on my multimeter.
https://www.amazon.com/gp/product/B00TWTLYQE/ref=oh_aui_detailpage_o00_s00?ie=UTF8&psc=1
Don't remember if I linked it due to having so many conversations here and on head-fi, but that is the actual meter I got. Again, thanks for your help!
I suspect the dialogue is missing because the XLR input is expecting a balanced signal. What you'll want to do is break out the 3.5mm stereo cable to a pair of 1/4" mono plugs, using something like this, and run those to the subwoofer.
the voltage side of the equation is easily dealt with, but the 50hz factor could potentially cause an issue. as well as the quality of the step down transformer. most things that sync off the frequency (like clocks, and motors) will run either slow or fast, depending on which region you move the item from and which you go to.
in this instance, you'd almost need to get a set of inverters, which is ridiculously overcomplicating things.
you might be better off getting one of the usb powered variants with analog output included.
or something like this from the uk if you can do it that way since its already setup for 240/50 even if it may have the wrong plug; https://www.amazon.co.uk/Audio-Technica-AT-LP60USB-AT-LP60-USB-Turntable/dp/B00EUSMFPQ/
cheaper to swap the plug end if you need to, vs dealing with sync problems caused by ac frequency timing issues.
I imagine this one might be a better choice?
edit: Jesus, it's 2.5x more expensive that way. I can see why maybe you don't want to buy it locally. RS16,549 is like $250.
22 hour old post, you'll be best off just posting again so people see it.
Make sure to remove the referral code from your amazon link. A sanitized link will look like this: http://www.amazon.com/gp/product/B0042F3K9W
Consumer grade R2R machines like that usually haven't even been turned on for at least a couple decades, so pretty much all of them need work these days. Assuming the electronics are OK, you should be able to get it functional enough to use as a tape echo in a couple hours.
Get a bottle of rubbing or denatured alcohol. Remove the front panel (might have to remove a few transport pieces first). Check the grease on the moving parts (bearings, levers etc.). It's probably sticky and gross after all these years and should be cleaned off. Don't replace it with WD-40, use some kind of machine oil or lithium grease. Check the rubber parts - idler wheels, belts, pinch rollers. If they are real hard and cracked (or turned to goo), you're shit outta luck unless you got spares or want to spend a bunch of money. If they are just dirty (they probably are), clean them up with isopropyl alcohol or preferably rubber renue. A lot of folks say that alcohol will damage the rubber parts but in my experience that's bullshit.
Clean any switch contacts and pots with contact cleaner. At the very least wiggle all the controls a few times to make sure everything works.
Have fun!
That's not crazy high, but I was able to buy a kit with 3 types of Deoxit and other cleaning supplies for around $20 from Amazon.
that ones AC output. (or poorly planned info/layout on the site) something like this; http://www.amazon.com/LEDwholesalers-100-240V-5-5x2-1mm-Converter-3206-24V/dp/B002LMQ6G2
though it doesn't need to 100% look like that one, just needs to have enough amperage (weird, in that my dead one says 2A)
i have a slightly older version of this i use for other things; http://www.ebay.com/itm/252052455650 (it has a dedicated m type plug, instead of the universal)
keeping in mind a wall wart would work too.
I'd suggest an outboard DAC.
Something like this:
or this:
They will sound better and solve any audio issues.
It is a little wierd that it dose not accept banana plugs, but it looks like you are correct.
The way I see it, there are 2 ways you can deal with this. You can buy true binding posts like these http://www.amazon.com/Vktech-Terminal-Binding-Amplifier-Banana/dp/B00D6AICR4 and retro fit them in place of the ones you have. I may not have linked the most compatible one for your unit, but with out a picture of the part outside of the unit, it will be hard to determine the correct part.
Option 2 would be to get a project box and mount the new binding posts in it, cut out the back of the box mount it over the current connectors using the screws that surround the current terminals and wire the inside of the box, this would leave your amp unmodified and easily reversed if needed. It will add depth to the back of the unit, which may limit locations where it can be set up. If I where to go this route, I would paint the inside of the box with silver paint every where except where the binding posts would go through... to within about 1/8th of an inch. But making sure the screws go through the painted portion, this will help keep noise off the lines by grounding the box and keeping the source of the audio output the same. It might not matter. But I would do it.
Wow, thanks for that site! Great information.
When it comes to desoldering, do you think this tool would be useful?
thanks for the response. i forgot to mention i have a subwoofer -- what kind of interfaces would support that as well? i am pretty sure the ones i've looked at (e.g. this one) do not support a subwoofer.