
What are
/r/Breadit's
favorite Products & Services?
From 3.5 billion Reddit comments
The most popular Products mentioned in /r/Breadit:
![Flour Water Salt Yeast: The Fundamentals of Artisan Bread and Pizza [A Cookbook]](https://m.media-amazon.com/images/I/5104LtoxPiL._SL500_.jpg)


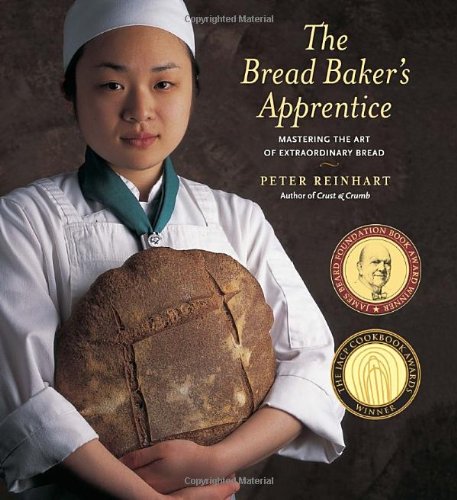


![The Bread Baker's Apprentice, 15th Anniversary Edition: Mastering the Art of Extraordinary Bread [A Baking Book]](https://m.media-amazon.com/images/I/61P9WU7dLEL._SL500_.jpg)


The most popular Services mentioned in /r/Breadit:
Allrecipes.com
Google Play Books
Yummly
Google Charts
Notion
Jet.com
The Book Depository
Dropbox
Imgur
Google Photos
BigOven
NPR News
MasterClass
Emojipedia
eHow
The most popular Android Apps mentioned in /r/Breadit:

Google Opinion Rewards

Multi Timer StopWatch

Panadero - Baking Calculator
The most popular reviews in /r/Breadit:
Apologies to anyone genuinely bamboozled. And if you are not already aware of the fantastic <em>Salt Fat Acid Heat</em> (which preceded the Netflix series of the same name), you should really give it a look.
Here is the original post about my sandwich bread for those curious about the recipe.
​
The bag is a dry bag for kayaking. Plastic bags work really well in my climate, so I wanted to get something reusable that would work the same way. It's difficult to get air out of so not perfect, but it's ok.
+1 for the title. Made me laugh.
I use one of these buckets. It's #1 HDPE so it's food safe. It also has measurements on the side so it's pretty easy to see when the dough has doubled/tripled.
https://smile.amazon.com/Encore-Plastics-81166-Measure-Container/dp/B00144B1AO/
This is commonly known as "the room where the baker sleeps" and happens when trapped gasses do not escape during baking. The oven spring effect creates more gas in the bread right when you put it in the oven (the heat excites the yeast right before they die). If you do not score the loaf properly, the gas will not escape, and may either burst out the sides or create a cavern like you have here.
Next time make a couple of slashes across the top of the loaf before baking.
It’s called a bread or baking cloche. Amazon has several kinds. I think I have this one:
So old-fashioned. Next time do what all the hip realtors are doing these days: https://www.amazon.com/Trinity-Candle-Factory-Cookie-Spray/dp/B002ZLIL8U#customerReviews
word of warning, use the cover, or a towel or something, but keep the basket clean. mice apparently love to eat stuck-on flour on the baskets. i found mine completely devoid of flour, and full of mouse poop.
Progress photos. I asked earlier how to get a similar result to a dutch oven while cooking multiple loaves at a time. /u/themodernmanhustle and /u/No-gods-no-mixers recommended bowl-on-pizza-stone, which seems to have worked great! Slightly lighter crust than the dutch oven (more radiation reflected by the shiny bowl?), but not actually much difference.
i modify it by preparing the baking soda into sodium carbonate(bake it on baking sheet in oven at 350F for 1Hour). It makes a more powerful alkaline and darker skinned pretzel
There is some confusion about this topic on this sub. Here is what I learnt from legit sciencey types.
A starter is symbiotic stable culture of specific strains of yeast + bacteria. They defend their turf. If you maintain it right - the original strains will continue to dominate and stay true.
If you want to get deets on how it works - check out this book (written by a PhD sourdough god):
World Sourdoughs from Antiquity: Authentic recipes for modern bakers https://www.amazon.com/dp/0898158435/ref=cm_sw_r_cp_api_i_AE.eDbXGCE0JB
Sorry, meant to post it as a top level comment. It's from the Momofuku cookbook by David Chang and Peter Meehan.
edit: The recipe is actually by Christina Tosi (who used to be Chang's Chef). Here it is, step by step. It's the exact same as in the cookbook, but with more pictures.
I love these. The unopened bag slides right into the container. Then just open the bag and bake away!
It is a Banneton brand lame. It came in a set with baskets and a dough cutter: 2 Set 9 Inch and 10 Inch Banneton Proofing Baskets, Bread Proofing Basket +Bread Lame +Dough Scraper+ Linen Liner Cloth for Professional & Home Bakers https://www.amazon.com/dp/B07QVCFFCL/ref=cm_sw_r_cp_apa_i_B07-DbFCCJATP
I use Emmanuel Hadjiandreou’s “how to make bread” for this recipe. I weigh the ingredients to get ~73-75% hydration. book here
Basically 200g bread flour, 3-4g salt, mix with 1-2g active dry yeast, 150g 100 degree F water
Mix, let rest 1hr. Fold twice, let rest for 1hr x3 or 4 depending on how the rise is doing. Transfer to baking sheet, let rest 10-20 min, shape, let rest, add toppings, let rest until 1.5x to 2x in size.
I keep a baking stone in my oven 100% of the time, I find it really helps with temperature regulation. Not required. preheat the oven at least an hour before baking. Bake at 475 for 15-20min
No water required in the oven since dough is pretty wet
Edit: forgot to mention - while resting the dough add olive oil so it doesn’t stick. Add more between resting if you need it - total is probably a few tablespoons
I've heard good things about FWSY, but if you want to get started without a dutch oven, I've had good luck so far with How To Bake by Paul Hollywood I was inspired after watching the Great British Baking Show and so far I like how he explains the process!
Thanks for posting a recipe! This is similar to what I used. Mine was out of This Book ($5 digital copy on Amazon) so I don't think I can post without breaking copywrite laws or something.
I will try again sometimes with the above recipe. Hopefully with better folding technique.
​
Edit: typo
I don't live near any Asian food stores (well, there is one, but they don't carry much) so I am wanting to order some pandan online.
Would this be what I want to order?
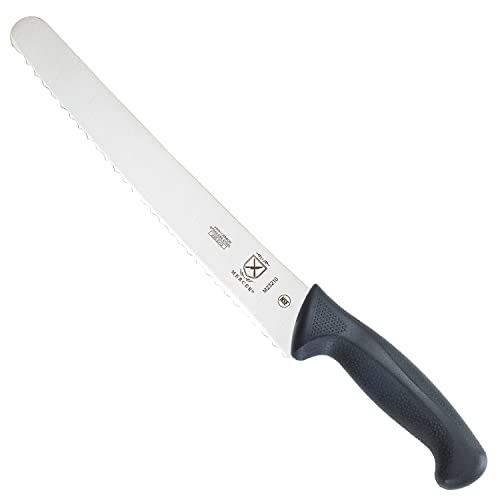
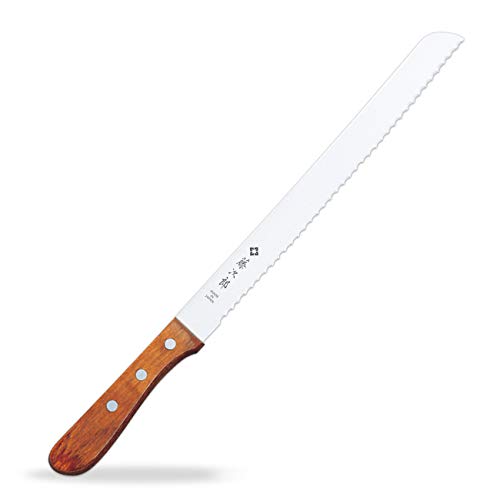
I agree. I also have a Wusthoff bread knife which is fine, but this one actually does a better job at cleanly getting through crusty sourdough than my Wusthoff ever did.
I use the Mercer Culinary Millennia Bread Knife. It was on an America's Test Kitchen video where they tested a bunch of bread knives—this one won and it was the cheapest! I love it.
Sure thing. Amazon had great prices, plus if you have prime it's an amazing deal.
Please note it is heavy, I believe about 85lbs.
Yeah I'm pretty sure this is a prankster going around putting gluten-free stickers on things that definitely aren't. You can buy them online. There's lot of random stickers that you can buy off amazon and have some fun putting them on inppropriate things at the grocery store or around town.
Thanks! The tubs are called cambros and you can find them at any restaurant supply store or on Amazon! They’re definitely cheaper if you can find them in a brick and mortar shop. The bowls are proofing baskets called bannetons.
Thanks! Just amazon! These are the prints we got.
Kitchen Herbs Art Prints - Botanical Prints - (Set of 6) - Unframed - 8x10s https://www.amazon.com/dp/B077J2BF57/ref=cm_sw_r_cp_api_i_DN5OEbK14TMH1
Thanks! I started an English blog but I never got time to translate all my recipes. I make a detailed video for each one and it is time consuming to keep up both sites.
the English version is here but I only have 4 recipes there. http://simplebaker.com
Here is the English translation of my Italian blog
Vittorio
I've been hearing good things about that book.
It's on my list.
I really like Shirley Corriher she really gets into the hows and whys.
Her book Cookwise has a great section on baking with some good recipes.
If you're a super baking nerd her book, Bakewise, goes DEEP into baking.
Don't mind the negative reviews, they're people complaining "the recipes don't work". They miss the point and didn't READ the damn book. Think of it as a baking textbook with varying baking science lessons. Some are DESIGNED to fail so you gain a deeper understanding of what's actually happening.
It won't be a disaster but it might taste odd. Rye, on the other hand, goes with beer beautifully. For instance:
http://allrecipes.com/recipe/rye-beer-bread/
There are a bunch more Russian recipes that use beer in the dough, plus check out kvass.
They sell it at Whole Foods and in the natural/specialty section now, and a lot of grocery stores are gradually getting it. It's supposed to be better for those who get upset stomachs and stuff from gluten sensitivity, but not safe for celiacs. Jovial is the brand I see most. You can make a whole loaf out of it.
The seminal work on all sorts of English breads is (http://www.bookdepository.com/book/9781906502874?redirected=true&v=A75X6&selectCurrency=AUD&gclid=CjwKEAiAqMajBRCdjejki6yjuDwSJACQeVukzuy2nDkHy5YeRATenVggQaxtReGziJGuZAkfGUS64BoCfxjw_wcB)
She's not a fan of the ENglish muffin, but you need to read the book
Recipe adapted from Jimmy Griffin’s Art of Lamination book.
Starter
- 16g starter
- 32g bread flour
- 32g water
Risen for ~4 hours at ~26C.
Dough
- 250g: 170g bread flour + 80g all-purpose
- 80g milk
- 40g water
- 32g sugar
- 72g starter
- 4g salt
- 12g butter
Risen for ~3 hours at 26C, then rested in the fridge overnight.
Lamination
- 140g butter block
Butter lock-in followed by a book fold and a letter fold, with 1 hour rest in between in the fridge + 10 min in the freezer. Every roll-out is to about 5mm thickness. Learned hand lamination technique from this awesome video by Jimmy Griffin.
Shaped & then proofed overnight for ~10 hours at 26C.
Preheated the oven to 220C, then baked for 20 minutes at 170C (fan-ventilated).
The two keys two success I feel were:
- careful and even lamination, while always ensuring the dough doesn’t get too warm
- patience proofing (most of my previous attempts were underproofed)
Both “poolish” and “biga” are different forms of pre-ferments used, rather than pure starter/levain recipes.
Poolish is a mixture of water and flour with a small amount of yeast. Biga is similar but more of a stiff dough.
Lol honestly I’m still learning but that’s what I’ve gathered thus far from the book, Flour Water Salt Yeast
Try that link, it shows me the recipe. Over time, I've found I prefer to put a bit less yeast and sugar than the recipe calls for, but it's good either way.
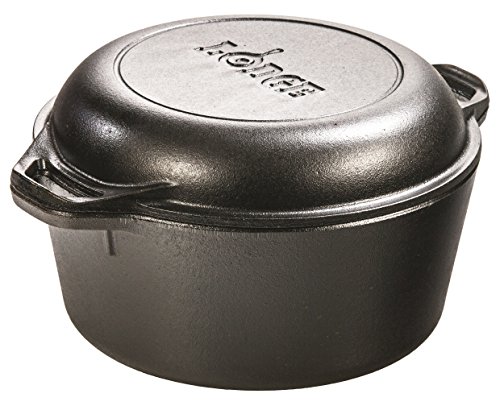
If you are buying a dutch oven specifically for bread baking, may I suggest getting a combo cooker instead. It is cheaper for similar quality and your hands would not be at risk of burning when you drop the bread in.
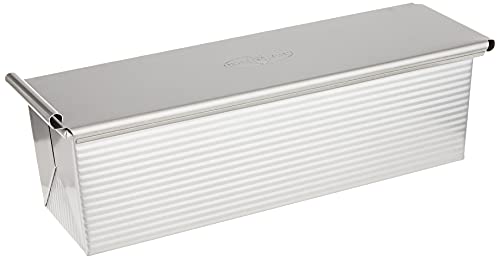
I was just wondering the other day where to get a pan that makes wide, grocery store sandwich loaves.
I found quite a few on Amazon, like this Nordicware one but there were also USA Pan and others. I searched for "wide bread pan" and there's also something called a "hearth bread pan" that might be interesting to you.
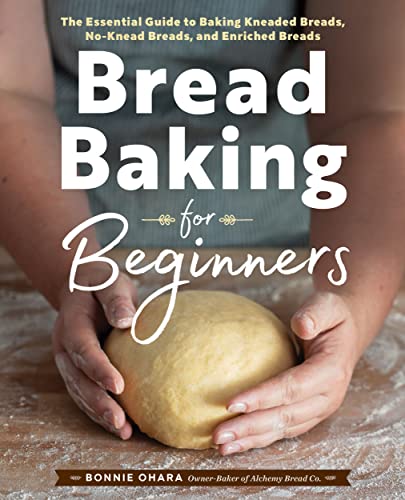
I started by going through the Bread Bakers Apprentice. I don't really use any of the recipes in there anymore but it gave me a good starting point and it's still a good reference for terminology and methods. Like, it got me really into ciabatta bread from that book. I'm still tweaking my recipe to perfect it.
Starter is a whole different beast. I've used the method found in this youtube series to make mine. He's got a series on sourdough bread, but that channel's non-bread content is pretty fantastic as well.
If you don't have one, I'd highly recommend a kitchen scale. Recipes using grams is so much easier/better than using volume. Also, don't buy those little packets of yeast at the grocery store if you're planning on making bread more than twice a year. You can find two pound bags of dry active yeast on amazon for ~$10.
I used the recipe from my “bread bible”; Peter Reinhart’s The Bread Baker’s Apprentice
I really, really recommend the book. Every recipe I’ve tried in there is an absolute hit. I follow the recipe by weight for better accuracy.
This was the dinner roll recipe I grew up with. Simple, yet it goes with any savory dish well. The slight sweetness also worked well with butter and jam/jelly/honey.
America’s Test Kitchen tested both models and highly ranks the Zojirushi. It gave the Cuisinart its lowest ranking of “not recommended.”
Zojirushi
With a fancy heated lid and dual paddles for kneading, this machine formed and baked beautiful, golden-crusted loaves with even-crumbed interiors. The machine’s heated lid helped it achieve the exact chosen crust shade every time. However, the control panel was slightly confusing to use, and we wished that the display screen showed a timer for how long the bread would take to make rather than the time of day.
Cuisinart
This bread machine sported an easy-to-understand (if a bit dim) display screen, and we also liked the handles on the outside of the machine, which made for easy maneuvering for storage purposes. However, the metal exterior and the lid heated up significantly during baking, making it hot to touch when opening the machine and removing the bread. It was also rather loud when kneading, and the results were inconsistent; sometimes a decent loaf with an even crust emerged, but other times the top of the bread was sunken in and the crumb was too light and feathery, falling apart when cut. We also had issues with the bread pan handle being too close to the top of the bread pan—on more than one occasion, it baked into the crust.
* Bowl A (6 quart bowl) * Mix together: * Bread Flour (2 cups) * Sugar (1 tablespoon)
* Bowl B * Water (warm, 2 cups) * Salt (2 teaspoons) * whisk to dissolve fully
* Yeast (0.5 oz; 2 foil packs) * whisk to disperse
* Add contents of Bowl B to Bowl A while whisking * No dough formed; will be a thick liquid
* Stir in ingredients * Oatmeal (1 cup) * Evaporated 2% milk (2/3 cup) * Sunflower Seeds (1 cup) * Flaxseed (1/4 cup) * Wheat Bran (1/4 cup) * Honey (1/4 cup) * Melted Butter (1/4 cup)
* Make into dough * Add while kneading
* Whole Wheat Flour (2 cups) * Bread Flour (3/4 cup)
* Knead on floured surface into a ball * Add to a greased bowl * First Rise: 2hr in warm location * Knead again * Split into 2 loaf shapes * Roll top of loaf in some oatmeal or flaxseed * Add to greased bread pans * Second Rise: 1hr in a warm location * 375 for 20min, then cover with foil and 15 more minutes * Done!
Based on: http://allrecipes.com/recipe/honey-wheat-sunflower-bread/detail.aspx
I found this comment more helpfull:
>After you roll it out into two rectangles and sprinkle the dough with feta, you cut each rectangle in half, length-wise. Next, you roll up each of the four strips as tightly as you can from the long side. Then, elongate each of your rolls until they are about 24 inches long. >Form an "X" with two of the rolls, braid them together, and coil into a round. >Makes two coils.
So its effectively a 4 strand braid, heres a video I found real quick on google
On second thought; THIS ONE might be better. The white (inside) enameled ones are better for browning meats, but cast iron is probably better for bread.
I have two 12x12 saltillo tiles like these on a center rack, and use rolled wet towels in a pan on the bottom rack to steam up the oven about 15 min before the bread goes in.
I bought a couche on amazon for shaping.
They’re these gloves. Thank you very much!
The Tartine Bread book, practice, and being really aware of the ambient temperature of my kitchen, haha.
https://www.amazon.com/Tartine-Bread-Chad-Robertson/dp/0811870413 I am only in the second section (Semolina and Whole Wheat breads), I have been baking every recipe one by one.
You can find them on Amazon or most baking stores, I picked up this one a couple months ago Pullman Pan
Oh okay. I know it’s not necessary because I do it all the time :) you can bake great bread without one (on a stone, in another type of oven, etc.) A clay pot would work great to make bread. I have used one as a gift from a friend a few times and have loved the results (https://www.amazon.com/gp/product/B00004S1D5?ie=UTF8&tag=arbrinfimiada-20&linkCode=as2&camp=1789&creative=9325&creativeASIN=B00004S1D5....this is the one I own)
This is the one I use. I love it. All my other knives are Victorinox Fibrox, but the bread knife was stupid expensive. This one does a great job. Super sharp and great for thick crusted heritage breads like this.
Mercer Culinary M23210 Millennia... https://www.amazon.com/dp/B000PS1HS6?ref=ppx_pop_mob_ap_share
I've got these ones. I think the price is pretty fair considering they should last nearly forever. I've seen these exact ones for almost twice as much too. If you've got Amazon prime it's a pretty good deal.
Https://www.amazon.com/dp/B005TUCDM4/ref=cm_sw_r_cp_apa_hme9xbX4BQVFQ
I used to use a bread knife that came with my knife block. It was awful. It tore bread and gave me awful and inconsistent slices. I also couldn't slice as thin as I wanted. With crusty bread, it would slide off of the crust and there were many near misses.
Now I use the Tojiro F-737. I originally wanted the Mercer Millenia 10 inch bread knife that was reviewed favorably by Americas Test kitchen. However, amazon didn't have it available on prime when I needed it (and I'm impatient). I looked up other reviews and Serious Eats gave this knife high praise so I figured it was a $22 experiment. It works great. I get beautiful even slices as thin as I want. I'd highly recommend it.
Right on! I too have just entered the world of fresh milled flour(I'm jealous I have a nutrimill). If your interested in having different grades of flour I recommend checking out at least a 50 micron screen. I got a 50 and a 100 micron screens on Amazon to sift out bran and flour that was closer to a fine sand kind of like semolina. I found the largest and cheapest stainless screens were weirdly enough in the gold mining section. Most of the screens people had reviewed the cooking models as not stainless as advertised or the frame would rust or they were as much as $150 for a brass framed model. Very nice, but also ridiculous.
The flour I sifted out of the 100 micron screen is super light and almost white. The bread I've made with it looks looks closer to a 20%WW and has a very wheaty flavor.
SE GP2-1100 Patented Stackable 13-1/4" Sifting Pan, Mesh Size 1/100" https://www.amazon.com/dp/B00BP2I77U/ref=cm_sw_r_other_apa_-V4HybDNMSWME
I tried to document the process https://imgur.com/gallery/nqAfF
You can buy a cast iron Dutch oven for $20 on Amazon. This is a great investment because it lets you make really good, really simple no knead breads.
Literally just miss together four ingredients and let things sit. Then fold the dough, let it sit some more. Bake it and you've got amazing bread. These no knead recipes are the best ROI for your baking time, effort, and dollar.
One great tip I picked up is to put the bread in the Dutch oven on parchment paper so there's no clean up!
I bought this 4 quart Lodge cast iron dutch oven from Amazon after skimming through FWSY and for under $30 bucks it has served me perfectly for every loaf I've made since having it.
I didn't buy two but haven't had any issues splitting the dough, leaving one half in the fridge at the end of proofing while the other bakes, and then popping the next dough in immediately after with a short 5 minute re-heat of the empty dutch oven.
I don't think you need to go super fancy or expensive with the dutch oven to get nice bread, and for $25 bucks it is a steal.
Hairnets. Here's the Amazon product page, which someone else on this sub sent me to and I thought I'd give a try. Fantastic!
Disposable Hair Net, Spun-Bonded Polypropylene, White, 100 per Bag https://www.amazon.com/dp/B002XK2FS0/ref=cm_sw_r_cp_apa_i_UZVgCbECY3KAY
As for how I baked it, I did it the usual way in a dutch oven. I sprayed it with a spray bottle quite thoroughly before hand, and that gives it those wonderful crust bubbles. The hairnet means that I didn't have to use any flour to make sure it would release from the proofing basket, so it keeps the surface of the crust nice and clean.
Old US made kitchen appliances are so easy to fix and so worth holding onto. I still have a blender my grandma bought in the 60s. And a food processor from the 70s. All metal drives and and no sign of dying affer years and years of use. I did replace the blades on the blender though.
Edit: I did upgrade to this mixer a few years back https://www.amazon.com/dp/B000PMZUGW/ref=cm_sw_r_cp_apa_i_33LKFbCFSR18K?_encoding=UTF8&psc=1
After 4 years of heavy use it is beast.
Thank you!
Spoons: ERCRYSTO Stainless Steel Tableware Creative Flower Coffee Spoon, Stirring Spoon, Sugar Spoon, Stir Bar Spoon, Mixing Spoon, Tea Spoon, Ice Tea Spoon, Ice Cream Spoons,8 Diffient Pattern, Color Golden https://www.amazon.com/dp/B078N2ZHJJ/ref=cm_sw_r_cp_api_i_CULyFb241BKR5
I have this bread Knife.
Mercer Culinary Millennia Wide Wavy Edge Bread Knife, 10-Inch, Black https://www.amazon.com/dp/B000PS1HS6/ref=cm_sw_r_sms_apip_A8qYnF3pdE6Of
My brother worked for an Outback Steakhouse and it’s what they used. I also have a Henkel one that tried to cut my finger off. It’s prettier to look at but I don’t like it nearly as much.
The Mercer Culinary Millennia 10” bread knife.
As tested by America’s test kitchen, and I can confirm this is an amazingly awesome bread knife for the price! I love it so much, it has replaced a much more expensive henckels knife that I previously used.
Check this out: Mercer Culinary M23210 Millennia 10-Inch Wide Wavy Edge Bread Knife
https://www.amazon.com/dp/B000PS1HS6/ref=cm_sw_r_sms_awdb_t1_86QLCb4VQ31M0
Right. It’s the lodge 4 qt.
I use this one, but honestly I think it was finally learning the technique that helped me the most. Tight gluten cloak, chilled dough, and coming in almost parallel to the counter (like using the edge of a spoon), that made the difference.
SAINT GERMAIN Premium Hand Crafted Bread Lame with 6 Blades Included - Best Dough Scoring Tool with Authentic Leather Protective Cover
https://www.amazon.com/dp/B01LY7NDQ9/ref=cm_sw_r_cp_api_xBxQBb68NRDM4
The bread itself is based off this recipe (http://allrecipes.com/recipe/easy-focaccia/) except with the fresh (unchopped) rosemary kneaded into the dough rather than being sprinkled on top. The topping is, in this order, EVOO brushed on, sea salt, minced garlic, fresh basil (whole leaf), fresh oregano, fresh thyme, 1/2 of a sliced red pepper, parmesan cheese, and mozzarella cheese.
I receive consistent good results with this recipe. I use skim instead of buttermilk and never have a problem with it rising. I also decrease the sugar by half. The differences between your recipe and mine seem to be: 1 more egg, 1/4 cup more fat, baking soda instead of powder, longer slower bake. I would say double your oil and add an egg for a moister cornbread.
I made two loaves of Basque bread for freindsgiving today with this recipe. This one came out fine, on the other i put the yeast in while the water was ~150* and I am pretty sure I killed it. no rise and even after baking for an hour it did not cood through. Fed it to the pigs.... no crumb pic since it was all gone within a few minutes of me slicing. Got some rave reviews though. I will definately be making this one again. Perfect for turkey sandwiches.
Progress and crumb. Mostly following Breadwerx 65% hydration.
I'm loving the crust I get in the dutch oven, but I'm curious: do others get a similar effect with some method that scales to 2 or 4 loaves? (I only have the one dutch oven. I tried a cookie sheet with water poured on, to steam the oven, but it didn't seem to have much effect.)
I honestly didn't give "bun recipe" a thought. I just figured I know this ultra-easy recipe comes out well for loaves of white bread, so why not make buns out of it?
I halved this recipe, and I substituted butter for the lard it calls for. After the first rise, I punched it down and split it in half. I made the 4 buns (and the little guy in the middle) out of one half, and rolled and braided the other half. I put the 5ish buns in a pan, and curled the braid into a pie tin. Covered them and let them rise another hour, then baked at 375º for 25 minutes (pre-heated oven).
The buns came out perfect, and I haven't cut into the braid coil thing yet. Still trying to figure out how I'm going to use it - I doubt it'll hold together well for sandwiches.
Moved into my new house. This is the first time making a panned bread. Tried something simple (Whole Wheat Recipe). The previous owner left an oven thermometer. I'm glad they did because the oven ran 50F hotter than the set temperature!
>I'm sure you didn't mean it this way, but the word distasteful has a significantly more negative definition and connotation than just saying you don't like the way it tastes.
I was going to put "yucky" but I thought it seemed like a juvenile adjective, so I opened my handy-dandy thesaurus, and out of all synonyms I thought distasteful was the most mild.
Here's the recipe!
Ingredients
>7g Instant (or active dry) Yeast
>75g Water (110°F/43°C)
>42g Barley malt syrup (or honey)
>245g Whole Milk (room temp)
>12g Salt
>30g unsalted butter (soft/room temp)
>400-450g AP Flour
Method
•In bowl of standing mixer, combine yeast, water, & malt syrup/honey. If using active dry, let sit for 15 min.
•Add milk, salt, and 400g of flour. Combine using dough hook until almost all of the flour is absorbed, then...
•Add in butter, a little at a time, until incorporated.
•Continue adding flour, a little at a time, until the dough begins to pull away from the bowl edges. Knead 5-7 min on stir/low/1 until smooth. If dough seems too dry, add up to 2 TBSP water.
•Rest in greased bowl for about 1 hour or until at least doubled in size.
•After dough is risen, deflate and shape. I usually shape it into one loaf, but this recipe also makes 6 mini loaves!
•After shaping, let rest 30 minutes before preheating oven to 350°F/177°C
•Bake with steam for 30-40 minutes, until browned and registers at 205°F/96°C inside
Here's the version of this recipe I typed up for my mom, with detailed instructions
there's the math way. check richard miscovich's "from the woodfired oven" for the exact formula (maybe this link will work )
It's also just something you figure out. Start logging water temp, dough after autolyse, and dough after final mix. Include room temp, preferment temp, and mixing duration. When you start to chart all that stuff, you get an idea of the right water temp.
I used to do the math, but now I just do the latter method. It gets easier, don't worry.
One of my favorite savory herb breads is Herb and Onion bread from The Vegetarian Epicure. Here's the recipe
A tall narrow tupperware container.
I take a strip of cling wrap and tie a knot in one end, place it over the top of the container, then use a twist tie on the other end to keep it on tight.
THIS go talk to your local baker I talked to mine and went up early in the morning and just watched him do his thing for 6-7 hours it was really awesome. I figured out I wasn't kneading the dough enough and what a difference bread improver makes to the texture. It was an amazing experience and I got to see all the tools and ingredients they used which was really helpful. Not only did I get to see all that but I also bought some things I just can't find anywhere else through him. These bakers mitt things http://www.ebay.com/itm/Pro-Bakers-Pad-HD-terry-oven-mitt-bakery-NEW-/360233668467?pt=LH_DefaultDomain_0&hash=item53df998f73 This thing I didn't even know these existed.
you put your hand through the hole and use it to grab hot pans with but they're way easier then glove type mitts. Also shortening since I can't buy it here. Definitely go see your baker!
https://desygner.com/design/?id=50IgnO1FiJZ
Loaf, crumb and recipe all in one image file creator. Free to use, modify or ignore.
By the way those aren't stock images. I just made them and they are freaking delicious
Allrecipes.com has a honey whole wheat bread recipe specifically for the bread machine. Find out what size yours is, and the wondrous thing about that site is that you can ask it to adjust the recipe for the size you need.
I have a bread machine but mostly use it to just make dough for me because I don't have a Kitchen Aide. It was sort of my 'gateway' tool, as I make all sorts of bread by hand now but I never would have tried to before I got a bread machine.
Oh, one more thing; make sure to use yeast that is meant for bread machines.
Although I'm interested in others' more exact answers to this question, let me just throw it out there that you don't need much at all. Just get a cheap bread pan and find a simple recipe (a little googling will get you that, of course). There's no real magic to it. Yeast, flower, pan, oven. Try one recipe a couple of times. Find another, try a couple of times. Notice differences. It's all experimentation.
This one is my standby (and one of the highest rated recipes on allrecipes.com). Like store bought crescent rolls, but much fluffier and more bready. I leave out the extra 1/4 cup butter to cut some excess fat out, and they're still fantastic.
Recipe is for a bread machine, but expand the first comment there, it has instructions to make it by hand.
This one but instead of making a bunch I made to huge ones.
https://www.masterclass.com/articles/how-to-make-conchas#how-to-make-conchas-homemade-conchas-recipe
One thing I learned is that I really have to develope the dough, they kinda collapsed a bit after it cooled down.
I've never used Squarespace, but if you have access to the HTML file of your page, it would be as simple as adding the script tag with the library as src, and then adding another script to load the chart:
Thank you!!! ☺️ I actually use a cat shaped mold that i brought from my local store. Similar to This One, which give pretty big slice of bread ahahaha
I’ve replaced quite a few gloves/mitts ever since I started baking last year. Many of them started ripping. I always double up with gloves. I put on bbq gloves on both hands, then regular oven mitts for extra heat protection on my right hand since it’s the one with most heat contact when removing the lids and stuff
Both are starting to rip/have holes after about 3 months of usage, on average 3x a week. Haven’t found one that is able to hold itself together for a longer period but I’m happy with the two links above
It’s this one, 13x4x4:
USA Pan Bakeware Pullman Loaf Pan with Cover, 13 x 4 inch, Nonstick & Quick Release Coating, Made in the USA from Aluminized Steel https://www.amazon.com/dp/B002UNMZPI/ref=cm_sw_r_cp_api_glt_fabc_5YN90TKSH3RM3N0PGXR9
It's not a lodge, it's from Cuisinel. I was tempted by the lodge which was $20 more, but since I was only planning to use it for bread (since I have an enameled Le Creuset for other cooking) I decided to skimp a bit. No regrets as the quality and finish is A-OK.
The recipe is from FWSY, specifically white bread with poolish recipe.
I fully understand the recipe being too much of a commitment- I never made sourdough until the start of the pandemic as a way to keep my spirits up. If you ever become interested in delving into it a bit further and dedicating more time, I ended up purchasing Tartine Bread and love it. The original recipe is there, plus lots of variations on it. My favorite is the olive version!
Yeah! I used this one: CHEFMADE Loaf Pan with Lid, Non-Stick Bakeware Carbon Steel Bread Toast Mold with Cover for Baking Bread - BLack https://www.amazon.com/dp/B07QHWXYF1/ref=cm_sw_r_cp_api_glt_fabc_E507K4X166DN64WFSXVC
It works really well and is nonstick. Some of the reviews said the pan sucks but I honestly have had zero issues with it. But you can definitely try the other suggestions too, I’m sure they work well.
Do you have a stone or a steel in your oven?
If so, get a spray bottle of water and an inexpensive roasting pan. (I use the bottom half of this pan from Amazon).
Let the pan get hot in the preheating oven for at least 20-30 minutes before baking. When you are ready to put the loaf in the oven, set the loaf on the stone, spritz it several times with water, put the roasting pan upside down over the loaf, and shut the oven door. 15 minutes later, remove the roasting pan.
Works beautifully. I have been baking beautiful loaves — including shapes that will not fit in a dutch oven — for years. Credit to The Northwest Sourdough lady for the technique.
Get some cheap shower caps (like these). They stay on the bowl easily and give you a little more room (although I think your oozing dough problem is because you're not using a big enough container in the first place). A moist towel works too, though.
Putting the dough in the fridge to rise isn't a problem and will often help contribute to flavor, but you need to make sure to REALLY adjust your rising times (1-2 hours will end up being more like 8 hours).
I have this kit from Amazon that included the lame. In my limited experience it helps to have some flour on the top before scoring to prevent snagging. (Banneton Bread Proofing Basket... https://www.amazon.com/dp/B081VHFYZM?ref=ppx_pop_mob_ap_share)
They help to lock in steam that improves crusts. The grey one in the middle is a good place to start, It's an Amazon basic model( https://www.amazon.ca/dp/B07VGGLDYN/ref=cm_sw_em_r_mt_dp_QGDcGbYKPPF6C?_encoding=UTF8&psc=1 ) and was much cheaper than the neighboring Staub and Le Cruset I used today.
I've used them for my snake in the past, tried using my seedling pad but it will get too hot so you need a thermostat. I plan to build a controller with an arduino and a smart plug but might just get one of those thermostats instead,, probably this one
I used this specific pan. Like u/GoodKidBadTiming said it's a pullman style has a lid and works pretty well once you figure out the right amount of dough to use. It makes like a half loaf but it doesn't sacrifice height just length. Good for sandwich bread and toast. Commonly used to make Shokupan or Hokkaido milk bread. Worth the $20 in my opinion. Also the bread is a little more brown in real life had too much light I think in the picture. I honestly think it's prettier in person.
Get a Tojiro bread knife and you'll never have this problem again.
https://www.amazon.com/Tojiro-Bread-Slicer-270mm-F-687/dp/B004LVIO3O
You don't. This how they always look unless you're shaping small 10 inch personal sized (175-200g.) or medium 14 inch (400-425g.) doughballs in a pizza shop.
If you buy the bigger pizza proofing trays they still do this after 2 days in the fridge. Unfortunately, these trays are large and require a huge fridge or walk-in to manage.
Reshaping is best avoided as it effects the crust formation. You're generally trying to avoid poking at the edge of the dough during shaping in order to preserve the air pockets and allow for a better rise.
Brush your container with a light oil, and the doughball once its in the container and it will release easier.
> I am looking to buy bannetons, bread lame, bowl scrapers, storage containers, dutch oven, pizza stone etc. Can you guys point me to some online stores where bakers shop for these things?
Someone else has mentioned Breadtopia, but also look at the SFBI: https://www.sfbi.com/baking-supplies. Amazon can also be a good place to look too.
I'd skip a strictly round pizza stone, and go for something like http://www.amazon.com/dp/B008CVFXFQ this instead. You can use it for bread as well as pizza.
> Also how do you guys store your flours and sugars?
I use the plastic storage bins with folding interlocking lids for storage of both opened and unopened ingredients.
Some of them (particularly specialty, GF flours) when opened have to go into the fridge, others go into the freezer (I buy yeast in bulk, and freeze most of it, with only a small amount in the fridge).
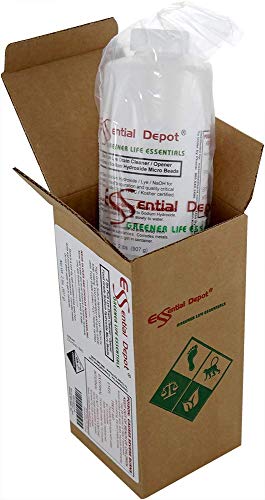
Many hardware stores sell lye. I live in Canada, and bought mine through Amazon Canada, here.
(I know you're feeling squeamish about using the lye bath. I'm afraid that if you look at the description in the link above touting the product's uses as drain cleaner, paint stripper and degreaser, that, well, you're not going to be reassured! :-) )
Lots of places online. Its also called Ceramic Fiber Insulation Blanket amazon
Saf Instant Yeast, 1 Pound Pouch https://www.amazon.com/dp/B0001CXUHW/ref=cm_sw_r_cp_api_i_3wkMFb7GA4PXP?_encoding=UTF8&psc=1 Let this guide your adventures (stays fresh for a year or two in the freezer opened in a ziplock bag)
You'll want an oven thermometer (at least in some point in your baking endeavors). Different than a meat thermometer as this is stationary inside the oven. Here is a top reviewed one on Amazon (FYI I have no idea if this is an Amazon Smile link).
Woot is a legit company. They're owned by Amazon. It's about the same price on Amazon if you count Woot's $5 shipping and have Amazon prime. https://www.amazon.com/dp/B0012N7G60/ref=cm_sw_r_cp_api_lUT-yb2Z3SFMG
Doesn't Forkish recommend at 4 or 5qt dutch oven? 7.5 seems a bit big. I got the 6qt Lodge dutch oven off of Amazon and it has worked well. https://www.amazon.com/gp/product/B0012N7G60/ref=oh_aui_detailpage_o09_s00?ie=UTF8&psc=1
They say if you do it with GT you have to get the black labeled ones because the new recipe for the regular labels don't contain enough fermentation.
You can buy a starter through amazon.