
What are
/r/HondaCB's
favorite Products & Services?
From 3.5 billion Reddit comments
The most popular Products mentioned in /r/HondaCB:


![4" Power Distribution Terminal Block Battery Bus Bar [Max. 300V AC/48V DC] Positive Insulated Busbar for Auto Marine Car Trailer RV Boat - Red](https://m.media-amazon.com/images/I/41GiHLqVVaL._SL500_.jpg)


The most popular Services mentioned in /r/HondaCB:
Google Photos
OfferUp
Facebook Marketplace
Walmart
TinyURL
TinyPic
Gumtree
The most popular reviews in /r/HondaCB:
LED headlight won't affect the turn signals at all. Only if you change a turn signal to an LED will you need an LED compatible flasher. What i did on my 80 CB750C is change the glass out to this one compatible with an H4 bulb and purchased this bulb. It doesn't blind oncoming traffic due to the little rails that block the light from hitting that spot on the projector housing.
You'll gain the benefit of lower power usage so your stator isn't as stressed and better visibility. The bike is more noticable head on in the day and at night you can see extremely well. I have 2 pod lights also wired into the high beam switch.
Switch over. The benefits far out weigh the cons.
Found mine at CVS. Paid $20 (it's worth it). Just saw you can grab it for $15 on Amazon with free shipping (not Prime).
https://www.amazon.com/gp/product/B07926CY1H/ref=ox_sc_act_title_1_1_1?smid=A1GNFOSVIBT33G&psc=1
EDIT: They raised the price to $16.75 since I posted,
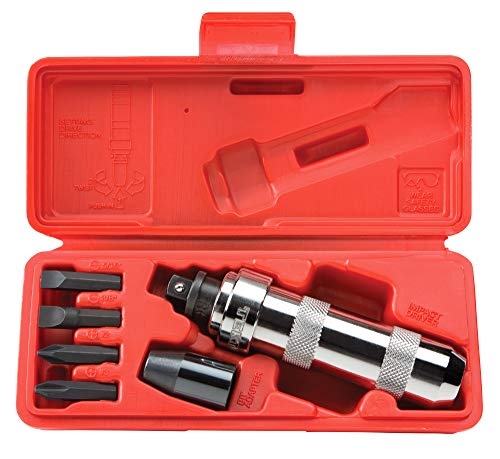
Before you cut or glue anything try this brand of screw extractor. There are several others that look identical at a cheaper price, but this is the only one you want. You use one side to drill into the screw head (set your drill to high speed, CCW rotation) until the cutting bit is mostly seated in the hole. Then flip the tool around in your drill. If you have an adjustable clutch turn it down very low, set the speed low, apply heavy pressure to seat the extractor in the hole you just cut, and try to unscrew the screw. It should seat in and click against the clutch. Maintain the pressure, and adjust your clutch up to mid range. Repeat, allowing the bit to bite a little bit more into the screw. Do this again in the top end of your clutch setting, then turn the drill all the way up (still in low speed) and unscrew it. I've had tremendous success with this extractor. Slow & steady is the key.
u/mononokayy , u/FrankJoeman
​
I have a 2016 Honda CB500F with a Puig windscreen, works great. Linked product page and a few pictures of how it looks on my bike. Hope this helps.
Product: Puig 6437F Dark Smoke Naked New Generation Windshield
​
How it looks on the CB500F
Wire in a voltmeter. You’ll know what rpm it’ll take to get a good 14.5vdc and how far it drops with lights.
I put one on my 72 Yamaha and was not surprised how low the voltage is at idle or how much it drops with lights. Was sort of surprised by how much it drops with blinkers.
No apparent leaks at the intake manifold, I took a video of what I am up against. Pulling the throttle on the left side carb revs the bike up, doing the same on the right side carb just gives a weird breath sound and does not alter revs at all, if anything it feels harder to keep the bike alive while messing with the right hand side throttle.
Also, while running, when pulling the spark plug boot on the right hand side the bike will stay running. Putting the right hand side spark plug boot back on and pulling the spark plug boot on the left hand side will kill the bike. Am I not getting spark on the right hand side or is my spark plug boot faulty potentially?
Here's the video - https://photos.google.com/share/AF1QipP2sBGrVEbj0HEVgdxjDqoxroXlWqXXFyQeQ_dStMJIhq9FYasW5EucVngWN427nw?key=Q0pWRk5fTVExU2M4MEFHOGg5ZHlqbDNuamRVUGNB
It looks like and aftermarket 4 into 1 header. Stock were 4 into 4. Just measure the pipe outside to outside. Looks like 2 1/4 probably. There are several option at dimecitycycles. Only problem is you might need someone to weld a bracket on the new muffler. Unless you put on a short muffler, then it might just hold. Thats all from me looking at one pic though.
Mine has four into two exhaust and I put shorty mufflers on and was going to weld tabs but the short mufflers were wider and touched the swing arm so I kinda rigged something to push them out instead from where the center stand was. Your 4 into 1 sits lower, so I think you could be good. If you go with a welded bracket, normally the rear pegs are used as the brace point, so you’d need something decently long as your bracket, it could just hold.
Also, look at something like evil energy clamp to clamp your muffler on. Maybe some RTV but o get a good seal also.
Your bike should run better with a muffler to create back pressure also, unless the carbs were tuned for this muffler removal, Which I totally doubt. Good luck!
I guess these are the things I remember doing:
Rebuilt the front brake (Mine was filled with mud!)
Replaced the chain (a rusty chain makes a slow bike even slower)
FREQUENT point setting. Learn how to do this, because you will likely have to do it every few hundred miles. Once you have done it a few times it's super easy and can be done in 15 minutes.
One thing I had a hard time finding out online was tires. These are the ones that worked well for me (sorry for the amazon links). They're tubed tires, so you need to get the corresponding tubes and rim strips. https://www.amazon.com/gp/product/B005J880SW/ref=ppx_yo_dt_b_asin_title_o04_s01?ie=UTF8&psc=1 https://www.amazon.com/gp/product/B005J8812M/ref=ppx_yo_dt_b_asin_title_o03_s00?ie=UTF8&psc=1
Other than that, it's hard to anticipate what you're going to have to do, so just post your questions on this subreddit and you'll usually get answers.
I https://www.amazon.com/dp/B0844JF5MD/ref=cm_sw_r_cp_apa_i_2p4-FbY8ADWFW?_encoding=UTF8&psc=1
If you wanna give it a go yourself! I tried this about ten years ago and its been good ever since.
The headlight is from amazon.
TASWK Motorcycle Black 6.5" Headlight Projector Head Lamp Hi/Lo Beam Bobber Chopper https://www.amazon.com/dp/B06ZXVN7QC/ref=cm_sw_r_cp_api_maQVAbQNV8E9Y
Mixed reviews but it’s a budget build. Well see if it was worth the $25
If all 4 are leaking I would pull the carbs. I would bet money your float level is set wrong on all 4 which is why they're all leaking. If something was damaged it would likely be just one causing a problem.
Do yourself a favor and get a cab float gauge and a manual and just make sure they're set right. Makes a huge difference on how well your bike runs so its important its correct.
​
I purchased this one for my 450 with no issues. (https://www.amazon.com/gp/product/B07MKFMB7K/ref=ppx_yo_dt_b_search_asin_title?ie=UTF8&psc=1)
If you look at the wiring diagram, both the rectifier and regulator are wired as parallel with everything else (as opposed to in series), so should be good to not have that extra tie in wire the common motor one has.
Definitely make sure you take of the main and pilot jet and get them really clean so you can see light through all the little holes. The first time I cleaned them I wasn't thorough enough and ended up having to take them back off. Those screws can definitely be tricky!
Sounds like a bad flasher relay. It's under the left side cover and is a silver cylinder with a 3 wire plug on it, I bought a used one off ebay and that fixed my signals, otherwise amazon has this flasher , but basically any universal flasher that an auto parts store would have should work. Just might need to find a way to wire it in, maybe using wires like the ones that come with the one I linked has because most universals just come with 3 prongs.
And that was caused by POs using a standard phillips screwdriver on JIS screws, always happens. If you don't have a #2 and #3 JIS (or the Motion Pro t-handle with all 3 sizes magnetically held in the handle itself) it will happen to any of the remaining screws you might need to remove eventually. I bought a pricey but complete NOS points plate with points and wiring when I built my 450 for the same reason, POs had totally trashed all the screws.
fair enough, I have heard some prices have been going up on used vehicles in general. Also motorcycle sales have seen their first growth this year in ages.
A little out of your pricerange but this one is stupid clean. That said, it seems like the prices are about 50% more than usual on these! They used to go for nothing! https://www.facebook.com/marketplace/item/1231705353831841
You’ll need this tool to synch your carbs.
> how far can I deviate before running out of room
That's the second part of the sentence you quoted. You'll have to measure or get VERY lucky that someone has the exact bike and will chime in with the tires they used. I have a bunch of these floating around the shop that come in super handy for tasks like this. A local art supply or hardware store should have something similar.
Mixing tread aesthetic isn't a big deal, but I would be surprised if it ends up being impossible to find front+rear of the same style. Like I said, I have gone through this (including building a table of sizes that would fit and available tires) and know for a fact it isn't an easy process. I ended up having to order from two distributors I had never heard of prior (motorcycletire.com was one, can't recall the second just now). One size had to be special ordered from Germany.
There's a really good degreaser call miracle mist
https://www.amazon.com/Miracle-Purpose-Bathroom-Concrete-Protection/dp/B07L8P1Q5Q/
Other than that, I'd say pressure washer.
The questions is....did any small pieces of ceramic fall inside or did it all come out with the rest of the plug. If you don't know you CAN borescope if you have a USB borescope. I have one like this.
https://www.amazon.ca/Seesi-Endoscope-Waterproof-Inspection-Semi-Rigid/dp/B07PBF6DX5
I can see the threaded part is still in there, you use the screw extractor to get that out.
LEDs use less amperage than stock, which is one of the reasons to upgrade. I've got one of these on my 75 750, and the charging system is now actually able to maintain 13v at idle. And I can see much better at night. With the stock headlamp it would drop below 12v at idle.
I have this one and it works just fine
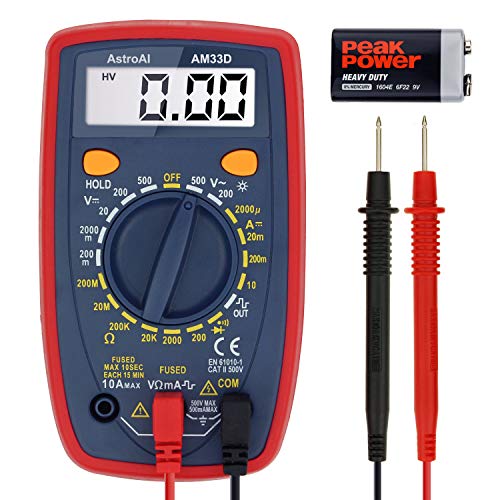
Hey, if you're broke, buy a cheap one. If you've got a few bucks. Get a Fluke or something like that. A cheap multimeter is like a cheap compass. I do not want to trust my life in an emergency wilderness situation, to a $5.00 compass. In the same way, a cheap meter might work, but it does not instill confidence when you're already a little unsure.
DM Me, we'll chat real quick
Yea it’s actually the original 1974 cb550 fuel tank, just bought aftermarket grips from Amazon hehe.
The emblem is aftermarket too since previous owners grinder down mount holes for the original ones, so I decided to just use 3m adhesive tape to mount the emblem.
I bought an Amazon led relay flasher on amazon for 10 bucks. Works great so far.
I spliced the wires to fit.
https://www.amazon.com/Motorcycle-Accessories-Carrier-2013-2020-2013-2015/dp/B08DHR2M37
The best I could find. A couple of people have made this rack work by adding small shims to it.
I want something I can strap a 30L backpack to for school and take it off quickly. I think just adding this small rack is a much superior sporty look than top boxes.
When the bike is parked, those high boxes look like they’re gonna tip the whole bike over. I get they’re ultra light and the bike weight is down low but I can’t be the only one who thinks this looks a little ridiculous
https://tasmotorcyclehire.com.au/portfolio-items/2015-honda-cb500f/
Also, if the engine has never been worked on before, and it still has the OEM phillips screws on the clutch cover and gearbox, you might need one of these. I recommend replacing all the screws with stainless steel socket-cap allen screws.
Saw from your other post that this is from a CB350. That's a relatively easy engine to work on. Also it's light enough where you (and the help of one other person) can easily remove it from the frame and set up on a work bench to crack it open. If this is your first time doing extensive engine work, I would grab a good service manual and get to work taking it apart piece by piece until you find what's broken and clean out every single part. This will take a lot of time. I would give yourself one day a week to work on the engine for the duration of the summer.
I prefer oem but in a pinch
Tuzliufi Fuel Cock Petcock Valve Tank Switch Compatible with Honda Nighthawk CB400 CB750SC CB 400 750 750SC CB750 SC 1991 1992 1993 1994 1995 1996 1997 1998 1999 2000 2001 2002 2003 Z321 https://www.amazon.com/dp/B07T1W47TS/ref=cm_sw_r_apan_i_2HSYP7YA1285F381FHDT
Impact screwdriver with the appropriate sized JIS bit.
I was going back and forth on which cleaner to get. I ended up ordering the 2L size off Amazon and it’s the perfect size for one carb. I grabbed the used option for $50, works like a charm! If you’ve been on the fence about ordering it, definitely get yourself one. It’s pure sorcery, and has the added bonus of being able to clean my gun parts as well 😇
I appreciate the insight, thanks!
It looks like the cafe seats are on Amazon for $`175... You can make me an offer :)
The paper that cames with it has the overall length 28", seat pan length 14", Front Width 7", Widest Point 10.5", bumstop height 4.5". I've got the foam that goes on top of it as well
https://www.amazon.com/CafeRace-Honda-CB360T-Universal-Tailsection/dp/B00TQ2MZSS
The most difficult thing about the carbs is getting them back in after you've taken them out. The boots are a pain to get seated properly. I would recommend trying to find good replacements for them. If they are original they will likely tear pretty easily.
Take tons of photos as you disassemble them.
This last tip I cannot stress enough.
Buy a jis screw driver set and an impact jis screw driver. Normal Phillips will work, but you'll probably strip the screws out with it.
https://www.amazon.com/dp/B07ZJ1KMW2/ref=cm_sw_r_apan_i_4DTYBJRH89NZ0AYWXBB0
This is the set I use for my metric bikes.
Not safe. And I'm generally a "safety third" guy.
Doesn't really matter what the adapter or rack is rated for. The class I/II hitch on your Equinox is probably only rated for 200lbs of tongue weight. As in the weight that's pushing down on the hitch.
Your bike weighs 260, lets say the rack weighs 40lbs. Now you're at 300lbs and that's got a little extra leverage on the receiver hitch thanks to the length of that Reese adapter. So you're putting 300lbs+ on a hitch meant for 200.
But good news! Class III hitches are available for Chevy Equinox's. That lets you eliminate that sketchy ass Reese adapter, gets the weight closer to the hitch, and the hitch itself is good for 350lbs of tongue weight. That's the route I'd go.
Connectors (these are the "mini" used on Honda. They're still big, but not as big as the ones used in the fuse box wiring.) - Glarks 700Pcs 2.8mm 2 3 4 6 9 Pin Plug Housing Pin Header Crimp Electrical Wire Terminals Connector and 30 Sets 4mm Car Motorcycle Bullet Terminal Assortment Kit for Motorcycle, Bike, Car, Boats https://www.amazon.com/dp/B07FCLGF3T/ref=cm_sw_r_apan_glt_i_PEBXSJ782MMT9J1ST1J8?_encoding=UTF8&psc=1
And the crimp tool - Molex Crimping Tool,Knoweasy Open Barrel Terminal Crimping Tool for Molex,Delphi,AMP and Tyco,Harley,PC and Computer,Automotive 24-14 AWG https://www.amazon.com/dp/B08CZDRV4N/ref=cm_sw_r_apan_glt_i_V7XDTBCV2HPPF5981G51?_encoding=UTF8&psc=1
Do you think something like this would work on it Smadmoto 9L/2.4Gal Cafe Racer Vintage Gas Fuel Tank for Honda CB 500 600 650 750 or Yamaha XS 650 750 or Suzuki GS 450 550 650 750 GT 550 750 https://www.amazon.com/dp/B08XB7H6W6/ref=cm_sw_r_cp_api_glt_i_609K6X0ERYDFWRVQ3ES8
https://www.amazon.com/dp/B001KOEBJ6?ref=ppx_pop_mob_ap_share
Notice how the arm going to the mirror is all one piece? Make sure you don't get the cheap ones that look like it's two pieces. I tried those and they broke the first time I adjusted them.
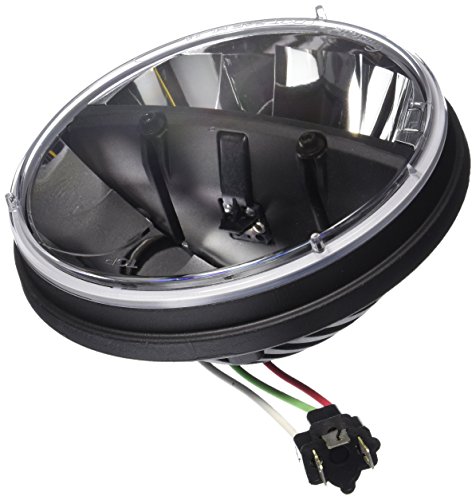
I put one of these in my 79 CB750:
https://smile.amazon.com/gp/product/B007K8AA7I/ref=ppx_yo_dt_b_search_asin_title?ie=UTF8&psc=1
Should fit any bike that takes a 7" round headlight. Original plug fit without any modification.
​
Beam pattern is good (not great), but it's significantly brighter than either the H4 retrofit I had tried before it. Overall it's worlds better than the stock headlight, and draws less power (may or may not matter depending on your bike's charging system). I've had it on for a couple years now and have been happy with it.
There are definitely less expensive options out there, but I wasn't confident in the quality of the beam pattern, or how long the lens would last before fogging/clouding, etc...
I took a video of what I am up against. Pulling the throttle on the left side carb revs the bike up, doing the same on the right side carb just gives a weird breath sound and does not alter revs at all, if anything it feels harder to keep the bike alive while messing with the right hand side throttle.
Also, while running, when pulling the spark plug boot on the right hand side the bike will stay running. Putting the right hand side spark plug boot back on and pulling the spark plug boot on the left hand side will kill the bike. Am I not getting spark on the right hand side or is my spark plug boot faulty potentially?
Here's the video - https://photos.google.com/share/AF1QipP2sBGrVEbj0HEVgdxjDqoxroXlWqXXFyQeQ_dStMJIhq9FYasW5EucVngWN427nw?key=Q0pWRk5fTVExU2M4MEFHOGg5ZHlqbDNuamRVUGNB
No vacuum petcock, it's gravity fed.
I did another carb cleaning and checked the floats and they are set to spec. I took a video of what I am up against. Pulling the throttle on the left side carb revs the bike up, doing the same on the right side carb just gives a weird breath sound and does not alter revs at all, if anything it feels harder to keep the bike alive while messing with the right hand side throttle.
Also, while running, when pulling the spark plug boot on the right hand side the bike will stay running. Putting the right hand side spark plug boot back on and pulling the spark plug boot on the left hand side will kill the bike. Am I not getting spark on the right hand side or is my spark plug boot faulty potentially?
Here's the video - https://photos.google.com/share/AF1QipP2sBGrVEbj0HEVgdxjDqoxroXlWqXXFyQeQ_dStMJIhq9FYasW5EucVngWN427nw?key=Q0pWRk5fTVExU2M4MEFHOGg5ZHlqbDNuamRVUGNB
No apologies necessary. I cleaned out the carbs again and am seeing similar results.
I took a video of what I am up against. Pulling the throttle on the left side carb revs the bike up, doing the same on the right side carb just gives a weird breath sound and does not alter revs at all, if anything it feels harder to keep the bike alive while messing with the right hand side throttle.
Also, while running, when pulling the spark plug boot on the right hand side the bike will stay running. Putting the right hand side spark plug boot back on and pulling the spark plug boot on the left hand side will kill the bike. Am I not getting spark on the right hand side or is my spark plug boot faulty potentially?
Here's the video - https://photos.google.com/share/AF1QipP2sBGrVEbj0HEVgdxjDqoxroXlWqXXFyQeQ_dStMJIhq9FYasW5EucVngWN427nw?key=Q0pWRk5fTVExU2M4MEFHOGg5ZHlqbDNuamRVUGNB
Cool thanks. I was looking at a similar bag…maybe the same one?
Motorcycle Tail Bag, Seat Bag, Dual Use Motorcycle Waterproof Helmet Bag for Motorbike - with One Extra Motorcycle Cargo Net https://www.amazon.com/dp/B08T1X5FPZ/ref=cm_sw_r_cp_api_glt_fabc_WVMEZAQF5YGQFM43T06Z?_encoding=UTF8&psc=1
I use this on my cb350 and works excellent: Engine Timing Light with Spark Plug Tester,Inductive Timing Light Gun Timing Light Ignition Testers Engine Ignition Coil Tester for Car Motor Motorbike Vehicle Motorcycle Marine Lawnmower https://www.amazon.com/dp/B07NRNPR6H/ref=cm_sw_r_cp_api_glt_fabc_WDK4K7HRY5KHSEPKHH05?_encoding=UTF8&psc=1
Any 12v auto probe will work but I use this one. I cut the clamp off though so I could ground it easier: Heavy Duty Automotive Circuit Tester, Premium 6-24V Test Light with Extended Spring Test Leads & Sharp Piercing Probe, Circuit Voltage Tester with Replacement Indicator Light for Car/Vehicles https://www.amazon.com/dp/B07Q3622FT/ref=cm_sw_r_cp_api_glt_fabc_Y1TKSZZ9J0S3XBCG3HMT?_encoding=UTF8&psc=1
Not sure what you have going on here, this may be a few problems in one. That looks like a starter solenoid bracket (the rubber boot thing) but with a blinker relay or the wrong solenoid in it.
If he said it just needs one to run, they may have had the wrong part in there? Not sure.
Starter solenoids look more like this;
https://www.amazon.com/Starter-Solenoid-CB750C-CB750F-CB1000C/dp/B079J6GDY7
Simply green and or degreasers, steel wool 0000, and scotch bright scouting pads. Lots of elbow grease to get started. I put an attachment on my drill and I’ll report back when I remember what it was.
I put things like the exhaust flanges and bolts in a tumbler with walnut shells from harbor freight as media. Put in a little polish and let it go. It’s not necessary though.
Loads of bits for sale, honda cbf125 2012. All in decent condition. Looking to get it sold and out of here ASAP. £200 but open to offers, based in Ashford, Surrey, UK. https://www.gumtree.com/p/replacement-parts/honda-cbf125-parts/1413424325
Glad to help! Fantastic model choice, if it is the F model. They're really quirky and a bit slower than the others, but they're like the little dog with a bark worse than his bite - he has something to prove and tries desperately to show you.
The ignition switch could be from any model CB if you want to stay with OEM (easiest option). It's basically a large switch which connects four wires in circuit at the given time. Easy peasy to use an aftermarket option too, if you want.
The battery you linked would work, yes. It's got 220CCA (cranking amps). It's pretty pricey however. You could also get a cheaper AGM from Walmart with 140 CCA for about half the price. This difference in cranking amps isn't super important if the rest of the bike is in good order, like the charging system and wiring. Besides, your bike has kick-start anyhow haha. Just trying to give you options, but yes you could certainly use the one you linked. Make sure to take good care of whatever battery you end up with, by using a trickle charger and fully charging the battery before putting it into use.
Thanks. What will happen if someone was to use AGW? Will it heat up, etc?
Also, all AGX fuses are rated for 125/250V, where as AGWs are rated for 32V. The Honda runs on 12V and cane go to 14.5-15V tops. Should one put a 250V fuse there?
Another good one is the Motion Pro T-handle, all 3 JIS bit sizes magnetically held in the handle and can be interchanged. The leverage with a T-handle helps get loose stubborn #3 JIS screws in crankcase covers, sometimes without the need for an impact driver
https://www.amazon.com/gp/product/B00M9IKK0Q/ref=ppx\_od\_dt\_b\_asin\_title\_s00?ie=UTF8&psc=1
Here’s two: the Vessel 240001 and the 250001
Probably over kill but I saw a TikTok of a someone using this on a stick nut. Was really impressive. JWGUTS Induction Heater with 8 Pieces Coils 1000W 110V Magnetic Automotive Flameless Heating Handheld Bolt Removal Rusty Screw Removing Tool https://www.amazon.com/dp/B095WZJQ9Q/ref=cm_sw_r_cp_api_glt_fabc_HNA5M8P8D750Y052DHGQ
I put these handlebars on my cb450 nighthawk without changing cables, brake lines or anything. Fit just fine. Might be similar geometry to your bike.
7/8" 22MM Drag Handlebars Tracker Handle Bars Universal For Sportster XL 883 1200 Bobber Custom Chopper Softail Dyna Euro Style Black https://www.amazon.com/dp/B07LF3XJ7B/ref=cm_sw_r_apan_glt_fabc_PDHF9M48SJ77EX9GH8CZ?_encoding=UTF8&psc=1
Also, don't leave aluminum in it for too long but it does wonders for brass: https://www.walmart.com/ip/17491945?wmlspartner=wlpa&selectedSellerId=0&adid=22222222228017563401&wl0=&wl1=g&wl2=m&wl3=40838859392&wl4=pla-78652565912&wl5=9014984&wl6=&wl7=&wl8=&wl9=pla&wl10=8175...
I wouldn't think you should have any trouble getting the screws out of a new bike otherwise. I cant find anything confirming this, and allot of fasteners have gone to metric hex heads anyways. I use this driver and I've had good success on my Honda's. It has a 1 way impact built in for moderately stuck screws too. https://www.amazon.com/dp/B003BI8HHQ
270-2400 AN3 1/8inch 28 Degree M10 Motorcycle Hydraulic Brake Line Oil Hose Pipe Fitting Stainless Steel Braided for ATV Motorcycle Motocross Pit Dirt Street Racing bike - black 500mm https://www.amazon.com/dp/B086Q1MLKT/ref=cm_sw_r_apan_glt_fabc_BNE5YV6V7ES6ESE729FG?_encoding=UTF8&psc=1
“cannot seem to keep a charge” is not exactly the same as not charging. You might want to install a voltmeter in to see exactly what the machine is putting out while running so you’ll know what you’re chasing.
How rusted is it? If the inside is rusted, pour some vinegar in it and a piece of chain from the hardware store. Shake and shake and then leave over night. Should.beable to clean it out really good. If there is alot of pitting in the inside, a radiator shop can remove all rust and seal it for you but where I am at that's about 250. Yo can also get a sealing kit from Amazon like this
Tank a pic of tank and post it.
Do you know how I can calculate the resistance I need for LEDs? That would definitely make sense (though not explain why one works). Found the link to his specific lights https://www.amazon.com/dp/B06XKFG8H6/ref=cm_sw_r_cp_apa_glt_fabc_F3Y6HGPWJK05B1RFF8AG
You'd measure the length, diameter, and thread pitch. Caliperfor the first two and a thread pitch gauge for latter.
Get yourself a set of JIS screwdrivers. I got this one for my 75 360 and it works wonderfully! VESSEL BALL GRIP 1/4" Hex. Bit Interchangeable Screwdriver (Bit 3PC. (+1, 3 / +2, -6 / PZ2, PZ3) SET. 220W3J1) https://www.amazon.com/dp/B00E55DL4I/ref=cm_sw_r_apan_glt_fabc_QDHEBRA9GHR80AB6NVX9
There are endoscopes with magnets and hooks that you could try here, if a simple magnet doesn't do the trick!
Headlight conversion - https://www.amazon.ca/IPCW-CWC-7006-Plain-Conversion-Headlight/dp/B001OMEPEU
Takes a minor bit of moding to fit as it's just a touch bigger around than the stock headlight, and because it's now a removable bulb it's deeper so you'll need to push some of the wiring out of the way to get everything in place.
I just saw this a couple months ago and will be giving it a try for my 550. I use this currently on my bikes
​
I got this one. The only down side is that it's a bit on the small side so I have to do each carb separate. Or 2 bodies and the bowls and misc parts separate. The plus side is it's relatively quiet and uses just under a gallon of the cleaner fluid.
https://www.amazon.com/dp/B075FQJ995/ref=cm_sw_r_cp_apap_9knV7d9ARR1pT
How are you sure of the vacuum leak just out of curiosity? Are they cracked or just not sealed?
For when you’re ready, Check out common motor’s 2 part video on carb syncing - makes it quick to understand the steps and with that system you can get by with a 2 gauge unit if you use an aquarium air distro - it’ll make sense after watching the video. Although 4s aren’t all the more expensive, but he uses this
You can save a few bucks with your own air line and this aquarium air distro
The kit is probably worth it for the sync wrench though, might seem expensive but having the right tools goes a long way.
Feeler gauges are cheap and you can get them on Amazon or an auto parts store, I haven’t worked on DOHC Honda’s, but for all the 70s ones you want feelers with the bend on the end. Look up your bike, but Honda uses .002” and .003” a lot so make sure your set has those or whatever your bike needs. Watch videos on valve clearances. Rookie mistakes are too much “bite” on the gauge when setting and tightening down the adjusting bolt and moving the adjustment. Best to check, tighten and try not to move and check, spin the engine twice after and recheck. It might take a few times to get it right so be patient. The results are significant though.
This is a lot of info so just come back to this post when you’re ready or ask more questions.
Is it okay to ride? Idk :) I don’t know how bad it’s backfiring…but when you tune it in, you’ll be glad you did
Good luck!
This is what’s on my bike
Here is another option from revival cycles
https://shop.revivalcycles.com/revival-secret-led-headlight-7-inch-retro-vintage-headlight/
I use this sometimes:
https://www.amazon.com/gp/product/B006JMK7N8/ref=ppx_yo_dt_b_search_asin_title?ie=UTF8&psc=1
Straps right on and makes it a bit more comfy.
Sorry, that one is kind of luxe. This one is more what I had in mind.
I brought up the subject of JIS earlier in the same thread and JIS bits are available for manual impact drivers such as the Lisle and others. For example, see https://www.amazon.com/Impact-Driver-Japanese-Standard-Screws/dp/B07YNTRXC8.
This is the link to one of the relays I purchased: https://www.amazon.com/Dewhel-Electronic-Flasher-0-02A-20A-Signal/dp/B0786CX8LP
I did try swapping leads and that did not do anything. Next step is to look for a bad ground. Thank you for your reply!
I do need to adjust it. It has to heat way up before I can drive it now, so it's got to be done before Spring. I'll take any help I can get!
I mostly used eBay and Amazon for parts. There are lots of parts available, but you just need to know what you're looking for.
I think the hardest part to source for me while I had it were tires because I didn't know the size. I ended up with these. https://www.amazon.com/gp/product/B005J8812M/ref=ppx_yo_dt_b_search_asin_title?ie=UTF8&psc=1 https://www.amazon.com/gp/product/B005J880SW/ref=ppx_yo_dt_b_search_asin_title?ie=UTF8&psc=1
They're tubed tires, so you'll need the strip and tubes as well, but those are the sizes you need.
Don't go with the super cheap ones you find on amazon/ebay that look like this. I bought these pieces of shit once and the arm that holds the mirror is just glued to the mirror (rather than bolted as it would appear) and they broke when I tried to adjust them.
I've bought these 3 times for various bikes and have been entirely happy with them.
you could probably find a used speedo on ebay, but most of them are so old that it may not be worth the effort unless you're doing a restore. I just bought and installed this one:
https://www.amazon.com/gp/product/B07VJMZXQQ/ref=ppx_yo_dt_b_asin_title_o05_s00?ie=UTF8&psc=1
and everything is in one compact unit. I like it even though the tach reads a little slow.
It's honestly been a long time since I replaced my harness, but this should do it for you. Check your current harness and compare it to the image before you buy.
Impact driver, with a hardened Philips bit, #2 or #3 if you can fit a 3 in there. https://www.amazon.com/s?k=Impact+driver&ref=nb_sb_noss_2
Never had much luck with the manual ones, but they do exist and are slightly cheaper than cordless. https://www.amazon.com/TEKTON-2905-8-Inch-Manual-7-Piece/dp/B000NPPATS/ref=sxin_9_ac_d_rm?ac_md=2-2-bWFudWFsIGltcGFjdCBkcml2ZXI%3D-ac_d_rm&cv_ct_cx=Impact+driver&dchild=1&keywords=Impact+driver&pd_rd_i=B000NPPATS&pd_rd_r=1a3648...
You can buy an aftermarket float type gauge. A little spendy just to know you are low on fuel when you probably already know you are low on fuel.
Those screws are very stubborn and a cheap driver could absolutely break off if used with a impact driver. I recommend one of these to get stubborn screws out. It has proved invaluable to me with my 4 Hondas
It isn't a JIS driver and will damage the head of the screws but will get the stuck ones out. Common-Motor.com sells replacement screws with an Allen head.
You should probably list the carb and the current main jet size. If you think there is more airflow one size up on the jet.
Any fuel resistant rubber o rings. You can get out the calipers and be specific (inner dimension and outer dimmension) but I just use the nitrile o-ring kits you get on amazon.
Gasket needs to fit the float bowl. Usually get that in a carb rebuild kit for that specific carb. If your current gasket seals the bowl... just keep it. Think of the gasket and the o-rings as serving a specific purpose... two pieces of metal mate... fuel can leak through that crack... anything that seals the crack and doesn't melt when fuel touches it is fine. Some people even cut their own gaskets out of cardboard and coat them with vaseline for the purpose of sealing the crack.
4into1.com, dimecitycycles.com, common-motor.com, and Amazon all have good choices. For the headlight, you'll probably be able to get away with zero wiring change, but you'll likely have to make a change to the wiring for signals (adding an LED conversion relay or something).
Here's a cheap / popular option on Amazon: https://www.amazon.com/dp/B078MVXJBL (It says for Harley Davidson. Ignore that). Main thing to pay attention to:
- Is your headlight 7" or 5"?
- Bottom mount or side mount?
- What diameter are your forks? (if purchasing the mounting hardware as well, to make sure it fits).
Blades are for clutch safety switch. I replaced mine with these - https://www.amazon.ca/Triumilynn-Universal-Motorcycle-Aluminum-Handlebar/dp/B07FFSHBMK/ref=sxts_sxwds-bia-wc-p13n1_0?cv_ct_cx=clutch+lever&keywords=clutch+lever&pd_rd_i=B07FFSHBMK&pd_rd_r=47536b97-c4cf-41ee-8995-a8fe7246f838&pd_rd_w=CU2zA&pd_rd_wg=3smEO&pf_rd_p=297ce9b9-daf1-4f06-9508-23d28b26bab9&pf_rd_r=DQ94ZYA0XEQBS6T6HY95&psc=1&qid=1590443073&sr=1-1-70f7c15d-07d8-466a-b325-4be35d7258cc
This Amazon one has the connector, but I haven't tested it yet as I am not finished my build. Check your area for motorcycle salvage places. You can get one for like $10.
I order one off amazon (in the link below) and its worked thus far! Just make sure your measurements are right, and know/have a friend who knows how to weld. I ended up having to replace the LED strip though, as when I messed around when trying to get it out, I messed up my left turn signals lights (dead). So I just order an eight dollar replacement set off amazon. But the hoop is perfectly fine!
The price is a little high right now though, as you can find them for 25-35 on eBay or other sites.
I'll back up 2k, that shits magic. Also, Here's an amazon link for one that's 75 cents cheaper by the same people. Every little bit counts ¯\_(ツ)_/¯
Don't buy from common-motor. They're terribly overpriced because they pretend they have exclusive items. You probably want a Motobatt MB12U depending on your bike. As far as tenders, amazon has them for under $20. https://www.amazon.com/gp/product/B000CITK8S/ref=ppx_yo_dt_b_search_asin_title?ie=UTF8&psc=1
Haven’t done any work in my CB petcocks but on my Airhead, I replaced the original petcocks with new ones and was able to re-use the original filters (they’re metal).
In addition, you could add a filter on the line itself after the petcock if you end up wanting some extra protection.
Until you tried Kroil, you haven’t tried everything. I started using this after the gunsmiths at Ruger told me it’s the secret weapon on their bench. Good luck, rider.
Kano KROIL Penetrating Oil, 8 fl. oz. https://www.amazon.com/dp/B000F09CF4/ref=cm_sw_r_cp_api_i_JM-PDbQF5G0SQ
Wait. You’re just trying to get the oil filter cap off? If you are just use these: nut extractor I’ve used them on turbos before and they work. Just hammer it on and twist it off
The Clymer manual is a must-have in addition to the original owner's manual. I find the latter less useful than the Clymer.
i bought mine off amazon. doesn't need to be anything fancy.
https://www.amazon.com/gp/product/B003F63WI8/ref=ppx_yo_dt_b_asin_title_o05_s00?ie=UTF8&psc=1
was what i bought few months back. i think it was the 02 that was the size that worked. but... the long screwdriver came in handy as well.
also bought the vessel impact jis screwdriver.
no idea if these are "good" but they seemed to work. and at $20ish not that big an investment.
I bought aftermarket because the rubber arms on the OEMs had rotted.
I actually didn't get LEDs as I couldn't find any that looked close enough to stock. In the end I got these and these. The second link is for the dual filament model so you can keep the running lights like stock.
It looks like Amazon is out of stock for those particular ones but the manufacturer is definitely still making them.
Here's one of Amazon that appears to be the same as the 4-into-1 and it's <$19 before a $4 coupon. Reviews are good too. That was the first one I found without really trying. There might be other (better) options and it is Prime Day, so maybe there's even a deal too. MC
I bought it on amazon with the bracket 7” LED Headlight . The plug for the headlight fits the plug on the bike, it also comes with an adapter if you have a newer bike with a different plug. Check your bikes schematics to wire into the left and right turn signals and find the wire that powers your running lights to hook up to.
Permatex won't do anything to those gaskets. You will need a Roloc from 3m to get that gasket off anytime this decade.
​
https://www.amazon.com/3M-Roloc-Bristle-Disc-2/dp/B0009RMAFM