
What are
/r/Leathercraft's
favorite Products & Services?
From 3.5 billion Reddit comments
The most popular Products mentioned in /r/Leathercraft:


The most popular Services mentioned in /r/Leathercraft:
Etsy
Creative Commons
Inkscape
Microsoft Bing
IGTV
Alibaba.com
Creative Market
Google Fonts
GIMP
Concepts
Pepakura Designer
Websta
Terminal
Amazon
The most popular Android Apps mentioned in /r/Leathercraft:


The most popular reviews in /r/Leathercraft:
It looks like you're just hammering directly on the rivet. Get a proper rivet setter. Example below.
https://www.amazon.com/Craft-Punch-Rivet-Setter-Leather/dp/B06XNSKYYJ
Shaped cup goes under to support the rivet, shaped driver goes on top, molding supports the rivet without marring the leather.
Thanks! I got a snap fastener set off amazon (100 Sets Snap Fastener Kit Button... https://www.amazon.com/dp/B07C9W41GC?ref=yo_pop_ma_swf) and an exacto knife then prayed I didn’t slice into my fingers and gave it a shot! Weaver leather supply had a pretty easy tutorial on YouTube that I followed.
Struggled a bit with rounding the edges but not sure if I wanna spend the cash on a set of strap end punches... right now just playing around as a light hobby. :D
hey dude you're gonna want one of these https://www.amazon.com/ZLKSKER-Adjustable-Lockable-Divider-Leather/dp/B0779R5FCJ/ref=sr_1_2?dchild=1&keywords=leather+compass&qid=1605766402&sr=8-2
what did you use to punch the holes?
Ouch! Yeah... I was a chef for many years, so I know the dangers that come from pressing down hard, while also trying to cut something accurately. It is so easy to slip or even to just go "off the rails" and end up with some digit-stitches. I bought this safety ruler after seeing Jo from J.H. Leather on YouTube use one. It is way too short for making longer cuts, at only 12 inches long. But the shape of it is really perfect for cutting leather. I just wish it were 24-32 inches long.
Standard plastic button with a leather or cloth loop to hook around it. Or something like this
As a corrollary to the OP, I thought I would also post my own design process for full disclosure and scrutiny (as this whole discussion has forced me to analyze how I do things).
Now, I don't have a "business" in the classical sense. My hobby has attracted friends, family, and now customers who want me to make them leather goods.
Over the last couple of months I've settled on a couple of designs that I really like but occasionally I'll get someone that wants something different and I usually go through the following process:
- Surf Google images, instagram, reddit, pinterest and expose myself to new and different ideas.
- Sit down and start drawing. Come up with a design.
- Propose the design to the client.
- Experiment and polish techniques I may not have done often (or at all).
So that's the list of what I do. Here's what I don't do:
- Check if my design has been done before exactly as I've drawn it.
- Wholesale copy designs I see on the internet.
- Trademark, copyright, or patent my designs.
Right now I make two kinds of wallets. A simple wallet and a bifold. They aren't complicated and I'm reasonably certain I didn't steal the idea of them because I haven't seen too many other wallets out there like it. But...what do I do if someone comes to me and says, "That's my design. Stop using it."? I have no idea.
Srsly though, inspiring work as always.
Edge beveling and burnishing hides a multitude of sins! When in doubt, use extra material, whether it's thread or leather. Much easier to remove excess than to correct not having enough to begin with. This is a GREAT stitching tutorial, even if you don't use pricking irons as she does, I personally prefer diamond chisels, but the method is basically the same. The trick she uses to lock the thread onto the needle is life changing.
And this app is super useful for calculating thread length:
https://play.google.com/store/apps/details?id=saddle.stitch.thread.length.calculator
Good luck, happy leathersmithing!
Edit: be sure to check that that measuring tape is accurate, I got one in a similar kit that was WAY off on the inches side.
Leathercraft seems to be more of a solitary hobby and not so much an apprentice hobby. I am a beginner as well and just started by getting a $6 book on amazon and using old pieces of clothing leather - belts, shoes, purses - to practice stamping, cutting and punching. I don't even have any real tools yet, just things around the house. I was warned not to buy lots of stuff until I actually run into a design problem that a specific tool would solve....like cutting a super straight line without waves or frayed edges.
- Sewing machine with no thread
- Drill press with awl blade attached to it (someone on leatherworker.net forum did this)
- Cutting dies with all the holes marked for punching - example from Corter
It also helps to get rid of as much of the glue on the edge as possible by rubbing it with an eraser. The kind I use are pretty easy to find on Amazon. https://www.amazon.com/Xyron-23675-Adhesive-Inch-Eraser/dp/B000WWGMSK/ref=mp_s_a_1_5?dchild=1&keywords=adhesive+eraser&qid=1626954087&refinements=p_85%3A2470955011&rnid=2470954011&rps=1&sr=8-5
You've answered your own question. You have the wrong setting tool for this snap -- it will never work correctly.
The center prong needs to be smaller and longer to roll the post and secure the parts together. I think this is more what you need -- https://www.amazon.com/Setting-Tools-Button-Fastener-Installation/dp/B07D12LM6M
Those are motorcycle or push-bike chains more likely push bike.
As for where to find them like everything else amazon has some
You could overnight some Kydex from Amazon and put together a sheath quickly using that. It would be much easier and much quicker than anything you could do with leather, given that you don't have any leather or tools. The link above is showing 2 sheets for $10 and is Amazon Prime (so free 2 day delivery).
Typically, the longer golf clubs are covered by decorative "HeadCovers." The last two years, leather headcovers have become popular and all the major manufacturers are switching to these for their high-end clubs. The shape of these covers has always reminded me of a meeseek. Today I finally took the time to sketch one out and draw it in Photoshop. If I had any talent with leather, I would absolutely be building one of these right away or creating sets with different facial expressions (a "set" usually includes a cover for your driver, 3 wood, and 5 wood) These nice, leather, headcovers can sell from anywhere between $30-$150 per set, or even more for the "rare" or collectible ones. Here is an example of what they look like from a variety of angles. It's an Amazon link but they have a bunch of images:
>Tandy Leather
You are truly a master. I am humbled by your work and advice. I just moved quite a long bits away, but go home sometimes, where are one or two tandy leather stores. I will visit there next time I return. Thank you. Would you recommend tooling sets and leather from amazon, such as below:
https://www.amazon.com/SIMPZIA-Including-Different-Adjustable-Stitching/dp/B0755D1T7D/ref=sr_1_4?ie=UTF8&qid=1533684188&sr=8-4&keywords=leather+tooling+set
The cheap route of producing a wallet you'll be happy with: Sharp knife(exact or utility work) like $5-$10 if you don't have one
Diamond Chisels- $18 3mm https://www.amazon.com/dp/B006OVYU5K/ref=cm_sw_r_cp_api_jo-PBb7M287N4 There are cheaper ones but I've used these so its what I can recommend. You could just use a cheap Awl to punch holes but it won't look nearly as nice since it's your first project. If you go the awl route then make sure you get a small one
Thread- $7 Ritza 25 Tiger thread .06mm at Rocky Mountain Leather Supply. You can cheap thread but it is harder to work with and doesn't look as nice imo.
Needles- Use the smallest needles you have that will fit the thread, if you don't have any needles then get John James Saddlers Harness Needles Size 4, $7.50 at Rocky Mountain Leather Supply
Contact Cement- Dap weldwood like $6 for a pint on amazon as an add-on item.
Those items will let you make a decent product. You still may want something to clean up edges. If its veg tan you might want an edge beveler and you can use a piece of canvas or jeans to burnish. If it's chrome tanned then you'll want edge kote($8) or something similar. Or you can just leave it as is if you like that look since it's your wallet.
I second this.
Also have you tried using a rotary cutter? Here is a link to one I liked but I have not tried any others to give feedback. https://www.amazon.com/gp/product/B0006SJB24/ref=ppx_yo_dt_b_search_asin_title?ie=UTF8&psc=1
Dont round them off by hand, nothing compares to having a curved punch and theyre cheap. I am a new leathercrafter and have a set of these and they are a serious game changer.
https://www.amazon.ca/Hanperal-Leather-Half-round-Cutter-10-40mm/dp/B01A0LNBTA
ALSO, belt stencils on ebay work perfectly for the holes, or just use a straight edge and mark a dot on the leather with pencil or an awl so your holes look straight.
And lastly, go into a hardware store and pick up some pure natural bees wax, and jump on ebay or amazon and look for a burnisher/ edge slicker. You can get cheap wooden ones to do by hand or little nylon disks to go on a drill. I use the wooden one because I like the fact that my stuff is 100% hand made. its easy, you are supposed to take the top and bottom edges off the outside of the leather and you can buy a tool to do that, but you run the bees wax along the outsides of the leather so it has a small coating, then run the burnisher along the edge and it rounds it and seals the fibers in with the heated wax. looks much much nicer.
I really love the aged look of yours, where did you buy your leather and for how much?
Another thing that might work well for you - not sure if it was on the earlier thread - is using metal pressed in corners like these
Thanks! I got mine at a local chemistry supply store. Here’s one on amazon. A google search for alcohol lamp should give you results though.
Your bag looks like the first bag I made. It has the earmarks of being made by someone who has experience sewing fabric and apparel. Fabric sewing and leather craft have many shared skills, but leather has stand alone skills that you will need to learn. Many crafters here have learned through on-line tutorials. I started with this book, which I would recommend. https://www.amazon.com/Leatherworking-Handbook-Illustrated-Sourcebook-Techniques/dp/1844034747. This book is also a wonderful resource for bag designers https://www.amazon.com/gp/product/9887710806/ref=oh_aui_detailpage_o04_s00?ie=UTF8&psc=1
Looks great! I've been wanting to do a sheath, but haven't had the opportunity. A tip I've picked up for making thick pieces easier to sew is to use some coated gloves. They give you a lot more grip on the needles and prevent getting those little cuts/abrasions on your hands when you're doing a lot of sewing. I use a pair basically identical to these and they've been worth their weight in gold. I haven't had to use pliers on anything since.
/u/yopla made a sweet card holder a few days ago and posted the plans up here, and I thought it was pretty fantastic. This is my little theme and variation on his movement, and I think it came out pretty swell. I hope /u/yopla is appropriately flattered, and I thank him for posting his designs.
I'd love to see someone else's version of this as well! I hope others are similarly inspired as I was by Yopla.
The deed is done! Vector assets are in this github page along with a raster image with a quick and dirty ruler, for the lazy. As always, licensed under CC Share-alike 4.0 license. Don't let it scare you off, it's pretty much just a license to guarantee you can do whatever you want with it so long as you contribute your changes to the design back to the github, since it's community property. The attribution part is unfortunately standard for copyleft licenses as a means of determining provenance to the original design. You don't have to credit me or yopla, just whatever version of the design you base yours on.
I order off Amazon: Tooling Leather Natural Veg Tan Bellies 5-7 Sq Ft 11-13 oz https://www.amazon.com/dp/B088RKRP4T/ref=cm_sw_r_cp_api_glt_fabc_S6W5PYYD5MK6XFKVZ1TM?_encoding=UTF8&psc=1
Usually have some blemishes and brands and things in there so you need to be circumspect about your cuts, but I’ve made several pieces of leather LARP armor and been very happy with the results.
I like to clean and condition my leather goods once or twice a year with Bick 4 leather conditioner. It doesn't penetrate the leather in the same way a neatsfoot or mink oil based product would, but you don't have the color change/oil smell issues that those have.
My wife buys the cricut stuff so I was with her once at the store. And I saw that cricut had a decent ruler so I bought it and I’ve been using it for a while now.
I use these for just about everything that I can put in them, including diluted dyes. It's a great way to create a faux patina and get that beautiful vignette.
Angelus has their own:
Not sure if links are allowed lol but this is the exact stuff I use. Very shiny so beware if that isn't the kind of look you're going for!
If it's a knife issue I found a 'utility knife' or 'box-cutter' can go a long way to be useful and cheap blade replacement until you get your footing under you.
Ex: https://www.amazon.com/ORIENTOOLS-Utility-Auto-Load-Retractable-Position/dp/B075Z3V5D6
https://www.amazon.com/1071858-Fiberglass-Rubber-Utility-Knife/dp/B000N7EU1K
I've had the same issues with X-Acto blades as well. With time you may get better, but I would suggest switching over to a chisel grind blade that you can easily sharpen to a fine edge.
I use one very similar to this:
The blade doesn't flex so you get a lot more control as well.
looks like #2 xacto are expensive on Amazon.
https://www.amazon.com/gp/product/B08R9Q7HHY/ref=ppx_yo_dt_b_asin_title_o06_s00?ie=UTF8&psc=1
I recommend this seller so highly. After a different seller put me through the wringer I found this guy and they shipped immediately and I had it from China in 4 days. I bought off Amazon since I figured they came from China. And my purchase was protected
This doesn't look like leather to me, it looks like faux leather, which is usually vinyl over cloth that is embossed with a leather texture. Usually cracked leather only spreads that much if it is really really old and dry, and the inside isn't usually so white, but a light tan.
Something like this should work fine.
I use this for most things, again Im not terribly well versed as Ive only used two finishes but this works well enough for me. It gives a slight waxy texture, high glass and darkens a hair. Apply then buff like hell.
I looked for one that specifically had a drill attachment on it. This is the one I got. (Promise I'm not promoting anything, just informing) https://www.amazon.com/dp/B085C5K8XZ/ref=cm_sw_r_cp_apa_fabc_WPZ8FBAYN5H16JB62JTD?_encoding=UTF8&psc=1
You don't need to use smaller ones unless you actually want the stitches to be shorter. If you think the hole is too big after you are done stitching you should hammer the stitches down to close the holes. I generally take a nice piece of scrap leather, lay it over the stitches, and take my little wooden mallet to them.
Traditionally pricking irons are what you described, they are just for marking the leather, then you use the awl to make the holes. Stitching chisels are the ones that actually make the holes. But I think people are now using these terms interchangeably for stitching chisels.
I just bought a set of these stitching chisels and am loving them.
For Christmas I received this set :
https://www.amazon.com/dp/B08FMH2P15/ref=cm_sw_r_cp_api_glt_fabc_.ZLcGbJ875RG6
(I know it’s unavailable now) but so far it hasn’t let me down and I’m pleasantly surprised. If I were you I would look up what kind of toolS you’d need and then scour Amazon for a kit that has most of what your looking for and more than 4 stars. For leather I’d recommend starting with oil tanned leather because it doesn’t require to be dyed or finished and the first things you’d want to nail down are stitching, cutting, edge finishing, etc.
CW
"First project, please roast" - Remember you asked for it!
They say not to judge a book by it's cover. In this case, the cover is your best foot forward!
Ok I'm done with the wise-cracking. In all seriousness, I like the cross-hatch design you cut into the front corner of the wallet (intentional or not). Gives the wallet some character! As for the sleeves, I like the stamping you did on the top one. Just be careful around the edges so you don't go over the line. The half-circle cut-outs on the sleeves look either hand cut and just a tad off. For your next wallet, try using a half-round cutter punch to give it a smoother, more uniform cut. Finish those edges with a bevel, and overall nice job on the hand stitching! Keep up the good work!
I put Scotch delicate surface painters tape on my paper patterns. I can still se where the holes go on the pattern and strangely the punches come out of the leather easily.
Handheld hole punch works pretty good for a quiet hole punching session. https://www.amazon.com/Revolving-including-Screwdriver-Grinding-Saddle/dp/B06XRDBGY6/ref=mp_s_a_1_3?dchild=1&keywords=leather+hole+punch&qid=1607890256&sr=8-3
I've always wanted those, but I don't think I could stand not knowing which needles were in each case.
I use https://smile.amazon.com/gp/product/B01CWM4OJ6/, which are both color-coded, so I can grab the right size immediately, but also have a sliding magnet inside, so I can turn them upside-down and all the needles come out for use, but none spill. It's kinda awesome.
I'm kinda new myself but here's the basic order of what should be bought first
1) razor blade for cutting leather (and accompanying self-healing mat
2) pricking irons and a soft mallet (and sewing needles and waxed thread) https://www.amazon.com/gp/product/B014549SNG/ref=ppx_yo_dt_b_asin_title_o06_s01?ie=UTF8&psc=1
3) leather hole puncher
beyond that I'd have to know what exactly you're trying to do.
hole puncher can be pretty cheap tbh
(Pack of 6) Barrina LED T5 Integrated Single Fixture, 4FT, 2200lm, 6500K (Super Bright White), 20W, Utility Shop Light, Ceiling and Under Cabinet Light, Corded electric with built-in ON/OFF switch https://www.amazon.com/dp/B01HBT3BVM/ref=cm_sw_r_other_apa_fabt1_TzERFbMKK0SW5
Here's that link to the ones I bought for the seed starting. I like them alot. You can daisy chain them together to make one switch work as many lights as you want. I do three and three. Very bright and solid. Admittedly the little clips they come with to mount them a super cheap, but double faced tape would work well to for them.
Yep, the left side is a pocket (so is the right side, but currently the back cover of the notebook is tucked into it). There are actually two elastic straps- one that goes all the way around the case and one that was intended to secure the back of the notebook (as is currently pictured). Ended up tucking the back of the notebook into the right pocket since I wasn't happy with the notebook sliding when held by the elastic. I also left about 1/3 of the top on the left unstitched to allow for easier tucking into the left pocket.
And I got the elastic from Amazon- so far I'm very impressed. (https://www.amazon.com/gp/product/B01DXRG7JO/ref=oh_aui_detailpage_o01_s02?ie=UTF8&psc=1)
Amazon is your best bet, sometimes you can even find Tandy stuff there for reasonable prices. I'm speaking in terms of needles, threads, rivets and such. The tools tend to be marked up ridiculously.
I think it's this one through Amazon: Leather Side Piece Veg Tan Split Medium Weight
So based on [aColorfulWorld](/u/aColorfulWorld) comment, looks like I got exactly what I asked for, just didn't know what to ask. Well, learned my lesson this time around.
Thanks!
I also have this project in mind, but a little different for me because i dont have the tools. I noticed you are considering some magnets, i bout some from amazon for a magnetic bag and they work pretty good, i will leave the link at the end. Good luck, and post a picture when you finish it, and of course, have fun making it.
VTURE Neodymium Disc Magnets 1.26"D x 0.08"H, Pack of 11. Strong, Permanent, Rare Earth Magnets. Fridge, DIY, Building, Scientific, Craft, and Office Magnets https://www.amazon.com/dp/B01MXIU9DY/ref=cm_sw_r_cp_apa_B-SZybWMKR78Q
I like to draw, but I bought a few books when I started and did some direct tracing for practice. I feel like planning out a carving is different from drawing, and having some reference to trace helped me figure out some of the ins and outs.
I'd say $50 may be a little pricey- maybe get one or two books to start and go from there?
Maybe western style isn't what you're into, but I can speak for the Al Stohlman books. How to carve leather has lots of patterns (flora AND fauna), great advice, tools used for each carving, and it's only $12 on amazon.
If you have never done leather work before I would recommend a kit to start with (belt, wallet, sheath, moccasins etc) You get the leather, lace, sometimes a couple stamps, maybe a swivel knife plus full instructions. If you like doing the work then I would start with some from scratch projects. Here in the States we have Tandy Leather etc but I have also seen kits at places like Michael's Hobby Lobby etc. so check around. You can also order them on line from Amazon ebay etc... Here's a couple examples:
Thanks!
I bought a flat of Ball mason jars off amazon, along with some silicone coffee lid inserts that the ring of the jar goes around. https://www.amazon.com/gp/product/B06XRXLLGD/ref=oh_aui_detailpage_o01_s00?ie=UTF8&th=1
That's a nintendo switch, it's own game console, went out to do some monster hunter inbetween working on these
Bought one on amazon (https://www.amazon.de/gp/product/B010LFI2YY/) and I'm very happy with it
At first moment I've tried it in the wrong side and made a bad review, but then I realized I was wrong and made a leather strap with it. Check my last post on this sub-reddit
I considered the Tandy bracket thingamajig, but ended up buying this doohickey from Amazon after seeing a similar thing in an ad. (I bought this cheaper one rather than the one advertised.) It's meant to be used to duplicate angles when laying bricks and other things I don't understand, but I thought it would work nicely with letter stamps! And at eight bucks, well worth it for my needs.
https://www.amazon.com/gp/product/B0733W4TDQ/ref=oh_aui_search_detailpage?ie=UTF8&psc=1
Hopefully the trials and tribulations I've gone through will help you out in this setup. If do or are planning on making a lot of items that will need to be embossed or have a foil stamp put on them I would advise to getting a specific press for this. It may cost more but it will be much more effective, less time consuming and most of all far less error prone. Nothing worse than making a great item and them it all going to hell when you mess up the press action. I've done this before with my setup.
At present I use a heat gun that has heat control on it. Found mine at home depot in the paint section. The press I use is an arbor press I found on Amazon that has a flat press attachment I found on etsy. I use the flat press attachment for use with my clicker dies. I'm primarily pressing my logo into items with my setup.
As for the foil, I found my stuff (Silver and Gold) on Amazon as well. Here is what I use, https://www.amazon.com/400ft-Rolls-silver-KINGSLEY-HOWARDBW88-100E200E/dp/B010C2DI1S/ref=pd_sim_229_5?_encoding=UTF8&pd_rd_i=B010C2DI1S&pd_rd_r=ead3c1b3-b2b9-11e8-b9b0-b9c4745829eb&pd_rd_w=1hXze&pd_rd_wg=QZ52C&pf_rd_i=desktop-d...
I think its good to mention that depending on the stamp design you could trap some of the foil within the stamp and due to the heat and tension being pushed down onto the stamp and foil you could cause more of the foil to bond to the leather. So you will not only get colored lettering that you want but the foil will bond to the leather around the lettering. Hopefully that made sense.
As I searched for the foil I use I came across this machine. I'm thinking of getting it. https://www.amazon.com/inch-Stamp-Rolls-KINGSLEY-HOWARD/dp/B018VEGLZO?th=1
I hope this info helps.
Good luck.
At my local Para Rubber, its a rubber and plastics supply store. That piece was only like $9NZD. Ive found a similar thing on Amazon here but its pre scored which would probably be better. Only reason i didnt buy it online is shipping costs are crippling to get stuff to New Zealand (the shipping on that is more than the foam costs for me). Edit: if you can find a local supplier they usually have a band saw to cut it to size for your container.
Assuming your printer can print A4 sized paper, you can buy it on Amazon, it's even eligible for free shipping with Prime:
They are quick release spring bars that work for any watch that uses standard spring bars. The benefit is that you dont need any tool to swap the band. My watch is 20mm width but they are available in many size
https://www.amazon.com/gp/product/B07TQ5YY37/ref=ppx_yo_dt_b_asin_title_o01_s00?ie=UTF8&psc=1
I use a leather strap cutter. Inexpensive, and easy to use to get consistent straps.
You can find an example on Amazon at: https://www.amazon.com/Leather-Cutter-Adjustable-Cutting-Screwdriver/dp/B07Q8JHNWY
I got mine fairly inexpensive at a local Tandy shop.
For me as well. Hey I was telling another redditer leather crafter about sand paper I bought today that’s used in another hobby. Check this out.... amazon link
I was using one of these, and then found out they make different angle blades for them with a finer tip!
The belt clip really is great. I got one exactly like that but with a nylon loop with velcro that came with a belt i got. I use it for my small accessory tools and stuff like that.
These tethers are much better for quick access to your keys. They have a smaller version but it doesn't hold as much weight. The large can hold my key ring and car keys.
I use a compass/wing divider to scratch a uniform line to punch & stitch along. still learning. trying every trick to improve & make it easier. https://www.amazon.com/Adjustable-Compasses-Lockable-Leathercraft-Rotating/dp/B081Z4F2LT
It's all a matter of preference, and you won't know what you prefer until you use a bunch of different kinds of tools.
I used a generic Tandy yellow poly mallet for years, bit slowly got tired of it. I switched to a generic maul off of eBay (or maybe Amazon) for like $15 and then used that for a few years - it was a nice upgrade.
A couple of years ago I got myself a 24oz BK maul just like the one in the picture and gave away my eBay maul to a friend who was also tired of using a yellow Tandy mallet.
It was a very meh difference for me. It wasn't the huge breakthrough my tooling was needing to reach the next level, nor did it make me feel like I had "made it" as a leatherworker. With that being said, it was an upgrade over the eBay maul, though not as much as I was hoping it would be. I love the hell out of my BK maul and it's an amazing tool. Just don't expect it to be revolutionary. I actually still have my Tandy mallet and use it for when a much lighter touch is needed.
I might suggest getting one of the cheap mauls like this to start with since they're so inexpensive. It'll give you a feel for mauls and you can then decide for yourself if you want a big name brand maul like a BK.
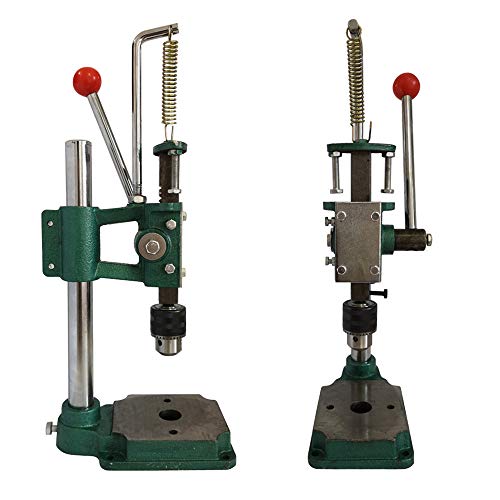
I found a thing! For those of you interested in purchasing instead of crafting.
Also has dimensions in the pictures for reference.
They make presses/punches so you don’t have to hammer. It has a chuck that holds your tooling (punch, pricking iron, whatever), and you just pull the handle down.
I’ve never personally used one, but it seems simple enough to operate.
Instead of a Dremel, please consider a pin vise hand drill. I use one like this https://www.amazon.com/0-2-2mm-Spiral-Drill-Chuck-Micro/dp/B0811C4CDY/ref=mp_s_a_1_4?crid=39UHX2N13VUZW&keywords=pin+vise+hand+drill+spiral&qid=1671565138&sprefix=pin+vise+hand+drill+spiral%2Caps%2C182&sr=8-4
I bought a wuta iron 2.7mm: https://www.amazon.com/WUTA-Die-Steel-Pricking-Punching-RE-3-38mm/dp/B07H4MH6W9?ref_=ast_sto_dp&th=1
and I'm guessing that for this style iron, the holes must be completed with a awl. I'm thinking about buying the KemovanCraft awl but I do not know what size blade matches the iron. Choices are 2mm and 2.5mm.
​
I see alot of nice cheaper awl blades but they are diamond shaped, how feasible is it for someone to shape the blade themselves?
You could try something like this https://www.amazon.com/SUPVOX-Internal-Frames-Handbag-Hinges/dp/B07VFG5MVD/ref=asc_df_B07VFG5MVD/?tag=hyprod-20&linkCode=df0&hvadid=621404722030&hvpos=&hvnetw=g&hvrand=4848371311430887791&hvpone=&hvptwo=&hvqmt=&... Never used one myself or installed but I would imagine there are some videos of people doing so.
I use an edge creaser, but a really cheap one with varying degrees of success: https://www.amazon.com/Clover-MCI-900-Mini-Iron/dp/B001CE73F8/ref=sr\_1\_5?crid=2MSI5OLJKKQNH&keywords=clover+heat+tool&qid=1670277213&sprefix=clover+heat+tool%2Caps%2C151&sr=8-5
Was something like this one. https://www.amazon.com/WEN-23190-Steady-Grip-190-Piece-Accessory/dp/B0784JHFKD/ref=mp_s_a_1_3?crid=2V4XOD99NHX4G&keywords=rotary+tool&qid=1670120388&sprefix=rotary+tool%2Caps%2C94&sr=8-3
Got it long time ago so probably a different model/kit but it’s orange. Also has a ton of attachments including the fine extending pencil grip one for small detail in crafts.
It’s only like 40 usd for 190 pieces. I think 1 “dremel” attachment is 40 usd.
any of the white glues, I just grabbed a bottle of this at Michael's, it's pretty good. No smell, tacks up quick, washes out with water when needed.
Aleene's Leather and Suede Glue
There's also 2-sided tape thats made for leather. I see it at Tandy but never tried it.
There's a book available on Amazon that lays out the whole process.
I have a harbor freight 1 ton for most things, and can punch for stitching with it. The limiting factor is the height to make sure your tools fit under the ram. My stamps, snaps, riveting, and beginner chisels fit great. My higher end stitching chisels are tall and barely fit, but it works.
I also have a mini 1/2 ton meant to be used for reloading ammo. Has a taller throat and less chunky to it makes easy to work on larger projects.
I still need a maul for working in the inside parts for bags and where I’m not sewing just the edges. I use all three methods and blessed to have the space for it.
Should be this one
you're gonna replace the punches soon anyway might as well save yourself 40 bucks to spend on them and get this one instead. https://www.amazon.com/Leather-Puncher-Jvedo-Punching-Machine/dp/B09BMZYZBQ/ref=psdc\_2933719011\_t1\_B07TBKGFBW
I am a total beginner to Leather Crafting.
Unfortunately, I live in a condo and I don't want to bother my neighbor after work.
I saw this on Amazon with good review and wonder if there is a downside to getting a manual press puncher? I also read that people use Arbor Press as well? Which one is easier to use for beginner and is there any downside compare to mallet?
Personally i use this set
i think these types are more functional than rotarys. You can apply more force and make hole anywhere on leather.
I dont have experience with rotarys (and im in europe, dont know US brands) but i would look for two things: must have compound action and be some brand name. And i would not expect to pay below 30 eur/$
Something like this
https://www.amazon.com/Herm-Sprenger-Powerful-Revolving-Leather/dp/B003NY844O
As stated it’s a roll up bag, mostly used for knives and tools these days but probably used for all sorts of things back in the day. Here is a contemporary one available from Amazon.
Noob Question:
I feel like edge bevelers should be rounding off corners. As in, they should shave in a convex shape. However I just got this: https://www.amazon.com/dp/B07MW2V64X and they are really scooping out a C shape from the corner, which is leaving me two pointy bits that I am slicking the hell out of and trying to mash down into a rounded corner in the slicker.
Am I crazy?
​
Thanks
lol, I think I literally wrote the post that reminded the OP to post this. I've been considering this or this: https://www.amazon.com/YaeTek-Leather-Splitter-Skiving-Peeling/dp/B07CGVGXZM/ref=sr\_1\_5?crid=2N0Z4KXLRLRKV&keywords=leather+skiver&qid=1668034826&sprefix=leather+skive%2Caps%2C166&sr=8-5&ufe=app\_do%3Aamzn1.fos.18ed3cb5-28d5-...
So you'd recommend something like these?
Hi all. I've bought a second hand (but never worn) pair of brown nubuck leather boots and I'd like to dye them black. How would you recommend dying them? Is it as easy as buying a bottle of dye like this from amazon?
Hi all. I've bought a second hand (but never worn) pair of brown nubuck leather boots and I'd like to dye them black. How would you recommend dying them? Is it as easy as buying a bottle of dye like this from amazon?
I try to use the most streamlined eyelet to needle as possible given the chisel tine.
Example, I use these chisels, and find "John James Harness Needles Size 1 (L3912)" to work great with minimal fuss.
https://www.amazon.com/gp/product/B01ALZ5M3I
I use thread that is 0.8mm or 0.6mm. 1.0mm is a bit too thick for my style, but it probably could work.
If your chisels or awl is wider then you can use wider eyelet needles and thread.
>Should it have a loop with the knot a little below, or the knot snug against the bottom of the eye of the needle?
Mine start that way, but eventually the knot gets closer to the eyelet.
Oh okay, I was assuming the black pads it comes with were to protect the leather. I've seen videos where people glue leather to the pony, I can do that.
Maybe something like this:
https://www.amazon.com/Gorilla-Original-Waterproof-Polyurethane-Bottle/dp/B0000223UV/
It's lower VOC and bonds to pretty much everything.
This?
https://www.amazon.com/Barge-All-purpose-Cement-Leather-Waterproof/dp/B00ANV704U/
I wonder if other rubber cement would work?
What do you mean by "Adapting the jaws of the pony"?
I use pecard leather dressing to condition leather. You apply a coat let it soak in, rinse and repeat until it doesn't soak in.
People might have other recommendations to get it to the point where it's ready for conditioning. It's a gorgeous jacket though.
I bought one of these for my old Dremel model 200 and it is the best investment I've made. I'm in a small apartment, so a standing drill press is out of the question.
I can't vouch for either of those products, but have you tried the Eco-Flo Waterstains? They require a bit of elbow grease, and I have never had a problem with them being too dark.
I use this app to assist.
https://play.google.com/store/apps/details?id=saddle.stitch.thread.length.calculator
This tells me the length I need, I add a little extra for "working room" so I gave enough to easily grip and it tends to work.
It's as he said timeand practice works wonders. With your stiching the over lap is important to get your thread even. When you saddle stich its important that one side is always on top to make the stitches look symmetrical. Meaning your right hand needle goes first through and is always under the left side. I do one at a time even though some people say not to. Just make sure your needle doesn't go through the thread in the hole.
With your holes make sure they are even by overlapping the punch like he said. You can use one of these to help get a straighter line https://www.amazon.com/ZLY-Leather-Stitching-Groover-Skiving/dp/B074YD8DXY/ref=asc_df_B074YD8DXY/?tag=hyprod-20&linkCode=df0&hvadid=219561413405&hvpos=&hvnetw=g&hvrand=5824729707901201086&hvpone=&hvptwo=&hvqmt=&...
I mold by getting the entire piece wet with a mister and a slicker tool with the lighter pushed in the leather afterward. I trim if needed, bevel the edges and then burnish or slick
I don't know anything about thread terminology I just looked at what it said on the thread I bought "210D" and found the article I linked.
This is the cobblerI bought
And this is some of the thread I bought
Congratulations on running 210! Best I can do is 135. You are correct in the needle being the biggest obstacle. From experience, size 23 gets stuck in the needle well and as the chart illustrates, size 24 is on the low end of what is needed. Size 22 is the largest I have put in, which is an industrial needle that has a round shank and requires adjusting the needle depth.
My only other recommendation, if you have not already done so, would be to try a slanted leather needle. It may help the stitching pop out a bit more.