
What is Reddit's opinion of
Pepakura Designer?
From 3.5 billion Reddit comments
83 reviews of this app found across Reddit:
The pepakura file (and the viewer to print/instructions) are both free IIRC. Started this many years ago but never finished. Kudos to OP for finishing!
ETA links for Link file versions and Pepakura Viewer.
It's called Pepakura Designer. Here's a video by Bill Doran about it.
Edit: here's more of an overview video (I have the same T-shirt... neat).
Just since I don't see anyone giving more information about this yet:
The general art of making these 3D sculptures with paper is commonly called "papercraft." One popular method of designing these projects is to use a program called "Pepakura," which can turn most 3D model files into a series of printable sheets of paper, which you can in turn cut, fold and glue into sculptures like this. It's common to print onto some card-stock, make the cuts with a straight-edge and x-acto blade, and glue everything together. It takes some patience but it's quite fun and is pretty friendly to learn.
Basically you print out sheets with an unfolded design on it, cut them out, glue the tabs together and you have a 3D model which you can then treat with resin, fiberglass and paint.
...Adam. AdamAdamAdam. I have just had a wonderful idea.
Picture this: As of the last patch, Tilt Brush files can be exported. How about a Tested.com series where you and Norm and Jeremy design something cool in Tilt Brush in Vive, export it to a file that Metasequoia can read, to create a Pepakura Designer template that you guys then print out and fold in the shop.
Awesome, right?
If you're looking for a free alternative, try Pepakura. It's a shareware program that is designed for making 3D paper nets like these.
People regularly make their own models and post them for free. A quick google search will often yeild a similar model to what you are after.
Edit: heres a link to the developer's site http://www.tamasoft.co.jp/pepakura-en/
Yup, I made my own 3D model then used Pepakura to unfold it and print it out!
I love using Paper crafting for testing out things when your making props and the like, so much better than just knowing the object's overall dimensions or something, much more tactile.
There is a thing called pepekura (japanese paper crafting) and software where you can load in CAD models to make paper items, like the masks linked here or this fox.
http://www.tamasoft.co.jp/pepakura-en/
You can actually then save the "low poly" files as OBJ files, and have fun with em!
I made the battlecruiser using Pepakura, it's a free program that helps print out 3d objects to paper.
Battlecruiser File - http://poppaper.net/80155164327 Pepakura Software - http://www.tamasoft.co.jp/pepakura-en/download/
this might help make it easier: http://www.trimensional.com/ it will at least give you a 3D model of your head. You could also use a 3D scanner or maybe even hack a xbox kinect.
edit: and then upload the 3D file to this: http://www.tamasoft.co.jp/pepakura-en/
Pepakura Designer will let you actually work it out yourself, just be prepared to print a fuckload of paper if you go that route. It's $38 but... I'm sure you could get it somewhere for free... not that I'd know where or how, of course.
It'll even make sure that each individual piece doesn't span multiple sheets of paper. Just note that the model will probably take a bit of cleanup before it's useable
Here's the site for the program. You can usually do everything needed with the free version (as long as you're not designing your own piece).
Edit: And despite what OP said, you will need access a printer.
OP, you should look up "Pepakura" - its a computer app that has a pretty big following that has lots of community designed paper craft models to build (papercraft is also a term you can search up)
They have everything from pumpkins to game figurines to craftable cosplay items.
You download template files that the community makes and then just.. print them out - alternatively, if you have some obscure stuff to make, you can rip and import game meshes/textures into pepakura and then do some reverse-origami computer-juju to create a printable, cuttable, and foldable model.
For example, I have been trying to makee this dragon skull for some time, however I keep getting distracted by other ~~sidequests~~ craftable items, as this dragon skull is like 70 pages of cutting, folding etc. Making these chocobos was much easier, and good practice.
Well first I made a paper model of the mask using the program, Pepakura and the psycho mask model also found on that website.
Next step was to reinforce it with a combination of fiberglass mats and resin coated on the inside and out.
After the resin dried, I applied Bondo, automotive body filler, to the inside and out, sanding out applying more until I had the shape and smoothness I wanted.
I then grounded out grooves for the leather strips with a dremel. I decided to just lay many small pieces of the leather string onto the mask to give it the illusion of threaded leather work instead of actually threading each hole.
The fan was made from a PC fan I got from my local PC/hardware store. The lenses were cut out with a woodburning tool from some blue sunglasses I found at a thrift store. I surrounded the fan and lenses with some layers of craft foam and ground it out to the right shape with the dremel.
The bullet casing end were supplied by my gun-nut grandpa who also lent me his bullet casing stripper tool so that's pretty cool.
The paint job was just some artistic layering of different shades of acrylics. I strapped the whole thing to my head with some leftover leather, rings, and buckles.
The left arm bandages are just walmart athlete tape. The right arm has an ebay bought driving glove, and a sleeve I sowed together from a two-dollar white bag. The right knee and elbow pads are simple roller skate/bike pads. The leg harnesses are built from scratch from a bunch of leather I bought. Although you can't see it in the picture, I made the bots from some rainboots I painted blue-green and strapped some from-scratch made shin pads to. Lastly I just sewed up some cloth I took from the bottom of the pant legs to make the right arm band.
actually this sort of thing is fairly straightforwards, it requires some simple technical expertise, but it's not hand carved or anything. The guy makes a very simple model in maya (which is fairly easy to pick up) and then uses this: http://www.tamasoft.co.jp/pepakura-en/ to automatically make a paper net which folds into the shape of the mask, and then he simply gives it a fiberglass coating. You could make an even better quality one by having a higher-quality model custom printed or cnc milled.
Any printer will do, I got mine at Walmart for $30. As for paper, it really depends on your experience and the model. For small parts, I find it a lot easier to use regular printing paper, as it is easier to fold small flaps without risk of tearing. If you are making a medium or large model, card stock is great! I use 110 lb. paper, but it is a little tough to work with. Most people will suggest around 80 lb. so it might be a good idea to start there.
I use plain Elmer's white glue from a bottle. I squeeze out a little at a time onto some scrap paper and use a toothpick to spread glue onto the tabs. with liquid glue, you need to hold the pieces together for a few seconds for the glue to start drying, and if it is taking too long, try using less glue. Another method of gluing is with gluesticks. It does dry a little faster than liquid glue, but I like having the precision of liquid glue better. Again, that is just what I am accustom to.
To cut out the pieces, I use a good pair of scissors. Many people prefer x-acto knifes, but all of the times I have used them, I never can get a clean edge. I feel a lot more comfortable with scissors, as long as they are tight and straight. If you do decide to try x-acto knifes, you will also need a self healing cutting mat.
Definitely get PePaKuRa. There is a free viewer in the downloads section. This program will take .pdo files and show the 3D model and the 2D pieces side by side. It is not too hard to learn how to use it, and there are plenty of files out there on the internet. I suggest looking at Nintendo Papercraft. There are tons of .pdo files from a lot of Nintendo games. You can ever sort by game genre on the right.
Start of easy, but always try to push your skills. The only way to learn is to try, and the only way to get better it to never give up.
Good luck, and happy crafting!
And you'll need this to view/print it
I think I'll use my afternoon to make the siege tank.
Pepakura is going to be your friend. You can download it here: http://www.tamasoft.co.jp/pepakura-en/
The file you'll want can be found here: http://www.405th.com/file-archive.php?do=download&downloadid=522
My Alphonse was constructed from Fiberglas and carbon fiber with video cameras, fans and LCD panel mounted in the cost. I would estimate about 1000 in materials alone for my build.
However for the foam Pepakura version I would think you should be able to construct one for under 100 or so in materials (EVA foam, glue, primer and paint).
The basic run down is you download a program called Pepakura and search the Internet for "Alphonse Elric armor Pepakura". Each file will be a 3d model that the program will unfold into a template that you print on a regular printer. You cut out the templates and trace them on to foam. Good idea to put the paper one together at this point so you have an idea of how things go together (but only after you copy it to the foam) You then cut out the foam pieces and glue them together. Primer and paint. Searching for building foam armor will provide you som tutorials as well.
There's an exporter that does just that. I think there are other as well, just search google for blender + papercraft OR unfolding. Alternatively there's the commercial Pepakura Designer(http://www.tamasoft.co.jp/pepakura-en/), which is $38. Can't really comment on that one since I haven't tried it, but from what I've heard, it's good.
See /r/papercraft, and replace the cardstock with cardboard.
If there isn't a suitable pattern out there yet, you can create one using Pepakura Designer and an existing 3D model of a raptor.
don't know if this guy used this or not but especially if you can use apps like maya, 3ds max, blender, etc. to model, you can convert low poly models to papercraft projects using:
http://www.tamasoft.co.jp/pepakura-en/
'pepakura'... papercraft... get it?
but yeah, it takes apart the polygons at the edges intelligently so that it prescribes folds in some places and cutting and gluing with others - and it places the little "tabs" to glue into the printout and everything. really nice little app. i figured if i ever wanted to "actualize" a 3dmodel, i'd get this app to do it.
You'll need either the Viewer or Designer. The designer is freeware and will allow you to resize the models.
There are tons of models to print and cut. It is how a lot of the 405th start out their Halo outfits.
A papercraft Cthulu would be pretty sweet to see. Depends on the model really. I'm super new at it, but that one wasn't too bad except for a few parts. It does however have a bunch of small, intricate detail parts like rockets and gun barrels though that I've started to make (the armor plates on the arms)that are super hard to make. Pepakura is pretty much the best thing ever to help you build/view/print models. For these I've been searching the internet for pre-made pepakura models.
The program I use to take 3d models and unfold them into 2d prints is called Pepakura - http://www.tamasoft.co.jp/pepakura-en/ . The last few models I have done have just been taken from websites by searching starcraft .pdo files (pepakura file type) but I'm currently ripping sc2 file models for the units I can't find. These are just taking the textures from ingame and printing them in colour, I couldn't imagine being talented enough to paint one :D
Studio of M.M does a good papercraft tutorial on her wolf link if you're looking to try one out - https://www.youtube.com/watch?v=GSxB8wWas5s&t=705s
I finally found the right keywords when searching. My previous searches were all cluttered with 3D printing websites:
Pepakura is a program that offers a 2D and a 3D view with tools to define cutting lines. It's exactly what I was looking for and might be of interest to others here.
Awesome. There is this model I found on RPF for you. It resembles the movie version. http://www.therpf.com/showthread.php?t=148889&highlight=thor+armor you'll need to download the pepakura designer/viewer from this link to open it if you don't have it. http://www.tamasoft.co.jp/pepakura-en/download/index.html It makes referencing a lot nicer. Good Luck!
Unfortunately since it hit a popularity peak there was a flurry of sites around it, that have since become 50% dead links. It can be frustrating to find a model you REALLY want to get into, only to find that its disappeared off the net.
Personally, I'm a big fan of Pepakura. It's not well organized, and the recent updates tend to not be very good, but I love their unique take on how to generate the templates. It's a great place for a beginner to start. One downside is that many of the complex designs have errors. Personally, I consider it an extra challenge to design my own cut strategy for the surfaces. Like in the picture above... the Valkyrie has individual fingers on each hand. But the fingers have no tabs to glue together. So I had to plan out my own tabs on-the-fly.
A few other notable sites are places like: http://www.papercraftmuseum.com/ http://www.papermodelers.com/
Pepakura Designer is the program I use for converting models into printable templates http://www.tamasoft.co.jp/pepakura-en/download/index.html but you need to already have the model ripped from the game already.
Getting the model from the game is another story, you need several tools and scripts, some are a little hard to find and some you can't find anymore. If you need more detals about extracting the models from the game, contact me at my e-mail address I'll be happy to help you.
In 3d modeling terms, this is an extruded face. To go about making such a thing, you could use 3d software (such as Blender) to make a face of whatever design you want, then simply extrude it. Next, pull it into Pepakura Designer to unfold it.
If you prefer to do it manually, draw a design, stack 2 papers, then cut them out together. Next, you will cut out a rectangular strip of paper for the sides. The long edge of the strip should be equal to the peremeter of the shape you cut out. The short edge of the strip will equal the height of the shape, a wider strip making the shape taller. Next, you will need to attach them with some sort of tabs. The simplest method is to just glue a bunch of small bits of paper to the edges of the design. Glue it all together, and you're done.
Yeah, pepakura is a papercraft technique/program. It allows you to unfold 3d models similarly to doing UV maps for texturing. Autodesk also has a free program that lets you do about the same thing and a few other things.
It's actually not that difficult, just make a low poly model and flatten/unfold it with something like Pepakura Designer or Blender's Export Paper Model plugin, although Pepakura Designer has a lot more options and makes the unfolding process a lot easier. Print the result on nice thick paper and get ready to spend some hours cutting the parts out, folding all the lines and glueing all pieces together. Here's my first try using this process, sorry for the bad pic I still need to make a better one.
We're in the future- there's no need to settle for a fort.
Cardboard is ridiculously strong, especially if you glue together layers like marine ply alternating the direction of the grain and once you varnish it it's pretty much invincible.
Get yourself a hot glue gun, a cutting mat and a few boxcutters. Sit down with something like sketchup and pepakura or similar but anything you can find or make a 3d model of, you can make.
Make yourself a cardboard mech suit. Or a full size goat statue. Or a lifesize Johnny 5.
Their is no best way, just different.
Some people sell vaccuformed kits you can paint and assemble like Razorflystudios . Those are plastic.
Other methods are using Pepakura files to make a cardstock model that is then slathered in resins or used to make a mold. Here's a place hosting a pepakura file for a Pip Boy. You will also want to go to Pepakura Designer's page. The file viewer is free, and the Designer version is pretty cheap. You'll want the designer, as it unlocks the tools needed to resize the pieces to customize it to the size of your forearm.
Their are also a lot of pepakura tutorials on youtube that are very helpful.
By hard work, it is papercraft. OP said he will post template when he will get to his computer. In a meanwhile go download pepakura viewer and read about this. I don't know any good forum, 4chan have decent board about it.
Just keep in mind that it takes a lot of time and you should start with easier projects. I only made terran marine and not only it took 20h to finish results were not as good. Even if you are good in manual stuff go with something easier to get familiar with how everything works.
Yes, rock hard & it comes in varying open times. I first ran across it when talking to someone doing cosplay. They made their armour with pepakura and hardened it with smooth on. It worked great.
Why thank you, good sir!
For anyone interested in the software I mentioned, here's a link to Pepakura. Not quite sure how to use it for making models myself but I printed off some stuff before.
I'm going to echo what /u/gingerandwasabi said about looking at Kamui. She's one of the best WoW cosplayers I've ever seen. And if you have the money, I strongly recommend buying her books. I spent ~$20 (I think she has a 4-for-3 promo) for five excellent pdfs. She takes you through armor making from the beginning - patterning, to basic worbla shaping, and all the way up to painting techniques. She doesn't really give you a "step-by-step for making this exact piece of armor", but rather introduces you to general skills. As a beginner myself, I found her writing quite helpful for understanding where to start, what to buy, and what methods might work best for the project I had in mind.
You might also check out the 405th forum. Pepakura can be amazingly useful for building armor, and the software is completely free. Even if you don't want to go the fibreglass route, it's a relatively simple way to make your own pattern pieces. There are also several excellent tutorials for sizing pepakura patterns to yourself. I'm not sure if your specific set is likely to have been made, but it might be a good way to get yourself some basic patterns to build off.
Best of luck!
You dont use a printer to print .pdo files, You use a program like http://www.tamasoft.co.jp/pepakura-en/download/viewer.html and then save the .pdo files as a .pdf.
Heres a hole collection of pepakura files if you need them http://www.thedaftclub.com/forum/showthread.php/17216-Daft-Punk-Pepakura-File-Collection
Sculptris works by subdividing areas of mesh you're working on, I'm not really sure how you plan to make paper models based around 3D models, but I think that with the level of subdivision sculptris provides, you won't be able to do it easily or use what you get from it as a guide.
~~Not sure what you really plan to do here otherwise I'd explain further.~~
I should learn to read! It should work assuming there aren't polygon restrictions. The models you make in sculptris will be very, very high poly. Export them as .obj files and import them to Pepakura. Assuming there aren't poly restrictions and Pepakura can make sense of the data, you should be good to go.
In my opinion you should use Blender's sculpt mode to help keep poly counts down so Pepakura doesn't give you any grief. As far as I understand, it's basically going to make a simplified and printable/foldable mesh based on the data you give it, and Sculptris may tip its scales because of the ridiculously high poly counts it makes.
http://en.wikipedia.org/wiki/File:Elephant_Beetle_Megasoma_elephas_Male_Side_2699px.jpg
If that is your target, do not even bother making details in the 3D model. I can't imagine any way of capturing them dutifully with paper folds.
The kinds of things it seems to produce aren't nearly as detailed as a beetle:
http://www.tamasoft.co.jp/pepakura-en/
...Eh, maybe I'm wrong. Seems to do well with hard-surface models but doesn't seem able to do anything with organic models.
405th is your friend. They have every tutorial you could ever need for armor making, including making foam armor.
In fact I made this based on the tutorials and files they have on their, and am currently making a foam armored collapsible version of this using the same basic principles.
Ahead of time, you will definitely need:
A hot glue gun
A Dremel (they're cheap, like 20 bucks for a 1500 rpm one like mine)
a sharp knife, like a box cutter or something similar, and a sharpener to cut out the foam pieces.
You'll also need this program if you want to use pep files to make your armor. It's free, but you won't be able to save any changes you make to the files. Also the 405th has tutorials on proper sizing and the like for that program.
A free program creates the paper and how to fold it. You can make your own if you download some software:
http://www.tamasoft.co.jp/pepakura-en/
and then take some fancy pictures of your own head.
http://www.tamasoft.co.jp/pepakura-en/ this is a great program to make real model with just 3d model from your pc, but the program is not for free.. search something on youtube or google you can find people doing stuff from this program, its called pepakura.
Ok, I have a few answers here, I suggest trying it out for yourself to see if you like the flow.
You have a few pointers on the site that explain the basics.
You need a 3D design software. They suggest Metasequoia which has a help file that could prove very useful. It can save in the formats that Pepakura Viewer/Designer can work with.
Unfold and position all pieces and finally
Print and build. I'm going to be working with it for the next few days and see how I like it myself. If it works, I'll post caps of my progress along the way. Going to have to start it Tuesday though. Long and early day tomorrow. Let me know if it works. Happy Pepping
- Found a pepakura file
- Bought foam mats from a hardware store (1/2" thick)
- Printed out the pieces of the file using the pepakura software and then transferred them to the foam
- Cut out
- Hot glue
- Sand down (you can sand down the foam itself or apply body filler Bondo to smooth out edges)
- Apply plastidip
- Paint
For all the bells and whistles I had to get creative and find random things around my job (I work in an industrial area so I had a bit of an upper hand there) as well as use ordinary items from the hardware store e.g. the light and tubing.
This I can certainly help in, at least to get you started.
IMO the best place to start (in terms of quality/price ratio) is the "paper-to-plastic" method. You start by finding a file for Pepakura, which lets you print out a template on cardstock, then cut, fold and glue together.
Next, you use fiberglass and epoxy resin on the interior of your piece to give it structural strength. Finally, Bondo body filler on the exterior, followed by lots and lots of sanding. This is the stage that my Fallout 3 power armor helmet is at right now.
Your best source of other info is the 405th, a group for Halo costuming. They have everything from spray-painted cardboard to vacuum-formed acrylic, and also a sizable database of pre-made and scaled Pepakura files.
Good luck!
use sketchup or blender to make the model, and output into .kmz format, and then import to unfold in pepakura designer.
Pepakura designer: http://www.tamasoft.co.jp/pepakura-en/download/designer.html
sketchup http://sketchup.google.com/intl/en/download/
blender https://www.blender.org/download/Blender2.79/blender-2.79b-windows64.msi/
You might want to take a look at Pepakura, and similar tools. The "paper craft" world has been putting out interesting "unwrap texture" utilities for a few years now. http://www.tamasoft.co.jp/pepakura-en/index.html
Also pepakura can turn 3d models into papercraft. pretty nice once you get used to it and you can use it as a good basework for some really accurate cosplay stuff without much difficulty. I'd also recommend using some heavier cardstock over paper, and a hot glue gun works wonders in both speeding up the process and being able to undo mistakes
I would make the shoulders out of EVA foam, if you dont have any experience with that i would highly recommend Punished Props on YouTube.
For the helmet i would use the program pepakura , its a program where you van print out certain patterns of helmets, chestplates etc. there are a lot of turtorials out there on how to use it, and i believe there are already files for the helmet out there, so i would look into that for the helmet
I don't have a page for myself, nor did I make it myself - I commissioned it from this wonderful person over here.
As for the process of making it:
- First, we pulled the character model for Bastion out of the game, resized it to fit my measurements, and made some tweaks to make it fit a human. We also reduced the polygon count as much as possible, so the next step wouldn't be hell.
- This model was then opened in Pepakura, where the model was split up into a bunch of sheets that could be printed out.
- These sheets were then sent to a laser cutter, where instead of printing on paper, it cut the EVA foam that formed the body of the costume.
- These pieces were then assembled and glued in place, and then covered in latex paint. Velcro was then added as a way of getting the costume on and off.
If anybody is interested while the servers are down, here is the link with the plans. I've used Pepakura software for printing plans
If you have a little 3D modeling experience, it's pretty easy to use a tool like pepakura designer to design your own patterns. Then it's just a matter of printing it out and putting it together.
Nah, free to view and print, http://www.tamasoft.co.jp/pepakura-en/download/viewer/, $38 if you want to start screwing around with the files more however. That means proper editing apart from just resizing for the print. I use it a lot to help unwrap custom 3d Objects . Also those files come with .jpg if you wanted to get crafty with photoshop or gimp or some other editing software.
EDIT: Short answer, pepakura viewer is free, pepkura designer is $38.
For those interested in these things: If you have a 3D model of a ship or manage to import one from WoWs you can use Pepakura to print out instructions on how to make it from paper and some glue.
I don't know if this is what you're looking for, but the info and files here might be helpful. You'll need to get Pepakura file viewer (it's free).
Good luck.
[](/seriouslycasual) First you'll need this, pepakura designer to use the files.
Next, make an account here and use the pep files to make your armor!
You will have to go get some cardstock to print it out on if you want it to be strong. Then you cut it out, fold it in the designated way, glue/tape it all together and the base is done!
Now there are more steps to make it durable and finished looking though!
Here is a link with PDF that will explain how to use it. Some folks said they figured it out without buying the Pepakura for Cameo but I could never get the registration marks with designer.
If you're trying to do what I think, Pepakura sounds like what you'd need.
http://www.tamasoft.co.jp/pepakura-en/download/viewer/
I've never used it before but it seems like people have done some cool stuff with it
I've been looking at this problem too. So far, no results.
Previous attempts have been to look for the Prepakura Viewer files. It's a papercraft software that uses digital models, unfolds them onto paper to trace/resize/cut out and make into stuff. I've been using this for some Dark Souls armor and it's been fantastic.
No luck in there though. Good luck, fellow hunter. Let me know if you turn up anything. :/
okay first off you need "pepakura Viewer" in order to print the parts out...its a free program :D how ever if you want to change the scale of a project or even change the parts layout, flap types etc. you will need the "pepakura Designer" which is like 30$ or so... http://www.tamasoft.co.jp/pepakura-en/download/viewer/ when putting them together i use 110 lb card stock paper and glue (i use superglue but most only use white glue sticks)...if you need anything else, like hardening, painting, sealing ect.. feel free to ask :D
I've always been interested in making armor. My first suit I made out of cardboard, plaster wrap and vinyl freehand and it went...terrible. So it was a while before I made anything again. That is until I discovered pepakura digital designer and all the fun things it lets you do. With that I could finally make armor that looked how I wanted it to and then I never stopped making stuff. Eventually though bills came around so now I have to charge people when they want me to make them something instead of just doing it for free.
Gladly!
- First off, get Pepakura. The Designer version is pretty pricey but it comes with a lot of very useful tools that the free Viewer version doesn't have, like measuring distance between points and changing the scale (both of which can be very important if the default scale is too big/small for you!)
- Download the .pok file here and open it in Pepakura. Measure your head and tweak the scale if you have the designer version or print right out of the Viewer like I did. I wouldn't recommend this though, as the default scale was JUST big enough to fit my head after I made some adjustments.
- After you print it out, cut all the pieces out with an x-acto knife or something and glue them together with hot glue.
That'll get you to about where I am at the moment, to go any further I'd consult the Instructable guide or look up some tutorials on youtube. I'll most likely post updates as I progress in the build so feel free to ask me questions when that happens!
It should be a .pdo for use in pepakura viewer its a free program. http://www.tamasoft.co.jp/pepakura-en/download/viewer.html
it lets you see and rotate the 3d model and highlight sections to show the corresponding 2d page so it takes the place of step by step instructions.
Pepakura files (or Pep for short)[.pdo] are used for making tabletop papercraft or the initial step in making wearable armor and props via the Pepakura process based on a 3D model file.
Pepakura is basically a UV unwrapper that does so with zero polygon squash/stretch, then adds the appropriate gluing tabs and numbers so that it can be printed out and cut/fold/glued together.
So far there have been Pep files out there for Samus but they're little more than direct in game exports. There's interpenetration issues, non-manifold meshes, holes, etc... On top of all of which I need to fix the proportion issues, so I've been working from scratch... I'm really more into mechanical/hard-edge models, so this all is driving me up the wall...
I'm only like 5'6", but I have a lot of... rather tall... female friends that are interested in a cosplay that fits their build, which is a short list...
I've got 4 friends that are already doing Zero Suit cosplays, but are interested in doing MP2-Varia cosplays, if only there were decent pep files out there. So as the resident game dev & prop fabricator, I've been trying to provide them with some decent pep files to fabricate their cosplays from...
Realistically you have a very very tight time budget on this project especially if you have no experience in mask or helmet making.
That being said. You have a few options on what you can do. I'm on mobile, so I'm gonna try my best to link you places, but won't be able to as much as I'd like.
You could:
3D print one. There's someone on this sub and over on r/cosplay that did this. Granted he did draft the model himself.
Modify an Iron Man helmet. Again, there was a Teen Titan cosplay group that posted some progress pictures over on r/cosplay who used an Iron Man helmet as a base for a slade helmet. Different end result, same basic process. The helmet was maybe a little bulky, but it looked fantastic. There are several other people to do this too. If you Google "Red Hood cosplay" they should come up.
Thirdly, you can fabricate one from scratch. Generally the go to method on this one is pepakura and resin. Don't know what that is? Here are two fantastic resources everybody should know.
Their rise to fame was with halo armor, but they're still a thriving community and offer tons of resources on prop and armor building.
And www.therpf.com
A great blog/message board style website where people post progress pics, link you to different resources, and critique and comment on work people post. Also a strong, healthy, and helpful community.
But the jist of the pep-resin method is you have a paper model in which you cut out, fold, and glue together to create a 3D base in which you reinforce with resin. This is a time consuming process with a very unforgiving learning curve, so be warned.
If you wanna go this route, Google "red hood pepakura" or "red hood pdo" and download the free pepakura model viewer which can be found here:
http://www.tamasoft.co.jp/pepakura-en/
And hit those forums, youtube, and Google to proceed.
I really hope this helps, and I look forward to seeing your progress! Best of luck!
http://www.4shared.com/file/CWh8Rq-5ce/Pipboy.html
Here you go. Open it in Pepakura
Just found these. Looks like a fairly comprehensive collection from all games, plus some addons :)
Enjoy, and make sure to post photos of your completed craft!
Make sure you have a .pdo viewer installed, such as Pepakura Viewer
Hmm, I saw the tail idea and it looks pretty cool! It's not exactly the effect I had in mind, but it could perhaps serve as a solid base, or be used in the speakers in her booth!
Oooh, I just looked at the organza and I think that will serve as a really, really good base actually. Someone else suggested fiber optic cables like these and I think they would mesh pretty well to achieve the look I'm going for, although the sheen the organza has... hmm. Definitely something to think on further!
And also I do want to do it more like a Guy Manuel helmet, with a smooth front, but I want it to have LEDs as well. I was using the Thomas guide mostly as a reference to know what I'm doing molding, casting, and using bondo! The base is going to be different, using PEPAKURA. I would also need to made and/or edit an existing model to get the look of Sona's helmet here.
This is going to be quite a challenge, as I've never worked with LEDs before. ^^; First time for everything though!!
Thank you SO MUCH for the tips!!
To elaborate, pepakura is a program for Windows that allows you to make 3D models and alter ones already made. With pepakura you can also scale your creations (or others creations) to any size you want. There are two versions of pepakura, viewer and designer, viewer is for viewing others creations and designer is for designing and altering.
Here is a link to pepakura's website: http://www.tamasoft.co.jp/pepakura-en/
And resin alone will be sturdy enough?
I kind of wanted to do Nui's blade next but had given up on the idea because the model was complicated in comparison. Could I just put resin on each individual piece and then place them together?
Here's my write-up of the process.
First I made a paper model of the mask using the program, Pepakura and the psycho mask model also found on that website.
Next step was to reinforce it with a combination of fiberglass mats and resin coated on the inside and out.
After the resin dried, I applied Bondo, automotive body filler, to the inside and out, sanding out applying more until I had the shape and smoothness I wanted.
I then grounded out grooves for the leather strips with a dremel. I decided to just lay many small pieces of the leather string onto the mask to give it the illusion of threaded leather work instead of actually threading each hole.
The fan was made from a PC fan I got from my local PC/hardware store. The lenses were cut out with a woodburning tool from some blue sunglasses I found at a thrift store. I surrounded the fan and lenses with some layers of craft foam and ground it out to the right shape with the dremel.
The bullet casing end were supplied by my gun-nut grandpa who also lent me his bullet casing stripper tool so that's pretty cool.
The paint job was just some artistic layering of different shades of acrylics. I strapped the whole thing to my head with some leftover leather, rings, and buckles.
The left arm bandages are just walmart athlete tape. The right arm has an ebay bought driving glove, and a sleeve I sowed together from a two-dollar white bag. The right knee and elbow pads are simple roller skate/bike pads. The leg harnesses are built from scratch from a bunch of leather I bought. Although you can't see it in the picture, I made the bots from some rainboots I painted blue-green and strapped some from-scratch made shin pads to. Lastly I just sewed up some cloth I took from the bottom of the pant legs to make the right arm band.
I don't really have much in terms of progress pictures. It was done using Pepakura software and some files that are available online in various places.
There's a local hardware store here that sells 1/2" anti-fatigue foam mats which is pretty much what all of this is made of. There are several YouTube videos that go over construction of costumes using this material. Here is one such video.
Thanks! I'm really happy with it as well, that's kind of why I'd like to resin/bondo it, but I was afraid of what the resin might do... I may still try it. No harm no foul right? and I dont mind extra bondo work :)
http://www.tamasoft.co.jp/pepakura-en/
Just go to Gallery and search Republic Commando, if you need the full suit, the chest and backpack are the separate downloads
You wouldn't happen to have any pep files for a clone trooper blaster would you? rifle or pistol?
2nd page on this forum has a download link for pepakura files for the helmet.
You'll need to get the paid version of Pepakura Designer, as you will need to resize the helmet to get the correct fit. Sadly be prepared for a lot of trial and error. You tend to have to assemble 50% or more to get an accurate feel of the size. Be sure to remember to accommodate for space for padding and hair.
There's dozens of pep tutorials all over the 'net. Good luck.
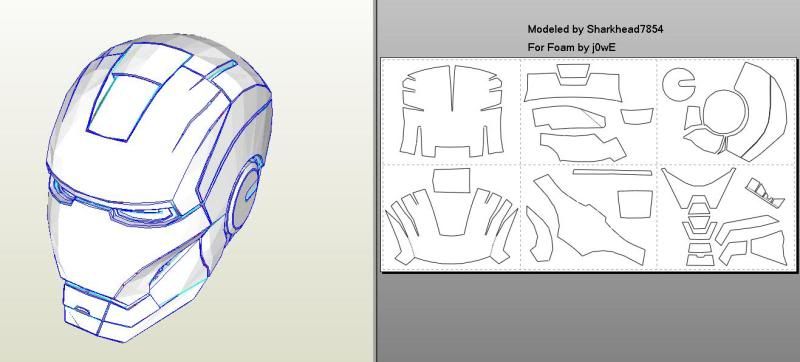
If you browse through the site there is basically every Iron Man suit available for pep.
The software to view is Pepakura designer 3 But I wouldn't buy it. The freeware works but wont save.
Here is a link for the paper folding software he mentioned (Pepakura), one of my friends took that exact process and made himself a suit of Halo armor that looks fantastic. I was thinking about attempting the same process for a Mark VI of my own actually...
Really though, I want to get more hands on into making tangible things. I tend to excel at book-work but I've never really been a 'maker' or do much hands on stuff of own, though I'm starting to try to get more of the skills necessary to do so.
The model for R2 was updated and tweaked as I made Darth D2 so the photos of Darth D2 are more representative. He is also printed on better stock than the original.
Models created on pen and paper, scanned, outlined and decorated in illustrator.
I have since discovered the joy that is Pepakura designer.
Both were made as part of my one fictional character a day for a year project that finished in June last year.
I had hoped to get some more papercraft pieces done as part of the project but I have not yet completed the few I started.
Crits are welcome, but please keep in mind that these were my first ever complete papercraft designs and each was done to a daily deadline.
Enjoy
It would have been much easier if you had used Pepakura or the papercraft Minecraft blocks already available.Yeah,it would be a bitch to cut them all,but they're just square blocks.