
What are
/r/VoxelabAquila's
favorite Products & Services?
From 3.5 billion Reddit comments
The most popular Products mentioned in /r/VoxelabAquila:


The most popular Services mentioned in /r/VoxelabAquila:
Cults.
AnonFiles.com
Autodesk Tinkercad
Youmagine
PrusaSlicer
The most popular reviews in /r/VoxelabAquila:
I own 3 Aquilas and I've found that the clips vary wildly in strength. I have one machine that they seem to always come loose on and the other two are fine. I would recommend using some standard binder clips to have some added grip.
Found a equivalent on the us Amazon store. I ordered one
Led Sewing Machine Light Set,15 inch Working Lighting Strip Kit + 5ft Cord with Touch Dimmer and USB Power Supplier,5pcs Adhesive Clips,Cold White with 3M Adhesive Tape, Fits All Sewing Machines https://www.amazon.com/dp/B07HJYSFPF/ref=cm_sw_r_apan_glt_fabc_852R2X7VE9C8MJQ6MJD6
For those of you wondering "what the heck is an H2?," here is a NON-AFFILIATE link to it on Amazon.
It's a clone of the Ender 3 V2, so searching for "ender 3 stepper mount" on Amazon comes up with this part that should work.
https://www.amazon.com/Befenybay-Printer-Aluminum-Stepper-Ender-3/dp/B07Z7CT1LB
The printer is also under warranty, so I'd see how long it'd take for Voxelab to take care of this. Or do both and have a spare part.
https://www.amazon.com/WINSINN-Extruder-Transparent-Compatible-Creality/dp/B08YY4YRGJ/
This one is a better design than the all metal variants of the stock extruder theme. And cheaper than many of them.
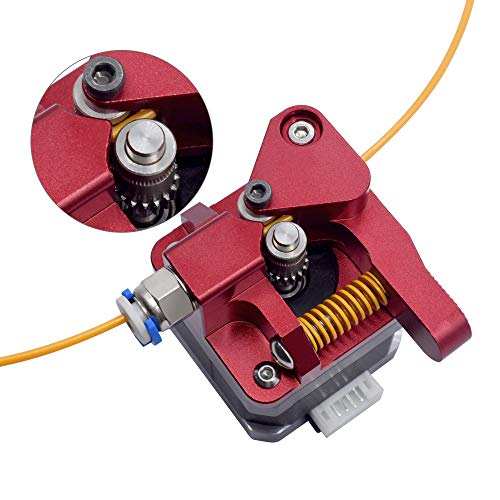
Be sure to align the hobb gears https://i.imgur.com/aAEWmKo.jpg
If you search around you might catch a better deal if you're looking to swap it out on the cheap... The extruder could prob. be found for around $15, but here's a pack that includes upgraded bed springs and the upgraded Capricorn tubing (which is enough for about 3 changes) as well as the aluminum extruder for about $10 more. I don't know how the stock springs are as I changed mine when I was building it, however tubing is a wear item that will eventually need to be replaced so you can't go wrong with having some Capricorn tubing from a reputable seller ready to install.
That extruder should be fine.
No, I was referring to this heatbreak https://www.amazon.com/dp/B0971FNCM4/ that u/Phlier linked to.
As Phlier mentioned, reports are that the gulf coast robotics hotend can be hit or miss. That’s too much to spend on something that’s not a sure thing, in my opinion.
Thank you!
It's this one. I was looking for the the cheapest white PLA I could find, I think it was less than $15. (Right now it's $18.40 with that 20% off coupon.) Turns out it's pretty good stuff. Not sure how strong it is, but I won't be supporting a lot of weight with these brackets anyways.
If you just want to replace the heat break itself and keep the rest of the stock hot end components, some guys have reported success with this one.
If you want to replace the entire hot end assembly, the Gulf Coast Robotics seems to be hit and miss. I had problems with it, but didn't spend much time trying to sort it out. Others have had no issues at all.
You might want to think about adding a BLTouch (or the like) to your list of upgrades, especially if you're going to be printing mechanical parts that need to be accurate. One of the added benefits of having a BLTouch is that it'll help even out the uneven lifting of the X gantry that single Z axis lead screw printers are famous for, which can be aggravating when you're trying to dial in parts accuracy.
You might also want to consider looking at upgrading/modifying the mainboard cooling, and you'll definitely want to do something about the Aquila's stock PSU cooling. As it comes from the factory, the PSU cooling vents are completely blocked off. Not ideal for sitting in a hot enclosure printing ABS.... or anything else, for that matter. These issues are easily addressed, though, using the various alternative covers you can get from Thingiverse and print up.
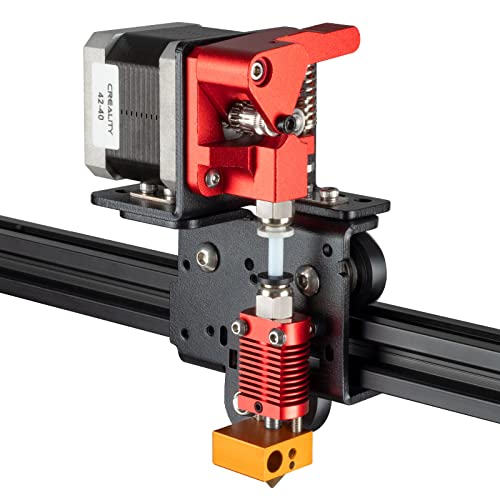
The Aquila's extruder is its Achilles heal. You're going to want to change out the stock extruder for something better. There's a ton of choices for this, ranging from 12 buck BMG clones on up to whatever price limit you'd like. ; )
A lot of it depends on your budget. If you don't mind paying for higher dollar parts, just say the word...
The Aquila can be a good printer for printing accurate ABS parts, but it does take some work. My son and I are using it right now (along with his Prusa Mk3s) to print ABS parts for a Voron 3D printer. It just takes some work to get it dialed in.
A bimetal all metal heatbreak should stop heat from creeping up to the heatsink even better than the original, so I saw no reason to upgrade the heatsink except to save weight. Some reviewers have tested bimetal hotend and can print successfully without a fan on the heatsink, so our heatsink should do fine with any sort of fan. No reason to upgrade the heater block either unless I want higher flow rates. At least that's the way I've been seeing it.
Here's the bimetal heatbreak I have.
https://www.amazon.com/Bimetal-Heatbreak-Titanium-Temperature-Creality/dp/B0971FNCM4/
Unlike some of the Mellow heatbreaks that have proven unreliable, this is a two piece heatbreak. This is good and bad. It doesn't have the super thin surgical tubing of three piece heatbreaks, so it'll probably have more heat creep than those. But it eliminates one of the failure points, so it might actually be reliable.
Unfortunately that extruder is out of stock right now.
This one looks the same. I have one on order, but the Prime Day sale will be over by the time I get it, so I won't be able to compare it to the Winsinn.
Are you using the clip?
If it's been printing for a while and then pops out on its own, it's best to snip off the end so that the fitting bites on undamaged hose.
Better fittings helps. PC4 pneumatic fittings are a popular choice, and that comes with Capricorn tubing too. Go ahead and add this printed coupling to make the fittings and hose last even longer.
https://www.amazon.com/WINSINN-Extruder-Transparent-Compatible-Creality/dp/B08YY4YRGJ/
Ignore the reviews and make sure to align the driven hobb gear with the filament path https://i.imgur.com/XYBt50k.jpg
I had the exact same issue and installed this dual gear extruder. Haven’t had extruder issues since outside of my own mistakes. From what I understand, the dual gear extruder is easier on the filament.
Oldman2525 recommended trying this one to me: https://www.amazon.com/gp/product/B08YY4YRGJ/ref=ppx_yo_dt_b_asin_title_o02_s00?ie=UTF8&psc=1
I really like it so far, though some of the reviews said it died in under 100 print hours (mine has almost 40 on it already)
I'm using the micro swiss clone. This design is courtesy of u/AcroFPV : https://cults3d.com/en/3d-model/tool/satsana-fan-shroud-for-voxelab-aquila
Hope all works out for you. I would say be careful when trying to take out the heater cartridge and most importantly the thermistor. My thermistor seemed to be coated in some silicone paste (?) , I'm not really sure what, but it fought me trying to get it out . Ever since I haven't felt too confident in it's operation. Just replaced it yesterday though and have been printing beautifully ever since.
The absolutely easiest thing to do would be to spend the $10 or $15 to get an Ender CR10 carriage, and print a V6 design for that.
The Briss Fang fan duct https://cults3d.com/en/3d-model/tool/ender3-v2-dual-40mm-fan-hot-end-duct-fang ,the paid $1.83 version, just added Aquila compatibility a couple days ago. Since it’s paid (albeit a pittance), and the aquila adaptation is fresh in his head, ask him to add V6 compatibility, if he hasn’t already.
Hero Me Gen 5 might also be something to look into.
The two mounting studs the stock hotend mounts to, are identical in dimension to the Ender, so any V6 groove-mount that uses those two hardpoints for attachment, should mount directly to our carriage.
Just drop-in. The only configuring necessary is you'll have to recalibrate your e-steps, which is good to do anyway.
This is the one I got and seems to be the defacto choice from what I can tell:
https://www.amazon.com/dp/B07SY745CF/ref=cm_sw_r_cp_apa_glt_fabc_9Y467DM2MYDGEDS45B8K
Several users and YouTubers recommend these. I use them myself. They're 24v so you don't have to worry about stepping voltage. You'll have to solder or crimp the wires somehow because the cable isn't long enough. It's a quiet fan though. https://www.amazon.com/dp/B087TG5KH4/ref=cm_sw_r_cp_apa_glt_fabc_H41FR4KEDR4SBDTBQ5ED?_encoding=UTF8&psc=1
Gizmo Dorks PEI Sheet 3D Printer Build Surface 235mm x 235mm (9.3" x 9.3") with Preapplied Laminated 3M 468MP Adhesive for Creality Ender 3 or CR 20 | Made in The USA https://www.amazon.com/dp/B07GSJSDWR/ref=cm_sw_r_apan_glt_fabc_D5AQJJRGC0EPM8WD6N6N?_encoding=UTF8&psc=1
https://www.amazon.com/Gelid-Solutions-Silent-Case-Fan/dp/B008S1DN66/
There’s a link to the US Amazon store. About twice the price of the 92mm I bought, but if it’s as quiet as they claim, another good option.
​
I see an upgrade in your future.
This one is a drop in fit for the Aquila. Don't worry about the one negative review... quite a few guys here have used that heat break with no problems.
But as /u/cr0wstuf said, it's important that you use an all-metal heat break, not the PTFE lined one that the printer came with, when you're printing at PETG level temperatures. The PTFE lining will break down, causing two problems: 1. It emits toxic fumes 2. The PTFE loses its lubricating abilities, which is why it's used in heat breaks in the first place.
I'm probably going to regret it, but I tried this one even though it has no reviews.
https://www.amazon.com/gp/product/B0951QFYHF/
I don't have a permanent space for an enclosure right now, so I wanted something I could fold up and put into storage.
I do have Lack tables, but they're not going to turn into an enclosure until I make a permanent space for it. I also kind of want to make a fire resistant enclosure out of drywall and and glass. Drywall has a decent fire rating and it's cheap. The wood for the framing isn't cheap right now though...
https://www.amazon.com/gp/product/B072JWMHSM/ref=ppx_yo_dt_b_search_asin_title?ie=UTF8&psc=1
Getting one of those nozzle tool kits improved my 3D printer quality of life so much. I used to hate changing nozzles when I was doing it with a socket and a ratchet. Doing it with pliers is self torture. It's so easy now that I have the right tools.
I use nothing after buying a PEI sheet. I can print initial layer at 50mm/s with no adhesion issues. I didnt buy the flexible powder coated one, I bought this one that come with adhesive backing. https://www.amazon.com/dp/B07GSJSDWR/ref=cm_sw_r_cp_apa_glt_fabc_M6NG7QK44NTX9NJ378Z6?_encoding=UTF8&psc=1 I just flipped the glass bed over to the plain side and stuck it to that side. That, combined with a bltouch and some time setting offsets and tramming, has made printing an enjoyable experience.
I'm going to try the flexible powder coated on next.
Any experience or thoughts on this one? The aliexpress ones are a month wait. I can have this Tuesday for only triple the price:
https://www.amazon.com/gp/product/B0971FNCM4/ref=ox_sc_act_title_4?smid=AJUKUXZVPYM6H&psc=1
No, I honestly didn't even think about that. What is interesting is the bl touch still probes when its powered on.
Is it a 15A fuse?
The filament is iSanmate PLA+. https://www.amazon.com/iSANMATE-Printer-Filament-Dimensional-Accuracy/dp/B081R88DQC/ref=cm_cr_arp_d_product_top?ie=UTF8
Stained with Minwax PolyShades (honey color)
Search Bowden Tube fitting
5pcs 1.75mm 3D Printer 4mm/6mm Push in PTFE Tube Fitting Pneumatic Connector Parts for Reprap https://www.amazon.com/dp/B06VSJ5K3L/ref=cm_sw_r_cp_api_glt_fabc_F3SZP87JRK46B61XDVT2
Use the clip that looks kind of like a fork.
For better results, switch to PC4-M10 fittings. Better yet, switch to all metal PC4 fittings. Before installing the ptfe in the extruder side, unscrew the fitting a little bit, then push the ptfe tube until it bottoms out, then tighten the fitting, and then install the clip. This reduces some of the slop that can eventually allow the teeth to grind up the end of the tube until it falls out.
For even better results, do the PC4-M10 fittings above, and then use this coupling to lock it down even better.
https://www.thingiverse.com/thing:3837897
For even better results, do the two things above, plus make that coupling grip the tube even better. Glue doesn't stick to the tube, but carbon fiber friction paste will grip it. That's something people use on bikes, and it works incredibly well.
Could always get this https://smile.amazon.com/Capricorn-Filament-Upgraded-Pneumatic-Fittings/dp/B0915V313C/ref=sr_1_2_sspa?crid=2QPTQZCNDXSNP&dchild=1&keywords=capricorn+bowden+tubing&qid=1623805222&sprefix=capricorn%2Caps%2C176&sr=8-2-spons&psc=1&spLa=ZW5jcnlwdGVkUXVhbGlmaWVyPUEzUkw0V09HOU9PWTAzJmVuY3J5cHRlZElkPUEwMzIzNjEzUlJUNkxYQkhUNzc0JmVuY3J5cHRlZEFkSWQ9QTAzNDc3ODAzSTQ2UkhWQU1GQU1aJndpZGdldE5hbWU9c3BfYXRmJmFjdGlvbj1jbGlja1JlZGlyZWN0JmRvTm90TG9nQ2xpY2s9dHJ1ZQ== and then change out the ends for the printed ones later
I had same issue within the first few days. Bought https://www.amazon.com/gp/product/B07Q9Q9JDP/ref=ppx_yo_dt_b_asin_title_o03_s00?ie=UTF8&psc=1 They are better than what came with the printer.
Something like these? It's got one shorter one, not sure how the Aquila is but I guess on the Ender theres a plastic part under one leveling screw so its shorter for that.
Good old WINSINN. Never heard of them before? Me either.
https://www.amazon.com/WINSINN-Extruder-Transparent-Compatible-Creality/dp/B08YY4YRGJ/
The extruder was surprisingly well made. Nice, thick, durable feeling plastic, machined (not cast) gears, and the price is right!
Cut the connector off of the fan and then you have one of three options:
1) Terminate to a JST-SM connector (or equivalent dupont) with the male on the fan end and the female on the old cable going down to the main board. This will make future fan swaps much easier. You'll also need an appropriate crimping tool.
2) Solder the new fan directly to the old cable.
3) Use a heatshrink butt connector to connect directly to the old cable.
https://www.amazon.com/WINSINN-Extruder-Transparent-Compatible-Creality/dp/B08YY4YRGJ/
I’m giving you the link to the BMG clone extruder, a good one that you can get on Amazon for $13, here. Ignore the bad reviews. They’re bogus and keep the price low. Probably will edit my post in the 3DPdeals thread so they don’t run out. Gotta watch out for my Aquila peeps first😂
I have my aquila in one of these, not 100% fire proof (that would require a metal enclosure) but it is fire resistant and helps dampen the light and sound of the 3d printer.
not to my knowledge it is this one
If you want to keep the same carriage plate, you can drill and tap a the threads with a Helicoil kit. This would install a steel thread (kind of like a spring) inside the bigger thread you will cut with the provided tap. Just make sure that the helicoil length is right. I think that kit is a 2D (2 x Diameter = 6mm long).
So this is the probelm I've been having with one of the 2 I have. I did alot to try and fix it, nothing worked. Until Oldman suggested I try: https://www.amazon.com/gp/product/B08YY4YRGJ/ref=ppx_yo_dt_b_asin_title_o02_s00?ie=UTF8&psc=1
​
before I put it on any print over 45mins would cause the chew threw effect on the filament no matter how tight or loose the arm was. (metal, metal dual gear, all the same results)
After I have had a 7 hour print, a 12 hour and a 9 hour come out flawlessly.
I did the esteps to air not to the hotend, and came up with 409.7 after doing some calibration I found that 409.6 worked better for adjusting the flow to get near perfect extrusion. One thing to not is I put the screw in on this BMG clone just barely in, like one full turn of the nob and it's super firm hold but doesn't seem to chew on the filament any more.
In case it matter my printer has the GD board and is running OldMan's firmware (see stickier post I believe) and is a V1.1-200923 (found in the bottom right corner of the front page of the users manual). and it's not the nozzle that came with the printer I had to replace it cause that one was clogged. (cheap amazon replacement like 24 pack of nozzles for $10 or something)
Mods I have: Spoolholder with bearings, and Satana hotend shroud with the -2mm adjustment.
I printed this cable chain initially, I have since removed it because it was wearing on the wires inside of it. I put them in a cable harness (its a wrapped flexible plastic) similar to this one: https://www.amazon.com/Alex-Tech-10ft-Management-Organizer/dp/B0833ZTPWN/ref=sr_1_2?dchild=1&keywords=cable+management+wrap&qid=1619810245&sr=8-2
​
if you do print the cable chain it's possible that using 0.12 mm layer height might make it less abrasive.
I've upgraded the extruders on my Aquila and my other printers and, if you're still looking, I highly recommend this one: https://www.amazon.com/gp/product/B08FC35H8F/
It uses a plastic slip ring instead of a coupler to grip the Bowden tube. As a result, it holds better (less stringing) and doesn't damage the tube. Also, it's unbranded and black, so it looks great on the printer.
I got this one. https://www.amazon.com/gp/product/B0761PGLZ4/ref=ppx_yo_dt_b_asin_title_o01_s00?ie=UTF8&psc=1 Based the decision on price and how fast I could get it to my house. Admittedly I didn't really spend much time comparing, as this was a "get it running" thing, not a final upgrade. That means that there is probably a better choice if you're upgrading and not just trying to get back in operation.
Also, this is the model I purchased. There are a lot of clones, but I've heard this is the best and I can attest to it. It's a bit pricey, but so, so worth it.
If you're going to buy new springs (you should), you may as well just get this kit so you have spare parts in case something else breaks: INNKER 24Pcs Upgrade 3D Printer Kit 3D Printer Extruders Kit Drive Feed Kit Ender 3 Extruder for Ender 3/3 Pro/5 CR-10 Series/10S/20/20 Pro https://www.amazon.com/dp/B08BZ5Q9P7/ref=cm_sw_r_cp_api_glt_fabc_WMS45XJ15PDV82590V8P?_encoding=UTF8&psc=1
One of these powered by the psu to the pi. It does shut down octoprint when you power off the machine so you will have to wait a minute before printing anything.
For extruders look for either a BMG clone, runs like $15-20 or the dual gear metal Ender 3 version, usually like $20. You can also find it as part of a upgrade kit that includes the extruder, bowden tube and springs for like $25.
Capricorn tubing is said to be the best.
The nozzle kit includes sizes from .2mm to 1mm. This one is only $5 right now
A caliper is handy if you don’t already have one. Good for calibrating and if you start designing your own parts.
Just replaced mine with these (below) this weekend. No buck converter needed. Hot end is pretty silent now. And it adds a cool LED effect to the printer. Note that these only replace the front fan. There's also a side blower in the shroud that's a different fan type, but it's fairly quiet already.
I just clipped the wire off the original fan and unscrewed it from the shroud. Then I clipped the wire on the new fan, soldered the wires together, covered with some heat shrink, and screwed the new fan on to the shroud. If you're not a soldering guy you could just as easily get away with stripping the wires and twisting them together, and cover with electrical tape. Make sure the fan is blowing on the hot end and not out the shroud.
Now I just need to tear out that jet engine in the PSU....
It is an easy splice. Just connect the 2 wires. There is not polarity(positive/negative) with thermistors, so it does not matter which wire is which. Ideally you would want to solder them together. maybe you know someone who could solder for you?
Otherwise, Amazon has them.
https://www.amazon.com/dp/B088GXCJJP?ref=ppx_yo2ov_dt_b_product_details&th=1
this one come with extra tube
PC4-M6
I just bought creality limit switch from amazon. Somehow, creality has 3 different limit switch (different price too). Not sure if they are the same sizes. Hope it's same size.
These are about 1" in dia. Might be able to cram into the display box
Mine been doing that for over a year now. Usually stops in less than a minute. Tapping on it sometimes helps. Typically a cheap sleeve bearing type fan. Look for the ball bearing type for a replacement. If the noise doesn't stop than the air flow could be low and trigger a thermal runaway. Sounds like that is happening. I believe this is the fan you need. Same fan used for the control board. https://www.amazon.com/WINSINN-Ender-Upgrade-Bearing-CR-10S/dp/B08R9L9YR2/ref=d_pd_sbs_sccl_3_2/134-9240532-3528908?pd_rd_w=iqmhc&content-id=amzn1.sym.1e7a0ba4-f11f-4432-b7d8-1aaa3945be18&pf_rd_p=1e7a0ba4-f11f-4432-b7d8-1aaa3945be18&pf...
Here's a link to the ones I have on both my Aquilas. They work great, and they hold their setting. Expect to have adjust your Z-axis stop switch, as these springs need enough tension to be secure. If not adequately compressed (to about 50% or original length) they may slip as another person posted.
https://www.amazon.com/dp/B0967TJS37?psc=1&ref=ppx_yo2ov_dt_b_product_details
HTH
Tim
I second that recommendation. I have two Aquilas and have this thermistor installed in both. Perfect solution in my opinion.
https://www.amazon.com/dp/B08YNX79H8?psc=1&ref=ppx_yo2ov_dt_b_product_details
I am not an Amazon Affiliate and get NO remuneration for recommending that product or any other. HTH
fair enough, its been a while since I had to buy one. Got a deal on a few of these before the pandemic so i'm stocked up:
https://www.amazon.com/Atomic-Pi-High-Speed-Peripheral/dp/B07N298F2B
single board computers are not hard to get. you could probably hack a wifi router to do it.
Have you replaced the brass extruder wheel? I need to do this every few months and it solved a similar issue for me:Creality3DPrinterParts5PCS
Super impressed with this stuff, it's been sitting for a couple months and still printed like a champ. Really pops, especially with a couple blue LEDs in the background. 250c/70c at 40mm/s
RANKI PETG Filament 1.75mm 3D... https://www.amazon.com/dp/B09QMSP53T?ref=ppx_pop_mob_ap_share
Glad you're checking into this thread half a year later! I should've updated my post, but I ended up purchasing this kit for my Aquila. I figured if the official Capricorn tubing costs ~$12, I might as well spend a little more to avoid the common extruder lever issue too. I've personally had no issues with this kit since installing it on my printer. That said, I'm still only printing with PLA for now, so I obviously can't tell you about printing with PETG.
You can also order the Unitak3D direct drive kit and use it with out the direct drive portion. It has the little metal tab that sticks out to hit the switch. Cost is usually between $15us and $21US depending on promo.
this is not always true..
i bought this
https://www.amazon.com/OVERTURE-Filament-Flexible-Consumables-Dimensional/dp/B08BC654PS/ref=sr_1_1_sspa?keywords=overture%2Bhigh%2Bspeed%2Btpu&qid=1665700186&qu=eyJxc2MiOiIyLjYxIiwicXNhIjoiMS45MSIsInFzcCI6IjEuNzUifQ%3D%3D&sprefix=ovutu...
i run it at 190 at 60mm if i go any hotter it just ooozes out of my hotend.
I do not outside of what I bought. I bought a capricorn tube off amazon and it came with a couple of them. Mine in the stock hot end stopped working also. This is what I bought https://www.amazon.com/Authentic-Capricorn-Filament-Extruder-Fitting/dp/B08BHVWNWK/ref=sr\_1\_2\_sspa?crid=1TB2LE1X2XA9I&keywords=capricorn+bowden+tubing&qid=1665611871&qu=eyJxc2MiOiI0LjU0IiwicXNhIjoiNC4xMSIsInFzcCI6IjMuOTYifQ%3D%3D&am...
Mine is also melted. Still using it on at least one machine though, lol order it from https://www.amazon.com/Fityle-Printer-Cooling-Ender-3S-CR-10mini/dp/B08QV7MR2P and you can get a metal shroud for like 10 bucks. idk if it will fit unless you get the direct drive bracket which has all the holes though since it has to fit ender 3 etc. worst case you have to drill and tap an m3 hole in your carriage. I have a carriage from an ender 3 pro I'd send for free just cover shipping. thats 15 bucks total or so. Direct drive carriage itself is like 18 bucks or less on sale. looking like if you want the actual VL shroud you have to order from them directly though like you were saying, so yeah that sucks. FWIW I like the mini me printed shroud if you use PETG or better to keep it from melting but the metal shroud is my favorite as I want to print up to 500c one day and try all the filaments. anyway I digress. good luck to you.
That's a nice idea, I got this one : https://www.amazon.fr/gp/product/B07ZBNZQ2S/ref=ppx_yo_dt_b_asin_title_o01_s00?ie=UTF8&psc=1
Where can I look what is it ?
Thanks for the feedback.
Didn't know that dual Z axis upgrade was a thing.
Well then, if I'm gonna order, let's take the opportunity to upgrade further.
So, first I would need dual z axis like this one and then I could use the direct drive extruder?
I got this one about a month ago. The top side is textured, the underside is smooth, but it just feels like a thin metal sheet (not rubbery at all). I've only used the textured side so far, but adhesion has been absolutely flawless so far. WAY better than when I was using the glass build plate.
I have this type of filament sensor: Link to filament sensor And yes it is open but I don't have a "Normally closed" Switch can this do something with firmware? I have been using Visual studio code but I cant export things...
yes, i print some of my voron 2.4 on the Voxelab
i did "upgrade" the DD but to get the ABS print, you need Enclosure (https://www.amazon.com/gp/product/B09DD76RPD) and "Vision Miner Nano" (it's magic) get the 5$ one it will last for a long time ...
you can test ABS+ that is easier FYI
LONGER LK4 LK5 Dual Blower Cooling Fan Kit
this would work on an Aquila.
otherwise I have designed one here on my thingiverse
i use both of these
The only thing I can say about people "nay-saying" about getting a same sized fan without getting proper airflow is this. The noise isn't necessarily about the number of blades, RPMs and so forth. The noise is about turbulence that we here when the fans are turning fast enough that the air can't roll off the blades without buffeting. The Noctua fans I am referring to have the blades designed differently. Their blades have shapes molded into the blades that smooth out the airflow. Yes, they turn a little slower, but the blades are designed like high speed boat props. THAT helps them move more air without the RPMs that a lot of fans seem to have to turn. When I went through flight ground school many years back, I learned there is, or was, a limit to how fast an airplanes prop can turn. Was taught that a planes prop (at least at that time) couldn't turn faster than 2200 RPMs due to the speed of the tip going faster than the speed of sound (or something of that nature) because the turbulence would then cause the prop to loose lift. Just like a wing, a prop gets it's lift, or airflow, with the air moving on either side and there is a difference in those sides. If you took a cross-section view of an airplanes propeller you would see that one part is more rounded than the other. This causes a difference in the air pressure, making the air that flows over the larger part, move faster than the air that flows over the more flat part. That's why/how the air moves.
The particular Noctua fan I use for cooling my hot-end is the Noctua NF-A4x20 FLX
Notice the different shape of those blades. It will move air differently.
To add to that, I used 3-in-1 oil and it's worked well. I use that stuff for many things with great results. Others will probably say it's not the best for the job, but in a pinch it works great.
Our rod’s lead is 8mm. One full revolution will move the Z axis 8mm. We also use 200 step motors, so 8mm/200 steps = 0.04mm per step; this is why we use multiples of 0.04 for layer height - an actual step is more accurate than microstepping between steps.
An option to increase that resolution would be to use 400 step motors.
like for example 150 for the aquila 299 for the s2 and the difference can be made up with a 18 dollar mount and 15 dollar extruder. scratch that the aquila is 139 brand new today. https://www.amazon.com/Voxelab-Structure-Certified-Removable-8-66x8-66x9-84in/dp/B095GQ87QG?th=1
i managed to take it out with pliers since it was broken. but i decided to get the full hot end from creality so i will have a spare one in the future (this one).
Don’t bother with a runout sensor. They error too frequently. Everyone suggests disabling them on the X2.
If you insist on buying an extruder - get a BMG clone for $15.
i tried searching around and found out voxelab uses resin to block them in palce. So i went on amazon and found a hot end kit with also the cage (would be nice since mine with all the screwing and unscrewing is a little lose now) and it's this one: https://www.amazon.it/dp/B08R77QLS1/ref=sspa_dk_detail_4?pd_rd_i=B08R77QLS1&pd_rd_w=uwoV8&content-id=amzn1.sym.af68bbbe-9539-4412-93f1-d493531f7de9&pf_rd_p=af68bbbe-9539-4412-93f1-d493531f7de9&pf_rd_r=QWBBSZKHSBMT7P328VN2&pd_rd_wg=FSHSM&pd_rd_r=034406be-11e7-4ede-992d-e2f46a734514&s=industrial&sp_csd=d2lkZ2V0TmFtZT1zcF9kZXRhaWwy&spLa=ZW5jcnlwdGVkUXVhbGlmaWVyPUFFUzY1NE9IWkhITUomZW5jcnlwdGVkSWQ9QTAxNDk1MzkzRlZZQVI2Q1dKUFRTJmVuY3J5cHRlZEFkSWQ9QTAxNjc5NDAyTUk0RFY4NFdBUUFYJndpZGdldE5hbWU9c3BfZGV0YWlsMiZhY3Rpb249Y2xpY2tSZWRpcmVjdCZkb05vdExvZ0NsaWNrPXRydWU&th=1
You think it's good or shall i just buy a hotend and print the cage ?
I bought this Kit, it has a bunch of upgrades all in one and for not a lot of money... https://www.amazon.com/Creality-Capricorn-Aluminum-Leveling-Extruder/dp/B08L3HB4L6/ref=sr_1_13?crid=1CWDFZF8M0UMA&keywords=Creality+Upgrade+Grey+Extruder+Feeder+Drive+3D+Printer+Kit&qid=1660923539&sprefix=creality+upgrade+grey+extruder+feeder+drive+3d+printer+kit%2Caps%2C100&sr=8-13
I think you mean the wave on top corner? I had those happen before, only on specific spots of the print. I think that is because of vibrations of the printer. these Isolation stands have really stopped vibrations from going through the table and it has been much quieter.
id try turning the part 90 degrees and see if it's still there.
Your extruder is probably shot. They tend to develop cracks on the underside of the tension arm. I’d buy a BMG clone and you won’t have to worry about it anymore.
Didn't even notice your username until now. I ad already gone to your video to learn about the extruders. I ordered this one: WINSINN Dual Gear Extruder, Ender 3 v2 Upgrade Motor Shaft>20mm, Compatible with Ender 3 Pro CR10 Series 3D Printer TPU Filament Drive Feed, but I'll just cancel that to get that clear one. Thank you so much for the help. This printing community is super inviting, pretty amped on that.
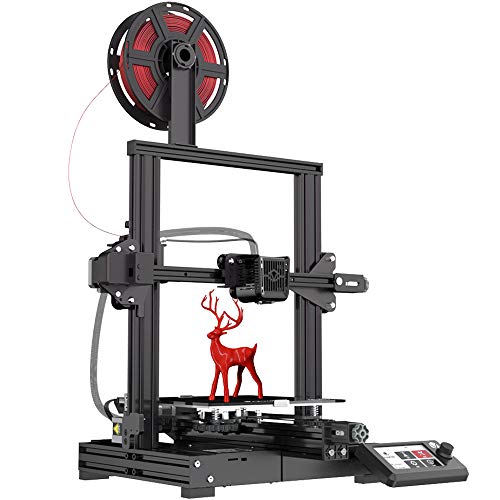
1) The OG "O1" was originally the base model, but it was positioned as a budget clone of the Ender 3 V2.
The C2 was introduced later as a competitor to the Ender 3 Pro, and supplanted the OG as the base model.
But the sweet spot has long been the OG Aquila, versus the stripper C2, or the X2 (+filament sensor, handle, and reoriented display), since it commonly went on sale for $160, or less if there was a promotion running.
With the current $150 pricing, there is even less reason to opt for the C2 or X2, which carry higher prices. And yes, Voxelab, like many Chinese brands, like to operate multiple sellers/stores on marketplaces, so the $150 listing is as legit as the $170 listing.
2) If you want the ability to print uninterrupted, have a spare extruder of some kind on hand, whether printed, metallic version, or dual-gear BMG. The OE plastic extruder arm tends to crack and cause extrusion failures at some point.
2a) The Aquila prints well out of the box stock. And I'm of the mind that one learns more from experiencing failures and deficiencies, and doing replacements/mods as needed, rather than from the start. YMMV.
3) As a starter, any cheap filament should do, since some of it will go to waste anyway. Again, how does one know something is good, if they've never experienced bad? Or the converse.
I installed Capricorn on my Aquila about 2 months ago and I'm only sorry I didn't do it sooner. I think my prints have improved but the PETG prints have improved drastically. This is what I used
https://www.amazon.com/gp/product/B07PS3NH82/ref=ppx_yo_dt_b_search_asin_title?ie=UTF8&psc=1
There is enough tubing to do the Aquila Bowden at least twice and the fittings are high quality. The tubing is approved by Creality and has a high temperature resistance. Whether you get what I got or another Capricorn ,,, it's worth every penny.
^ These are just like the Bondtech original BMG. I tried a UniTek3D and had all kinds of issues feeding filament. Returned it and got this one which has been working great! They also have one without the coated gears for about $6 less.
UniTak3D Ender 3 Heatbreak All Metal Smooth Upgrade Titanium and Copper Bimetal Throat Nozzle for Ender 3 V2,Ender 3 Pro,CR10 3D Printer Hotend(Pack of 2Pcs), https://www.amazon.com/gp/product/B09JVPBHQZ/ref=ppx_yo_dt_b_search_asin_title?ie=UTF8&psc=1
And yes, all I print is PLA. It took some work, but I finally settled on 3mm retraction and all stringing was GONE. YMMV. Overall, though it took some work, that bimetal heatbreak has solved stringing AND heat creep up into the cold end on long prints.
it appears you will have to get a new bracket. this one allows u to have a direct drive and regular aquila / ender hotends. got it and love it.
or you can get yourself a micro Swiss tool steel plated nozzle, it's 20 bucks I think.
Buy the 1 at $150 the x2 is not worth the upgrades. IMHO
know that if you you print petg without an all metal hot end you are releasing neurotoxins from the ptfe tubing. use these https://www.amazon.com/dp/B09JVPBHQZ? they bolt right into the stock hot end all you gotta do is get a good tightening on grub screws to avoid the heat creep from those other screws. bam all metal for 13 bucks. though I would get some thermal paste too.
I would go with the original, it's on sale right now for $149.99. You can easily upgrade it for less than the others would cost you. Good entry point to see if it's for you.
Then I would assume your extruder is shot. They tend to crack on the arm. You could take the pivot bolt out, remove the arm, and inspect.
I’d just go ahead and order a BMG clone from Amazon.
no it was my mistake. it is parallel, I just confused the two. being in series would be connecting negative of one motor to positive of the other.
so parallel is the way mine is set up, I know there is a difference I forgot what exactly it was about.
and i think this belted kit here has metal parts
as for the pancake motor, what u can do is turn down reference voltage, it's a tiny screw on the mainboard next to the driver. ull need a multimeter. it is usually higher than the motors. XYZ are ~1.0v - 1.2v. the extruder I've seen up to 1.40v. so try turning down the ref voltage to like 1.2 or less. if it skips steps then it's too low. if it is warm it's OK just so it's not burning hot.
I just recently replaced my thermistor+hotend and I used this wire loom.
Alex Tech 10ft - 1/2 inch Cord... https://www.amazon.com/dp/B07FW3GTXB?ref=ppx_pop_mob_ap_share
It’s not 100% back to normal I have a few more things to tie up. But using some small zip ties at certain points. I’ll try and post some pics after it’s done.
Nice! I bought the same DD kit and this motor but haven't installed it yet. I have my printer so well tuned right now that I am a bit worried about messing it up.
Have you done dual z yet? I hope to go to belted dual z at some point but that's a bit in the future.
it wasn't too bad, but it did take some time and thinking. I got this kit here and its perfect. u can put just about any type of extruder on. I would say the hard part was getting everything in the right place, like making sure all the wires are to one side, getting the right length ptfe tube now that it is like as long as a finger, and having the filament come in at the right angle and placement.
it would be easier if the filament were at the top but I left mine to the side, so I had to Jerry rig some sort of setup.
- Machine: Aquila
- Filament TPOIMNS PETG Black
- Sliced in Cura, 30% infill, .12 layer height, 50mm/s with 25mm/s top/bottom layers, 240C Nozzle, 85C Bed w/ painter's tape.
- Used a skirt to fine tune the z offset, want good squish to adhere the first layer, preheating the bed for at least 10 minutes also helps greatly.
Ah so this one then, https://www.amazon.se/-/en/gp/product/B09RX3Z6ZW/ref=ox_sc_act_title_1?smid=A33SC74WQ32P5S&psc=1
A bit more expensive than the Aquila board, but perhaps worth it?
I bought these https://smile.amazon.com/gp/product/B096QKY8LC/ref=ppx_yo_dt_b_search_asin_title?ie=UTF8&psc=1
​
only used 1 nozzle so far but gonna try a hardened one soon with some glow in the dark pla
If the stock one is working well i don’t see a need for a pei one.
I see that you have the stock extruder, they break quite easily so i would recommend buying or printing a spare. I have this bmg clone and it works amazing