
What are
/r/cyberDeck's
favorite Products & Services?
From 3.5 billion Reddit comments
The most popular Products mentioned in /r/cyberDeck:


The most popular Services mentioned in /r/cyberDeck:
Hackster
Autodesk Tinkercad
Cool Retro Term
Kiwix
Flatpak
AlternativeTo
Android IMSI-Catcher Detector
OpenWrt
tmux
Darik's Boot and Nuke
Plasma Mobile
Unified Remote
DietPi
eDEX-UI
Onboard on-screen keyboard
The most popular Android Apps mentioned in /r/cyberDeck:

XServer XSDL

X Server

Graffiti Pro for Android
The most popular reviews in /r/cyberDeck:
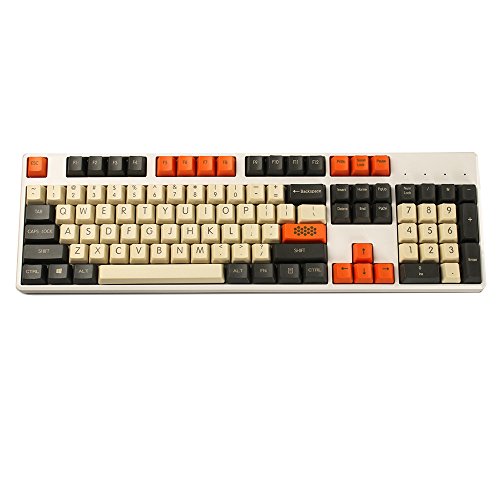
If you notice in Episode 2 the libarian lady is using the beige/orange/grey YMDK Carbon keycaps that every third poster in here uses (myself included lmao)
I built something similar: https://www.hackster.io/cameroncoward/featherquill-34-hours-of-distraction-free-writing-bf522b
It uses an LCD, but you could swap it out for the Waveshare 6" (you'd just have to figure out the software side, like they did).
It's a really cool design and if you don't mind some advice.
The official pi display sucks, it's very low resolution and bulky. In its place the uctronics display is much nicer. https://www.amazon.com/dp/B07VWDDWQ9/ref=cm_sw_r_cp_apa_fab_r8jzFb8JWS7TX
If you are interested and don't want to spend a shit ton. And want to use a raspberry pi instead: https://www.amazon.com/GeeekPi-Retroflag-Raspberry-Heatsink-Carrying/dp/B07X53S356/ref=mp_s_a_1_3?dchild=1&keywords=raspberry+pi+gameboy&qid=1611028244&sr=8-3
files for 3d printing the pieces were all made on tinkercad, and area available on the link below. The build required 2 sets of the extenders, so I would recommend anyone trying this to just print those at 2x the length.
Display's diagonal size doesn't look to be more than 7-8 inches.
https://www.amazon.com/OSOYOO-Raspberry-Capacitive-Touchscreen-Beginners/dp/B07Z685PM6
If you're gonna use a Pi, this is a cheaper alternative to an official Pi display. And since it uses the DSI interface, it's more or less plug and play as well as fairly low on power consumption.
for this kind of thing I just use tinkercad because everything I'm designing and printing is 80s style chunky anyway, so why make it harder on myself? It's so intuitive you can just figure it out. I design ports and spacers and things in a few hours. When I find the time, I can knock out a design, and print it, in a single Sunday afternoon.
My first build was in one of these .
The case is actually made of a sort of hard-pack paper, like extra strong cardboard, so I only needed a hobby knife and drill to make all the holes. I removed the top half and the buckle, and cut aluminum to make a top cover, and put a small USB keyboard over the whole thing, then used a pair of video glasses with it.
This is going to ba a Samsung Dex based deck using a usb c docking hub and a Note 10+ built in a harbor freight apache case.
Also included is a PI-STAR DMR hotspot running on a raspberry pi 3.
Still waiting on the screen to mount in the lid. I bought this one: https://www.amazon.com/dp/B07PRTNSJY/ref=cm_sw_r_cp_apa_i_E2ylFbD5VCC80
The foam will be replaced by a custom panel i am building out of leftover laminate flooring.
This is the one
as mentioned as raspberry pi zero could work, but would be slow. if you need this for any kind of volume work, at least go for a lower end rpi 4. anti-virus software is cpu hungry.
if this is for personal use, tbh the better way to do this would be to have a computer isolated from any networks that boots from a usb drive with whatever your preferred linux distro is, dban the drives and format.
if this is for work, although I'd always prefer people recycle, it might make more sense to buy new. your time and efforts are worth something, and you'll never have 100% certitude the antivirus didn't miss something.
If its not then maybe a solution could be this?
Then clamp it to the front of the hitbox? You could also take the clamp off it and maybe use just the frame? But then you'd be drilling into the hitbox and that's a little iffy since it may not hold very well.
This is very similar to what I am trying to do on my 'CP 2077 terminal' post below. It's tough to tell without a better idea of dimensions. They're are loads of cases like this in the 36" range (just check Amazon for rifle cases) but not many smaller than that. The closedt I have found is 33" exterior here https://www.amazon.com/dp/B071GRYV1H/ref=cm_sw_r_cp_apa_fabc_dw4aGbMAA547P
Do you think a small 60% keyboard could fit in there? I got no idea how big that thing is and I guess versions would be different on ebay. I wondered if this screen from Amazon would fit in this device or a device like this if I took out all the internals and added a chiclet keyboard perhaps with a pi and battery bank on the back or inside if possible: https://www.amazon.co.uk/Elecrow-Monitor-800x480-Display-Raspberry/dp/B013JECYF2/ref=sr_1_6?dchild=1&keywords=5+inch+touch+screen+display&qid=1599248590&sr=8-6
If you want to mess around with it just make a copy of it first. Enjoy!
>What's the app for? Android and iOS?
It's android, so it would run on the phone you use for your datalink. Here's a link iOS... Psh... get outa here.
>So I suppose just do your research before you get your battery lol.
Actually, someone's already done that for you:
Still, I'm pretty sure it has safety features already installed. I would only add the caveat that you should always use High Drain IMR batteries, and always go name brand. Anything that isn't toshiba, samsung, motorola, etc is just a chinese rewrap of the batteries these companies rejected.
https://www.amazon.com/dp/B07W8MCBMS/
​
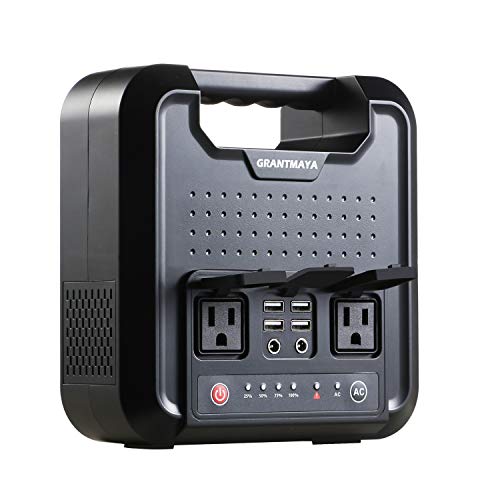
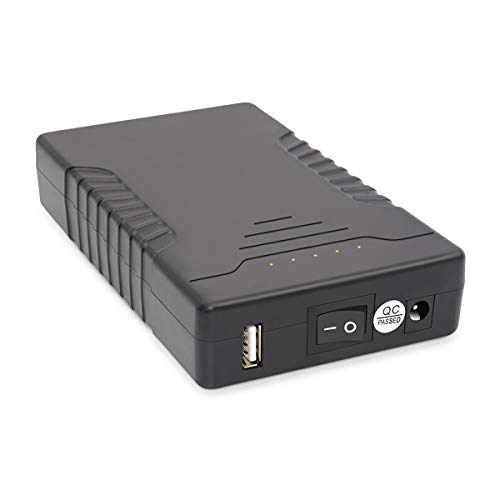
I use one of these. nice thing about it is that unlike most portable power banks it has ups functionality, which is to say it doesn't shut off when you unplug it
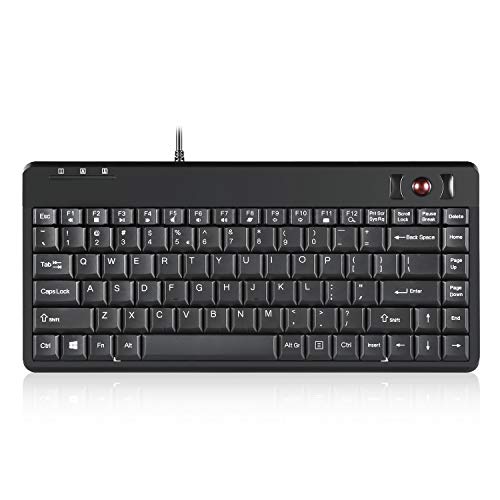
the keyboard is just this: https://www.amazon.com/gp/product/B085B7L979/ref=ppx_yo_dt_b_search_asin_title?ie=UTF8&psc=1
​
at this point. I'm going to make a console with it and a trackball soon
Its a Waveshare 7.9 400 x 1200. You can find it cheaper on Alibaba but prime shipping was worth the extra 15$ for me lmao.
It surprised me how perfect it was for this build, it has standoffs on the back to mound the Pi to and they have perfect fitting hdmi and usb power for multiple Pi models.
If you do use it make sure to put the information in your boot/config under Working with Rasberry Pi of the Wiki. took me too long to figure that out and it glitches out I think because its a 400x1200 display not 1200x400 .
​
Here are the settings I used for this build
max_usb_current=1
hdmi_group=2
hdmi_mode=87
hdmi_timings=400 0 100 10 140 1280 10 20 20 2 0 0 0 60 0 43000000 3
display_rotate=1
Might I use these for interfacing with the ribbon cables? One ribbon cable is 12pin while the other is 9pin. Are there any arduinos able to accommodate those 21 connections?
Velcro straps. Something like that -
https://www.amazon.ca/Wisdompro-Polyester-Blousing-Trousers-Gardening/dp/B082SSTJ34
.
Thanks; The SD micro slot was extended with a simple cable you get at Amazon for example. Been using this a lot in my projects;
If I may.
This is the board I am upgrading my Malta Systems Cyberdeck to. Version 2 I mean.
I feel it to be a good mixture of capabilities.
https://www.amazon.com/dp/B086MK4YB8/ref=cm_sw_r_cp_apa_fabc_1DyZFbZXQ3TB3?_encoding=UTF8&psc=1
Any critique on my choice is invited. I want to be sure I invest right.
Integrated battery controller, charger and buck or boost converter with enough overhead to run the sbc, lcd and power 4 usb devices at the same time..
The pi CM4 with some over clocking really is enough for a good user experience. Cooling is easy with a tiny heatsink and fan. Sure you could bump up to a rk3399 but coreboot is a hassle and the power draw is a lot higher.
One of the reasons the PI SBC's are a favorite is because of the performance to price ratio there's nothing else even close.
Something we have talked about is to have ribbon cable connectors onboard for the hdmi so you don't have to deal with bulky connectors and adapters. There's already a bunch of inexpensive hdmi jacks to choose from sourced off amazon or ali express (for a lot cheaper).
Its a lot easier to route those ribbon cables through the deck case.
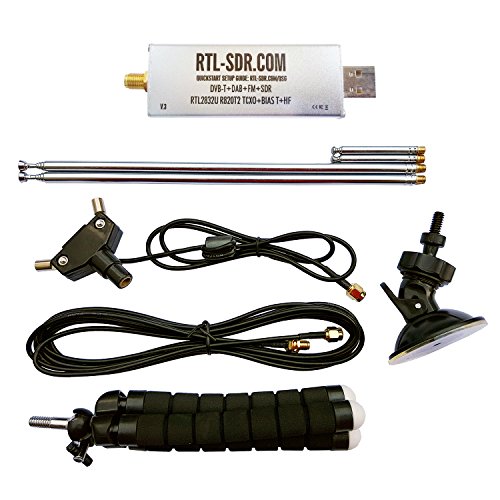
I used this cheap one for my project and it's great for picking up the Fire Department in my area (not a trunked system).
> Internal batteries are a whole other level of difficulty.
Why not use a PD rated battery bank like this one from Anker?
20,000mAh and outputs 5v@3a so would run any Pi for a decent bit, and it's small(ish) and already cleanly packaged. They also make higher rated ones in terms of both capacity and output. Seems like it's a simple and reliable solution unless my lack of understanding something critical is showing
Only issue I can think of is you might need to figure up some sort of "dummy load" on the bank in case it has an auto off/on, since I doubt an inert RPi draws enough current to do it
I found something that could potentially power a GPU.
The sellers claim that it supports 110-120v/60hz AC Power, at a maximum wattage of 300 watts.
I’m using a power bank of 20000mAh that I got off Amazon. It will power both the Pi and the 7” Monitor for 12 hours. Not sure about the spec or connection on your Netgear, but likely you can get a cheap USB to DC adapter and power that too off the bank. My Pi4 calls for 3 amps, but 2.4 off the bank works just fine. You want to make sure you get a bank that has pass-through power and you will see why. Then you can plug the bank into a charger and it will pass through and not drain the battery. Here is a link to the one I have and another of the same brand, only more mAh hours of 25000:
https://www.amazon.com/gp/product/B01422TC14/ref=ppx_yo_dt_b_search_asin_title?ie=UTF8&psc=1
https://www.amazon.com/gp/product/B016DA61V2/ref=ppx_yo_dt_b_search_asin_title?ie=UTF8&psc=1
If you get these, they have a dual input so it charges twice as fast. You will want a dual port fast charger also to get the most advantage.
I’m building a cyberdeck myself. It’s nearly all wired, just gotta figure out a way to mount the monitor nicely (without Velcro!).
Hey man, I saw everyone talking about cleaning the edges up, and I just thought I would thrown in my 2 cents. If it were me, I would get some auto edge trim to finish the screen. Far easier and much less work than filing it to make it perfect. Maybe just trim it a bit to make the edges more square, throw on some edge trim, and it should look great! Some 1/32 edge trim should be the size you need I would think for that. They also make it completely smooth with no metal inside, which is probably what you want. I just linked a quick search on amazon above to show you what I was talking about in case you hadn't seen it before. Should be able to pick some up from any auto parts store, though maybe not the 1/32 stuff.
I just bought a knock-off 'Pelican' box for $20, because I need a dedicated pi-top for SDR and Mesh.
You could search for "headless mini pc with battery"
Here's one at Amazon, though the Atom processor isn't very powerful. https://www.amazon.com/Kangaroo-Mobile-LPDDR3-Finger-Windows/dp/B0009MK6P8
If you're buying components, no reason to buy a framework mobo. Lenovo ThinkCenter USFF, OptiPlex MFF, HP ProDesk Mini, or a Mac Mini or Mac Studio. Add a giant power station, and you've got a portable monster!
get some raw usb a ports (could use extension cables with the plugs cut off and data pins capped off) and hook them all up to a 5 volt powersupply.
this ought to work as a powersupply for the whole rig. for the batteries, get 4 raw lifepo4 cells and a bms board.
How about 25w of PD and 10/100 data? https://www.amazon.com/PoE-Delivery-Compatible-Computers-Microsoft/dp/B085CN1RNW
Or just the 25W PD. https://www.amazon.com/PoE-Delivery-Compatible-Computers-Microsoft/dp/B07WPWMXZM
> Keychron K3
Would that be a silent keyboard, I tried a a cheap one from amazon and it was so 'hight', my hand would have to be a lot more inclined upward in order to rest on the home row.
I get that what most people wants type of mechanical keyboard for the clicky sound, but for me I want a dead silent one, I hate clicky sound, I like the small form factor of this though, this is what i usually take but they don't last that long.
I have been told that the travel distance of the mechanical keyboard is a lot more comfortable, but the only one I got I couldn't keep it more than 5 mins because of that sound.
Any advice welcome.
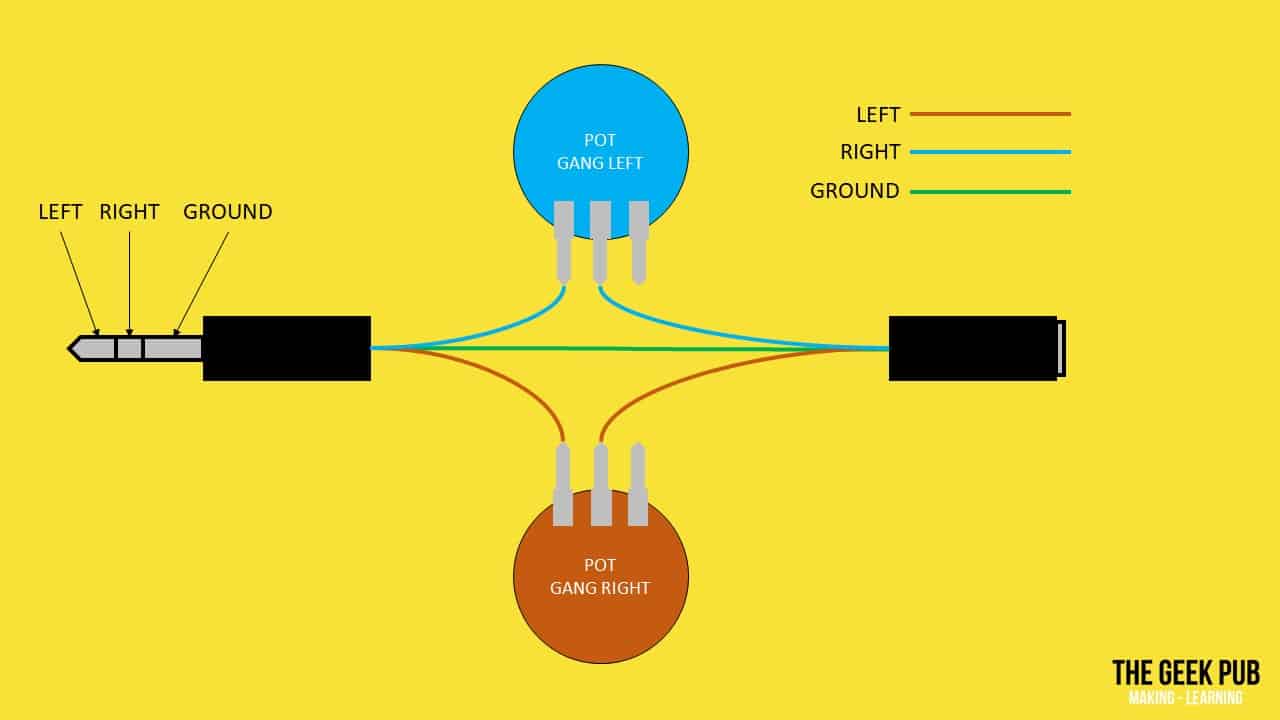
oo yeah the extension cables look like they'd do exactly what I'm trying to accomplish. I actually just found a diagram that I think is exactly what I was looking for here. I think I was confused because I thought pots only had 3 pins, but I just needed to look at the ones with 6 (like these). Definitely think I'll pick up an RTL though as a backup. Thanks so much for the reply, definitely cleared up a lot.
I'm a cheater. I would take this, tear it apart, and try to understand it and then trial and error stuff together and kill a bunch of hardware and just end up using the second one anyway lol.
Not really that cheap but the LattePanda gen 1 is an atom-based SBC with onboard arduino. Unless you really want an arm-based thing.
It was actually $99 for a long time but it appears the price has gone up. Later versions of LattePanda are even more expensive.
Another atom-based thing is the atomic pi, which is only $50 but requires are things to make it work. Minor things like a power button and power supply. And it's a really low end CPU with very little storage and only 2 gigs of ram. Meets the price, though.
https://www.amazon.com/DLI-APi-Atomic-Developers-Kit/dp/B08CGFM2B1/
I don't own one, just been looking at them for a long time trying to find an excuse to get one.
Use a USB C power delivery capable power bank like this, and a USB C power delivery cable with a 12v barrel jack on the other end, like this. (you can definitely find cheaper options, those are just the first ones that popped up for me)
Yeah I wouldn't buy the mini pc with ram or storage if you're buying off aliexpress, they tend to come with overpriced low quality stuff. You can get that stuff on ebay used for cheap tho.
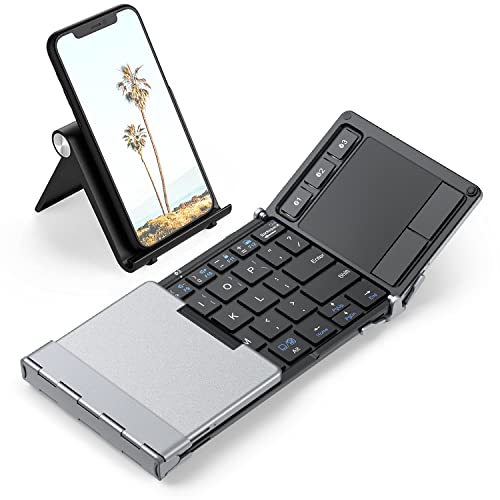
The only foldable keyboards I can find are bluetooth like this one ( https://www.amazon.com.au/iClever-Bluetooth-Sensitive-Pocket-Sized-Tri-Folded/dp/B07ZRNJ4DX/ref=mp_s_a_1_3 ) but honestly this looks like an amazing idea, and now I want to give it a shot haha.
If you use high power devices you could use something like this hub that supports external power. I have a couple of them since they support regular-assed usb 2.0 power through that plug.
I'll post more about it when the backpack gets here and I get the last pieces for packaging and cable routing. The primary interface for this system is a HMD and this Bluetooth Keyboard and Mouse app for Android. I know this is going to sound really stupid but I'm going for more of a 'present' take on what a functional wearable high performance computing environment would look like. I love the scifi looking bits of kit but I'd like for mine to be a bit more invisible. I'm trying to use out of box stuff where possible.
Yes, it will run the entire system. I got two of these and ripped the cheap plastic cases off and added a small heatsink to the chip on each. They accept extra power from a usb source so I will manage that and the fans (3x Noctua 40x10 5v) from a shared 5v power source on the LP3D board. The LP3D supports 11-15v @ 3A so I'm confident I can do everything within that window.
The one I use is unfortunately not for sale anymore, but here's one I found with a battery life indicator
IPhone X is a little under 6 inches right? Try searching ' 6" hdmi screen '. I found this on amazon, which actually mentions ar type applications. But it does seem a bit of a dodgy listing so your mileage may vary
https://www.amazon.com/Monitor-Printer-Projector-Display-2560x1440/dp/B0826YHTLM
You'd want something like this. Scaled down obviously.
Raspi makes a 7" that I like. Controls on the back plus ribbon connectors to attach it to pretty much anything. Looking at their Amazon store they also make a 5"
You'd be better off with a Logitech K400 (if you want the track pad,) or the very cheap Onn Compact Wireless that's $6.88 right now. The more expensive Logitech K600 might be ok.
i found this one looking for keyboards
The one he uses with the data blaster is called VuFine (amazon).
The other one on his face was built from a torn-down Epson Moverio he basically cut in half.
The modulator isthis onefrom amazon, but I'm certain you could find a cheaper one somewhere. The nice part about this one is it's a single sided pcb, so removing the connectors and soldering wires to it was super easy.
I'll have to do a write up on github for it soon, but tldr:
Pi is running on 5v buck converter, modulator is running on 12v buck converter, radio is running on 19v, everything is powered by an old laptop charger that splits out to the various parts.
The modulator is this one from amazon, but I'm certain you could find a cheaper one somewhere. The nice part about this one is it's a single sided pcb, so removing the connectors and soldering wires to it was super easy.
Definitely, and thank you!
The thing I have is something like this but older and a little smaller (see 3 AC plugs on the side): https://www.amazon.com/dp/B09HGYTDTZ?pd_rd_i=B09HGYTDTZ&pf_rd_p=7e505763-fc2b-4771-871e-c8789cf7e144&pf_rd_r=KJ8JMWCR6GD9FYN49D7B&pd_rd_wg=TEY9l&pd_rd_w=ewK6c&pd_rd_r=0a104ee1-e217-4f9c-a84e-f198e7724910
The Royal Kludge RK925 gives you a similar phone and tablet stand, but with the added benefit of low profile mechanical key. https://www.amazon.com/RK-ROYAL-KLUDGE-RK925-Mechanical/dp/B09KTKXD24
Needs to be on a flat surface though.
Many years ago, back when the RPi 3 was brand new shit, I built a small "Emergency Info Kiosk" that you could power up and it would self-host enough internet services that cellphones could connect to it and see the web pages of emergency info on the thing. The intention being that In Disaster Emergency Services could drive out somewhere power this up, and have a sign for people to QR Code their way to downloadble info. Basically "Connect to this wifi, browse to this URL or use this QR code" (and a pair of qr codes to do the wifi / webpage)
I had two wifi cards on mine, and a good bit of self-made software so they could detect another one and "mesh network" themselves together to make a larger system, and if one found "Outside Internet Access" it would announce and route it down the chain so that -eventually- people could get a drizzle of internet access.
The intent was to make a stack of durable "bricks" that could help provide/rebuild internet in a damaged area. They had solar power panels, and a few "long storage" batteries in them with terminals on the outside that you could affix any 12v power supply to (since solar panels, car batteries, and TONS of shit provide 12v)
Hell, I had one test that lasted 14 days, running 24h only off a car battery.
I demoed it at one of the Yahoo Hackday Contests that happened quarterly back when Yahoo was a company worth being an engineer for. (fuck you marissa). I figured that if anyone saw value in it, I'd get some traction or network nibbles.
So! For powering the Pi, get yourself a DC-DC converter. I used these. Stick the 5V output into your Pi, and feed the input basically any voltage you can come up with below 24V. Run yourself a bunch of batteries in parallel and you can even hot-swap 'em if you're daring. I ran the main power bus at 12V so "in case of emergency" I just bolt on a car battery and blam, weeks of power.
This is the one I got currently, (great power bank by the way!)
More a square than a rectangle but you might make it work. There are many brands and features in devices like this so this is just one example from a decent brand.
I prefer Logitech but it costs a lot more so this is to serve as an example in case you're on a tight budget for this build.
Thank you. The magically appearing table is indeed a foldable camping table that i had used for for several weeks as my main work desk. Its a great table with small footprint when folded:
completely useless from a usability standpoint but this would look good as hell with the screen gripped by a hand (skeletal or otherwise)
This Adafruit keyboard is a pretty good option. It's smaller than the given dimensions but its keys are still big enough to be used.
The other option is this foldable keyboard. The folding ones are a little flimsy but it might work for you.
​
Good luck on your project!
there are some large android type watches in the market. had a look at a few but couldn't find one that could run linux.
random example
I've seen people use a slide viewer glass to give an LCD a rounded quality.
I honestly just searched Scamazon for a power bank that can push out 3A and be able to provide power while accepting power. The unit I went with is this one: https://www.amazon.com/dp/B07JYYRT7T?ref=ppx_pop_mob_ap_share I have one usb going to the Pi, another usb that goes to a break out terminal to power the fans (through a switch) and the screen, and an incoming usb just for charging. I'm planning on just Velcro sticking this to the back of the case
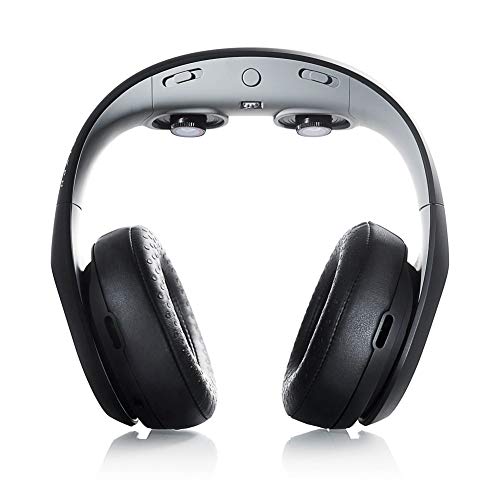
Avegant Glyph AG101 VR Video Headsets
+
Wireless Mini Keyboard Remote Control Touchpad Mouse Combo Controller with RGB Backlit for Smart TV Android TV Box PC IPTTV 2.4GHz
Or am I misunderstanding what you are asking for?
Both have batteries but the headset supports a straight HDMI in and the keyboard comes with a dongle you can just plug into any USB port.
Carrying case and you don't even need a desk.
No custom parts, no connections between the two to fail.
I also know they are both natively supported with a pi.
Actually, that reminds me - I found this but it's designed for left eye, which means you'd have to set 180 degree rotation for monitor output and wouldn't be compatible with random devices, and also it's on the left eye instead of the right eye - but in doing so probably helps with the cable weight pull problem that it has in general.
I'm complete ass at 3d modeling and I also don't have access to a 3d printer (eventually!), so I overlooked it when I was searching around before.
I did get the official 'pro' attachment but aside from having a good actual attachment piece to the Vufine itself, it's a terrible design in terms of keeping in line with where I put it because the cable weight keeps pulling on it even if I try to push back the weight from underneath.
One thing a custom design should probably aim for is being able to rotate it above your eye out of sight like it can. I'm fairly new to dealing with creative solutions for hardware as a lifetime software coder, but that's soon to change I think.
This is a similar design to the now-impossible to find Visor X https://www.amazon.co.uk/XIMMERSE-Smartphone-Magnifier-Watching-Amplifier/dp/B07K22MG2F
Why did you design to use two small screens instead of a single larger screen? I guess the way you did the optics as two pairs of curved lenses you had no choice. It’s a shame the Visor X is no longer sold as it has really good reviews. There are some similar ones on Aliexpress but reviews are spotty.
Let me be the first to introduce you to USB controlled GPIO modules.
the pieces attached to the base came with the smartipi case but the extensions are from this kit which i bought two of.
I don't know what your requirements or budget is but if you're set on x86 you will likely want something either atom or Celeron based. Both of those come in quite small form factors.
And finding either 12v or 5v board will make things so much easier for power solutions for both a battery and actual wiring.
By the way, there is the atom-based "rock pi x" with GPIO pins that match the raspberry pi.
https://www.amazon.com/dp/B08NJZ7DLG/
Also x86 based Latte Panda is cool too (it has an onboard Arduino).
Instructables is a good site for information on batteries and battery charging solutions.
Oh yeah forgot to include that, I generally only ever SSH into it from my phone, but in a pinch I plug in this media remote which I also travel with and it works fine for quick fixes just to get SSH back up as it has a little keyboard and trackpad. https://www.amazon.com.au/Simplecom-RT250-Rechargeable-Wireless-Backlight/dp/B08L8M34KG
You could use a macro pad like this with QMK: https://www.amazon.com/Tidbit-Programmable-Mechanical-Numpad-White/dp/B08CBQHGJ7
Just set up tap dance in qmk to make one tap on “2” as “a”, two taps as “b” and three taps as “c” and so forth
Looks a lot like my RoyalKluge ones, might pick one up, but the custom keycaps really "make" this stand out.
I've bought 4 sets of these for all my keyboards.
here on ebay this seller
or like this:
https://www.amazon.com/gp/product/B07CYTLXRB/ref=ppx_yo_dt_b_search_asin_title?ie=UTF8&th=1
I found mine on Amazon . I just bought one with a trackpad with the same dimensions so it should fit the pelican case as well keyboard
I bet you could fit a narrow tip-up display in that typewriter area. Cut off the extra flappy bits, maybe install a different keyboard or reverse read the matrix.
Good LCD for this...
What your looking for is called a marquee monitor. They come in a variety of shapes and sizes.
Found you some keyboards that are close. Keyboard 1 (the closest) or Keyboard 2 (I like this one)
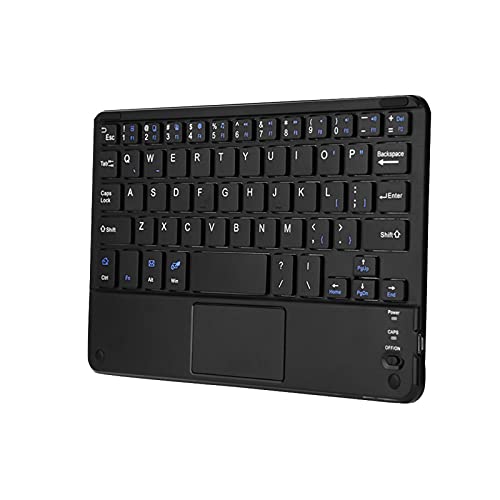
It's a 60% keyboard from Amazon! They have a few options for switches, too. I'm not too versed with mech keyboards and just wanted to sample one without breaking the bank.
It's a 60% keyboard from Amazon! They have a few options for switches, too. I'm not too versed with mech keyboards and just wanted to sample one without breaking the bank.
Yeah, the block with labels goes directly to the Pi! I got it here:
https://www.amazon.com/dp/B01M2ZSUP2
The other terminal blocks are various voltage sources, 1.8V, 2.5V, 9V, and 12V (no 3.3V or 5V because they're already on the Pi GPIO block), and also some logic level converters, in case I need to switch a 5V to 3.3V or something for logic.
I always buy ESP in lots of 5-7. Here's a link for 5 for a bit over $32, which isn't $5, but ... $6.60. So, super cheap. I feel like when I was ordering for a bluetooth keyboard they were cheaper.
As someone who used to just tack on a Pi Zero W to every order from Adafruit, because they were so laughably cheap, it kills me to see them going for ten times that now!
The hardest part of running this sub is all the complaining about lack of good content, and I'm 100% convinced a big part of that is that you don't have people just buying a cheap Pi and Display and hacking stuff together.
Now building a Cyberdeck is an investment, if you can even find the parts!
This crazy project really gets the wheels turning on the idea of cheap ESP based Cyberdecks. Especially since they'll do VGA, so you could run that gas plasma display with it.
https://hackaday.com/2021/07/28/emulating-the-ibm-pc-on-an-esp32/
That is a tricky subject, battery management using proprietary ports (USB C in my case) to my knowledge isn't something that can be easily DIY'd considering the communications, in addition to the power, that takes place to regulate the power flow.
My solution was to use this battery's screen (just opened up the battery and mounted the little screen with the buttons into position) to monitor the battery's condition.
an alternative would be to use a USB tester to get the readings off the input being fed to the pc, however, I'm still yet to find one that doesn't reset after being powered down or can be configured to act as a battery gauge.
However, if you plan on building your own power supply and using a USB C controller, there might be some way to create some sort f custom battery monitor using a raspberry pi pico and a small OLED. (still on the lookout for a source or guide on that)
Agreed. motherboards, especially from laptops, are a good starting point for the computing component of your cyberdeck considering the integrated circuits and ports allowing you to interface and monitor a battery if you consider portability. I will say, tough, that in terms of size and power consumption there are some better alternatives if you still want something more powerful than an RPI. I picked up this a few months ago for building my cyberdeck and so far its worked like a charm (despite its sometimes limiting processing power) while consuming <10W. I'd say go for whatever floats your boat, a proper motherboard can be great if you're looking to make your deck a daily driver and have enough power and cooling or a stick PC could also be good if you need something more compact and consumes less but you still can manage with the limited processing power.
Maybe one like this, no wall wart https://www.amazon.com/Anker-5-Port-Charger-PowerPort-iPhone/dp/B00VH8ZW02/ref=mp_s_a_1_3?crid=3V0IRD5S49QS4&keywords=anker+5+port+charger&qid=1650287449&sprefix=abner+5+port+charger%2Caps%2C126&sr=8-3
I have used Anker and Ravpower brands, both have been running for years
Just out of curiosity, is this the battery you were referencing? This is my current plan and wanted to see if you had any thoughts on it.
I mean, a lot of people tend to use things like this for small projects. You can find them for like $12 on eBay
Start in a seem in the middle, and work your way to the corner. Also as others have suggested, check under the stickers, the rubber feet etc first. I repair laptops daily for work.
I use this:
I have no affiliation with them. It's just the thing I'm using ;)
Something like that https://www.amazon.com/Female-Rectangle-Charge-Laptop-5-52-1mm/dp/B083321BMJ
Luckily it's hard to fuck those up. All they do is tell the power supply (AC-DC or powerbank, or even another USB C device, doesn't matter) to deliver the 20V3A profile (if they can, otherwise it defaults to 5V). The power rails are just straight passed through to the cable, no power switching or regulation happens on those adapters.