
What are
/r/estoration's
favorite Products & Services?
From 3.5 billion Reddit comments
The most popular Products mentioned in /r/estoration:


The most popular Services mentioned in /r/estoration:
Pixeldrain
Google Drive
Buy Me a Coffee
Let's Enhance
imgbox
ImgBB
Photopea
Microsoft OneDrive
MediaFire
Veuwer
FileDropper.com
Amazon Drive
Google PhotoScan
TinyPic
PostImage.org
The most popular Android Apps mentioned in /r/estoration:

PhotoScan by Google Photos

Snapseed

CamScanner - Phone PDF Creator

Manual Camera Compatibility

TouchRetouch

Get Current Wallpaper
The most popular reviews in /r/estoration:
I can't take much credit for this most of the heavy lifting was done by and amazing app call
Remini did minor colour correction and some issues with the beard
Yes you can try these apps :
Android : https://play.google.com/store/apps/details?id=com.google.android.apps.photos.scanner
iOS : https://apps.apple.com/us/app/photoscan-by-google-photos/id1165525994
I use the heal tool in photoshop ( https://www.photopea.com/ is a free knockoff photoshop that has the same features) and just trace along the rip lines with the brush until they're gone. Sometimes you have to try it multiple times if it comes out weird, or use the clone tool and manually do it but usually it works quite well. Hope this helps!
Here is my take on the 2nd photo Colorized version Let me know if you wish to commission me for the other photo as well or any modifications required in the current photo :)
​
>ok I like this one but some darker shading has been left on mum's top lip and I'm not sure about it
I believe this is the magic behind the science on this one
https://drive.google.com/file/d/1uZ5IzAgOATN5o_25ZOOwcbGlPxo5EQfh/view?usp=sharing
I found this tool the other day ( https://letsenhance.io/boost ) and ran your image through it and this is the result.
Open image/url in PhotoShop or https://www.photopea.com/
Filter/Noise/Dust&Scratches
If necessary, first duplicate layer, Dust&Scratches, then add a black or white layer mask and paint it, then maybe invert.
https://i.imgur.com/jyddnIu.png
Seriously, this Photopea thing is amazing.
Here's the restored version. You can also play around with the psd file here
You might want to try an app like this, if you have kept that lockscreen active. Apparently the app can recover your current lockscreen image and save it without any loss of quality.
Also, from those who don't have access to a scanner, please use photo scan....
It'll cut down on the glare by mixing several shots together.
FINAL VERSION: https://drive.google.com/file/d/0B5YjJlxwfk3ReU8wNHdrdUtnSXM/edit?usp=sharing (warning: 229 MB)
("Final?" Well, let's just say that this is as far as I'm able to take it - hope it helps. To progress further one could rebuild all of the JPG artifacts and sharpening halos: I did much of this, but to take it further really needs another ten hours or more - and it's possible this is sufficient as-is.)
Re payment: I put in about two and a half hours on this, but since we made no agreement there's no contract. A gesture would be nice, though: please drop me a message if this meets your needs or provides you substantial progress towards them.
Try https://drive.google.com/file/d/0B5YjJlxwfk3RU1FEdjctS0ZmUUE/edit?usp=sharing for the sample face.
I'm using Photoshop CC 2014, with plugins from Dan Margulis (see Amazon.com for his great books on color retouching). It's quite possible that the work you've tried is as good or better than what I'm providing, but at least I've given it a go. I'm uploading the final copy to Google Docs right now, but it may take another few hours (scratchy phone connection and a huge file).
if he did i found a lead on ancestry it had a list of soldiers who died in World War 1 and one of the names was like the one you mentioned here is the link scroll down a bit and you will find your great-great grand uncle there although i am not sure it is him ofcourse maybe just a similar name and situation.
I made a little program some time ago, which can reverse unsharp masking – if you can guess the sharpening radius and strength. Which I can't, so I average a few attempts to make it less sh*tty. :)
But something similar can be done in Photoshop and such: duplicate your image, apply a high pass filter to bring out the unnecessary sharpening edges, invert it (because we want to remove/reduce them) and set layer mode to Linear Light/Overlay or similar, and play with opacity. Or you can make a bunch of High Pass-ed layes with different radiuses and play with their opacity. I quickly tried to make an example on Photopea, I hope the link works:
If you have an Epson, this is how: http://www.howtogeek.com/109409/how-to-properly-scan-a-photograph-and-get-an-even-better-image/
It's similar for other scanners, it's just an option you choose. You can skip the editing parts.
I'm cheap and I refuse to pay Adobe prices. I've been using freeware called Photoscape X for many years. I really like it. For a one time fee of like $40 USD you can get the pro version which offers some extra editing tools and filters and whatnot.
​
very late to this but here's my take
https://www.amazon.com/clouddrive/share/4TNZpKbihCuNGDO9DCFaW6GFbnLQnbakqsWKwnjqhuO
Not the best attempt, but it's really difficult to fix that photograph. I would need a day or two, but here's a hour attempt - https://i.imgur.com/5XYRliH.png
Done with a graphic tablet for selective blurring and sharpening along with painting missing details on hair. I worked mostly on the face and hair because of the huge amount of work required to do the rest.
Also, here's the Krita file - https://expirebox.com/download/71fd67c94fb8b3db7cbd14732b037414.html
For simple editing like this you can use touchretouch . It's easy to use. Available on android (and probably on iOS as well).
Edit: Took about 5 seconds
Thank you, I really like the way it looks! Unfortunately, I just realized that IMGUR compressed the pictures :(
Here is the link to the bigger version. I would love to have you restore it once again.
https://drive.google.com/file/d/0B4mnsfz2d5zmZFVmdk1JSy1RN09JM3BqaC1sMDZXX0pLcDFn/edit?usp=sharing
I want to get this picture printed at 3400mm x 2600mm at 200ppi (typo in title) and use it as a wallpaper in my house. The quality is much too low to blow it up so big. I know you can't do miracles, but perhaps someone can help me out or point me in the right direction of an online service. Even if someone has to remake the whole thing by hand.
As stated in the title, I am willing to pay for the service.
Here is a link to a .zip with the file incase imgur downsampled the original. https://drive.google.com/file/d/0B88YoQ6BtUIkTW9vM1pSclZicms/edit?usp=sharing
Have not done this in years, so I gave it a try.
Here I cleaned up the lines, enhanced the quality a bit and improved the colors I hope you like it.
This is going to take me a lot more time. I am very far from finished, and this is more of a digital painting than a “restoration” (I am an artist by trade) But if it is on the right path, I will finish it up. Let me know.
Here is my version https://pixeldrain.com/u/PTBUVoTd
If you choose to go it my work I'll work on all the images and show you preview watermarked pictures first and if you like what you see you pay for them.
Here's what i have, there are two versions, one includes layers the other is flattened. https://onedrive.live.com/redir?resid=646833EFDD427D95!11979&authkey=!AKp7cn6RCGS5W8k&ithint=folder%2ctif
Thank you for your advice. You're indeed correct in that such important pictures such be kept in a higher quality format and at a higher resolution. I'll try to find a scanner to rescan them.
For now, however, I have uploaded a higher resolution version hosted on Mega. I hope that's better for the intended purpose.
Links on Mega:
https://mega.nz/#!YVVVhJrA!lJQ-kP0BywJfx9zPK89yIEEZMmvA13gs7ili6Fhd3V0
https://mega.nz/#!JF9yxbSR!kkGVkGjUg96qy1GKsT5hwc1aedQhsvoIlCm8FID2hxg
Please comment here FIRST with some links to previous work if you are interested!
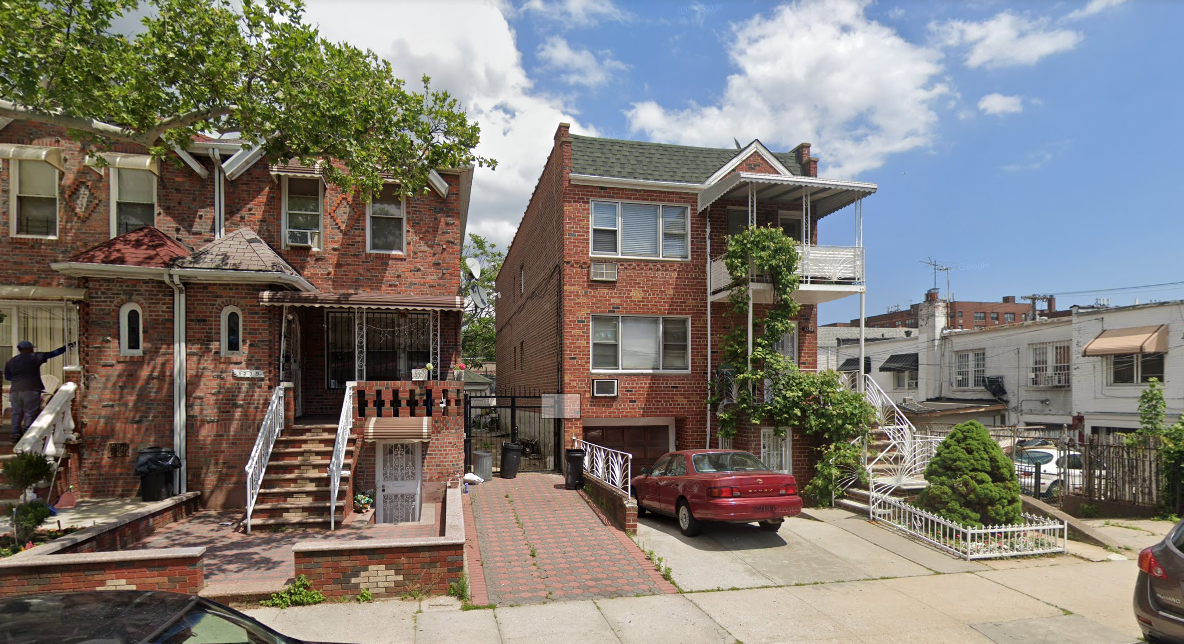
- Resolution is [3024x4032] portrait.
- Not the best detail, my dad is in quarantine and I can't get the photo to scan it.
- Looking for some detail to be brought out first, if possible, before colorization if that makes sense
- Subjects are Italian-American
- Photo taken in 1945 in Brooklyn, NY (actual location)
- Full resolution photo is here if the submission isn't for some reason
- $10 USD paid through PayPal after completed full resolution link is provided if I reply to your comment to proceed!
No, it was doodled on top of it.
I just worked on it a bit. This is all I have time for, today. Others are more than welcome to continue from here if they wish to:
Strange, it might be because the finishedwater is quite big. I tried uploading it to imgur and minus but those didn't work because it exceeded their size limits. I did, however, succeed in uploading the other one to imgur: http://imgur.com/Ys4Vf3L. You should be able to download both (uncompressed) files from mediafire at https://www.mediafire.com/?6ek5ba1u489w9ec,falmdm5qy8hz99y. Hope it works now!
I'm not sure as to what caused the lines, I'm pretty sure both photos are scans of an actual photograph though.
Google Drive Folder with the same images. I know Imgur compresses... but I think these are all pretty small nonetheless due to my fathers scanning abilities ;)
https://drive.google.com/folderview?id=0B-WXxEkLHvGZLTdfZjROQnRWZlU&usp=sharing
Here is the link to the photos. The folder contains two versions of the photo, one is the original photo and the other is an AI-Upscaled version of it upscaled using lets-enhance.
Young Grandma Rose - and her is her in another reddit post just for some cross referencing if you need the right colors
The quality is terrible here, however the good news is that not one of these photos (out of the four in the album on the imgbox link) appears to be in bad condition. If you have the originals, keep them safe. If you were to get all of these scanned properly, every single one of them could come out looking great with some basic restoration work.
Nothing's really that complicated here since none are torn, no heads/hands are damaged, and there are no missing sections. To get good scans you'll have to use a decent machine and use the correct settings but it's not hard if you know what to do. Basically the goal is an uncompressed high DPI 48-bit raw scan without any software edits (sharpening, exposure, skew correction, etc) done to it.
A good machine to use here would be something like the EPSON V600 due to the balanced lighting used in it which would be great for <strong>photo #3</strong>, however the lower end V370 or a Canon 9000f or any other decent CCD based scanner would do just fine for the rest. The V600 isn't rare it is about 10 years old and still being sold. It's likely to be in a lot of places such as libraries and schools and it is pretty much the go-to budget flatbed/film scanner for anyone still shooting and scanning their own film.
The original is on the left, here is the link:
https://pixabay.com/fr/photos/vintage-jeune-fille-d%C3%A9calcomanie-1357424/
If you want to learn Photoshop by "muscle memory", the free (ad-supported) online Photoshop clone https://www.photopea.com/ can be a good tool. Though I haven't used its retouching/colourising related features.
Thanks! I used to play around on my own with color with varying results, but this tutorial helped me a lot. For me, it's all about the layers and opacity. I've been told that this color tutorial is awesome, but it just seems too complicated to me, so I haven't tried it yet.
Sorry for your loss, here is my version of 2nd image, let me know if you wish to commission me for the other one as well Restored version
​
Actually have to go do some work. But Here's my progress just for fun in a side by side. And to OP- are you interested in a colorization after the restoration? I was going to do one anyways, just to refine my skills of restoration and then taking it to a colorization. Anyways, if you are interested, inbox me, like what eye and hair color each person has, an idea of the skin tone, and what color for the clothes. If you don't know, this stuff, theeen just tell me your preference, or what you think it might have been. If you don't have ANY preference just let me know that too, and I'll just do whatever colors I think would be best.
Anyways, the progress http://i.imgur.com/T4bkvDD.jpg
Also, for anyone interested in expanding on my work, or just having picture that now only needs minimal restoration for practice or whatever, or if someone wants to do a colorization too. Here's a link to my PSD
http://www.filedropper.com/notsoeasyfix
And a quick overview of what I've already done.
-Basic Spot Healing.
-Some quick, rough patching
-Levels adjustment just for contrast to see what I'm doing. (As an adjustment layer not directly on the image itself. Going to do a much better levels adjustment after all of the repairs are done.)
-Clone stamped sources over most of the tears and creases,
-And a quick crop, to remove the border and a slight rotation for the photo to be more centered.
Hey u/ccoop93! Here's what I was able to do, I hope you like it. I touched up the face, fixed the nose and hair, cleaned up the background, and enlarged the image 4x. I'm only sorry I couldn't fix up the clothes without losing realism.
When u/Ruthless_Cutie said tips are appreciated, they were talking about financial tips. I don't think anyone here expects tips however, they are always appreciated when it happens. That said...
^I think your tip is sexy.^
You cannot recover the key from such a badly worn sticker. The best thing is to download ProduKey. It's tiny utility but believe me, it works!
you can image search the original, and then download the PDF of the original newspaper.
You can then import the original page into photoshop at high resolution and crop.
This allows you to apply various noise reduction tools without loosing too much of the actual detail when viewed at a normal size. It would still be potato quality when viewed at high resolution though
A proper cleanup would require a lot of hand touchup, and so should be paid for
It would be far better to contact the original newspaper and see if they still the original photos/negatives, and see if they could print a fresh copy of the original photo and what it would cost. (This is a long shot, of course)
There is such a thing as unblur. Here's an article about it. Smartdeblur does what the author describes mathematically. (I don't own it.)
Honestly I feel like 5 edits per day for free is pretty decent. I've been using Let's Enhance on and off for years and I think you get 5 free per month: https://letsenhance.io/pricing
Another tip; if you do not have access to a scanner and cannot get access to one, use Google Photoscan. It's the next best thing to a scanner and is still much better than just taking a picture of it with your phone. It's available for both Android and iOS here, and is very easy to use.
Well, that's not that good. In this case maybe you could share the original file you have, because imgur/reddit may recompress images. Maybe you could use https://imgbb.com/ or google drive/dropbox/etc., whichever is your favourite. :)
Sadly yes, if you want an actual valuable result, you'll probably need to do some fixes here and there on each individual picture.
You can try to apply a few basic filter as a "first pass" using batch mode to lessen the amount of work.
Another tip is to separate the pictures by time range;
You can apply more agressive filters in batch of similar pictures. (lightning, angle, environment)
Usually pictures taken on a short period of time matches the conditions.
maybe a little late but here's my take
https://www.amazon.com/clouddrive/share/Kg9WZLvNE8C3tzOxWS6IwyjcCbP8Qpb2Qrnqrj2sKWu
I want to show off 2 awesome pics from "back in the day", but even to get them into capable hands I think I'll need some handholding. My first result after scanning were 151MB and 76MB. (I scanned them years ago using a flatbed machine that was brought over on the Mayflower, and can't find the photos now so this is our official starting point.) I opened the monster bmps in ms paint and managed to resave them at half the size. Then used the snip tool to manage 4MB files. Both are here , but I will follow any reasonably simple directions to provide the size and format you need: https://onedrive.live.com/redir?resid=2DE510FE56D35B16!643&amp;authkey=!AIGOh03qS7jf_Cg&amp;ithint=folder%2c.PNG
Outside: The yellow paint is what you'd call Chartreuse if you'd be forced to name the mix of lemon yellow with a bit of lime. The other color is a forest green. The grass in the background is whatever is common in Pennsylvania.
The 2nd pic at the link above is the interior. Key features: black velvet painting, to the left over the minifridge. The captains chairs are olive pleather. Carpeting on ceiling - olive with specks like seductive hazel eyes.
Probably many typos. Assume they've already been edited.
https://play.google.com/store/apps/details?id=com.bigwinepot.nwdn.international
That's for android, but should be available for iphone too. Gives you 5 restorations a day in the free plan with ads.
It kinda looks like Remini - it gave me this version. It can be good for sharpening faces, not backgrounds and it doesn't always work. It's a free one-click called 'Remini Photo Enhancer App.' Hope this helps some of you who want to sharpen your photos. :)
I'd give it a shot if you would scan the image. As it currently is, it will take more time removing glare than restoring the photo.
If there's no way you can get to a scanner at least use google's PhotoScan
I just processed it using "Remini", which is an Android app, specialized in facial recognition,
to enhace and reconstruct blurred, old and very low resolution photos.
https://play.google.com/store/apps/details?id=com.bigwinepot.nwdn.international
Although it generally makes restoration masterpieces on its own,
even a little unnoticed bunch of pixels in a crucial position can make the difference in the final result.
So if you have a damaged or dirty photo like the one in question,
in order to avoid algorithm confusion, you'll first have to repair all defects manually
from the original picture using a regular image editor.
Then, to obtain the best result, I suggest to blur a bit the original photo, if it is noisy,
and to scale down, if it is too big, in order to make the algorithm work properly
on the whole scenery of the image instead of just the face.
The radiator went back up before we could get a better pic I’m afraid. There’s a bit more of the pic in the uncropped version. I’ll try and work out how to send it. Weirdly, the decoration we’re doing in the rest of the room is with this wallpaper
There are apps on Android like OpenCamera or Manual Camera that can take lossless if your device supports it.
Here's a compability test app:
https://play.google.com/store/apps/details?id=pl.vipek.camera2_compatibility_test