
What are
/r/pcmods'
favorite Products & Services?
From 3.5 billion Reddit comments
The most popular Products mentioned in /r/pcmods:


The most popular Services mentioned in /r/pcmods:
Rainmeter
tonymacx86.com
DealExtreme
EVGA PrecisionX 16
Autodesk Tinkercad
f.lux
Macrium Reflect
FanControl by Rem0o
AutoHotkey
Google Photos
Alibaba.com
Adobe Color CC
IFixit
Paletton
Freepik
The most popular Android Apps mentioned in /r/pcmods:

The most popular VPNs mentioned in /r/pcmods:

The most popular reviews in /r/pcmods:
The back plate is an end user removable part. Taking it off will not void your warranty as others suggest. Disassembly does not void warranties in the United States.
I wouldn't paint it though. The sand paper, primer, and high quality metal paint would cost way more than just getting a new back plate. If you want it black, you're in great luck. If you want it a different color; I'd still buy a cheap one off amazon so I didn't paint the original in case I wanted to sell it or RMA it down the line.
Could take a sewing needle or something about the same thickness and punch them out..
Edit: Failing that these look like a good match, just check the sizes: https://www.amazon.com/MoKo-120240mm-Computer-Magnetic-Dustproof/dp/B07R4WWX4W
I've never painted something like this before but the thought I just had was some kind of putty on the bottom side that fills the holes. Like 3d masking tape. Paint the top then peel the bottom layer off and you should have really nice clean holes.
I wouldn't paint those blades. Noctua fans are specially molded for the air they put out and quality. Any time you paint a fan blade, you are creating an imbalance. The casing itself you can paint without much issue, but your really looking to reduce the life of the fan and create future noise by painting blades. I know a lot of people do it and then rant on like they know something and will tell you "Oh just sand them up and paint, no big deal", but this really isn't the case long term. What I would recommend if you are wanting that type of look, is just replace those Noctua's with some of these: https://www.amazon.com/dp/B00NOTV48Q They actually run quieter then the Noctua's.
EZDIY-FAB Vertical Graphics Card Holder Bracket Support with Multi-Angle,GPU Mount,Video Card VGA Support Kit with PCIE3.0 Riser Cable- White https://www.amazon.com/dp/B08R9MRKRB/ref=cm_sw_r_cp_api_glt_fabc_K60B06JCBB7XD2TTCYVK?_encoding=UTF8&psc=1
LOVE it. looks awesome and I think the effort really paid off.
my only question is, where did you buy the mount for the GPU? Not the PCI Extension cable, the part where it mounts the case.
edit: found it. but where did you buy it?
edit 2: oh, fuck me, it's on Amazon, now. a few months ago, you'd be luck if you got the notification from coolermaster before they sold out. I though I'd come back and leave the link incase someone else wanted it
I'd get some Extruded Plastic edge protectors The 1 dimensional stuff for thin edges and not corners.
This..
covers the bad cut
adds some styling to the top of the case
Gives you something to hook the leggings onto under the lid.
I'd even try epoxying the PVC and the nylon together jsut to get an even better hold
You can usually migrate windows across providing you have space on your new drive for it. There a dedicated partition for Windows on your drive, you should be able to copy that across to a new drive.
I would create a backup of all your files as well as a Windows recovery drive on a usb flash drive, just so you're prepared for the worse case scenarios, data loss/corruption etc.
Handy instructions on Microsoft about window 10 recovery with links to other windows versions Here.
Software I use to copy partitions.
P.S Forgive formatting, on mobile
When I did a cutout in the side of my case for a stat display, I used this stuff around the edges to give it a more professional finish and to cover up the rough bits.
I’ve taken apart several of those, it’s not too hard. Usually on the thermal plate side there are a few screws around the edges that hold the pump model’s shell together. Remove those, and the cover will lift off.
For changing the color, you could put a couple of light layers of paint on the inner surface. When the light from the LEDs shone through, it would be whatever color you used. Alternatively, you can use these plastic sheets - cut out a small piece that fits the inner surface of the cover, then close it back up with that inside. You can darken the color by using more than one layer.
Hope that helps.
It’s a Phanteks vertical mount that comes with the riser cable. I love it! it’s a good metal and it includes padding in case there is a gap with your case and the mount! I have a Phanteks case but I’ve seen it works great with other cases
https://www.amazon.com/dp/B07MW73HTJ/ref=cm_sw_r_cp_api_glt_fabc_U8jdGb58ZKDS7
AIOs are not easily serviceable, they are not manufactured for that. It's not impossible just a pain. What about wrapping or split covering the hoses, something like this (https://www.amazon.com/dp/B016045W16/ref=cm_sw_r_cp_apa_fabt1_EKeTFbEWMK6V5) that doesn't require disassembly. Just a suggestion.
Always liked tinkering around and got into building computers early on. Here's my first PC-related scratch build/mod I made when I was 18. I had the first generation of unibody Macbooks and I decided I just had to use firewire.
Things I learned in hindsight:
- 3.5" enclosures with fans built in already exist. No need for 2 power bricks
- Metric screws are a thing. I'm using standard screws to attach the standoffs to the bottom. They don't quite fit
- Aluminum and nylon spacers exist. Didn't need to cut my own out of copper
- Noise dampening could have been used
- Should have painted the metal mesh. It's starting to oxidize.
- Could have used body filler to fuse the metal ends together
- Soldering! not used at all in this
- Not even sure if it's electronically safe with the IDE pcb.
- Served me well through college and to this day as a media and backup drive
One of these days I'm going to revisit this project and start over with what I've learned over the years
Always liked older Apple macs and have been case modding and hackintoshing those for the past few years.
Build logs for some other projects I have going:
grease splash guard for pans ama
After doing lots of research and considering going with the Raspberry Pi screens I ended up going this route as it was the least complicated and easiest to set up.
I followed this video guide: https://youtu.be/H13luIsPADY
Was up and running in 10 mins.
the usb header to usb a adaptor helps tons in keeping everything neat and in the case. Only downside is I have to turn off usb when PC is off now and cant charge my wireless mouse when PC is off but I usually charge it when my PC is on anyway
We use these at work in cases like this. It's a little more expensive than the cheapest ones on Amazon, but I know for sure it'll do what you need.
i have the same case, but i use it to carry some fpv drone stuff. i recommend this backpack adapter for it in case you want to comfortably transport it.
You could get an internal USB hub (NZXT sells one for 20 bucks) and plug it into that for power and connect via Bluetooth on the motherboard. Or get something like this.
Look's like it has a molex for power and plugs into HD Audio, which you would lose your front panel I/O on the case. Probably sounds like ass chips too.
I don't really think there is a good way to get a legitimate speaker into the tower without doing some weird stuff.
Edit: Speakers have magnets and also cause vibrations. Evidently this is why you don't usually find them in tower.
Bought mine off Amazon here. It dries hard and is pretty adherent, and doesn't run when you're positioning the mod. There may be better options, but it's worked well for me.
Alright first step is you need a WOL app from the play store, autovoice, and tasker. After that just put your info into the WOL app. It will need the mac address of the computer you want to wake up, the ip address of it, and a port #(default is 9 which is fine). If you need any help finding that info just ask. Then launch tasker and click the plus button to add a new profile. Click on state, then plugin, then autovoice and then recognized. Click the pencil on the configuration thing. Then go to command filter and enter the command you want to say to launch it. Then click the check mark. It'll take you back to tasker and then just click the little arrow thing in the top left corner. Then click new task, name it whatever you want. Then click new action and click plugin. For this plugin choose the WOL app you have. Click the pencil and choose your settings for the pc you want to wake up. Sorry for the huge text block but if you have any questions just ask. This is the app I use. Can't say anything about it other than that it works.
Best of luck to you! I know copper isn't cheap but I can't say I know how much it'd cost you. Sounds promising, a rubber gasket would do a fine job, IIRC DangerDen use them in their blocks. What GPU are you cooling? There's another interesting bit of reading here.
If you want any advice on the rest of the loop let me know =)
I ordered some fan brackets from Amazon but still ended up using zip ties
Ya I remember that lol. Thanks for responding to both. Sure the software I used was called Argus monitor but I don’t reccomend as it needs a monthly subscription. I got reccomend a piece of software called fan control that can control all fans in your pc.fan control
https://mega.nz/#!8dRklKwB!wQMyNONxadKLppMQYl2FatiwcfzkZ_lKzb2SI0etVIc
So this file has my drawings as well as some drawings i found online which might help with designing ATX motherboards in CAD. Let me know if there's any issues downloading it!
Also, just a shout out to "QCAD" who make a free CAD tool which is what I've used for the design. http://www.qcad.org/en/ Cross platform to!
With Zero CAD experience at all I was able to figure out how to use the program by just clicking around and make the attached.
When you're holding the magic mouse properly, the main useable 'gesture' part of the mouse is right where the individual click buttons would be. I don't see how you can then put this on a mouse with individual buttons, let alone one like the M65 that has a big gap between the two.
Surely a better option would to just have a separate magic trackpad to swap to when you need gestures?
To be honest, you won't need more than 500MB. This could easily fit on a flash drive with an internal USB header.
Here's the one I'm familiar with. All the documentation you'll need to run it is on the web site.
Here's what it looks like mounted on standoffs:
You can find standoffs lots of places:
You'll need to carefully tap holes for the standoffs to match the mounting holes for the motherboard. Are you using an ATX motherboard?
If you don't mind some hacking of an RGB component, I have a solution that will work. I've used this tactic for an acrylic control panel top on one of the arcades I built. Get a set of these: https://www.amazon.com/gp/product/B07DVFM4TJ Tear them apart with the provided screw driver. Inside each one, you will find a very tiny addressable RGB strip. These strips are much thinner then a conventional RGB strip and will fit into small tight spaces that ordinary ones can't. As long as you keep the wires attached, you can daisy chain them and get as long of an RGB effect that you need. The ends are standard 5v 3 pin, but with a JST adapter you can sync them with Lian Li's RGB, or with an adapter from Pirate dog Tech, you can sync them in Corsair if that is what you are using.
There are several ways and several types of adapters that will work for you. If you are looking for something like the picture, you'll want a USB-A to DuPont connector, like these: https://www.amazon.com/dp/B06Y5RKMT8 That will allow you to convert your internal USB header to one that will plug into the 5.25" bay. That controller bay itself can be found on several sites, but the only model I have found that also includes Bluetooth on Amazon, is shown on the Canadian version of the page here: https://www.amazon.ca/dp/B07T6LQF74 Not sure how that works ordering from Amazon Canada from America or elsewhere, but the important thing to know is the distributor (Homyl), which might make the hunt a bit easier. The exact model is the SSU-Tech FW2601
You'll need to spray the board with some conformal coating first: https://www.amazon.com/dp/B06XWGCKX5 What this does is put a thin barrier of protection on the PCB that prevents any moisture in the paint from getting in. I'd suggest maybe watching a few videos on YouTube first about conformal coating, and then proceed from there.
There's nothing particularly special about the cablemod aio sleeves other than the little end clips they supply. The mesh is fairly generic wire sleeving material.
Not sure this is the right size, but you should easily be able to find a yellow mesh that works for you.
https://www.amazon.com/VSDISPLAY-LQ091B1LW01-Industrial-Controller-industrail/dp/B07RW2G39B?ref_=ast_sto_dp Here ya go. Using a Molex to 12v DC for power.
I used this particular LCD from Amazon, I was too impatient to order from overseas.
https://www.amazon.com/VSDISPLAY-LQ091B1LW01-Industrial-Controller-industrail/dp/B07RW2G39B?ref_=ast_sto_dp You can get some much cheaper!
I'm running Molex to 12 DC for power internally, some screens are USB powered so you can just add a splitter off the mobo which I think is a bit easier but I wanted this style so they look like billboards.
I use Wallpaper engine and Rainmeter for any extra GUI features, I want to design my own when I'm not busy.
I put a 7 inch screen in my friend's PC build and only needed USB.
i like demciflex filters. like this one: https://www.amazon.com/DEMCiflex-Radiator-Filter-Standard-Double/dp/B01IABY6QE
i have a 280mm version on my front panel of my case. you don't need to use them for radiators.
not sure if you already have one but those adapters are a blessing!!!: CRJ 4-Pin PWM GPU Dual Fan Splitter Adapter Cable All Black Sleeved for Graphics Cards https://www.amazon.ca/dp/B07T95C68T/ref=cm_sw_r_cp_api_glt_i_3WYQDV5C004XDT51T1JB
*no need to Dremel anything to use it 😉
Do you have experience with soldering?
Honesty I would recommend lead solder, lower temperature to work with. But obviously contains lead so be careful. Get a goooooood iron small tip heat controlled. Do not attempt this with a 20 dollar solder from Lowe's or home depot, soldering isn't super hard. But working on really small components like that take experience to do right
MAIYUM 63-37 Tin Lead Rosin Core Solder Wire for Electrical Soldering (0.8mm 50g) https://www.amazon.com/dp/B075WB98FJ/ref=cm_sw_r_cp_api_glt_fabc_RZ6D4K2ZBX3EA345RPPF
Those balls are used for bga components, you really need to know what you're doing to get that working.
I’m willing to solder it, any idea if on what components to use to solder it or would something like Tin Solder Ball BGA Lead-Free Reballing Soldering Heat Universal Stencil Balls for GPU CPU IC Chip PCB(0.3mm) https://www.amazon.com/dp/B07HJSJ59T/ref=cm_sw_r_cp_api_glt_fabc_D8Q34X62QT3GP6QJ3DBJ
Work?
Something like this
Would actually probably work the best. Just clip off the end with the button and use the wires. It even has a usb power in the same cable.
Usually it is an hdmi display, so you can connect it to the gpu something like this
Maybe this one doesn't stick out as far. You could even put some heat shrink on it after connecting your headset so the adapter stays connected better.
Lazy? She spins me right round baby right round, like a record player, right round, right round.
Btw, Putting a case with skateboard wheels on a lazy Susan probably contributed to 100% of the problems on this build.
Amazon
[Kidding aside. Excellent table. Solid. Powerful. Smooth. I like being able to sit and work and just turn the case as I go from side to side on my builds. $100, but pays for itself as a Real time, back muscle and space saver. ]
I have to assume this is the same exact item https://www.amazon.com/140mm-Aluminum-Filter-Grill-Black/dp/B007EVKIXW/ref=sr_1_8?dchild=1&keywords=140mm+Aluminum+Mesh+Fan&qid=1604520722&sr=8-8
My thought on using a computer PSU that is also powering a computer is if there is a problem with the led strips. Such as one gets danged or the RGP controller goes bad, this could result in damage to your psu and other components. If it was all in case it would not be a problem as the strips will likely not be able to be damaged. For my own project I thought about using an PSU standalone to power some extra led strips for the garage, going for total of 288W. I deiced not to as I can get something smaller, cheaper and no waste of power like the 5v rails and 3.3v. At 200W depending on the psu you may have to wire into mutiple rails of the psu. I got this 360W 12v from amazon. Do note that this probably not UL tested. From what I understand for it to be safe and legal to be used in your house it needs to be in some other enclosure. Basically if it causes a fire your insurance may not cover damages. Also a note on long runs of led strips you should plan on running multiple 12v lines as the strips will have voltage drop. Being you are doing RGB you will need a signal amplifier/repeater like this. I would start with 1 repeater and test it to see how far you can power a run.
Amazon has USB powered fans. They come in sets of two but you can buy multiple and daisy chain them together. Given you have so many electronics I recommend the USB because you can plug it into anyone of open ports. I used them for a custom desk build with the cooling fans. They are nice because the feet on them also work as anchors. You cut the hole the same size as the fan and once you attach the feet the fan stays in place. Here’s the link to the ones I bought. USB Fans
I used 3M 1080 Gloss Metallic Gold Vinyl: https://www.amazon.com/dp/B007EEXXVI/ref=cm_sw_r_cp_api_fab_QUKHFb6A4TR02
Blow dryer to stretch as needed and an Xacto knife to cut. If you do the same method I’d recommend getting multiple blades as my blade is already pretty dull so I need to run n grab more blades if I find any other parts I want to wrap during my build.
If you do it, take your time and be careful. I've killed a couple of sticks over the years while removing the heat spreader. Use a hair dryer to warm them for a few minutes - this will soften the adhesive and aid in removal. Go slow and easy, and the two sides will open up like the covers of a book.
I'm not certain how RGB RAM gets its power and signal, but I can't see how that would transfer over from one stick of RAM to another. A better option may be something like this, which is designed for turning regular RAM into RGB.
Hi, please dont get from cable mod unless you have money to waste haha. I got these instead. You get 5m of it for like half(?) the price of cable mod's. Only thing is that you wont get the "clamp" to give it a cleaner look. But zip ties will pretty much seal the deal. Also, if you have the exact AIO as mine, please get size 1/2". I got 3/8 and it was too small as this AIO's tubes are slightly thicker than the ones on Corsair or NZXT.
I got a idea, check out these 2mm thin magnets. Looks like not too much room between case and cover so see if you might be able to epoxy the mags to the case and inside of the cover where there is room. If not and you can fit the case side mags, you could put these on top of the cover, being neodymium they would have enough to attract through the cover plate. I have not played with that case so what I'm saying might not even apply.
Amazon too. I have the linked one in my PC and love it. You have to tap the button twice or it is held down and the PC will turn off. Extra security. Lol
https://www.amazon.com/dp/B071H9KWL6/ref=cm_sw_r_cp_apa_i_okNxFbMNVQ48M
Just checked amazon and found some keyboard and mouse combos without a USB port. I guess I’ll just have to plug up my GC controller hub externally. You think an external setup would look good?
Heres the CPU motherboard I’m using on Amazon. It supports a 1 m.2 key slot for a Wi-Fi and Bluetooth module. Read the description for details.
https://www.amazon.com/ASRock-System-DESKMINI-A300W-Max-32GB/dp/B07QSCCRC9
You could get a adhesive rubber sheet, cut to size you want and cut a vertical center slit in it for the cables. Also amazon has different rubber grommets available so measure your hole opening in mm if that's what you want.
Yeah I say keep the hands black because the light from the other fans kinda bounces off the hands and adds cool shadows to them. I found these on amazon and you could just make a mount for the ball that attaches to the back so you couldn’t see it. https://www.amazon.com/dp/B00GOJDB84/ref=cm_sw_r_cp_api_i_2JoKEbPX22H45
Or you could use a clear ball and put a whole in both hands with a light in each and have them kinda shine thru it
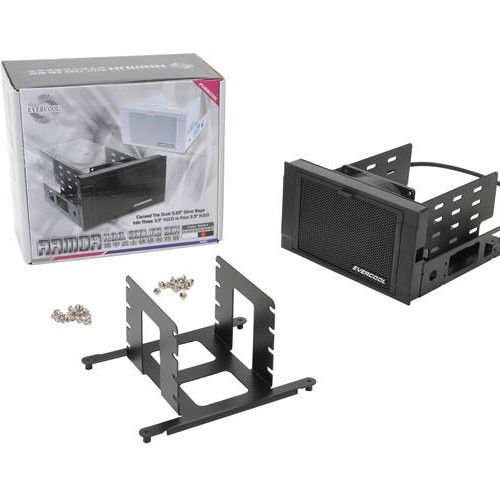
Yup, one of these: Optical drive HDD adapter
Just about 95% of double sided tape is non-conductive. You've got to look for conductive tape.
I use this for lighter jobs and this for the heavier jobs. The first one would be fine for your backplate unless it's really heavy.
DON'T use that second option. I've made jigs in the shop with that stuff and when I took them apart it literally took the veneer off of the plywood with it.
It's really not, and the best thing about that strip is that if you screw up a solder joint you can just cut that part off. You can cut that strip anywhere there's a copper joint visible.
All you need to do is cut the connector off of that power brick, the round one that plugs into the white box. Strip that insulation off and there are 2 wires in there, power and ground.
If you're like me you have something laying around with a Molex connector on it that you don't need. Cut the connector off and strip the black and yellow wires. Solder black to ground and yellow to power (you can experiment with them loose to see which is which beforehand) and you're done.
Plug that into a Molex and the other end into the white box and it will power on with the PSU.
OR, as /u/DeMoB pointed out, you can get a ready-made adapter to go from your PSU (either Molex or PCIe power) to the white control box. You'll have to be sure the round connector is the right size though. This one has three different barrel connector sizes so it might be a good option.
The best way? Drill a hole and run a cable.
Wirelessly...
Something like this: http://www.amazon.ca/High-Gain-Long-Range-Alfa-9dBi-Strongest/dp/B0035BGNWU/ref=sr_1_3/175-1512819-2637123?ie=UTF8&qid=1441502987&sr=8-3&keywords=long+range+wifi+antenna
If you're concerned with power, you can always get the power directly from the PSU and just the PWM signal from the GPU. Something like this...
Cable Matters 2-Pack 3 Way 4 Pin PWM Fan Splitter Cable with Molex Power
You can drive them off the fan header on the GPU using an adapter like this. You can safely drive at least three fans off that header, and it'll be controlled directly by the GPU.
Only RGB lights? Where's the sparkly paint job...
https://www.amazon.com/Treasure-Dell-Desktop-Computer-Bluetooth/dp/B0BB37DG68
That header uses 2.54mm spacing - you can use any cable made for that spacing.
Here's a good example. These separate very easily - with this one you'd just peel off a section of 8 wires and plug it in.
They come in different colors and lengths also.
The closest I can find is the Xencelabs Quick Keys but that feels like overkill for what I need
I like the idea. Would be sick to have something with a copper tuning helix like this: copper hexis amazon
Then as u say a central reservoir with space for airflow on in and out of the helix.
I like the idea. Would be sick to have something with a copper tuning helix like this: copper hexis amazon
Then as u say a central reservoir with space for airflow on in and out of the helix.
I like the idea. Would be sick to have something with a copper tuning helix like this: copper hexis amazon
Then as u say a central reservoir with space for airflow on in and out of the helix.
I have the same laptop and same problem. How did you solve it? My easy fix solution was to blow air with an external usb fan (like the one I linked down) rising the computer from the table allowing better heat exchange.
I also thought about mounting an additional fan+heat sink system on top of the original one (using thermal glue), replacing the the CD drive with the new fan.
I would not tinker with the existing port, pretty sure it's a one piece PCB frontpanel. I believe the only way is to drill/dremel a complete new hole for the USB-C Port (which would not fit anyway in the USB-A leftover)
yeah, so, my current plan is to figure out how to remove one of the USB 3.0 ports on the front, and use the space to stick in something like this: https://www.amazon.com/LINKUP-Motherboard-Extension-Internal-Connector/dp/B07THC8ZVF/ref=sr_1_3?crid=1E5BGHIIJSGHG&keywords=USB+3.2+2x2+header+to+Usb+c+female&qid=1666095806&qu=eyJxc2MiOiIxLjU2IiwicXNhIjoiMC4wMCIsInFzcCI6IjAuMDAifQ%3D%3D&sprefix=usb+3.2+2x2+header+to+usb+c+female%2Caps%2C84&sr=8-3
yeah, so, my current plan is to figure out how to remove one of the USB 3.0 ports on the front and use the space to stick in something like this:
No, I found this one to be prettier than any other option, even high end ones. cable on Amazon and it's cheaper than most coiled cables out there so big plus.
Let me introduce you to this:
https://www.amazon.com/gp/product/B00BIE996S/ref=ox_sc_saved_title_1?psc=1
Just use the power supply portion of this kit. Plug and play. No soldering or modification required. :D
NZXT uses a matte finish paint, so a can of Krylon or Rustoleum flat black is perfect. Sand it well, rinse or blow all the dust off, then wipe it down with alcohol to make sure there's no oils on the surface. Apply a coat of primer, then several (maybe 5-6) coats of the black paint, letting it dry for ~30 minutes between coats. Several thin coats are much better than a few thick coats.
For case exteriors, they still are prone to scratches/chips, so I always use a high quality clear coat after painting. I personally use this one. It's a little pricey, but it's automotive grade. Once dry, it's very durable.
You can use an internal USB hub:
https://www.amazon.co.uk/NZXT-Internal-USB-Hub-Multifunctional/dp/B01IFGFTJ2
I've just grabbed one myself.
I have a 3.5" monitor for my test bench that does everything I need. It is not raspberry pi but depending on what you're trying to do with it, may fit your needs and is easy to configure.
Not sure what look you're trying to go for. But you could go with This. You can cut a hole in the plexiglass for the knob and mount it to the underside so you can use the knob for volume control. As for power, You can just use power from a molex cable. Molex supplies 11 amps @12 volts and this only needs 5 amps. You can buy an adapter for this
Here's another one you can also use (this one lets you mount just the fan mount only and not have to mount the hard drive mount at all):
Decided to use LINKUP - Ultra PCIe 4.0 X16 Riser Cable [RTX3090ti RX6950XT x570 B550 Z690 Tested] Shielded High-Speed Vertical Mount Gaming PCI Express Gen4┃Univer https://www.amazon.com/dp/B08YZ5S29D/ref=cm_sw_r_apanp_TMSJqm8u5KKrE.
It's a little short, but works great.
Check this out! . It’s only ten dollars and really easy to use. I put it around my wires as a nice alternative until one day I have the extra cash for some clean cables. It’s so handy and hardly took anything I ended up using the rest on the other cables around my area.
https://www.amazon.com/NOYITO-Motherboard-Extension-Silver-Gold-Plated/dp/B07BVS3FX7/
Could get some extension cables like this which would then let you split out the different connectors. USB is separate. The F_Panel is generally just power, reset, power LED, HD LED and speaker.
It is an anti-access screw, but the threads are normal, buy a metric thread checker and a tool kit with bits to remove this abnormal screw and replace it with a button head Allen. Your pic is not clear enough to see the bit style needed for removal. Also known as Tamper proof...tool kit
Technically, you should sand to improve mechanical adhesion(actual physical intrusion into the pores or rougher surface of a material), but it's not strictly necessary with a good cleaning and tack coats. Obviously, use a high heat primer before your base coat. Since it is your first time, I'd recommend first cleaning with soap and water, then a light sand with either the green or the maroon scour pads, then a second clean with soap and water. Then use a prep spray or a degreaser. I personally prefer 1 part simple green mixed with 4-5 parts distilled water.
​
A tack, or tap, coat is one sprayed at roughly double the speed of a standard coat to create a rougher surface for future coats to more effectively bond to(chemical adhesion).
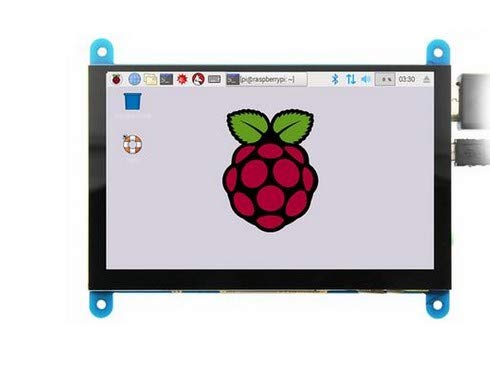
The display itself is a 4 inch LCD designed for Raspberry Pi
The problem is you physically have two separate cables the HUB and USB are distinctly their own thing, An option you could go down would be to have a 2 port USB hub internally, you can then solder you keyboards connection to the one of the USB ports and the 'HUB' port to the other with the single 'PC' usb cable being the one used to create the detachable cable, its a pretty simple idea but it should work.
this might be an appropriate hub.
Put some foam like this in front of it https://www.amazon.com/gp/product/B000ONZT5Y and you've got yourself an air filter. Did it with two 140mm fans on my custom case and it works great.
It is a 7in touch screen for a raspberry pi that I had from a previous project I never got around too.
Yes. Window etch spray or window frost glass spray. Works great. You'll have to layer it (it's very subtle with only one layer). Link for attention, cost a third of that at the hardware store. https://www.amazon.ca/dp/B0009XCKBA/ref=cm_sw_r_apan_i_Q8P8TV705HESYWJVV0VC
I found them on Amazon from the company EZDIY they are inexpensive and you can't see the individual LED's.
I'd recommend a heat resistant paint marker for a cleaner look and less mess once the adhesive heats up. Here's one in white but you could go with whatever color you want.
Some ideas so far:
Turkish Lamp
IPS Wimaxit 14inch Portable Touch Monitor 98% sRGB 1920x1080 FHD External Display with Mini HDMI Input/USB-C Port/3.5mm Audio https://www.amazon.com/gp/product/B08JLWNX22/ref=ppx\_yo\_dt\_b\_asin\_title\_o00\_s00?ie=UTF8&psc=1
Outus 30 Pieces 67 x 20 mm Silicone Thermal Pad Reusable Thermal Conductive Silicone Pad Each Thick 0.5/1/ 1.5 mm Pack of 10 Pieces for GPU Heatsink CPU Chip Heat Conduction or LED Heat Conduction https://www.amazon.com/dp/B094PWW9TM/ref=cm_sw_r_apan_i_0ZQN1QNM40B3YSV7D4MK
Cheap and can be cut to size.
As long as they squish and are not torn , should be fine tho.
I got this little Silver Stone thing that'll remote start your pc with a fob. I bet you can deconstruct the fob and solder a different button and switch so that it would start with that thing in the post. Also, it'd be wireless, so you can place it anywhere, within a certain distance of the pc.
I think This is the one.
SCCCF 3x90mm 92mm Graphic Card Fans, Graphics Card Cooler, Video Card VGA Cooler, PCI Slot Fan GPU Cooler https://www.amazon.com/dp/B09294VVTT/ref=cm_sw_r_cp_api_i_D3BDDEJ2R7H06YNRXV00
Lol this thing
Put it on wheels: STALWART Dolly Cart – Durable Plastic Multi-Purpose 4-Wheel Mover's Dolly Cart for Home, Shop, or Garage – 1,000 lbs. Capacity https://smile.amazon.com/dp/B08XWG6PGK/ref=cm_sw_r_cp_api_i_5PRXAFA6DERZ69W9NS9Q?psc=1
get this hole saw bit and find a smaller drill bit to start a pilot hole. Measure out how where you need the spacing for the holes. use the small drill bit for pilot hole as well as the screw holes the follow that up with the hole saw to cut the big holes. Then use these fan grills to protect fan and fingers. I suggest using the noctua rubber gromet mounts or else fanagle some zip ties to pressure lock them in place. I also agree you should test all this out on another piece of plexi first.
In regards to acrylic, the most important tools you need are fairly inexpensive. Most importantly, you'll need an acrylic cutter, that's needed to properly score it to make clean breaks (dremel works too but it's hard to get perfectly straight lines). Make sure you either leave the backing on or cover it in painter's tape before scoring/breaking, and you'll also need either some sandpaper or a file to file the edge down after you break it.
But the 3d model approach really is for the best. If you find yourself struggling to do it, you might be able to find someone to modify it to your specifications on fiverr for cheap.
You want a hot-swap sata backplane, like this?
StarTech.com 3-Bay Hot Swap Backplane for 3.5in SAS II/SATA III - 6 Gbps HDD - Aluminum Trayless Mobile Rack Backplane (HSB3SATSASBA) https://www.amazon.com/dp/B00HS23QZO/ref=cm_sw_r_cp_api_i_2T7VGZZSEJ5PWW00FEWN
I used a Dremel to cut a hole out of the case that was just smaller than the screen so the case acts as a bezel.
I then placed the screen on the inside of the case and fixed it in place with double sided tape some velcro.
I ran the cables through the case and out a pcie slot, I used a Dremel to cut a notch out of the pcie cover to allow these cables to pass through neatly and back into the GPU inputs.
Raspberry Pi Screen, ELECROW Touch Screen Monitor 5 Inch HDMI Screen Display 800x480 Compatible with Raspberry Pi 4 3B+ 3B 2B BB Black Banana Pi Windows 10 8 7 https://smile.amazon.co.uk/dp/B07PQQGP7R/ref=cm_sw_r_apan_i_38DTBH7868BHBGZQHN88?_encoding=UTF8&psc=1
This is the exact screen I used