
What are
/r/Arcade1Up's
favorite Products & Services?
From 3.5 billion Reddit comments
The most popular Products mentioned in /r/Arcade1Up:


The most popular Services mentioned in /r/Arcade1Up:
Retropie
balenaEtcher
Visualping
µTorrent
Tixati
Cambridge Dictionary
Rakuten
HandBrake
Google Photos
Facebook Marketplace
ImgBB
PuTTY
PortableApps.com
Lakka
OfferUp
The most popular reviews in /r/Arcade1Up:
I want to preface this by saying that at the end of the day, if you're happy with your project, that's all that matters, so congratulations on that, and please feel free to disregard my comments entirely.
I have to be honest here though, this is just completely baffling to me. At this point, it kind of seems like you just gutted what I assume was a perfectly fine Rampage and reduced it to a glorified monitor/wheel stand, so I don't really see why one wouldn't just get a ready-made racing cockpit (such as this) to begin with. Seems a lot easier, more fit for purpose, and much less destructive.
At the same time, I do understand the appeal of a DIY project and doing something your own way, so like I said, as long as you're happy with it, that's all that matters. You do you, and enjoy.
Click here for the riser I used. It’s actually a washer, dryer, fridge stand but it is a perfect fit for the riser and it’s super stable. It gives it about a 5” lift and is fully adjustable for size and height.
Gaming pc running bigbox inside the cab. the screen for the marquee is this one- VSDISPLAY 14.9" 14.9 inch... https://www.amazon.com/dp/B07QGBL568?ref=ppx_pop_mob_ap_share
I’m using the built in marquee system in bigbox, I had to find some marquees for some of these games and mess with the xml files in the themes folder but I’m happy with how it came out.
I was able to drill deck protector using step bit without cracking it. I taped the deck protector to the deck and left the stock buttons on to keep the deck protector from moving. I drilled through the protector and deck. The new buttons will have to sit on top of deck protector.
I’m no wood worker and have little experience, but I found this mod fairly easy. I did put masking tape before drilling as I’ve seen suggested. I also had to stop drilling about 2 times per hole because the acrylic would wrap around the drill bit like a string. Stopping/starting drilling didnt result in any cracks.
I would recommend this drill bit for anyone drilling a few extra holes spaced apart. I think it would be difficult to not crack deck protector using this bit to do a SFII-type layout where you’re drilling holes really close to each other.
Neiko 10189A Titanium Step Drill Bit, High Speed Steel | 7/16" to 1-1/8" | Total 12 Step Sizes. https://www.amazon.com/dp/B000RP82F8/ref=cm_sw_r_cp_api_glt_i_E6831D8MV9J217P2ZVTT?psc=1
When you install just make sure you flip the clear plastic part under the joystick to the 4 way. My was on the 8 was directional setting that you’d want for fighting games. Games like Ms. Pacman gotta play on the 4 way setting.
SANWA JLF-TP-8YT Joystick Red Original - for Arcade Jamma Game 4 & 8 Way Adjustable, Compatible with Catz Mad SF4 Tournament Joystick (Red Ball Top), Use for Arcade Game Machine Cabinet S@NWA https://www.amazon.com/dp/B08WWSX6JL/ref=cm_sw_r_cp_api_glt_fabc_1RPZ6NJ9W8NSWNFDBW0P?_encoding=UTF8&psc=1
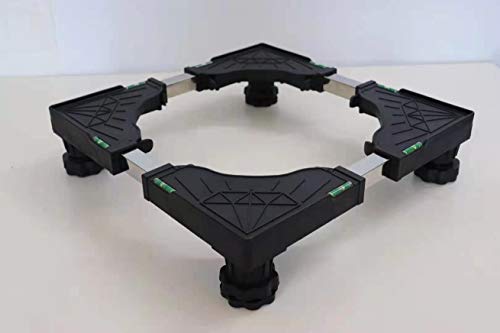
I'SMARTMOON Mini-Fridge-Stand 4 Strong Feet,Adjustable Dolly Washing Machine Stand Base,for Furniture Portable Refrigerator Dryer Stand Black… https://www.amazon.com/dp/B08SKV5PVM/ref=cm_sw_r_cp_api_glt_fabc_18GE7D9VM9PFCY8DPES6?_encoding=UTF8&psc=1
Not sure if anyone else has wanted/needed a little more height on any of their cabs, but I just put my Pac-Man legacy cab on this and it’s a great improvement! It was easy to slap together, and it goes with the black riser. I wish I had done this sooner.
I installed a power inlet module so you can use a standard power cable on the exterior of the cabinet. The inlet module I rewired to a power strip so everything stays inside the cab and it has a nice, flush look on the outside.
I posted about it here, though it seems to not be a popular choice.
If you are putting a Raspberry Pi in your machine, Whenever you make any type of significant process, make sure to back up your card. I can't stress how many times I had to reflash my card due to a novice coding addition that pretty much stopped me from progressing. If you are drilling additional buttons, Take your time and measure your holes, do not rush it. Remember you are sticking the buttons in there with washers, make sure there is plenty of room for those as well ( I almost screwed up my Raph buttons by drilling the holes too close together). Don't be scared to improvise as well, I've modded my TMNT cabinet to the ends of the earth (See my profile). Once I learned how to drill holes, I became power tool crazy and started drilling holes all over the place and making some cool mods on the way. Also just a tip, If you want to replace the power switch, you can use this one (Ofcourse if you're putting a raspberry pi in it only), It fits perfectly in the "on/off" hole.
Edit: Grammer
A1up said orders will be available when the cabinets hit land from overseas and that should be around late Jan., early Feb.
I use https://visualping.io/ to have it email me when the website changes and orders go live. If you use the free checks they give you, just set the pings to something like checking 2-3 times a day or you will run out quick of the free checks if you do every hour.
You just need a client to start. I have been using utorrent for the past 10 years with good results. https://www.utorrent.com/
There are others to look at so feel free to research it.
After you install the client click on the torrent link and it will show a pop-up from the torrent client asking if you want to download it and where you want it downloaded too. Once that is finished just wait for the download to finish.
Once you are done you can decide if you want to leave the torrent up running in the background for other people to use for a period of time or shut it down.
One thing to consider:
If you have internet that is slower it may be a good idea to start your download in the evening to run overnight.
Good Luck!
I'm using these as I stand at 6' , for both my legacy cabs.
https://www.amazon.com/gp/product/B07TQ82C4V/
​
Beyond the height, it give me a nice little space for the first 1/4 of my foot to go under, while I play, letting me stand closer to the cab.
But I also like the one you linked to for the wheels. I have my cabs in a back room but want to bring them out to the living room for get togethers, and had no easy way to move them. Your item fits that bill nicely to move them across my house / across the 1st floor.
This is the one I got, and I love it. Holds small bottles/drinks, right up to a big Double Gulp from 7-11. Highly recommend, and easy to install.
Camco Adjustable Drink Holder-... https://www.amazon.com/dp/B000EDQR4G?ref=ppx_pop_mob_ap_share
Universal Mobile Base Fridge Stand with 4 Strong Feet Multi-Functional Adjustable Base for Adjustable Dryer, Washing Machine and Refrigerator (4 Strong Feet) https://www.amazon.com/dp/B07SDQG31W/ref=cm_sw_r_cp_api_glt_fabc_1VDN8YRWV8AQSXCS17KM
This is another option that seems to work well.
a GRS encoder works and it operates as a mouse.
https://www.amazon.com/Arcade1Up-12-1-Interface-Board/dp/B07NKJ3SKH
https://www.reddit.com/r/Arcade1Up/comments/jcm7ay/golden_tee_trackball_plugs_into_grs_interface/
Barrina UV LED Blacklight Bar, 22W 4ft, T5 Integrated Bulb, Black Light Fixture for Blacklight Poster and Party, Fun Atmosphere with Built-in on,Off Switch (4-Pack) https://www.amazon.com/dp/B074N26GJT/ref=cm_sw_r_cp_api_glt_fabc_XdcdGb6WYV1WV?_encoding=UTF8&psc=1
And
I am in the middle of converting a spare bedroom into an arcade. I still have some things to do (buy rug, shades, and lights) but I wanted to share this cool pac man wall banner I got from amazon.. super cheap and it adds some flair to the arcade..
Looks like it should fit if you mount it to the back door after turning so that the VGA adapter points upward !
OR maybe using a VGA right angle connector - https://www.amazon.com/SIENOC-Converter-Adapter-Connector-Monitor/dp/B00MXT9OG2
I got this for my conversion. you can change it from 4 way to 8 way by pulling up and twisting. I love it for my 60 in 1 cab. Edit to add: sorry I missed when trying to reply to a different message but the information is still correct.
Bought the top buttons separately, used carbon fiber vinyl wrap from Amazon too cover the board: VViViD XPO Black Carbon Fiber Car Wrap Vinyl Roll Featuring Air Release Technology (17.75" x 5ft) https://www.amazon.com/dp/B00YLFUFLY/ref=cm_sw_r_cp_apa_i_s6prCbG68WMD9
I got it working .. outside of a centering issue .. its great
https://retropie.org.uk/forum/topic/28665/mame-deadzone-with-analog-controller/25
So after reading your wonderful write up on your mod I was inspired to search your problem. If I understand correctly, you also have to specify the resolution in autostart. I found this recent thread:
https://retropie.org.uk/forum/topic/26651/rotating-emulationstation-gui-for-vertical-screen
It's easy to add roms/games.
https://retropie.org.uk/docs/First-Installation/#samba-shares
Scraping for artwork and metadata (descriptions, num. of players, etc.) is the tricky part. If you're only adding a handful of games, I'd add that stuff manually.
The specifics of scraping or adding manually will depend on many things that I will summarize as "depends on the wolfanoz image". I don't use those images, so I can't for sure. However, I tried one when I first started and imagine some of this will the same. Here are my guesses:
- artwork (screenshots, videos, etc.) will be in a subfolder of the rom folder. Google this stuff for your new game and put it in the appropriate folder.
- gamelist.xml will be in the rom folder. take a look at them and see how they are structured. Make a backup copy of it before you start messing with it. Copy/paste a game listing already in the file and edit it to match your new game.
Quick way to do it:
Start a game of the system you want to remap the buttons
Invoke RGUI (Select+X with player 1)
Go to Quick Menu and then Controls
Configure the buttons the way you want
Select Save Core Remap File
OR, if you want to save this remapping for the current game only, select Save Game Remap File
Pulled from https://retropie.org.uk/RetroArch-Configuration/
from what I can tell, you should also map the Left shoulder and Right shoulder button, looks like you skipped those. Be sure to mapp A, B, X, Y, LS, RS, Start, Select, and Hotkeys (use same button as Select), and the joystick directions. Select is usually the coin button. Map the hotkey to whatever button you map the select button (I did this to the new button that I added like ETA), the player button I map as start.
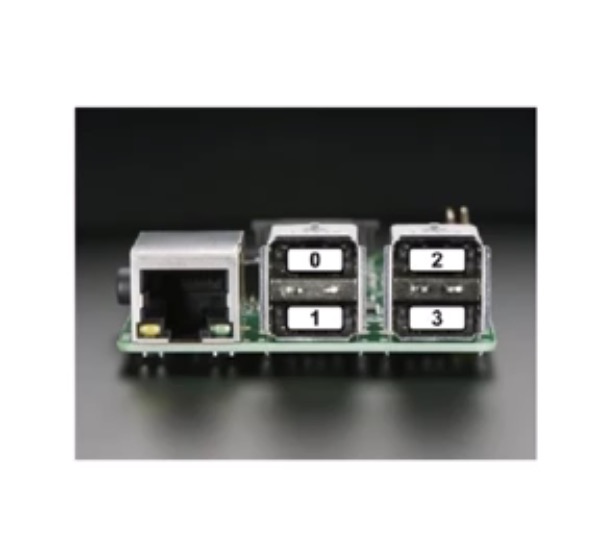
First off, you'll want to make sure you plug your USBs controller this order like the picture. For some reason, my USB controllers were reversed, my player 1 was recognized as player 2, so I plug my player 1 into USB port 2 and player 2 into USB port 1, or whatever way it works for you, just make sure to use port 1 and port 2, see picture below for ports. But than again, this all depends on what images you're using, sometime the author will write player 1 as port 0 or in my case port 1, confusing I know.
https://retropie.org.uk/forum/assets/uploads/files/1487206306473-image.jpeg?v=i2v8u91272g
You may want to test with another game as well like SF2, so you know if all buttons work or not.
Here's an article about retropie control and what you can do with the hotkeys
https://github.com/RetroPie/RetroPie-Setup/wiki/RetroArch-Configuration
Go to arcadepunks dot com. Find the pi image you like. Download it. Then go to:
Download that to write the image to the sdcard.
Then, like most things: insert and enjoy.
This is the strip I use on all of my cabs and the color is remembered. It's also 9ft so it goes perfectly around the entire back panel with a only a little excess to cut.
I just bought a pack of these round stickers on Amazon and they match well enough for my 5 cabinets
Also for anyone looking for these they are pretty cheap. I originally wanted TMNT POPs since I saw someone put some on their cab, but they were pretty expensive. https://www.amazon.com/YongEnShang-Teenage-Leonardo-Michelangelo-Donatello/dp/B07QVLYRL3/ref=rvi_1/141-8846941-5932017?pd_rd_w=l8uie&pf_rd_p=c0296674-5a83-4ad6-b035-0702d2b359df&pf_rd_r=277KX21MHBV4NQ78AK2N&pd_rd_r=9bda073f-a632-490f-8...
Not sure what you’re looking to spend, but this kind of fits the theme
BOB'S BIG BOY Vintage Padded Swivel Bar Stool https://www.amazon.com/dp/B00P3VQ33O/ref=cm_sw_r_cp_api_glt_fabc_Y2M6N9APG2752FAWG82P?_encoding=UTF8&psc=1
Unfortunately they are out of stock again but they seem to actively restock them from what I read so you'll have to just keep an eye out.
https://www.amazon.com/dp/B08VJ8WRBK/ref=cm_sw_r_cp_apa_glt_fabc_PTW4TZEPD8BHGY9A6YQM
Get it and get this as well as a regular a1up riser:
Raises an a1up cabinet up another 4 or 5 inches use it on all mine
Yes I dont think I will screw in the riser. I saw this one which seems to be best of both world
https://www.amazon.com/dp/B08JX5LX5Q/ref=cm_sw_r_cp_awdb_imm_DTQ7SYSFKMC15JD6N8YG
But the review varies...
You can get these on amazon - they are under car/rv cup holders:
Ogrmar 2PCS Adjustable Folding Drink Holder/Adjustable Cup Holder for Marine/Boat/Caravan/Car/Trucks/RVs/Vans (Black) https://www.amazon.com/dp/B07XCBY31J/ref=cm_sw_r_cp_api_glt_fabc_GBM3H636YXQ34JWJS89J?_encoding=UTF8&psc=1
I use them on my Recroom Masters cabinet and they’re great. When they’re folded you don’t even see them!
Oh, but I should point out that for a Gen1 countercade, you might be able to go with a larger screen, like this one. I ordered that one first but had to send it back because it was just about 2 cm too tall for my Gen2 cabinet. But I understand the Gen1 cabs are about 3 inches taller, so it might be perfect for that.
I've got a v2 Galaga countercade on its way from eBay, and I'm hoping to put this 12" monitor in it. Who knows, maybe I'll make a video!
No, the cloths for eyeglasses should be okay, I'm talking about the microfiber cloths like these.
Paper towels have fibers that will also cause swirling on the plexi, so yeah, whatever the smoothest cloth you have that's non-abrasive is fine.
The monitor would have to be powered by its own power cord as you wouldn't want to power that off the power supply but the marquee & amp could always be powered by the pc. The monitor would turn itself off and on automatically when it detects the pc turns on/off so you wouldn't have to manually power it on/off anyways.
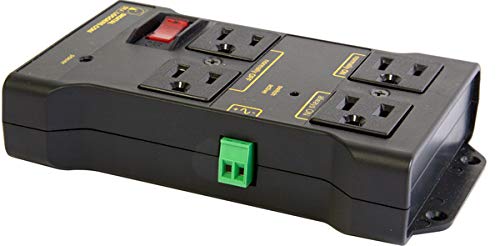
You can get a power saving surge protector which will turn on/off the other devices when the pc powers on/off like this one or this one. You would just plug the pc into the control outlet and the devices you want to turn on/off with it on the switched outlets.
You will still want to use that momentary power switch I linked to turn on/off the pc itself vs slapping an external power button somewhere on the cab if you want to have it all function like the stock power switch does.
I bought it on Amazon here: https://www.amazon.com/gp/product/B075FC4M29
The rims are 65" high, and my ceilings are 85". However, I did place the machine so that the hoops are in-between my exposed joists for even higher clearance as the boys will arc their shots 90" or so. This is why the basketball is against the wall and not the skeeball - the ceiling under the basketball is more suitable.
If you have 8 foot ceilings, you're good.
Just an inexpensive tin sign from amazon. https://www.amazon.com/dp/B08THD481N/ref=cm_sw_r_cp_apa_glt_fabc_J32C11708M6RYPDZ3PF8
It isn't embossed, unfortunately. It's a printed graphic overlay on a glossy white metal sign. But, I am not a fan of the printed coin door.
My brother found this sign for me and I've always liked that version of the Pac-Man art and am happy to have a way to incorporate it on my cab.
The sign will attract a magnet, but I didn't have one strong enough to keep the sign in place by putting the magnet on the other side of the kick-plate. So I used a couple of 3M Command Z strips.
I think it’s this one:
Game Console Dimmable LED Neon Signs (Custom Options: Color, Size, Electrical/Battery Powered, Wall Mounted, Desktop Type, Hanging in a Window/Ceiling) https://www.amazon.com/dp/B0834YNXZY/ref=cm_sw_r_cp_api_glt_fabc_8MJ7W5HJP816GEN7KTVK
Was a Xmas gift from my wife 😁
I bought a 12v 2a power supply on Amazon. Cut the connectors off, stripped the wires and spliced it together. Super easy and worked perfectly.
Like a few others here, I'd also say to add risers. These are the ones I use for my SF & Pac-Man cocktail cabs
https://www.amazon.com/dp/B07S9RSXYB/ref=cm_sw_r_cp_apa_glt_fabc_2NPTWZE007J1X2RG4CTJ
The newer machines have a usb Jack on the board to do updates. I bought a 6 inch usb A to micro usb to do an update from a thumb drive to the a1up. I read you can buy usb led lights and just plug them into the adapter for power. When the machine comes on, the leds come on and backlight the machine. link to adapter
I added led lights all around the room that change colors, where the walls meet the ceiling, and those plug into a wall outlet (my smart outlet)
If you’re still in the Market for signs, real neon adds so much. The light bathes the room makes your LED neon seem that much more real. I’m sure you can find US distributor but I went with this above my Star Wars machine:
Saw it on here somewhere they used something like this
Attached it to a piece of wood and then secured the wood to the cabinet.
Alternatively you could just get a piece of wood and make holes and mount the monitor directly to the wood then secure the wood to the cabinet, I think they went with a wall mount because less measuring involved.
Thanks for your response!
Hmmm your reasoning is strong. Would you recommend the following joystick replacements for the MvC cab:
The issue is mostly for those 6ft and above.
However, using one of these raises the whole cabinet up by just about 5 inches and eliminates the perspective issue:
I have way too many already but you can get them on Amazon. You can even get 3 or 4 ended ones for led buttons and what not.
Edit to add: search barrel splitter but here is a link to a 2 pack of 2 ended ones.
just the standard washer stand from amazon.
https://www.amazon.com/dp/B07RMX6MBR?ref=ppx_pop_mob_ap_share.
it started with 1 for BBH, then 3 more, then 5 more, then 3 more.
the front and sides are hand cut foam board with some rubber U channelling on top to even it out and for a sturdier look. mounted with gorilla mounting tape.
YULEMY Universal Mobile Base Dorm Fridge Stand Washing Machine Base with 4 Strong Feet Multi-Functional Movable Adjustable Base for Dryer, Washing Machine and Mini Refrigerator https://www.amazon.com/dp/B07VZTC7S6/ref=cm_sw_r_cp_api_glt_fabc_22RGZ6ERTKSM06KB8G5W?_encoding=UTF8&psc=1
For all the plexiglass whiners just get 4 of these, screw them into the side, and have people set their drinks on them. https://www.amazon.com/Camco-44043-Adjustable-Drink-Holder/dp/B000EDQR46?th=1
Use the screws tho cause the adhesive is junk. I have them on all 10 of my stand up machines.
There is a barrel adapter your marquee should have shipped with that will let it fit in the small PCB power out.
I am not sure if the micro usb supplies 5v or if that would be enough to power the marquee and/or buttons. If anyone has experience with this please chime in.
Here is what I have encountered. I bought a TMNT light up marquee and powered it through the top barrel power out. All was fine. I later purchased an LED button set and decided to split that barrel power out to energize both the marquee and buttons whenever the unit is turned on (and turn off when it's not on). I simply bought a barrel y split and hooked up both devices to that single power out. It works well, HOWEVER, I notice that the marquee is a little dimmer when I'm piggybacking the buttons off it. It's subtle, and still looks good, but it's definitely dimmer. I am considering trying to energize either the marquee or buttons through the micro usb port.
I am thinking about using one of these:
Hmm could go with a HDMI to DVI Converter with Audio Out. Either as a separate converter or sometimes there are ones that have the audio out built into the cable too.
https://www.amazon.com/TNP-HDMI-DVI-Converter-Audio/dp/B01MQYTUAK
Or buy an lcd driver board for the Dell monitor that supports DVI and has audio out.
At the suggestion of someone else on here I tried these out. The look good in each corner, and give you just enough height to make it more comfortable. https://www.amazon.com/gp/product/B07TQ82C4V/ref=ppx_yo_dt_b_asin_title_o01_s00?ie=UTF8&psc=1
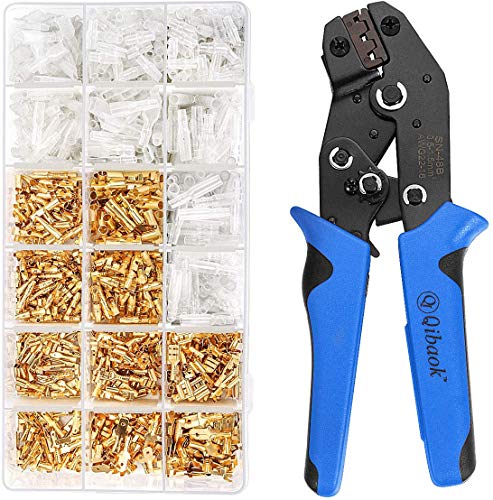
I recommend getting this kit. It has the crimping tool and all the female terminal connectors you'd need for HAPP or SANWA joystick and button installs.
Just to add to this, Bliss makes a smaller USB version called Starport (for only $20) which looks amazing as well. I have two in my game room.
Did you replace the stock usb zero delay controller board when you swapped the buttons? IE: https://www.amazon.com/Reyann-Arcade-Encoder-Joystick-Fighting/dp/B00UUROWWK/ref=sr_1_5?dchild=1&keywords=zero+delay&qid=1611331870&sr=8-5
VSDISPLAY 14.9" 14.9 inch... https://www.amazon.com/dp/B07QGBL568?ref=ppx_pop_mob_ap_share
This is the one I got. A little pricey, but I found my cab on Facebook for $100. Since I had planned on buying one at retail price, I figured I could justify the extra cost haha
If you want to keep the bearings in top shape I have been using this on my trackball bearings and makes a world of difference https://www.amazon.com/gp/product/B00CVUR8S4/ref=ppx_yo_dt_b_search_asin_title?ie=UTF8&psc=1 after using this oil the bearings are much quieter and silky smooth.
Haven't ordered buttons from them but the eg starts (on amazon) buttons are a little bit easier to install as they don't have the copper two prong ends (with a positive and a ground like the older sanwa style), they have female 3 pin plastic connectors which are a ton easier to plug in and remove if any issues occur. I would recommend these over what you're suggesting unless you are dead set on supporting them. 🤷🏾♂️🤷🏾♂️🤷🏾♂️ https://www.amazon.com/dp/B01N09SO20/ref=cm_sw_r_cp_apa_i_IMH-FbNZ1Z9TG
You would need to cut the cable running from the stock power supply going to the cabs or find a replacement with the same barrel connector and wire it up to the Yellow (+12v) and black (Ground-) wires on the pc power supply. You could also use a molex to 12v adapter like this https://www.amazon.com/CRJ-4-Pin-Molex-5-5mm-Adapter/dp/B07TZCTDSK/ref=sr_1_4?dchild=1&keywords=molex+to+12v&qid=1610130792&sr=8-4 to make the cab wiring detachable from the pc power supply if needed. That power supply only has 3x molex connectors so if you wanted to connect more than 3 cabs you would need to splice into the yellow wire for some of them. That power supply has 49a on the 12v rail so it would be overkill but have plenty of headroom for other cabs in the future.
To turn the pc power supply on the Green wire in the 20+4 connector would need to be grounded to one of the black (ground-) wires. You could wire a switch inline between the green and black wire to control it or just splice them together and use the power switch on the back of the power supply to power it on and off.
I had to wire the on-off switch to my Raspberry Pi using some ribbon cables and download a script to monitor for changes.
I'll tell you from experience: Don't bother with the replacement one on Arcade1up's site--it's better than the original spinner but it's far too sensitive and no way to fix it
Just go with this one (you can also get a replacement black cap instead of the default silver)
https://smile.amazon.com/dp/B07P5WJ7BC/ref=cm_sw_em_r_mt_dp_DqJ3FbRH7QJ5T?_encoding=UTF8&psc=1
It's plug n play.
Does not run on battery
Your phone has more photo filters
Advertised as capacitive touch, yet no pinch to zoom or other capacitive features
LED light ring is weak
No security for uploading via QR code, but I haven't checked to see if there is any sort of timeout
This is $80 and can snap much better photos using the cameras on your phone and identical ZINK paper: https://www.amazon.com/KODAK-Smile-Instant-Digital-Printer/dp/B07NWZGCZ9/ref=mp_s_a_1_4?dchild=1&keywords=zink+printer&qid=1607635134&sprefix=Zink&sr=8-4
The printer is decent
Pass.
There are different models of the converter. While ETA Prime means well and puts out some good stuff, he doesn't always cover everything you need to know. For instance, the Costco Pacman uses a different screen model then the Walmart one, therefore need different converters even though it's the same game. On the back of the screen, there should be a sticker down in the corner that shows the model number. For instance, the Costco Pacman's screen is part number DV170YGM-N10 which needs this one: https://www.amazon.com/dp/B07ZVMWPZP While Walmart's Pacman uses M170ETN01 1 which needs this one: https://www.amazon.com/dp/B07JCQCQH6
The GRS spinner will work with the Atari 12-in-1, I have it on mine, you just need an interface interface card for it to work. https://smile.amazon.com/Arcade1Up-12-1-Interface-Board/dp/B07NKJ3SKH/ref=sr_1_10?crid=25M6MS8NNXARB&dchild=1&keywords=grs+spinner&qid=1605823213&sprefix=GRS%2Caps%2C173&sr=8-10
Can’t you turn the gate inside to 4 way? If not buy one.
https://www.amazon.com/SANWA-GT-8F-Restrictor-Plate-Joystick/dp/B07GDJHBKC
While you are at it you should change the spring.
You can get a plain plastic "racing seat" on Amazon for like $80
Edit: actually even less than that:
I got this mag stick joystick. I really like it, it has a short “throw” if you will but able to switch between 4 and 8 way on the joystick. So it works for everything. Centipede and millipede are playable with 8 way but I have the 12 in 1 so they are both on that so I turned them off. I opted for no trackball for that reason but still. Like 2 games use it so I’m a no. With dupes and I deleted off those there are 50 games on the 60 on 1. If we ever open up again this one is great for entertainment. The raspberry pi is great (I have done that too) but it isn’t as user friendly for people who don’t use it every day. The 60 in 1 is pretty much all the big ones. There are some misses but it definitely feels like the arcade I went to as a kid in the eighties in one cabinet.
Edit to add: You learn something every day I play the crap out of Gyruss and did not even realize it did not use a joystick in “real life” until reading other comments, so it definitely does work well with the 8 way joystick on.
Second edit to add: Gyruss used a joystick.
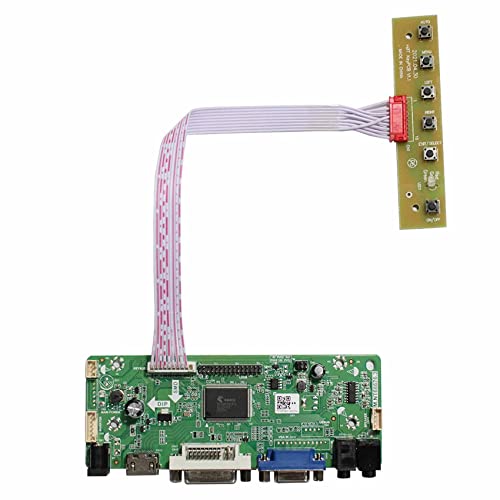
Here is a link to the LCD controller board I got after wasting time on a broken one I got from eBay. This Amazon one came in "real" packaging and works as intended.
VSDISPLAY HDMI VGA DVI Audio LCD Driver Board For 17" 19" M170EG01 LM190E02 1280x1024 4CCFL 40Pin LCD Panel https://www.amazon.com/dp/B01N4FL014/ref=cm_sw_r_cp_apa_7fqWBbK5VAYMV
Thanks for the info!
Did you happen to purchase your speakers for the stereo upgrade on amazon? If so, did you just go with some car speakers, maybe something like the JVC-CS-J620?
using eta prime's hdmi control board link for amazon this is the pair of speakers that comes up as the one most customers bought when buying the other parts of the cabinet mods.
​
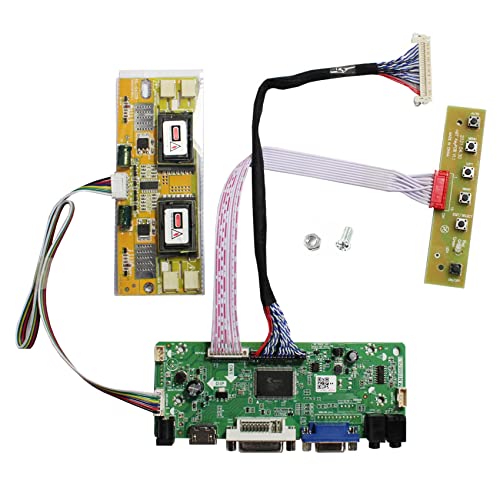
This is the same same monitor that I have installed in my Pac-Man cab. I ordered this lcd controller board from Amazon (just arrived today). https://smile.amazon.com/gp/product/B07JMBSHGL/ref=oh_aui_detailpage_o05_s00?ie=UTF8&psc=1
Same thing happened to me. Bought the wrong controller board and it messed up my monitor. I tried plugging all of the original parts back in and got the same black screen. Had to contact Arcade1up for a new monitor which took about 5-6 weeks to arrive. Bought this board from amazon and everything works great now. Worked for monitor M170ETN01.1
HDMI VGA DVI Audio LCD Controller... https://www.amazon.com/dp/B07JMHZSKL?ref=yo_pop_ma_swf
40th anniversary pacman would have the speakers up in the marquee, they wouldnt connect to the encoder. They use a 3.5mm cable hanging down from the back of the marquee that plugs into the PCB attached to the monitor. you could run a 3.5mm cable from the PCB and wire it to the speaker on the control panel if you are using an older gen 1/2 cab but you would only be able connect a single speaker where the stock 40th would be using 2 speakers.
They're listed on Amazon but are currently unavailable, probably to replenish stock. I got mine from the initial offering before the amazon store opened and it was $60. Definitely worth it! Makes a huge difference. It's super easy to install and no drilling or additional hardware is needed. The kit comes with everything you need. https://www.amazon.com/dp/B07P5WJ7BC?ref=myi_title_dp
ebay.ca has several if your model number is the original M170ETN01.1
DOn't see any listings for a Canadian source since they all come from CHina but shipping from CHina to the US usually takes only 3 weeks and US sources charge at least double the price normally just for reshipping it to you after they receive it.) The US pricing is probably going to increase for awhile with all of the 25% tariffs going on between CHina and the US right now (since it is costing more to import the vendors will be increasing the prices to cover their costs ! )
ALso for Amazon if you take the link for amazon.com and just change .com to .ca it will usually come up with the same product listing on the .ca site ! ie. https://www.amazon.ca/VSDISPLAY-Driver-M170ETN01-1-1280x1024-Backlight/dp/B07JCQCQH6/ref=sr_1_3?keywords=M170ETN01.1&qid=1557759687&s=gateway&sr=8-3
>Glens Retro Show spinner
this one?
https://www.amazon.com/ThunderStick-Arcade-Spinner-for-Arcade1Up/dp/B07P5WJ7BC
BTW you'll wanna replace the spinner for Tempest. Link below to the best one made for that control panel and it's plug n play. Also including a link to different color spinner in case you want a black one instead of the silver one that the spinner kit comes with.
So I have no clue how to solder, so I bought a pack of these connectors.
https://www.amazon.com/gp/product/B07KWKF589/ref=ppx_yo_dt_b_search_asin_title?ie=UTF8&psc=1
I just connected 2 of the yellow wires to the speaker and then plugged them into a Kinter amplifier.
For a 3" speaker I think it sounds great! Definitely an improvement over the stock speaker. The bass can get a little distorted at very high volumes: however, adjusting the amplifier's treble, bass and volume helps this a lot. I have my treble and bass set to about 25% each and the amp volume at 75%.
Then just adjust your retropie volume to where you want... I have my volume switch set to to 75% for the lower volume and 92% for the higher. IMO this gives great sound all around.
Ahh... now I understand what you did. I may give that a try if my other methods don't work. What I'm going to try first is using 2 inch black Gaffers Tape to close up the back of the lit marquee. It's a non reflective tape often used for stages and sets and it's easy to work with and stands out less than electrical tape.
https://www.amazon.com/gp/product/B01FZRLPQK/ref=ppx_yo_dt_b_asin_title_o00_s00?ie=UTF8&psc=1
Yup. It's this one to be exact:
https://www.amazon.com/gp/product/B01DOFD0G8/ref=ppx_yo_dt_b_asin_title_o05_s00?ie=UTF8&psc=1
Not sure how much Golden Tee actually utilizes the GPU, but either way it runs like a champ!
$40 pedals!! https://www.amazon.com/gp/product/B0753CSGTK/ref=ppx_yo_dt_b_search_asin_title?ie=UTF8&psc=1
​
I also jammed a steering wheel on a GRS spinner, it works extremely well!!
Hope it works out! 1 inch corner brackets weren't quite long enough to screw flush to the side panels, I'm going to try these which are slightly longer and are adjustable. https://www.amazon.com/Cyful-18x18x30mm-Adjustable-Brackets-L-shape/dp/B07S25BH38/ref=sr_1_2?dchild=1&keywords=slotted+corner+bracket&qid=1602371454&sr=8-2
So 4 encoders for 52 or 4 encoders, buttons, or joysticks for 110. I'd splurge if you can. The LED buttons look great and the joysticks will last longer. Here's what I got: https://www.amazon.ca/EG-Joystick-Controls-Illuminated-Raspberry/dp/B071WC7TGK/
double check your model number matches but it should be this one https://www.amazon.com/VSDISPLAY-Audio-Controller-Board-Arcade1UP/dp/B07ZVMWPZP/ref=sr_1_3?dchild=1&keywords=tmnt+arcade1up+lcd&qid=1600540341&sr=8-3
I’m thinking of buying this other brand called Creative Arcade
It’s pricy AF but it has all 60 games I want, the screen is deeply recessed in cabinet, the control button area has a slope, and a trackball is included
https://www.amazon.com/Creative-Full-Size-Commercial-Refrigerator-Trackballs/dp/B07W15ZLDM https://www.amazon.com/Creative-Full-Size-Commercial-Refrigerator-Trackballs/dp/B082XM8Q4M?ref_=ast_sto_dp&th=1&psc=1
It looks like something similar to these may work.
180pcs Fully Insulated Wire Crimp Terminal Nylon Quick Connectors Wiring Male/Female Spade,YuCool Disconnect Electrical Connectors Assortment Kit AWG 22-16, 16-14, 12-10 https://www.amazon.com/dp/B07KF88D3D/ref=cm_sw_r_cp_api_i_7u6wFbH3J1PGX
These help with connecting pins close together, but it's definitely tight when you use the GPIO for multiple functions. Good luck!
https://www.amazon.com/TOTOT-Terminal-Insulating-Electrical-Connectors/dp/B07H22V67N/ref=sr_1_3?crid=HABMRIZZNR5V&dchild=1&keywords=2.8mm+female+spade+connector&qid=1595263134&s=industrial&sprefix=2.8mm+female+spade+%2Cindustri... these would fit the 2.8mm terminals on the stock buttons
Hmmmm ... I'd probably go with something like this. Some will adjust up to 3 inches for extra height. You could hook these up to the inner panels (labeled as rP) and then the cab would look like it's floating. Could even add some led lighting!
Hello, I just got done the DIY retro arcade 60 in 1 mod on my PAC Man 40th and I am having screen issues. The image is about 1/4 down the screen (see video) I used this lcd driver board from amazon which I was told would work with the pac 40th screen https://www.amazon.com/VSDISPLAY-Audio-Controller-Board-Arcade1UP/dp/B07ZVMWPZP. Any suggestions? Thank you ahead of time!