
What are
/r/Ender3Pro's
favorite Products & Services?
From 3.5 billion Reddit comments
The most popular Products mentioned in /r/Ender3Pro:


The most popular Services mentioned in /r/Ender3Pro:
Cults.
Autodesk Tinkercad
Notepad++
PlatformIO
PageSpeed Insights
Onshape
FreeCAD
Youmagine
SD Card Formatter
Blender
Visual Studio Code
The most popular reviews in /r/Ender3Pro:
It depends on the board.
Marlin is the software that 3d printers usually use (firmware is the more specific term).
Open up the printer where the motherboard is and try to find the version.
If it's an 8-bit board, it's likely a green one. That one is a bit more complex, it requires like some sort of additional adapter piece and you have to manually make some changes in firmware or whatever. You can still attach a BLTouch to these boards but it would be more difficult. I think you also require a separate bootloader. Try to look up youtube tutorials for these as the process could be a bit too long to type out.
If it's a 32 bit board tho, it's likely black and says V 4.2.2, or 4.2.7. These are much easier to install a BLTouch on. Creality does offer upgrade kits that will come with all the hardware you'll need for the 32 bit board. The 32bit board already has a connection for the BLTouch so just connect the cable and install the BLTouch on the printhead with the given mount.
In terms of firmware if you have a 32bit board, you can flash (basically install) new firmware into the printer by just putting the .bin firmware file into the SD card and inserting it in, and then turning on the printer. It will then automatically read it and install the new firmware.
Try to find some youtube videos to explain this, but make sure they are ones about the 32 bit board. Version 4.2.2 or 4.2.7.
your nozzle was way too close to the bed and it dug in.
nothing can fix it.. you have to replace the mat.
for now you can just avoid the center. also dont ever try to pull the part off the bed by lifting the mag sheet.. it will break it.
i personally picked up a couple of these.
they are more rough than the mag sheet, so they do leave a texture on the bottom, but they are also more durable and you can use both sides.
You can see if it's working by putting a piece of masking tape at the top of the Z-Axis screw, like a flag. While the object prints, the end of the tape should move in small arcs as the firmware compensates for bed attitude.
The BLTouch is not a miracle worker - you will probably need to do a final (manual) bed leveling after installing it, which should then be followed by a BLTouch calibration. I had to do this a few times before mine started working properly, but YMMV.
Don't take the entire motherboard out to upgrade the firmware, like I did. The programmer works just fine with the motherboard still installed in the machine! I felt super dumb for not realizing this.
I purchased this bltouch kit for my Ender 3 Pro with the v1.1.4 motherboard, and it worked well. Genuine part, made in Korea, came with mounting hardware, etc. Finding the correct firmware and ISP programming software was a bit of a struggle, though. I can try to dig up the link I used if you'd like.
i did the dual z axis belt mod on my e3 and i got belts from amazon.
just make sure you get the fiber reinforced ones.
this is the specific one i got
https://www.amazon.com/gp/product/B07BRKZGMS/ref=ppx_yo_dt_b_asin_title_o01_s03?ie=UTF8&psc=1
​
but my original belts are over a year old with no visible wear.
BLTouch. If you have the newer boards (4.2.2, 4.2.7, the black ones) then it's quite easy to install. Creality sells kits of BLTouches for these newer boards. The process is much simplified compared to the older 8-bit green boards. There is only one connection into the board, and then you flash some firmware using the micro SD card, and boom.
These have worked great for me
These are horrible and should not be bought for any reason
Replace your stock, plastic extruder with an aluminum one. Eventually the plastic one will crack. I recommend one with dual drive gears. There are a ton of them out there. They're inexpensive and will save you headache later.
Nozzles and Bowden tubes are about the only "consumables" besides the filament that come immediately to mind. Even those don't need to be replaced very often at all.
I start at 120 and work to 600. I also use 2 in 1 filler/sandable primer to help really smooth it out.
Tbh, most stuff I don't do all this work for, if I want it to look real nice I just print at smaller layer height, but like you said, this mask is pretty big and already a long print. I wasn't about to push it down too low and turn it into a 3day print lol
I purchased this one and it's been fine. Large door and window and easy enough to set up.
Bujidir 3D Printer Enclosure, Dustproof and Fireproof 3D Printer Accessories,3D Printer Tent for Ender 3/Ender 3 Pro/Ender 3 V2/CR-6 SE/CP-01/Mega S, Mega Pro https://www.amazon.com/dp/B09B7BBDZ6/ref=cm_sw_r_apan_glt_i_1X11QFJYJSKR7APJPYCZ?_encoding=UTF8&psc=1
Try this: https://cults3d.com/en/3d-model/tool/ender-3-nivelador-de-cama
You can print it with PLA.
I put these on and made the bed leveling easier and also till I am not taking of the glass, the level is perfect.
You don't need to print it in high quality; 0.2 is fine.
Great place to use tinkercad
*But let me know if you need the STL exported :)
It's caramelization of the PLA. Completely normal to occur, but not typically on the OUTSIDE of the tube... that speaks to an issue with the "seal" between the bottom of the tube, the top of the nozzle, or between the nozzle and heat-break tube.
Likely causes:
- Not enough pressure between the tube and nozzle (seat the nozzle in a hot block first, then finish tightening the tube coupler by about half a turn)
- tube not cut square/flush (your pic looks okay)
- nozzle not seated properly on the heat-break tube (make sure you "seat" the nozzle while the block is hot, and use the correct torque (I printed this bad-boy just for that)
HICTOP Ender 3 Dual Z-axis Upgrade Kit with Lead Screw and Stepper Motor for Ender 3, Ender 3 pro, Ender 3 V2 3D Printer https://www.amazon.com/dp/B08T1VJ9ZT/ref=cm_sw_r_cp_api_glt_fabc_JDR2NEG37TXH102MC4QH?_encoding=UTF8&psc=1
For sure, and I can bet depending on the inner core of the belt can depend on the twang as well, I had over tightened my X on the e3V2 and at the Extruder/hotend the core snapped loose so I bought about 32 feet of this 6mm Timing Belt 3D Printer Belt White GT2 Open Synchronous Belt PU with Steel Core 10M https://www.amazon.com/dp/B07BZDM8FH/ref=cm_sw_r_cp_api_glt_fabc_08EX7DKMYX4N6WR8HX80?_encoding=UTF8&psc=1 , I specifically bought this because I used to tend to have a heavy hand in tightening basically anything on accident… thing I worried most about though was if I had messed up the stepper motor, which thankfully not.
You can search on Amazon for Ender 3 silicon bed column and you should see. FYSETC 3D Printer Heatbed Parts, Solid Bed Mounts, OD 0.63 in ID 0.16 in Stable Hotbed Tool Heat-Resistant Silicone Buffer for CR-10 Ender 3 Bottom Connect, 4 Pcs https://www.amazon.com/dp/B07MH4JQB8/ref=cm_sw_r_cp_api_glt_fabc_BK3E6AW29P567Y6BJ1HH
are you talking about one of these? I was thinking the micro sd reader on your printer was faulty. if it’s just the adapter for the PC side you can use any USB to micro sd.
I’m planning on buying the Gulf Coast Robotics all metal hot end. It’s half the price of the micro Swiss
[Gulfcoast Robotics] All Metal Hotend Conversion Kit w/Polished Titanium Heatbreak for Creality Ender 3 Ender 5 and CR10 3D Printers https://smile.amazon.com/dp/B0811NWV2F/ref=cm_sw_r_cp_api_glt_fabc_ZJPF5AJ3TBNCNETG8QZM
Actually, my plan is to have 3 hot ends that I can easily swap, each with different size nozzles and pre determined z offsets for my abl. That is another part of why I don’t want to get the micro Swiss lol
Sure, I purchased it from amazon -
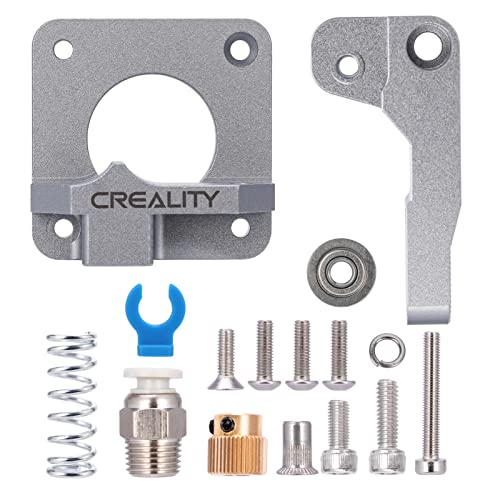
[Creality Upgrade 3D Printer Kit with Capricorn Premium XS Bowden Tubing, Upgraded Metal Extruder Feeder,Pneumatic Couplers and Bed-level Spring for for Ender 3/ Ender 3 Pro/Ender 3 V2/ CR-10 Series
I thought about doing the tape trick, but saw this mentioned somewhere. Working great for me!
PortaPow USB Power Blocker - Only Data, No Power https://www.amazon.com/dp/B08VHDKCX3/ref=cm_sw_r_cp_api_glt_fabc_S933XWRND8CVFD5RN3AW?_encoding=UTF8&psc=1
Same thing happened to me. The settings I used at first, the ones on the sd card, were too high, like 900. Setting them to 580 and 650 did help, but I had to double check that the settings got written to the printer properly. I think my first attempt didn't store them properly.
Not sure about changing the values through Octoprint, but I'm pretty sure you can use it's terminal and google what commands you need to use.
Even after getting the max currents fixed, the temperature of the steppers still concerned me so I added a heat sink to X,Y, E, and cooling fans to the X and Y motors.
Nobody is talking about it, but different filaments may have different shore hardness. I printed some 98A TPU on my ender 3 pro with BMG extruder, but I am not sure I would be able to print some 85A ninjaflex without direct drive or at least some extruder created for this purpose.
BTW, I watched lots of videos to get some tips on stringing and to, get a base for what config I would need, and SLOW is a MUST and retraction doesn't work, so I print my TPU at 20mm/s MAX and no retraction. There are other details like bridging and cooling (avoid bridges and up the cooling) but you can do your own tests for your setup
I almost forgot, there are some 3D printed extruders on thingverse that have tighter tolerances than stock, to help print TPU, but I don't know if you need them nor if they work at all.
Just buy some TPU, keep it dry and test it out.
It's nothing special but it's got a good variety of colors (though I only use grey) . It's decently priced and has pretty decent tolerance. I haven't had any real issues with it, only reason I switched was hatchbox was faster shipping, filacube was having supply issues I guess (was taking 2-3weeks delivery )
eBoot 9 Pieces Gel Filter Transparent Color Film Plastic Sheets Correction Gel Light Filter, 11.7 by 8.3 Inches, 9 Colors https://www.amazon.com/dp/B06VT87HRZ/ref=cm_sw_r_u_apa_glc_fabc_HB6ZH038A0NKFAQPT976?_encoding=UTF8&psc=1. So i used this it comes with a black one i messed it up though when putting on so i took the green one and sprayed it with Night Shades a tinter and made it dark.
Ya, some sort of adhesive on glass beds helps the first layer to stick. Glass beds r nice bc they leave smooth surfaces but the downside is having to use something for adhesion. I just use these. https://www.amazon.com/dp/B003ULCZ7M/ref=cm_sw_r_cp_apa_glc_fabc_BSFPR71KHAHPTFCPBV8S
Some people do hairspray, some people buy special adhesives made for 3d printing
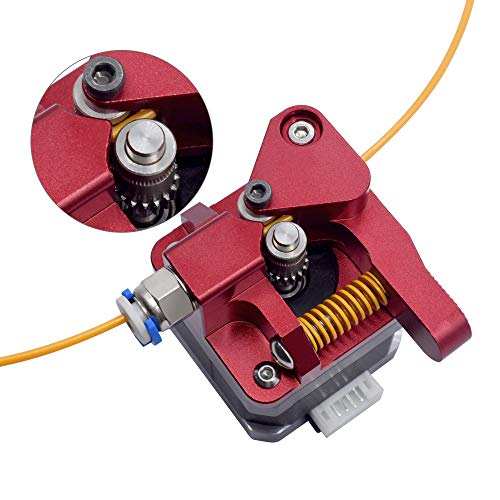
I have that on one of my enders and this on another. Almost the same, but the silver one is slightly better. Either is better than the original plastic extruder, but there were minor problems with each.
With the red extruder, the counter*bore* for the pivot screw was too shallow by a few thousandths and it caused the idler to bind when tightened down. Luckily, I have access to machine tools and was able to deepen the counterbore and fix it. The silver extruder had the counter*sink* on the flathead screw underneath the idler (mounting for the z stepper) too shallow by a tiny bit and it interfered with smooth swiveling of the idler. I deepened it slightly and all was well.
I feel the dual gear extruders are overkill, though others swear by them. You'll have to recalibrate your e-steps if you go with one.
It looks like your pivot screw is loose and wobbly. It's important that everything is rigid and works smoothly.
you might need a better extruder, the one on the right looks like it has irregular extrusion. Try increasing your hotend temperatures . If that doesn’t work, buy an all metal extruder
Enclosure helped a lot with PLA curling.... especially on those huge prints that cool unevenly. I bought a little temp-controlled relay and wired it to a 120mm fan... so I can stabilize the temp at whatever I want
For PETG, I still use an "adhesion helper" because it never seems to stick well for me (my preferred product is Magigoo, but hairspray works as well).
I just got the real one here: https://www.amazon.com/ANTCLABS-BLTouch-Leveling-Premium-Extension/dp/B076PQG1FF
It comes with the 1 meter extension cable, but I actually found that it was a little short if you use it in place of the short cable. So I actually used the short cable and the extension together, but then you have to cut off the end of the extension and recrimp the dupont connectors to be male. This makes it all a perfect length. Alternately you can buy it with the 2 meter extension, but you'll have a lot of extra length.
Also, I suggest people should also change the end that goes into the motherboard to their proper JST connectors, so they fit well and won't come loose.
Autocorrected from "thicker". Something like this::
I usually put mine on front and back but it depends what your printing I recommend buying these they hold great and take up less space https://www.amazon.com/Sonder-Picture-Printer-26mmx14mm-1inchx0-55Inch/dp/B083V6BVCT/ref=mp_s_a_1_3?dchild=1&keywords=Sonder+photo+frame+clips&qid=1597764506&sr=8-3
It's not on the removeable magnetic bed, it's on the surface that the magnetic bed adheres to. The bed itself isn't ferrous. It looks like it's basically a thin magnet that's been glued to the bed.
I assume it's the 'lower magnetic adhesive base' that's referred to if you were to order the magnetic bed as an add-on.
I briefly thought about trying to remove it, since I'm not going to use the magnetic bed, but getting it completely off and clean seems like it would be a nightmare. It'd probably come off in small pieces.
I can look it up, thanks. Was it easy to install?
Edit: this one? Creality 3D Printer Platform Heated Bed Build Surface Tempered Glass Plate for Ender 3/Ender 3 Pro 3D Printer 235x235x3mm https://smile.amazon.com/dp/B07FSM8DK9/ref=cm_sw_r_cp_api_i_G6ifFbVGW41KM
You can buy 100 of them off Amazon for $15: https://www.amazon.com/TBWHL-Picture-prtiner-26mmx14mm-1inchx0-55Inch/dp/B07X2MRW76/ref=sr_1_2?crid=3HA1ZMURC5PBY&dchild=1&keywords=swiss+clips&qid=1589928152&sprefix=swiss+cl%2Caps%2C162&sr=8-2
There's also some jackass 3D shop selling them individually for $6 - yes, each - on Amazon as well if you want a laugh or maybe a drive by 1-star review.
Best advice I have is to keep the Comgrow seller page up on Amazon. I checked maybe 20 minutes ago, none in stock, and then 10 minutes later, seven Ender 3 Pros became available, and then sold out again within 10 minutes. I know it’s a pain to wait and wait, but I’ve spent basically the whole day trying to get one and that’s the only thing that’s worked and seems reliable! (Plus, reviews for Creality customer support are horrible, but customers who have had issues with Creality say Comgrow have been really helpful and responsive).
Here’s a link to the one I was able to get:
https://www.amazon.com/Comgrow-Creality-Printer-Upgrade-Certified/dp/B07GYRQVYV
I paid a bit above the original price (I paid $307, tax included/ free shipping), but if you’re really set on getting it like I was, I hope this helps! :)
I like Gulfcoast Robotics's hex thermistor. From an electrical standpoint it's the same kind of thermistor that comes with the machine, so you don't need to change the firmware. But it attaches to the block in a completely different way: you take out the retaining screw, then screw the thermistor into the hple the retaining screw used to go in. You can't overtighten the screw since you don't use the screw anymore, and since the new thermistor is encased in metal it's much harder to break.
the puller I bought is no longer available, but this one is very similar, and 3 dollars cheaper than the one I bought:
That may be true for a proper built laser engraver not a modified one, this is the head I'm using https://www.amazon.com/Creality-Engraver-Engraving-Attachment-Blue-Violet/dp/B0B1J3NYWR/ref=asc_df_B0B1J3NYWR/?tag=hyprod-20&linkCode=df0&hvadid=598396786243&hvpos=&hvnetw=g&hvrand=13902303032269430678&hvpone=&hvptwo=&a...
I just bought the standard creality glass plate that's $20 on amazon
And the regular run of the mill bltouch sensor
$30
Note: to use the sensor you need to update the firmware, i compiled my own and there's a learning curve to it.
But the sensor maps the build plate before every print just in case something gets jostled around.
Oh and i'm using a large thermal pad in between i think it was like 5 bucks, but its basically what some people use in place of thermal paste on gpus, with it i don't need any clips or anything and the bed gets really fast and consistent heat with it because everything is conducted right through into the glass. It's not exactly standard, but i saw someone else do it once and it's way better than paperclips or hairspray
I was offering you a mod path to go direct drive using the e-fit extruder if you already had a working all-metal micro swiss that was printing at 300c.
If you have an e-fit and microswiss all-metal hot end, and your thermistor is not reading above 260, you can replace it with a Gulfcoast Robotics 100k thermistor. They are reliable for 300c on long term use. https://www.amazon.com/dp/B07B42NPW3/
I'd also swap out the heater cart for a 60w so you are not spending forever waiting for it to heat up - https://www.amazon.com/dp/B09SXZ5MYT
i woudlnt bother with pre cut or crimped.
and get a glass reinforced one.
i got one of these to do my z belt mod.. its worked perfect and i have a lot left.
The default thermistor is a small bulb at the end of a wire jammed into a hole and held in by a screw on the wires. If it is not in the middle of the hole it can read wrong. If it is bouncing around in the hole it can read wrong. If it is a Tuesday it can read wrong.
There are thermistors available that are basically the same thermistor epoxied into a brass hex screw, so you screw it into the same hole the retaining screw is currently in. Gets a good temp read, no bouncing around, no crushing the wires with the screw, etc. only drawback is for a Ender 3 Pro the default fan shroud is real close on that side of the block and it can be a tight fit to cram in there.
That looks like a piece of your extruder arm. The plastic ones are notorious for this. I'm afraid you need a new extruder. You may want to get a metal one that won't break. I like the gray aluminum one, but there are lots of other possibilities.
Hmm not sure why the link wasn't working maybe this one will work: https://www.amazon.com/Creality-Upgrade-Temperature-Supporting-Printing/dp/B0BGX65RLX/ref=sr_1_2_sspa?crid=TIYZK4SLM51Z&keywords=creality+spider+3&qid=1667249536&qu=eyJxc2MiOiIwLjAwIiwicXNhIjoiMC4wMCIsInFzcCI6IjAuMDAifQ%3D%3D&sprefix=creality+spider+3%2Caps%2C105&sr=8-2-spons&ufe=app_do%3Aamzn1.fos.006c50ae-5d4c-4777-9bc0-4513d670b6bc&psc=1
the nozzle should butt against the heat break inside the heatblock, and be torqued giving enough friction to overcome the forces of vibrations.
however if you, like me, thought it was too much of a juggle to change the nozzle, I used this "loctite" made for firearms I bought online for this same reason and it works wonders.
Creality Upgrade Ender 3 Hotend,... https://www.amazon.com/dp/B082PGCF2B?ref=ppx_pop_mob_ap_share
Buy one of these, connect it up, do the Bowden end gap fix and follow the correct steps for replacing the nozzle and get back to printing in no time
It sounds like you found the source then. I would get a new one on order. Bearing is probably starting to seize. I would treat the grease as a bandaid to limp it along while waiting. ABSOLUTELY be careful not get grease on or near any surface the filament touches.
Quick search i couldn't find the bearing by itself, but here is an upgrade that includes it. https://www.amazon.com/Official-Creality-3D-Extruder-Aluminum/dp/B07TWQFT7J?crid=3T805EHOCIK1G&keywords=ender+extruder+idler&qid=1665897235&sprefix=ender+extruder+idler%2Caps%2C181&sr=8-8&linkCode=ll1&tag=noturavg02-20&...
for textured i have the biqu plate.
its very durable and you can use both sides.. i scraped mine a couple times and its still ok.
the material is bonded to the steel like a powder coating. its rough so makes rough bottom prints.
for smooth i have the creality gold plate.
this one is not very durable as the coating is a sticker.. if you dont let it cool off completely you will peel it off with the part.. its also only coated on one side. it makes super smooth bottom prints tho..
I calibrated mine and still had this issue so I replaced my extruder with this dual drive one. Never had another issue. And it’s cheap! Dual drive extruder
The type of connector is called JST-XHP. You'll need a crimp tool as well. this one works pretty well for me.
Is it a new printer? May be as simple as the tension screw is too loose and the gear is not engaging the filament. That is the screw at the 2 o'clock position in your picture.
Other possibilities - the plastic extruders are known to have issues with cracking and causing feed issues. Or the soft brass extruder gear can have a divot warn into it. You can purchase a extruder replacement for $10 on amazon that includes the replacement feeder gear - https://www.amazon.com/dp/B09PHJGV79/
No, I’m running the micro Swiss direct drive with all metal hotend, This is the link Micro Swiss Direct Drive Extruder... https://www.amazon.com/dp/B08CGN18KJ?ref=ppx_pop_mob_ap_share
If you have a stock Ender 3, then u will also need a new stepper motor, linked here: Creality 3D Printer 42-40 Stepper... https://www.amazon.com/dp/B091CXPXVP?ref=ppx_pop_mob_ap_share
Micro Swiss Direct Drive Extruder... https://www.amazon.com/dp/B08CGN18KJ?ref=ppx_pop_mob_ap_share Also, you need a new stepper motor, linked here
Creality 3D Printer 42-40 Stepper... https://www.amazon.com/dp/B091CXPXVP?ref=ppx_pop_mob_ap_share
Been dealing with that for about two months. I can pull off the shroud and tighten/loosen the thermistor screw and give myself 2-3 prints before getting the alert again.
Just put a new thermistor (switched to a hex-screw one - www.amazon.com/dp/B08YNX79H8) and it was so nice to run three overnight prints without a flutter on the temp.
I have so much trouble with that damn retaining screw that I have switched over to the ones epoxied into Hex nuts that screw directly into the block.
https://www.amazon.com/gp/product/B08YNX79H8 - this is the one I just put in my printer. It is a direct replacement for the 100K 3950 probes, so I don't even have to redo the firmware. Just be aware the fit between the heater block and the cooling part fan is a little tight. This supports up to 300c
the allen wrenches that came with the printer will do the trick. easy fix, I find it harder to pull it through the sleeve that wiring it in.
this is what i usedEnder 3 thermistor.
unplug the machine from the wall and from the power supply before doing any work. just an fyi just in case you didnt know prior. good luck
yeah best thing to do to fix this is a different build surface, glass is popular, but I really like the poly one I have.
Sorry it took so long to respond! You’ve probably figured it out by now, but for those who come looking, it was the 2 prong connectors from this box: Glarks 1180 Pieces 2.54mm... https://www.amazon.com/dp/B07CTH46S7?ref=ppx_pop_mob_ap_share
You're such a kind, dedicated human being. It's hard to find someone like around you here. Thank you. Are you a pilot by chance? That protocol of yours is something else! I took my 4.2.2 board out and swapped it with the silent 4.2.7 board because of the display and SD card problems, but then decided to keep it because of how silent the motors became with that board. My 3 Pro is in my living room desk, next to my gaming laptop. Just got the printer early this month. I don't really have a lot of projects or anything to print at the moment so I barely use it. Managed to learn so much about printing, tuning, leveling the bed, filament jamming, etc. SO far I've done a few minor upgrades, 4.2.7 board, red metal extruder body, Capricorn tubing, orange silicone bed springs, and this incredible magnetic metal bed https://www.amazon.com/gp/product/B08B4CBY9C/ which makes a perfectly smooth first layer finish. I've tested 4 different beds and this is by far the best in my opinion.
Just wanted to remind the OP that on nearly every ender 3/3Pro bed ever made has a dip or a rise in the center. You can level that bed until you can't see straight and never get it perfect. I'd recommend a bltouch but if that not an option, try increasing the flow on the initial layer, if there are minor imperfections this may help. Another cheap fix, if the bed has a dip, put a small square of typing paper under the build surface, right in the center. You can check for dips and rises with a straight edge and a flashlight.
Ultimately, replacing the build surface with something more rigid or a bltouch is the best option. The bltouch can map the surface and compensate for imperfections. Here's a link to the cheap ones I buy on Amazon.
https://www.amazon.com/dp/B09Y8Z6482?psc=1&ref=ppx\_yo2ov\_dt\_b\_product\_details
Oh naw, I just purchased a new motor lol. $5 more than the tool
https://www.amazon.com/Creality-Official-3D-Compatible-axis%EF%BC%88D-Shape%EF%BC%89/dp/B09L5M63B1/ref=sr\_1\_3?crid=DSM3K6FCJUOZ&keywords=Creality+3D+Printer+42-40+Stepper+Motors%2C+2+Phase+1A+1.8+Degree+0.4N.M%2C+Stepping+Motor+for+3D&qi...
It's a tool for measuring small distances very precisely. Machinists and mechanics use them to determine the tolerances of their tools, and of the things they're working on, and this makes them suitable for leveling printer beds too. Here's what I use, but you can shop around for other models. Just make sure you get a "dial indicator", and not a "dial test indicator". They work differently, and the test indicator isn't really suited for this particular thing.
I prefer this little guy for $6 - https://www.amazon.com/dp/B094FYL9QT
Advantages - not modifying the cord so I don't forget and try to use one else ware, no tape to slip, it works great for Ender's.
Con's - Restricted to USB 1.x and 2.x, does not work for USB 3.x
Definitely a pretty cheap upgrade with perfect results so far (about 2 months). Mine were ~$7 on amazon in the USA. These ones. The surface effect personally bothered me and I have zero regrets with the upgrade. I am sure you can find someone promoting a different brand than what I got.
I’ve been looking all day trying to decide if i want to do this, or just buy tensioner’s with pulleys already on them. I think they’re just gt2 20t 5mm bearing pulleys for 6mm belt if my research was correct today.
I always can tell that i can feel way off the teeth on the belt when i manually move the X or y carriage. I am hoping that swapping the bearings out would help that. And since my linear rails will be here Friday i want it to be as smooth as possible.
I believe these are the kind you would need. https://www.amazon.com/Onyehn-Timing-Bearing-Suitable-Printer/dp/B07J4JC2N7/
Someone please correct me if i am wrong.
I’ve got this one and I enjoy it. There’s some red ones that are slightly cheaper on Amazon too that function the same. Some people swear by the dual extruders but I’ve just never used those.
I replaced the board with this model below and I assed the auto bed level. But for this print the bed level was turned on
SOVOL Creality Ender 3 Pro Upgraded Silent Board Motherboard V4.2.7 with TMC2225 Driver Marlin 2.0.1 for Ender 3/ Ender 3 V2/ Ender 3 Pro/Ender 5 (Customized and Non-Standard Matching) https://www.amazon.com/dp/B07TMX9WFW/ref=cm_sw_r_apan_i_Y5815J4XRY4ZJG8DFM1N?_encoding=UTF8&psc=1
i got a bag of these.
just put one in the ziplock back the filament came in. pretty much every brand comes in a resealable bag..
​
​
id purchase a "airlock" filament vacuum thing.. waste of money.
This was recommended to me by teaching tech I believe it was, and it's cheap.lube link to Amazon
Creality Ender 3 V2 Dual z Upgrade Kit, Dual Z Axis Kit Lead Screw Upgrade Kit for Ender 3, Ender 3 Pro, Ender 3 V2 3D Printers https://www.amazon.com/dp/B08T8YXBT1/ref=cm_sw_r_cp_api_i_66RWVQ6B2M38CPG0WP1J?_encoding=UTF8&psc=1
I ordered this one just worried I’m going to have issues setting up syncing
If you have a micro Center near you:
https://www.microcenter.com/product/625613/creality-ender-3-pro-extruder-fan
If not:
Just finished running one of the spools in the food dehydrator for just under 8 hours at 40c, and I'm still getting the same results, prints great for the first 40min to an hour, then just goes to hell.
I have this nozzle set on order, should be here tomorrow, I'll update ya then. :)
I will say after the failed print I swapped out to my amazon basics blue silk PLA which I just keep in a tote with a bunch of desiccant packs thrown in there and it printed great.
so I really think /u/Downfall350 nailed it, it's just ebay garbage. But on the other hand, the manufacturer was able to get it to extrude to a pretty accurate 1.75mm, I checked it at a few different points with the calipers, and it really was with in .02, so it really seems like it should be doable.
You can buy it pretty much any online shopping site but here is official price and website link for skr but I can't find one official website for original creality board but I found it an Amazon Link for original creality 4.2.7
I recommended you skr mini e3 v2 of plug and play experience V3 is also plug and play but you will have to make a third fan connector which is what extra feature you paid for.
Creality board is just the same plug and play but only have bltouch port and filament runout port where skr you will have extra neopixel ps-on power detection as bonus. Oh btw creality can't run linear advanc (improve corner) on any creality board due the how they connected stepper driver.
So this? BIGTREETECH SKR Mini E3 V3.0 32Bit Control Board for Ender 3, Ender3 Pro, Ender 3 V2 3D Printer with TMC2209 UART Stepper Driver,Compatible with BL Touch, TFT35 E3 https://www.amazon.ca/dp/B09S9LL7XW/ref=cm_sw_r_cp_api_i_2SWQ4CMSZVB9KF9NVSNQ
Will this work? BIGTREETECH BLTouch V3.1 Auto Leveling Sensor Kit for Creality Ender 3 / Ender 3 Pro/Ender 5/ CR-10/CR-10 S4 / CR-10 S5/ CR 10S/ CR 20/CR-20 Pro (Without BLTOUCH) https://www.amazon.ca/dp/B08QCZSQ2X/ref=cm_sw_r_cp_api_i_25D9094DJ2PQ7XE3YV3Q
does the brand matter? So lost here.
Yes, all hardware is stock. I am using Sunlu PLA from Amazon.
I will try to play with the Z height a bit more, thanks.
Yeah, fysetc silicone spacers off Amazon.
FYSETC 3D Printer Heatbed Parts, Solid Bed Mounts, OD 0.63 in ID 0.16 in Stable Hotbed Tool Heat-Resistant Silicone Buffer for CR-10 Ender 3 Bottom Connect, 4 Pcs https://www.amazon.com/dp/B07MH4JQB8/ref=cm_sw_r_cp_api_i_RSJYA61VMDP3YHB96QD9
I also purchased a random blue set for another printer that are working great. Make sure to compress these a good amount so they bow outwards like a squished marshmallow.
I replaced mine before it happened but it seems to be extremely common for the arm on the stock extruder to crack and cause under extrusion. The stock gear is also brass which wears down pretty easily after that kind of use.
Unfortunately, if like me, you have a gear that was pressed on, you might find it easier to replace the stepper motor with one with a flat side to accommodate a replacement gear easier.
https://www.amazon.com/Printer-Stepper-Stepping-Extruder-Compatible/dp/B08LVZKYYV
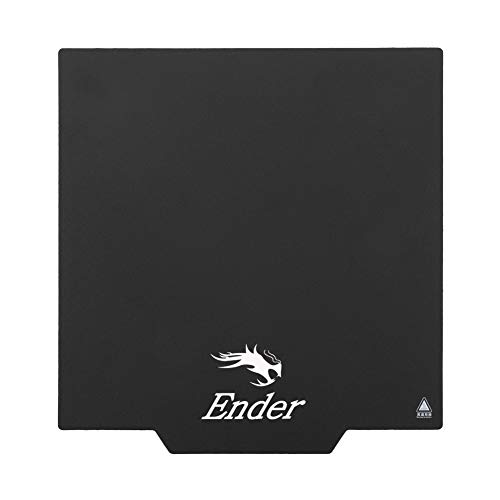
I had just posted about my creality glass bed coating peeling off not even a week of owning it and some people have the same issues, not to mention having to unclip it whenever I needed to take it off, which for me was every print to throw it in the freezer before prints would come off, so I decided to try a pei spring board..... what a difference it made I love peeling my prints off now it is so satisfying to literally just pluck them right off after cooling, no glue, no scraper, excellent flatness, nice smooth first layers I can't recommend it enough, (http://PEI Magnetic Flexible Heated Bed 235x235mm for Ender 3/ Ender 3 V2/ Ender 3 Pro/Ender 3 Prox/Ender 5/ Ender 5 Pro https://www.amazon.com/dp/B07XBM24HN/ref=cm_sw_r_apan_i_P9WS7K09BQ7HKGRHHB5Q?_encoding=UTF8&psc=1)
Lubriplate L0034-094 No. 105 Motor Assembly Grease, 10 oz https://www.amazon.com/dp/B000HZJFE0/ref=cm_sw_r_apan_i_XE854H09QE7KA6NHCQ69
Here's the stuff that I used to lube moving parts works on my wife's knitting machines and everything else. I'd give this a go
back left corner between the bed and the plastic thing that keeps the wires in place
​
I've ordered these two things and couldn't be more pleased. I'm afraid to get into things like BL touched based on reading what others are saying. A quiet board would be nice though.
Also printed a tool caddy, a cable chain, and currently printing a filament guide. Haven't had mine long but for mostly stock it's been printing great.
This is the way. You should be using a PEI sheet like this. Ender 3 Spring Steel PEI Bed Plate,Heat Resistance, Removable,Flexible,Magnetic Build Surface, with 235mm×235mm,Upgrade Replacemnt Parts for Creality Ender 3/Pro,Ender 5/Pro https://www.amazon.com/dp/B08B4CBY9C/ref=cm_sw_r_cp_api_glt_fabc_P609P9QJFC1PGQD7QN8X?_encoding=UTF8&psc=1
As the other person said, watch a bunch of YouTube videos. If you're just going to stick with PLA for a minute, I would suggest a few minor and cheap upgrades to save yourself some headaches.
Aftermarket Capicorn bowden tubing is a higher quality tubing that also has a higher temperature resistance. This will prevent melting of the tube itself I side the hotend if you decide to start using PETG filiment. This kit also comes with aftermarket fittings that work better then the stock fittings. The stock fittings tend to let the bowden tubing move out of place on retractions, which then can cause a nozzle clog. https://www.amazon.com/dp/B08BHVWNWK/ref=cm_sw_r_cp_apa_i_Q9JR7EKT9EMX4MKDB634?_encoding=UTF8&psc=1
The stock extruder is single gear and plastic, which will eventually break. Some say within the first month. Link below is for a metal dual gear extruder. https://www.amazon.com/dp/B07SY745CF/ref=cm_sw_r_cp_apa_i_WR8D4JM1BMCH26B4JREB
From a pragmatic viewpoint, I wouldn't bother with any other upgrades after that. Most don't really give a obvious better print on PLA filiment. If you find yourself wanting to use flexible / exotic filiments / or go hard core, i would then just buy another printer such as the ender 3 s1 pro. It'll cost the same as making all the individual upgrades, minus the head ache of having to assembling, upgrading firmware crap, trouble shooting, calibrating, etc. Plus then you'll have two printers instead of one Frankenstein printer with a bunch of stock parts. Though some people enjoy the whole doing individual upgrading part (I personally don't).
Z motor shim and z-rod stabilizer. There are plenty of print yourself models for each on Yeggy or thingiverse. Or you can buy an all metal one on Amazon: Adjustable Metal CR10 Z-Axis T8 Lead Screw Top Mount Compatible with Tornado AM8 CR10 V3 CR10S Pro Ender 3 V2 Pro BLV Z-Rod Bearing Holder Aluminum Profiles Frame 3D Printer Upgrade https://www.amazon.com/dp/B08T9PL29W/ref=cm_sw_r_cp_api_i_4CZMA2884M8KWK5KHJDA
8mm OD 20mm Long Light Load Compression Mould Die Spring Yellow Compression Mould Die Spring for The Ender 3s Bed 20pcs https://www.amazon.com/dp/B07FY47BX7/ref=cm_sw_r_cp_api_i_2XWHYCRPTFQZYT8FQQ78?_encoding=UTF8&psc=1
I have it wired with a few inches of 20awg from the PSU 12V output to the step down and then wired out to the strip from there. These are the step downs I purchased. I had thought about the USB models of step downs. I guess I may have to switch them out. I'm hoping not because these suckers are tiny! I set the voltage output with my DMM so that's how I know it's just under 5V.
As others have said this is a common failure with Creality printers. Grab an all metal one and never worry again.
Creality Official Upgrade Extruder, MK8 Extruder Alloy Block Bowden Extruder 1.75mm Filament for Ender 3 Series, Ender 5/5 Plus/Pro, CR-10 Series 3D Printer https://www.amazon.com/dp/B08F23ZNTG/ref=cm_sw_r_cp_api_glt_i_HCGH12NBFNKNZ8P7Z6SW?_encoding=UTF8&psc=1
If you’re replacing the belt, I’d recommend getting the white steel belted ones. They seem to be way stronger...
Thanks for your answer! So is it ok if I buy those two for the wire replacementt?
-Wire
This feeler Guage has made it so my bed is always perfect. Use the .2mm Guage until the nozzle barely snags the metal https://www.amazon.com/dp/B06XHXJG31/ref=cm_sw_r_apan_glt_i_424EVY88GBS03X0EPVAF?_encoding=UTF8&psc=1
A buck converter like this one might work, but in my experience the voltage isn't stable enough to keep an RPi happy under load.
Luckily for OP, google is right there.
You can try heating it a little on your bed. Or cutting it, the tube is relatively inexpensive. However make sure if you cut it is exactly straight.
I recommend taking this as a sign to upgrade your tubing. Creality Upgrade 3D Printer Kit with Capricorn Premium XS Bowden Tubing 1M, PTFE Teflon Tube Cutter, Pneumatic Fittings and MK8 Socks and Extra Nozzles for Ender 3/3 Pro/5 CR-10 Series/10S/20/20 Pro https://www.amazon.com/dp/B08G8MGLBX/ref=cm_sw_r_awdo_F2BDBVFJTA556Y9SC3C9