
What are
/r/Pyrography's
favorite Products & Services?
From 3.5 billion Reddit comments
The most popular Products mentioned in /r/Pyrography:


The most popular Services mentioned in /r/Pyrography:
DeviantArt
WordPress
Shutterstock
The most popular reviews in /r/Pyrography:
It's pretty easy - once you have your image ready, mirror it. Then use an ink-jet printer to print onto the paper that shipping labels are stuck on. I use these. You just peel the stickers off and print the image to the waxy paper they are stuck onto. The ink prints sharply enough on it, but doesn't soak in. Then carefully lay the paper onto the wood, tape it in place, then rub it with something. You do need to be careful to not move the paper at all once it's on the wood. I just use my finger and a paper towel. It works really well. I'll never go back to hand tracing stuff with graphite paper.
You can also get two imprints out of one if you peel it up. It's not as clear or dark, but for something like a sign it's good enough.
Well, considering another user just posted that Walnut Hollow Versa Tools are frickin dirt cheap on Amazon right now, I'd get one of those asap. Here's the link. I've used mine for the last 3 1/2 years and it's the only tool you'll ever need if you learn how to use it. This entire piece was done with my Versa Tool
Lightly sketch out the outline of the design you want to burn. Then turn the burner on and just trace the pencil lines. You'll need to just get in there and practice, nothing I tell you will make much sense until you get some hands on experience. Don't wet anything, you use the burner to draw the same way you'd use a pencil.
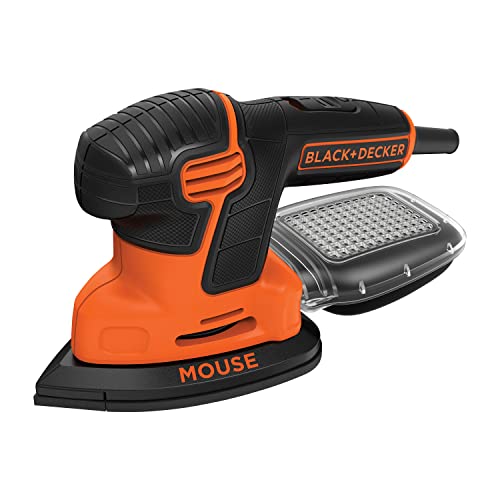
Not really sure what your budget or needs are, but a palm sander (also called corner or detail sander) might work for you. They are relatively inexpensive and the sanding pads are too. I've used a Harbor Freight one almost daily for many years for many different types of projects.
Here's a decent one from Amazon
Whatever sander you decide on, an essential add-on is a gum rubber sandpaper cleaner. I went for years always replacing the sandpaper when it got clogged until I discovered that I could clean them over and over, and save a lot of money.
Hope that helps!
Mostly depends on how serious you want to be about it. I started with one off Amazon for about 30 dollars and soon upgraded to the one linked below. If you have the money to splurge and want to be somewhat serious about it, go for it. It's great.
As for actual methods, I just watched YouTube videos. But also the one below comes with a book that I never read. I trace all of my works onto the wood before I burn. Freehanding is difficult if you are trying to make it look professional. Other than that, just practice.
this is what i have , and your right it loses heat quite regularly , i thought this was a good one ? ahh not used that type of tip. i only really use the one thats designed for letters i believe , its called "round tip"
Not familiar with that brand, but to be honest I went from an actual soldering iron ($20) to my current: 110V BURNMASTER Eagle PRO, 2-PENS, 15-Tips & Bag Set https://www.amazon.com/dp/B07D41HKS7/ref=cm_sw_r_cp_api_glt_fabc_K8WP8NTTQ7JECKC4W2B9
** Definitely don’t feel like you need one at this price range. As far as price range, you are at the lower end/beginner level, so might not be getting the quality you’re aiming for. BUT!! That’s not necessarily bad; I did a massive table top (with shading, textures, etc) with my $20 pen and it turned out amazing. If you’re looking to upgrade search the threads here for recommendations. I LOVE my Burnmaster and I will for real cry the day the unit gives out and then I’ll order the exact same a minute later. But everyone has a preference and I’ve seen amazing work here with ‘beginner’ units**
Yours has universal tips so just search for shading tips/nibs on Amazon if you want that flat shader (it is worth it). If this is a hobby you enjoy and will continue then I’d definitely recommend stepping up your equipment to the next level just to have something more consistent and ease frustrations. No matter what though stick with it and keep creating - I do recall seeing your work before and you’re on your way
Prost!
Hi Zigsphere! Sounds like you need a desktop fume extractor - you can find a variety of them online for anywhere from $35-$70.
Here’s one that’s reasonable for price and size:
KOTTO Solder Smoke Absorber Remover Fume Extractor Smoke Prevention Absorber DIY Working Fan for Soldering Station https://www.amazon.com/dp/B07VWDN29F/ref=cm_sw_r_cp_api_glc_fabc_m8a8FbFFJGZSM
Here’s the one that I own and use: (it’s a bit big but it chugs along great!)
Valtcan Solder Smoke Absorber Fume Extractor Fan https://www.amazon.com/dp/B07HPZ3FF6/ref=cm_sw_r_cp_api_glc_fabc_s-a8FbAS43C05?_encoding=UTF8&psc=1
Do you need a big one? Nah, I wouldn’t sweat it. Go with what works for you! Good luck!
This is the exact product I bought on Amazon. You have to cut it apart to get the size you need, but I haven't had any problems so far.
From a comment I posted yesterday:
This is the exact product I bought on Amazon. You have to cut it apart to get the size you need, but I haven't had any problems so far.
Try amazon smile to donate to a charity of your choice automatically at no cost to you!
https://smile.amazon.com/Walnut-Hollow-Versa-Temp-Temperature-Woodburning/dp/B005P1TRAS
^^^I'm ^^^a ^^^bot ^^^and ^^^this ^^^action ^^^was ^^^performed ^^^automatically.
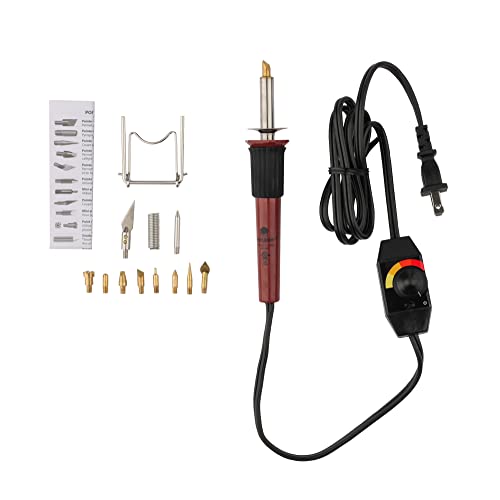
Can you buy from Amazon? The Walnut Hollow versatool kit is a really good starter set.
https://www.amazon.com/Walnut-Hollow-Versa-Temp-Temperature-Woodburning/dp/B005P1TRAS
Having a control that lets you reduce the heat is a big improvement for not much more money than cheaper kits.
There are much nicer kits out there if you don't mind spending over 100 dollars, but the Walnut Hollow is great for the price.
There's a transfer paper called Graphite paper that is essentially pencil (graphite) instead of carbon on the paper. It leaves lighter lines, doesn't smudge as much and is easier to erase.
This is one of my favorite things. They're heat resistant but don't cover your entire hand making it hot
https://www.amazon.com/gp/aw/d/B09V6ZKPL2/ref=ox_sc_saved_image_8?smid=A3I09HGZF1BYUV&psc=1
And this is very important. It's to make sure she's not breathing in fumes
A lot of people like Danish oil or similar.
I typically use a clear spray w/ UV protection. A couple of coats should do the trick.
However, I think the Danish oil or my favorite Minwax Antique Oil Finish Does a better job of making the wood grain pop.
If you want to spend a bit more money, the Walnut Hollow Creative Woodburner is a nice choice. Wire tip burners are generally much better than solid tip ones.
I have the Colwood Detailer and love it. With your budget, you could go with the Super pro two pen solution and pick up a couple of extra tips. I use the 1mm ball tip quite a bit.
I don't know what any of them are actually called, but I got an extra set with my machine that has Small, Medium and Large ball tip nibs, I used the smallest one for all the detail work. Then there's another piece in there that's right next to that set of three ball tips that I've been calling a "Boop" because it's like a tiny half bowl/scoop, that's the one I used for all the large areas. It take longer to get dirty and when it does, I can roll it and use the other side, also if I pull it away and keep the heat cranked it burns off the excess easier than the others, I assume just because it's a thinner piece. This is the amazon pack and it's for a 60W machine.
https://www.amazon.com/dp/B095729223?psc=1&ref=ppx\_yo2ov\_dt\_b\_product\_details
I just bought a fume extractor meant for soldering. I got this one from Amazon US. It works pretty well. Here's the UK listing, not sure why it's more expensive there.
You might be able to find something more reasonable on other sites.
I use this exact machine.
I’ve altered some of the tips by bending them or fine sanding them down for a sharper more precise edges. I started practicing on wooden squares I picked up at Walmart in the crafting section. They were basswood which is a very soft wood. The harder and smoother the wood, the easier I find it to burn a design nicely. My wood of choice at the moment is olive wood. Has beautiful grains especially once u shine it up, is very popular and sells well. Every piece of wood is different so I always start out at a low safe temperature and work my way up to a temperature that is burning the way I want. You can always go back over something to make it darker but its hard to fix areas that have been burned too much.
This is what I use.. alcohol is cheap.. and you don't have t soak it all that long.. If it doesn't all come out.. clean the brush as best you can under water and repeat.
do you have enough plugs and a budget to get this type of fan? I found it cheaper in the past, so maybe someone sells it for less than $70 xD, but this is what I have seen to combat the issue you are talking about if you are burning at a temperature that is high enough to create smoke
I'd use large sheets of graphite paper.
I recommend against carbon paper as it leave darker lines, smudges easily and is harder to erase than graphite paper.
Better yet, thanks!
For anyone interested: Amazon: 36 ct. Wood Bookmark Blanks 6"x2"
Yeah I found with my boards if you don’t send it first it has a slightly yellow tone to the board and if you sand off a mistake without sanding the whole board it looks off and you can tell you sanded it, and makes quality overall better. I don’t use a pen I’d call great quality and I’m actually looking to upgrade but the brand is “yissvic” and here’s a link to the actual kit, I only use the pointed tip for everything but I don’t reccomend buying this one though. I need pliers on hand at all time because the tip is switchable and you screw it on but I find while using it the tip starts to come unscrewed and loose. Apart from that pen, sandpaper, and a pencil that’s all I use to do the woodburning :)
I use Boos Block mystery oil and board cream. You rub the oil on and leave it to soak overnight, then the next day you wipe off any excess. Next rub on the cream, which you also leave on overnight and wipe off any excess the next day. It conditions the wood and also brings out/deepens the natural color of the wood. Highly recommend!
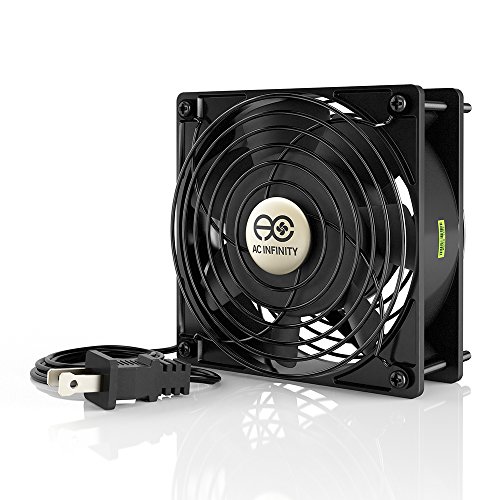
I got myself a little fan like this. AC Infinity AXIAL 1238, Muffin... https://www.amazon.com/dp/B009OWRMZ6?ref=ppx_pop_mob_ap_share . I set it close to where I'm working with it blowing away from me. It helps to pull the smoke away from your face and won't cool down your tip by blowing towards it.
That’s a way better woodburning kit than what I started with, Will be plenty for you to learn on and depending on the quality of the kit, might be all you’ll ever need. Here is the kit I now have TRUArt Stage 2 Dual Pen... https://www.amazon.com/dp/B06Y5PXZ31?ref=ppx_pop_mob_ap_share I can verify this one is fantastic.
heyo i just finished burning my two guitars on commission, you can PM me for details if you'd like=) Def not too ambitious I think this will look awesome and clean.
generally, yes sand well and cover/ remove electronics before doing so. I used a cheap dean vandetta (around 120$ but great guitar). to make your life easier and not have to sand off the original stain etc. (I did bc i owned this guitar already) you can buy guitar "kits" that come with an unfinished guitar. I think ball/ round tips will be the best for the swirls. Looks like it will be a great project!
Here's a pic of my most recent one: https://wordpress.com/post/theartsymedic.wordpress.com/365
Here’s one of the places I’ve ordered from: Unfinished Wood Panel Boards, Wooden Canvas for Painting Arts & Crafts (9x12 in, 6 Pack) https://www.amazon.com/dp/B07QYKQFVW/ref=cm_sw_r_cp_api_glt_fabc_FR918PAB1BWK6592T0AS?_encoding=UTF8&psc=1
They’re very lightweight and ready to just hang straight on a nail
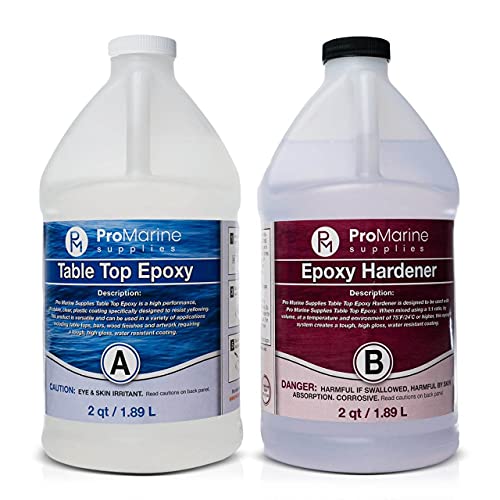
With a little practice it's way better than using varnish. He's also, it would take a Jack hammer to damage your artwork!
this is what I'm using:
Clear Table Top Epoxy Resin That Self Levels, This is a 1 Gallon High Gloss (0.5 Gallon Resin + 0.5 Gallon Hardener) Kit That’s UV Resistant – It’s DIYER & Pro Preferred with Minimal Bubbles https://www.amazon.com/dp/B01LYK2NAG/ref=cm_sw_r_apan_glt_fabc_NTYFC2TGM1ZS1WYPC2MT?_encoding=UTF8&psc=1
Thank you so much for your suggestions!
I think I might have a look into some local lumber mills. But alternatively, having done a little more digging and I think that this seems to be appropriate (although I understand I shouldn't burn too deep?) and not too pricey!
I am also very new to this, but I like using the small pointed tip to do lettering. Also not sure what kind of wood you are using, but so far I've had some good fortune with basswood. There is little to no grain so your pen tip doesn't "jump" when you're going perpendicular to the grain, and it responds to heat very well.
Here are the basswood pieces I got on Amazon - Link
I absolutely love my Colwood Detailer, but if you just want to test the water so to speak, the Walnut Hollow pen is the unit a lot of people start with.
The Detailer is going to be more versatile, and easier to control. In my opinion, this is the way to go. You can always buy more tips and pens as you decide to.
I'm using this https://www.amazon.com/dp/B08Q4FLV92/ref=cm_sw_r_cp_apa_glt_fabc_AMYWYNEG4QVEA1PD5YXS?_encoding=UTF8&psc=1
The tips turn red but its usually just the middle of them, not the very tip of the wire.
Thank you! I’m quite happy with them. Got the wood on Amazon 80Pcs Wood Burning Pieces, Selizo Wood Burning Kit with 4 x 4 Inch Unfinished Wood Squares Crafts Tiles Blank Wooden Slices for Wood Burning Coasters Painting Carving https://www.amazon.com/dp/B086VCBMT4/ref=cm_sw_r_cp_api_glt_fabc_0P396HQGZ0Z15HQMXGJK?_encoding=UTF8&psc=1
No, You need thinner tips. That's one of the reasons the higher end burners use wire or razor thin tips - they heat up very quickly.
Any time a tip contacts any surface, it will transfer heat, and cool down. The longer it takes that tip to re-heat, the more uneven the burn will be. Another thing to consider, is the medium that's being burned. Wood similar to Pine has an uneven grain - tighter, harder growth rings in the winter, and looser in the summer. The loose grain burns easily and the winter grain is harder to burn.
If you want a cheap solution to see if you like the hobby, you could buy something like this. It's a cheap Chinese burner, that may or may not have reliability or longevity issues, but many users seem to like them. If you're sure that you want to take up this hobby, a better solution would be the Colwood Detailer. I've had one for years and love it. You can buy additional tips as you feel the need.
I have a workbench and yea, I just kinda deal with getting sore and stiff from being hunched over. But I’m always on the lookout for better options!
A friend of mine uses a lit magnifying arm (something like this: https://www.amazon.com/dp/B01K10XA1O/ref=cm_sw_r_cp_api_glc_fabc_A8l5FbAPYX7Q0), that might help with not needing to be as hunched over.
With your budget, you would probably have to pick up something like this. Personally, I'd go with a brand name burner at about twice the price, but this might make an intermediate step. You can also save up so you could afford something like the Colwood Detailer.
The pros seem to go with razortip or colwood
I have a knock off similar to this
TEKCHIC Pro1 Professional Wood Burning Kit with 2 Woodburners for Wood Burning Pyrography with 20 Wire Nibs Tips Including Ball Tips(with Case) https://www.amazon.com.au/dp/B081CFBF65/ref=cm_sw_r_cp_api_fabc_amkQFbT6TXE6F
It has temperature control, dual pens, multiple tips, quick heat/quick cool. I’m pretty happy with it compared to the cheap soldering iron types but I haven’t used a pro kit to compare
Just the first one that popped up on Amazon when I searched for burning pens.
Walnut Hollow Creative Versa Tool... https://www.amazon.com/dp/B005P1TRAS?ref=ppx_pop_mob_ap_share
I only use the universal tip that seem to be sold with every pen I’ve seen
I've been working on wood burning for a bit. Tried using just the single tip burner. But you can't control the temperature. I found this one on amazon for about $50 and it has totally changed my game. Wood Burning Kit 110V 50W Crafts Gourd Wood Burning Tools Multifunction Pyrography Machine Heating Kit Single Port Wood Burner Tool with 2 Burning Pens 20 Tips Pointer Display Temperature Control Red https://www.amazon.com/dp/B06XK8R4HR/ref=cm_sw_r_cp_apa_i_VM7sDb6KXDGHN
Hello! I've just started my first wood-burning project and am looking for some advice. I am making the Oogie Boogie man from Nightmare Before Christmas. While I did OK with the outline, I am struggling with filling him in.
I would like to make him as dark as possible, but no matter what metal tip I use, I'm struggling to make any real progress. I've done most of what you see using the shading tip (looks like a leaf?).
Any advice? Thanks!!!!!
​
The kit I am using: https://www.amazon.com/gp/product/B005P1TRAS/ref=ppx_yo_dt_b_search_asin_title?ie=UTF8&psc=1
Robert Sorby - Peter Child Pyrography Machine with pen, a meter length of 25 standard wire gauge, six spare nickel chromium nibs and a handy 12 page manual full of ideas. https://www.amazon.com/dp/B073SJKYXF/ref=cm_sw_r_other_apa_i_BHtwFb5JWKHFQ
I like Krylon artist's spray It's made to protect artwork, and has UV protectant.
I like spray on finish with UV protectant. This is the satin finish - a couple of coats will give a nice sheen and protect your work.
I like spray acrylic with UV protectant. I prefer matte, but you might like the satin. Give it a couple of good coats.
Get magnifying lenses. I normally wear 1.5x readers but for burning, I have a pair of 2.5 and another of 3.0 for really small details.
Also, get a small fan to suck the smoke away from your piece. Don't get a fan that will blow air over your piece to blow the smoke away: blowing air over the piece will effect the temp of your burner. Instead, get one that will suck the air & smoke away from it.
If you can afford it, get a "fume extractor" fan meant for soldering. Amazon has a decent selection from $30 to $40, although you can spend tons more than that if your budget allows.
This is the one I have: https://www.amazon.com/Adjustable-Absorber-Extractor-Soldering-Eliminate/dp/B077Q99PPV
That’s really good you won’t mess it up. Best tip I got was if you make a mistake just think , “ I meant to do it.”
For tips I fell in love with this rounded tips from amazon.
https://www.amazon.com/Tekchic-Wood-Burning-Tips-Pro1/dp/B082W3CPWW?ref_=ast_sto_dp
Here's a Colwood Detailer kit over on Amazon. A great kit. Or for just a little more than your budget, you can pick up the Colwood Super Pro, A dual pen system.
I've used the Detailer for years and love it, but if I'd had the money at the time, I'd have bought the Super Pro.
I actually don’t know because it was a gift, but I do know it was a starter kit from amazon. From what I’ve seen they’re all pretty similar though. Something like this.
We get most of our boards on Amazon. This is an example of what we like to get. These are the 12x12 and we get a 12x24. Lots of other good cuts of wood there too.
https://www.amazon.com/gp/product/B01N4B1G3B/ref=ppx_yo_dt_b_asin_title_o06_s00?ie=UTF8&psc=1
We give them a good sanding before we start burning, just to get a nice smooth surface. We also pick up some nice wood at Lowe's. We found out that if we buy a large sheet and have it cut down that saves us some money.
No worries. https://www.amazon.com/dp/B06XK8R4HR/ref=cm_sw_r_cp_apa_i_VM7sDb6KXDGHN That's the burner that I have. It's decent and better than the typical soldering iron one. I also think I might just need to get more tips to use.
Not sure if you have purchased one yet. But I have Wood Burning Kit 110V 50W Crafts Gourd Wood Burning Tools Multifunction Pyrography Machine Heating Kit Single Port Wood Burner Tool with 2 Burning Pens 20 Tips Pointer Display Temperature Control Red https://www.amazon.com/dp/B06XK8R4HR/ref=cm_sw_r_cp_apa_i_VM7sDb6KXDGHN That one and although it's all in chinese. It's still got two pens and a great assortment of tips and control over temperature.
I used a Dremel versa torch ;)
I use a toothed hanger, it has a jagged edge to catch a nail, and 2 screws hold it in. Sawtooth Hangers Picture Frame Hanging 1.5'' Hanger Double Hole with #4 Screws Golden (50 PACK) https://www.amazon.com/dp/B071Y3ZDGL/ref=cm_sw_r_cp_apa_i_UHpkCbYDKGGJA
Then I use 2 clear bumpers on the bottom corners. Waxman 4215395N 1/2 inch Round ... https://www.amazon.com/dp/B001WAK6DS?ref=yo_pop_ma_swf
A lot of people start with the Walnut Hollow burner.
I use a Colwood Detailer and absolutely love it. It's very easy to add to the pens and tips as you find a need.
I just upgraded to a Colwood Detailer (from the same walnut hollow tool you have) and I really love it so far!! It was about $150 on amazon, including shipping, 3 tips, and a pretty cool workbook. Amazon link
Thanks a lot for the advice. Will this sandpaper work? Can you please link me to a suitable sandpaper on Amazon.
no, i got it on (amazon)[https://www.amazon.com/Walnut-Hollow-Introduction-Intermediate-Woodburners/dp/B000VRTG8Y/ref=sr_1_6?ie=UTF8&qid=1476735159&sr=8-6&keywords=wood+burning+kit], but it wouldnt surprise me if it was the same.
Yes, that's the tool I used. I didnt have a whole lot of room so I wanted a really fine tip and thats all I had, so I just carefully (and very lightly) used the tip of that. I tried using it for shading where the snake loops back on itself and ended up burning too much. Still learning.
Thank you! I definitely think you should give it a shot. From what I see so far on this subreddit, I use a different tool than most. https://www.amazon.com/Walnut-Hollow-Versa-Temp-Temperature-Woodburning/dp/B005P1TRAS/ref=sr_1_3?ie=UTF8&qid=1466045184&sr=8-3&keywords=wood+burning , but I really like it.
I'd say that I'm somewhat artistically inclined, but in that I like to be creative. I wouldn't say I can freehand well, aside from stick figures. I use carbon paper to help me transfer images.
The tricky part is more in your steady hand and eye for shading than in your artistic ability, I think! I mainly use three tips: one that looks like a pencil, one that's a tinier pencil tip, and one that looks like a leaf (I use that one for the shading and the others for outlining). That's it!
I've been doing this for maybe a year now, and still learning techniques. Give it a shot!
I'm assuming you're using one of the cheaper green pens with the three tips. There's another, more robust hobby pen from the same company that comes with a circle-shaped tip to it, that's about the size you're asking. The burns won't be crazy fast, but if you do it right they'll come out as nice black polka dots.
This is the pen I'm talking about
If that doesn't work for you, you should look into getting a more expensive setup or a blowtorch that you can heat that circular tip with more quickly.
As long as you have a laser printer (not laser jet either). Print the image reversed, and place securely with tape, inked side down on the wood. Buy a chartpak colorless blender pen (usually about 5 bucks a pen), and run it over all the inked parts on the paper, and then a blunt dull object to press the ink into the wood. I usually use the back of a spoon. This technique works like a charm, and you can get perfect transfers of very detailed images. Then you just color in the lines with the burner.
I know this is an older post and sorry if this is a dumb question - but when you say pencil crayons do you mean like colored pencils? Like these?
Are you talking about a VersaTool/Walnut Hollow (or similar) with screw-in brass tips? I was getting the variety packs at Michaels using the 40-50% off coupons they always have, or at Menards for around $6. You can get the mini chisel tip by itself at Amazon for $5 each with free shipping. I never really used the other tips in the sets either.
Edit: you can get them for $2 here (regular, not mini, I think).
http://www.amazon.com/Walnut-Hollow-Creative-Versa-Temp-Temperature/dp/B005P1TRAS
This is what I learned on. It's a great starter burner with temp control and multiple tips. I've seen it for sale at any number of craft stores but I'm pretty sure i got mine at AC Moore. Good luck and happy burning!
This is the one I have http://www.amazon.com/RAZERTIP-DUAL-BURNER-W-PEN/dp/B0002IXT30 . I love it, I bought the med razor pen and one that has uses replaceable and shapable wire. I have never used the ball tip pen but its going to be my next purchase along with a shader.
It depends on what volume of product you're looking for.
If you're looking or a smaller amount, check your local craft store. I know Michaels has live edge cuts in their raw wood aisle. You can also shop around online.
If you're looking to buy in bulk, I'd recommend finding someone who can supply you directly (keep in mind that you will probably need to dry the wood yourself, as you will most likely be getting fresh cuts). A lumber yard, an arborist, even a craigslist ad for someone with a bit of land and a chainsaw.