
What are
/r/ender5's
favorite Products & Services?
From 3.5 billion Reddit comments
The most popular Products mentioned in /r/ender5:


The most popular Services mentioned in /r/ender5:
Cults.
Autodesk Tinkercad
Visual Studio Code
PrusaSlicer
Meld
Hackster
PlatformIO
IFTTT
The most popular reviews in /r/ender5:
Oh man, that sucks. Fortunately it's pretty easy to solve yourself... I have a set of drill bits and metric taps like this one. Just use a little oil on the tap (cutting oil is best, but even cooking oil will work for this job too.) and turn it in half a turn, then back out a quarter turn, then back in until you reach the depth you need. (Plenty of YouTube instruction!)
You don't really need the drill bits as the hole is pre-drilled but having them and the taps has come in quite handy with 3D printing, as they're really good for cleanup and preparing threaded holes in printed parts. If you find a tap set locally, you can still be printing by the end of the day!
Everyone is yammering on about T-nuts, but you did not ask about T-nuts, you asked about the tensioner. I think you attached the wrong image. Based on reverse image search, if you are asking about this tensioner, then yes, this one will work fine on either the X-axis or the Y axis. Note that the centerline of the idler is slightly offset to one side of the extrusion, so if using on the Y-axis, one belt will be slightly higher than the other. No big deal. https://www.amazon.com/Sunhokey-Synchronous-Straighten-Compatible-Accessories/dp/B081GW58LZ
Not sure if they just sell the board on its own. I cant see it even being worth the effort to change the board the whole psu unit is pretty cheap. Just buy a new psu. This is what you need.
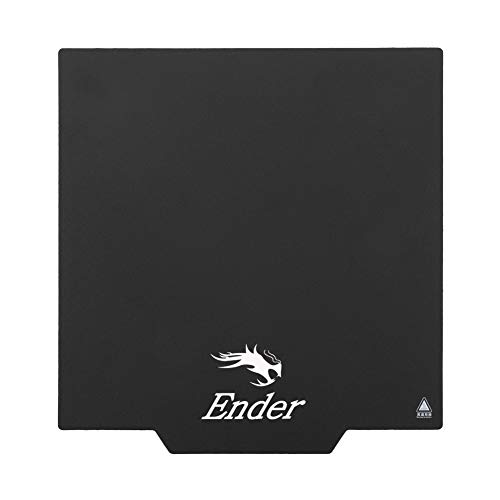
Don't bother, in my opinion. Purchase this instead. No tape. No glue. No hairspray. Just wipe it off with a bit of alcohol and start your print.
I would buy a springsteel+pei bed and an inductive sensor for the same money.
Inductive sensor is the best bed sensor out there, solid state (so it is unlikely to break) and great accuracy.
https://www.amazon.com/uxcell-Inductive-Proximity-Sensor-Detector/dp/B07CWR14V2/
https://www.amazon.com/Resistance-Removable-Flexible-235mm×235mm-Replacemnt/dp/B08B4CBY9C/
Digital calipers are great to have for when you start designing things that need to fit something you already have. Radius gauges are good to have as well. These are the ones I ordered, I just had to clean all the oil off of them with some alcohol, but they’re a good little set.
Noctua is the path. I got this model and a pair of 4020 Noctua 12V fans (plus a pair of step down converters).
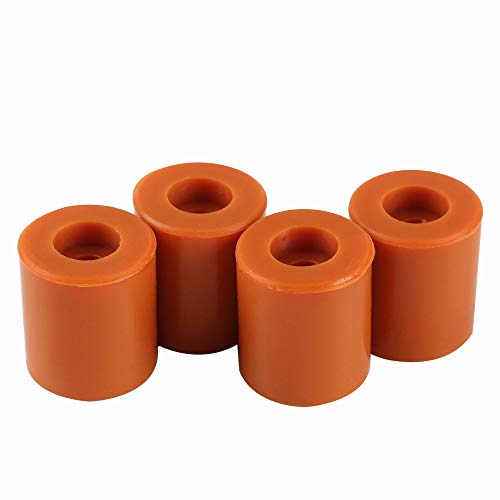
No different sizes, they work just like the bed springs only they stay put much better and don't allow for as much movement.
I mostly run prints on the Creality textured glass bed.
I have these on mine https://www.amazon.com/dp/B07RZKF8MB/ref=cm_sw_r_cp_apa_glt_fabc_D5ZCEFSGRM0JC489AMYH
It was only $50 for me. https://www.amazon.com/gp/product/B07R3RRR13/ref=ppx_yo_dt_b_search_asin_title?ie=UTF8&psc=1
It helped, but in the end, in conjunction with the PEI surface and Microswiss Direct Drive, printed wheel to help filament swaps and All metal hotend, I have had no issues with PLA, PLA+ and PETG, but trying TPU needed less tension on the direct drive and was pretty much fused to the PEI.
it's this magical lil thing. comes in a bottle for like $20 its liquid adhesive for everything from PLA to some things you won't even dream of printing! it works wonders.! here's it on Amazon https://www.amazon.com/dp/B079984GV5/ref=cm_sw_r_cp_apa_glt_fabc_N2JN3YD6FSDTPCSYFARK?_encoding=UTF8&psc=1
got some the day I started, haven't even Finnished it once
I run this fan and DC-DC. Works great and practically silent.
Noctua NF-A4x10 FLX, Premium Quiet Fan, 3-Pin (40x10mm, Brown) https://www.amazon.com/dp/B009NQLT0M/
eBoot Mini MP1584EN DC-DC Buck Converter Adjustable Power Supply Module 24V to 12V 9V 5V 3V (6 Pack) https://www.amazon.com/dp/B01MQGMOKI/
ENOMAKER Direct Drive Extruder Ender 5 Conversion Kit, Upgrade Near-end Extrusion Great at Printing TPU for Creality Ender 5, Ender 5 Pro 3D Printers https://www.amazon.com/dp/B08399KX3X/ref=cm_sw_r_cp_api_glt_fabc_XAX5S6EDCW9SEF4VWQPW and just added Micro Swiss All Metal Hotend Kit for Creality CR-10 / CR10 / CR10S / Ender 2 / Ender 3 Ender 5 Printers .4mm https://www.amazon.com/dp/B0789V2D7C/ref=cm_sw_r_cp_api_glt_fabc_V2GYZ4910Z2KR0GS878Q?_encoding=UTF8&psc=1 to do carbon fiber petg
You can only lower it because it doesn't know where it's at and it doesn't want to crash, electronics have feelings too! But seriously it's the pitch on the z axis screw. They've made an adjustment to recently built ones but the only way to remedy this is getting a less steep pitched z axis rod.
Edit: https://www.amazon.com/dp/B07QXYT9MH?ref=ppx_pop_mob_ap_share
Here's the one I bought. It's overkill, and you'll have to adjust the steps/mm in the firmware. But it works and there is a zero % chance the bed will fall!
I've replaced just about everything but the frame at this point...
Ive got an Ender 5 with ExoSlides, SKR 1.4 Turbo w/ TMC 2209 drivers, Pi 3b+ inside the electronics case, BMG Extruder from Bondtech, Pancake stepper, EZABL, Slice Mosquito Hotend, thermistor and heat-block, 5015 fan, Logitech c920 for the camera
I moved the electronics case with THIS
The spool is kept in THIS
Im sure ive missed something but ive done multiple rounds of mods. I'm planning to cut some extrusion and build a second printer soon...
Added the ENOMAKER Direct Drive Extruder Conversion Kit to my Ender 5 Pro.
After fixing my X-Axis limit switch (the hotend shifted a few mm), adjusting my probe offset (x/y), fixing my bed level and recalibrating my Z-Probe offset we’re back up and running.
Side note… when using a BLTouch (or I’d suppose any probe) don’t worry about leveling the bed, but making sure it’s not slanted. I used a triangular architecture ruler to line the bed up as straight as possible. The inconsistency with the first layer was driving me nuts (thanks google!)
STL : https://cults3d.com/fr/mod%C3%A8le-3d/art/moai-statue-no-overhang
Ender 5 pro with Microswiss direct drive and nozzle. bl touch. PLA is Eryone black Glitter.
Printed at 0.2mm without infill, 4 walls and no supports in 10 hours! (Max speed 80mm/s)
A corner lifted at the beginning but fortunately it recovered very well!
I never dared to print for so long before because of my cats. Now I have an enclosure and I've gotten more reliable prints so I tried this beautiful model!
This is the setup I'm running. Tough extruder from th3d and a printed adapter for near DD.
https://www.thingiverse.com/thing:4554469
And this is the Manta Ray mount:
So, the big difference is the LPC is a "modern" 32 bit microprocessor, where as your existing v1 "Melzi" board uses an 8-bit processor design that's pretty much the glorious peak of 1980's technology.
Previously those 32 bit processor boards were rather expensive, and the old Atmega chip based ones were dirt cheap. Even now, though 32bit boards have become more common, most of them are now using the lower clock speed "STM32" processor rather than the more expensive LPC chip.
For comparison, most Ender owners with an LPC chip forked out the cash for a BTT SKR 1.4 Turbo board to get it.
As for learning CAD, I'd recommend https://www.tinkercad.com if you're just getting started. It's simple, but that's a good thing at first. If you're on more limited hardware, "FreeCAD" is a viable option you can run on something as cheap as a $55 Pi 4, but it's a bit painful to use compared to the commercial offerings. Fusion360 also has a "free" version for a year if you're not doing commercial work as well.
Depending on what you want to do, the biggest thing you can do now is to learn some basic design software for 3d modeling. Bonus is that you can try and build some stuff you already have in mind. I can recommend tinkercad.com since it's free and super beginner friendly.
I got a borosilicate bed, shit does stick to it, used this and it works amazingly now, you can print multiple times in it 10/10 will keep using glue again
I have the 4.2.2 board. Here is the link Creality sent me. It has the firmware an install video for this bl touch. A few things to note. The setup video is on a touch screen Ender 5 Pro. The menu options were a little different on mine so if you get stuck feel free to PM me. The menu options should still be there but they might be in different places than in that video. The wiring setup is accurate.
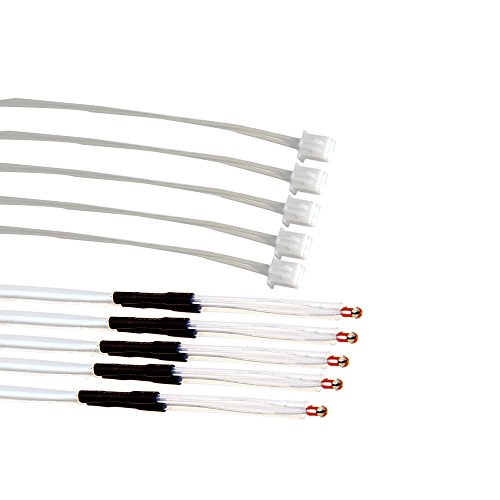
They're all pretty generic, I'm not sure there's any real model numbers for any of it... the important details are that the thermistors are the NTC 100K kind, the wires are as long as your stock one, and it has the same connector on the end. And similar for the block heater, except it's the 6mm diameter style, and stock power is 40w.
I think these are the proper ones, but double check against what you currently have before ordering to be certain, these heaters may not have the right connector for you in the right place: https://www.amazon.com/WINSINN-Removable-Cartridge-Ceramic-Creality/dp/B07Q11N8BH/ and https://www.amazon.com/WINSINN-Printer-Removable-Thermistor-Creality/dp/B07Y4NYMSN/
I think people are assuming the problem fan in this case is in the one inside the PSU, which may not have a connector, but there seems to be a few version of the Landy (one of which actually says Landy on it!) so it's entirely possible that yours has a user-replaceable fan in it. I still personally say that at the point you discover you have a the knockoff, it's time to order the real Meanwell PSU. I've already smoked too much equipment through using cheap power supplies to want to risk it, particularly if you've already lost a fan and possibly overheated things.
Yes, 4010 fans are what I used. Specifically this one and this one.
Performance on both of those are close enough that I consider it negligible.
I haven't heard anything about the throughput not being enough. I've had one jam in the last ~3 months since I've replaced it, but I can't say for certain that was due to heat creep. My hotend is a mosquito magnum clone, so it should be more efficient at cooling than a stock Creality heatsink. Maybe it can cause jams on the stock ones, or equally inefficient ones?
Honestly ignore my ramblings, just get the Noctua 4020 fan to be safe. Cost difference is basically null and the added bulk isn't really much. You may have to adjust fan duct mounts to accomodate but that depends on what you use.
Those are JST-SM connectors. You can buy a connector kit to make them. The same crimping tool also works for making JST-XH connectors (more common on 3D Printers) where it's very convenient to have on hand.
3D Printer Parts Open Timing Rubber 2GT Timing X Axis 765x6mm Y Axis 720x6mm Belt for Creality Ender 3,Ender 3 Pro, Ender 3 v2 Ender 5,Ender 5 pro VOXELAB Aquila https://www.amazon.com/dp/B089FJT72R/ref=cm_sw_r_cp_api_glt_fabc_S874S651FMRWBA0KTXXZ
I bought this , removed the bed completely, cut holes for the leveling screws, installed it and it was a game changer! Cut about 30% heat up time at 100C and temps are much more steady
These are not the exact same ones that came with my printer and this is just an example, but can find several options on Amazon.
2020 Corner Bracket, 2020 Series Aluminum Profile Connector Set, 10pcs Corner Bracket 6mm Slot Aluminum Profile Accessories https://www.amazon.com/dp/B07VW9H99P/ref=cm_sw_r_cp_api_glt_fabc_PSCB9446KB5FSDDM7NJH
I've got a few printers and I already ruined some JST connectors. I wish I had this heads up a few years ago. hah.
I did order a MEAN WELL LRS-350-24. As for the SKR Mini E3. I have one on an Ender 3 and it's getting TMC Connection Error. I read that this can be caused by using a raspberry pi and it seems to always pop the X-Axis Stepper Driver which causes the error, and of course, I was using a Pi with Octoprint. I found something about moving some Jumpers on the SKR board and interfacing the pi directly to the board instead of using the USB port.. I need to find that github page again. So much learning to do. So annoying.
Thanks for the input though, my man.
Yes use this one. It has an adapter for the stock creality board so it will work right. You will also need to install a custom firmware.
This guy is awesome. I used him for the vast majority of the knowledge I’ve obtained over the last year.
This one. It’s a pack, I figured a spare part for my XY wasn’t a big deal.
Creality 3D Printer Original Stepper Motor 42-40/1pcs and 42-34/1pcs 2 Phase 0.8A 1.8 Degree 0.4N.M https://www.amazon.com/dp/B08KTJHM9P/ref=cm_sw_r_cp_api_glt_fabc_9P0HKBDWTKJ7XX4QQQCS?_encoding=UTF8&psc=1
This is a good glass bed I use it on 3 printers and have recommended it to multiple people already.. .. .. as far as adhesion the most needed for glass is hair spray unless your having major issues with a filiment then you might use a glue stick same glue stick as you used in school .. .. .. https://www.amazon.com/dp/B08K92X26D/ref=cm_sw_r_cp_apa_glt_fabc_K0C5D0Y13XBR05DTDF43?_encoding=UTF8&psc=1
I put a winsinn BMG clone on mine and I'm pretty happy with it. Do note that most of the reviews indicate that filament can get stuck in the channel in these when unloading, which is definitely a common problem if you do it wrong. If you have a custom firmware with the "M600" command enabled, or otherwise have a firmware load/unload menu option that does a short extrude then a retraction they work great. They're a bit more problematic if you just try to grab the filament and pull by hand to remove it though.
I got this and it is superb, and loves PETG too
https://www.amazon.co.uk/gp/product/B08D77MFX6/ref=ppx_yo_dt_b_asin_title_o03_s00?ie=UTF8&psc=1
If you need a glass bed also this ones nice haven't had any adhesion issues as long as its cleaned before print
Forget all this "get a 'quality' glass bed" / mirror / hair spray / glue / whatever nonsense and get one of these PEI spring steel sheets. Tiny parts, square parts, circular parts -- doesn't matter. They stick without warping and don't require the silly stuff people put up with just to try to get their prints to stick to glass. Still have yet to have a person describe why all the hoops they jump through / messes that are made on their build surfaces / brims and rafts (waste of filament in my opionion) are somehow better than switching to a print surface that just works...
If you're using the crappy Creality flexible or special glass bed, switch to this (use the 235x235 -- the 220x220 is too small). You'll have a much better time. :)
I use Maxi-cure ... Fast dry time and it's nice and thick so it stays where you put it.
I know I could have printed something, but I wanted it to be extra sturdy holding a webcam for Octoprint.
I used this mount https://www.amazon.com/gp/product/B07GVJMWFF/ref=ppx_yo_dt_b_asin_title_o04_s00?ie=UTF8&psc=1 and camera (coupon makes it $20). https://www.amazon.com/gp/product/B086GQSKK3/ref=ppx_yo_dt_b_asin_title_o05_s00?ie=UTF8&psc=1
I replaced the m5 hex screw with one that was slightly longer. Only using 1 hole is still very solid on the camera mount.
When I put a nasty gouge in my bed, I bought this
Creality Original Ultra Flexible Removable Magnetic 3D Printer Build Surface Heated Bed Cover for Ender 3/Ender 3 pro/Ender 5 3D Printer 235X235MM https://www.amazon.com/dp/B07X3WBNPX/ref=cm_sw_r_cp_api_glt_fabc_22GHBCN1F68M9R0S99RY?_encoding=UTF8&psc=1
This is the one you want to replace it with to keep everything the same but get better quality.
https://www.amazon.com/dp/B013ETVO12/ref=cm_sw_r_cp_apa_fabc_KZN76CQCESQP3MGGPHFK
Kersey fabrications has a vid where he shows the differences inside a meanwell and a cheapo one.
I have the meanwells in both of mine.
Endend up ordering the E3 mini v2 with TFT35 E3 V3 - Now where is that jar of patience? I could sure use some now...
its a 4020 Blower. i hope Links are allowed here. i always use these threaded inserts for everything. there are other, cheaper ones out there, but these are unbeatable cause of their geometry.
Mine came with the aluminum extruder and Capricorn tubing. I think I have the springs already as well -- this is my model: https://www.amazon.com/gp/product/B081SPJ2VX/ref=ppx_yo_dt_b_search_asin_title?ie=UTF8&psc=1
I have a glass bed already coming. I'm hoping that it clears up my leveling. No matter what I always have one spot that doesn't seem to level right. Maybe it has a slight bow to it?
https://www.amazon.com/gp/product/B086GK1LG9/ref=ppx_yo_dt_b_asin_title_o03_s00?ie=UTF8&psc=1
​
She's a good board.
Since you are running Octoprint anyway, you might be cheaper, and easier in the long run, to add a relay instead. I have bought the relay, but have not done the install yet, so this is theoretical knowledge.
A relay works by taking a small voltage (like the 5V that the Pi can generate right off the bus) and using it to allow a larger voltage to pass through. Think of it like a powered switch. There are three lugs on the relay. I will call them A B and C. If there is voltage coming from the Pi to the relay, then A and B will be connected. if there is not, then B and C will be connected. This lets you setup the relay in one of two ways: Normally powered or Normally Dead. If you cut the main 24V power line in the power supply, you can hook it up so that it is normally powered, unless the Pi shuts it off. This way you can still print (from SD Card) without the Pi on or connected. The Pi will keep it shut off when you are not using it. If the Pi fails, the printer will be on.
The second way (and the way I intend to do it) is to have the relay normally off, and the Pi will turn it on. This way, if the Pi is not working, neither will the printer.
The way this works, you use an addon in OctoPrint called "PSU Control" It will turn on the Power supply to the printer when you are ready to use it, and turn it off when you are done. Think of a desktop printer that goes into standby mode when not needed, but wakes when you are ready to use it.
Here is the relay I got: (out of stock right now, but gives you an idea)
https://www.amazon.com/gp/product/B00VRUAHLE/ref=ppx_yo_dt_b_asin_title_o04_s00?ie=UTF8&psc=1
​
Edit: minor word changes
They're all the same one. It'll fit the Ender 3, Ender 3 Pro, Ender 5, Ender 5 Pro, etc. It should say the size is (or very close to) 235x235x4mm.
This is the one I got (UK) https://www.amazon.co.uk/gp/product/B089B76DW4/
Yes, its a great article, you can actually get the NASA paper here: https://ntrs.nasa.gov/citations/20170000214
I debated using the IR heating lamps, instead of the fan heater i ended up going with: https://www.amazon.com/gp/product/B07NYX5DKD/ref=ppx_yo_dt_b_asin_title_o08_s04?ie=UTF8&psc=1
But to use lamps would require me to build an entirely new enclosure.
That's interesting info about aluminum blocks! Also, while it does seem like the only brand name copper heater block is by E3D, there are a ton of them on AliExpress. But the E3D block is currently $24.44 so it's not too much to pay to guarantee you get a quality one.
Let the bed cool all the way and usually they'll just pop off. If not, I use a paint scraper or one of these thingies that slides underneath and the pressure is on small areas https://www.amazon.com/dp/B01A81FXMK
You can create a Y-splice using the existing fan cable. Either by hand or by using a splice. I used something like this and it's been working great
yep created a mount specifically for my Pi cam to sit on top of the bracers (can place in any corner obviously).
here is the cam I use:
https://www.amazon.com/gp/product/B07R4JH2ZV/ref=ppx_yo_dt_b_asin_title_o06_s00?ie=UTF8&psc=1
if you want the files for them I will send them. They should work fine with this specific camera... not sure of other versions and models. I had to design this one because there were none that fit properly online..
​
I got stls, step, and f360 files....shoot me a pm if you're interested.
https://www.amazon.com/gp/product/B07H94WCKW/ref=ppx_yo_dt_b_asin_title_o03_s01?ie=UTF8&psc=1
I have purchased new bearings for my printer previously for a Dual Z mod and again recently to build a second printer. These can be removed and if one is sticking or damaged it should be replaced.
I have lubricated them by simply lubing the rod and running the bearing up and down.
I use a generic crimper like this crimper which gets me good results from the Molex Micro-Fit 3.0 down to the 2mm JST PH connectors used in the stepper drives. There are racheting ones that have a few more dies which is better
I also have a fair amount of practice doing so. The biggest mistake most people make is stripping the wires too far back, followed by using pins that are the wrong size for the wire.
Edit: would not do this in an industrial setting.
Its actually not the AmazonBasic's brand. I assume they picked that name to sound similar to amazon's brand, because marketing is hard and that's easier.
Here's a link to what I would say is my favorite color/roll of filament so far. I have no idea when they're actually going to restock, I've been waiting awhile so maybe they just wont come back :/
Micro Swiss Plated A2 Hardend Tool Steel Nozzle RepRap - M6 Thread 1.75mm Filament .4mm
And this is the hotend I also purchased if you're wondering that as well
With these two, there are some bumps in the road but definitely works if you can handle it.
If you would like me to lay out the details of what I did I will
I've been dealing with this issue for about 20 days. When mine freezes, it emits a high pitch sound as well. I have reached out to BIGTREE and they just say flash their newest firmware, which I've done countless times now. After doing every troubleshooting technique, I decided to finally just go with one of these because my friend has it and works perfectly. Good luck, please let me know if you ever find an answer.
They're generic 10-pin 2.54 (0.100") IDC cables, which you can find anywhere in all kinds of lengths. Just as an example, these are 50cm (20") long. Its not really worth buying the individual parts unless you're going to be doing a lot of them
It looks like the PH (stepper) connectors are actually available, but you're going to buy a lot of parts you'll never use. And by the time you pay for both kits, getting just what you need from Digikey/Newark will actually be cheaper, even with shipping. https://smile.amazon.com/JST-PHR-Connector-Female-Housing-Adapter/dp/B07L3GL995/
Not really. Just make sure it is 24 volts instead of 12 volts. There are 2 wattages available. The higher heat faster, but also could put extra strain on the board and PS. I got mine from Amazon. Actually got a kit with 5 heaters and 5 thermistors for under $20.
Like this...
G27? G29 is the ABL command. Where did you change it to 5x5? I was thinking of doing that myself. I went with TH3D instead of regular marlin though.
Maybe try a glass bed? I got the creality one on Amazon and it is amazing. https://www.amazon.com/dp/B07RD6D2ZQ/ref=cm_sw_em_r_mt_dp_U_vdiREbXB5R5H8
I would recommend taking this opportunity to upgrade your board to the Creality 4.2.7. By the time you purchase that adapter ($8) and the tools to flash a bootloader, you're about half way to a 32 bit silent board that already has native support for the CRTouch.
Thank you for the help! Unfortunately the motor from the attached link is not availible in german anazon. I tried looking at different ones with the search name that you suggested and i found this one. Could you please check it if it is okay? dual shaft stepper motor
I got rid of those wheels and replaced it with a linear rail... The wheels added more time to maintenance (cleaning and tightening bolts) and replaced it with rails I got from Amazon (OUYZGIA MGN12H 300mm Linear... https://www.amazon.co.uk/dp/B08ZY4ZYC6?ref=ppx_pop_mob_ap_share)
So far my prints have cleaner (more uniform lines)
I believe it's call a lever arm. Unfortunately it's not available as a separate part. You need to buy the whole switch assembly. This is what I bought when I broke my limit switch/endstop.
https://www.amazon.com/dp/B09K7K3486?psc=1&ref=ppx\_yo2ov\_dt\_b\_product\_details
You're better off buying a new coupler. To get the shank of the screw out you need to drill a pilot hole and use a screw extractor which would be incredibly hard for something like this.
https://www.amazon.com/gp/product/B08G1BN1BK/ref=ppx_yo_dt_b_search_asin_title?ie=UTF8&psc=1
I use this one with Polyamide tape on one side. Works great for all common filaments. Nylon not well at all but can flip it and make due with some of the usual treatments for that kinda filament.
Not OP but I've used these and they worked for me. https://www.amazon.com/gp/product/B0150YLX9C
but also just look up ender 5 thermistor. Pretty sure they're the same as the ender 3 tho maybe a bit longer wiring?
You can use a gear puller instead like this:
ShareGoo RC Motor Gear Puller... https://www.amazon.com/dp/B09BPXC5W1?ref=ppx_pop_mob_ap_share
Nice little tool to have and it basically costs the same as a replacement nema-17. I’d prefer an extra tool over an extra stepper motor to be honest, but I can see people choosing a spare motor (though you need to remove the gear to make it usable)
You could use a Mean Well UHP power supply, like this one: https://www.amazon.com/MEAN-WELL-UHP-350-24-350-4W-Switching/dp/B083P5VP3L/ This model is fanless, also provides 350W of maximum power, and the mounting hole pattern is the same (or very close) to the one used on the Ender 5. The catch is that it is more expensive.
That's why I don't print on the magnetic bed. Go to the hardware store, have them cut you a 1/8" thick 9.25"*9.25" piece of glass, stick this on there and you'll have a perfectly flat bed. The stock bed is cheap and they're all warped from the manufacturing process.
Just ordered the Winsome Wood Groveland Dining, Oak from amazon. It's just about 30" x 30" x 30". Only $100 when I got it.
Same fans as the ender 3. I would just buy a replacement fan at a certain point, snip the ends on the wires and wire in the new one with some solder tubes. But I also agree with the above, you could always just print the necessary parts.
FWIW the standard connector (if you want to roll your own) are:
Thermistor side: SMP-02V-N or SMP-02V-BC (the difference is color). Pins are SHF-001T-0.8BS
Board side: SMR-02V-N or SMR-02V-C pins are SYM-001T-P0.6(N)
Cable sets be like this: https://smile.amazon.com/Gikfun-2-Pins-Female-Connector-Arduino/dp/B01EJI8TQK/
I agree with others regarding retraction and making sure whatever build surface you have the printer is leveled (aka trammed).
I have a PrinterMods direct drive but I did that for other considerations, not because of stringing.
What type of filament are you using? Some have better quality control and output than others but asking is like asking if you prefer Mac or Windows or Linux.
What temperature were you printing at? Have you ran a temp tower? Then you can also run a stringing test.
If you are using the original build plate the original 5Pro came with, get a spring steel sheet with PEI. If the original magnetic is on the aluminum carriage you do not need to remove it, just make sure the new build plate sticks well. Here is what I purchased: https://www.amazon.com/gp/product/B07ZS8S11W/ref=ppx_yo_dt_b_asin_title_o00_s01?ie=UTF8&psc=1
The issue is the filament slightly deforms going through the gears and then because of the extra tight tolerances of the Capricorn tubing it get stuck. Then you’re left with the extruder gears grinding it down until it breaks.
I’ve purchased this one before and it’s great.
If you’re concerned with not being able to print at higher temps then you can spend $40 on a bi-metal heat break which basically turns your stock hot end into an all-metal hot end. And you can lower your retraction (mine went from 7mm to 2mm).
Ive been scoping this project out pretty hard. I think once I get my new printer running on petg im going to start this. that being said
1) what do you think of these xt60's https://www.amazon.com/gp/product/B09SL2MNN1/ref=ox_sc_act_title_2
2) where are you finding the microfit molex with 2 pins for the back plate? these seem ideal for labeling various ports with text and having one molex for each thing, like the hot end fan, etc.
This exact thing happened to me. Dont buy a motherboard (I did this and it solved the issue for only a day). Get these!
-Some Rando on the Internet.
I usually prefer velcro straps. As you can remove them to do some maintenance and re-add them later when you are finished.
Something like this for example: https://www.amazon.com/VELCRO-Brand-ONE-WRAP-precortado-organizar/dp/B001E1Y5O6/ref=mp_s_a_1_4?keywords=velcro+straps&qid=1660478780&sr=8-4
As for zip ties size between 10-20cm should be more than enough, but you could need maybe smaller ones for smaller things. Just one bit of advice, if you use zip ties instead of velcro and you cut them, make sure the cut area is not sharp or it will cut you in the future. I have had some scratches for not cutting them completely flat and leaving some sharp plastic corner... Don't recommend that, and that's also another reason why I use vecro straps.
Here's where I'm at so far. Ignore the build surface. That's my scrap one for making sure Z-offset is right (usually not) before I put my flex steel on it.
I think the whole wet filament thing is overblown. I live in the midwest where it can get pretty humid and I've never had to dry my filament. As long as you store it in a ziplock back with a dessicant pack when you're not using it at all for long periods of time, it should be fine.
I did swap the extruder motor to a smaller stepper motor. I didn't do it because the OEM one wasn't capable. I just thought maybe less weight would be better for the direct drive setup. I also lowered the current for all steppers just to reduce heat. But I'm not sure if either thing was necessary.
get your self some purple glue and double (or more) your nozzle to bed gap. i usually apply the glue while the bed and nozzle is warming up. i'll do 5 or 6 prints and apply fresh glue each time before washing all the glue off.
That's likely it -- my brother purchased it at this link via Amazon. Not sure what he paid for it (it was sometime in the last 6-12 months), but it seems it's currently $1 more at Amazon.
Looking through Amazon, it seems the Two Trees PEI sheet I purchased is available again. Purchased mine in January of 2021 and it's been working perfectly ever since. :)
That's correct. The board uses JST-XH, but on the Ender 5, Creality runs short extension cables from the board to the outside of the case making them easier to access. Those extension have JST-SM as /u/P1xxle mentioned.
So, you can either crimp JST-XH on to these and plug them directly into the board, or JST-SM and keep the extension cable. Without the proper tool though, crimping these can be a royal pain. It runs about $20 on Amazon and is worth it IMO. However, unless you plan to do this on a regular basis, it would be cheaper to just buy JST-SM Pigtails and splice them on to your wiring.
If you're using the "flexible" bed it came with, or glass, you'll have issues without adding more mess (tape, glue stick, and hair spray are all popular). I personally say to dump all that crap and switch to something like this. Only on the absolute tiniest prints do I have issues - heck, I printed this 'expandable dice tower' segment on my Ender 5, with a PEI spring steel build plate, and it completed perfectly on the first try, even with that tiny window segment not being connected to anything else for quite a number of layers...
Okay, I just realized your display for the TFT35 display is not going to work for the 3.0.1 display
https://www.amazon.com/gp/product/B09MYT45BQ/ref=ppx_yo_dt_b_search_asin_title?ie=UTF8&th=1
she's a big boy, I am not sure if it would fit cleanly.
Both of those link to third party sellers I do not recognise. I think it would be better to go with the official comgrow store. Slightly more expensive, but you know what you are getting. $339.15
https://www.amazon.com/Upgrade-Creality-Upgraded-Extruder-Capricorn/dp/B081SPJ2VX/
You need that
https://www.amazon.fr/gp/product/B07RFC8KNX?ref=ppx_pt2_dt_b_prod_image
same model
I got this pb too
Yes!*
*but not without using one of these, which is exactly what I did with my Ender 5 when I replaced its hotend fan...
Besides needing a buck converter as others mentioned, that Cooltek 4010 fan appears to be 5.47 CFM. Silent fans generally known have lower static pressure too. You may or may not end up with heat creep.
My original fan started to rattle so I bought this 24v Orion Fan. It does 6.7 cfm, and is about the same level of noise at the original.
The wires for the replacement probe are never long enough to reach the connector between the case and the probe. The probe also doesn't come with the connector attached, so you have to splice the wires together. When clipping the cable, pull the red cable's out of the wire sleeve and cut it at the halfway mark. That should leave you with enough slack for this probe and future probes. If you don't have some Solder Seal Wire Connectors, i would recommend picking some up to make connecting the two wires much easier. You're going to need a decent wire stripper as well.
This is a great answer. I just added a PEI sheet on top of my glass giving it the best of both worldsPEI I used. There is also a video on YouTube I came across that is super helpful and full of great tips Video
I would give a glue stick a go. I use these.
Also check your bed levelling and offsets since using the glass bed.
Hope this helps!
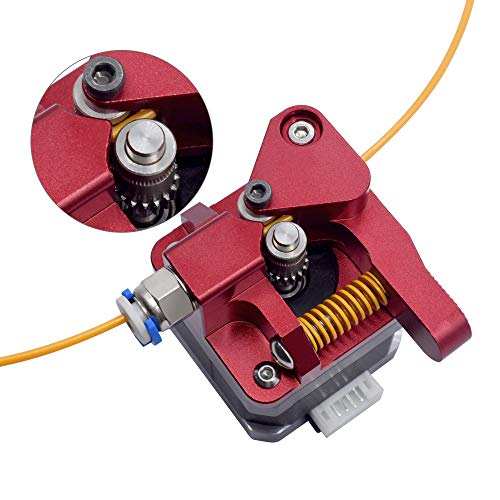
Blue Tube: Bowden Tube
Gold screw: pneumatic tube fitting
It appears that tube fitting is missing the snap collet(LINK) or it could be that the internal "teeth" inside the fitting have failed. (I have run into both of those.)
I designed this in 3 variations for mine, -45 deg, +45 deg, and flat, depending on how you want to mount it. I just used some white LED strips off amazon. Mounted with m3 screws and m3 t nuts.
I can see that your extruder gear is worn down. It needs to be replaced. Since your gear is pressed on, you'll need to get a RC-Gear puller and remove the old gear. Pickup a pack of steel gears and screw them on. I did that with my press fit extruder, and it works just fine. That will solve your underextrusion.
I am the opposite, I can't get anything to stick to the spring steel PEI ( https://www.amazon.com/gp/product/B07XBM24HN ) but the glass with glue stick is a godsend!
Well, I take back what I said about the price and you are indeed correct. While I did genuinely pay £6.99 for mine 6 months ago, they've more than doubled in price since then...
Link: https://www.amazon.co.uk/gp/product/B07XL41QNH/
Those have the bits to fit both the X and Y belts.