
What are
/r/hobbycnc's
favorite Products & Services?
From 3.5 billion Reddit comments
The most popular Products mentioned in /r/hobbycnc:


The most popular Services mentioned in /r/hobbycnc:
Inkscape
Notion
Creative Commons
Google Photos
Krita
Convertio
HackADay
Onshape
Google Fonts
Youmagine
FreeCAD
Banggood
Cults.
meshmixer
Retropie
The most popular Android Apps mentioned in /r/hobbycnc:

Spectral Audio Analyzer
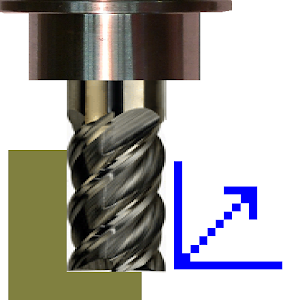
FSWizard Machinist Calculator
The most popular reviews in /r/hobbycnc:
You need a metal brake of some kind to do that. These parts are small enough that if you've got a vise with a wide enough throat and you used aluminum instead of steel, you could use a vise mounted brake which is an order of magnitude cheaper than a stand-alone brake.
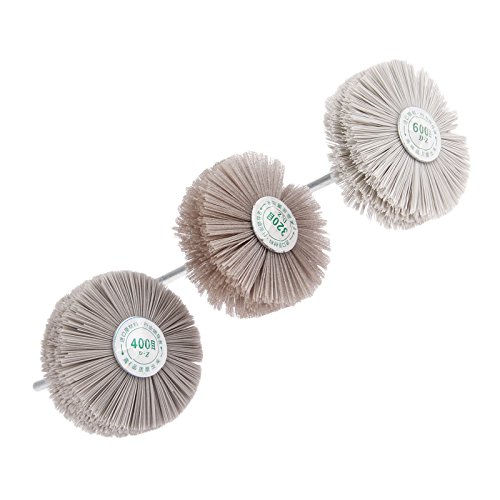
I use these vcarve sanding brush attachments from amazon, the higher grit works great to clean up fuzzy detail but you gotta be careful on the fine details as you could break them depending on the angle you hold the brush
Thanks for your response. Can you speak to the Genmitsu 3018-PRO or Genmitsu 3018-MX3 might fall short in that regard?
You don't have the rigidity to cut Aluminum. But, here's an idea.
You don't need exact X/Y dimensions on the plate. What's important is where the screw holes go. Many metal suppliers will cut Aluminum bar to length. (Metal Supermarkets is a national chain that will do this, you might have one nearby). If not, Aluminum can cut with woodworking tools, and you can get 4" x 12" bar online. If you have a chop saw with a carbide blade, you can cut 3/4" Aluminum bar using that. Clamp it down, and you MUST wear at least safety glasses. I use a full shield.
Now, uses your CNC machine to cut out an acrylic template. That will be 100x easier on your machine. Use a transfer punch to mark the aluminum. Then drill it with a drill press. I can get about ~0.1mm accuracy using this technique.
That's some kind of L298N based board, with TTL logic to convert steps into H-bridge activation. While it's so simple that you could probably trace the board to figure out what the inputs/outputs are for, you'll probably also be far happier buying some other stepper controller off of Aliexpress/Amazon that has microstepping and current control.
ie: https://www.amazon.ca/TB6600-Stepper-Driver-Controller-tb6600/dp/B07RRB6BGQ
I've been learning the ropes for PCB milling. Every board I've done so far has been usable, but I've been trying to figure out how to avoid the burrs and get good, precise dimensional accuracy.
Today I worked out the right settings for these wonderful 60-degree engraving bits, and got my cleanest result yet. Trace widths and gaps came out spot-on, at least as well as I can tell with my calipers under a magnifier :-).
Zero or negative rake blades are better than regular wood blades. More teeth generally make for a smoother cut. Cheap but decent blades can be found on Amazon.
Wood blades can grab and kick back. I've almost broke my thumb on more than one occasion cutting aluminum on a mitre saw with a wood blade. Use a clamp.
Edit: These blades are really cheap but work ok. https://www.amazon.com/Concord-Blades-ACB1000T100HP-10-Inch-Non-Ferrous/dp/B00LFCMTHY/ref=sr_1_2?ie=UTF8&qid=1467800047&sr=8-2&keywords=concord+blades
Damn it.
I got it one amazon.
Does really well on painted aluminum too.
I have the 90 degree one.
DIAMOND SPRING LOADED DRAG ENGRAVING TOOL WITH 120 DEGREE TIP https://www.amazon.com/dp/B07DMLN88W/ref=cm_sw_r_cp_api_i_mGS0Cb2RSWVDX
I just bought my Shapeoko 3 earlier this year. Also new to cnc. I really like it so far - I’ve mainly been carving signs and small gifts for people. I recommend buying a 1/8” flat upcut endmill to compliment the stock 1/4” that comes with the machine. I also picked up a couple cheap 0.5mm tapered ball endmill for carving small features. Working holding will be important and I recommend looking up guides for making your own supplemental waste board and hold down clamps.
I recently picked up the bit runner accessory because of the cool factor and plan to set that up this weekend!
Figured I would also recommend getting a shop vacuum and hose that adapts to your dust boot. I’m using this one with the Sweepy:
Cen-Tec Systems 94192 16 Ft. Hose for Home and Shop Vacuums with Multi-Brand Power Tool Adapter for Dust Collection, Silver https://www.amazon.com/dp/B07NZZZ5ZL/ref=cm_sw_r_cp_api_i_HrljFbST5NEZC
Universal g-code sender. https://github.com/winder/Universal-G-Code-Sender
You'll need some g-code first though. Easiest way is create a drawing in a vector graphic program, Inkscape is the most popular ( https://inkscape.org/en/ ) and install the g-code tools extension.
This is the basic way. I personally use Fusion 360 to generate g-code, but CAD is slightly more of a learning curve. If you have any experience in CAD, you'll appreciate Fusion 360
Edit: corrected auto-correct: "g-coffee" into "g-code"
Edit 2: I started with g-shield g-code controller - upgraded to the Inventables x-controller. Both are GRBL - x-controller has long lead times.
Elitist machinist here 🤣. If you're not using them to make a living don't be afraid to cheap out.
I use a pair of these Fowlers at home and keep my 200$ starretts at work. They're fine, obviously not as nice as my work calipers but they're a fraction of the price.
As far as ratings helping prolong life- ip67 isn't super necessary unless you're working near coolant or oils often (or have a habit of spilling drinks haha). Throw it back in the case every time you put it away and it should last.
https://www.amazon.com/dp/B08G87N6VB/ref=cm_sw_r_other_apa_i_B-DbGbM4E2KPB?_encoding=UTF8&psc=1
https://www.amazon.com/dp/B07ZHFV4N5/ref=cm_sw_r_other_apa_i_a.DbGbK9HXX9B?_encoding=UTF8&psc=1
These are the two parts I used, along with some 3d modelled parts I printed out, the old z axis bearing had a few millimeters of play between the linear rods so the machine was basically useless. With the upgrade z-axis its much more rigid, im fairly certain I would be able to mill out aluminum now, I have some in the mail to test out.
Instead of hand sanding the crevices, try a bristle sander and/or a mop sander. Great for cleaning out the fuzz in v-carves.
https://www.amazon.com/Abrasive-Nylon-Woodwork-Polish-Grinder/dp/B0787ZPHKN/ref=sr_1_2
I cut vinyl with my home built gantry style CNC fairly often. I borrowed some ideas from around the interwebs and mounted a Roland style head in a linear bearing block that was roughly the same diameter as the Roland cutter (kind of like this - but find the right size. https://smile.amazon.com/dp/B00IJ67BJA). Then above that, I mounted another block with a threaded insert that I could extend a 1/4” bolt through towards the top of the cutter, and stuck a small hardware store spring between them. I can roughly adjust the cutting pressure by either a) adjusting how far the bolt compresses the screen or b) how low I zero the z height on the CNC. Usually just lower the z height until I can tell the cutter starts moving up just barely in the bearing block and that’s good enough. I’ve been meaning to design and 3D print the holder to be a bit more clean - but it’s worked so far even though it’s not much to look at.
For the vinyl itself - I keep a clean sheet of masonite that I just tape a vinyl section to with masking tape. I can then clamp the board to the spoil board and give the cutter a nice clean surface to back the vinyl.
Try amazon smile to donate to a charity of your choice automatically at no cost to you!
https://smile.amazon.com/Dog-River-Tools-Touch-Probe/dp/B07TBRFQWQ/ref=mp_s_a_1_1_sspa?dchild=1&keywords=xyz+touch+probe&qid=1601488305&sr=8-1-spons&psc=1&spLa=ZW5jcnlwdGVkUXVhbGlmaWVyPUEyTFBDM08zU1dJUllSJmVuY3J5cHRlZElkPUEwMDA3Mzk4MURNVlRLRVQ0Qk9SMyZlbmNyeXB0ZWRBZElkPUEwNDg5MTU1Mk1FRDI5QTFaRzMzTyZ3aWRnZXROYW1lPXNwX3Bob25lX3NlYXJjaF9hdGYmYWN0aW9uPWNsaWNrUmVkaXJlY3QmZG9Ob3RMb2dDbGljaz10cnVl
^^^I'm ^^^a ^^^bot ^^^and ^^^this ^^^action ^^^was ^^^performed ^^^automatically.
Here is a calculator on google play by Vortex. I found it useful when starting out.
Things i now look for are the size of chips. If you are getting too much dust you are probably recutting the chips, which means that you are not clearing the chips out with the cutter. This heats the cutter and really shortens the cutter life. So something is wrong.
It could be model of cutter, feed speed, rpm, depth of cut.
I now pick up a handful of chips and look at them in the palm of my hand.
Good size chips take the heat away from the cutter, and you can feel a gentle warmth from freshly cut chips. I often use a 10mm cutter so there are lots.
Sometimes, after cutting, even for a long time, I test the heat in the actual cutter. If its cutting okay it will will be warm to touch, perhaps 40 to 60 degrees Celsius. Nothing like a burning touch
Another sign of a hot cutter is a resinous build up on the cutter. The heat brings it out of the wood and sort of binds to the bit. As bits loose their edge, the more resinious buildup and this is an indicator of time to change
Hope this helps
https://play.google.com/store/apps/details?id=app.id_38547413580646ea98c70ae133a4c9cd
I bought a 3018 just to see if I'm willing to dive into CNC. It's a nice cheap stating point but it has serious issues.
First rigidity, harder wood would cause a lot of chatter at reasonable speeds. Second, the controller board is a grbl (atmega328) and the USB to Serial converter is a CH340 which is unstable, drops some bits here and there and causes physical crashes.
So I did some small upgrades
http://hackaday.com/2016/02/02/fully-printed-cnc-on-an-ikea-table/ This one? Looks very nice, probably a bit pricier. It's more of a router I think, but I'm not sure how hard it is to add more Z axis height.
Take a look at the 3D printing parts on Aliexpress. You can get a Mega with RAMPS shield for very cheap: https://www.aliexpress.com/item/Mega-2560-R3-Mega2560-REV3-1pcs-RAMPS-1-4-Controller-for-3D-Printer-arduino-kit-Reprap/1947676736.html
I wouldn't bother much with salvaged parts unless your salvaging from higher end stuff. The motors and such in cheap printers are not worth the trouble. Your hard pressed to even find a stepper in many printers these days, as they have all gone to cheap DC brushed motors.
NEMA17 stepper motors can be found for under $10 each and are fairly easy to work with. You can also get timing belts, pulleys and lead screws for very cheap on aliexpress.
Its more along the line of Raspberry Pi and Arduino for a CNC machine. With the RPi doing higher level task and the arduino doing the real time stepper driving.
I milled a bunch of holes for this cribbage board I used an 1/8" and peck drilled .11" per peck with an 2 flute upcut @ 12in plunge feed. I'm not familiar with your machine, but I would guess starting somewhere around 30" plunge feed and .2" peck distance for a .25" 2 flute upcut bit around 16,000 rpm. Then 70-100" feed for moving/cutting, technically you could set it as fast as your machine can rapid because a peck drilling operation will not cut any wood at that feed rate. Peck drilling operations only use plunge feed. If you find deflection in the pecking, slow your feed or set your peck depth smaller. My machine isn't as rigid so I would set plunge about 20" feed.
You can use Inkscape to covert the image to a line drawing (vectorize it) and make g-code. Here is a full tutorial.
Best of all it's all free software
Since you seem to want a DIY approach, this requires hands on electronic assembly and troubleshooting.
To control a D.C. Motor with a encoder will require a servo driver. This is one of the easiest to build and really does work.
https://www.youmagine.com/designs/dc-motor-closed-loop-control-software#!comments
You will also need a gcode controller that outputs step and direction to command the servo driver. Grbl is the simplest to implement and requires a arduino board and a gcodesender program that runs on a PC. Read up on grbl and it will help explain some more questions you will have.
Edit. I should add that building servo drivers will probably cost you more than a stepper driver solution.
I bought a Roland MDX-40A. A nice and very precise machine, that come with housing and has a rather large work area (30 x 30 cm). It also comes ready assembled and ready to go. At $8000 it is rather expensive, but it is easy to start with, as it comes with all control software and a quite simple to use CAM software package. That is not the very best CAM package, but it is easy to start with, and you can switch to some better CAM package that produce g-code later.
That machine is not able to mill metals, not even soft ones, so if that is what you want, it is not for you. My decision was that milling metals was not worth it, because in addition to being expensive, metal milling is also quite noisy, and it would annoy the neighbours, since my workshop is in the cellar of an apartment block. Wood and plastics and vax milling is considerably less noisy, and is not a problem.
My main guide was Michal Zalewskis Guerrilla guide to CNC machining, mold making, and resin casting. That is a very good guide if you have no experience, and I learnt enough vocabulary to find help elsewhere by reading that. It is very focused on machining molds for casting robot parts in plastic, but the part on CNC machining and CAD/CAM gives a very good intro, even if your intend to use the CNC machine for other purposes. It does not mention anything about metals at all.
For CAD, I have mainly been using openscad. In most CAD software, you design your parts in a GUI, but in openscad you write the spec as text, composing solids into what shapes you want. For a programmer like me, that was much more close to home than typical CAD programs.
Thanks for the kind words!
Yes, two good options: for general hobbyists, the free plan provides unlimited public/open source storage and usage with all of the modeling tools (much like GitHub used to do). For students and teachers, the education plan provides the same functionality with unlimited private storage. I'm on the education plan.
In which case - rather than a FDM (traditional filament 3D printer) - look at SLA resin based. Far higher resolution and there are flexible curing resins (for example - https://www.amazon.co.uk/Siraya-Tech-Tenacious-Flexible-Resistant/dp/B07PLJ9XW9)
Especially good for smaller items and of higher detail than any FDM printer is going to reach. Very often used for printing table top game miniatures, jewellery moulds - that sort of thing.
VEVOR Spindle Motor 7.5KW Square Air Cooled Spindle Motor ER32 Collect 18000RPM& VFD Variable Frequency Drive 220V 7.5KW for CNC Router Engraving Milling Machine https://www.amazon.com/dp/B081SXF1DQ/ref=cm_sw_r_cp_api_glt_fabc_R2V37CWVF99EVE0HCWTX?_encoding=UTF8&psc=1
I ordered these inexpensive rail+screw kits. Being able to buy parts on Amazon vs eBay or aliexpress gave me the confidence to take on this project. I was so worried about receiving junk and having little recourse from those other marketplaces. In reality, I haven’t had any issues with anything I’ve bought so far (incl spindle and vfd)
https://www.amazon.com/BestEquip-HGR20-1500mm-RM1605-1500mm-Ballscrew-Routers/dp/B083CTPRKM
Doesn't add up. First, because an 8' extrusion of any profile close to being reasonable for an unsupported gantry is going to be more than $150 by itself, to say nothing of shipping. Second, because an 8' run of extrusion for a gantry is probably not the best choice - it may suffice if it's BIG, but then you run into questions of cost (see above) and flatness.
e.g. a 6' section of 3"x6" runs $232 on amazon, with shipping being another $80 - double your price and you're 2' short. 3x6 or 80x160 would be the absolute minimum to consider, and IMHO would actually be rather underspec'd for an 8' gantry. https://www.amazon.com/80-20-Inc-T-Slotted-Extrusion/dp/B001F0I3QW
Personally, I'd suggest looking at alternate strategies for the gantry - probably building up a beam out of composite construction and then epoxy-leveling the surface to achieve suitable flatness. 'composite construction' meaning something like a lighter/smaller pair of extrusions or steel tubes running top/bottom with internal gussets/braces and front/back plates to provide rigidity. More work for sure, but can be done fairly cheaply and will be FAR better than a 3x6 extrusion over an 8' length.
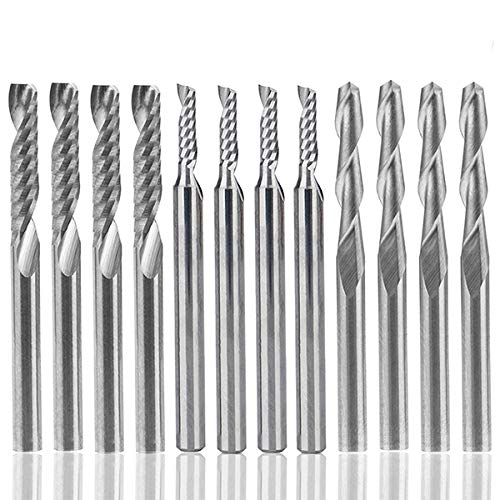
Most of those look like rotary burs and are totally useless for CNC routing.
My go to bits are mostly single flute endmils. I also use 2 flute compression or up/down cut endmills quite a bit. I usually just pick up inexpensive packs on amazon.
Something like this:
https://www.amazon.com/Carbide-AFUNTA-Milling-Acrylic-Hardwood/dp/B07FGFHTG8/
or
https://www.amazon.com/HOZLY-3-175x22mm-Carbide-Cutters-Compression/dp/B073RK6F8N/
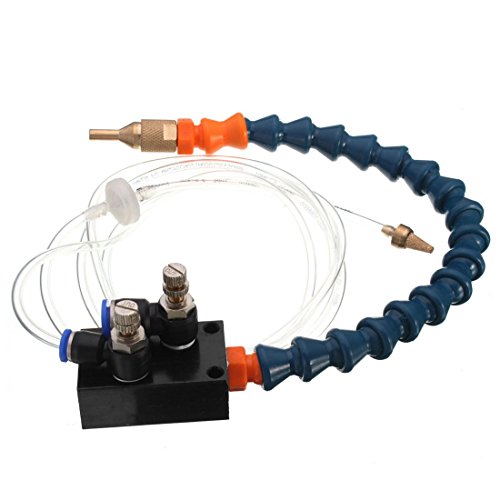
If you're running it in your house you won't want flood coolant anyway because it stinks. Mister requires air though, which means a compressor running. California Air Tools makes some reasonably priced small compressors that are about as quiet as you can get.
I have this one, and it's just enough to run my mist setup, while being way quieter than my other compressors.
Super glue stock down, drill holes, then insert 1/8" brass stock and cut flush with beefy wire cutters.
The cheap-as-chips calipers are SO frustrating to work with, they don't seem repeatable. Mitutoyo ARE the best, and I've got several pairs, but for a cheap-but-still good set, these are great:
https://www.amazon.co.uk/Moore-Wright-MW110-15DBL-Digitronic-Digital/dp/B00DN3NYS6
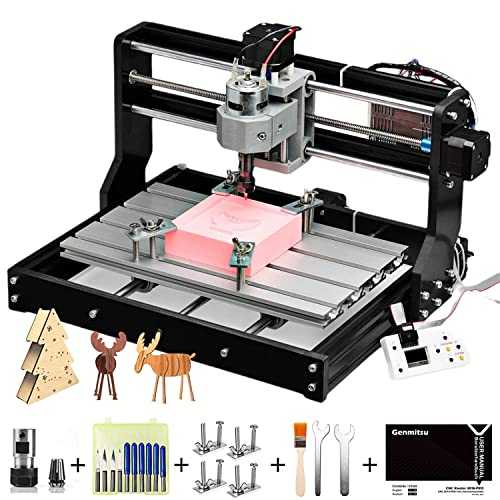
The PRO kit is not terrible for a small desktop CNC working with wood and sticks with GRBl. Upgrade the spindle to the 20K rpm one and it will do logos and stuff all day long in larger stock than will strictly fit on the table. It will take a while though, think an hour each piece minimum to cut a logo and even longer if you are trying to shape a piece like a cutting board.
You might have less work during cleanup time if you try out a radial sanding disc. https://www.amazon.com/Radial-Bristle-Abrasive-Jewelry-Polishing/dp/B07W4NQC8Z/ref=sr_1_9?dchild=1&keywords=radial+sanding+disc&qid=1620166098&sr=8-9
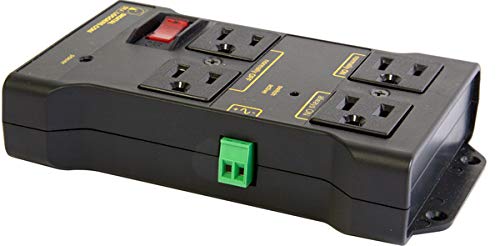
If you want a functional chiller, buy a CW-3000 clone for $160, and call it day. It run's off 110V. Plug it into a surge protector, and plug the surge protector into a switch like this. It's got 110V male / female ends, so no wiring required. Your 24v / 48v DC power supplies for your CNC will go into that surge protector, along with the chiller.
That leaves your 220V VFD. It would be easiest to just turn it on / off, or a get a separate 220V switch. But, if you want, you can control it via a relay, triggered by your low voltage stuff.
Having ONE switch that can kill your 110V and 220V appliances in one flip, that's a lot more complicated wiring.
If you want to DIY a chiller, I can give you some ideas. But it won't save you any money. And, you'll have to worry about more voltage transformations, since cheap fans are 5V.
Those are not great but they are better than nothing and can be a good base to build on. For the pipes leading to the dust collector you should use metal or PVC at least 4" diameter. Any dryer vent style hose should only be used at the last joint to the machine.
Static electricity in dust collection is a very touchy subject and the opinions range from "don't worry about it" to "your house will explode if you don't do anything about it". I am in the don't worry about it camp and my system is fine.
I have a wen dust collector combined with a thein baffle over a trash can and it's a very budget friendly way to get some decent dust collection.
you wouldnt want to run a 220v VFD on 110v
I have a 220v VFD but no 220v to the garage, so as of now im using a 110v to 220v transformer. they are resonably priced (probably less than having a 220v line installed) and it has worked great for me so far
I have this one, or at least one very similar to it
5000w seems overkill, but I thought it was better than underkill lol
If your system/plugins don't support it, you can get a usb wireless mini keyboard/mouse that works well too - https://smile.amazon.com/Rii-Wireless-Keyboard-Lightweight-Controller/dp/B00I5SW8MC/ref=sr_1_4?crid=3A3Z7W2FOBRHK
This is great! Can you detail the process a little bit?
Like your laser doesn't line up with your spindle, so did you just measure the offset and create a macro or line of gcode to adjust it?
I use Duck brand double sided tape with great results. The only time I had a problem was when I was cutting aluminum and probably didn't have the right speed and feed for the endmill, so the aluminum stock had heated up and the tape let go.
Duck Brand 240200 Double-Sided Duct Tape, 1.4-Inch by 12-Yards, Single Roll https://www.amazon.com/dp/B002O16SHW/ref=cm_sw_r_cp_api_glc_fabc_UkN3FbYN01JV1?_encoding=UTF8&psc=1
I looked at your method and it seems to cost more? The two part adhesive cost a lot. I can see how it might hold on to an uneven surface better though.
https://www.amazon.com/dp/B07WNW7MKL/ref=cm_sw_r_cp_apa_fabc_BQq2FbRAKA9NA?_encoding=UTF8&psc=1
You could put these on the aluminium bar? Or use an aluminium angle so you can stand them upright them out these on the back?
I've had good luck on plywood with this compression bit. It's downcut over most of the flute, but the very tip has a few mm of upcut. So you avoid tearout on the backside and get a clean top finish as well. https://smile.amazon.com/HOZLY-6X25mm-Carbide-Cutters-Compression/dp/B073RKDLDR/ref=sr_1_1?dchild=1&keywords=B073RKDLDR&qid=1607550246&s=industrial&sr=1-1
Along with what the others have mentioned, depending on the CNC controller you might be able to use handwheel pulse encoders that you can mount near the normal handwheel positions. They can feed pulses back into the CNC controller when you turn them and more or less give you a "manual" effect. It won't have the same "feel" as a real manual machine, but it might be good enough for casual use and you don't have to worry about the electrical feedback problems of spinning steppers.
I make signs (including nameplates), and stuff for a small etsy shop I have on the side. I've found that typically, harder woods machine better. I make nameplates for people out of Walnut or Maple usually. Also, I find that using a 60 degree bit for smaller lettering looks really nice.
The nameplates I make are 9in x 3in, and 3/8in thick. I also make a stand for them out of a contrasting wood (if I use maple for the nameplate, I make the stand out of walnut). The stand allows me to set the nameplate at an angle if it will be displayed on a desk.
Here's the bit I use: Amazon Link
Let me know if you have any questions!
You should be ok cutting such woods, just be wary of heat build up in harder hardwoods and ply because you will be recutting chips quite a bit.
Something like this may be a cheap solution https://www.harborfreight.com/router-speed-control-43060.html ... I have not used one myself, but I learned of this thing from folks who have.
edit: Amazon link as well: https://www.amazon.com/Harbor-Freight-Tools-43060-Control/dp/B002MLE01A
edit again: Also, if you do start to see burned wood, try a shallower depth of cut so chips are able to clear easier. And avoid straight flute and downcut bits, they already clear chips pretty poorly.
I found a dust shoe on thingivers and had a friend print it on a prusa
Then added this https://www.amazon.com/gp/product/B01566L3HQ/ +2 hose clamps
The library has models for multiple different sizes of spindle and hose
It is not perfect but the price was sure right. ~$25 total (1/8 the price) .. save your $ for end mills
I use a small 2hp dedicated shop vac that i found at a yard sale
Found it https://www.thingiverse.com/thing:2019569/files
Note: don't plan on using it for a while till you get to know your machine and software
​
These have worked well for me and they aren't as expensive as the amana tools.
I'm using this 3018 CNC router. I used a 3mm endmill to clear out the area and then one of the 20 degree V-bits that comes with the router. I used fusion 360 to generate the tool path and a lithophane generator online to get the mesh file. I would really appreciate any tips you guys have, I know the machine is low quality I just wanted to learn CAM and CNC for a cheap price.
Slightly outside your price range, but I have these exact calipers and prefer them even over the digital ones I bought some years back: https://www.amazon.com/Vernier-calibrador-sistema-métrico-Mitutoyo/dp/B000VBAC0Q
Assuming these are your first calipers, I suggest getting verniers and learning how to use them. They are essentially bomb-proof and maintenance-free, in addition to being cheaper than dial or digital calipers. The fact that they're less precise than dial or digital calipers won't mean an awful lot to a hobbyist shopping for their first pair - what matters is that they do a good-enough job and last you until your needs grow past them.
I got this guy, it's all metal and no batteries required. Has worked great for me so far. Fair warning though, the tips are sharp as shit (ask me how i know lol)
Anytime Tools Dial Caliper 6" / 150mm DUAL Reading Scale METRIC SAE Standard INCH MM https://www.amazon.com/dp/B00B5XJW7I/ref=cm_sw_r_cp_api_i_DbDkFb3P9S4KQ
A Shop vac/ wet dry vacis a type of vacuum cleaner commonly found in hardware stores. They have a number of advantages: - They are cheap, shopvacs are really basic. Essentially just a big fan over a bucket. - They can handle larger debris without getting clogged (I would recommend using a Dust separator as well to help with this) - Most of them can vacuum up liquids safely - They are sturdy and designed to take huge amounts of punishment for a long time - They often have a blow mode that can be useful in a workshop - They are very easy to empty - They have a large volume
However, they do have some quite substantial disadvantages that may make them impractical as a home vacuum: - They are big - They are loud - They usually don’t have retracting cables - they have a tendency to blow out fine dust - great for sawdust, less great for household carpet cleaning.
In most cases, the vacuum is considerably louder then the machine.
I'm working on a 6"x16"x1" piece of aluminum plate on mine at the moment.
Granted I have the larger version of the one I first linked.
These 2 flutes from Amazon have worked good for me. I feel like 2 flutes tend to be more durable and put you in a better chipload range for high speed spindles than 4 flutes, but both will work.
Depends on your budget. I've had nothing but great luck from this one.
The drawbacks to a dedicated spindle are added complication and difficulty repairing/replacing if needed.
The DeWalt 611 makes a decent spindle too, though the runout is obviously higher than a dedicated spindle and it's louder. It's cheaper and available from a lot of places if you need to replace it.
Oh, don't worry!
I've been purposefully limiting the "progress spam" here so as not to become annoying - but the second it goes live, I will shout that fact from the rafters!
I wrote this and I'm highly reliant on word-of-mouth to generate sales. I want this new book to be "the answer" to like 90% of the questions that get asked here.
I won't be shy about letting folks know when it is ready!
https://www.amazon.com/dp/B018YPWORE
I plugged this in yesterday. It gets power from the USB port on the back of the HMI, and acts as a WIFI client on my home network while providing an ethernet port for me to connect to the one on the DDCSE. The real shame is that the DDCS folks haven't been able to get the built in WiFi working yet!
Oh noes I wouldn't use packing tape to hold stuff down that sounds like a bad idea! I have had great luck using double-sided foam tape though for sticking stuff down https://www.amazon.com/3M-Natural-Polyurethane-Double-Coated/dp/B007Y7J1X4/ It has some give for things that aren't exactly flat but holds things in place laterally really well.
I was just saying to maybe rectify the painter's tape getting fuzzy when a vbit runs through it maybe a layer of packing tape would work.
I'm using vinyl on stained wood to cut through on a CNC router with a vbit and then the vinyl serves as a stencil for spraypainting the cuts. Then peel the vinyl off to reveal the original stain on the top surface with the cuts painted and with perfect edges along the cuts.
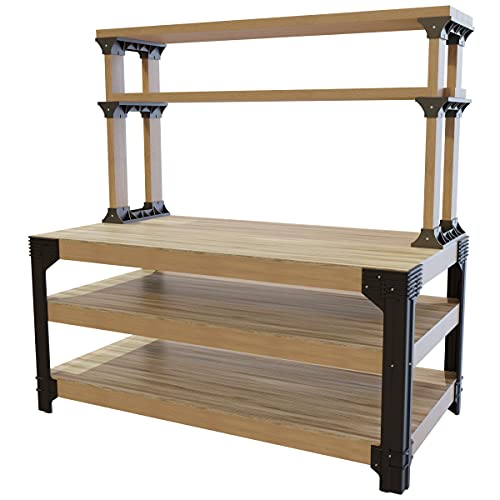
Here is the machine I bought. All power to you if the machine is the “project”, sometimes it’s about the journey rather than the destination. With that said sometimes certain components are just way easier to buy rather than make yourself.
1/4 shank 1-1/2" It has dead space in the middle so if you want to cut a pocket you need to compensate by using a helix ramp in or predrill the plunge location the size of the empty cutting area.
I’m biased bc I own this machine but for $1K on amazon, you get way more hardware with one of these: https://www.amazon.com/dp/B098XGTCJ7/ref=cm_sw_r_cp_api_glt_i_MDX08WBZNQ8ETPFF98ZC
Ballscrews vs. belts 1.5 kW VFD vs. 300 W DC motor Linear bearings (rod based) vs. V wheels Die cast frame vs. extrusions
In terms of support however, you probably get more with those other machines so it depends on what your priorities are.
I'll "chip in":
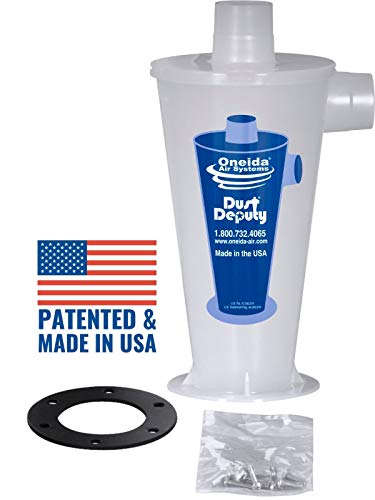
I tried several methods of dust control for my 1325 router. I ended up buying this shoe. I also bought a dust monitor. I connected the shoe to this extractor, and also to 3 different shop vacs (small Ryobi, medium Ryobi and large Fat Max) using a 3D printed adaptor.
The best air quality was with the... small Ryobi. In fact it showed no change from the baseline. The other vacs showed a minimal change, whereas using the big dust extractor showed a massive deterioration in air quality.
The reason is that 1) the bag filter on the dust extractor is crap - not only does it pass through the tiny particles that the monitor picks up, but also it collects other dust on the outside, and releases it when it gets turned on. 2) the large vacs blow a powerful jet of air that stirs up whatever dust has settled nearby. At least that is my theory. None of the methods releases any dust from near the spindle itself, however picking up the finished pieces can stir up some dust, and the small Ryobi does seem to leave more dust on the workpiece than the others.
My next step is to direct the exhaust from the vacs to the outside, which should produce great results with the Fat Max large vac.
In addition to the other suggestions (dust, shellac prep), I use a roller to apply mask, and then again after I cut to re-secure the edges.
Cheap but effective - https://www.amazon.com/Rubber-Roller-Construction-Stamping-2-5-Inch/dp/B01N9AL149/ref=sr\_1\_2
I never understood having the DC hose off to the side of the shoe either. Takes up too much space and makes for less pressure draw at the bit.
I was going to design my own like you have and then I found this. Works so well and is so cheap I haven't had the need to do anything else.
Has a small footprint so it doesn't affect the ATC as much and allows me to space tools closer. Ive got about 300 machine hours on it so far. It's wearing a little, probably at about half it's lifespan. Pretty damn good for 40 bucks.
It's not just the big chunks you want the DC to get, it's the little dust. That takes volume and power. This misses nothing paired with a 2hp DC.
>5500mW CNC 3018 Pro-M Engraver
Hey - thanks so much for replying!
I have found the Machine Settings on Easel that you're referencing, the default "Spindle Controlled by" was set to Manual, are you instructing me to switch this to Hardware? And if so, what is your recommended "Default Spindle RPM" you'd suggest with my current machine on a soft aluminum? The Amazon page I got it from is linked here.
Just get a dupont connector kit and switch it to something a little more standard. I know thing like the "cnc shield" use the Dupont connectors (.100 spacing male headers)
The bits I did that with were from this set: https://www.amazon.com/Genmitsu-10Pcs-Router-0-8-3mm-1-5-3-175mm/dp/B07ZGQ6TDZ
The interior pieces were done with the 1.4 mm bit, and the outside was done with the 3 mm bit. I have already broken a few bits in my test pieces, so I slowed everything way down, which probably contributed to the crispness. The stepdown was 0.5 mm, and I set the other speeds pretty low. The two interior pieces together took about 40 minutes of cutting time with a 2 mm depth.
I got an adapter like this and it works great :https://www.amazon.com/Amana-47648-Extension-Adapter-Router/dp/B016PYR0YS
But I don't think I paid that much for mine, so you might look around for a lower price. Good Luck
You may be best served by buying a 10 pack of 2 flute ball end and 2 flute strait cutters. Work out your feeds and speeds and the rest from there. I just cut out a mini table saw in aluminum on a old ox router with these https://www.amazon.com/HQMaster-Carbide-Router-Acrylic-Hardwood/dp/B010NI39WO/ref=sr_1_9?crid=1BLCW7JK9CZKS&keywords=2+flute+carbide+end+mill&qid=1664866092&qu=eyJxc2MiOiIzLjk0IiwicXNhIjoiMi43NSIsInFzcCI6IjIuMTMifQ%3D%3D&sprefix=2+...
>Foxalien WM-3020
This looks like a solid new machine on the market, thanks for pointing that one out, I quite like it! But it still only uses a two linear rails blocks per axis vs the four I wanted to have (significant stiffness increase, >>2x). The ballscrews are definitely a good upgrade but they don't have a solid backlash reduction mechanism (the SFU1204's have a simple friction based system that is not good at all) so there will be some play there (I used two nuts and heavily spring loaded them against eachother). I'd also caution anyone using that for metal engraving that ballscrews are more susceptible to metal chips getting inside the ball nut than lead screws are so be careful about covering the ball screws themselves to help keep it clean!
​
>Which 600W Daedalus
I bought this one this one below from amazon and I love it, would highly recommend it. However, it spins at a lower RPM and so it really requires a more rigid machine than most people have (the WM-3020 is prolly okay) otherwise it can actually be a downgrade.
To use a face mill in aluminum with a diameter of larger than 12mm, you will need a milling machine. The RPMs (min 6k on a water-cooled spindle) and lack of rigidity will result in an ugly and potentially very dangerous cut.
Try one of these: https://www.amazon.com/GBJ-Indexable-C15-16-150-C20-21-160-LNMU0303/dp/B08XZJTQSN
I have one similar to this I think the beige variants have more Z height, big things you want are ballscrews and a 1.5 kW vfd or larger, I think most have these nowadays.
Decide on a project or two that you want to do first and then pick a machine to get that job done. It'd be a bummer to buy a $2k machine and realize it can't do your project because the z-height is too low for example. I started out with a different brand of this machine (https://www.amazon.ca/ChinaCNCzone-HY-TB5-5-axis-Router-Engraver/dp/B00W7F36BG) and ended up finding a higher quality desktop cnc on facebook marketplace that use to be in a school woodshop for $1k.
Definitely budget for software too, when I bought my first BobCAD license, it was the most expensive piece of software i'd ever bought. I forget exact cost, high 3 figures. Fusion360 will do your parametric CAD and CAM to generate g-code to run your machine if it is available in Canada. There are free and low-cost Fusion360 licenses available from Autodesk.
This one, it's not bad, I'm sure there is better though haha. I had to make a 15mm plate to make it level with the micro-arc 4th axis.
65mm Lathe Center Morse Taper 2 Live Center Movable MT2 Tailstock with 4pcs Replaceable Heads For CNC 4h Axis Engraving Machine Woodworking https://www.amazon.com/dp/B094QQ4TRV/ref=cm_sw_r_apanp_1i1Vcmt9ZNWjA
No problem, my friend!
You're going to have trouble boring 1/8" holes with a 1/8" end mill, you need some room to ramp into the stock so the bit isn't plunging directly down, that's not how they're meant to cut.
I would invest in a smaller single-flute end mill (2mm is a good size, still rigid enough to be a little aggressive in aluminum) and do helical bores for the holes: try using a 0.002" pitch and a 30IPM feed rate for the boring operation, vacuuming out chips more or less continuously. This way, your bit is constantly stepping over 60% instead of plunging right into the stock.
This is a good variety pack:
https://www.amazon.com/HOZLY-3-175mm-Carbide-Milling-Engraving/dp/B07F33HP75/ref=mp_s_a_1_10
Are you worried it's going to fall apart due to stress? I run mine at about 70ipm per edge. Works great on pine.
If you don't need the point detail, I found that this Amana bit has a down-sheer angle.
https://www.amazon.com/Amana-Tool-RC-45716-Composite-Alucobond/dp/B0112T8LQW/ref=pd_bxgy_sccl_1/145-3145806-6231005?pd_rd_w=AqVeq&th=1
Works great for flat bottom sign lettering, especially if you're using adhesive masking. I made a batch of signs using the Lowe's rough surfaced cypress and the masking didn't peel due to the angle.
https://www.amazon.com/Autocross-Win-DGs-Secrets-developing/dp/1521406987
is my other book.
It will be both print and ebook. My print sales are roughly triple my ebook sales.
As of today I'm at 9000 words and it's going well.
More concerning though is the graphics cheques I'm writing. I have to produce a lot of diagrams (I make notes for placemarkers as I go) and... there's a lot of them. That takes as much time as writing, so I'm starting to wonder if "the fall" is too aggressive a deadline.
XMas for sure though. Can't miss the holiday sales window!
It's interesting that the sound level for the stealth compressor is listed as "less than 70dBA at 2m". Noise level is normally quoted at 1 metre distance, not 2, and 70dBA is not quiet: it's about double the volume level of a conversation (60dBA), and at 1m will be 2-4 times louder. 70dBA at 2m is actually similar to my small shop compressor, and I wouldn't (and don't) have that in the same room; it's too loud.
You can get small airbrush compressors which do have a tank, and they're much quieter. I have one right at my feet under my workbench, and although not silent, it's not too bad. Whether they'd have enough airflow for a mill (as opposed to a little CNC router or airbrush) is another matter, but you don't need a lot of air for misting. This is the one I have. Buy a similar one or a slightly larger double-piston version from Amazon, try it, and return if unsuitable?
I swapped out the noisy and abused porter cable hand router with this 2.2kw 220v spindle (https://www.amazon.com/gp/product/B078J5CXP3) on my Techno Gantry CNC and it has worked great for me. I only cut wood so it is rarely pushed too hard.
V-wheel is what you want. Like this at amazon or better quality from openbuilds
Honestly I think the capability boost of making the leap to a 6040 with an actual vfd spindle is more than worth it. I have an owners bias but I’ve cut everything from foam to tool steel on mine and have made dozens of good looking metallic parts. Aluminum plate up to 0.75 in isn’t a problem. More expensive machines will be better but for $1000 there really isn’t a better “out of the box” solution.
https://www.amazon.com/Suppressor-Single-Phase-Line-Conditioner-JREle-CW4L2-20A-S/dp/B073MCGBP5
most of them have a wiring diagram printed on them... pretty simple to install
Hey! Thanks for the reply. I will put new electronics with these motors that I have. I will use FreeCad + GRBL. From the videos I've seen it's not hard to reinforce the Y axis so I wouldn't be too concerned about motor weight.
It's the 1000x1000 mm. Not sure about the exact version, I asked.
Using this as a spindle is cheap and rigid. It has a short shaft unlike chine spindles. https://www.amazon.com/Makita-RT0701CX7-1-1-Compact-Router/dp/B00E7D3V4S/ref=sr_1_2?crid=3SZ1P2HDN6AOL&keywords=Makita%2BRT0701CX7&qid=1655478186&sprefix=makita%2Brt0701cx7%2Caps%2C117&sr=8-2&th=1
Using this as a spindle is cheap and rigid. It has a short shaft unlike chine spindles. https://www.amazon.com/Makita-RT0701CX7-1-1-Compact-Router/dp/B00E7D3V4S/ref=sr_1_2?crid=3SZ1P2HDN6AOL&keywords=Makita%2BRT0701CX7&qid=1655478186&sprefix=makita%2Brt0701cx7%2Caps%2C117&sr=8-2&th=1
That will depend on your travel and distance between the bearing blocks for your screw. Again this will depend on how much load your putting it under, yes if you go slower it will minimize this but if you want to take a heavy chip you will get more chatter, again this has to do with the rigidity.
Remember you have feeds and speeds to account for, sure you can go slower but at the same time you will need a motor that has high enough torque at lower speeds to be able to take a chip, if you spin a undersized motor up so it doesn't stall you will burn up bits. You have to be able to take the right amount of material off. If your screws are to light, they will bend under the load and if your axis motors are heavy enough it will actually snap them because of the whip.
Honestly I am not sure why 8mm would be the only choice other than price, IMO that is WAY TOO LIGHT, that's more for a 3D printer setup not a mill. Just taking a guess without seeing the design I would say probably a 12mm or 16mm would be required.
I hate to send anyone in this direction but may be a viable option for you, Amazon. I bought a few of these ball screws and look decent so far, haven't installed them yet so not sure about quality and accuracy. The reason I don't like Amazon for this kind of stuff is because I have purchased other components that haven't been anywhere close to the specs they advertise, accuracy was .02in not .005in things like that. But these screws I got seem to be different so it may be worth your time to check into them
One benefit is you can buy a "package" that has the bearing blocks, coupling and nut the price is very attractive but again I can't verify accuracy
Would a DA converter like this work as a filter? Take the Pwm input and output just 0-10V analog
I'm just using an arduino flashed with grbl and a pinout shield attached. The Arduino will cost you next to nothing and the pinout shield about 10-20$
With that massive backing plate on the Z… why not make a bracket that bolts to that? The leverage on that wooden connector from the length of the PVC, is going to twist it off. They have dust boot fibers on Amazon that are up to 3” long, you just have to make sure they are 3” away from the bit! lol.
CNC a new boot with a channel for the fibers/brushes, mount it to the Z plate and have the flex tubing go from directly above the center of the table straight to the boot. The brushes will catch chips and help focus the suction. You’re getting there
100mm Dust Shoe Brush,TwoWin CNC Vacuum Brush Nylon Vacuum Cleaner Engraving Machine Dust Cover for CNC Router Spindle Motor Milling Machine https://www.amazon.com/dp/B08M98BRKS/ref=cm_sw_r_cp_api_i_KMG061XHTETA0SVNQ90X
> Definitely going to go with green glue
Green glue is awesome but pricy and sometimes hard to find. If you’re struggling to get hold of it, apparently Roberts 3095 carpet adhesive is a good stand-in. There are some really great posts on here, if you do a search for “soundproof” you should see a few good ones. It says that 1 gallon can do 100sqft so you should be alright with a small amount. 1-2 tubes of green glue should do it according to the specs on their product page.
> Any recommendations on a water cooled spindle?
Not really, I need to buy one myself. Most people just buy generic Huanyang spindles. If you ask on the unofficial Shapeoko FB group they should have some good advice about sourcing and mounting. The spindle will really cut down in the noise and make your machine much better at working with metals.
> I’ve ordered leveling caster wheels
Probably a good plan, locking casters might be a good idea too if you haven’t already ordered them.
> Fein dust extractor and cyclone
Good move, I’ve heard good things about that brand.
Sounds like you have a good plan. Good luck
- Layers of OSB with greenglue, carpet adhesive or contact cement between work very well.
- block as many air gaps as possible
- at some point, consider switching to a spindle (ideally water cooled as you will likely get a lot of heat build up). It will be much quieter and more powerful
- Rubber feet under the machine/entire enclosure (similar to the rubber pads you can get for washing machines).
- windows will be a liability, double pane will work better than single pane.
The next problem to address is dust collection. As you have probably found, the vacuum will likely be the loudest thing in your shop. You could help mitigate this by building a similar box around that too, but you would need to watch to make sure the vacuum doesn’t overheat as it uses air for cooling. I don’t know if you have one somewhere but a cyclone separator is a great addition to your dust collection and will significantly prolong the life of your vacuum.
Nice setup, you seem to be approaching it the right way. Nice idea to keep a fire extinguisher handy, it’s so easily to have something go wrong and it’s good to have a plan B.
Seeing as you have a CNC you could always make yourself a rack 😁. I have old enterprise servers and I made my own with parts from my router, although I also added fireproof board for safety as 10 servers in a rack is a lot of power.
If I was looking to enclose electronics, I would see if a 4U PC Server case would suit your needs. It has built in cooling and standoffs (although those could be removed if needed), I would remove the drive trays unless they were useful. But you can have all your cables coming out of the back of the unit, and be able to pull it out on its rails if needed.
These units are also quite “cheap”, CiT 4U Rackmount Server Chassis, 500mm Deep, ATX, Micro ATX, Mini-ITX, 8 x 3.5" HDDs, 1 x 120mm Black Fan Included, A Budget Friendly Rackmount That Delivers An Exceptionally Powerful System | Black https://www.amazon.co.uk/dp/B07G4KF134/ref=cm_sw_r_cp_api_i_WTWBQ57C9GYVY21W1700
I bought one of these rotary axes from Amazon have been very happy with it. I think it's same as what you'd buy on AliExpress, but locally warehoused. The one thing to keep in mind is have a plan for how you will align and calibrate your 4th axis, so it's perfectly parallel to an axis, and you can accurately find the center of the rotational axis.
As for software? Not a lot out there for 4th axis work that is free. Vetric's Vcarve can do it.
I have been tinkering with making chess pieces on a 4th axis, and I bought a copy of DeskProto Multi-Axis for less than $300. It's pretty capable - there are some nuances to the software, but I've found it meets all my needs. It's not the quality of a SprutCam, Fusion 360, or other industrial software, but for hobby-grade, I think it hits the right spot. There are several Youtube videos as well tha are good tutorials.
Is a CNC 1.0
I’m biased, but If you have $1000 and that’s IT, a vanilla 6040 is your best bet IMO. Be prepared to do some tinkering.
For my understanding a lot of jewerly (made by hobbyist) is drilled with either a pin vise hand drill or a rotary tool.
There is also CNC Electrical discharge machining.
If using a drill bit make sure you match RPM and feed for the material. You may want air to remove the chips. You may want to retract the drill bit to pull chips out on thicker material.
https://www.amazon.com/Mini-Drill-Chuck-Shank-Micro/dp/B001S00FYM
Hope this helps.
oh, you'll probably want a test indicator kit for tramming the mill in, and getting the vice square. Again, there are cheaper options, but that's a fairly cheap option that gets you a test indicator, dial indicator, and adjustable mag base.
They are out there they just don't say they can cut aluminum for some reason. As long as they use carbide inserts and you go slow. The only thing is that a 1/4" collet will experience more torque and the cutter shank could slip. Get one with a 1" cutting diameter to reduce the overall torque.
This might be good https://www.amazon.com/Spoilboard-Surfacing-Flattening-Woodworking-BINSTAK/dp/B08SKYYN7P/
This one has carbide edges and a 1/2" cutting diameter so would be much less likely to have torque problems but I think carbide inserts would be better but you could probably get away with this one: https://www.amazon.com/Magnate-Surface-Planing-Bottom-Cleaning/dp/B0093C1ZNC/