
What are
/r/robotics'
favorite Products & Services?
From 3.5 billion Reddit comments
The most popular Products mentioned in /r/robotics:
![Official Arduino Starter Kit [K000007] (English Projects Book)](https://m.media-amazon.com/images/I/41BlK004WQL._SL500_.jpg)


![Arduino UNO REV3 [A000066]](https://m.media-amazon.com/images/I/51txW1iicVL._SL500_.jpg)
The most popular Services mentioned in /r/robotics:
HackADay
Udacity
BeagleBoard
Hackster
Thingiverse
Scratch
Aliexpress
SlideShare
SemanticScholar
Engadget
Coursera
Instructables
ResearchGate
Autodesk Tinkercad
Google Sites
The most popular Android Apps mentioned in /r/robotics:

ArduinoDroid - Arduino IDE

Arduino BT Joystick Free
RambleBot Telepresence Robot
The most popular reviews in /r/robotics:
This post got way more questions than I was expecting AND someone gave me gold! Thank you!
So here I'm going to try to answer some questions.
Firstly here are some more pics.
The robot is controlled by an ESP8266 connected to two DRV8833 stepper controllers that drive the stepper motors. The stepper motors are the smallest steppers I could find on amazon typically used in CD drives and camera lens assemblies as linear actuators. The robot has no sensors as to keep the cost as low as possible (Costs about $13 at the moment). The robot is powered by a small 150mAh LiPo that passes through an LDO that drops the voltage from 3.7v to 3.3v for the microcontroller. I have yet to program it since my ESP8266 programmer has not arrived yet but have been testing everything with a NodeMCU. The wheels are just 3D printed fittings that go over the gear on the stepper shaft and have a 7mm o-ring as a tire.
​
The parts list is basically:
A piece of perfboard cut to 17mm*24mm.
1x ESP8266
2x Micro Steppers (If anyone can figure out the proper name for the steppers I am using I would be greatful)
2x DRV8833 Motor Drivers
2x 7mm*1mm Nitrile O-rings
1x 150mAh Lipo Battery
1x LP2985IM5X-3.3 LDO Voltage Regulator
1x SMD Switch
​
Assembly is just some copper enamel coated wire to hook everything up.
​
I'll probably post an update of it working once it's programmed!
C and Python are both good starting places. If you've never programmed before, I'd try Python. It also depends on what hardware you're using. If you're going to use Arduinos, they use a kind of bastardised version of C.
There are plenty of courses that teach programming, but I think it would be more interesting to do something that covers the basics of robotics, like this one - https://www.udacity.com/course/cs373. You should pick up the basics of Python from that course.
honestly it goes too slow and doesn't have enough torque to bounce around and i have quite a bit of debugging to do in the code and in the hardware, but here are some basic specs: attiny85 processor, i need to upgrade for more io, these https://www.amazon.com/gp/product/B075S368Y2/ref=ppx_yo_dt_b_asin_title_o07__o00_s01?ie=UTF8&psc=1 motor drivers, some super tiny Chinese motors i'll never find again, a pretty standard limit switch, o-rings for tires, and a coin cell powers the entire thing.
Raspberry Pi and or Arduino with a kit of sensors. There are Arduino based robot kits also available which would allow her to build a functional rover of some kind and learn more about coding.
Edit: a kit like this would be a great start
pretty likely. Kind of a shame it's so expensive- the Jetson is only ~$300 in hardware, but the price is all kinds of jacked up even for lots of 1000+, much less single units. It's not that much more than a GTX 1050 + 8 core ARM + RAM and a few peripherals, but NVIDIA has no competition so they price everything like that.
I understand that he has tried to upload this as a discussion but heres what ive put on his other posts,
Anyone looking at this please be aware that this is not his project and is simply a means to get upvotes and karma. He has had multiple posts deleted on this subreddit due to project theft and karma farming. Please downvote this and stop this subreddit from being abused.
Evidence: https://www.hackster.io/hackershack/make-an-autonomous-follow-me-cooler-7ca8bc
Just like the field of robotics varies significantly, so do companies and the level of experience that they expect. Nonetheless, I think a broad, but apt, statement is that hobby/DIY robotics typically won't stand on their own, unless you're looking for a robotics technician job. Just do a job search and see how many engineer positions require Master+. Robotics companies tend to focus more on academic experience for entry-level positions, and it's hard to cover robotics-relevant topics unless you do graduate study (Master to Doctorate). Will this always be the case? Probably not, especially as robots become more and more mainstream and integrated with our daily lives. But for now, robotics is still a nascent and R&D-heavy field, and I think that academia is a levee. If you don't have an MS or PhD, and you want to be a robotics engineer, I think your odds are much better using DIY robotics projects to get into academia first and then launching from there. Hope that helps...
3D printing won't work (because of strength, quality and size). These have to be made of molded plastic. Buy an assorted gear set like this one. You may also find the exact gear here as well.
Where would you like to focus? What might be the purpose of the robots?
ROS.org is great for a robot with a lot of brainpower, like a BeagleBone or laptop based build but I find it can be very bulky for simple projects.
Arduino is a great ecosystem for beginner electronics and smaller robots.
I like woodgears.ca and robotroom.com for building things.
Amazon has $20 robot chassis' with motors and battery backs, you just need an brain (Arduino/Launchpad/BeagleBone/Raspberry Pi), motor drivers (hit the wiki on H-Bridges, LM298 breakout boards are cheap) and some sensors (IR sensors, tact switches, MPU6050 IMU, etc, depends on your application)
Python is friendlier to learn and good for high level scripts and machine learning, but C (original) and C++ (higher level) are the bread and butter of embedded systems. I like Deitel's 'How to Program' for C++ and Mark Pilgrim's open source book 'Dive into Python' personally.
If programming gives you too many headaches try Ardublock for Arduino to get the concepts with a working prototype.
Thrun and Norvig run a good course on AI: https://www.udacity.com/course/intro-to-artificial-intelligence--cs271
Check out 'Programming Collective Intelligence' by Segaran if Thrun/Norvig seems daunting, it's ML concepts in Python.
My advice: Don't. Waterproofing things sucks, and your testing (therefore development) will be severely limited, based on when you can use a pool.
That being said, I expect you will probably disregard all of that, so here's what I made (x2):
https://sites.google.com/site/cmuseawolf/
Advice: * Make your ROV out of PVC pipe (the 6" diameter stuff is all you'll be able to afford).
Use liquid thread seal on any pieces that you screw together. (Not the tape, it sucks)
Assume your ROV will flood. Make it cheap enough that you can replace the electronics inside.
While a sleek torpedo shape may be tempting, it is the WRONG way to go about it. Make a (somewhat ugly) frame around the pressure vessel to mount your thrusters.
You want your center of mass as far below you center of buoyancy as possible. This gives you passive stability.
Buy epoxy (the 5 minute stuff) in large quantity.
Seal EVERYTHING with epoxy. Then put a layer of RVT silicone on top for good measure. (We tried just about everything else, this works the best).
Use a PVC T-fitting to give yourself a flat spot to pass wires through the pressure vessel (see link). Sealing against curved surfaces is no fun.
This: (http://www.robotshop.com/cytron-single-dc-motor-controller-2.html) is a good motor controller for controlling thrusters. However, it cuts out if the voltage drops below about 10 volts, so plan on a seperate battery for the motor controller boards.
Sensors: Internal temperature sensor is a must, and leakage sensors are also good.
Thats all I can think of for now.
Still sorting out supply chain issues so these are only estimates but our goal is actually not to make money but only break even. We care that much about learning! Every reward level will receive ROS instructional course work earlier than a broader public release. We expect to offer a few options at these approximate prices:
- Swag $5-$50
- DIY Plans with assembly videos - $50
- Telepresence only - $1800, This is functionally equivalent to a Turtlebot2 but costs $300 less and supports user supplied tablet device for video conferencing
- Ultra actuation - $3000, This comes complete with 2.5 degree of freedom actuation system giving the robot a 1m work envelope. This price point also includes a pneumatic system capable of generating positive and negative pressure.
All versions supplied by our team are complete with LED movement indicators, auido, low power motion detection, and have a tilting head. The tilting head allows for nearly 180deg vertical positioning of the 3d sensor for fast full 3d map construction.
These prices are subject to change as we nail down the exact volumes we expect to be shipping. All versions are based around a very modular design so you can supply your own sensors or attach custom actuation or compute modules.
Check if your school has a robotics club, or of there is a robotics meetup near you. Meeting others who are actively working robotics projects is a great way to get involved. Other than that, a RPi running ROS with a chassis, battery, and some motors will get you working on the basics.
https://www.amazon.com/Chassis-Aluminum-Platform-Raspberry-Projects/dp/B078HQ5T5H/
It's certainly not a trivial task, but it's a pretty well-studied problem in the literature. The most important thing you need to determine is what, exactly, you are trying to maximize. The translational workspace? The orientation workspace? Fixed-orientation vs dexterous workspace? Do you want a maximal sphere, or would you rather sacrifice vertical motion for a greater workspace in XY?
If you want a full-on analytical approach, a number of people have given procedures for calculating workspace sizes. For instance, this paper shows how to calculate workspace sizes to determine the maximal workspace and optimal link length limits, if you know the rest of your geometry. This paper talks about the effects of various parameters and gives graphs of things like base/plate ratio vs workspace size. If you want more, Google Scholar has lots of stuff on "stewart platform workspace", and you can find most of the results on SciHub if you don't have access.
I'd imagine you have some applications in mind and might not be really be interested in true 3D workspace volume as such. In this case I'd probably go with your approach; just don't use brute force. You don't have all that many variables to tune; if your platform is rotationally symmetric you can probably get away with 3 parameters, and only a few more if it's not. Code the inverse kinematics and a fast routine to get the limits by moving the platform bit by bit, and then throw it into a nonlinear optimizer (i.e. fmincon in matlab). It's probably not a convex problem, but it should be well behaved enough to be readily solvable numerically. Honestly with 3 dimensions even pure brute force with mesh refinement should be doable fast.
A simple sensor is to just pick up the motor's brush noise. Properly filtered and amplified, it is like having an encoder hanging off the end of the motor shaft. And like an encoder, it will give relative displacements only.
Another way is to interface a set of cheap digital calipers, and tap into their serial output.
Learn how to program in something like Arduino or LabVIEW(with a DAQ) or any kind of I/O board and you can easily build a pretty highly functioning bot. For multi-limbed complex geometry I suggest you get Spong's <em>Robot Modeling and Control</em>
Also, a background in either Mechanical or Electrical Controls Engineering is helpful.
Something like an Arduino that can have many multiple I/Os and Raspberry Pis for computation is helpful.
But as a whole I suggest:
*Have a basic Matrix Math foundation. (Elem. Diff Eq.)
*Have a basic Dynamics foundation.
*Have a basic Circuitry foundation.
*Own an Arduino(~$35) and learn to program it (great online community), or a DAQ if your engineering program makes you buy one like mine did ($200-$800).
*Have $$$ to throw at motors and soldering parts.
*Read a book on Inverse kinematics (Spong's is good).
*24 pack of Natural Ice to keep you sane on a low budget.
That is pretty young. Depending on the maturity of the kids it might be ok. I was a FIRST LEGO League coach for many years. My kids were older, but I would start them with a discussion as to what a robot is. Is a toaster a robot? How about a self driving car? What about a surgery robot? Does a robot have to be autonomous? Getting a definition for your students is important.
Next came a game I call Human Robot. One kid plays Memory, one is Brain, and two are motors. Later you can introduce sensors. Write a program on index cards and give it to Memory. Memory is to give one card to Brain. Brain does what is on it. Is it is to turn on a motor, Brain tells a Motor to start to move. Now the group (with linked arms) starts to move. You can introduce conditionals, loops, and sensors by adding new index cards.
Now you take the leap from Index cards to a programming language like NXT for LEGO Mindstorms or something like Blockly (https://developers.google.com/blockly/). If you designed your index cards right, they flow into the programming language.
Next design a few very simple tasks for them to program. Drive forward for one second and backwards for a second. Drive forward, turn 180, drive forward. Drive a square pattern, ...
The simple the better introducing one new programing idea at a time.
And then by the time they kids are in college, they should be employable.
Personally I really like doing the Algorithms practice on Hacker Rank. I think it teaches you how to solve problems with code and that's really what you want. Moreover it gets gradually harder which is perfect.
​
Hey, I think it's great you want to give your kid a head start. By the time he grows up, robotics will be a huge industry and more universities will have a robotics option.
If you want to really teach him, get him an arduino and a raspberry pi.
Here is a link for arduino robotic kits made for children: http://www.makershed.com/collections/robot-kits
Arduino and robotics are a great way to learn programming, because it has instant physical feedback.
Also, Raspberry Pi is great for learning programming with kids.
Scratch Programming (https://scratch.mit.edu/) is also a great way for kids to learn the flow and style of programming. This is something that he could do basically on his own with supervision at age five. It's built to teach programming fundamentals like: loops, control, statements, etc by using a graphical interface to animate a character on the screen.
The best thing you can do for him at age five however is get him reading. When a child is comfortable reading at an early age, he is more likely to enjoy school early. The more he enjoys school early, the more he is likely to enjoy school later.
Good luck!
This one looks decent and it’ll teach them soldering techniques: https://www.amazon.com/Geeek-Club-Robot-Building-Adults/dp/B08ZSSMW9R/ref=mp_s_a_1_2_sspa?dchild=1&keywords=robotics+kit+for+kids+12+and+up&qid=1624129840&refinements=p_n_age_range%3A5442388011%2Cp_36%3A1253563011&rnid=386491011&am...
A touch over budget, though relevant and highly rated: https://www.amazon.com/Thames-Kosmos-Robotics-Workshop-Kit/dp/B01CNSPGU0/ref=mp_s_a_1_4?dchild=1&keywords=robotics+kit+for+kids+12+and+up&qid=1624129686&refinements=p_n_age_range%3A5442388011%2Cp_36%3A1253563011&rnid=386491011&...
An amazing Robotics book that is suitable for students is:
Valentin Braitenberg, Vehicles
Braitenberg(1926-2012) is a Cyberneticist
The book describes around 20 different Vehicles that can be built with sensors and motors and quickly complex behavior emerges even when built with analog components. Each Vehicle draws a parallel to a biological system from something like bacteria and amoeba to more complex lifeforms.
The book is divided into chapters that are pretty short and can make a good assignment and encourages discussion.
you could also build one of these vehicles in the practical part.
Book on Amazon: (there are a parts that you can preview with look inside)
Here's a free online course on self driving car software taught by google's self driving car lead:
https://www.udacity.com/course/artificial-intelligence-for-robotics--cs373
This will introduce you to the concepts you need to know (on a high level) so you have a roadmap when figuring out what to do.
This is the buck converter I've used and like for this exact purpose: https://www.amazon.com/DROK-Adjustable-Converter-Regulator-Transformer/dp/B07N3QT628
That's the issue, I don't know the model. These steppers are typically used to my knowledge in CD drives and camera lens assemblies. Here's the Amazon link but if you are able to find a proper model or part number of these steppers please let me know!
10PCS 3-5V dc Mini 4 wire 2 phase stepper motor with output Copper gera micro stepper motor Dia 6mm stepping motor for camera https://www.amazon.com/dp/B00M7QQUNQ/ref=cm_sw_r_wa_apa_i_O8jtCb9GG2ZWN
Buy an arduino, a button, and a speaker. Plug you're USB cable into your arduino and computer. Download the arduino IDE from the arduino website. Spend a month or two learning how to code... or rip it off github.com.. build a box, record your sound, and voila, you're done. Not too shabby............ooooorrrrr just buy this already made sound recorder box from Amazon for 16 bucks, have it prime shipped to your door in 2 days and your problem is solved. https://www.amazon.com/dp/B01384GIP0/ref=cm_sw_r_cp_apa_i_5CI2CbFR9W013
While it won't teach her about the mechanical side, this robot mouse is useful for learning things like order of operation, preplanning movement, etc. I had one similar as a kid, but it was a truck: https://www.amazon.com/dp/B01B14XK00/ref=cm_sw_r_cp_apa_N7oQBbRX854M3
For the mechanical side, I'm not sure. Hope this helps!
Edit: Just a thought, you could attach a magnet to the front, place a light steel/iron object in the room, and help your daughter to program the mouse to go up to the object and bring it back.
These books are all really good:
- Russell and Norvig Artificial Intelligence: A Modern Approach (3rd Edition)
- Brogan, William L. Modern Control Theory, 3rd Ed.
- H. Choset, K. M. Lynch, S. Hutchinson, G. A. Kantor, W. Burgard, L. E. Kavraki, and S. Thrun Principles of Robot Motion: Theory, Algorithms, and Implementations (Intelligent Robotics and Autonomous Agents series).
- Craig, John J Introduction to robotics: mechanics and control, 3rd ed.
- Spong, Mark W., Hutchinson, Seth and Vidyasagar, M. Robot Modeling and Control
- Murray, Richard M., Li, Zexiang and Sastry, S. Shankar, A Mathematical Introduction to Robotic Manipulation
- Forsythe and Ponce Computer Vision: A Modern Approach (2nd Ed)
- Hartley and Zisserman Multiple View Geometry in Computer Vision
- Khalil Nonlinear Systems
- Arkin Behavior-Based Robotics
- Robin Murphy Introduction to AI Robotics
- Bekey Autonomous Robots
- Siegwart Introduction to Autonomous Mobile Robots
- Sebastian Thrun Probabilistic Robotics
- Wasserman All of Statistics
- Bishop Pattern Recognition and ML
- Koller & Friedman Probabilistic Graphical Models
- Sciavicco and Siciliano Robotics: Modelling, Planning and Control (Advanced Textbooks in Control and Signal Processing)
- Siciliano and Khatib Springer Handbook of Robotics
https://www.udacity.com/course/artificial-intelligence-for-robotics--cs373
​
I took that in grad school and found it really interesting and a way to learn high level information on robotic navigation and planning
"ideal" may be a stretch, but it certainly is a neat idea that makes many aspects of grasp planning a lot easier.
Irobot made a soft mobile robot for the DARPA chembot project that uses this technology to move. Its pretty neat. link
I have done the coursera course https://www.coursera.org/learn/machine-learning which was engaging and a great introduction to AI. If its not the theory that interests you may be checkout https://www.edx.org/course/robot-mechanics-control-part-i-snux-snu446-345-1x that seems to cover kinematic chain and control concepts.
I dug around for a bit and couldn't find any information on people profiling the range, accuracy, and data rate of the sensor. Would be really interesting to see how good of a sensor this is.
Interestingly, this is a custom built sensor for the Neato and not a standard sensor. They have their own embedded software that interfaces with this imaging module, which I found from this HackADay post. Lots of solid reverse engineering that went into this. I'm looking forward to digging into the code to port this to other things.
This is an instructable that shows you how to make a robot as basic as possible using an arduino, breadboard, servos and some sensors. All of which are cheaply found.
This website is awesome and has a bunch of tips and tricks AND a guide to making a home made robot for around $50-60 bucks and stuff laying around your house.
You can program an arduino with python right? It looks like according to this you can if you have Linux or use PySerial.
http://www.makeuseof.com/tag/programming-languages-can-use-arduino/
Do you know if mBot can work with Raspberry Pi?
I wouldn't be surprised if amazon picked them up to start adding some Atlas models to the fulfillment and sorting centers. You saw how good it is at moving boxes right?
> Amazon said earlier this week that it has more than 90,000 full-time employees working in its 50 fulfillment centers and 20 sorting facilities in the country
...
> Amazon has been adding new robots and boosting automation in its fulfillment centers — it had 15,000 Kiva robots at the end of 2014, but that number has increased to 30,000.
...
> Earlier this week, Amazon said it’s preparing to bring aboard as many as 100,000 seasonal workers at its U.S. fulfillment and sorting centers this year
Amazon will start automating rapidly in the next 5 to 10 nears in order to stay profitable and survive the increase in demand that will come from automated drone/driverless vehicle delivery. If its not some Boston Dynamics bots it will be others.
EDIT: Forgot to link the article.
The real question is when and to what scale.
It's hard to get information on this bot and how pizza's done currently. An article states it takes 60s for the bot to prepare the pizza, but judging by this video at Dominoes this guy is definitely taking less.
Will these jobs be phased out? I believe so. However, the scale at which these robots would have to be available and the investment that would be required are also substantial. I'd be impressed if the majority of pizzas at chains world-wide were made by robots within 20 years.
Its a fair characterization considering humans have a strong tenacity towards violence. I think CGP Grey does a good job covering some of the economic/social implications of robotics. On the other hand, we have to yet understand the political aspect of emerging robotic technologies. We need to cultivate more folks to build these machines and to understand not just how they work but the impact it will have on the World (which is potentially profound). Here is a Tedtalk on the topic if you want to check it out.
This one looks decent. Electronics, and programming of robots. It’s a good all rounder: https://www.amazon.com/ELEGOO-Tracking-Intelligent-Educational-Compatible/dp/B08FLBBBZL/ref=mp_s_a_1_5?dchild=1&keywords=robotics+kit+arduino&qid=1624130010&s=toys-and-games&sprefix=robotics+kit+ar&sr=1-5
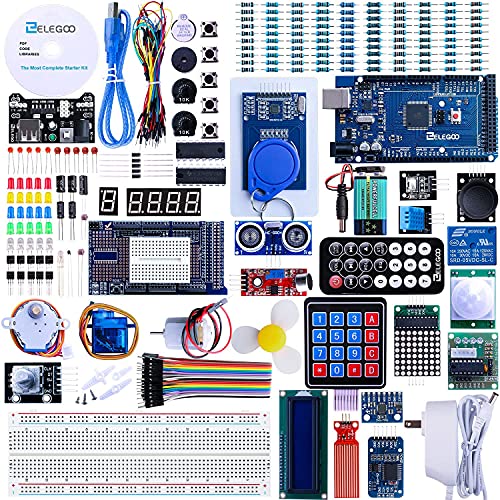
As a programmer without much electronics knowledge I bought one of the cheapie elegoo arduino kits and actually really like it.
They walk you through all the basics of reading different types of sensors, powering motors, etc. It’s all in the arduino IDE which is in C.
The component quality is not high but the variety is good and they do use lots of standard bits. Afterwards you’ll have a wide grasp of the basics to more easily move up to bigger projects.
I think I bought this one — https://www.amazon.com/dp/B01D8KOZF4/ref=cm_sw_r_cp_api_i_O7BSFbS859JZ2
Try out one of the arduino starter kits. Search amazon for arduino kit.
The Arduino Starter Kit (Official Kit from Arduino with 170-page Arduino Projects Book) https://www.amazon.com/dp/B009UKZV0A/ref=cm_sw_r_awd_X0pywb51ZSDYK
I found this paper (https://www.researchgate.net/publication/242655178_A_Low-Cost_Educational_Platform_for_Swarm_Robotics) that details a lower cost robot for use in swarms (ignore the rest after the part about the robot and its capabilities). They state that their cost is $235. This is still a little high if you are trying to get 10-12 for students. On the upside, it is based on an arduino uno so the programming should be simpler in some aspects. There are also areas of the robot you could change to lower the price I'm sure.
Since you need swarm capabilities you may end up paying a little more because you will need communication between robots and something to handle that, which will increase the price. Maybe finding a cheap robot kit that you can modify with some communication abilities would work?
http://www.instructables.com/id/A-reliable-plasma-speaker/ this is the one i tried to build.it really is simple but covers a lot of the basics and a bit more if you do the trouble to try and understand everything to be able to improve it.
So the model number is: Oumefar8r2gund350
https://www.amazon.com/dp/B08FB5D4SD?psc=1&ref=ppx_yo2ov_dt_b_product_details
The batteries are also powering the Arduino, but it doesn't reset it, rather the motor is just making sad noises :(
I haven't tested out a wall power supply, but yeah I might be lacking a lot of current ;-;
Gravity Vehicle? Like an inverse gravity vehicle, otherwise known as a UFO, or one of these? The latter is a car, plain and simple (unless you add batteries and solar panels). The former is controversial and unproven to be real.
Can you provide a link to a Wikipedia article or research into what your teacher thinks a Gravity Vehicle is?
I'm pretty sure that's the exact gear design you said doesn't work:
http://hackaday.com/2015/05/23/hackaday-fail-a-3000-prototype-that-doesnt-work/
https://www.automata.tech/img/tech-gearbox.png
edit: sorry it's the exact same gear as the article photo. The article itself is about hypocycloids.
For those interested in the book.. Amazon didn't have new copies but B&N does
Here's another link in case other people have trouble viewing the OP's videos from the workplace as I am.
Should probably also emphasize that this is a NEW version of Asimo. The title kind of sounds like it might be a link to an old article.
HAL was developed partly to assist elderly in Japan with tasks like farming. I have been watching developments in this area for a paraplegic friend and this is the best for robotic assistance on the market now*. Unfortunately, you can only get them in Japan for now. That is supposed to change eventually though, so you might want to keep it in mind for the future.
'* - Correct me if I'm wrong.
I can direct you to some research from my cybernetics institute at NTNU. It might be worth a read.
Design and Control of Precision Drop on demand Herbicide Application in Agricultural Robotics
A poster from a project following that research
edit: words
> MP Maker Select Mini
I can't comment on it, but it looks cute ;-) Make sure to check out some reviews (edit: e.g. this). If you like to tinker, a reprap kit is probably the way to go as you learn the most. And you can fix/change/replace stuff more easily!
If you just want to print without worrying about complex settings and set-up, the UP Mini is probably one of the easiest, but also more expensive (I have the UP Plus).
3D printing / designing is a hobby for itself :-) You can print fairly thin, but it depends on a lot of factors. Often it's cheaper / quicker to combine methods (e.g. print brackets, holders for other materials). Keep in mind that the small printer's print-area might be small for some things (but of course you can combine prints). Large things take quite a while though. But a 3D printer is versatile and a lot of fun :-)
Also check out http://thingiverse.com (and similar) if you haven't already :-)
Basically you can use everything with Arduino. It's just a matter of how to "speak" to it ;-) Motors, analog sensors and such are easy to connect. Displays and things like that only work if you can find a data-sheet / controller.
Arduino runs with 5 Volt, but it can control higher voltages and currents via relays, transistors, h-bridges and so on. Signals of other voltage can be read using a level shifter.
If you search around (Instructables, google) you'll usually find some existing projects using the parts you consider using.
I have a three axis arm like the uArm. Larger reach, open source, available on thingiverse. You may find you can make a copy within your budget. here is the thingiverse link. Let me know if that helps.
http://www.thingiverse.com/thing:248009/#instructions
All his steps are listed and you can deduce the tools needed from there. If you can't laser cut parts then print out the designs, glue them to a piece of cardboard, and then cut it out with an xacto knife. Won't be great but it's a start.
Hello :-)
I suggest you start with a Arduino Kit and some basic tutorials, such as the $22 kits from Aliexpress (if you don't mind the wait or paying a bit more from a local store). It's flexible enough to make all kind of things. For $25 you can get it with the Mega and ultrasonic sensor.
As for electronics: "Getting started in electronics" is a fun read. Lots of doodles, nice to learn electronics on a somewhat intuitive level... Not only for children. "Practical Electronics for Inventors" has a bit more background info if the first one is too simple for you.
For about $15 you can build a 2wd robot (see older link-list here). It's simple to get started, and you can expand it with smarter code, more sensors, and so on :-)
If you want and can afford it, consider getting a 3D printer. Prusa i3 kits start at around $180, and while not perfect (cheap extruders), they are great to get started. With a 3D printer you can make all sort of parts for your hobby.
Only part 3 of this course really focuses on particle filter but overall I found it very interesting. If I remember correctly, it's also all Python.
This wonderful (free) course gives you a good understanding for how driverless cars determine their location: https://www.udacity.com/course/artificial-intelligence-for-robotics--cs373
It gets heavy after a point, but he explains the concepts very well. Even in the first couple of classes you'll have an "aha!" moment about what's going on.
this is the article/discussion that I tried and had luck with: http://www.raspberrypi.org/forums/viewtopic.php?f=43&t=71977
theres a comment farther down that talks about input_file.c file changes. I modified that, did a recompile and it worked for me.
>I thought about using the 802.11 signal but I'm worried that noise may interfere with getting an accurate strength reading.
While noise is a problem, reflection are a far bigger concern. WiFi reflects off everything, and those waves interfere with each other, causing numerous peaks and valleys. Check out this guy's project where he mapped wifi signal strength in 3D. Even in free space it's all over the place, and the pattern produced is entirely dependant on all the objects in the room.
> I wish there were more people who've done this sort of thing :/
You won't find radio solutions (yet) because it's not at all practical with today's hardware.
We're a few years off (maybe even a decade) from devices like Ultra Wideband, which will provide fairly accurate 3D positioning indoors.
An airsoft quadrotor would be cool but that would be pushing it... I think you could do something with quadrotors like having them play ping pong like this. You can make them do almost anything, it would be cool to see what people could do.
Thanks for the lead on AliExpress. I think I found the world's cutest motor.
Ooohhh EE&CS/ME showdown coming on.
I suggest watching his TED talk, he's actually doing some really, really neat stuff with mechanical pneumatic "brains". In this application, sure there is not a lot of EE "brainy stuff" going on, but a bunch of circuits without a means of locomotion fails the popular definition of robot just as much as an r/c car does.
The BeagleBone might be a good solution for you. Think of it in terms of a Raspberry Pi, but with true dedicated GPIOs. Lots of pins, nice Linux support.
I found the Sebastian Thraum's online course pretty good and it might be worth linking to ROS and other applicable software tools and frameworks.
Sebastian Thrun has an online course on Udacity called Artificial Intelligence for Robotics, Programming a Robotic Car where he covers some localization, particle filters, etc.
Localization in a known map using a range finder is one of the most common examples used for particle filters, like in this video, so there's plenty of resources available in that area. The problem is also called pose estimation, if you want another term to search for.
You can use a lot of things for speech. If you're on Windows you can just use Microsoft's Speech APIs, they are ok. If you want open source try Sphinx.
This is a nice design. I would recommend this site for sharing this.
Sadly the 'market' for robotics is very scattered. There doesn't seem to have been any successful attempts to consolidate its information sources online. It's much like the situation with Open Source design. Most people remain unaware that you could actually build a whole house, all its furnishings, even light vehicles and domestic robots from designs found online. There's no one source for them all. It's all scattered about, and Google just isn't that efficient.
https://sites.google.com/a/lbl.gov/microfluidics-lab/valve-controllers/solenoid-valves
A number of valves are discussed for microfluidic applications; however I don't think you are going to find anything in your price range. Maybe this will at least get you started.
There are more intermediate options before the Mindstorms, which may be daunting at 5. Check out Lego WeDo, which has scaled back designs and simpler parts. You still get an array of sensors/motors and a graphical IDE for controlling the models.
I'd also recommend checking out scratch, which is another IDE for making 2D video games and interfaces with the WeDo kits.
All the stuff about wix aside, I can see there's a lot that can be learned in terms of the architecture and the way things are put together to form a final product.
Quickly found their technical blog too and it looks quite well-presented. So even though I don't think I'll be getting their actual robot since I am thinking of a more general-purpose construction kit of some sort where I can play around with different ideas at first, the project still looks like a good source to learn about the processes and stages going into making a robot. Thanks for the suggestion!
Husarion CORE2 - web browser user interface, dc motor with encoder hardware support, Real Time Operating System based C++ framework, lots Of GPIOs, communication interfaces and examples.
Some how to start projects are here: https://www.hackster.io/husarion/projects
Have you seen the PXFmini ?
From Hackster. A $200 smart drone with the Pi Zero. I have just started this project.
https://www.hackster.io/vmayoral/pi0drone-a-200-smart-drone-with-the-pi-zero-4fec08
Camera focus control stepper motor actuators can be had for a few dollars that meet this criteria.
https://www.amazon.com/uxcell-Stepper-Stepping-Camera-Focusing/dp/B07QYB4C7P
You could also look into motorized micrometer heads or differential screw driven actuators. Basically you have a screw with two very similar threads on it and a nut for each thread. One nut is fixed and the other translates. The output motion ends up being the difference in thread pitch.
My advice would be to learn how to read resistors assuming they have various bands and are not just pure blue. If you want to measure resistance a multimeter will do the trick, but they can be somewhat expensive: https://www.amazon.com/Fluke-115-Compact-True-RMS-Multimeter/dp/B000OCFFMW/ref=sr_1_6?dchild=1&keywords=fluke+multimeter&qid=1625523462&sr=8-6
No, those are called nibblers but are actually shears I think. It's much closer to this: https://www.amazon.com/Makita-JN1601-Amp-Gauge-Nibbler/dp/B000TKRLS0/ref=sr_1_5?dchild=1&keywords=nibbler&qid=1619648088&s=hi&sr=1-5
It is a kit. Link : Kit4Curious Acrylic 6 Wheel Drive Curious Chassis for DIY Robotics (Black) https://www.amazon.in/dp/B07D5T2DN3/ref=cm_sw_r_cp_api_glt_fabc_KN6087S6WS6WDDRS6CR1?_encoding=UTF8&psc=1
I don't know what design you have in mind but you could get started with some servos and brackets. I have been using these for my projects and they work great. There are cheaper ones also. You could use standard servos with brackets also and there are a few variations.
Those kind of motors in my experience usually have very low torque. Maybe try using some stepper motors, or geared motors. They're more expensive but typically have higher torque, and wont be stopped by the weight of your chassis. For reference, I think I've used these before.
Those ones turn pretty slowly ofc (30RPM), so if u want something faster there's other options. Really there's tons of options out there so it all comes down to what you want in terms of torque, rpm, voltage. These ones look pretty cool too.
Next, i'd say you probably want to improve the traction of those wheels, say with rubber bands, or treads, or something like that. Otherwise your vehicle may slip on smooth surfaces if the chassis is too light.
Granted my experience with this stuff is pretty small, so maybe someone else could add on with some more pointed advice!
Am I the only one that gets a Small Soldiers vibe from this?
Also anyone have a review on this? I would buy it, but I am getting a super strong vaporware vibe from this. Everywhere that has it for sale has no reviews.
edit: Never mind, found it on Amazon with a couple of reviews, and only $399!
I'm a big fan of Iron Man. Always wanted to build an exo-suit with some strength-enhancing capabilities. I'm pretty excited for the possibilities (though not hopeful for the market acceptance) of JIBO. Although, with products like the Amazon Echo getting people used to the idea of having AI personalities in their home, maybe I'll be proven wrong.
So I've looked into purchasing the gecko adhesive for myself but alas it looks like they only do custom orders still. Hopefully it will become more accessible in the near future. One idea would be to purchase one of those sticky mats usually used in cars to hold your phone Amazon Link and attach it to a plate that is pressed down from the robot. You could use pneumatics or (probably easier and cheaper) just a spring to make sure that it hits the ground quickly. Those sticky mats are nice because they don't leave residue (unless they get really hot) and create quite a bit of friction.
I use a standard rc airplane remote control. Edit: Updated Link - https://www.amazon.com/dp/B07CWBQ2HM/ref=cm_sw_em_r_mt_btf_awdb_PxczFb098WTAW
These are made for rc planes so the range is more than sufficient.
Best place to start is with the arduino uno. https://www.amazon.com/Vilros-Arduino-Ultimate-Starter-Learning/dp/B00BT0NDB8 With this micro controller, you will learn coding and circuits. In watch lots of YouTube videos on what to do with it. I feel like it's better to do these things on hand than just watch videos without the physical components. The basic components of a drone is a radio receiver, Inertial measurement unit, and brushless motors. In the end, you might even opt out of using an arduino for the drone but it is best so you know the basics of robotics from it. Radio receiver - communications with a controller IMU - for stability Brushless motors - for the power I obviously left a lot out but you should probably learn how to do the rest yourself through research. This is really just to get you into the robotics world.
That's kind of a big task to start with, lots of gotchas. Start small and work up to it. Make a small scale version of it first, such as have an arduino spin a wheel a set number of degrees in both directions using a belt to connect the wheel to the motor. This will force you to solve a few of the core problems with your end goal.
Having a 3D printer, or access to one, will also be a huge help for this type of project. Sketchup Make is a great & easy to learn program for designing custom parts. TinkerCAD website is also phenominal.
That motor will not really work well for what you want, you need a stepper motor or continuous servo etc... Brushed motors in general are not all that great IMO as they wear out. Regarding what size of motor you need... technically you can use gears or pulleys to make just about any motor work if you don't mind it taking forever. Unfortunately I can't be much help on motors for stuff like this, still learning that end of things.
Prepare for lots and lots of tutorials, there's a handful of different new skills you'll need to pull this off. Pay extra close attention to voltages and basic circuit design, and learn Ohm's law. It's very easy to release the magic smoke from your more expensive components or fry a motor.
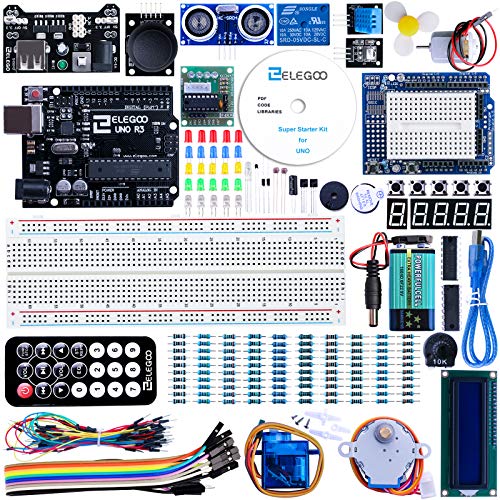
Good luck! There are some great kits out there that give you a series of projects to work on to build your knowledge while having fun along the way such as this one on amazon:Elegoo UNO Project Super Starter Kit
L298Ns will do up to 46v. If you have one of those little precooked driver boards with the 5v regulator, they have a jumper to disable the regulator. The driver can tolerate higher voltages, the regulator cannot. The problem you're going to run into there is those motors will probably exceed the 2 amp capacity of the L298Ns. I've beat the tar out of L298Ns in the past, shorting them out at currently way higher than 2 amps for extended durations and they were fine, but as always, your mileage may vary.
Just try the higher voltage with your existing setup. Grab some old 9v batteries and connect them together. It'll probably be fine for testing. They're low current, but you'll probably be able to drive a single motor with them to see how your setup behaves. Then just buy a bigger battery. Anything will do. Hobbyking is a good source for some lithiums.
Also you can't run a Raspberry Pi off of the L298N 5v linear regulator. That's a recipe for a bad time. You need a suitable 5v (switchmode) regulator. Linear is not going to cut it here. These are really good. I've used them lots in the past: https://www.amazon.ca/DROK-Converter-Step-down-Transformer-Regulator/dp/B00C63TLCC/ref=sr_1_5?ie=UTF8&qid=1536764440
Some AI and ML books:
Artificial Intelligence: A Modern Approach (this is S tier)
Pattern Recognition and Machine Learning
The Elements of Statistical Learning
Deep Learning
The Cambridge Handbook of Artificial Intelligence
> * Robotics reading books (the best of the best) e.g. Artificial Intelligence: A Modern Approach by Stuart Russell and Peter Norvig (http://aima.cs.berkeley.edu/[1] ), etc. * Links to leading robotics research resources, etc. * List of robotics labs around the world (augmented after review by moderators and citations)
Any suggestions for those?
Hai, I've utilised Play to Labs' robotics kits for kids. This company allows students aged 6 to 16 and older to take robotics classes. Five levels are available, and each one is fully dependent on the age of the children. They also provide you certification once you've completed all stages. They also sell all of their kits on Flipkart and Amazon. You can examine them. Additionally, their kits are affordable too.
Good luck!
Hello, thanks for asking this question. I'm not sure about many robotics toys out there in the market but we purchased one of the best inexpensive robotics toys on amazon Playto Labs' kits levels. So far I have found this kit very cheap and easy to play with it. What I will suggest is, rather than going with just Robotic toys, better to buy kits.
Thank me later. Hope it finds helpful!
I have very general things, ultrasonic sensor, couple of servos, lcd screen, general starter kit with some sensors. this kit
Solenoids are either fully extended or fully retracted - no option between. Does that fit your use case?
What are you moving with this mechanism? How much resistance will the mechanism be working against? With USB’ish voltage I’m thinking your best bet is a small DC gear motor moving a threaded output rod…
Hello everyone, 25 year old web developer here with CS Degree. I'm bored of my job and want to learn something new. I have to money to pay for kits and courses but I don't want to waste it. Has anyone got experience with good robotics courses that let you learn at your pace?
I'm pretty serious about learning. Although it pays well, I feel unsatisfied with my career. I want to learn something more meaningful. It would also help if the course included some practical section's, like putting together a toy car or whatever.
Edit: The Udacity course looks promising but I wanted a second opinion before dropping £300 on it. https://www.udacity.com/course/robotics-software-engineer--nd209
Personally I think that you should use some kind of metal rod or shaft like this one and make your designs around it.
If the metal shaft is not an option then you can sand down the 3D printed part slowly with something like 220 grit sand paper until you get a fit that you are happy with. I would also do it to the inside of the part that the bearing will sit inside of as I suspect that will also be a very tight fit for the bearing.
I read half of this and made my own flight simulator and autopilot in matlab using the techniques described. Very good book: https://www.amazon.com/Small-Unmanned-Aircraft-Theory-Practice/dp/0691149216
Yes a belt drive with a NEMA motor seems to be the best solution for now. Still learning the technical side of arduino, but I'm thinking I'll be able to drive this unit with an appropriate motor controller and 24V power supply.
I think pneumatics will add too much complexity. The end goal is a portable device that can just plug into the wall and be ready to go.
Try a starter kit, they’ll walk you through how the program relates to functions
You might like to draw some inspiration from this Robotics related horror book:
You're right on all three points. I was thinking of something else, or maybe just switched the number for degrees of freedom with that of a human. I was definitely thinking including the fingers which is cheating regardless. AFAIK PIDs like you're talking about are just used to handle the resonance and inertia of the actuators themselves, and don't operate in concert. I think I may have had a stroke or something posting that video... I'm not sure what I meant to post but this is a better example. Any inverted pendulum will use some feedback/feedforward because it has to know where the pendulum is pointing.
Thanks for the corrections!
Then following the video is probably the best bet for a quick and easy solution. If you want to make something more robust, I recommend A Recipe for Soft Fluidic Elastomer Robots, you can get Silicone quite cheap and 3d-print your own molds according to the designs.
The explanation of what you want is not super clear, do you want a motor that after a set amount of time spins the other direction and repeats indefinitely, if so, what is the button supposed to do? If the button just starts and stops the thing and you would prefer not to program, you can make this purely out of a circuit. My approach would be to use an H-bridge where you have the forward inputs tied together and the backward inputs tied together then put the forward inputs in the Normally open connection on the relay side of this timer circuit board and the reverse inputs in the Normally closed connection. This adjust the knob on the potentiometer of the timer. This will make it so when you press the button the circuit will start spinning the motor one way, then after a set time passes they will spin the other way, and this will repeat until the button is pressed again. Hopefully that is helpful!
what we did in college was mostly we crimped on quick disconnects