
What are
/r/3DScanning's
favorite Products & Services?
From 3.5 billion Reddit comments
The most popular Products mentioned in /r/3DScanning:


The most popular Services mentioned in /r/3DScanning:
ReconstructMe
Agisoft Metashape
Blender
Thingiverse
Youmagine
MeshLab
meshmixer
Meshroom
Blender Game Engine
Vimeo
xNormal
AlternativeTo
WeTransfer
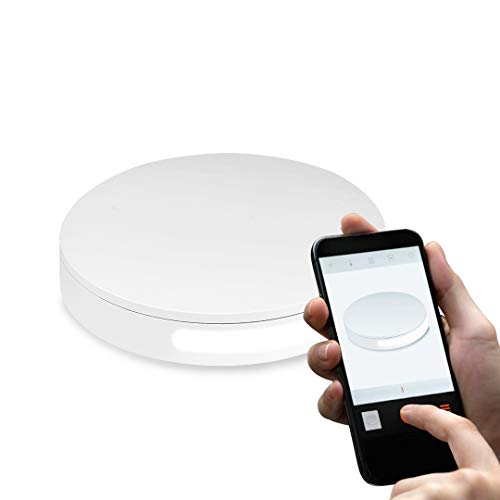
Sirv
Amazon Drive
The most popular Android Apps mentioned in /r/3DScanning:


The most popular reviews in /r/3DScanning:
I also would recommend a 3D image-based rotation presentation as opposed to 3D scanning. 3D scanning results will take longer to capture, longer to process, and longer for your prospects to download than an equivalent 3D-looking results made with photos only.
Take a look at this: https://sirv.com/demos/360-spin-3d-model/. This would provide a 360-view of your products with the resolution and accuracy of digital photos without creating full 3D models.
It's only being sold used on Amazon and the reviews for it are terrible.
https://www.amazon.com/Fuel-3D-SCANIFY-Handheld-Scanner/dp/B00PBUL04O/ref=sr_1_1?ie=UTF8&qid=1508357443&sr=8-1&keywords=fuel+3d+scanify
Only sold used indicates the product might have been discontinued. The suspicious part is the two cameras are only 3.5 megapixel cameras. It is a structured light system but it isn't even laser, using xenon flash.
That mask is mostly about the paint job which would be easy to copy. The blank generic female face mask is available for $7 on Amazon.
https://www.amazon.com/MaskIt-Full-Female-8-5-Inch-White/dp/B00CP45WAM/ref=sr_1_2?ie=UTF8&qid=1544063182&sr=8-2&keywords=female+face+mask+costume
The Unreal Engine creators did a video and blog series on this, where they used a HDR/Chrome-Grey ball to obtain lighting information during the photogrammetry process, to later delight the model - https://www.unrealengine.com/blog/imperfection-for-perfection-part-2
The R200 support is new. The R200 is really small and good for clipping to a tablet, and the F200 realsense sensor is great for smaller objects, e.g. here is a sample that we scanned of a garden gnome that is about 25cm tall: http://reconstructme.net/download/gardengnome/
You could try the old reading glasses trick: http://reconstructme.net/2012/03/26/reconstructme-with-glasses/
But in general, I think that most of the primesense-based scans (kinect 1 / Sense / structure, etc...) all have issues with fine detail like this.
We had a personnel change up due to our client pushing us back a bit on the timeline and I stayed back at the office.
I have been thinking about it and scanning may not be the best bang for your buck. Photogrammetry has the potential to be just as accurate and a LOT cheaper. Cheap enough for me to do it as a side project and only charge you if you like what you get.
Here's what I need from you: * 20-40 digital images from a nice DSLR of the area you want captured * Make sure to maintain the same pose throughout it all without moving * Make sure to also take photos from various angles completely around the area being captured; High, low, straight on, and at various angles
That's it. You can send them to me in a format that works for you, I recommend wetransfer.com. My email is
I hope this helps!
I would visit a dollar store to buy the cheapest plastic step-stools you can find, something like this: https://www.amazon.com/Rubbermaid-Stool-Black-200lbs-90-7/dp/B00IGITQFI
Put printed checkerboard targets on top of each one. I bet they have a dimensional uniformity of 1/8" or less, and your software will probably automatically detect the checkboards and tag with XYZ values.
You can leap-frog them from one end of the building to the other. I would think 10-12 would be enough. Good luck, and post pics!
Aesub sells a spray that disappears after a while we use on car parts like interiors that we can’t wash off. Otherwise we use this spray if you can clean the part Aircraft Tool Supply Magnaflux... https://www.amazon.com/dp/B08MHYXH7B?ref=ppx_pop_mob_ap_share
try https://play.google.com/store/apps/details?id=com.lvonasek.arcore3dscanner
there is a paid pro version that add extra settings
it works with arcore depth sensing and is starting to use TOF sensors in higher end Samsung phones.
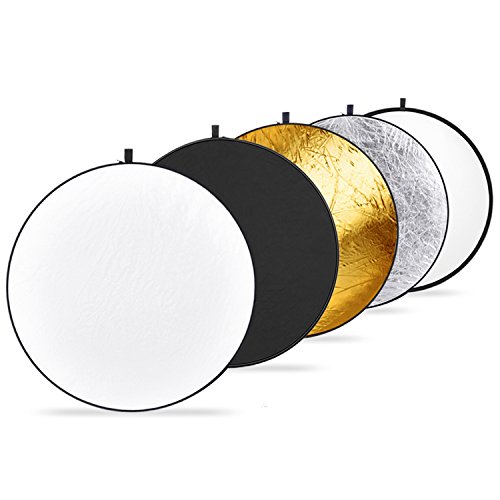
You need to use diffused or soft light.try reflecting a lamp off a semi shiny dinner plate or something. Or u can buy those shiny white things photographer s use on amazon for cheapNeewer 32-Inch Portable 5-in-1 Collapsible Round Multi Disc Light Reflector - Translucent, Silver, Gold, White, and Black https://www.amazon.co.uk/dp/B002ZIVKAE/ref=cm_sw_r_other_awd_O27swb4F3QFSR
The first thing I'd try with their setup is to spend $10ish to pick up a phone sized ring light off amazon, such as this.
It's essentially a tiny version of what I use (I'm using a large 18" light sold by Neewer, like this). This provides bright very even light, especially if you use it in an otherwise dark room. Bigger lights help handle larger objects, but can get a lot more expensive.
Make sure the one you get fits with your rear facing camera for the better photo quality - a lot of the ones on amazon are set up for the selfie camera.
>Asus Zenfone AR
​
The Amazon reviews for that phone are brutal.
​
https://www.amazon.com/ASUS-5-7-inch-Unlocked-Warranty-ZS571KL-S821-6G64G-BK/dp/B073XW4JHC
​
Unfortunately, the Lenovo Phab 2 Pro has reviews that are just as disappointing.
You can use P30 Pro for 3d scanning, try this app https://play.google.com/store/apps/details?id=com.lvonasek.arcore3dscanner
There are also cloud based photogrammetry websites like ReArk.
Not yet, it is a feature which is going to be introduced. And using Camera2 API is not good together with motion tracking.
I developed this: https://play.google.com/store/apps/details?id=com.lvonasek.arcore3dscanner I expect that usage of depth sensor will in the future drastically improve the quality.
Not in real-time and still in beta but does single camera photogrammetry by just walking around the target.
https://play.google.com/store/apps/details?id=com.smartmobilevision.scann3d&hl=en
http://scann3d.smartmobilevision.com/
Scann3D for Android works a treat. https://play.google.com/store/apps/details?id=com.smartmobilevision.scann3d
If you can find a Kinect V2 and have a decent Windows GPU, Microsoft 3D scan will scan in relatively real time. Handheld orbit mode or a turntable.
Otherwise you could get a trial license of PhotoScan for Mac. The easiest solution with the best quality is reality capture available on Steam with an Nvidia GPU.
It actually depends on the camera itself and it REALLY depends on properly calibration. This is done with a chessboard printed pattern approach. If you download OpenCV examples on google play: https://play.google.com/store/apps/details?id=com.jnardari.opencv_androidsamples&hl=en
You can create a proper .YAML lens+cmos corrective file that you can then pipe into software like photoscan to give you a MUCH, MUCH better result then you think is currently possible with a cell phone. If microsoft is smart, they'll allow you to export the generated pose graph (OR AT LEAST WORK WITH IT!) to take a series of photos after the base geometry is calculated to get a much better texture and post process the object.
They are balancing speed and detail in the example you saw.
You may also want to try: https://play.google.com/store/apps/details?id=com.smartmobilevision.scann3d&hl=en
This is a pure photogrammetry approach that does not use an external server (like 123d does) and is calculated directly on your phone. These guys are really advanced. it's a little bit nitpicky but when it works, it works crazy good. It also has lens profiles for the most common android cameras already, so you can skip the generative step.
The problem with cellphone cameras is that when you're streaming video at X hrz you have to do it at a low resolution to get the fastest cmos refresh rate possibe - because you need clear images without motion blur to get feature pose geometry as fast as they demonstrated. This makes things "fuzzy".
When you have all the time in the world to calculate geometry with SIFT/SURF/ETC approaches on a GPU on a computer, of course you can get a better result.
Plus photoscan knows the parameters of your camera, AND you're taking still images at 12MP or something.
I tried basically every android Scanning app out there and the only one that really works is Kiri https://play.google.com/store/apps/details?id=com.kiri.kiriengine
And even if there's a paid verison, you can actually scan and export for free (3 exports/week)
Honestly, you'll save so much time and effort by just making an alginate mold of your feet then casting them in plaster or something.
https://www.amazon.com/Alja-Safe-Lifecasting-Alginate-3-lb-Box/dp/B000KVSU60
Have you considered using 123 Blocks?
This one costs $22 and claims accuracy and squareness on all sides within .0001"-.0002" (2.5-5.0 microns)
https://www.amazon.com/dp/B00092CJC6/ref=dp_iou_view_item?ie=UTF8&th=1
​
I'm unsure how to get past the problem of calculating the thickness of your spray, but it should get you in the ballpark.
Android is officially launched!
https://play.google.com/store/apps/details?id=io.spectre3d
There is a free 7-day trial for premium - after that you can continue to use the app for free (no ads) with a reduced daily scan count, or you can sign up for a Pro account for $14.99 annual.
These are super helpful for taking them off of most surfaces:
https://www.amazon.com/Plastic-Cleaning-Stickers-Adhesive-Scratches/dp/B08YF7TFJD/
Also consider the Quadro gpus since cuda cores are a consideration.
I run a 1050ti with an AMD 1045t with 16gb for my Einscan SE.
The Quadro K2200 seems to match exceed my 1050ti for a budget price.
At first, I was just throwing the item and powder in a bag and shaking. Nothing really needed to get it to stick to the stuff I tried (servos, jewelry), and it doesn't need to be any kind of opaque coating to get results.
But then I bought some of this: https://www.amazon.com/gp/product/B08W5F2H15/ref=ppx_yo_dt_b_asin_title_o00_s00?ie=UTF8&psc=1
That stuff is working amazing. Sticks to pretty much whatever. I imagine a smooth coat would give more perfect results, but even slapdash sprays have been just fine.
Finally, based on success with the spray powder, I've ordered some Aesub Green sublimating coating. The idea with that is that it simply disappears after a few hours, no residue. They have aerosol sprays of their stuff, but it's shockingly expensive. Their Green product is something you apply with a spray gun or airbrush, and goes for a much more palatable price. I'm hopeful for this stuff, because I've got some items with lots of little nooks and crannies that I can't imagine scrubbing scented Gold Bond out of--circuit boards, wood art, etc.
Now that I've figured out the trick with item prep, I'm getting some decent results. I'm still having trouble scanning the entirety of a large object (1m x 0.5m) object in one pass. But I get awesome scans of sections of the object now... so I'm hoping I can export into external software and stitch together the sub-scans.
Sure, here is an example I made awhile ago from the nextengine: http://www.thingiverse.com/thing:401507/#files (sorry about the weird alignment, I never took the time to align it in 3d space).
I'll get an example from the david sls-2 up here in a little while. The biggest differences between the two are that for an individual scan it takes around 20 seconds on the sls-2, and for the most part you can do single point alignments of a scan. The David software also seems much more robust in the amount of data points it can handle, and does not crash frequently crash during the fusing operation the way that nextengine does.
Firstly, what you see demonstrated, is the applied results from a big machine. Not an app or a software. The results in the form of normal map (mixed with other textures) is then shown on a plain model inside a blender - a free 3d software. You shouldn`t have any problems running blender on ubuntu of your specifics. If you are interested in these things, give it a try, if you hadn`t already. Blender is the best.)
I use an a6500 and a sigma 30mm f1.4 (I didn’t buy this setup exclusively for photogrammetry) as well as this for the turntable. Works great. I’ve done plenty of things roughly the size of a rc car as well as bigger and smaller.
My 3d systems Sense V1 does pretty dam. Good for the $120 I paid in Craigslist for it. I bought Skanect also, and use the Open NI2 driver package (opensource). No 3d systems software or drivers required.
It's a decent little lidar unit for what I paid for it but the lidar mesh resolution leaves much to be desired. The RGB camera is a joke at best, and textures have a "1mm pixel" density, but honestly it's way worse than that, and the contrast is awful, in addition to be non adjustable by user.
I do however have fun with it, and my Surface, enough that I tore it apart and made a new handle for the guts inside (RealSense R300). The model and pics are available here: https://www.youmagine.com/designs/3d-system-s-sense-v1-v2-new-chassis-for-skanect
But to your point, yeah it's still not good. The current gen of realsense developer boards don't really blow me away either. Seems like nobody wants to make a decent "prosumer model" of these things.
Try using skanect (demo) to see if the software or the hardware is the issue. Since you said you have OpenNI2 installed, it should be plug and play, but you will have to rotate the sensor 90°. If its still doing the same, idk. Maybe your USB power is failing.
If it's software (I've had a muuuch better time with skanect) and you end up needing to hold it sideways.. and happen to have a 3d printer (or access to) i designed a sideways holder for it. https://www.youmagine.com/designs/3d-system-s-sense-v1-v2-new-chassis-for-skanect
The under $500 depth sensor 3D scanners have a long throw, about 2 feet, that makes them really unusable for small things, like something that is 1 foot tall. Agisoft has a sample data set with a porcelain doll about that size. The trial of Photoscan/Metashape allows that to be used and see what the solution looks like, although their output is a useless low polygon 3D model. The data set can also be used with the 3DF Free version, limited to 50 frames.
https://www.agisoft.com/downloads/sample-data/
Try reconstruct and get used to the tracking functionality of the software. Which means, it is importent to scan "non shiny" Objects with moderate amounts of environmental light.
In addition I would recommend meshlab and a 3d modelling software to fill up the holes.
Alternatively try the "portrait" mode which almost guarantees nice printable results!
This is rather late I suppose but since this sub is rather slow maybe it'll be okay. I used several Carmine 1.09's back in the spring for a project in conjunction with ReconstructMe SDK. ReconstructMe keeps a copy of of the drivers on their website here. http://reconstructme.net/?wpdmdl=85
They always worked perfectly (for every program I used with OpenNI) for me and should be installed by clicking on the appropriate installer. Hope to hear you get it working. Carmines are fun to play with.
I’ve found Meshlab to be a decent tool for photogrammetric clean up work. It’s also got lots of nice tools for decimating and reducing your models to make them easier to work with.
Actually, D3D-s provide a better price on the Jewelry scanner Model S. :)) And D3D-s has a 5MP camera with a resolution of 0.022 mm/pix
The scanned samples -
https://www.amazon.com/clouddrive/share/qRkzqpGuWa2C8TYbCc8QyMxsdSBcRoFVJvBXDQFxwy6
Please check the checkbox and click download in the top-right corner.
If the person is less than 175lbs, I've used this for a cheap and easy fix.
https://www.amazon.com/gp/product/B014W1EUY4/ref=ppx_yo_dt_b_asin_title_o00_s00?ie=UTF8&psc=1
Have you tried https://play.google.com/store/apps/details?id=com.eyecue.qlone or https://play.google.com/store/apps/details?id=com.lvonasek.arcore3dscannerpro
Both options may give enough of what is needed with minimal costs ... If you have the right cell phone.
When testing out using Sony's (android) 3d scanning app I scanned a lot of household objects but also my left foot. The scan came out detailed with wrinkles and veins visible on the model, but because the app uses the object's surroundings and background for positioning (it uses a single camera, no stereo vision or or lidar), the object must be absolutely still. Therefore I scanned standing with my foot on the ground so the sole wasn't captured.
You dont have a ToF sensor, but it supports Depth API so you should be able to try 3D Live Scanner. Its a very good 3d scanner app that I use alot. It works best with phones with ToF, but you could try the free version to see if it works good enough for you.
https://play.google.com/store/apps/details?id=com.lvonasek.arcore3dscanner&hl=en_GB&gl=US
What phone do you have?
This is a very good 3D scanner app made for scanning rooms.
https://play.google.com/store/apps/details?id=com.lvonasek.arcore3dscanner
If you have a phone with a TOF-sensor you can buy the PRO-version which is much better.
There is one on Thingiverse to 3D print, although it is a large object that is probably difficult to 3D print by itself. The checkerboard pattern can just be printed out on a regular printer.
The Makerbot Digitizer was supposed to be Bre Pettis' swan song for selling out Makerbot, showing how the money went to research. It was pretty much a total piece of crap. It is still sold on Amazon, just scroll down and read the reviews.
https://www.amazon.com/MakerBot-Digitizer-Desktop-3D-Scanner/dp/B00FOUCBOO/ref=sr_1_1?keywords=makerbot+digitizer&qid=1558053668&s=gateway&sr=8-1
You may try this mirror website if they don't respond: https://apkpure.com/s3d-capture/com.levels3d.mycaptr/download?from=details
There's also another 3d scanning app called Imerso which I wasn't able to download, it said it was restricted in my region. Link: https://play.google.com/store/apps/details?id=com.imerso.app
Hi, I am developing this app: https://play.google.com/store/apps/details?id=com.lvonasek.arcore3dscanner&hl=en
Currently it can use depth sensor on Huawei P30 Pro and Honor View 20. However the motion tracking is still not accurate enough to generate good quality 3D model.
Looks like you are using LED lighting. The array ends up being like a lot of point lights hitting the surface. You need to put a diffuse filter over the light, some say polarized works, haven't tried it.
white filter
https://www.amazon.com/Neewer-Portable-Photography-Lighting-Adjustable/dp/B07YFY7H7J/ref=sr_1_6?dchild=1&keywords=led+light+filter&qid=1599486349&sr=8-6
Keep up the great work Grzegorz!
I'm still trying to take what I learned from your polarized light video and try it with my own 3D captures. This latest video also makes me want to explore color corrections.
I just ordered a light tent from Amazon a few weeks ago that features integrated adjustable Bi-color lighting so I can adapt the color temperature as needed. It's pretty cool but I don't think I'll be able to use it with polarized lights because of the reflective internal surfaces. Now I wish I would have tried something else with custom polarized lighting and polarized camera filters.
It's really cool to see our community is innovating so quickly. There's always something new to learn.
Right now, my best camera lens is non-motorized, so my old Nikon D3200 camera body can't adjust the focus automatically because it doesn't have a focus motor either. As soon as I upgrade my camera body to one with a focus motor I want to start experimenting with focus stacking because I have a hunch that it will greatly improve my capture quality.
Not a scanner but lots of the time I just take a picture and add some dimensions for things like you're talking about. Imagemeter in Android is great for stuff like this. It's probably faster than scanning too
Edit: https://play.google.com/store/apps/details?id=de.dirkfarin.imagemeterpro&hl=en_US
Also Huawei P30 and Samsung S10 5G have ToF sensor. Google is trying to compete Apple and as there are leaks that the next iPhone will have rear ToF sensor, Google wants to reintroduce ToF sensor support ASAP.
Proper Tango support is not necessary, two devices which I mentioned have wide-angle camera which can provide better functionality than fisheye camera. ToF sensors in the new devices are different than Tango's. Tango's ToF provided depth data in rate 5FPS and in range 0.5m-7m. New sensors have rate 30FPS and have range 0m-4m.
Do you have Nokia 9? Could you provide me an output from this app? https://play.google.com/store/apps/details?id=com.hvt.camera2test I am interested in DEPTH16 parameters.
Just a friendly suggestion:
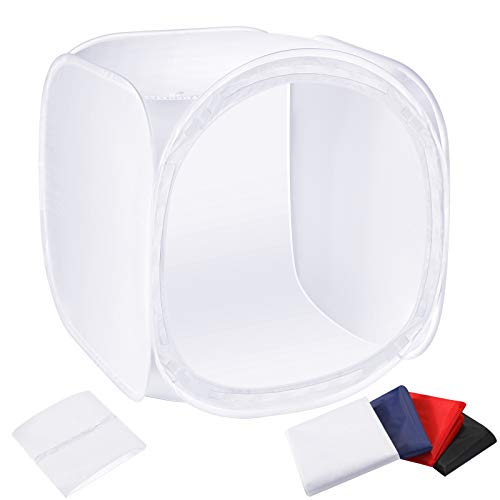
Try putting your subject inside a light tent like this for optimal shadow free lighting:
A lot of 3D scanning is finding the right lighting conditions, the space to move around the subject, and how good is the software. There is probably a next generation coming but the 3D Sense from 3D Systems is a repackaged Realsense with their 3D Sense software. It helps that it has a forward diffuse lighting built-in. The Realsense short-throw has about 3mm resolution. It's a good starter to learn all the ins and outs, get output that isn't totally frustrating. The best thing is have a Windows Surface or touch screen laptop in a harness and walk around the subject with the scanner in one hand. The motion can't be too fast or track will be lost and it can't be too slow because the software will use up all the memory. Not too much of a risk for a learning experience and get useful working material. 3D Sense has some nice finish-up editing.
Is this a feasible alternative?
I've seen someone use one on Youtube while 3D scanning and it didn't look too cumbersome.
They're $50 shipped from Amazon
https://www.amazon.com/Connect-A-Desk-Mobile-Laptop-Harness-Desk/dp/B001G713NO
Thanks for your reply! That actually makes a lot of sense now that I think of it. I wen't ahead and bought a 24mp DSLR so I'm looking forward to that. https://www.amazon.com/gp/product/B017AG18O8 I'll keep this updated as soon as I get everything :) Thanks Again!
Imagine if there was an open source version of this.
You could use an open source laser cut or 3D printed stylus,
A tripod with an adjustable double camera mount like this one,
and open source OpenCV code for object tracking.
To keep things cheap, you might be able to get away with replacing the stylus with a wooden pencil, a ping-pong ball, or a custom tracking pattern you could print on paper and glue to your own custom stylus. Even a block of wood with a nail protruding would work as long as it was calibrated.
I would buy an alignate mold and cast kit (non-toxic, non-irritating, quick setting 3 or 4 minutes). After you have your cast, you can scan it in high detail on a turntable. Congrats and good luck!
EDIT: A kit like this is good: https://www.amazon.com/Luna-Deluxe-Prints-Casting-Pearl/dp/B003MU2FNK
Right on, I have a https://www.amazon.com/gp/product/B003X26VVO/ref=oh_aui_detailpage_o00_s00?ie=UTF8&psc=1
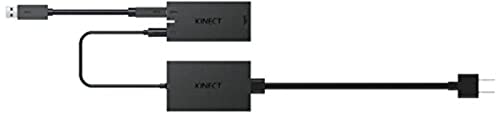
coming soon, I'll probably be able to update you next week. Really wish Microsoft would support this issue more, it's rather shameful there's not much support for the hobbyist community around the Kinect V2 it's a really powerful tool, potentially.
You ever purchased one of the other scanners?
I've just used the Kinect V1-2, I can't believe I sold my V1 for a V2, woops. I've also used a DSLR with Agisoft for photogrammatry, but that is much more intensive than my early days of testing Kinect scanning. My last PC had an MSI motherboard, so check, no problem on using the Kinect, but it only had an i5 from 2009 and a 2gig video card.
I went for the PCI card option...
https://www.amazon.co.uk/gp/product/B0037AQMJS/ref=oh_aui_detailpage_o01_s00?ie=UTF8&psc=1
It arrives tomorrow so I let you know if it works. Hooking up to an ASUS Z170 Pro Gaming.....
That link was the only info I could find.
I made my money back on this after two 3D scans + prints. It's been kicking for two years and I put it through hell. You have to spend money to make money sometimes.
Ok so first hurdle I encountered:
I knew I had to add in a USB 3.0 PCIe card and I also knew that there are only a couple chipsets that work with the Kinect (Intel eXtreme and Renesas uPD720202f) but I was impatient and after the Kinect and adapter arrived in the mail I went to best buy to pick up a USB 3.0 PCIe card from Insignia.
Got home everything plugged in, installed, fresh Windows 10 install. Plug in Kinect and start up the free 3D capture "app" (why is every program an app now?) Anyways, the kinect is recognized, lights up, and seems like it tries to scan, but then I recieve an error, not enough bandwidth.
Unfortunately it looks like whatever chipset Insignia uses is not compatible. I ordered up a cheap card from amazon http://www.amazon.com/SEDNA-Express-uPD720202-Optional-connection/dp/B015DOO6JI which supposedly has the correct chipset and should be arriving in a few days.
I'll provide an update then and at least others can benefit from my trial and error.
EDIT:
Ok so the Kinect V2 really needs USB 3.0 on the motherboard directly. I've tried several PCIe Renesas chipsets and none of them provide the bandwidth needed. The kinect simply fails to scan.
Well the good news is that I've simply decided to use our beefier PC that normally handles image processing for this task, and the USB3.0 on this PC is working very nice.
The specs on this PC are Core i7 930 at 2.8Ghz; 24Gb DDR3 RAM; R9 270 GPU; Intel USB 3.0 motherboard integrated controller.
Also Windows 10 is an adjustment. After it continually failed to log in to my Microsoft account I decided to turn off VPN. Turns out even if you enter the right username and password you are prevented from logging in if you are on a known VPN IP. Just FYI took me 30minutes to figure out to turn off VPN.
Now to learn the art of scanning. We have a Photobooth setup with lighting and a grey backdrop which should help with acquisition.
I would reach out to the folks at e-nable they should have lots of info on how to best accomplish the scanning/modelling process.
For the ergonomic handles and such, I would try a low temp thermoplastic like InstaMorph / ShapeLock
I've been meaning to do this with one of my own projects, but just haven't gotten around to it yet. I hope you find this idea useful.
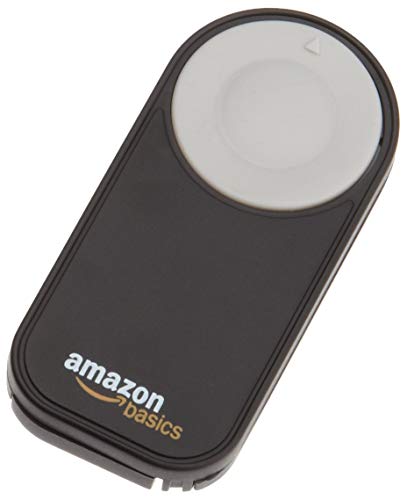
If you're going to use an Arduino controller, then I highly suggest adding an Infrared LED light to trigger your camera for fully automated photography.
Most DSLR cameras can be triggered by IR. Here's a remote that I purchased for under $10 from amazon An Arduino controlled LED could easily be automated with some simple code and an IR-LED costing about 25 cents. The only thing that makes the Amazon remote worth $10 is that it is programmed to send the right pulses to that 25 cent LED.
Add a little bit of scripting and you could use a WiFi enabled SD card that could automatically transfer files to a PC and then automatically start VisualSFM.
I wish I could remember where I found the pulse width information for triggering Canon, Nikon, etc, but the info is out there.
My main problem with these adapters is that they need to be plugged into the wall for power.
I prefer systems that use power via the USB so I can use it outside without an extension cord.
I process models like this in two chunks. One with the object right side up and the other with the model flipped 180 degrees to be upside down. I usually use grey rubber kneaded eraser to prop up objects and keep them still. It grips well, but doesn't really leave a residue. I then merge these two point clouds in PhotoScan and use the combined point cloud to build my mesh.