
What are
/r/modeltrains'
favorite Products & Services?
From 3.5 billion Reddit comments
The most popular Products mentioned in /r/modeltrains:


The most popular Services mentioned in /r/modeltrains:
Cults.
eBay
Microsoft Forms
Microsoft OneDrive
Ecosia
Microsoft Bing
CircuitLab
Lifehacker
TinyPic
Inkscape
Google Photos
Pixabay
Slides
Autodesk Tinkercad
MagicaVoxel
The most popular Android Apps mentioned in /r/modeltrains:


The most popular reviews in /r/modeltrains:
I looked it up and it's $5,377.24 in 2019 american dollars.
Edit: For comparison, by searching "model train" on amazon sorted by price highest to lowest the most expensive item is over 50k and it's just a four car add on set. Kato also seems to make some train sets people are selling for 10k ish. The most expensive Lionel are all 4-6-6-4 steam locomotives at 2k. Also, here's a $7 Thomas Train if ya'll broke like me.
Here’s the link in case anyone is interested in getting one: https://forms.office.com/Pages/ResponsePage.aspx?id=Ob0wQVN8nEGx5YdY1tY_IRZUVZioNyxKhQ_sr-7DJQRUNVREOUxWSjVIVVA3QkxOVlM3QUxBN1paNy4u
He mentions the red and silver Santa Fe, which he's referring to the "Warbonnet" scheme. Both Bachmann and Athearn make kits with a ATSF F7A unit in that scheme. I would go with Athearn over Bachmann, although I have a bachmann engine that actually runs pretty well. The Bachmann kit is $70 on Amazon (https://www.amazon.com/Bachmann-Trains-Santa-Flyer-Ready/dp/B0006KQGJ8/ref=sr_1_1?s=toys-and-games&ie=UTF8&qid=1476494482&sr=1-1&keywords=bachmann+santa+fe), and the Athearn kit is $120 (https://www.amazon.com/Athearn-HO-Warbonnet-Train-Set/dp/B0169HCB1S/ref=sr_1_1?s=toys-and-games&ie=UTF8&qid=1476494223&sr=1-1&keywords=athearn+warbonnet) Both Bachmann and Athearn kits come with the Bachmann EZ Track system which works great on carpet and hard floors and is easy to store. Bachmann has lots of expansion pieces for ez track and it's available at any hobby shop and even Hobby Lobby so you can make the layout bigger and bigger if you want.
He can definitely use the engine as a starting point later. It can be converted to Digital control and work with other digital trains. It's how I got started. I bought the Bachmann Rail Chief set and now have a layout, and have converted the Rail Chief engine to Digital control to work with the other engines i've bought.
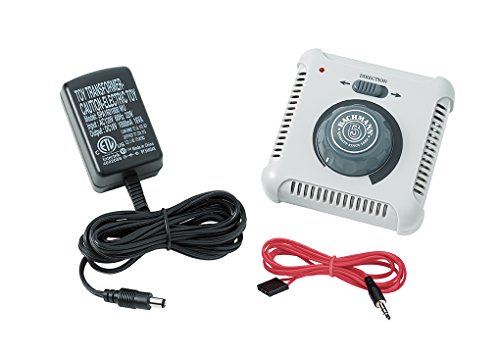
This is an older set, so do some basic housekeeping: clean the rails with rubbing alcohol, you should have a nice, smooth sheen, almost reflective. After that, clean the wheels on the locomotive, I recommend a contact cleaner, specifically this exact bottle of DeoxIT, it’s expensive as hell, but it comes with a needle applicator, a few drops will go a long way, and it’s also useful for other things around the house. Follow up on the wheels with rubbing alcohol, I recommend not using oils on the wheels or rails, it can cause the wheels to not pick up current. If your locomotive is still not running, I recommend replacing the power supply, something like this Bachmann unit will do nicely and isn’t complicated. Don’t worry about DCC compatibility, because I’ve personally owned the same set in the past and it’s not DCC-equipped. It was also made in a time when computers that size were a laughable pipe dream, so unless the previous owner did some modifications, safe to assume they didn’t, a regular DC power supply like the aforementioned will do nicely, be reliable for several years, and have a fuse to protect against shorts. Don’t leave screwdrivers on the rails.
If it still does not function, you’re going to have to do a tear down of the unit, and if at this point you’re thinking “this is expensive/complicated/more than I bargained for”, I’d like to personally say Welcome to the hobby, YouTube is your friend!
SCARM has undo... and redo. It's actually very straight forward to do and probably the exact same key combos as your digital graphics software. You should invest more time into playing around with it and learning how to use it. I suspect that, like many graphics programs, it just has a steep initial learning curve that you haven't cracked yet.
As far as track spacing, it's 2" in HO. I don't know about N. The max grade depends, I've seen people do 5%, but in practice 3% is considered very steep and 2.5% is enough to cause issues running 100 car trains on my club layout.
You could find all of this with a little internet research though, so stop bitching because you didn't bother to research. Go buy some books if you don't know how to use Google or Bing.
I'll be honest in that besides eBay, I really don't know. The small blue one is the "Torpedo" from the original Lionel Great Railway Adventures back in the late 90s. There were three stories in the run - The Daylight Limited (starring the Southern Pacific GS-4), the President Express (Staring the B&O President Washington), and the Torpedo Run (Starring, of course, the PRR S1 as evidenced by the number assignment). Each of the three stories came in 'adventure packs' which included the book, a cassette tape (featuring Levar Burton as the narrator!), and a battery powered locomotive for wooden toy trains and is compatible with BRIO, Thomas, etc. with the locomotives just paint variations of the same chassis and mechanism.
Here's an example of one, the President Express set:
https://www.amazon.com/Great-Railway-Adventures-Presidents-Express/dp/B0021H0ZK0
This was over 20 years ago (I've had the Torpedo and its sisters President Washington and the Daylight since I was 6) so they've been out of production for ages. You can't even find wooden trains in most toy stores anymore, but they were a staple back when these engines were around on shelves.
You can find similar ones much cheaper as Micro-Mark, despite the selection, has some of the highest prices around!
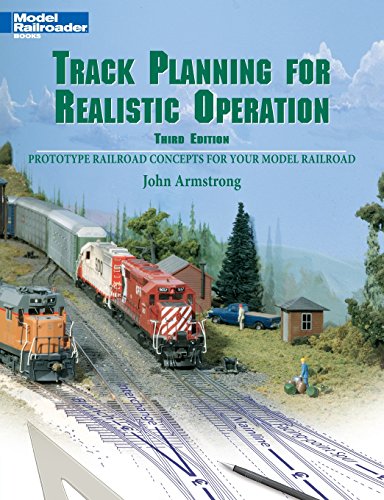
I'd start with the CB&Q Historic society. Also, try to get your hands on a book that covers the region you're interested in. Amazon has several, but you may not get them easily/economically on Amazon - try eBay, Ron's Books or a local train show. https://www.amazon.com/Chicago-Burlington-Quincy-Color-Vol/dp/1878887327 Learn about what sort of industries were served, how they operated and what equipment was commonplace in the era you are interested in. Sketch a track plan in the space you have. Start with John Armstrong's "Track Planning For Realistic Operation" (try to get a first or second edition).
Unfortunately the N scale one is a little more expensive, but Here
My freelance conversions always look like SHIT. (South Houston and Indian Territories). https://www.ecwid.com/store/circusdecals/South-Houston-&-Indian-Territories-SHIT-Railroad-Freight-Car-Decal-Set-G-Scale-p98172120
Hi, it's made with the (free) software magicavoxel
I don't play minecraft myself (I'm already to busy with terraria and starbound) but I know some creators use the software for making big assets for minecraft, like giants buildings or sculpture.
This is the one book everyone reads too late into the hobby, it will teach you more about how to build a layout than almost any other source. Many, many mistakes will be avoided.
ah, so in that case the comment from /u/angrycat9000 will probably solve your issues. the other thing I'd recommend on is search for "Track Rubber" (e.g Amazon UK link) as another method of cleaning.
Generally speaking, over time track gets dirty which effects the electrical conductivity between the rail and wheel. Without this, the motor stops and makes playing trains a lot less fun!
I dont know if they offer the exact same color, but I believe this may be the one you're looking for:
https://www.amazon.com/Toysmith-Pull-Back-Train-Colors/dp/B003UNH534
I don't think there is a general rule here. It depends on what you want and who is having a sale. When I was buying track, a seller on Amazon was having a good sale on Unitrack sets so I got my basic oval for less than it's component parts would have cost.
The problem is that most people don't want a simple oval or an oval with a passing siding. At that point you are buying additional pieces and leaving parts of the set off of the layout. This is when it is often cheaper to come up with a detailed track list and buy separately. It may also be the case that no set has everything you need even for a simple plan. As an example, Kato doesn't make a pack with switches and a controller that also has 11" curves (which is what I needed). This might have been cheaper in the end but the curves were too big.
Sorry that got a little rambly but I hope it helped.
I used that model as a reference/inspiration; but I designed this one myself; to fit the N-scale tracks I have; I wasn't sure if I could just scale the model by KABrumble down and it would still fit...So I designed my own to fit the Minitrix tracks I use.
​
As a reference: The model in question
Monday we ventured over to the Warther Museum in Dover OH. Ernest "Mooney" Wartherwas quite the carver. Along with the trains, he had a thing for carving plyers, scissors canes. He was also quite the knifemaker.
The full album is here which includes more than just the trains. All the trains are in 1/2 inch to the foot scale. He used no glue during assembly. Couplers are functional, wheels rotate, pistons move in and out. It was pretty amazing the amount of detail that he put into it.
If you ever want to search for an audio file-not music- use Dogpile
I was searching for the sound of the elevator doors opening from the original Star Trek TV show and Dogpile has a different logarithm than Google and I was able to find it immediately.
As much as I wanted to use Imgur it was down. Here is a little sample of what you could do Scenery wise.
The brown on the top right and left would be a mountain line, where the terrain starts to rise and there are tunnel portals for the outer loop to be hidden for a bit. And you can have the upper loop be on top of the mountain. Leaving a cliff side for the second inner loop near the back to travel along.
They do make these; here's an Amazon link to a boxcar with a camera inside.
you can use something like BlueTack, double sided tape or some other sort of temporary adhesive to hold it. I've seen people even use very low heat hot glue for fixing minis for painting, then peel it off with a knife
I would do one of two things, either start with an inexpensive bachmann set, or go all in and get yourself a proper DCC controller and a nice DCC sound locomotive.
I started with a bachmann DCC sound value set, but I very quickly got rid of the controller because it stinks, sold the locomotive for a different one (it was fine but not the road name I wanted), and now I'm going to get rid of the track and start modeling with something nicer.
If I could do it over again I would just just bought a good DCC controller up front (I got an NCE Power Cab and it's great), the locomotive I really wanted, and some nicer track. Kato Unitrack is awesome if you want something with roadbed built in that you can set up and take back down. Now I'm going with Atlas code 83 track because there's a lot more variety.
If you just want something simple to start out with and try, grab one of Bachmann's ~$100 train sets like this one or this one that come with the cheap black EZ track, a basic DC controller, a locomotive, a caboose, and a car or two. That's a great way to get started without spending a ton of money on stuff you won't want or use if you dive deeper into the hobby.
That's just my two cents from someone who's on a budget and had this exact same question a couple years ago.
Edit: This is about HO scale. It's a little different in other scales because pricing and features differ a bit.
Kept it real simple.
Floating shelf posts (mounted on a stud vertically) and stained 2x10s
Getting the 8” hole thru the side of the board at a 90deg angle required a drill guide
The mirror is just a piece of chromed plastic
There should be a rerailer track piece. That looks like the Bachmann track plug. The Terminal Rerailer has a big black plastic plate on top, it looks a bit like a road crossing. There should be two metal prongs on the side to connect that plug to. Here is an amazon link just to show what it looks like. https://www.amazon.com/Bachmann-11-25-Radius-Terminal-Rerailer/dp/B0006KSNJY
If you do not have one, you need to get one, especially if you want to make the layout temporary. You could always solder the wires directly to the rail, but I wouldn't do that unless you had to. They also make terminal rerailers on straight track. Usually you see the curved ones in starter sets.
Bachman has these starter sets for $130 on Amazon not bad. I looked through ebay for some locomotives and I found a few Southern Pacific GP38s for $50-100 used/new and I found a few freight car packs ranging form $50-100 on ebay.
I used to have an HO set when I was younger with a table and everything, parents divorced and we had to get rid of it :( but I have been looking at N scale because you can do so much more on a smaller foot print.
It definitely can be replaced. The term for it is coupler, which may help your search. There are 2 major kinds of ho scale couplers as far as I know. There are the modern kind that are called knuckle couplers that are made by a number of different manufacturers. The kind you have are older and called "horn hook couplers" and I believe you can buy them from a variety of manufacturers as well. From a quick Amazon search I found these. I can't guarantee they'll work but you can do more searching for ho scale Tyco horn hook couplers and see if you can find a pack that look just like the one on the front of your locomotive.
They are battery powered lights from amazon. I hot glued them to the train cars and connected each strand to the next using bullet crimp connectors. I used a normal wire underneath from front to back of the car to it easier.
Beware of the MDC model. It’s not a bad model, but it takes a massive amount of work and tinkering to get it to run right.
To put it in perspective, AFAIK it’s the only HO model that has had a literal book written on how to get it to run right.
Go with the Bachman model if you can find one.
I’m on mobile right now and I’m not sure if this will work but I hope this link will send you to some information options if you like https://www.amazon.com/Hornby-R3414-0-6-0-Class-Train/dp/B01LSCTRHA/ref=mp_s_a_1_2?dchild=1&keywords=hornby+j15&qid=1596054921&sprefix=hornby+j&sr=8-2. Sorry for such a long link btw
https://www.amazon.com/FloraCraft-Styrofoam-Snow-Liters-White/dp/B000XZY0OY
Here’s a link I do warn you if you use it be sure to put up a boarder to keep it from falling off or glue it together
Try amazon smile to donate to charity automatically at no cost to you!
https://smile.amazon.com/dp/B07Y4W91ZW/ref=cm_sw_r_tw_dp_x_yp8CFbRAXMDE5
^^^I'm ^^^a ^^^bot ^^^and ^^^this ^^^action ^^^was ^^^preformed ^^^automatically.
thank you so much for the info. i bought a lionel off amazon that should get here tuesday (https://www.amazon.com/gp/product/B07BF34J6K/). i'm not sure if the bachmann i bought today will run on that track or not, i'll have to do some more research on it. i bought the lionel b/c i really liked how that train looks and for a starter, i think it's what i want.
i saw some bachmann starters on amazon for like 40% off but i liked how the lionel train looks.
i'm in no rush to get the TGV running though, i'd like to at some point but i also don't want to ruin it by trying to run it on something new like the lionel.
i just noticed i rambled a bit... sorry.
Here a set of R.R. Roman font from Amazon. You would need the reverse - White lettering on black.
Woodland Scenics R.R. Roman Black Dry Transfer Decals
https://smile.amazon.com/dp/B000BRBZ2E/ref=cm_sw_r_cp_api_i_f5VmFbYGVVQZ6
The kadee knuckle coupler on the left is preferred and supports prototype look and operations because the horn on the bottom is metal and by using a magnet you can auto uncouple without having to use “the hand of God” to uncouple.
The numbers of a kadee coupler (also sold by other makers) are cross referenced to height of coupler and length of shaft, and whether truck or body mounted. Some makers provide further info that cross references the number to a specific loco by maker or rolling stock by maker. Once you figure it out, it’s pretty straightforward.
Replacing them can be easy (high quality name brands) or a challenge (copies or clones).
If not sure, a NMRA standard coupler height helps. It’s a plastic block with a coupler mounted on it that you put the rolling stock next to and align the coupler to. Shims can adjust the coupler a little, but sometimes you have to replace w a higher or lower coupler. Alignment ensures no accidental decoupling on curves or inclines. Available on Amazon and well worth the cost.
Oh man, it frustrates me so much seeing model train manufacturers taking a $12 power supply from China, slapping their logo on it, and charging you $50-80 bucks for it.
Just get one of these. It’s the exact same thing and will work just fine, as the others said.
Yup, 100% custom.
Materials:
Screws and wingnuts for easy removal of the hairpin legs.
30" circle
24" circle
18" circle
Flex track
Extra wire to extend to the transformers
PVC Pipe
Green Spray Paint
Brown Spray Paint
Old top of an artificial tree (for us, though I see small trees at Michaels that would work just as well on top)
Pine garland for each level.
Lights for each level.
It will disassemble into 3 tables that stack on each other. The hardest part was getting the flex track to fit on the top level with the right angle of connection. The gandy is the only car that will run on that one. I used the hairpin legs because they're hard to see and they give enough stability so that the trains going around don't unbalance the tables. The garland is attached with command hooks and the track is nailed in.
All of the wires go through the PVC pipes and out the bottom. I used T connections. Word of warning - use a mask to cut or get a special cutter to avoid sawdust on that as it's incredibly toxic. My hardware store helped out on that.
I started with the Hornby High Speed Train set in January this year! It’s a good simple locomotive with a coach and a dummy car. Nice detail and runs really well. It comes with a loop of track and a siding as well as a controller so you can get going straight out of the box.
It even comes with a scenery mat which you can run it on and then add ‘track packs’ to expand your layout and experiment a bit and decide what you want your first designed layout to look like!
Having nearly a year under my belt starting again I would buy this same set!
HST train set comes in about £145 on Amazon.
There's an index of posts I've written on various topics related to track planning here; some of these (including the replies further down) are related to what you're asking, so I would suggest reading through anything there that seems relevant and if you still have questions afterwards then I'm happy to answer those.
The reason I said you wouldn't even need helices is that with the space you have available you can have semi-underground staging that's hidden behind a backdrop or directly under the scenery rather then several levels down. Of course this would put certain constraints on the track plan, so it's not necessarily the better option, especially if you want a large staging area or do manual fiddling there.
As for resources, the by far best introduction to modern layout planning is this book which unfortunately is only available in German. However, I would say that you should still be able to understand 90% of its contents just by looking at the many illustrations.
Other than that, I have a bunch of track plan collection e-books that I could share (DM me if interested). Curated track plans are by far the best source of inspiration out there, so I would suggest paying your local library a visit and see what they have in their railway modelling section.
DCC controller that controls a DC loco simultaneously. I have an old one of these, again probably a bad idea to actually use with a DC loco
​
https://www.amazon.com/Bachmann-Industries-Command-Dcc-Controller/dp/B01ECBM5A0
I used something like this.
Here's the video of the loco: https://youtu.be/cAV34x5c30Q
I thought that sugar cube speaker was a generic term, is the specific brand or type? I searched amazon/ebay for sugar cube speakers and ended up with this. I'm sure this is probably the worst speaker I could possibly use, but the loco body was a tight fit.
I forgot to mention this is N scale. I think this is the kit:
https://www.amazon.com/Bachmann-Industries-Super-Chief-Electric/dp/B007923CU2
​
I *think* it's the ez-mark 2 couplers. I can take a picture of the other cars couplers if that would help
How much are you looking at spending for your start up and what interests you about DCC?
Bachmann has a decent DCC starter set that doesn't have sound and gets tou everything you need. https://www.amazon.com/Bachmann-Trains-Digital-Commander-Ready/dp/B000BPPNWE
This was what got me going and ive since upgraded to an advanced DCC system (JMRI vi Pi-SPROG) as well as some scale trains engines for sound.
As a side, i have track and that DCC controller I'd be willing to part with.
For what its worth, its just crumb rubber. You can buy it at playground equipment stores, or for adding to epoxy floors or truck liners
https://www.amazon.com/Als-Liner-ALS-RC-Additive-Gripping/dp/B004OI2AOI
You need to dilute your glue with water and soap. I usually paint the side of the roadbed (cork) with a white/grey (whatever color your ballast is), then I use straight Elemers glue and paint it over the painted area. Then I use this to lay the ballast on the glue and in between the rails. https://www.amazon.com/Bachmann-Trains-Ballast-Spreader-SHUTOFF/dp/B01LWWAQOK Then go over everything with the glue/water mix to finally set it.
The ballast we use for the mainline is Woodland Sceneics Medium Light Grey.
Not a book on modelling, but probably one of the best general interest train books is Don Ball's America's Colorful Railroads. It's not expensive used on Amazon and covers almost every large railroad in America during the transition era: https://www.amazon.com/Americas-Colorful-Railroads-Jr-Ball/dp/0517304880/
If you go to a surgical supply house, you can get rolls of gauze that have a plaster on them. It's what they use in hospitals for casts. I've seen them sold at train shows, but I feel it's cheaper to buy it outside the hobby
One of our club members has been experimenting with these: https://www.amazon.com/ESP32-CAM-Bluetooth-Camera-Module-Development/dp/B07S5PVZKV/
No enclosure, but shouldn't be too hard to knock something up -- or just mount it inside the cab of the locomotive for a "more real" view.
I haven't used them personally, but might be a reasonably priced path to look into.
Something like this would probably have the tip to open it up.
ORIA Precision Screwdriver Set, 126-in-1 Magnetic Screwdriver Set with 112 Bits, Magnetic Driver Kit, Professional Repair Tool Kit for Mobile Phones Smartphones Laptop Electronic Devices(Blue Black) https://www.amazon.com/dp/B07ZH1DZSN/ref=cm_sw_r_cp_api_i_4YDMHA94GZ7EYWH035N6
10-213 is designed for the jewel cases their stock comes in. If you want to use the foam insert version, one of these cuts the foam perfectly
If you buy a case like the one I linked you can cut the foam insert to fit anything you’d need securely.
Pelican 1120 Case With Foam (Black) https://www.amazon.com/dp/B0051QIBUE/ref=cm_sw_r_awdo_0SZCNP7MRX4F1MW6YGWJ
You need a distribution board for that. This one is pretty nice because it also comes with the plugs and spade connectors that make attaching the wires a lot easier. You just insert the bare wires into the spade connector and crimp it with a pair of pliers. It can handle up to 30 volts at 6 amps which is more than enough for your setup. https://www.amazon.com/PCB005-Distribution-Inputs-Outputs-Voltage/dp/B07BC9BV1S
I can't find a DX65 decoder via search. Is this equivalent? https://www.amazon.com/Digitrax-DGTDZ126T-Tiny-Decoder-2-Functions/dp/B00LADPCJK .
https://www.amazon.com/Pacer-Technology-Zap-Corrosion-Inhibitors/dp/B0006O8EKS
Rail Zip, $8 usd. Shits a life saver.
Also lacquer thinner works better than isopropyla. But also can get you a bit high. Sauce, I crawled though a tunnel with a soup can of it and a shop rag hand cleaning some tracks one night.
As far as I can tell it is a Kato -- so not a lot of specific help.
Some models will allow the cab to detach separately. You'd need to remove the shell and look to see if there are obvious clips in the cab area for that purpose. If it's one moulded piece, probably not.
Does Kato have a hole in the cab where that piece would mount into? If so, a set of tweezer pliers might be helpful in getting them to the right place. If not, they may still be helpful in getting the detail part carefully to the right place for gluing with Contact Adhesive/Plastic Cement. Even if it has a hole to mount in, I would recommend using CA to ensure it stays there.
Assuming these are HO scale or N scale trains, the 23V power supply will burn out your engines. Those engines are made to handle 12-14V DC only. Find another power supply. Now, the best way to wire your railroad I would suggest the following reads
How to Wire Your Model Railroad
by Linn H. Westcott
Atlas 0012 Complete Atlas Wiring Book
https://www.amazon.com/Wiring-Your-Model-Railroad-Essentials/dp/1627001751
And I'm sure there are videos on YouTube as well.
When I ran DC I did not use common rail as I ran 4 power supplies with blocks and Atlas selectors and more. I'm now in DCC so I really don't remember how I wired them up. It's been a decade..
It might be a bit too small for H0 tho
​
Adding to some context to my post, the new owners were super nice!
In addition to the new owners being nice, there were like 5-6 people updating scenery and revitalizing and of the areas that looked like they needed some TLC.
thanks for the links to that ebay store. They obviously know what they have, and it looks like i'll be shelling out some big bucks. But it makes things SO much easier on me.
There is one on eBay, not quite sure if it the one you're after ....here
It is in a set, but still if it gives you the locomotive you're after......
Edit: never mind... sorry, it is a steam engine...
keep an eye out, new ones on there a lot..
Buy yourself an Arduino starter kit with a bunch of components like sensors, motors, resistors and so on.(e.g. https://www.amazon.de/ELEGOO-Mega2560-Deutschem-Mikrocontroller-Elektronik/dp/B01II76PDM)
Do the tutorials that are provided with the starter kit to learn the components. That will give you a good base to build projects upon. And with different projects, you need to buy different electronics. Because they are so cheap, I always buy more than I need for possible future projects.
https://www.amazon.com/Noch-60135-Gras-Master-Applctr-Scale/dp/B00CMZ3WWE
​
That is the one I purchased 5 years ago and it was like $68 now $100 more. I will say that i have covered some major territory with it, have been through 8 pounds of different static grass and it works fantastic and the attachments are nice. The one here mentioned to make at home is no where near as powerful as the one I purchased. Depends on what your trying to do but one can get great results with one of the puffer bottles.
I have some of these, they're Bachmann big haulers track bumpers https://www.amazon.com/Bachmann-Industries-Large-Scale-Bumpers/dp/B0006O43TY
They fit best on Bachmann's track (the cutouts on the bottom are spaced for their tie style) but they will also fit at the end of aristocraft and possibly LGB track.
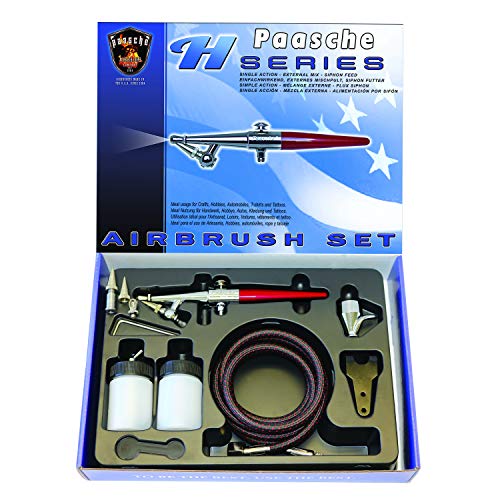
If you want to paint a model, it's irreplaceable. You will be frustrated trying to apply an even, smooth finish with a brush.
I've never seen an airbrush and compressor kit under $100 that wasn't junk. The Paasche H kit is $60 on Amazon: https://www.amazon.com/Paasche-Airbrush-Anodized-Aluminum-Handle/dp/B08W4Z38H9/
Get that and a cheapo compressor and you're probably around $150. Or you can start with some propellant cannisters but they have a bad habit of running out right when you least expect it.
If you only have a couple of models to paint and they're a single color, you can get away with Tamiya spray bombs if you don't mind the color being a little off.
If you're just interested in weathering already decorated models, you can get pretty far with a brush, paint, colored washes, and weathering chalks. There are some effects you can do in a snap with an airbrush that are more difficult to replicate with brushes, but you don't need to run out and get an airbrush set just for weathering.
Wow, thanks again. I found this below on Amazon for ON30 scale. Cool looking holiday car. I’ll need something bigger like O scale as this is more than 9 feet up. I’ll try to find similar stuff in this kit
Bachmann Trains - Village Streetcar "Christmas" Auto Reversing Set - On30 Scale - Runs on HO Track https://www.amazon.com/dp/B000EHH3HC/ref=cm_sw_r_cp_api_glt_fabc_WJ0W8C27EF9N8VCVHX86
Yes, I use the Hobbico builders mat or ones made excel.
https://www.amazon.com/dp/B0014VRTXK
They come in many sizes I have an 18"x24" pad and some smaller ones
Very nice set you have there. Make me want to get one but guess they are back ordered.
Just wanted to throw in my two cents that my Harry Potter Hogwarts express train set https://www.amazon.com/Hornby-Brothers-Hogwarts-Electric-R1234M/dp/B07N88MGS3 is OO scale but runs fine on HO scale ;)
Have fun.
Nice job!
If you do any more look at the real stuff and notice how much of it is close to the ground, bottom third of boxcars, since many taggers don’t bring ladders with them.
This is the set I’m considering.
I am curious if this is a quality set for the money. With the extra pieces, I’d be able to make a 60” rounded rectangle that would clear my 57” dia tree skirt.
Yeah my husband has a rechargeable 9v in an MTH engine around the similar time frame. You can replace the battery for around $30, but I recommend finding a local MTH dealer.
I’d run full power to the track for 15-20 minutes with just the engine on the track. Sometimes the batteries run dead and just need recharged, but if you keep fucking with the remote, it won’t recharge and turn on. He expects it to turn on after the charge even if the battery is bad as long as the track has power.
As others pointed out, it is a conventional train set. One thing you can do if you have a multimeter is check the voltage of the track with the power on at max power. You should get 16-24 VAC between the 1st/2nd and 3rd rail.
Replacement battery that controls engine, lights, sounds, etc: M.T.H. Electric Trains Protosound Battery, 8.4V https://www.amazon.com/dp/B0006O7896/ref=cm_sw_r_cp_api_glt_fabc_G2FR45H6E6W5Q5WR24F3?_encoding=UTF8&psc=1
Here is a green https://www.amazon.com/Stove-Bright-High-Temp-Paint/dp/B006BKMK1A/ref=sr_1_3?keywords=Green+Stove+Paint&qid=1637447872&sr=8-3
I just used search term like “red stove paint” and “green engine block paint”
This is my first "nice" design (simpler designs here)...made from pics found on internet, and I am looking for advices on how to improve it! The last three wagons have a removable roof. Thanks!!!
What tools do you use to paint? I plan on buying a Montana Rail Link but editing the logo/text to be the faux Slaveškan Državna Železa (Slaveškan State Rail)
If you're looking for the simplified line drawings that people put LEDs and switches for their turnout machines in for a control panel, I'd recommend using something like Inkscape which is a) free and b) relatively easy to make straight lines of varying widths.
It can do a whole heck of a lot more, but the basics are pretty easy to figure out.
The layout is very tough to sell on Ebay. The shipping of the layout would cost a lot. You may be better off selling the trains and track separately or put it on Craigslist or maybe your local neighborhood site. We have nextdoor.com where your neighborhood may be on it. Then you can post the layout to cover many areas local to you. The showcase is in the same boat, you really can't ship that unless you pack it so tight with the glass wrapped. Is there a local hobby shop near you that may be able to help you sell it? Or a local train show.
Good luck!
Consider this additional to your layout for your container loading area?
23-142 Freight Depot Plate Basic Set https://www.amazon.com/dp/B07YPXNCJM/ref=cm_sw_r_cp_api_glt_fabc_DAB17RXDNQHV14HB52A9?_encoding=UTF8&psc=1
Here's a hot tip- get a pair of ordinary clothes pegs, preferably ones with soft tips that won't scratch up your phone. With phone rotated sideways, gently attach one peg at each bottom corner to give your phone four legs. Now you can sit it just about anywhere on the layout :) It's how I've taken the majority of my videos, such as this one where I had it standing up on a bridge.
Even better, get yourself a small tripod like this. Just be aware that there's a LOT of junk for sale, you can find these things for as little as $5 but you get what you pay for.
That is part of your issue. Those aren't the best paints, and have a low pigment count. You can make them work, but they require some doctoring up.
I would suggest getting actual model paint and see if there are better results.
https://www.amazon.com/dp/B009162PWU/ref=cm_sw_em_r_mt_dp_8XVTWAFGVMZ87ZCJR02Q?_encoding=UTF8&psc=1
Vallejo is a good brand, I use them for miniature wargame painting, not too expensive.
They come with solid knuckle couplers. A pack of Bachmann EZ-Mate Couplers would fix that. Like these
Could I suggest something other than bending? Buy these and cut them to the length you need, then slide it over the pin after connecting the drawbar. Alternatively, you could use some rubber tubing and make a sort of poly-cap to put over the end of the pin.
Do you have one of these to share the controllers power with your second loop?
http://morleycontrollers.com/shopexd.asp?id=34 Would that be a bit of an upgrade over the standard control unit I got with the Flying Scotsman
Okay phew, that makes life a lot easier. Gauge aside, would my controller be fine too? Kinda looks like this https://www.amazon.com/Bachmann-Trains-44211-Power-Controller/dp/B01LWP3DIN
I think it world depend where you are.
If in UK then there are loads of reviews on Sam's Trains.
Not sure about best, however the mehano sets on amazon UK are relatively cheap. Sam's trains gives indepth reviews.
He is complimentary about the controllers and the engines of some sets for the price. However he also notes the bad points: packaging quality and track that rusts and damage to detailing etc.
Not sure about how good they will be.
The metal coupler covers are for freight cars. You are looking for part number ATH90606.
For convenience, here is an Amazon link, or search the number on eBay.
https://www.amazon.com/Athearn-HO-Coupler-Cover-Plastic/dp/B0006O7IYG
There are some Dapol Kits that you can put together that are static, however you would have to paint them. There are a few scattered models out there too like this https://www.amazon.com/Italeri-8701-Locomotive-Br41-Plastic/dp/B003L14XLM/ref=sr\_1\_1?dchild=1&keywords=italeri+Model+Trains&qid=1628208811&sr=8-1.
Ok so the king class has $14 shipping that I forgot to mention here are the links. Standard 4: https://www.amazon.com/Hornby-R3548-Standard-Class-4-6-0/dp/B0842WBQSH/?_encoding=UTF8&pf_rd_p=5d7544cc-433f-4ae4-a7e0-4f48fba522ad&pd_rd_wg=bWy4T&pf_rd_r=90Z32SNX92J2ZE61V31H&pd_rd_w=4UzWD&pd_rd_r=4c603b0f-8d22-4042-b01d-8a7a2.... King class: https://www.ebay.com/itm/183747480738?epid=2256058351&hash=item2ac8340ca2:g:oAkAAOSwUMhcmKVV
I’ve used these LED’s HSicily USB Plug in Fairy Lights with Remote Control Timer, 8 Modes 40ft 120 LED USB String Lights with Adapter, Cool White LED Twinkle Lights for Christmas Bedroom Indoor Decoration https://www.amazon.com/dp/B07H78SGSM/ref=cm_sw_r_cp_api_glt_fabc_3Q8VZNRRE12HJSE6AM42?_encoding=UTF8&psc=1 and ones similar to these 2-Pack Extendable Green Wire Christmas String Lights Outdoor/Indoor, 200 LED Christmas Tree Lights with 8 Modes, Plug in Fairy Lights for Xmas Party Wedding Decoration (Warm White) https://www.amazon.com/dp/B08CXHQKMM/ref=cm_sw_r_cp_api_glt_fabc_ZQRVGZ1PA62W8HTFSW12?_encoding=UTF8&psc=1 . These are so easy and I love them.
I found an overpriced Amazon listing for some of the track; it’s admittedly more toy-like than I remember, but it’s better than the blue track.
https://www.amazon.com/Fisher-Price-Thomas-Friends-TrackMaster-Expansion/dp/B002SNA5HU
I thought this was cool. I have no interest in Christmas or toy themed stuff, I want to get it because it's a great introduction into hornby, for only about 70 bucks.
Indeed you are DUMB
Determined
Understanding
Motivated
Brave
If you live in the US.
I recommend getting a DC Power Pack with a 110v input that will put out 12v to the track.
https://www.amazon.com/Model-Rectifier-Corporation-Railpower-Power/dp/B0006KSN4E/ref=sr_1_1?dchild=1&keywords=model+train+power+supply&qid=1619390278&sr=8-1
I would recommend cleaning your wheels with some alcohol so you can have good electrical contact.
If you want to go the extra mile, if you are using steel (silver) or brass track, they are not very good at conduction electricity which can cause running issues. I would recommend getting some nickel silver track, they are durable, better, and do not oxidize. Also, get a terminal track section so you can hook up the power pack to the track.
That is just my two cents. We all got to start somewhere.
Paasche single action kit is $73 at amazon. You can get by with propellent cans at first but pick up a Chinesium air compressor at Harbor Freight when it's in the budget. Get a regulator and a moisture trap at the same time.