
What are
/r/premiere's
favorite Products & Services?
From 3.5 billion Reddit comments
The most popular Products mentioned in /r/premiere:


The most popular Services mentioned in /r/premiere:
Shutter Encoder
HandBrake
Final Cut Pro X
Adobe Premiere Rush
DaVinci Resolve
MPEG Streamclip
MediaInfo
Subtitle Edit
Pexels
VLC Media Player
Bandicam Screen Recorder
Amazon Elastic Compute Cloud
Screenlight
AutoHotkey
7-Zip
The most popular reviews in /r/premiere:
Actually yeah, that is good news!
This particular glitch is a keyframe getting missed on playback, which is often caused by the video being outright corrupted with missing data.
But if it's skipping in Premiere but not VLC, then it's probably fixable and very possibly the result of variable framerate media. Is this a screen recording by any chance?
Anyway the fix should be pretty straightforward, you just need to transcode it.
Simplest way to do that is by using Shutter Encoder to either ProRes or h.264.
Shutter Encoder uses the same codecs as VLC (via FFmpeg) so if VLC can play it, Shutter can transcode it.
Judging by the filename, I'm guessing your working with OBS or Shadowplay recordings?
Screen recordings are almost always variable framerate, which causes a huge number of issues in Premiere, one of which is extremely slow or failing exports.
Grab Shutter Encoder and convert all the footage you're using to either ProRes or h.264, then replace the media in your project.
I'd bet on VFR being the cause of this issue, but another cause for stuck exports is running out of free space on your media cache/boot drive, espevially if you're exporting a very long video.
If you hold down shift+alt (shift+opt on mac) whilst premiere is loading you will reset premiere to all defaults. This will reset ALL defaults though (including label colors) so you will need to setup other preferences the way you like them.
If it will help though I have my label colors at default so you could go through them based off this screenshot and put them back to default, screenshot here.
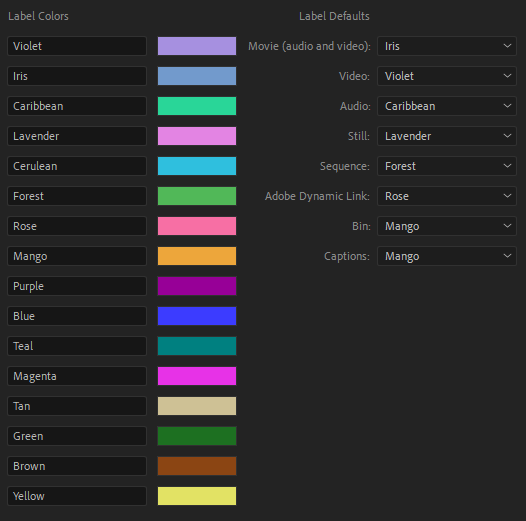
Premiere preferences > Audio Hardware > Input device > Set to 'no input'
(Your footage is also VFR so it would be a really good idea to transcode it to h.264 or prores in Shutter Encoder before importing to Premiere.)
Footage from a DJI drone by any chance?
If that's what you've got, use Shutter Encoder to convert the offending clips to ProRes, and replace them in your project.
If that's your problem, this could be a symptom of the SD card in your drone not being fast enough or underperforming. The newer DJI drones apparently swap to variable framerate in the event they can't write data fast enough to the card, and the resulting VFR footage causes this kind of issue with Premiere.
Then I'd definitely look into resolve. It's free, and very similar to Premiere. It's mostly known for it's color grading capabilities, but a lot of premier users are moving over for editing as well.
Use a good video converter to transcode your material. (Handbrake is free). Quicktime is optimal but some H264 does work too. CS6 at this point is ancient. I don't know what codec you are using but certainly it doesn't help.
Other posters are close...
This isn't strictly a variable framerate issue - although your footage probably is variable framerate, and you'll be solving that problem at the same time by fixing it!
Some game recorders, most notably Xbox Game Bar and Razer Cortex, do a weird thing with the video resolution that doesn't play well with Premiere.
Basically they record at a higher resolution than you think, then add a flag in the file to tell whatever is playing it back to scale the video to the actual size it's supposed to be. Premiere's codecs don't read that flag correctly, and shows you the full resolution, but since there's no data in the pixels you're not supposed to be able to see, you end up with the corrupted border.
You need to transcode your source files using something other than media encoder (such as Shutter Encoder) and replace the footage in your project with the new versions.
All game recording Variable framerate footage, Premeire hates it, and it can screw with effects rendering because the plugin doesn't know what frame it's looking at.
Use Shutter Encoder to transcode to ProRes (Big but fast) or h.264 (Slow but smaller.)
Whatever that file is, Premiere can't read it. Is it a FLAC?
You'll need to convert it to another format before you import. Try Shutter Encoder to .wav or .aiff.
Two possible causes...
First off try going into Premiere's preferences > audio hardware and set 'input device' to 'none.'
Secondly, looks like you're working with an OBS recording, so it's going to be variable framerate, which Premiere doesn't work well with. That means you need to transcode your footage before import.
To do that you need to use something other than Media Encoder (because that doesn't like VFR either) such as Shutter Encoder's ProRes or h.264 functions.
For projects you're already editing, you can use the replace footage feature to swap your clips out for the transcoded ones.
Even if VFR isn't the cause of your playback issue, it's something you should get into the habit of doing. VFR can cause all sorts of issues like really slow/glitchy exports and bad performance.
The audio is (probably) in an encrypted digital format that Premiere doesn't natively support.
Grab Shutter Encoder, select the 'rewrap' function and set the filter/extension to mov.
Under 'audio settings' enable 'convert' and run that function.
The video quality shouldn't be affected (unless it's in a codec not supported by mov.)
> 30.08 FPS
It's variable framerate. You need to transcode it to constant framerate before using it in Premiere.
Try Shutter Encoder transcoding preferably to ProRes 422 (but use h.264 if hard drive space is at a premium.)
Then you can replace the affected clips in your project window/bins.
Try another format/preset.
WMV is shakey as all hell, and wouldn't at all be surprised if Microsoft had slipped out an OS update that breaks their compatability with Premiere.
If you need WMV, export a Prores OP1a MXF, then run it through Shutter Encoder so you're not using the Microsoft codecs.
Export HEVC using the 'Main10' profile and you'll get a 10bit output.
Or use something like Shutter Encoder to transcode your existing ProRes export to Main10.
Are you working with footage that might be variable framerate, such as screen recordings, smartphone footage, footage from a recent DJI drone, or recordings from teleconferencing apps?
This could also be an indication of a corrupt clip.
Either way you'll want to try to transcode the affected source clips using something other than Media Encoder (such as Shutter Encoder to ProRes) and then replace the footage in your project.
Looks like it might be a variable framerate issue.
Use Shutter Encoder to transcode the source clips to either ProRes or h.264, then replace the 'bad' clips in your project.
h.264 .mov is not possible in Premiere/Media encoder, the only mov files you can export are ProRes which is while the file size is huge!
You'll need to export an h.264 .mp4 file first, then you can use Shutter Encoder's 'rewrap' function to copy the streams into a .mov file.
(Or use Shutter to transcode your Prores exports to h.264 mov, which might be a bit faster since you've already exported.)
Let me guess... xbox game bar?
Xbox game bar is both variable framerate, and does weird things with the video resolution that Premiere doesn't like.
(Even if it's not xbox game bar, most screen recording applications are likely to have one or both of those issues.)
You'll need to transcode your clips before importing them to Premiere. It would be sensible to do that for all the clips, even the ones that look fine in Premiere as you will probably find when you export you'll have similar issues show up in your video.
Use Shutter Encoder and convert the clips to either ProRes 422 (if you've got lots of HDD space) or h.264.
You can't just rename a file and turn it into something else! That's like turning a Ford into a Ferrari just by putting a badge on it ;-)
You need to copy the audio and video out of the file into a new container - a process called re-multiplexing or remuxing.
If you're using OBS, it has a MKV to MP4 remuxing feature built-in - I think it's in the 'file' menu.
Otherwise use Shutter Encoder's 'rewrap' function set to mp4.
Shooting your own footage and editing it is the best way to make your portfolio stand out!
But you can find a lot of footage from YouTube, or other websites such as www.pexels.com or www.videvo.net
If these websites aren't that good then simply search for more, there are tons of free stock footage websites!
One of more clips in your sequence is in a format that isn't available on the trial - you need to buy Premiere in order to use that footage.
Alternatively you can transcode those clips to h.264 using Shutter Encoder and then replace the footage in your project.
iPhones are stupid picky, for some reason they don’t like the mp4s Windows Premiere makes.
Try shutter encoder, use the rewrap function with filter/ext set to .mov
If that doesn’t work, I’m pretty sure that if you export an h.265/hevc mp4 from Premiere, the iPhone will read it just fine.
This is a specific issue with the way your game recorder functions. (Xbox game bar or the Razer one by any chance?)
Basically the recording software is creating a video with a higher resolution than it needs to, and is then adding some flags to the file to tell whatever software is reading it to crop it down to the right size.
Premiere ignores those flags, so you see parts of the video that should be cropped off.
(I think the cause of this is recording a game running at a lower resolution than your screen)
Your video will also be variable framerate which is something you need to deal with before using it in premiere. Both those problems have the same solution!
You need to transcode your video using something that both reads the flags and converts to CFR (Media encoder can’t do it!)
Shutter Encoder can. use the ProRes or h.264 function, and replace the footage in your project.
Glitches on export are a common sign of variable framerate media.
Try transcoding your source footage to ProRes 422 using Shutter Encoder (or Compressor if you have it, don't use Media Encoder) and replacing the footage in your project.
That's either corrupt footage, or Premiere is having a hard time decoding your footage.
Given that this looks like a stream recording, it's likely to be variable framerate which can cause issues like this in Premiere.
Grab Shutter Encoder and transcode your raw footage to ProRes or h.264. Then replace the footage in your project.
Even if it is a corruption issue (maybe try downloading the file again?) you might find that transcode through Shutter makes the glitching less apparent and easier to clean up.
Media Encoder is included with Premiere? So log into the CC app and download it?
Otherwise you could use Shutter Encoder to generate your proxies and manually link them in Premiere.
Woah. That's a memory leak of some sort. Premiere should definitely not be using 64GB just when playing clips!
This could be a variable framerate related issue, or something else weird going on with the actual video clips you're using.
Try transcoding them in Shutter Encoder to ProRes before importing to Premiere.
Make sure your Premiere is up-to-date as well, there were some memory leak issues with older versions on OSX.
If you're on Intel mac, export an AAF.
If you're on M1 mac, you're in for a tougher time - AAF export (and import) is not currently possible in the M1 version of Premiere.
Instead you'll need to export an FCP7 XML from Premiere, then convert that to an FCPXML file (Resolve can do it, there are some standalone tools that can do it too.)
In both cases you'll need to reverse the steps (or export a mixdown) to get the audio back into Premiere.
Does it sound like that in the actual file if you play it back in something else, like VLC?
OBS will often give you a variable framerate file, and that can cause issues like this in Premiere. If it's otherwise fine outside of Premiere, use Shutter Encoder and transcode it to either ProRes or h.264.
You could try transcoding it to h.264 using Media Encoder which will be a little eaisier to play back compared to the default HEVC that the iPhones record.
The setting you need to make sure is set correctly is the h.264 profile level - you'll need profile level 5.2 for 1080p120 or level 6 for 2160p120.
In Media Encoder, the setting is located under encoding settings. It should guess it correctly but worth checking. You will probably also need to set 'performance' to 'software encoding' for that option to be available.
If ME doesn't let you use a level high enough (or the exported file has glitches,) try Shutter Encoder instead - the profile setting is under 'advanced features,' and again you'll likely need to make sure hardware acceleration is disabled. Generally Shutter does a better job handling the variable framerate footage that iPhones record.
Even 120fps h.264 can be pretty hard to play back too though!
Problem with something like AWS is that you still need a good enough graphics card to render (unless I've been taught wrong) even if you increased memory. (I think) there should be some Windows images available on AWS, if so get one and look into Adobe Media Encoder. Will still need to find a way to upload footage though
Have you seen Adobe Color? It might not be exactly what you are after and I haven't really played around with it that much but it might be a good start.
If you export a frame, upload it to the site and then analyse it it will give you a pallet and then you can save them to you Cloud Library. There may even be a way to do this inside some of the programs, without having to export.
No, you can't export raw from an NLE.
Raw is unprocessed sensor data (more or less) and NLEs have to process that and turn it into rasterized frames so you can actually see it and export it. There's no way to reverse that process.
To maintain as much quality as possible, you need to use an intermediate format like ProRes.
422HQ will probably be enough for what you need, but if you want to maintain as close to the full quality as possible you'd need to use 4444.
Double check with your manufacturer's website because there is a possibility they have a tool for dealing with and trimming raw files pre-edit.
Read that. You can largely ignore the final cut pro stuff and it's pretty much all the same benefits are there for premiere pro as well.
You can set up an ingest profile to transcode all your clips into a flavor of prores if you want to. Or DNx, as it's a verrrryy similar family of editing codecs. Now yes, when you do an ingest it gives you the option to transcode or proxy or both. Proxy is a KIND of transcoding but not all transcoding is for proxy. Proxies are typically lower resolution, and when attached correctly premiere will always use the original source files for export.
My personal philosophy is proxies are for high end camera files that need to be lower resolution for editing, transcoding is for consumer files that need full resolution because I don't want to use the unoptimized consumer files at all. I don't ever want to go back to the original files, so I wouldn't make proxies of them. But some people don't or won't adjust to the file size difference of transcoding from basic consumer files to full resolution prores 422 or higher files. It's a shock to the newbie to the video production world but to a video pro, ProRes 422 bitrates are not that big really. It's all a matter of perspective
Yeah, that's what you'll need to do, as with smart rendering you have to be exporting in the same format that your footage/previews exists in.
So if your previews and footage are ProRes 422 HQ, you also have to export ProRes 422 HQ. All the resolutions and framerates need to match up perfectly too.
No point pulling the export back into Premiere though, you can run the file through Media Encoder.
Or better yet, use Shutter Encoder (or handbrake) so you can use the x.264 codec which is superior to the MainConcept codec in Adobe apps.
Protip though - for graphics that are final, don't render previews - do a render-and-replace to the required format instead. Premiere has a nasty habit of forgetting previews between sessions, especially with linked AE comps.
This is a common issue with DJI footage from their more recent drones - they shoot a particuarly weird form of variable framerate that causes the footage to freeze or heavily stutter after exporting.
You need to transcode all the DJI clips to constant framerate using something other than Media Encoder (such as Shutter Encoder to ProRes) then replace the media in your project.
That's a weird black bar because if you look closely it doesn't actually cover the entire bottom of the footage.
Are you running some sort of overlay software to get that framerate counter in the top left? Maybe it's overlaying something on the bottom for some reason, and it's just not actually on the screen.
Try transcoding the clip to either h.264 or ProRes in Shutter Encoder and replace the footage in your project.
Some game recording apps (Xbox Game Bar and Razr Synapse to name a couple) do strange things with the video resolution that Premiere/Media Encoder doesn't handle correctly.
That's something you should get into the habit of doing with game recordings, as they're also always going to be variable framerate which can cause a lot of other issues with Premiere.
Definitely install the studio drivers, but looking at your mediainfo readout:
> Frame rate mode: Variable
This is a very likely cause of your issue. Premiere/Media Encoder does not like variable framerate footage and such footage can cause errors when exporting.
You'll probably need to transcode your footage to constant framerate and replace the footage in your project.
You need to use something other than Media Encoder for this, such as Shutter Encoder. Preferably transcode to an editing codec like ProRes 422 (will require ~180GB for that much 1080p60 footage) or h.264 if space is at a premium.
Either with Adobe Media Encoder or Shutter Encoder
Go to prores LT or h.264 at same rez as zoom the zoom file(or if the zoom is 4k, you can set the intermediate you are creating to lower rez 1080p or 720p for editing and delivery if that suites your needs), but change the audio to 16bit or 24bit stereo and 48Khz
it should edit and export much easier.
I didn't even need to click your link to know that's DJI footage ;-)
The recent DJI drones are known to shoot variable framerate, which causes this issue when exporting in Premiere or transcoding in Media Encoder.
You'll need to transcode your footage using a 3rd party tool (such as Shutter Encoder to ProRes) and then replace the misbehaving footage in your project.
You may want to investigate your SD cards, as I believe the cause for them shooting VFR is your SD card not being fast enough to cope with the video bitrate.
Any chance that you're working with variable framerate media here? That can cause export glitches. Adobe keep 'improving' VFR support in Premiere, which really means they keep pushing the problem around from one part of production to another...
Cell phones and drones footage may be VFR.
Either way the first thing I'd do is locate the offending clips and transcode them to ProRes, and replace them in the project. If they are VFR, you'll want to use something other than Media Encoder to handle the transcodes, for example Shutter Encoder.
Have you got audio in your nests? If your nested audio is a different sample rate to your sequence (i.e. your source files are 44.1khz and your sequence is the default 48khz) then premiere has to do a real-time resample and mixdown of the nested audio which can cause performance issues.
Going to timeline > render audio will temporarily resolve this by precomputing the mixdown and resample, though Premiere does have a nasty habit of forgetting rendered audio between sessions.
Generally though avoiding nesting audio is a smart idea in Premiere - even the mixdown can have a pretty substantial performance hit.
Other random things it could be:
- This could be a VFR related issue - if you're dealing with footage that is pontentially VFR like screen recordings or cell phone footage, transcode with Shutter Encoder to ProRes or h.264 and replace the media in your project.
- Under 'audio hardware preferences' in premiere, set 'input device' to 'no input'
- It could also just be that whatever is going on inside your nest (or effects you've applied to it) are too heavy to be rendered in real-time. Try reducing playback resolution in your preview window, doing preview renders (place I and O points, hit return). Or re-examine your effects workflow paying close attention to the effect order to ensure that any CPU-only effects are rendered before GPU accelerated effects (and try to swap any CPU-only effects for GPU equivalents wherever possible!)
Xbox Game Bar?
It's the result of the app using an unusual way to handle the video dimensions that Premiere isn't able to handle correctly.
The video isn't corrupt, it's just Premiere is showing you parts you're not supossed to be able to see!
Use Shutter Encoder's h.264 or ProRes function to convert your clips before importing to Premiere. That program will interpret the unusual resolution setup of your file correctly, and will output something Premiere can use.
This sounds like an issue related to variable framerate footage. Is your footage a screen recording, off a cell phone, or a teleconfercing app like Zoom?
Grab Shutter Encoder and use the h.264 or ProRes function to transcode your footage. Then select the clips in your project window/bin, right click > replace and replace them with the versions Shutter made.
Not a clue then I'm afraid.
If it was me the next thing I would try is either transcoding the problem clips to ProRes 422 in Shutter Encoder and replacing the 'bad' ones in the project.
File size is a product of bitrate multiplied by time, so you are exporting at a higher bitrate than your source file. If you want a smaller file, reduce the bitrate slider.
However you'll likely find that quality will be quite significantly affected if you try to use the same bitrate as your source file.
Disabling hardware encoding, and enabling 2-pass will help, but every time video is re-encoded the quality is affected slightly - like resaving a jpeg over an over.
If you just want to trim a section off a video file, use Shutter Encoder's 'cut without re-encoding' feature. That will avoid any quality loss, and the bitrate will remain exactly the same.
Any chance the source files are variable framerate? I.e. screen recordings, videos from teleconferencing apps, or game recordings.
That can cause unusually long export times in Premiere, and if that's what you're up against you'll need to use Shutter Encoder to transcode your source clips to ProRes or h.264 and replace the clips in your project.
Also how exactly are you applying the colour grades? Is it through Lumetri, or are you using some other colour correction effects? Some of the older colour correction effects aren't GPU accelerated, and can greatly increase rendering time.
And finally screenshot your export settings, just incase you happen to be using some settings that are very slow.
Let me guess... iPhone or iPad? They shoot variable frame rate which can cause sync issues in premiere.
You'll need to transcode the footage before importing to Premiere using something like Shutter Encoder.
This issue is caused by Xbox Game Bar recordings handling resolution in a weird way that Premiere doesn't like.
Get Shutter Encoder and transcode the footage to ProRes 422 or h.264 before importing to Premiere.
You may want to swap to OBS which doesn't have this issue (but you may still run into VFR problems.
Green frames in an export means the encoder didn't know what pixels to put there. It's basically an error designed to make the 'bad' pixels easy to spot.
A common cause of that issue is working with variable framerate media. Is your media from a screen recording, cell phone, teleconferencing app, or DJI drone?
If you are working with VFR media you need to transcode it using something other than Media Encoder before you import it, for example using Shutter Encoder.
If you use one of the 'editing codec' formats like ProRes 422, you'll probably find you don't need to create proxies for those clips.
For the clips that can't be imported, that could be an issue of the container or codec not being supported by Premiere.
Notably, the trial version (and... less than legal versions) doesn't support h.265/HEVC which a lot of cameras are shooting these days.
The solution there will be to transcode the footage to another format before importing using something like Shutter Encoder to ProRes.
Proxies and interpreted framerates don't play well together. You have to manually create your proxies at the interpreted framerate, rather than at the framerate.
This video shows how to do that.
I personally prefer to transcode the HFR footage to ProRes to avoid the hassle of dealing with those extra proxy steps ;-)
And the file before you upload is definitely the right length? That's weird as hell.
Sometimes weirdness with video length can be caused by bad metadata in the video container.
A quick way to fix that is to download Shutter Encoder and use the 'rewrap' function set to the same extension the file is already in.
It will copy the video/audio streams out the 'bad' container into a new one.
If that's the problem it doesn't really answer as to why Premiere is exporting a broken container though, not something I've seen happen before!
If you can get a ProRes file out fine, try running that through Shutter Encoder rather than ME. It sounds like your issue is with Premiere's h.264/265 encoding engine specifically so at the very least you can work around it for now.
It seems like this is a pretty old bug going back to at least 2018, and it may not actually be related to smartphone rotation metadata. There are a few reports that counterintutively it's related to the framerate rather than rotation somehwow?
Here are a few potential workarounds:
You could try stripping the rotation metadata from your source files, this FFmpeg command will do it:
ffmpeg -i "inputfile.mp4" -metadata rotate=0 -c copy "outputfile.mp4"
If you don't want to use scripting/CLI, you could paste the following adapted version of the above command into Shutter Encoder's function box:
ffmpeg -metadata rotate=0 -c copy
That'll let you batch run it on a bunch of clips.
Alternatively, you could use Shutter to create your proxies - it can transcode to prores - and then attach those files as your proxies rather than having media encoder do it.
And finally you could just transcode all the footage to full-res ProRes or Cineform in shutter, in which case you probably wouldn't need proxies. That's what I typically do with smartphone footage, as it tends to be variable framerate which is a problem proxies don't help with.
Prores is a professional production codec with a high bitrate so that’s totally normal.
You probably need an h.264 .mov which unfortunately Premiere cannot export (anymore) - you have to use .mp4 instead.
If the client really can’t live without .mov, you can use Shutter Encoder’s rewrap function to convert the exported .mp4 losslessly to .mov.
Have you tried IINA Player for macOS? Not 100% sure if it plays 10-bit, but it is worth checking out. I like the UI much better than VLC or QT.
I think most festivals use some professional VJ Software like Resolume, but it is quite expensive.
I’ve subtitled a full-length film in English, French, Spanish, and Chinese using SubtitleEdit. I had been using it a while before that, but once you figure it out it goes quick. Having multiple displays helps a lot as well.
Should be possible with AutoHotKey. I’ve changed mine this way—but it’ll depend on the keyboard (which one is it?). Once you find the codename of the key, it should be easy. Let me know if you need any help.
See more info here:
https://autohotkey.com/board/topic/149375-script-to-change-keyboard-multimedia-keys/
There are some tricks you can do to get better encoding of noise with h.264, but you're going to need to pull it out of Premiere.
Export a MXF OP1a file from Premiere (it'll be quite big so watch out for that), and download Shutter Encoder.
Add the mxf file to the queue and try the following settings:
- Function: h.264
- Under bitrates adustment:
- Click the 'lock' icon next to the filesize, set it to 49 MB
- Enable 2-pass
- Enable max quality
- You may want to reduce the audio bitrate to make more room for the video (the video bitrate will adjust automatically)
- Under Audio Settings
- Consider setting audio to mono, especially if you lowered the audio bitrate previously
- Under advanced features
- Ensure hardware acceleration is disabled
- Check 'Force tune' and set to 'Grain'
- Enable fast start
Then click start function.
That will get you pretty much the best possible results you can expect for your video while keeping it within 50MB.
If it still isn't good enough... well as others have said it's the noise thats the problem so simplifying that noise would help a whole bunch.
However it'll all be undone the moment you upload it somewhere and it gets transcoded to something else...
You may not have enough space on that 1TB drive to export this file.
Premiere can require up to 5x the free space on the target drive as the estimated filesize, which for a ~200GB export will be 1TB.
That is a worse case scenario though, but best case will require at least twice the estimated filesize in free space, so 400GB.
Also your media cache will get used a lot in the export and may be filling up. By default that's your C:/ drive on Windows. You're going to want at least 200GB free in the cache for this export, which may require moving your media cache to another drive in preferences.
You may need to export this video in many small chunks and concatenate them together afterwards. Shutter Encoder can handle the concatenation - add all the chunks in order to the queue and use the 'merge' function. (Again this will require you to have 2x the space free on the 1TB drive.)
Use Shutter Encoder to convert the video. Ideally use the 'Apple Prores' function for best results, but the filesize will be very large after the conversion. If that's an issue, use the h.264 function instead but there will be a little bit extra quality loss.
Once you've converted the file, in your project locate it in your bin, right click > replace footage and find the new file you created.
Variable frame rate issues are very common with video game recordings, and it's always safer to transcode everything before you start working. If you're doing very long recordings, you can use Lossless Cut to trim it down to the highlights you want to use in Premiere before transcoding to reduce the amount of time/space you spend doing it.
>NOTE: I will get the paid CC version
While it's good you're doing this, I would argue that it still doesn't excuse pirating software.
That aside, I think you're doing yourself a disservice. CS6 is old enough where enough would have changed, even drastically, with the latest releases, and you might leave yourself just as confused, or not taking advantage of the software fully by trying to embrace legacy tools when newer ones available and even replacing/removing the legacy ones. You're practicing on a row boat and looking to buy a jet ski.
I can offer two pieces of advice:
- Go ahead and get a CC account set up and download the latest version of Premiere Pro. You get a 1 week trial, so you'll be able to practice with the actual software you'd be using. Click "Free Trial" in the top right.
- If money is a concern, check out DaVinci Resolve. It's a fantastic pro-level NLE similar to Premiere Pro, and is completely free.
probably the best thing to do, would be to find a designer, or someone who uses photoshop/illustrator more. This way you could use premiere while they are using photoshop or illustrator. however, if your strapped for cash, but want to edit, Davinci Resolve is free and does almost anything premiere can. Many people use resolve for color correcting alongside premiere because a lot of people like it better for that.
https://www.blackmagicdesign.com/products/davinciresolve/
hope that helps or at least provides one solution.
What audio card/device are you using? On my Roland Rubix, with Premiere set to anything over 50ms latency in MME mode (edit>prefs>audio hardware), I get the same thing you are getting and it gets worse the more latency it is given.
But set to 50ms and under it is sync'd up very well when playing in slow mode. In ASIO mode it is sync'd up perfect.
Either try reducing the latency, or perhaps install ASIO drivers for your audio device. If none exist, you could try ASIO4ALL.
I have a client that requires lots of burned DVD's (sadly).
I export my video in H.264 and just use a 1080p preset for youtube or vimeo. It doesn't really matter, it's getting mushed onto a DVD anyway. After I have the .mp4 file I use DVDStyler to setup the menu structure and create a .iso file. Then, I use Imgburn (You can use Burn.) to burn the iso to a blank dvd.
DVD Styler: https://www.dvdstyler.org/en/downloads Burn.:http://burn-osx.sourceforge.net/Pages/English/home.html
I do everything on a PC but I believe this is a similar process.
Are you using AWS for the write speed?
Well, one of the "effects" that gets touted as a VHS look is image degradation due to the tape wearing out, so taking the footage, adding a vhs color filter, like one of these presets, cropping it to 4:3 ratio, dropping it to 480 resolution, several things.
Download Mpeg Streamclip , it is a free software that reads most file types and will able to convert the file to something you can edit with.
If streamclip cant read it, try Aunsoft It costs a little bit of money but when all else fails, that thing is great at reading corrupted footage or damaged files, and will be able to convert out of it.
Your submission was removed because it was determined to violate r/premiere's rule forbidding discussions of piracy.
This includes submissions asking for or sharing Creative Cloud account access, or asking for or sharing access to illegal copies of Adobe software.
Please do not engage in these conversations in the future. If you are looking for a free version of Premiere to use, check out Adobe Premiere Rush: https://www.adobe.com/products/premiere-rush.html
Seconded on Davinci Resolve for a free option. It's fantastic software especially considering it's free. Even that aside, it's pro-level software.
If you still want to stay in the Adobe family though and want a free option (with less features), Adobe also offers <strong>Premiere Rush</strong> for free with a starter version.
That said, even despite the work being done for a non-profit use, sharing CC subs is still piracy. So to prevent you from getting in any sort of trouble, consider the above two options.
> I've used third party apps to create/transcode 120fps to ProRez
Technically speaking, the highest framerate supported by the ProRes codec as specified by the Whitepaper is 60fps.
I'm going to guess the 3rd party apps you were using were making use of FFmpeg to handle the Prores encoding, which uses non-licensed reverse engineered prores_ks codec. There's no Apple code in there (Apple would have shut it down in an instant if there was), and it also doesn't limit itself to 60fps.
Problem is, since Premiere uses the real-deal Apple licensed ProRes codec, it doesn't know how to handle the format when it's >60fps, and probably never will until Apple update the ProRes specs.
Apple, naturally, are not a fan of this as people pay them good money to license their codecs, and dedicate an entire page in the white paper to slagging off FFmpeg... so FFmpeg must be doing something right!
Realize I'm replying to a 13 day old post! Just ended up here because I'm recommending this video to someone else ;-)
Presuming you use 720p60 ProRes proxy for the games you'd be looking at about 800GB for 40 hours. Quite a lot but not hugly unreasonable!
If you're working in 24fps for the movie footage, it's a much more reasonable 320GB for 40 hours.
This document has a whole table of common framerate/resolution combinations with bitrates and storage per hour.
This error can be caused by working with variable framerate media, for example screen recordings and cell phone footage.
Transcode the media in your project to h.264 or ProRes using Shutter Encoder and replace the footage in your project.
If you're just gluing the videos end-to-end, you can losslessly concatenate them which will result in a file that is equal in size to all the files combined.
The format, resolution, and framerate of all the files need to be identical to do this.
Shutter Encoder can do it, add the files in-order to the queue and use the 'merge' function.
If you do need to trim them down before merging, it also has a 'cut without re-encoding' feature that will help, but note that you may not be able to place your cuts exactly where you want them - they have to fall on interframes.
Online 'youtube converter' websites can produce non-spec files that don't play well with Premiere.
Use Shutter Encoder's 'Web video' function set to 'convert to WAV' to get something Premiere compatible from a YouTube video.
Double check your file from Recode in MediaInfo to see whether it has actually given you a file with 5.1 audio or 5 discrete audio streams.
If the file has 5.1, then it's probably just that your Premiere's default interpret settings (somewhere in Preferences) has been set to interpret multichannel as mono.
In which case you can change the preferences there, or you can select the clip in your project window > right click > modify > audio channels, and reconfigure the interpretation for 5.1 and map the channels accordingly.
And an obligatory reminder to ensure your sequence is set for 5.1 audio if you're planning to export in 5.1.
If it is Recode that's splitting your channels, I'm not familiar with the software so couldn't tell you what to do there, but try Shutter Encoder's 'rewrap' function instead - it should be just as fast.
Premiere doesn't support exporting h.264 .mov on Windows. If you want an h.264 mov, you'll need to export a .mp4 and then use a 3rd party tool like Shutter Encoder to rewrap the resulting file to .mov.
But it also shouldn't be crashing when exporting h.264!
If you set encoding mode to 'software' rather than 'hardware' in video settings on the export dialogue, does it export OK? The default h.264 presets use hardware encoding, except for (I think) h.264 BluRay.
If that fixes it, it may be an issue with your GPU drivers.
(But the GPU isn't involved for Cineform encoding either, so it could still be an issue with your source media, maybe variable framerate media?)
> As far as framerates go, the original footage is 23.976. Yet for some reason during export Premiere says the source is 25. I don't really get why.
This right here is the most likely cause!
The 'source' framerate in Premiere's export dialogue shows you the framerate of the current object you're exporting.
If you're exporting a sequence and it says the source is 25fps, that means your sequence is 25fps (the footage inside the sequence could be any framerate!)
And 23.976 fps in a 25fps sequence will result in one frame getting repeated every second(ish).
Applying optical flow on those clips will 'fix' that to an extent (and would add hours to your export), but if you shot 23.976 there's not a whole lot of point exporting 25 unless you're going for PAL delivery.
So go into sequence settings, and change the framerate to 23.976... and that might be all you need to do ;-)
> It was easiest to notice the judder during the credit roll,
Rolling credits are one of the eaisiest ways to introduce (and see) judder. If the credits aren't moving by an exact number of pixels every frame, you'll see it quite clearly, they'll sorta appear to shake up and down a little.
Are you making these credits yourself, and if so do you have After Effects? There's a pretty simple way to do rolls in After Effects that will avoid judder completely.
(Though the 23.976 to 50fps thing will also make credits scroll really badly!)
> The other most noticeable time is a drone shot.
Judder is fairly easy to spot on drone footage as usually the entire frame is in motion, and it's pretty easy to move the drone too fast!
However if it's a DJI drone and it's extremely bad, you may be dealing with variable framerate footage, meaning you need to transcode it to constant framerate using something like Shutter Encoder to ProRes before importing
> filmed with OBS
It's variable framerate.
Use something other than Media Encoder to transcode the files to constant framerate (such as Shutter Encoder to ProRes 422), and replace the affected clips in your project.
> The footage is recorded via OBS
It's VFR for sure. OBS always records VFR, there's no way around it.
Remuxing just takes the video/audio streams out the file and puts them in a new container - it doesn't actually affect the video at all. If the stream is VFR in the MKV, it'll be VFR in the MP4 as well.
You're going to need to transcode it to CFR using something like Shutter Encoder to h.264.
(Media Encoder can't handle VFR very well either!)
Providing you're running 14.9 or later, and you've got a Geforce 10 series GPU or better, you may find that you don't actually need proxies once you've done this. VFR can cause really poor performance in the timeline, but CFR h.264 should be decoded in hardware on your GPU which should be pretty fast.
If you export all the individual chunks as required, you can use Shutter Encoder's 'merge' function to losslessly glue them together.
I'd suggest warking in smaller chunks though, maybe ~2 hours per chunk. Last thing you'd want is to spend 20 hours exporting a part only to find you hit an error or mistake in the edit and have to do the whole thing again ;-)
Just incase you weren't aware, you're probably going to be working with variable framerate footage from whatever screen recording app you're using, which you'll need to transcode to constant framerate prior to editing:
https://www.reddit.com/r/premiere/wiki/faq/playback#wiki_variable_frame_rate_.28vfr.29_media
Try Shutter Encoder's 'Web video' function.
That should grab the highest possible quality straight off YouTube.
However, the resulting file will probably be AV1 or VP9 codec, neither of which are supported in Adobe applications, so you'll need to transcode the files to a compatible format which Shutter can also do. Preferably try the ProRes function, but otherwise h.264 should work fine.
Shutter Encoder can be used to remultiplex an MP4 file to AVI. Use the 'Rewrap' function with 'To' set to 'AVI' and that's pretty much it - the quality will be identical and it'll take seconds to process.
But it's still a bit vague what they're actually expecting, see if that satisfies them and if not hopefully they'll be more specific what exact format the streams need to be inside the AVI file.
Oh another reply because I missed something important in your initial post!
You're recording game footage, so that's almost certainly going to be variable framerate.
Forget the effects for now (but still update your GPU drivers), first thing you should address is VFR as that can definitely cause extremely long render times.
Run your footage through Shutter Encoder ideally to ProRes if you've got plenty of HDD space but otherwise h.264, then replace the footage in your project with the new versions.
This is definitely a 'what the hell' moment.
> Overall bit rate: 35.5 Mb/s
Well that would explain why it's so big, but when you look at the individual streams...
> (Video) Stream size: 7.48 MiB (9%)
> (Audio) Stream size: 463 KiB (1%)
So the video and audio stream are taking up only 10% of the total size of the file! And media info doesn't think there's anything else in there.
Something is definitely not right here. Seems like the actual video/audio data came out under the estimate, but 90% of the file is just... data that media info can't see? Honestly never seen anything like that before.
Couple of things to try that might hint to what's going on...
If you compress the file into a .zip archive what size does it come out as?
If you use Shutter Encoder and use the 'rewrap' function with 'filter' set to 'MP4' does the resulting file end up ~7.5MB?
I'm not near Premiere to expermient at the moment, but just a hunch - try disabling XML metadata in the export dialogue (there's a button down the bottom somewhere.) A convenient explaination would be that Premiere is including the XML metadata in with the file which can get pretty big... but I didn't think that was possible with MP4.
Use Shutter Encoder and transcode the clips to ProRes.
The Mavic Air 2 can sometimes shoot variable framerate footage which causes issues with Premiere, so you need to get in the habit of transcoding before import ;-)
Adobe keep 'improving' VFR support between versions, but really they keep breaking it in different ways!
First off, if you're using an Nvidia GPU, make sure you're running the 'studio' drivers.
Next, under preferences > media, try disabling 'GPU hardware accelerated h.264/265 decoding' and restart Premiere.
This is a problem that could be caused by variable framerate media (for example a screen recording or phone footage) in which case you'll want to use something like Shutter Encoder to transcode your footage before import (or replacing the existing clips in your project.)
Probably the quickest workaround (rather than taking on the challenge of trying to work out exactly where the interlace issue is occuring) would be to transcode your captured clips and deinterlace, then replace the effected clip in your project.
Shutter Encoder would be a good choice for this. Add the clips to the queue, set the function to Prores, and under 'advanced features' set 'force deinterlacing' to BFF and let it process.
If that doesn't work, there's something weird with the actual clips themselves, maybe you captured them progressive with the interlacing burned-in?
Yeah you don't need to do that, AVCHD handling is native to Premiere ;-)
The important thing is that when you copy data off the cards, you have to copy the entire contents including any folders and non-video files. Otherwise you break the format and AVCHD compatibly software won't know what to do with it.
AVCHD splits clips into 2GB chunks so that it can record onto media cards using the FAT16 filesystem.
If you have messed with the file format so the clips aren't recognised as AVCHD, you could use Shutter Encoder's 'merge' function to combine them losslessly into a single clip.
Your technique is fine but it means you're transcoding the clips and will be losing a bit of quality.
Those times sound pretty normal. 2-pass VBR will take around twice as long as 1-pass - but the crashing isn't!
The glitches are also a bit concerning. Any chance you have variable framerate media in your project? I.e. screen recordings, zoom recordings, cell phone footage? That type of footage can cause glitches after export and very slow encoding times and instability.
Your previews are being used, but smart rendering doesn't work with regular h.264/265. If you want to use smart rendering you have to export with the same codec/framesize as your previews are rendered, and it will only work if you are using codecs supported by smart rendering.
Assuming all your codecs are right, that will probably be your best approach here. Hopefully you're using something like ProRes 422 for your previews so export to that with 'use previews' checked - it should be really quick.
Then run that file through Media Encoder to h.264. If that still gives you issues, use something else like Shutter Encoder. If you end up using Shutter, try these settings rather than 2-pass as it will be much faster but with equal or better results:
- Function - h.264
- Bitrates adjustment - click 'VBR' until it says 'CQ'
- Set the CQ value to 20
- Check 'Max Quality'
- Under 'advanced features' disable 'hardware acceleration'
- Check 'Fast start'
Select the clips in your project window/bin, right click > interpret footage.
Set 'Assume this framerate' to double whatever it is now. However this will mean your audio will probably go out of sync.
> from a Phone
Your footage is going to be variable framerate which will cause other issues with Premiere (but might not be the cause of this one.)
Using Shutter Encoder to convert the video to h.264 or prores is a pretty smart idea and might save you some headaches later on.
On the right track then!
The fix is pretty straightforward. Get Shutter Encoder and transcode the misbehaving clips to ProRes 422 (or h.264 if you're short of HDD space.)
Then select those clips in your project, right click > replace, and replace them with the new transcodes you created with Shutter.
Try using Shutter Encoder to transcode the video to ProRes 422 or h.264. It should maintain all your audio tracks no problem.
Your issue sounds like it could be caused by variable framerate media, which doesn't play nice with Premiere at all.
This sounds like a VFR issue. Is it screen recordings, cell phone footage, zoom footage, or drone stuff?
Try using Shutter Encoder to transcode the 'bad' clips to ProRes 422. Then select those clips in your project > right click > replace footage and swap them out for the transcodes.
Xbox game bar does weird stuff to the video resolution that Premiere doesn't like at all.
You'll need to transcode your footage to ProRes or h.264 using something like Shutter Encoder before you import it to Premiere (or replace the existing clips in your project.)
Export as ProRes 4444, you should get the 'include alpha channel' option with that codec.
Then use Shutter Encoder to transcode to VP9 WebM. Under 'advanced features' check 'include alpha channel'.
Game bar does weird stuff with resolution (and is also VFR.)
This comment explains what's going on.
But long story short, you need to transcode the footage using something other than Media Encoder before you import it into Premiere.
Shutter Encoder is a good tool for that, use ProRes 422 if you've got hard drive space to spare!
The quality difference between CPU and GPU isn't huge, and you can offset it by increasing the bitrate. If your upload speed is reaaaaaaly fast, it might save you more time that way even if your files are much larger.
You can get a (rough) idea of the quality differences using Shutter Encoder (no GPU required!)
Start with a ProRes export, set up your bitrates as you intend to use, and then check 'max quality' and export. That will be your reference for how good a software x.264 transcode could look at slowest settings.
Then do two more transcodes. Uncheck 'max quality' and under 'advanced features' set 'Force Preset' to:
- 'Faster' to simulate a GTX1660 GDDR6, 2000 series, or 3000 series
- 'Very fast' to simulate a GTX1000 series card
It's not going to be exact because you're still using the superior x264 encoder, but in terms of visual quality it should give you a fairly decent idea of what the difference will be.
There is more food for thought if you have a really fast internet connection, would uploading ProRes masters be a practical alternative? Obviously they'll be huge, but you may spend less time uploading those than you would transcoding to h.264. Then you wouln't need a transcode box at all - you could just export ProRes straight from your workstations.
Does the file contain a captions metadata track? Proxies cannot be created for media containing a captions stream and will result in the option being unavailable. You'll need to remultiplex the files before import to strip the captions stream using something like Shutter Encoder.
Some cameras use caption tracks to store metadata, most notably things like drones (that use it for GPS/flight information) or CCTV systems (for timecode/camera information), and I think some cameras use them for accelerometer data too.
> i know i can convert the original clips to CFR but that would mean i would have to edit my project all over again and im trying to salvage the video
No it wouldn't!
Transcode the clips using something other than Media Encoder, such as Shutter Encoder
Then select the clips in your project, right click > replace footage and find the new CFR versions.