
What are
/r/BeginnerWoodWorking's
favorite Products & Services?
From 3.5 billion Reddit comments
The most popular Products mentioned in /r/BeginnerWoodWorking:


The most popular Services mentioned in /r/BeginnerWoodWorking:
Autodesk Tinkercad
Omni Calculator
Facebook Marketplace
Banggood
Pixabay
Wordnik
Blender
FreeCAD
Walmart
OfferUp
Gmail
Gumtree
Coda
Onshape
Slickdeals
The most popular Android Apps mentioned in /r/BeginnerWoodWorking:

PlantNet Plant Identification

Handyman Calculator

Segment Calculator
The most popular reviews in /r/BeginnerWoodWorking:
Get yourself a draw knife. They work great on live bark.
One board foot is a piece of wood 12 inches long, 12 inches wide and 1 inch thick. It’s a measure of volume, so you can shape it anyway you want, 6 inches wide, 24 inches long, 1 inch thick is still one board foot.
I just got one of those light sockets with an outlet on the side of it, and plugged it into the ceiling fixture. Like this.
Not so fast!
I looked on Amazon & found a "baby pop up tent" that looks a hell of a lot like the one in OPs shop: https://www.amazon.com/Monobeach-Portable-Protection-Shelter-Infant/dp/B01K15UQ4I
That "tunnel" at the bottom of the tent is a "mini pool" that allows you to pour some water into the tent for the baby to play in.
I would think that should work. However, I would go half-face respirator. Something like the 3M Half Facepiece Reusable Respirator 6200/07025(AAD). This way you can buy filters for various different applications. These should work for your needs.
Strap clamp.
No endorsement of this. Just the first search results to show you what one looks like.
HORUSDY Band Clamp, Woodworking Frame Clamp Strap Holder for Picture Strap Clamp Strap Clamp https://www.amazon.com/dp/B07BW2T7YH/ref=cm_sw_r_cp_api_glt_fabc_PGV0YHG9ZR43GSXC215X?_encoding=UTF8&psc=1
I got them from amazon. I bought a 4 pack for 2 x 8s for $20. There were nicer ones out there but these fit the bill and the budget.
https://www.amazon.com/dp/B07RFD4GD8/ref=cm_sw_r_cp_api_i_avFhFb5GF5BNV
I was going to suggest this, little Bluetooth receiver/amplifiers are super cheap and pretty powerful. You could hide a speaker behind the original grill and no one would be the wiser.
Put little adjustable feet on the bottom. This was the first hit I found on Amazon, but anything with this principle will help cover any slight differences in the legs.
I used this one Sprayer
I just used a scrap piece of wood to get it dialed in each time I filled it up. It definitely took some practice but wasn’t too hard to get it dialed in. I did buy a new compressor to be able to put out enough air.
The following is based on experience from my own lumber store so YMMV: Bring gloves and a tape. Know how to calculate board-feet as this is how most lumber will be priced. (https://www.omnicalculator.com/construction/board-foot) Thickness is usually measured by quarter inch. So 2 inch thick board would be listed as 8qtr.
Seriously, **THIS** should be the top comment. These tools aren't going to get much use when you can't see, can't hear, or can't breathe. Invest in comfortable PPE. Good safety lenses, good ear muffs, and good masks.
3M N95s are awesome. I bought a 10-pack in the Before Times and they are insanely comfortable. I also use the 3M worktunes so I can listen to music, podcasts, or audiobooks while working. They are amazingly good and comfortable for only $40.
If you spend a little time learning how to configure it properly, you can get a CNC machine on Amazon for $200 that can do this. I was able to make something similar for another board game that way. Fair warning though, I found it to be more complex than learning how to use a 3D printer.
This is the one I bought, not sure if it’s still recommended but it’s on sale:
I bought the DeWalt 10-inch 32-1/2 inch rip capacity (DWE7491RS) and love it. Amazon The rack & pinion fence is incredibly accurate and easy to make micro adjustments.
You may find this book particularly interesting.
https://www.amazon.com/Hammer-Head-Carpenter-Nina-MacLaughlin/dp/0393352323
Anecdotally, the woodworking industry as a whole is aware of it's almost total lack of diversity, and looking at ways to approach it. But it is a tough industry. There are many hobbyists with tools and talent you'll be competing with for furniture and custom cabinets, and mass production has really driven down the consumers expected costs.
But don't let size or gender get in your way, do you and keep learning. You can even start with minimum of tools and find a style or small 'thing' for sales at craft shows, etsy etc. Still tough, but a starting point.
Add sheets of galvanized steel:
And you can make it magnetic to work with magnetic pieces. You can cut the steel with tin snips.
Haha yeah sorry! Just got these ones off Amazon: 8 Pcs 6" Black Solid Steel Floating Shelf Bracket Blind Shelf Supports - Hidden Brackets for Floating Wood Shelves - Concealed Blind Shelf Support – Screws and Wall Plugs Included https://www.amazon.com/dp/B07S9L87JL/ref=cm_sw_r_cp_api_glt_fabc_X89W5Z29RHZXCCK36FCD Generally went by this guy’s instructions: https://www.thenavagepatch.com/diy-floating-shelves/
I love using these levelling feet on my projects because even if it is level I have to account for the bubbles in my floor. Might be worth a shot! Just drill a hole and pound em in.
It looks great! Awesome work.
Looks like the perfect place for a desktop power grommet 😀
Biggest tip Ive ever gotten is get a lift mechanism so you can store things on the ceiling!
FLEXIMOUNTS Overhead Garage Storage Rack Lift Ceiling Storage Lift System Heavy Duty 4 x 4 FT Black https://www.amazon.com/dp/B08KY1DCQL/ref=cm_sw_r_cp_api_glt_fabc_HW5ZNF1MPVYA6FG7PNNR?_encoding=UTF8&psc=1
Like an engineer, you’re making this WAAYYY too complicated. I’ve learned the equations too; you’re right about the math of it. But you aren’t right about the practice of it.
Ohms law governs, yes. These motors (the ones that are rated for both 110 and 220) ARE fixed to a power output. Therefore, mathematically, they HAVE to halve the amperage. The resistance stays the same as you say.
Amazon link to 110/220 replacement motor
Noted that not all motors are rated for both, or compatible with both voltages.
Found it on amazon. There are a bunch of options for desktop power and usb. Wife wanted the USB ports for her phone and headset for work.
Here’s the link to the one I used:
Get these https://www.amazon.com/dp/B00L7KTBZC/ref=cm_sw_r_cp_apa_fabc_VIt9Fb4C4WZX6
And these https://www.amazon.com/dp/B004MQYDTW/ref=cm_sw_r_cp_apa_fabc_wJt9FbTQ20D0R
Amazing additions. The first helps push the piece through so no push stick (most times). The second holds the piece against the fence firm.
I live in the inner city so I have to plan my projects around a house that's 11' wide and doesn't contain a work space. That does 2 things - 1) limits what I can build since I have no place to store it when it's done being built and 2) limits what tools I have because I have to carry them up the steps from my basement, through my house, out the front door, and down the front steps before I can use them. With that being said, I bought this book on amazon (warning, almost nothing in it actually uses 2x4's) and have found it full of some really good (cheap and smallish) projects to practice on. I think I'm going to try and build a bench when I get a couple of free days.
Outside of that, there's a place around the corner from me called a Tool Library that contains every tool you could ever possibly want for wood working. They offer several really neat classes that I plan on taking in preparation for my project to build a table
Are you interested in using hand tools or power tools? If hand tools I recommend getting a ryoba, a japanese saw that can be used for cross cutting and rip cutting. Here's one I own which I think works great for a beginner: https://www.amazon.com/Gyokucho-770-3600-Razor-Ryoba-Blade/dp/B07NVT52F4?th=1
If you're interested in power tools I'd start with a circular saw, ideally a cheap one you could get for $20-$50 on craigslist, facebook marketplace, etc.
Either of those tools plus a drill and/or wood glue can get you pretty far. After completing a simple project or two you'll have a better idea of what tools you'll want to get next.
Fear can be just as dangerous as overconfidence. Use your safety features. Get a good push block. Make sure you know your saw. You should sqaure it up anyways when you get one just to make sure your work goes well. This process will acclimate you with how it works.
You can buy drill bits specifically for socket caps.
Here is an example https://www.amazon.com/dp/B002J70UGG/ref=cm_sw_r_apan_glt_i_VS2PX7EMZH3B9E61H6SB
You can also get them for 114° flatheads
When I was in college, had cheap mdf furniture and moved once or twice a year causing that cheap ass stuff to break, I held my stuff together with angle brackets when the dowells inevitably broke the mdf around it. It wasn't pretty and I had to keep adding more as the poor furniture was abused, but they held things together even as the edges deteriorated.
I just ordered a Switchbot for my new air cleaner. With the added hub it’s compatible with Alexa.
SwitchBot Smart Switch Button Pusher - No Wiring, Wireless App or Timer Control, Add SwitchBot Hub
Compatible with Alexa, Google Home, HomePod and IFTTT https://www.amazon.com/dp/B07B7NXV4R/ref=cm_sw_r_cp_api_glt_fabc_95NRG5J39VSCQC23EZ4B
Thank you!
And yeah, here’s the pieces I used for the top, the apron and the shelf:
https://smile.amazon.com/dp/B07LFN7R3M/
And here’s what I used for the legs:
The poplar is from an 80' tree that fell during a hurricane last fall, on th side of a state highway. I cut it into 8' sections. My father has a Woodland Mills saw mill and I got several hundred board feet stacked and drying.
The stain is Varathane American Walnut with Varathane Polyurethane (Oil Based). The paint is Rustoleum Painter's Touch Furniture Paint. It comes only in quarts at Home Depot. I sprayed both the Poly and the Latex paint with a HomeRight paint sprayer from Amazon.
I swear by this unit. It was the only one I found that could spray latex paint, stain, and poly. It's awesome. The finish is Flat. Semi and Gloss shows too many mistakes. LOL!!
I agree about the drawer pulls. I did the whole plan in SketchUp and didn't know if they would look good. I think they are okay, but some will not like it.
Thanks for asking. It took forever to build this unit. The drawers were done 3 times before I got them right. As I stated before, there are many mistakes and spots that did not turn out right, but I'm like everyone else, learning.
>It’s virtually impossible to keep the dust out of everything
Accept it now, and it makes it easier when you find out it's a reality.
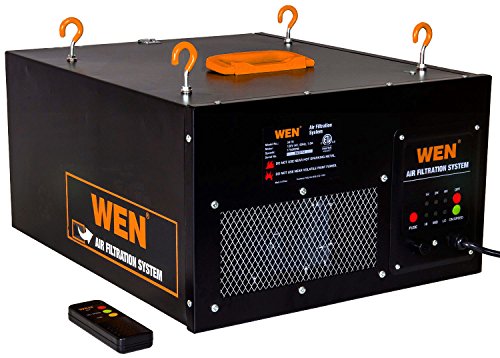
I made a dust collector for the big equipment. I got one of these air filtration units. I put up tarps to make a sort of Dexter room to segregate it from the rest of the garage. Then I got a small duct fan and ducting and blew that outside to create a bit of negative pressure in the room. Fine dust still gets into the rest of the garage, but it does help.
Thanks for the compliment!
The big lettering was done with a 60° v-groove The smaller letters ant outline of graphic done with a 15° detail liner and the "flat" of the graphic with a 20° flat tip profile bit
I used these bits from Amazon: https://www.amazon.ca/dp/B07PNQ45W4/ref=cm_sw_r_cp_apa_glt_i_V9F0D4ZECJGB8GFDE818?_encoding=UTF8&psc=1
That’s my favorite part as well always try to add a mag cap from Amazon on any of my projects
MAGCAP Wall Mounted Bar-Style Magnetic Bottle Opener that Catches Caps - Stylish, Easy to Install and Incredibly Convenient (2 Pack) https://www.amazon.com/dp/B014LLDTJC/ref=cm_sw_r_cp_api_glt_fabc_QYRQ97J7TGKFA7XD0JBF
I used one of these for a workbench when I was in an apartment https://www.amazon.com/Keter-Folding-Workbench-Sawhorse-Capacity/dp/B001CWX26Y/ref=sr_1_4?crid=1QO1CPWND4CNV&dchild=1&keywords=kettering+work+table&qid=1614351323&sprefix=kettering+work+ta%2Caps%2C180&sr=8-4
Also I would suggest starting hand tools, becuase they are smaller and easier to store. Also cheaper and safer. If you do t have a good bench go with Japanese style saws. They are generally designed to be used with out a work bench.
My one word of caution. With hand tools is lower your expectations on what a straight line or a perfect fit is. You can, get really good but you probably won't have perfect straight cuts at first. I personally like figuring out how make better cuts. It's that fi. Itererative approach you mentioned.
Also check out r/handtools if you're still interested.
I use less paint for sure, two coats of primer and two top coats. It’s so much faster and leaves a very smooth finish after some sanding with 400 grit. I usually paint two projects at a time and set up doesn’t take long. The nozzle on this gun isn’t super wide so there’s not very much overspray so hardly any waste. It comes apart easily to clean in about four pieces. If you’re painting indoors I’d use water base paint. I use sherwin Williams kem aqua plus
I recently bought a palm router and got this set to test out all the types of bits. If I wear one out, I'll know to invest in a better one of that particular bit.
I got this one, I hate those with plastic clips, they always break, this has the over the shoulder straps with ties, not clips. Very substantial and well made. Highly recommended.
Ryobi 18-Volt ONE+ Lithium-Ion Cordless AirStrike 23-Gauge 1-3/8 inch Headless Pin Nailer (Tool Only) https://www.amazon.com/dp/B07P7S2GRD/ref=cm_sw_r_cp_api_i_IYXMFbSGRE8YY
Delta Power Equipment Corporation S26-262L 10" Shop Master Miter Saw with Laser https://www.amazon.com/dp/B076S6LNZ4/ref=cm_sw_r_cp_api_i_-YXMFbXRPAJX5
Good luck.
There are lots of sources for small cloth bags online. Any one of these could serve to collect the dust. The trick is to make an adapter to mate the bag to the sander. It looks to me that the mating adapter needs to be male; that is, it sticks inside the rectangular opening at the top of the dust chute. (If it were female, it would fit over a protrusion at the top of the chute.) So -- are you up for a little sheet metal work? I would get some aluminum flashing, bend it to form a rectangular tube that fits the chute loosely, then wrap it with duct tape. This will hold the tube together and convert a loose fit to a friction fit.
Decide which face of that homemade tube is the top, and attach a 6- to 8-inch long (15-20 cm) stiff wire (like a coat-hanger wire) to it with another piece of duct tape -- this will support the bag and keep it from flopping down while you work. Bend the wire to make a slight arc, then bend the free end in a half circle so it won't poke through the bag. Even better, cover the bent end with another piece of duct tape.
Finally, attach the bag to the tube with (what else?) duct tape, draping it over the wire. Then insert the lower end of the tube in the sander's dust chute. This is classic Red Green-style* engineering at its most inelegant, but it should work provided the opening in the homemade rectangular tube has sufficient area to accommodate the air flow.
*Google it, youngsters. Better yet, find some old Red Green episodes on YouTube. You won't be disappointed. (My favorite is the one where he duct-taped two Jeeps together to make a Humvee.) Welcome to the Possum Lodge!
If you find you’re outgrowing the 5 gallon bucket, I switched to a 14 gallon drum and love it! I’ll link the one I use below...
Eagle 1610MB Blue High Density Polyethylene Lab Pack Drum with Metal Lever-lock Lid, 14 gallon Capacity https://smile.amazon.com/dp/B0026GO5CA/ref=cm_sw_r_cp_api_i_p7BpFbVGH0TCC
Whoa, I didn't even notice how much they cost haha. I picked these up from amazon for less than half that price. Not as cheap as a DIY solution but the time I saved was worth the $23 (used them for miter saw foldable wings).
The purpose of the dowel jig is to make sure your holes are properly aligned. What might work well for you are dowel alignment pins. Basically you drill one hole, pop in one of these pins, then line up the mating board and press down. It'll leave a little divot/mark you can use to drill the mating hole.
In order of strength for leg+apron constrution:
- Mortise and tenon (you should try it! It's not as hard as you think!)
- Dominos/Beadlock/other loose tenon
- Dowels
- Biscuits
- Pocket holes (might actually be stronger that biscuits TBH)
- Butt
I really like this blade. A nice 1/8" wide, flat tooth. "Freud 8" x 24T Heavy-Duty Rip Blade (LM72R008)". I often use it for cutting rabbits, grooves, etc.
https://www.amazon.com/Freud-24T-Heavy-Duty-Blade-LM72R008/dp/B0000225UC?th=1
This. Very much this. I grew up with an old belt driven Craftsman. You can find these things cheap, as in darn near free (Offer Up is one forgotten place to look) and spend your money on blades and beer.
Try Amazon search for delta planer blades and you should find them. I have and older delta, 22-560, and the blades have the slots you described. I just did this search and I found after market ones there. Here is a LINK to an example.
A friend of mine had the same problem with the bolt you are having and he got his out by using a screw extractor and an impact wrench (the kind you hit with a hammer). He drilled a hole in the head of the screw and used the extractor in the impact wrench. If this works you can replace the bolt. It’s a metric size. Just carry one of the others to the store and you should be able to replace it.
You can def wax the mdf. Keep an eye on it and rewax it when needed.
You should be able to wax the saw top. If you're uneasy about waxing the saw, you could use an anti-friction lubricant spray, like Bostik GlideCoat or T-9 Boeshield
Could get some toggle clamps, something similar to https://smile.amazon.com/Adjustable-Antislip-Capacity-Horizontal-4002/dp/B08HZ2KSWT, on the outer 2 edges. Lock those together and it's pretty stable, and then you also don't have hardware on the inside where you might use them as seat backs.
I work with rabbet joints a lot and I have a few of these and absolutely swear by them.
Do you already have wood drill bits? If so, buy actual counter sink bits rather than combos. They're cheaper and more versatile.
E.g. https://www.amazon.co.uk/Countersink-quick-change-drills-5-blade-countersink/dp/B085LKQ1J7/
In keeping with the copper motif, would this flex copper pipe work?
They make both. Ones like these have the countersink bit wrapped around the drill but that you can slide up and down using the included Allen wrench to automatically countersink once you’ve drilled your desired depth, all in one pass.
And ones like these are for using after using a normal drill bit. Each have their own use cases.
This is my adaptation of pre existing old design. If you look up Roubo bench you'll get a lot of info. Also, this book thought me a lot https://www.amazon.ca/dp/1440343128/ref=cm_sw_r_cp_awdb_imm_18GVDXQN8TSCYVJEHJAA
Yes, I used “Total Boat Deep Pour” resin. It’s phenomenal stuff. A little more expensive than some others on Amazon but I look at it as “you get what you pay for” type scenario. If I’m tinting resin on a pour I don’t care quite as much, but with something I want crystal clear, this is my go-to. I dropped the Amazon link for the stuff I use.
TotalBoat Thickset Deep Pour Epoxy (1.3 Gallon Kit) | Clear Gloss Pourable Casting Resin Kit | for Art, Epoxy River Tables, Live Edge Slabs, Molds, Wood Voids https://www.amazon.com/dp/B07QKF5F6F/ref=cm_sw_r_cp_api_glt_fabc_WMWVAMRAM8FY3Y2RMXRX
I don't have any pictures, but it's similar to this. It's for a utility shower in my basement, which is unfinished. The first one I made was sealed with standard polyurethane and it eventually got waterlogged and rotted. This one got 3 coats of spar and when I assembled it, I dipped the screws in spar urethane before screwing into the pilot holes, so it's sealed up really good this time.
These are the ones I got from Amazon. Tons of similar options available as well with varying levels of robustness.
Good luck on your build, can't wait to see it!
something like this might work
https://www.amazon.com/gp/product/B07CJHZ7QL/ref=ox_sc_saved_title_5?smid=ATVPDKIKX0DER&psc=1
Couple of options off the top of my head;
the guy from WoodWorking For Mere Mortals mentioned in his video that, when doing Rabbet cuts, you can take a paint stir stick and glue sandpaper to it(someone mentioned this in this thread already)
There is a tool that's sold mostly to miniature modelers called Sanding Twigs( https://www.amazon.com/Keystone-Cushioned-Abrasive-Sanding-Woodworking/dp/B00C5RFIXK/ref=sr_1_2?dchild=1&keywords=sanding+sticks&qid=1611963019&sr=8-2 ) which i have personally used. I'm not sure how effective they would be on wood, but it does say that they can be used on wood.
Amazon. I get them with countersunk holes and screws for very easy mounting. Link below.
Apexstone 100N/22.5lb Gas Strut,Gas Spring,Lid Support,Lift Support,Lid Stay,Gas Props/Shocks,Set of 4 https://www.amazon.com/dp/B01AHHCHBK/ref=cm_sw_r_cp_api_glc_fabc_UIWaGbXZMT1AX?_encoding=UTF8&psc=1
Crystal Clear Bar Table Top Epoxy Resin Coating for Wood Tabletop - 1 Gallon Kit https://www.amazon.com/dp/B01LYK2NAG/ref=cm_sw_r_cp_api_glc_fabc_zxqaGbCCJDFDK is a great and trusted brand. I’d advise going with a much smaller size though, unless you have more epoxy/resin projects you want to pursue.
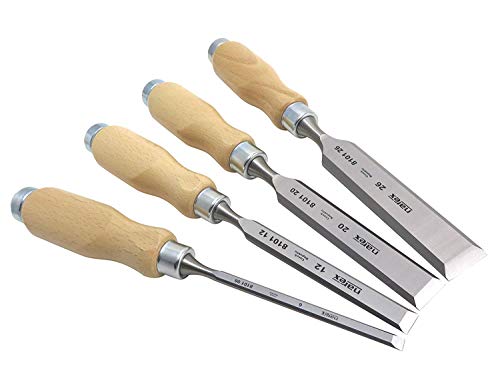
I went with narex for two reasons. They seem to be well regarded for decent quality. Also, they weren't a mortgage payment for a 4 piece set. I'm no expert but that's the value I found in them.
Edit link: https://www.amazon.com/dp/B00GPC74ZQ?ref=ppx_pop_mob_ap_share
> Is the melamine what you use for forms?
Yes.
Unless you are doing a deep pour, the bar top epoxy that Home Depot carries is fine. You can find similar epoxies on Amazon for a little less.
I used this: https://www.amazon.com/gp/product/B07CZR9BLW/
Worked well. Total Boat is another brand that is popular and has a variety of offerings. Look for the best deal you find.
The liquid watercolor looked the best and you can see the wood grain. Added the watercolor and water maybe 1:1 or stronger in a ziplock bag and dunked the pieces for a few minutes. Slowly would add a different color when changing pieces. Tried the same with more watered down acrylic paints, but it was too opaque.
My wife checked with toxicologist and they thought this was fine. We haven’t drool tested yet though Sax Liquid Washable Watercolor Paint, 1/2 Pint, Assorted Colors, Set of 8 - 1567858
I really loved both of these books, terrific quality and pictures and descriptions. Even my kids loved reading the first with me (not woodworking specific). I checked them out from the library but already hinted to the wife that they'd be a great Xmas present.
https://www.amazon.com/dp/1465468544/ref=cm_sw_r_cp_apa_fabt1_lSBXFbSEWS9XG
https://www.amazon.com/dp/1465491112/ref=cm_sw_r_cp_apa_fabt1_jUBXFbERTKW1P
Is there a mega thread on recommended books? I have a cool one called "building early american furniture" and I would like to find another one like it. Link: https://www.amazon.com/Building-American-Furniture-Joseph-Daniele/dp/9991520511
I bought this one a while back. I like the strap system and adjustability.
https://www.amazon.com/gp/product/B07W3V6735/ref=ppx_yo_dt_b_search_asin_title?ie=UTF8&psc=1
Thanks!! There are some mistakes, but paint really covers much of it. My client (wife) is very happy, so I'm good with it.
It has a heater embedded. I'll post a link to it down below. It's a nice heater, but you won't feel it if you are more than 6' apart.
https://www.amazon.com/dp/B088FB9XR7/ref=cm_sw_r_cp_apap_4eHdCcuI67FTu
Thanks man! I posted a link to both the lights and the diffuser track/covers
LED Strip Lights Bluetooth, Govee... https://www.amazon.com/dp/B07XBSN3Y5?ref=ppx_pop_mob_ap_share
Starlandled 10-Pack Aluminum... https://www.amazon.com/dp/B01LL2SLME?ref=ppx_pop_mob_ap_share
You can find edge banding on amazon for cheap, buts super thin, maybe 1/64". You may also be able to go to a hobby/craft store like Hobby Lobby. They may have good stuff, although it may be mostly balsa wood.
Edit: look for something like this
I've got a beard and such and use a community shop to do my work (think a maker-space dedicated to wood working) so there's usually a ton of dust in the air. I bought one of these 3M filters off of amazon (with the basic filter pack) and it works great - seals around my facial hair without an issue.
While not cheap, you can probably find baltic birch in that thickness and size. Look for a local Woodcraft or order off Amazon.
Even though the manual says that you can't use Dados, I have successfully used a set on this Dewalt model for 4 months with no issues.
Here is the Dado I have used Amazon Link
I think you can find cheaper Dado sets that will work as well. But I picked these up from a recommendation from a friend.
-Do I need a primer to paint MDF?
Yes
-Should I use glue or screws? Either way, what glue and what screws?
Depends on how much weight your looking to hold. Since I'm paranoid about stuff falling apart, I always pre-drill with a countersink drill bit (non-affiliated amazon link here), glue up, and use Deckmate Deck Screws to secure it.
The glue will hold, and the screws will secure it in place.
I would suggest priming/painting before assembling. Its hard to get into those inside corners once everything is put together.
The best part of MDF is its relatively cheap, so if you make a mistake, just start over and learn from it.
I would also HIGHLY suggest using a respirator (you should use one at all times when working with wood) and setting up some sort of dust collection. MDF is very very messy and can pretty much be like powder, especially when/if you use a router.
I have this little guy from Wen. IT works fine for wood and light metal use, but it's nothing heavy duty, you do need to be cognizant of it's limitations. It's also not variable or have a worklight, though I think the latter is easy enough to set up. I don't remember what I paid for it, but it wasn't the $90 currently listed on Amazon.
Maybe buy something like this https://www.amazon.com/MHMYDZ-Bracket-125mmX75mm-Decorative-Brackets/dp/B0768SH78H/ref=mp_s_a_1_76?dchild=1&keywords=table+top+fasteners&qid=1600151636&sr=8-76 and connect with vertical poles
Bullnose router bit + either a plunge router, or a jig to lower the router. Or, eyeball it if it doesn't need to be perfect.
You'll need to drill a pilot hole to the desired depth first; bullnose bits don't cut a small area directly in line with the bit.
EDIT: derp, bullnose is the opposite of what you want. You want this: https://www.amazon.com/Router-Double-Carbide-Tipped-Woodworking/dp/B07MJJVRQS
'Core box round nose bit'
I had the same question a few weeks ago. What I came up with is SPAR Urethane. Something like:
For cutting boards, I use food-grade mineral oil. You can then finish with beeswax or any other natural waxes. You can use butcher block oil, but it's just a combo of those two plus carnauba wax, but it's much more expensive. I think there are a couple other food-safe finishes, but I don't think any stains.
I started making cutting boards earlier this year and made enough mistakes that I really studied how to do it right. My first juice groove was a disaster!
I have a nice molded case that came with mine. But what I do for small router bits, and which would work just fine for 1/8" shank rotary tool bits, is stick them shaft-downwards in a piece of pluck foam. You don't need to pull out any of the pluck foam, they fit pretty nicely on their own inside the cut lines.
This is an example of pluck foam just searching the web shopping results
No worries! Yeah cutting out the tenon first will almost always lead to gaps, because you can’t test the fit as you slowly take off material. Cutting the mortice first allows you to cut your tenon oversized, and sneak up on a snug fit. Honestly, there’s no need to get a super expensive marking knife - this is what I use and it performs brilliantly. Plus the blade is easy to sharpen and replace if need be.
Try amazon smile to donate to a charity of your choice automatically at no cost to you!
https://smile.amazon.com/dp/B01D0LGNLU/ref=cm_sw_r_cp_api_i_5VmDFbST6313C
^^^I'm ^^^a ^^^bot ^^^and ^^^this ^^^action ^^^was ^^^performed ^^^automatically.
I wish I made the legs! I bought them on Amazon along with mounting hardware. The wood is red oak plywood with a dark walnut stain. The joinery is just pocket screws.
Edit: Here are the links to the legs and hardware I used.
https://smile.amazon.com/dp/B000BQU3Z0/ref=cm_sw_r_sms_api_i_fRhhFbD7BJTGH
https://smile.amazon.com/dp/B071DJQFY5/ref=cm_sw_r_sms_api_i_QShhFb
As far as Adirondack chairs are concerned, the best I've seen is from Norm at the New Yankee Workshop.
As for other furniture, tables, etc, paid plans are out there, a suggestion would be to google "Woodcraft Mazazine plans" which should be enough to get you started, they have reasonably priced plans. Once you get more experienced, you can translate knowledge of joinery and simply use pictures for inspiration. I've not used any plans for over 20 years.
Also, buy some books (I know, I know, very Boomerish...). Waring's book is excellent for newbies as well as the more experienced. https://lostartpress.com/products/the-essential-woodworker
Tage Frid's set is another resource I regularly refer to:https://www.amazon.com/Teaches-Woodworking-Joinery-Veneering-Finishing/dp/1561580686/ref=sr_1_5?keywords=tage+frid&qid=1578187666&s=books&sr=1-5
Norm Abrams' books with plans are pretty good for newbies as well, plenty available used on Amazon for cheap, he did 3 of them.
Lots to learn and lots of good resources to learn from are out there. Ana, well, god bless but she's a hack.
Interesting read. I recommend checking out Good Clean Fun by Nick Offerman (link). The first part of the book has some great beginner info and the rest of the book are projects, with humorous stories peppered throughout.
Looks good, they don't ship to Germany though. I thought about this plane
https://www.amazon.de/dp/B000LFTOE2/
And these sharpening stones, although I worry they might be too small?
https://www.amazon.de/DMT-Diamond-Whetstone-Mini-Diamantstein-extrafein/dp/B00004WFTD/
squaring aids are underrated IMO. I replaced an entire lower panel on my garage door, so it had to be square. My first one was a mess and ended up being a 30 dollar lesson in carpentry. For my next one I used extra techniques like planing and paying more attention to precision overall, but then using these guys clamped in for the glue up. They made all the difference and it came out really square and "professional".
Not OP - but it looks like candle cups. https://www.amazon.com/UUYYEO-Holders-Candlestick-Prevents-Dripping/dp/B09KTWCL9P/ref=sr_1_6?keywords=menorah+candle+cups&qid=1671464371&sr=8-6
You are never going to match the grain with a fill. Easiest option is to chop off 1" (the overhang), break the sharp corner left from the cut with some sandpaper, then add some topcoat to the end grain. Being end grain it will look different no matter what topcoat you use so this will help make the color match easier.
Next best option is to use a jigsaw and round off both corners but if done properly might end up looking terrible. Some risk, but a little better payoff. You can also buy a rasp and create the round by hand which IMO is rather fun and you would have plenty of control. This Japanese Shinto rasp would be perfect. Find something with the correct radius you want (maybe the bottom of a can of peaches ?) to draw a radius, then work your way to it.
Kind of a mess but here is mine. The https://www.amazon.com/Robert-Sorby-840FH-3-Fingernail-Spindle/dp/B0036B2NIM/ref=asc_df_B0036B2NIM/?tag=hyprod-20&linkCode=df0&hvadid=309813767497&hvpos=&hvnetw=g&hvrand=11444310578061188131&hvpone=&hvptwo=&hvqmt=&hvdev=m&hvdvcmdl=&hvlocint=&hvlocphy=9012267&hvtargid=pla-571991617198&psc=1bench on the right has wheels and can be moved around.
Voltage drop would be the big concern. For that length, I would go no smaller than a 10ga cord, and an 8ga would probably be better.
You can see here that such cord is not cheap, so the shorter the length the better, both for cost, and voltage drop.
https://www.amazon.com/Painters-Pyramid-Stands-Yellow-KM1257/dp/B003L2DDAI
Or if you want to roll your own, Take a bunch of finish nails, hammer through and use that "bed of nails" to hold up your wet side.
Make it a simple project if you plan to make lots of boards. Just get a few pieces of scrap wood, drill some holes in it and glue in some vertical half inch (or any size really) dowels. Something like this maybe.
https://www.amazon.com/Goodsdeco-Wooden-Dish-Rack-Countertop/dp/B09SLKRNC1
Could even skip the dowels and just use square stock if that's easier.
I have the same router so understand your question. I think what you are supposed to do is adjust the router depth so the collet sticks out beyond the plate. But mine is semi-permanently installed in a router table so I typically don't do this. Instead, I stick the smaller wrench on the flats and use the walls of the access hole/area as a way to hold the smaller wrench while I turn the larger wrench. You can also get both wrenches on at the same time in the shape of a 'V' and then squeeze both wrenches with you hand.
You can also get recessed/angled wrenches like this that will reach from the top of the router table.
u/b1ghurt
That's funny, if I had taken pictures of all the failed attempts at that handle the knife would have never been in the frame. Well okay, maybe 5 or so. Still really frustrating. I had a drill press, but I did not have the right size drill bits at 1st, and melted at least three basic dewalt 7/16 bits trying to get through three holes before I broke down and ordered a set of cobalt carbide drill bits and just took my time not allowing the new harder bits to get to hot.
Then the holes for the fasteners presented a new issue, the fasteners were so slightly larger or smaller than my bits and my step up bits. But I saw a trick on a YouTube channel where someone put one of the brass fasteners in a hand drill and ground it down on sand paper, and that took a while to get all three just right, then to use the step up bits to the correct depth without going all the way through.
And like you, I used a Dremel tool to shape the final curves, but that also can leave burn marks. Then sanding it down to 320 on the handle , but 600+ on the brass pins. Did you post yours?, I'd like to see it.
No problem. The other thing I will add is that decent chisels are only half of the battle. Sharpening is the other half.
At a minimum, get one of the $20 wheel-bearing guided thing like this, to help you hold it at the proper angles.
It’s very hard, imo, to hand sharpen smaller chisels, without it one of these.
As you go on your journey, eventually consider investing in some really nice stones. If you get a whole system, and really take care of them, they can last essentially a lifetime, depending on how old you are.
Good tools usually save money long term, and leave you with far less frustration.
Yes and yes, if that makes sense. With time and effort you can get this sharp… though sharp, square, and with the back flat is not a certainty.
You should also look into mid-tier nicer chisels. I recommend this set to everyone I know who is in the market. I’ve used them for over a year and they were a game changer for me.
Narex is a solid brand. They come out to about $15 a chisel, and you get the four most common sizes. Mine didn’t take much work to flatten the back, they sharpen fairly quickly, and hold an edge decently well. They also strop well.
Yes, you can spend a lot more for even nicer chisels, but for most people on this sub, this is, imo, the perfect “step up” chisel set. Sure, there is no fancy case (but you get to make your own holder as a fun project!), and they don’t have a cool name like Two Cherries, or Richter, but they also don’t break the bank.
I’m pretty sure they also sell them individually if you don’t want all four.