
What are
/r/FixMyPrint's
favorite Products & Services?
From 3.5 billion Reddit comments
The most popular Products mentioned in /r/FixMyPrint:


![Redrex Ender 3 Extruder Bowden Aluminum Upgraded with 40 Teeth MK8 Drive Gear Kit Compatible with Creality Ender 3V2 /Ender 3 Pro/CR-10 Series and Other Reprap Prusa 3D Printers [Right Hand]](https://m.media-amazon.com/images/I/41rxL1V9n9L._SL500_.jpg)


The most popular Services mentioned in /r/FixMyPrint:
Thingiverse
Cults.
Autodesk Tinkercad
PrusaSlicer
FileDropper.com
Youmagine
Gofile.io
imgbox
Snipboard
SD Card Formatter
ImgPile
Repetier
HackADay
hastebin
Google Groups
The most popular reviews in /r/FixMyPrint:
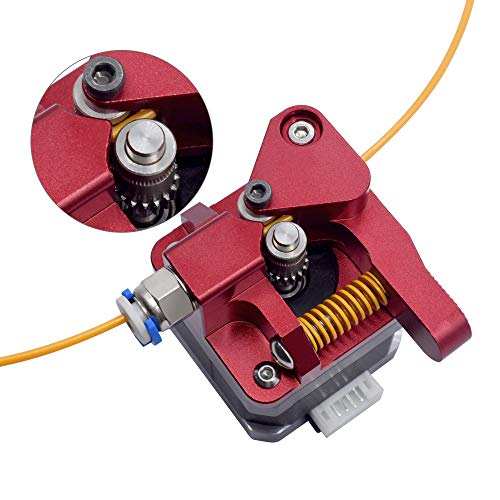
Not just common, it’s inevitable. The plastic ones all break at some point, I would get the red aluminum one off of amazon. here
This ^ Rust-Oleum 260510 Automotive 2 In 1 Filler and Sandable Primer Spray Paint, 12 oz, Gray https://www.amazon.com/dp/B006ZLQ4HQ/ref=cm_sw_r_cp_api_i_qD7gFb441PTMW Do a few layers of this and then sand it down.. this stuff is made to be sanded
This is an extrusion problem. It’s hard to tell for sure if you’re under or over extruding, but i’m inclined to go with the former based on what i can see. If you havent done a single-wall cube test to calibrate your extruder, you should. Here’s a guide I made on thingiverse:
https://www.thingiverse.com/thing:3144345
I now recommend getting a proper micrometer for this test, rather than calipers as I recommend in the writeup. Here’s the micrometer I recently began using for calibration:
https://www.amazon.com/dp/B07DNNX9Y3/ref=cm_sw_r_cp_api_i_k8rDDb0F06VXH
If you dont want to spend the money on a micrometer (worth every penny if you’re going to keep printing for a while) then you may also tune with your naked eye by printing small calibration prints (i recommend a benchy or 12) and adjusting the extrusion multiplier based on the surface quality you see. This is obviously less precise and can be quite frustrating for inexperienced users.
Yea it shouldn't touch at all. I can't tell from this photo but I'm going to bet the bed isn't perfectly level....and it NEEDS to be for this print
Make sure you don't use the same paper over and over for the leveling. Level it loose.
Did the test print have elephant foot? Cause that answers the situation
I had an issue with pimples mid print which was a temp issue with the filament
This print is critical for perfect everything, it's annoying but a great challenge.
Side tip: 8$ on amazon get a gap gauge it's a literal life changer amazon link
I just went with this. Some swear you should get a dual gear extruder, but since what I had performed adequately other than the plastic cracking, I didn't see much need for that.
You can hear it when you're printing. It can have all sorts of bad effects on your print.
If you put your ear close you can hear little pops, when the moisture turns to steam in the hot end.
I'm not even in a high humidity area, but I already have to store my filament in bags with dessicant or else I have to trash it after 6 months, but now sometimes I use filament that's 4 or 5 years old.
I use reusable dessicant like this: https://www.amazon.com/Dry-Desiccant-Indicating-Industry-Standard/dp/B01I5Y2DG6 and gallon ziplock bags (but some people have special dry boxes).
Thanks is this what you are referring to?
Do yourself a favor OP, get yourself a bit screwdriver and never look back.
Yes, coincidentally (maybe done intentionally), standard nozzles are the same size of a regular tool bit. This has been the easiest way to remove a nozzle once I figured it out after my 3D Printer's cheap little nozzle wrench got chewed up from trying to crank on the handle after I apparently gorilla tightened it with the strength of a 1,000 gods. Also, pro tip, only remove a nozzle after heating it up (despite what cautions say) for thermal expansion reasons and so the plastic in the nozzle can loosen it's grip.
Especially with composites like the wood or granite PLAs. I know I had a lot of frustration with both, where I ended figuring out I had to change the nozzle between pretty much every single print.
Almost no bed is perfectly flat. In many cases good leveling can reduce or eliminate the artifacts caused by this, but in bad cases you can either invest in an ABL sensor or perform a mesh bed level. These are both advanced fixes, but after doing either one you will likely not have to worry about bed level for a long time.
when i print planters, i use so-called "vase mode". in cura i think that's "spiralize contour" or similar? i'm not in my lab just now to check.
​
it helps to use a fat nozzle (i use 0.8mm). printing like this makes a single layer bottom and walls, with no top. some planter designs are compatible with printing in this manner already, but others require extra work.
​
i created and shared some self-watering designs a year back meant to be printed in this manner to prevent any leaks from z-seams. they've proven to work well for me, i have basil and fennel still growing in window sills today. the larger "double" size is definitely the better design. they are available on thinkgiverse and cults3d:
Easy self watering pot by bitflung - Thingiverse
Download free STL file Easy self watering pot • 3D printable design ・ Cults (cults3d.com)
The way you orientate your model can reduce warping. This guy did a good demonstration about modeling practices to reduce abs warping.
http://hackaday.com/2011/11/15/a-technique-to-avoid-warping-on-large-3d-prints/
You can use those terminals to run a MOSFET for bed heating or hotends, assuming it still works. Might want to do that to prevent future catastrophic damage. That takes the current off those terminals and components and offloads it to a dedicated pcb with heavier-duty terminals. You can sometimes relocate them outside the enclosure or in a forced air path for better cooling too. https://www.amazon.com/dp/B077GPZZS6/ref=cm_sw_r_cp_apa_glt_fabc_CXH5Z0Q97KGFZ590G6FV
Confirming what the other posts have said. It depends on the filament, ambient humidity, and how well it's stored. I'm in the Chicagoland area so we get some pretty high humidity during the summer but very low humidity during the winter. I use a plug in dehumidifier similar to but larger than this one (Looks like they stopped making the exact one I own) and an air tight plastic box. I have some ~4 year old PLA that prints well enough.
Everyone else has already mentioned it, but I’ll say it too, just for redundancy’s sake. Get yourself an UPS. I have one on every sensitive device I own. Both PCs, home theater system (except the sub), both 3D printers, home lab.... hell, I even put a cheap one on the router that has to be in its own room because idiots designed my home.
We live out in the countryside. Our electricity flickers hard enough to trip all the devices at least 3x/week, so it’s a flat out necessity for us.
CyberPower CP1500PFCLCD PFC Sinewave UPS System, 1500VA/1000W, 12 Outlets, AVR, Mini Tower, Black https://www.amazon.com/dp/B00429N19W/ref=cm_sw_r_cp_api_glt_fabc_EDQS5YD3MHWRM04N7T2Q
This is the one I’ve got on my printer and it will run it in a blackout for a solid hour and a half (at PLA temps, that is...)
Mika3d i believe?
This was all a Xmas gift but I think everything came from Amazon. I've been loving it, when my printer does what it's supposed to lol.
Edit: here ya go
https://www.amazon.com/dp/B07JMRNHVS/ref=cm_sw_r_cp_apa_fabc_1i2aGb26VFCBW
I've got all 3 metallic colors in various Fix My Print posts, let my constant failure be your filament showroom if nothing else.
I asked a friend what his kids favorite pokemon are (they are obsessed and have no idea this is coming)
He replied and I left him in the dark after that.
I found a cool stl file of a pokeball on thingiverse
Printed 4, and inside each was supposed to go the favorite pokemon of each kid, plus some extra neat prints I've made.
However I had a problem printing one of the files and reached out to both r/fixmyprint and r/pokemon for help asking the 3d printing community how to modify the files to make it work better and the pokemon community for help on a backstory explaining greninja's size.
Both subs came through as very very helpful and I appreciate you so much, you are really gonna make some kids very happy!
Inside the box I used a Japanese candy/snack surprise package from Amazon as packing material which I thought was really cute
Anyways I just wanted to thank this sub for helping to make this project come together. I'm very excited to see the reaction of these kids!
Check out the google groups for a good list of upgrades.
https://groups.google.com/forum/m/?fromgroups#!topic/wanhao-printer-3d/pjWof2uIkNE
I believe that what Jetguy (the 3d printer guru over there) did was place some washers and locking nuts under the headbed inside the spring. (Hard to explain but he has a video for the mod). In addition he removed one of the x carriage bearing mounts to reduce weight. In any case there is a good list of cheap easy mods put together that drastically improve print quality. Go check it out.
As others say, it's the distance from nozzle to bed.
Look up the paper leveling method and do that to get close.
Then use something like this and as it prints, slide your finger over the printed line. If it moves, carefully turn the wheel just a bit to the left on that corner and snatch what has already printed. Repeat this on each corner until you get a nice even line all around. Too close will squeeze out material with the nozzle making a 'V' groove and much too close can scratch your bed. Remember, right is tight and left is loose except when you're behind it. So in this case right is loose and left is tight.
Good luck.
Your issue is exactly what #22 of this cults3d page describes . Tuning the driver to match the motor may be the solution.
In addition to what the other guys are saying, make sure you have a cooling fan blowing on the print. Your photo reminds me of this: http://hackaday.com/2016/01/29/keep-your-nozzle-hot-and-your-prints-cool/
I keep printing this until the hot-end doesn't drag through the material anymore, and the corners doesn't curl upwards. It's taken a lot of trial and error, but now I'm finally printing with consistent results.
This is one of those really good ideas that I'm wondering why I didn't think of sooner. Gonna try ~~this one~~ the 30 degree part from this one when the PID tune is done.
I'm not that expert in 3d printing, and I don't really know if the 200% flow could be an issue as other people mentioned in the comments, but I had the same problem with my Ender 3.
I don't know what printer do you have, but on my Ender 3 the spring that pushes the filament against the extruder motor wasn't strong enough and sometimes it couldn't push the filament through the hotend, so I bought a replacement on Amazon which is a dual gear setup and it also wears out the filament way less than it did before.
Edit: I just read you don't have an Ender 3, my bad, but maybe you might have the same problem...
If you have a free corner then this is what I use Container
Also you could look into building the prusa enclosure V2 and put that in the corner instead. 3d printers emit micro plastics that are NOT good for your lungs. And you will need and enclosure anyways for PETG. I strongly recommend not to print in your bed room. And I also recommend printing with a HEPA filter fan running. Here's a great video covering the emissions of microplastics. Video
I have a office I print my ender 3 v2 clone in with a HEPA filter fan and the prusa enclosure. It makes me feel better about the health risks.
This is the one I used until I went with a direct drive setup. Any of the aluminum dual-gear ones should work fine
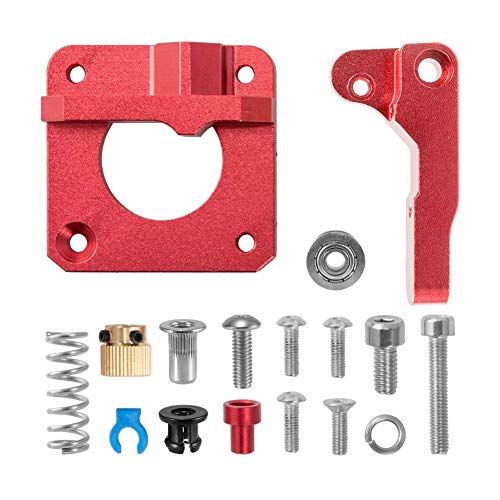
I had the little handle crack and then I decided to change it for a metal extruder and took advantage to make sure it was dual gear. This is what I got and its been working just fine:
It's worth noting that that is only a single drive extruder. But this kit has everything mentioned, and it's Dual Drive.
The single drive is good, it's what I have on my CR10, but it has noticably more slippage than my dual drive.
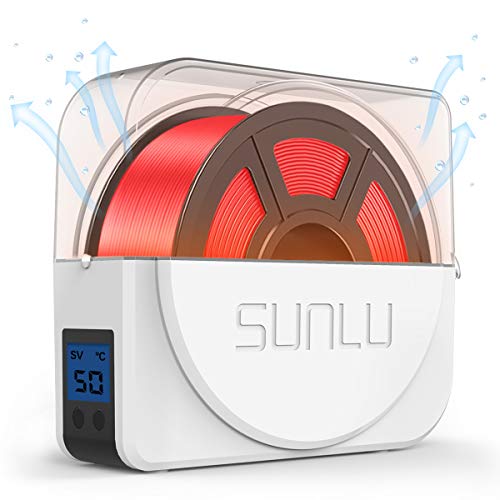
I’ve found that Hatchbox comes pretty properly dried, but some others come vacuum sealed with a desiccant and still loaded with moisture. Hygrometers and a dehydrator helped me get rid of most stringing issues. My oven is too hot for PLA, so I had to break down and buy a small dehydrator for about $35.
You can tighten the screw if it's not all the way in already. Make sure the arm in the extruder is not broken, the plastic version that ships with stock breaks easily. That was my problem, took me a long time to see it. You can upgrade to the metal extruder, it's not very expensive. It grips the filament a lot better.
https://smile.amazon.com/dp/B081DN6RM2?psc=1&ref=ppx\_yo2\_dt\_b\_product\_details
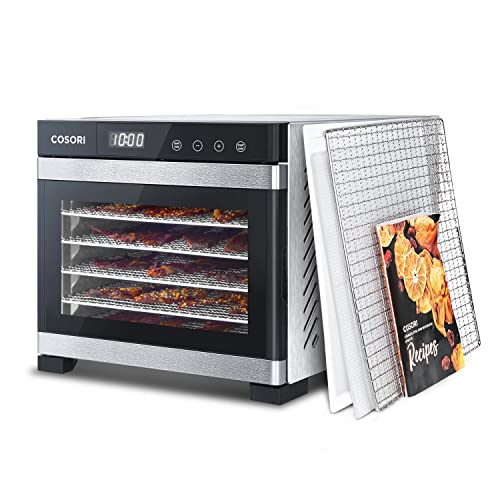
Does your oven have the ability to regulate very low temperatures? You need to sustain 65c/150f for probably 6 to 8 hours, but if your oven runs too hot you can have the filament start sticking together (iirc around ~80c) or you can have the spool itself warp and “pinch” the filament so it gets stuck trying to unwind. If you have access to a food dehydrator they’re usually a good way to do the task, I own this model myself. There is a cheaper ($40ish) round dehydrator that is commonly used as well, and rebranded as one of the specialty filament versions.
If you don’t want to buy something and just want a free fix, you can bake the little bags of dessicant that come with the filament rolls at a much higher temp to dry them, and when cooled you can add them in a ziplock with the problem roll, and put it in a warm spot in the sun/in a car/whatever and get the moisture to move out of the roll so the dessicant can soak it up. Free, but will take a day or two to really dry stuff like this, and you may need to dry your dessicant a few times depending on how much you have around.
How fast moisture gets absorbed is heavily dependent on both temp and the ambient humidity in your printing location, HOWEVER... I can tell you from experience that at an approximate 50% humidity in my house my PETG spool starts to print exactly like this by about the end of the first week.
I got sick of the battle and purchased a relatively cheap ($99) food dehydrator that I can fit a couple spools inside. I've since learned that a single spool at a time in an even cheaper model would have probably been totally fine too. I store my spool in either a box with some color indicating silica gel, or just back in the zipper bags they usually come in, with little desiccant gel packs.
If you're stuck, and just want to get your current spool re-dryed, as-is, there's a couple ways you can go about it. If you have any way to maintain a controlled temperate around 55c to 60c, such as a fancier digital oven or food dryer, that's the optimal method. If you don't have something so well controlled at a safe drying temperature, my second option would be to get ahold of some desiccant packets in any manner, even if they've been stored in the open, as you can throw those in your standard kitchen oven on it's lowest temp setting (usually safe even as high as 150C (~300F) if that's as low as you can get) for a couple hours, then let them cool back off, and put them in a ziplock bag with your spool, then put the whole bag of spool in the sun or maybe on your printer bed at 60c with a cardboard box over the top. Anywhere you can warm it up to drive out the moisture so the desiccant can soak it out of the air in the bag.
You need a multimeter with a resistance measurement function like this one:
https://www.amazon.com/Multimeter-Auto-Ranging-Klein-Tools-MM400/dp/B018EXZO8M/ref=sr_1_9?dchild=1&keywords=multimeter&qid=1619668832&sr=8-9
There are other cheaper ones, but this was the first one that I found when searched.
I have the EXACT same problem with my Ender 3 v2 and BLtouch. Exactly the same, even the intermittent errors that just blink. It’s done the bed ramming during the auto home a few times now.
Maybe we can narrow down the source of the problem. My BLtouch is this one, what about yours? https://www.amazon.com/Creality-BLTouch-Upgraded-Leveling-Mainboard/dp/B08L9DHP5R
I’m using Smith3D firmware, although previously I used the stock Creality BLTouch firmware and experienced the same problem.
Let me know! I can’t imagine what the problem could be. I checked the wiring and it looks okay. I’ve heard something about how it could be interference in the cabling? But idk. This sucks
I prefer a chisel and a combo file (round on one side, flat on the other) to do the post processing. The 45 degree beveled chisel in the Octave set is my favorite.
Don't worry about the cuts when you slip. The scars will hardly be noticeable 4 weeks later.
Yup ^^^. Make sure it’s the V2 though (Amazon link: [https://www.amazon.com/dp/B088W6517D](BIGTREETECH SKR Mini E3 V2.0)). Although don’t buy the color TFT IMO—it’s not as useful as you’d think if you use Octoprint or anything similar.
I do love the color of the filament! It's this one: https://www.amazon.com/dp/B01EKEMN9W/ref=cm_sw_r_cp_apa_fabc_72J27AGTQY3ZRJWZ6X7X?_encoding=UTF8&psc=1
Google would probably want me to also give the pixel 5 credit lol
I bought this one: https://www.amazon.com/dp/B08B6B5SMG/ref=cm_sw_r_cp_apa_fabc_XNBCWYR3TPYN1VYZTV13?_encoding=UTF8&psc=1
It has everything for the V2 and extra pieces I assume are for the ender 5 plus the top rod holders that I've read shouldn't be installed. Fairly straight forward to install, I just added it tonight so can't comment on the improvement yet. I'll update either way! I'm thinking it'll probably just increase the time between having to re-level the gantry and improve the results when I eventually go direct drive extruder.
Preciva Crimper Plier Set, 0.25-10mm²/AWG23-10 Self-Adjustable Ratchat Wire Crimping Tool with 1200 Wire Terminal Crimp Connectors and Wire End Ferrules (Crimping Tool+1200 terminals) https://www.amazon.co.uk/dp/B073TZ5BBG/ref=cm_sw_r_cp_api_fabc_D7WZH0PW25R43T28X4RP
Ahh the 'Insufficient bed clips vs great print bed adhesion' issue.
I'd moved mine into a heated cabinet... and this was my first heated cabinet print.
Also I've found that the picture frame clips hold much better, since I can use 8 to 16 instead of just 4 to keep the glass in place. Send me a DM if you're in the US and I'll snail you some, 120 is a lifetime supply otherwise.
I know I was super skeptical as well! But it’s awesome, it prevents the print from sticking to the FEP, but doesn’t impede it. Here’s my process after every 5 or 6 prints, it may seem a bit crazy but since I’ve done it all my prints have been amazing.
Drain any resin out of the vat with a strainer to get any bits and pieces out
Spray cleaner on FEP and vat and clean and dry, inspecting FEP for tears or stick on resin. Address those as needed.
Let dry then put a little bit of this grease on the FEP inside the vat: 3-IN-ONE - 120032 Multi-Purpose... https://www.amazon.com/dp/B00J25JDDY?ref=ppx_pop_mob_ap_share
Rub with paper towel it will look filmy but that’s ok.
Replace vat and fill, do a print and slow down your pull up speed too.
For prints I use chitubox and add a ton of supports even if it’s overkill and then tadaa!
Good luck!
Excellent suggestions already made. Also get a GOOD pair of sprue clippers. I have these :
Many "mistakes" can be nipped off and sanded. Use them ONLY for plastic prints to keep them sharp.
Great - no idea what you call great - I got this roll - https://www.amazon.com/gp/product/B08974S1CC/ - and seems to be fine. I guess Gates belts would be the "best" not sure.
You need something like this. However, you can find cheaper ones from where you are I guess.
So honestly this is what I would do personally, I was shocked when you stated 800 watts but a 400x400 bed does require quite a bit of power to heat up. I would invest in a silicone heater (115 or 220 volt) and SSR, they will heat up a hell of a lot quicker. My 300x 300 bed takes under 2 minutes to heat up to 100C. And buy a smaller power supply for your steppers and electronics. And you might come out ahead on price I found one a 800 watt PS on Amazon for 76 dollars. I think I paid 10 bucks for my 300mm silicone heater may from Alibaba. And a SSR would be 10-20 bucks as well. Good luck !
No, you are not wrong on the temp. I just got some eSun PLA+ and the pamphlet that came with it said sweet spot is 210-215. At the end of the day though what really matters is how the model looks. For what its worth, I'm currently printing with eSun PLA+ pink at 215 and I'm not having any drooping issues.
From the product page here
> PLA PRO(PLA+) print temperature is about 20 Celsius higher than regular PLA. Most users print at around 210 to 215 Celsius.
This set includes a shorter one to compensate for the height of the plastic mount on the back left screw on an ender 3 and probably others
Possibly. It has more to do with moisture clinging to the outside of the filament. Nylon actually absorbs water, so you need to keep it super dry all the time. PLA is the least affected of common materials, but it will still suffer performance issues because of this.
My advice is get an airtight container/box and get a big pail of desiccant off of Amazon. Dump a bunch into the container so you have about an inch of desiccant on the bottom. Then just put your spools in their and keep it shut unless you need to get a different spool out. This can recondition material over the course of a week as well. Nylon would probably need a professional dryer of some sort, similar to what injection molding companies use to dry their plastic pellets before using them. I haven't had to dry nylon yet, but I would think that's what you'd have to do.
Not that I recall, but I bought a pretty early version of the Monoprice Maker Select when they dropped the price a few years ago, and the glass bed was one of my first additions.
The mod isn't difficult. I had a 16"x24" piece of window glass cut into four 8" squares. They did it at the hardware store (Lowe's iirc) for no extra charge.
The squares lay on the bed using four 1" (or so) thermal pads. I bought a sheet of the stuff from Amazon and just cut what I needed. It occasionally tears, so I replace it a couple of times per year. Using the thermal pad eliminates the need for binder clips or something more elaborate to hold the glass on the printer's bed.
The Z-Stop adjuster I used is so old that I probably wouldn't use it today. Just search Thingiverse and pick one you like. There are some nice designs out there.
Here's the process I would follow:
- Install the z-stop adjuster and raise it all the way up.
- Adjust the bed so that you are at the mid-point of the adjustment screws
- Put the thermal pad on the corners of the bed
- Put the glass on the thermal pad
- Adjust the Z-Stop so that it activates just before your nozzle hits the bed
- Level the bed like you normally would - by adjusting the four screws at the corners
​
If you want to try buying the same filament that comes with the printers. The brand is CCTREE transparent on Amazon. Sorry can't help much with your problem. These printers/slicers are so finicky.
CCTREE 1.75mm PLA 3D Printer Filament Accuracy +/- 0.03 mm 1kg Spool (2.2lbs) for Creality CR-10S, Transparent https://www.amazon.com/dp/B074KCHMLM/ref=cm_sw_r_cp_apa_dDf6Bb9N5GY59
Its hard to say. I don't know anything about that printer, and I wasn't able to find info on it either. Its possible that this stepper might work for instance, but its hard to say for absolute certain.
So I just checked again, and I think that amazon stepper I linked before might have the wrong plug. If you don't want to deal with wiring, I think this one has the correct plug.
It looks like this hot end setup may work. It's kind of expensive, so you might try looking around to see if there's anything similar.
https://www.amazon.com/Hexagon-100Kohm-Thermistor-Lulzbot-Printer/dp/B07QGN3DS6
If you have a drill and can get a left-hand drill bit of the right size, you may be able to drill out the remains of the old nozzle without damaging the threads. All you really need is a new hot end block and a new nozzle. There are hundreds of these on Amazon and other sites -- look carefully at the existing one and find one that looks like it will fit.
As for what nozzle will fit, you want one that has the same screw thread as your heat block (most do seem to use the same size), accepts 1.75mm filament (if that's what you use now), and has the right nozzle diameter (0.4mm by default, which is a good compromise value and is probably what 90% of people run, including me.)
Yes, the length and quality of the mini usb. I haven't tried the blue cable with my SKR mini because I've had success with this cable: https://smile.amazon.com/gp/product/B01N5PHSJE/ref=ppx_yo_dt_b_search_asin_title?ie=UTF8&psc=1
I know the cable can be problematic, longer cables have impacted my prints. I would think the short blue cable would be sufficient. When I had my problem originally, I watched the print and could see it pause and extrude while waiting for the next command to be received. When I printed the print again, the blobs and zits were in different locations, which also helped me diagnose it wasn't a slicing error, rather something physical.
I Used these https://www.amazon.com/dp/B07DC2CV6T?ref=pd_basp_dp_primary
And This
https://www.amazon.com/dp/B07XYQ4KJ9?ref=pd_basp_dp_primary
Make sure the nuts have they same pitch and lead as your rods
They also make silicone covers for the heater blocks so you can more easily take the plastic off if it happens in the future:
FYSETC 3D Printer Parts MP Select Mini V2 Silicone Sock BP6 Heater Block Silicone Cover Hotend Protect for Anycub V5 Hotend/Monoprice MP Select Mini V2/ MP Mini Delta, 3Pcs https://www.amazon.com/dp/B07T6L36G8/ref=cm_sw_r_cp_api_i_MbEgFbE9V1VAQ
Try picking up a can of unscented, extra strength hairspray! On my glass bed, after forming a thin layer, I only needed to give it a light spray every 5-10 prints in order to get great adhesion with PLA and PETG. Depending on the type of filament or the prints, I would have to respray more often, but only rarely.
It takes seconds to do a quick misting of the build plate before a print. The only slight frustration was cleaning the plate after half a year of prints, though that really isn't that bad either. All it takes is hot water running over it for a minute or so to loosen up the (kinda gross) layer of hairspray that had built up.
Two cans will usually last me an entire year of occasional printing. I use White Rain, though I'm sure others can be used to the same effect.
if that still doesn't work you can always try elmers glue sticks or hairspray. i had that issue with the stock bed. I no longer have that issue since I got a creality brand glass bed. They're on amazon here. I highly recommend it. I have mine adhered to the bed with spray adhesive instead of clips and it works great.
I am printing basic red PLA. https://smile.amazon.com/dp/B09XH2C9HV Cura settings are in the second link but I am printing almost exactly stock except I upped temp to 205c and set z seam to random.
The tube is completely clear no blockage. Also I did try a new tube I just switched back to see if that was the issue.
I have 2 other filaments matte white PLA and black PETG this happens with both as well.
I don't have a way to use octoprint at this time I could set it up later though but I could try a different sd card.
I’ve had this issue and the two things that worked for me:
1) clean your nozzle
2) make sure your filament is dry enough. Easy way to check is to get something likethis on amazon the humidity indicator cards will help you get an idea of the moisture in your filament
I guess that could be a problem with the cheap brass nozzle that come with the printer. I stop using them after a few months and several nozzles. Switch to these. https://www.amazon.com/gp/product/B08NW2B8GB/ref=ox_sc_saved_image_4?smid=AJUKUXZVPYM6H&th=1 The only time I had a problem with that nozzle was when the brass gear wore out and got a jam.
Works better and last longer. I print alot and switch to the steel gears. Wearing out the brass gears is not that uncommon.
Honestly I did the DIY enclosure thing but in the end it's more economical to get a pre-made enclosure from Amazon or something, like this one. By the time you've paid for materials, hardware, and spent the time putting something together you'll have something inferior to an out-of-box solution like this. Plus, this has some level of fire-resistance and a reflective surface on the inside to help with temps.
PLA 220 using the below filament. I've done a few test prints and the color looked alot better, but this was a long running one. The lines are really pronounced and the color is only correct towards the top. Is this because its probably too hot? The temp tower I did looked the best around 220, and I tested the flow with a cube and it seemed fine at the time.
​
https://www.amazon.com/dp/B09YVKK6PV?ref=ppx\_yo2ov\_dt\_b\_product\_details&th=1
The print was sliced with Prusa slicer 2.5 and Prusa mini+ (using Arachne and using concentric infill). The nozzle is 0.4 and the profile was 0.2 quality.
Regarding the Filament, it is a polymaker army red and it used a 60 ºC bed temp and 220 ºC for the first layer, and 1.02 extrusion multiplier.
​
Regarding the retraction values, it uses the default of the printer which is 70mm/s retraction speed and 40mm detraction speed (with a 3.2mm distance).
As you can see in the photos it looks like the main problem is in the infill.
Which attributes should I try to change to fix it? Also is there any test so I can adjust this?
Anything is fixable, but for the cost of a completely new hot end with heater and RTD installed already ($25), why bother?
I think this is due to some sort of nozzle clog, though I did just switch from my stock extruder to this https://www.amazon.com/Extruder-Printer-Upgraded-Creality-Anycubic/dp/B08B4FRR5F/ref=asc_df_B08B4FRR5F/?tag=hyprod-20&linkCode=df0&hvadid=459517264276&hvpos=&hvnetw=g&hvrand=6583989756330857526&hvpone=&hvptwo=&hvqmt...
Yeah. Yeah. This makes sense. Specifically, you can accommodate low temps somewhat by slowing down the lift-speed. Low temperatures cause the resin to be more viscous, which means less detail. For large areas, it means inconsistent resin density, as it doesn't have sufficient time to squeeze around evenly.
Slower Z lift-speed, more lift-distance, and more LCD-off delay are some of the tools available to deal with cold temperatures.
Meanwhile, I haven't done prints on the same scale as you're doing here, but I'm generally printing indoors at roughly the same temp as you, 71F to 74F, with the Anycubic Tough Resin: https://www.amazon.com/gp/product/B096ML9SN3
I recommend you invest in a set of feeler gauges. Something like these.
They make a world of difference during bed leveling. Having a solid, repeatable tool that you can use over and over is very helpful.
I have identified the thickness that gives me the best results for my first layer and I just pull it out every time I want to do a bed level. Nozzle height is dead on every time.
You can also try to get a PEI sheet for you bed.
I know it not the same machine and bed. But just as an example. Got one of these for my ender 5 2 years ago. Only when my bed is not leveled I get prints that do not stick.
Printer Creality Ender-33 s1
Creality pla Grey https://www.amazon.ca/gp/product/B088T6TVFR/ref=ppx_yo_dt_b_asin_title_o04_s00?ie=UTF8&psc=1
Nozel temp 215
Bed 70
Retraction 40mm/s
Print speed 50mm/s
So the lower layer lines look really stringy. even under support. A benchy was printed with this and no noticable issues similar to this.
I've got one of these and it's perfect. I've got a couple but that one is the cheapest and I'm happy with it.
Sprint steel weighs a lot less so you're less likely to get ringing, so you can print a bit faster. I think it sticks better too, and it's easier to remove prints. I was printing keychains on my glass bed for a bit and since they're thin I'd have to wait for the whole thing to cool down to get them off. Huge pain. With the PEI you just flex it and the print pops off.
I was having so many issues with the CR touch on my e3 S1 Pro. I finally caved and picked up this from Chep,
https://www.amazon.com/Filament-Friday-Leveler-Electronic-Leveling/dp/B09S173CVK/ref=asc_df_B09S173CVK/?tag=hyprod-20&linkCode=df0&hvadid=564933863206&hvpos=&hvnetw=g&hvrand=9765925295052132715&hvpone=&hvptwo=&hvqmt=&hvdev=c&hvdvcmdl=&hvlocint=&hvlocphy=9030250&hvtargid=pla-1651426026473&psc=1
​
I just use this once every couple weeks instead of the CR touch, works much easier. Depends if the hassle is worth $25 to you though lol.
I fixed the same type of issue just last week. I purchased a small $6 tube of synthetic grease containing PTFE and applied it to the lead screws on my z-axes. Here's the one I purchased off Amazon.
For good measure, be sure to min/max the bed up and down the axis a couple times once it's applied to make sure the threading is properly lubricated and you'll be good to go.
FYI, you shouldn't be soldering those wires (or stranded wires in general). The inflexibility of a soldered joint creates a stress point and the wire will fail prematurely.
You have a few options for replacing the stock thermistor that don't involve soldering.
You can buy a replacement thermistor with sufficient cable length. They are usually quite inexpensive so this is probably the easiest choice.
If you want to use the thermistor that came with your hotend you can do one of two things:
- Buy pre-made extension cable with JST-XH connectors. Something like this should work.
- Make extension cable with JST-XH connectors. You'll need a crimping tool which will probably come in handy for other cable-making needs. Be sure to get the pliers type like IWISS IWS-2820M (good budget pick) or Engineer PA-21 (upgrade pick but still affordable).
Good suggestion.
The fan is definitely running, so I think it's probably working correctly. Is there an effective way to test it, or is the fact that it's running a pretty good indication?
I did install a different heat break a while back. Could that be an issue? It seems unlikely to me, but I am far, far from expert.
I use something like this. The exacto can only do so much, the heat makes it butter. Sometimes it's that quick swipe while it's printing to clean up a spot that could be a problem. Usually it's a string on my wipe tower, or my support filament that bundles up on a raft print where the nozzle will hit it the next few layers.
Make sure you check the knives heat temp ranges and settings before you buy. I just copied a cheaper one on amazon. No good when it's too low. And some without a heat control will go too hot.
Have you tried the print with a different filament?
BTW I printed that articulated dragon with this stuff and it looks incredible.
here’s the link on Amazon I asked on another subreddit and someone suggested that my Teflon tube was broken which was casing filament to leak and burn
All stepper motors are stock for the A8 Plus so I imagine the same as the A8. I have replaced the Y belt with a GT2 with 2mm pitch so no change there. https://www.amazon.com/gp/product/B07BRKZGMS/ref=ppx_yo_dt_b_search_asin_title?ie=UTF8&psc=1
I went to try and print the skew print for klipper and the 50mm piece and 100mm piece kept coming out larger than 50mm.
I also bought a califlour calibration tool from Vector3D and the 100mm measured out to 124mm
So I did the rotation on X,Y,Z
I believe the stock rotation distance for X and Y was 30 or 32, right now on X=39.795 on Y=39.472
Don't remember what Z was but I have it at 8
I had some sunlu petg that printed ok on my glass bed then I bought some hatchbox that pretty much cost me hours trying to get it to adhere to a glass bed. Then I found out about g10 and it freaking worked perfectly. JUSTHANGIN' Garolite G10 3D... https://www.amazon.com/dp/B09VX6KDGN?ref=ppx_pop_mob_ap_share
My settings were 240/58 and the first layer was dang near perfect. I also used some elmer glue stick on the bed as well. Very happy with the results.
I'm a bit late here, but I was experiencing a similar issue with my dual z printer. After watching the leadscrews operate, I realized that they were pushing my x-carriage around. So while looking for new rod couplers, I discovered Oldham Couplers. They allow the rod to move in the x/y direction and not transfer that movement to your print.
I bought these from Amazon and they fixed my issue.
Its possible that thee filament sucked up moisture, put it at 60 Degree celsius in a Food dehydrator for about 6 hours, it should than print fine again.
i use this one:
It might be called an "extruder pulley", an "extruder gear" or an "extruder wheel". Here's one example. https://smile.amazon.co.uk/gp/product/B06XBZ86Y3
Completely understandable, the only reason I got it was because I was questioning something or other about the typical dual drive extruder I had at the time. Forget what it was, but I remember it wasn't the cause behind whatever issue I had.
I recommend getting something like this from amazon, which is only $15. The thing that's nice about this one is that it has a washer on the bottom of the idler, which stops it from grinding into the aluminum housing.
https://www.amazon.com/dp/B09XB421B9?psc=1&ref=ppx_yo2ov_dt_b_product_details
Whatever extruder you decide to get, I recommend just looking for that tiny detail, and you should be golden.
Best of luck!
You should really only keep the cardboard part wet and the plastic dry. If the cardboard is wet it helps with lubricity when the printer is pulling the roll. I myself use a Syringe Needle to impregnate the cardboard with water.
​
Ender 3 printing in PLA. I recently upgraded the extruder to a knock off BMG, upgraded the hot end to the Creality Spider, and changed the firmware from Marlin to run Klipper (fluidd). I have ABL running and that appears to be operating correctly. I use Cura for my slicer. I am printing with a 0.6mm nozzle at a 0.45 layer height at 100mm/s (set in Cura). Printing temperature is 200 deg. Pressure advance calculated and set to 0.298 mm/s. E-steps calibrated.
​
I have noticed the extruder makes a grinding noise, particularly when retracting. I am not sure if it's a physical issue with the gears, or a s/w related tuning issue.
​
As you can tell from the pictures, there's some blobbing on the top of the Z axis as well as an occasional messed up layer.
Forget paper, get a set of feeler gauges. Much easier to dial in the right distance and you can then repeat it consistently.
That's a good point about the hairspray composition.
​
Out of curiosity, what are the ingredients in it?
This the one I use: https://www.amazon.com/Aqua-Net-Extra-Professional-Unscented/dp/B002K33AFM
Definitely z wobble. This happened to me! The first thing to troubleshoot is to make sure your Lead Screws aren’t bend and your belts are tight. If those look good, then I would recommend spider couplings. (They connect the lead screws to the motors). They only cost $10, and they solved the problem for me: POLISI3D 2pcs 5mm to 8mm Shaft... https://www.amazon.com/dp/B07YYBQHVX?ref=ppx_pop_mob_ap_share
the high pitch sound is signaling an issue with your thermistor cable. unfortunately its a very fragile glass sensor that is screwed into the side of your hot end. they can easily break. fortunately easy to replace and find.
https://www.amazon.ca/Creality-Printer-Thermistor-Sensor-CR-10S/dp/B0714MR5BC
You can mitigate print curling by lowering your bed temperature, or raising environment temperature. The curling happens because of the temperature difference from what I understand.
Curved corners tend to curl less, so you can either edit the STL or there's a plugin for Cura called "anti warping tabs" or something like that.
Final note, I implore you to get a PEI build plate. I fussed with the stock creality one, glue, tape, glass plate, a whole lot.
https://www.amazon.com/dp/B09TVGDJYP
I got a cheap PEI plate off Amazon, and it has blown everything out of the water. I print almost exclusively in PETG, so it's very fussy about adhesion, and loves to weld itself to build surfaces.
I've put allot in this message. Most of its replying to the message above. Some are just tips. Another thing i forgot to mention to you is Replace your extruder 1st. See if its cracked in the picture i put on the other thread. Once you've fitted it. Do another print and see if the issues fixed. If it seems that its gone, Don't bother replacing the nossel. But Id still order them anyway because there good to have.
​
​
Sorry I didn't reply to this... Didn't see it! Listen replacing an extruder is quite daunting at first. I personally didn't use the right equipment with made it a bit of a pain really. If i was you order some cheap 0.4 mm nossels from amazon. Btw they have to be .4 no bigger or smaller. The quality doesn't really matter since your not really printing professionally. The only downside to the cheaper ones is that they can clog easier. But once you get the hang of replacing them there quite easy. Anyway here are some tips for replacing it:
I never linked a metal extruder heres the one i got
Follow a guide like this. Watch it whilst and before you replace it
Get this or something similar. Have to be 6mm. Some have said 7mm work but i found 6mm worked for me. They help loads and I've tried to do it without one and its a bloody pain.
Don't rush or get too stressed. You cant break anything really and the worst thing is burning yourself but if I'm honest that's quite hard to do.
​
The all metal extruder is fairly easy to fit. You might have to do your e-steps after you replaced it. (I didn't but it depends with you) There are plenty of videos of how to do it.
Here is the bed leveler: https://www.amazon.com/Filament-Friday-Leveler-Electronic-Leveling/dp/B09S173CVK
The CR touch works great but I also changed the firmware to probe more points than it does usually. only problem is that you have to make sure to reenable it each time you turn the printer back on.
Another thing that happens a lot with enders and is hard to diagnose since it presents as a clogged nozzle is a cracked arm on the spring loaded extruder stepper, which causes it to not be able to push the filament against the extruder gear and it will just skip and/or munch filament. Upgrading to an aluminum one like this one will get rid of any such problems and is a good move regardless
That's a good point. The did do a horrible job at winding the spool. For the first few days, the filament would often get stuck and even the Bigtreetech Dual Gear Extruder couldn't pull it free. The extruder did manange to yank the entire filament roll mount hard enough to topple over.
Tried to take a few photos so the light hit the imperfections better. This item is just a foot for a keypad I built. It's just a rectangle with the last few layers adding a bit of an angle to sit flush on a desktop. The layer lines look fine on the three sides aside from this one for some reason.
Not sure what settings are relevant but I'm running JAREES PLA+ on an Ender 3 with various upgrades including an EZABL pro and layer height of 0.2 with a .3 nozzle.
Thanks for helpful comments. I have solved the issue. The filament was under extruding. I replaced the old plastic feeder with a new red aluminum one from amazon and so far prints are coming out nice!
Here is the part if anyone was interested
https://www.amazon.com/Upgraded-Aluminum-Extruder-Feeder-Creality/dp/B09MD5HC6X
i ended up following a suggestion in the past to switch to an all metal because the stock hotend kept cooking my bowden tube. it kept getting all gunked up with a nasty burnt coffee smelling goop.
retraction distance 6mm and speed 25mm/s
nozzle size 0.4mm
It's very possible that it causes some problems. If you're having issues you could get a stabilizer kit and it might help. You could probably even print it and use some wooden dowels or something.
Another option would be installing Klipper and using input shaping.
Finally, do this and put it next to the printer.
If you do end up replacing the thermistor, I highly suggest one of the screw in upgrades, such as the following:
https://www.amazon.com/Gulfcoast-Robotics-Thermistor-Creality-Printers/dp/B08R3J6GJ3/