
What are
/r/Gunpla's
favorite Products & Services?
From 3.5 billion Reddit comments
The most popular Products mentioned in /r/Gunpla:


The most popular Services mentioned in /r/Gunpla:
Camelcamelcamel
Barnes & Noble
Adobe Color CC
Aliexpress
Walmart
RetailMenot
Flickr
Crunchyroll
Autodesk Tinkercad
Inkscape
eBay
GIMP
Paletton
Google Photos
Facebook Marketplace
The most popular Android Apps mentioned in /r/Gunpla:

DOF Calculator

Adobe Photoshop Lightroom CC

Prisma
The most popular reviews in /r/Gunpla:
Personally I'm going to get cases like these,
https://smile.amazon.com/dp/B0795MDWP5/ref=cm_sw_em_r_mt_dp_U_lTijDbTCTRARR and then use the name from one of the side panels to label each part area. I only keep extra runner for unique colors.
HASEGAWA 71814 Adhesive Detail & Marking Film Hologram https://www.amazon.com/dp/B003HC8ECO/ref=cm_sw_r_cp_apa_i_IxNxCbY9RS3A9
It's not technically a tutorial, but it's applied to the visor at the beginning of this video
Edit: I just realized the OP made that video
Buy a $10 sanding stick set off of amazon [ Squadron Products Value Pack Sanding... https://www.amazon.com/dp/B000CDR5K8?ref=yo_pop_ma_swf ]
Cut AWAY from the part (put nippers flush against the part, and then rotate 180 degrees so its now not flush and away)
Once the part is cut out with a decent size nub (a couple mm or two) take the nippers and cut it again towards the top at a 45 degree angle (you’ll see why in the next step)
Now, go ahead and take your “Course” stick amd make it level with the edge of the part and resting on the remaining nub. GENTLY rub in ONE direction until there is a little “mound” of a nub (shouldnt be completely flat at this point.)
Next, your “Medium” grit stick is up. Same thing as step 3. At this point you might be accidentally scraping the rest of the piece but thats not too big of a deal. This is also where the nub should be even with the piece. Gentle is the key, no need to press down to get rid of a nub.
Lastly you have a “Fine” and “Ultra-Fine” grit. Take the “Fine” grit and now go in a back and forth motion across the side if the nub with slight pressure. This is evening out the scratch marks and the nub to minimize them. Now, with your “Ultra-Fine” set it on the nub shadow, and then in a CIRCULAR motion, run the rest of the scratch for a few times and then your nub will be invisible!
Hope this helps and sorry if it comes off as condescending, it is by no means meant to be that way haha. I struggled for a long time to and it takes a bunch of practice to get used to it.
https://color.adobe.com/create/color-wheel
​
adobe colour can also help if you've got a colour in mind and want a few ideas about what to pair with it.
No matter how bad this kit is, the 8 dollar price tag makes it worth it.
Edit 1: here is a link to the product listing
Gundam Build Divers RE:Rise #07 Core Gundam (G3 Color) & Veetwo Unit,Bandai Spirits HGBD:R 1/144 https://www.amazon.com/dp/B07VVGBK25/ref=cm_sw_r_cp_apa_i_ye4IDb0P8J38H
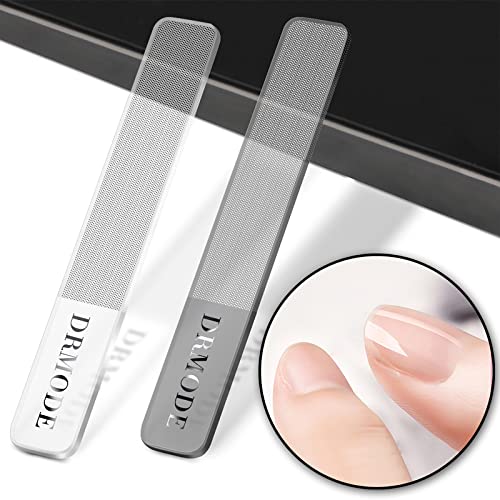
To get rid of nub marks you can: 1. Use your xacto/hobby knife to slice them off. 2. Use various grits of sandpaper to file them down, gradually working down. 3. Or use one of these glass nano files: https://www.amazon.com/dp/B07S9Q9QD9/ref=cm_sw_r_cp_apa_glt_fabc_BS3SR2AAMR1718E7M6BY?_encoding=UTF8&psc=1
Ive done all 3 and am now exclusively using the glass file for all my nub removal.
Are you in the USA? If so:
USA Gundam Store and Amazon (for almost 50% more) has it.
​
Edit: Down voted for helping some one out, really?!
The static ones are just 3mm LED's wired in parallel with each one having it's own respective resistor rated to handle 5V. There are also some small 0806 chip LED's used as well that were quite a challenge to solder.
The running track lights are from this DIY kit: https://www.amazon.com/gp/product/B07HBNDT78/ref=ppx_yo_dt_b_asin_title_o06_s02?ie=UTF8&psc=1
that I tweaked a bit to instead of just being 1 series of red lights cascading, spliced to run 2 sets of blue LED's running in cascading fashion.
It's a race of magical humanoids that use runes to cast magic, they are also tatoo themselves with said runes for defensive and offensive purposes.
The books themselves (death gate cycle) aren't too specific how it look, but I imagined it something like that
Kit's also only $9 on ~~Amazon Prime~~ right now.
Edit: AAAAaaaand you guys have depleted amazon's stock. Way to go guys. I expect full-on build posts on this thing in the coming weeks. Fill that frontpage with Thundermans!
As others said, Molotov Liquid Chrome.
The marker would work fine for detail work, not sure how fine a point it has though.
If you're going for chrome armor panels, buy the marker refill and spray it with an airbrush for smoothness. It's alcohol based, and sprays well as is.
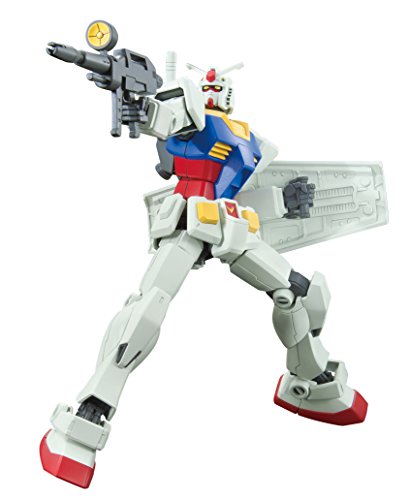
MG RX-78 Origin ticks most of those boxes. It's a modern kit of the oldest gundam. (despite the Amazon photos, the kit is in full color. Next to no paint needed)
Not terribly expensive, not overly complicated, iconic, articulate, etc. Good kit to get back into the hobby with.
If you want to just blow him away, Sazabi Ver Ka always works.
After searching my guess is the Mirage Frame (purple color). Mirage Frame (Wikia)
Edit: there's a seller on Amazon with the HG Green Frame but won't arrive for a while Amazon Green Frame
Edit 2: Damaged packaging kit on Amazon warehouse deals if you look at other sellers
Hey man, you gotta start somewhere! Great job and great choice for your first kit! I would suggest you give Tamiya Panel Liner a try. It is the right consistency and it comes with a brush in the lid. You just put a tiny dab at the top of the line and it will just run through it. Grey for white pieces, and black for the colored pieces. Hope this helps!
I totally admire the ingenuity and creativeness but you can actually pick up a 50 pack of all metal clips for $9 on Amazon. Hope this helps for next time 😄
Oh no, the base is a non-Bandai kit called a Mechatro Wego, from Hasegawa. I used the orange one originally, but there's a couple different scales and versions
Kshatriya can be there by Friday with free shipping. I've never seen $25 shipping on an amazon kit, ever. They're almost always either free 2 day shipping, or free boat from japan shipping.
You should get some scribing guide tape. It last quite a while as well.
HIQPARTS (high queue parts) Sujibori guide tape 3 mm x 30m winding (1 pcs) [CGT-3MM] https://www.amazon.com/dp/B00B8GQRHK/ref=cm_sw_r_cp_api_glt_fabc_7HX75DSWG74VES6EEX9A
Innovative and genius! 😄
To take it one stem further, a game changer for parts like this is the GSI Creos Polisher Pro which can be had for like $20ish usually.
It is great for tiny parts / finicky parts where it can be hard to find a good point to tackle.
My “process” is same as you outlined here, but then using that to clean up the nubs.
I don’t use the polisher pro for everything (although I guess you could technically?) I just find it useful in tricky situations like this.
Thanks for sharing man!
:3 thank you I appreciate it~
I used this topcoat: Mr. Top Coat Flat Spray https://www.amazon.com/dp/B0000WS12C/ref=cm_sw_r_cp_api_glt_fabc_VCBW39K4H1B46J5YRFTZ
I was pretty nervous about over spraying the gunpla parts but the process was super fun haha
Brush cleaner / conditioner. Also depends on the type of brush / type of paint your using (water acrylics / enamel / alcohol acrylic / etc.).
If it’s a natural hair brush and you used it with oils (enamel) you might be out of luck. If it’s a synthetic though you might be able to resurrect it.
https://www.amazon.com/Tamiya-Sharp-Pointed-Side-Cutter/dp/B000J47Z4G
Hate to recommend amazon, but shockingly they’re fairly cheap from here. These aren’t going to be no-stress mark one-cut cleans it all nippers, but they’re sharp and accurate and can easily clip a nub for sanding.
I found something similar on Amazon. It's not great since you can't see the entire kit if it's on the second or third level, but I don't have a proper display case or anything. This guy really saves me a lot of space on my desk.
Edit: I forgot to mention, Masurao's on the stand that came with the kit.
For this kit (and almost any kit) I’d recommend getting the set of black, gray and brown gundam panel line markers to start off with. Black for the blue parts, grey for the white parts and brown for the red and yellow parts. Using the three different colors will give you a nice subtle look.
Here’s an amazon link: Gundam Marker Value Set -GM01&02&03- (Black, Gray, Brown) by TAIYO Corporation https://www.amazon.com/dp/B00HY93GHY/ref=cm_sw_r_cp_api_bqdxAbKZ551P9
For top coat, I like to use a matte coat and I’ve found that a light coat of Krylon Color Master clear flat works pretty well and isn’t too expensive or hard to find.
Amazon link: Krylon K05353002 Crystal Clear Protective Finsh, Flat, 11 ounces https://www.amazon.com/dp/B001C42OXY/ref=cm_sw_r_cp_api_IudxAbFH7NZ48
Hope this helps. Keep at it and most of all, have fun!
He's under the name GP01 on Amazon. The MG is pretty dated, but looks nice enough. The RG GP01 and MkII both look a lot better these days.
it’s a build divers/fighters add on weapon for like 15 bucks.
Bandai Hobby HGBC Giant Gatling Gundam Build Fighters Model Kit Action Figure (1/144 Scale) https://www.amazon.com/dp/B00VJKHSUK/ref=cm_sw_r_cp_api_i_S9ggFbB1RCSPK
Other comment described it well, just wanted to add that it is a term used in more than just gunpla.
> back·log > > ˈbakˌlôɡ,ˈbakˌläɡ/ > > noun > > an accumulation of something, especially uncompleted work or matters that need to be dealt with. > > "the company took on extra staff to clear the backlog of work" > > synonyms: accumulation, logjam, pileup, pile, mountain; informal: buttload > > "Stella's been gone for one day and there's already a backlog of messages"
It's also commonly used by PC gamers - http://www.backloggery.com/
Not OP, but I personally use Mr Hobby Clear Coat. Most gundam plastic are semi-gloss, but they also have glossy and flat. Just make sure to do it outside and wear gloves cause the clear coat is sticky when it’s not dry.
>Where is the best place to get them?
Amazon. Especially if you have Prime. For SOME kits. Obviously there can be better deals on other sites and in person, but for some kits they can be pretty good.
For instance, and although you didnt ask, my recommendation for the perfect beginer's kit - The HGUC RX-78-2 Revive
Amazon carries all three sizes:
https://www.amazon.com/Molotow-Liquid-Chrome-Marker-1Mm/dp/B01E7EFSVU
Also, Blick has it for less:
https://www.dickblick.com/products/molotow-liquid-chrome-marker/
I've used these for the same purpose.
Kinda pricey now and no longer sold direct by Amazon for some reason. They were $7.99 when I bought them.
But you can search for "shelf organizer" or "spice rack" and find plenty of similar shelves, though they might not be as pretty as the Bandai versions.
EDIT: The 10" version is really cheap so that's a better option than the 15" one I linked above.
SD Dom is only $35 on Amazon; for $54 you can get a pack of SD Char MS.
Bandai, rerelease the SD lines again plz.
Loving the gold accents! Also try these I found on Amazon (Pangda 400 Pieces Cotton Swabs Cotton Tipped Applicator Double Tipped with Cardboard Handles https://www.amazon.com/dp/B076M461Z7/ref=cm_sw_r_cp_apa_CPQSAb71XG2EA). They are pretty cheap and are pretty point and stiff :D
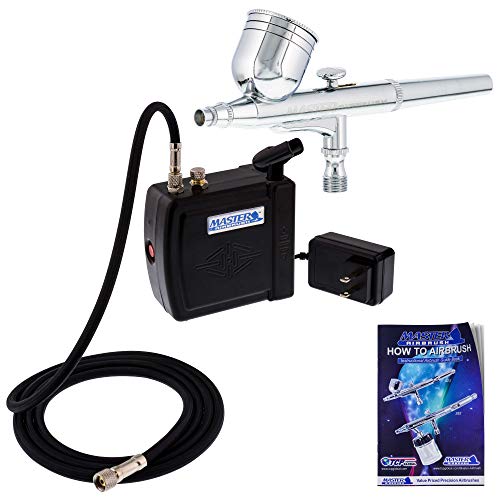
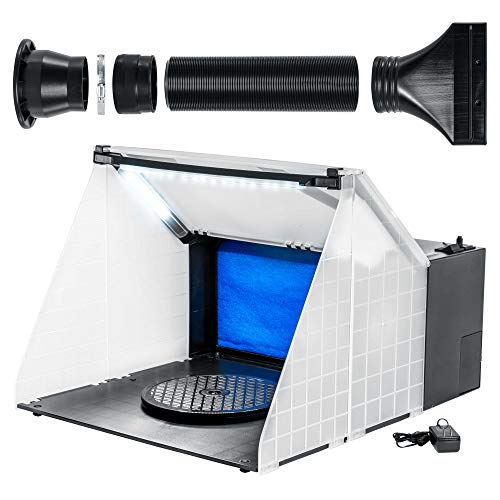
Here's a link to the one I got on Amazon:
Master Airbrush Brand Portable Hobby Airbrush Spray Booth (without Optional LED Lighting) for Painting All Art, Cake, Craft, Hobby, Nails, T-shirts & https://www.amazon.com/dp/B00B2TESUQ?ref=yo_pop_ma_swf
It's seems pretty good. I haven't been able to test mine with paint but I did plug it in real quick when I got it and it seems like it's pretty strong. Hopefully this week I'll be able to start.
I have this cheapo one that came with the gunpla toolkit I bought off amazon when I just started gunpla and it saved me a ton of times. There are just those stubborn parts, especially abs in some cases, that just dont want to come off.
If you put too much force with your hands or other tools, you can end up breaking the pegs or even the piece.
You don't need anything fancy, you can buy a spudger meant for phones for like 5 bucks on amazon; anything with a wedge will work. Here are 10 for 6 dollars.
tl;dr: Add one to your toolkit!
Well all of them just have there normal names with SD in front of there names this kit specially is called the SD RX-78-2
Bandai Hobby SD Gundam RX-78-2 Gundam & Cross Silhouette Frame "Mobile Suit Gundam" https://www.amazon.com/dp/B07B3VWW7T/ref=cm_sw_r_cp_api_i_5CKQCbK5D6G3M
Here’s a link to it on amazon
For nubs : Good nippers (as suggested) and then grabbing yourself one of these : https://www.amazon.com/Manicure-Fingernail-Precision-Expertly-Professional/dp/B00ZPELRW6
Glass nail files are fantastic for shaving down the plastic. I don't like metal files since they can be a bit much, but glass files are cheap and easy to get as well as working very well for filing those nubs down.
So, just take your nippers, cut a good amount away from the part (to avoid stress), then do a second cut closer but not flush to the plastic, and then use the file to make the nub flush with the part. There are a couple of things to be aware of using this method, though.
1) Be careful with curved parts, especially parts that curve 'in'. You can't really file these all that well without gouging the plastic inside the arch of the curve. Use an x-acto knife for these.
2) If you do cause small gouges or marks on the plastic around the nubs, get some really high-grit sanding paper and gently sand it down. Then polish it to get back to that nice plastic shine.
According to the eBay community this is a widespread issue. It seems that people were taking advantage of the code and registering multiple accounts, and abusing the code towards gift cards. eBay may have disabled the code and are "looking into it." In the meantime, if you care enough you can call eBay customer service and they may or may not issue a unique discount for you.
​
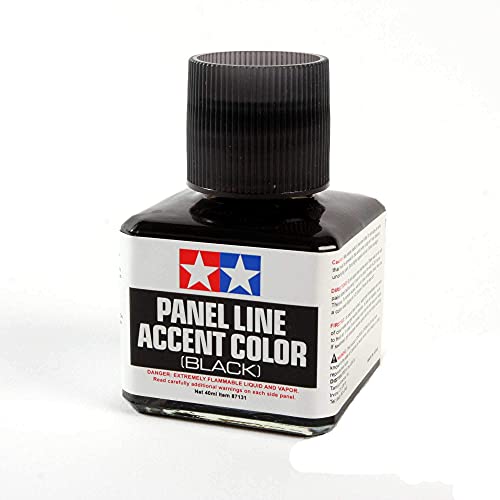
Welcome to the club. If you want to make the models really stand out, you can try panel lining (making the recessed lines darker). A surprisingly easy way to do this is using Tamiya Panel Line Accents.
https://smile.amazon.com/TAMIYA-87131-Panel-Accent-Plastic/dp/B01HDJ7BR0
Good Luck to your wallet and enjoy.
I thought there was some site that was selling them in different colors somewhere.
EDIT: Bandai is releasing their own in October but I cant find the other site that has it.
EDIT2: goodguydan found it, that was the site that I was thinking of
>For example, if you want an MG Heavyarms EW at retail, you're paying $64 + tax.
What. It's $49.95 with free shipping on their site I got mine for $40 with a coupon and I got free shipping.
>If you don't have Prime, or you don't mind a decent wait, you can pay as little as $33.
I wouldn't trust this all the time. I got a package from Amazon through one of the other Gunpla dealers and it came in a "Package" which was just the gunpla box with a band around it which was then wrapped in heavy paper. No actual packaging to be found.
>For RGs, it's $8-15. For HGs, $5-10. Accessories usually aren't marked up much at all
Are you talking about Amazon here or something else? Because where the hell are you finding kits that cheap without like $20 shipping?
Also you never mentioned the name of this "Local Hobby Shop" so we can't confirm nor deny your information. We're at best lead to believe your word of mouth and it's hard to take it as fact when you seem to have a very negative bias, especially since you "struck them from memory" regarding their PG kit prices.
Ending note: You have to shop around, this isn't uncommon. Sites like GG Infinite charge differently than Gundam Planet. Both of which charge different than Amazon or Model Grade. You just have to shop around and see who has the best prices, then see if you can get them to compete for your dollar.
I prefer the minimalist approach as well. Here's my MG Hi-v as an example.
I line the scribed parts of the kit and the use a white hi-polymer eraser to up up the excess from the gundam marker. Wipe away eraser particles with a microfiber cloth, like the ones you'd find in a screen protector kit.
Thank you so much for your feedback everyone! I've posted this in various facebook groups as well and after seeing the responses, I think I know which one to go with. :)
For those who were wondering how I did this, the program I used is GIMP. It's like photoshop but free! Here's a tutorial on how to color lineart, but it can also be applied to photos of primed kits like mine. Again, thanks for the feedback!
According to camelcamelcamel, confirmed lowest price in Amazon.com history. Pulled the trigger for both the Sazabi and the Nu! (And darn it CA taxes!) Thanks!
Here's the Amazon price tracker page for proof. I can't get this myself due to no money syndrome, but I hope you guys get this if you haven't already!
FOR SALE https://www.facebook.com/marketplace/item/218455352303771/
sinanju ova mg partially built- inner frame of arms and chest sinanju stein verka unopened unicorn mg unopened
take it all for 160
https://www.amazon.com/TAMIYA-87131-Panel-Accent-Plastic/dp/B01HDJ7BR0
This is what you want. It's a pre-thinned paint that comes with an ultra fine-tip brush attached to the bottle cap. You simply shake the bottle, take off the lid and hold the tip of the attached brush to the panel lines and they will fill through capillary action. Leave them to dry for a few hours and then wipe off access with either Enamel Thinner (Tamiya has some but its pretty expensive) or certain lighter fluids (Zippo being a known example) and q-tips. It's not only the easiest way but the most clear method as well, as Gundam Markers usually don't get into tiny crevasses.
Bandai Hobby MG Freedom Gundam (Ver. 2.0) "Gundam Seed 1/100, Multi-Colored, 8" (BAN204883) https://www.amazon.com/dp/B01BD3NJ8C/ref=cm_sw_r_cp_api_glt_fabc_XED4MS795GVPYYF65DEG?_encoding=UTF8&psc=1
that joint is the softer plastic is it not? I imagine it'll be ok. You're not going to use a normal power drill though. you'll want to pick up something like this. preferably with different sized drill bits. want a hole roughly the diameter of the paperclip.
https://www.amazon.com/Army-Painter-Miniature-Model-Drill/dp/B001AEB6EE
Games Workshop Citadel Fine Detail Cutters are what I use and I love them. I’ve had them about a year at this point. I bought them at my LGS for $20.
There's few ways to go about this.
Shiny layer first. Put down a base of chrome / silver and then put the orange on top. This requires the orange to be a translucent paint. Most oranges are pretty translucent to begin with so this isn't a terrible option.
Orange layer first. Put down your orange and put something on top of it to make it shiny. If you put a thin layer of chrome over the orange you'll soon see why black is recommended as a backing. You can also do a pass of 'metalic medium'. Another option is Iridescent Medium, which provides a shiny shimmer effect while still letting the colour through.
Mixing! You can take your orange and mix it with either a chrome/silver paint, metalic medium, or an iridescent medium. Keep in mind mixing types (eg, acrylics & enamels) will make a useless mess. If you want to mix your own shade of orange, what I'd recommend is starting from a red metallic and adjusting that to get the tone you want.
Thank you friend, the video is more of a tribute to Miura sensei. I do showcase my painting process but I can list my step on how to do it here in case you want to follow along:
For the black parts: I first prime with Gunmetal Primer and then Airbrush on top with Vallejo Air black
For the cool silver: I first prime with Gunmetal Primer and then Tamiya Gloss Black, followed by Tamiya Rose Gold on top
For the Gunmetal it is straight up pure Gunmetal Primer, that stuff is amazing, here is link in case you are interested: https://www.amazon.com/Metal-Colour-Primer-Army-Painter/dp/B00OQ820JG
For the handpainting and weathering, a majority of it is with dry brushing using Citadal Paint Leadbelcher. The panel line is with Citadel Nuln Oil. The blood is of course Citadel Blood for the Blood God, amazing paint for making blood splatter.
There are more paint that I used of course but these one I mentioned here should be good to start withg.
I’m still fairly new to the hobby. My first like 10 kits weren’t panel lined but I’ve started doing it and it makes a huge difference. Check out Gundam Markers GSI Creos Gundam Marker Value Set -GM01&02&03- (Black, Gray, Brown) https://www.amazon.com/dp/B00HY93GHY/ref=cm_sw_r_cp_api_glt_fabc_ESYJ5AG5AEWJTS90Y3ZK
This is the one I got here:
https://www.amazon.com/dp/B08PF9N13L?psc=1&ref=ppx_yo2_dt_b_product_details
but there are plenty of options if you search "nano glass file" on like amazon or ebay and a lot of them are coming with a large foot file now....
A lovely choice, and a good looking build. If you're feeling intrepid, grab a Gundam Marker and go over the panel lines. The panel lines really help the Turn A match Syd Mead's line art.
Are those finer than the basic set that tamiya has? I've been using the basic set here https://www.amazon.com/dp/B000BMUONA/ref=cm_sw_r_cp_awd_jiIBwbRBX5X36 and I can't tell from the photos on Amazon if they're different. I'm assuming finer.
Could they be any manuals or do they need to be something specific? I have a couple manuals for kits that I'm not going to build or just for stuff that I won't need the manual to re-assemble. We can work out a price after I figure out what you want and just how many manuals I'm selling.
I don't have Paypal or anything like that, but I will accept payment in Amazon gift cards (PM me for my account).
I was planning to, but decided to just buy one on amazon :P
This is the one: https://www.amazon.com/gp/product/B005CX9S8A/ref=oh_aui_detailpage_o00_s00?ie=UTF8&psc=1
It's honestly a little small for 1/100s, but for 1/144s it works great. I may get a bigger version of this later on!
I recommend the iwata neo cn for a first dual action airbrush. You can get it at hobby lobby or Michael's with a 40-50% off coupon they do weekly. As far as compressor goes I got mine from amazon. https://www.amazon.com/dp/B001738DXU/ref=cm_sw_r_other_apa_9qIOxb4P4CDXF here's a cheaper model with no tank https://www.amazon.com/dp/B001BJFHAW/ref=cm_sw_r_other_apa_ZrIOxbQCF62S0
I'm in the camp of using HGUC kits for practice, if only because they are dirt cheap. Amazon, for example, has the HGUC GM Cold Type for $9 with Prime shipping available, and there are several grunt kits in the $10-12 range.
Now, I'm relatively new to the hobby, so I like being able to practice everything... assembly, nub removal, painting, etc. If you just want to practice painting, there might be better options.
- Don't know what your budget is, but Amazon has Godhand nippers (the gold standard in the nipper world) for $50: https://www.amazon.com/God-Hand-SPN-120-Ultimate-Nipper/dp/B00T5IH8PI/ref=sr_1_1?ie=UTF8&qid=1477373731&sr=8-1&keywords=godhand+nipper
- in terms of customization, if you search 'builders parts' and/or 'plaplate' you'll find some cool materials for adding/making new parts for gunpla
- this book on scratchbuilding and customizing looks very cool. Personally I haven't been able to bring myself to drop $40 on it, but I'd be stoked if someone got it for me, so maybe a good option
For me really good lighting is necessary (pretty bad eyes) so I got an led lamp of Amazon. Others have suggested a runner holder, but I would prefer a setup I saw once on here but can't find to save my life. Basically it was a peg board, but didn't have to be, with like a tiny curtain rod with lots of those rubber coil scrunchie key chain things on it. That picture is actually a pretty good representation of what I mean. You attach to the runners so they are just hanging above your work station. No idea if that makes sense to you guys, but that really stuck in my head as a cool setup. You could just make it on a board and mount that on the wall above you since you don't have one of those deck top surrounds.
You'll probably want a place for the box and runners (assuming you don't do my suggestion above). I use a big plastic tote that's got my supplies (paint, tools, thinners, etc) which puts a box at waist height when sitting. I think the dinner tray idea is great.
Edit: Heck yeah found it http://i.imgur.com/TZqhwH7.jpg it includes using those id clip things. Also spelling
I am painting the equipment, yeah. I decided to go with a silver sharpie instead of silver paint for the Progressive Knife, and it looks a lot better than I thought it would. I finished the Pallet Rifle last night, and was gonna touch it up this morning. I haven't built the rocket launcher yet, and I don't know if I will, because I just like the poses where it's Berserk the most, haha...
This kit is the original, I think. I got it off of Amazon right here: https://www.amazon.com/Bandai-Hobby-Genesis-Evangelion-Limited/dp/B000BFJYQU/ref=sr_1_1?ie=UTF8&qid=1485571105&sr=8-1&keywords=bandai+eva+01
You can get it for 32 bucks on Amazon.
I recently came across this on Amazon and it really has come in handy!
https://www.amazon.com/gp/product/B0033UJ6HW/ref=oh_aui_detailpage_o08_s00?ie=UTF8&psc=1
I haven't done so yet but I'm thinking able labeling each of the sections with A, B, C, etc. so it's easier to track but it really saves space and make it easy to the runners quickly. May need 2 of you're doing an MG or so but for a HG and even RG, 1 was enough.
The only problem I see is that each runner is leaning on another, otherwise it'll fall over. I went with a couple of cheapie file holders from amazon.
they routinely drop down under 4 bucks, so for under $10, I have a solution that's tall enough to have things not falling over.
I guess I was wrong. bandi continues produce the expansion kit/custom kit, but it's expensive. I'd rather purchase another gundam instead of paying $40 for the kit. Here's the link on Amazon where you can purchase it. You can see in pics where it's holding the spiked ball and chain.
MG 1/100 CUSTOM SET FOR MG RX-78-2 GUNDAM VER3.0 https://www.amazon.com/dp/B00EIBKR9Q/ref=cm_sw_r_cp_api_H94SAb2XEG9AN
https://www.amazon.com/Kotobukiya-Armored-Core-V-B/dp/B003479GLU
I know it's the Armored Core: For Answer 'White Glint' with a V.O.B. kit. Though that model on Amazon is probably entirely different..
Looks like a ArtBin Three Tray Art Supply Box $23 @ Amazon
No, if you have a Michael's or hobby lobby nearby, or any hobby shop that deals with model kits, they should have panel lining markers, outside of that you can order some off amazon
Gundam Marker Value Set -GM01&02&03- (Black, Gray, Brown) by TAIYO Corporation
Here's one on Amazon for $60.
I got mine cheap on Ebay (not from China) because the seller mis-named the thing Super Bazooka or something like that. It wasn't showing up in searches so only a couple people were bidding on it.
Get something like this -
Or
Doesn't have to be those exact ones (those links are to japanese sellers i think, just look around for US seller), but the tamiyas are known to be good modeling tools and the 2nd one are entry level nippers - i actually still use them (older model). Dont get the cheap testors nippers (from hobby lobby/michaels), those are probably as bad as nail clippers...
Also, get:
- tamiya or jewelers file set
- various grit sandpapers. Med grit to fine and super fine.
- X-acto knife
Those are probably 4 basic essentials. Amazon has a lot of "gundam kits" that includes basic tools, but i don't know what brand/quality of the tools included.
Once you get decent basic tools, the build experience and results will be much better. Good luck, have fun and welcome to the hobby!
I bought a Basic tool kits from Amazon. Additionally I have alot of free time, so I could build one model a day. So far each HG took me around 4 ~ 6 hours to finish. The MG took me around almost 8 hours.
Edit: wordings
Good job! Here is an inexpensive set of nippers that worked well for me:
​
Grab an Xacto knife and a pack of #11 blades from amazon while you're there. I get 7 in one nail files from walmart for a dollar each, they work pretty well for sanding. for around $20, you'll have enough supplies to tide you over till you get a bunch of kits under your belt then you'll be thinking about godhands and panel line scribers and a bunch of other stuff you don't need when you're first starting out.
I don't know if amazon links are allowed, but it seems this comes in a multitude of Metallic shades
​
​
Have you considered getting actual prescription glasses from your optometrist? If your vision isn't totally bad, you could also consider getting those magnifying headbands/goggles like this.
I don’t know if it’s available in Canada, I was looking for a cheaper alternative to the ultimate godhand nippers. This is what I ended up with and it has worked wonderfully. I got it for cheaper but maybe you go to the original manufacture for cheaper.
Valtcan Prime Model Nipper with Blade Case https://www.amazon.com/dp/B01M5AOPN6/ref=cm_sw_r_cp_api_i_SWcxFbW0D5TMQ
In terms of panel line you can absolutely do panel lining without topcoat, I do it all the time. Nothing wrong with that, EXCEPT, I use the gundam markers, because the Tamiya panel line color is enamel based. If the plastic is not top coated the plastic could crack from it.
Help this helps.
Hello! For silver I sometimes use metallic sharpies. If you are going for chrome you can use the Molotow chrome pen. They have various sizes for what you are trying to do. https://www.amazon.com/Molotow-Liquid-Chrome-Marker-Set/dp/B074JJ1YMY. I love this thing. Just allow it ample time to dry and avoid touching it with bare hands afterward because the oils from my fingers make it look dark. Hope this helps.
I'd recommend using a bilge blower. These are boat exhausts used to extract flammable gas/smoke out of the boat's engine room so it'll handle paint thinners fine.
Here's one on amazon: https://www.amazon.com/SEAFLO-Line-Marine-Bilge-Blower/dp/B0166S2PA2
You can use bathroom exhaust fans, kitchen fans, etc as well. The only problem with these is that the electronics are in the path of the airflow and paint thinners are flammable.
I haven't heard any horror stories about spraybooths catching fire, but it's something to keep in mind when shopping for exhausts.
It’s seriously a life changer. I’ve fit runners with just a few extra on the side with PG kits. $25 bamboo dish rack amazon. Lawei Bamboo Dish Drying Rack with Utensil Holder - Collapsible Dish Drainer Foldable Dish Rack Bamboo Plate Rack for Plates, Cups, Mugs, Utensil, Flatwares https://www.amazon.com/dp/B0814Q9NHQ/ref=cm_sw_r_cp_api_i_zpZZEbDEK82Z2
So most of the common Wing MGs now aren't bad, but they are a little dated in that they use polycaps for joints. Which isn't terrible itself, but I've had to tighten some up because I don't have a lot of them on stands (something I plan to remedy when I have more space). If you're talking about the Wing Zero Custom from Endless Waltz, it's actually really solid and pretty straight forward. I was actually really surprised by it. The RG Tallgeese I is also super solid, and in reality the III uses basically the same build aside from the weapons and minor details. Unfortunately yeah, the P bandai kits are up there right now. Pretty much why I haven't gotten a few Endless Waltz kits.
What I would recommend is the Mg Wing Gundam (obviously don't need to buy from amazon, just using it as reference). It's not pricey and if you enjoy building that, then pretty much all the other Wing MGs are similar since they use the same base frame. As the other commentor mentioned, unfortunately the Wing MGs that you can get easy are mostly re-imaginings. So they're not exactly the TV versions and they're not exactly the EW versions. Kind of a hybrid. I guess it's from a manga.
Last bit, they have a few newer high grades of Wing Gundam, Wing Zero tv, Sandrock tv, a Maganac suit, and Leo that are all pretty solid. I have a few on my profile if you want to check them out. I'm hoping they do the rest of the main cast at least. Good luck!
I like Humbrol's Maskol a bit better, it dries faster and leaves just as clean of a separation line. These things are best applied with your normal modelling paint brushes, depending on the fine-ness of detail you're trying to achieve. Your brushes can be cleaned with plain water while it's still wet, or with laquer/cellulose thinners when it's dried. Mistakes are easy to fix, as you can carefully trim the excess with a blade once dried. Maskol (not so sure about Masking Sol R) can also be thinned with water to whatever consistency your situation calls for, but it's generally best applied right out of the bottle. I like to use it in conjunction with tape, primarily for irregular shaped areas. First I'll tape any straight lines and large areas, then fill in the irregular areas with masking fluid. In most cases, be sure to apply a nice thick layer so it's easy to peel off. In other cases where you have to cover fine/thin details, you'll need one of these rubber cement removal erasers. Regular masking rules apply to this stuff as well, i.e. don't use on unprimed painted surfaces, make sure the paints beneath your masking area are cured (not just dry) before application, etc.
This stuff is super versatile and makes masking faster and less fiddly. I love it. Just make sure you remove it within 24-48 hours, as it might become permanently adhered to the surface beneath.
Hope this was helpful to someone somewhere!
Try Vallejo or Citadel for hand-painting. These paints can be thinned with water and self-level a lot better than Tamiya acrylics jars.
​
Best tip I can give you is to make a wet-pallete with Vallejo or Citadel - this method removes the guess-work of how much water you need to add to the paint (usually a 1:1 ratio, but it will differ if you use metallic colors or some other types). All you will need is a shallow plastic tray, a sponge, and baking sheets. Cost is relatively low (<$10) if you make it yourself, but if you are not sure if you can, https://www.amazon.com/Sta-Wet-Palette-Keeps-Paints-Airtight/dp/B000C18GTE.
​
IF you want to continue using tamiya for hand painting, you NEED to get Mr. Color Leveling Thinner. This gives the tamiya acrylics stronger adhesion (the Leveling Thinner is lacquer-based) but it also extends the drying time, so the paint can self-level.
​
Lastly, look up on brush care guides. It is important you use the correct brush type to the job, and to keep your brush clean for a good paint job.
Barnes will be getting the HG Barbatos for $12.95. My local doesn't have it in stock yet but check the store-tracker locally on yours to check when they get their's in.
> Sorry, forgot to specify. Yes the airbrush. And by the way can i use a nebulizer compressor as spray paint compressor? if yes, i might consider buying a regulator. I'm looking at this one https://www.aliexpress.com/item/Dual-Action-Airbrush-Hot-Air-spray-gun-Compressor-Kit-aerografo-for-body-Makeup-Manicure-Craft-Cake/32690321211.html?spm=2114.01010208.3.81.iThYT1&ws_ab_test=searchweb0_0,searchweb201602_4_10065_10068_10000009_1... a bit cheap and comes with a compressor.
Click on the 'pick up in store' box and put your zip. It will show you a list of stores in your area. If one of them says "in stock", it most likely has the others.
I built the Farsia over the summer, and it was fun. The build is simple but it works, and it looks great. While I only painted the flowers and panel lined it, I think it came out ok. Also its not categorized as an HGUC kit. Its an HG AGE or just HG. Here's the album to my Farsia: https://www.dropbox.com/sh/ztc6h5ibhzjzjst/pcGvO1bQqe
well this is one way I track MG/PG prices and do a snag as best as I can hopefully this can help others too. I normally use amazon to find the MG/PG I want then take the link of the amazon page and paste it in http://camelcamelcamel.com/. It's online amazon price tracker (good for other uses as well) It'll tell me the lowest and highest the model has been along with email notifications.
Hope this helps!
When supplies start to get low, some shops start to price gouge.
That being said I picked up my Sinanju for about $85. If you absolutely have to have it now, look for coupon codes. Robot4Less has two right now.
Welcome! Personally I recommend; Amazon, Hobby Wave and Robot for Less.
(Robot4Less still has a $20 off $100 dollar order coupon + free shippin on certain items) http://www.retailmenot.com/view/robot4less.com
It's a great deal considering $100 usually = 2 Master Grade kits
Not sure how the builder in your linked post did his specific kit, but I've gotten hex masks from Plamo Masks and hex camo decals from Hiqparts via HLJ.
They're the 1/1200 scale Z'Gok and Zaku II that came with the old Gaw (HG Zaku for scale) I built.
Edit: I have no idea what scale the middle Z'Gok is, it came in a box of 12 random little kits I got from Gundam Store and More.
Ah I meant that I understood they were compact but man i wasn't expecting this small. It is a great kit though. As I progress along with it and my other builds I'll be sure to keep you guys in the know with major updates to them.
If your looking for advice on customs the good folks over at R/Buildfightsystem (myself included) are usually on in the sub chatroom Your always welcome to stop by and we can maybe help you out. And once you're done with it come o over and battle with us!
Thank you guys so much for the help with the survey I posted yesterday! I have a short follow up survey with three more questions. Please fill it out if you have time =) For anyone interested in the results of the first survey, the first 100 responses are here: https://www.surveymonkey.com/results/SM-K3J7NT7V/