
What are
/r/PrintedMinis'
favorite Products & Services?
From 3.5 billion Reddit comments
The most popular Products mentioned in /r/PrintedMinis:


The most popular Services mentioned in /r/PrintedMinis:
Cults.
Gumroad
Blender
meshmixer
Autodesk Tinkercad
Youmagine
Creative Commons
Gmail
SculptGL
Sellfy
Ticket Tailor
Blender Game Engine
Steam
Unreal Engine
Amazon Drive
The most popular reviews in /r/PrintedMinis:
My adult son got into painting minis a few years back. He tried using an Xtra Hands with magnifying glass and couldn't do it since it didn't give him any depth perception.
I loaned him my jeweler's loupe and he loved it. You might want to try one out.
OPR is now providing free test print models for all of our releases on Cults3D! Please make sure to like our models and follow our page to help us grow!
Get 15 free models here: https://cults3d.com/en/users/onepagerules/creations
The files come both supported and unsupported, and they're perfect for you to try our models before you buy them. Don't forget you get 50% discount on all models in our MMF store by supporting us on Patreon.
It was in a variety pack of nozzles on amazon, this one I believe. There were only two .3mm so I'm probably going to buy a few more.
As to the files, I found some on Amazon for $6.90, though they're actually files specifically for miniatures as opposed to jeweler's files.
I bought a glass front golf ball display case secondhand. Perfect shelf size for most figures. The top shelf is taller so the figures I printed at a larger scale go there. I wish it had some lights - maybe I’ll add LEDs.
>That's a great idea. I was just worried if the sculptors found it it could be a legal issue but I'm guessing as long as I'm not selling the file its fine.
So that all depends on the license that the creator released the plans under.
Take this random thing. Looking at the page, you can see that it's released under the CC-BY-3.0 license. Which basically says you're free to do whatever you want with it as long as you attribute the original creator. So if you were to 3D print and paint that model, you could sell it as long as you included a link to that page along with the model.
The thing to look for is the term "commercial use". If that's allowed in the license, then you're good to use it for whatever.
Granted I'm not a lawyer
There is also the Elegoo Saturn
A lot of people speak highly of Elegoo
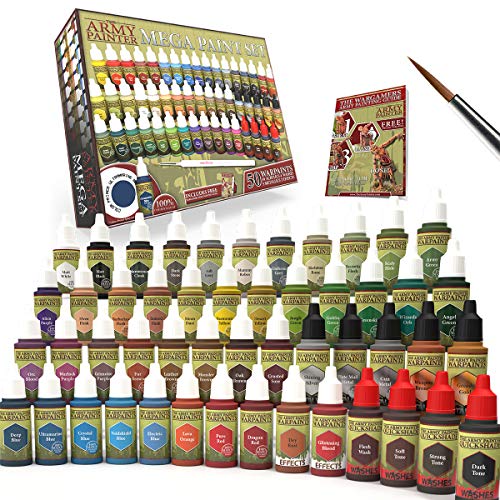
The Reaper learn to paint kits are a great place to start! Most of the paints I used came from the core set, with some additional army painter washes.
https://www.amazon.com/Reaper-Miniatures-08906-Learn-Paint/dp/B00NTMC49G
Awesome prints!
Got them on Amazon (here is the link):
https://www.amazon.it/dp/B06Y3VS23M/ref=cm_sw_r_cp_api_i_FAKkDbFPWW0SZ
I also got some moss from my garden and tied it up, works very well with miniature and plus it’s free!
Like others have said, it depends on the licenses of your individual source files. If you got them from Thingiverse, you can scroll down a bit and on the left there'll be a License section. I think that everything on Thingiverse uses some form of Creative Commons license, so you just want to make sure that there's no No Derivative flag set on the items. If any of them are set up in that way, you'll need to get the original author's permission before you use those parts.
https://www.patreon.com/Duncan_shadow/
As far as I can tell, they are only available to his patreons right now.
I'm assuming they won't be free when released publicly, but his works is generally amazing, so I feel the Patreon is easily worth it.
He also has quite a few free models to start with: https://gumroad.com/duncanlouca
One of my favorite artists for 3d models these days.
First step I'd suggest is getting a sculpting program and a modelling program, both of which behave quite differently from a CAD as used by most people in the 3DP world.
For modelling, I suggest Blender because it's free, though nearly any other polygon modeller would do, and I use 3DS Max, myself: https://www.blender.org/
For sculpting, I reccommend Sculptris, because it's also free. I use ZBrush, myself, because I've been using it for well over a decade: http://pixologic.com/sculptris/
And the next step... is to do every single tutorial you can. Read and understand what edgeloops are, and how to rig a figure in your program of choice so it can be articulated and posed. Study up on anatomy, because even that rogue, up there, had to have some of the muscles and bony landmarks properly placed. And practice, practice, practice.
Did I mention practice?
Duncan Louca is going to be making some of the Gumroad sculpts Patron only, but has temporarily made the Mushroom Trees files available for free again. Get them here while you can.
Thank you for letting us know about the file problem. Now the model is reloaded on myminifactory and is being checked again. We placed the Demon Hunter (all parts of the model in the archive) on cults3d and you can download it there right now.
Here's the link : https://cults3d.com/en/3d-model/game/motley-beholder
As is, they fit a 10mm glass eye. You can purchase a variety pack on Amazon or probably a lot of other places. The file I uploaded has a base and a version with the eye included in case you want to paint that. The ones pictured are actually resin castings I did and they're propped up with a wooden dowel drilled through a wooden coin essentially (the base included with the file is much cooler).
So, the miniature thing has really gotten it's hooks into me, and I'm heavily leaning towards putting together a Patreon for this kind of stuff. I know it's a long and slow uphill climb, but I would love to know what kind of things you'd like to see that would entice you to sign up for yet another minis patreon. I'm currently working on my first set for release, which will be based on Japanese Yokai. Currently, I won't be able to do what I would consider a full set a month, so I'm planning to have the Patreon set up for each pack of minis rather than on a monthly basis. I would absolutely love to get your guy's insight!
Best recommendation I have for you it sign up for Tinkercad which is a very basic Lo-Fi piece of cake software and just make a base of equal or slightly larger size of your mini and use the text option on the right side to engrave or emboss into that base. Then you cab export and print from there!
got an ottlite on sale at joanne fabrics I think, for significantly less than the link price. the lighting is decent and the magnification area is big enough that you can just move your face and the workpiece back and forth to get ideal focus without headaches. Biggest problem is I forget its there and I'll go to lick the brush and get paint all over it.
If you're looking into the Photon, there is an easy way to manage the smelly fumes if you already have an FDM machine.
print yourself one of these.
get some 4" dryer vent hose and clamps from a hardware store.
Grab this combo from Amazon.
Hook all that up to the back of the Photon. I run the fan at about 1/2 to 3/4 speed while printing in an apartment, drawing negative pressure on the printer housing and exhausting through the carbon filter. No fume problems at all. You'll want to experiment and run the fan at the lowest setting that prevents fumes from escaping, to avoid drawing excess dust into the printer enclosure during printing.
For dealing with resin, I recommend learning the "clean hand, dirty hand" technique used by lab workers and medical practitioners. Practicing this discipline while handling uncured resin goes a long way toward keeping the mess confined and under control. It does take practice, though. Some choreography is involved in knowing what you will need to touch and when in order to accomplish a specific task.
The stats on that machine aren't anything better than what other manufacturers offer. My suggestion? Get either the Anycubic Photon or the Moai.
https://www.amazon.com/ANYCUBIC-Assembled-Innovation-Off-line-Printing/dp/B078N2TSYS
$450 off Amazon with the instant coupon.
or
https://www.matterhackers.com/store/l/peopoly-moai-laser-sla-3d-printer-fully-assembled/sk/M2513KLL
They sell a fully assembled version or the unassembled version MUCH cheaper.
Both of these systems have a large and active community. Both can use a wide variety of resins as well. The Moai has a bigger build plate and should mechanically last longer. Both will require you to replace the FEP film in the Vat. Which I managed to buy two square feet of it from McMaster Carr for $30 shipped. Both will print to the level of detail you need. The print files on the Moai are Gcode and therefore can use open source slucing software, the photon will have to be sliced in their program but prepping can be done elsewhere. The Moai will be slower to print because it uses a laser/galvo vs the Photon's LCD DLP.
I own two machines one of which is a Photon. I plan on purchasing the Moai 200 when it comes out this month as well. If there is anything else I can answer for you just ask!
The answer is it depends. You can of course prime the miniatures if you want, which should help the paint stick to the model better. Any primer paint will work for that need, and I do suggest using white for miniatures as it will be a lot easier to see if you missed areas of the model when painting, but perhaps that is just personal preference. For a lot of miniatures, I don't prime at all though. I just print in white and paint directly. It comes out good enough for my purposes and I'm satisfied with the result.
As for a special type of paint, there are a lot of brands that make paint specifically for miniatures (Citadel, Game, etc.) that can be found with a quick google search of the topic, but pretty much any acrylic paint will work fine if you aren't worried about achieving true perfection. I picked up https://www.amazon.com/Vallejo-Game-Color-Basic-Paint/dp/B009LH0YTA on Amazon for my first paint set as I wanted a lot of colors without having to worry about mixing. Of course you could get away with a far smaller size of paints and do mixing to get the color you are looking for.
There is an endless supply of youtube videos that go over the basics of printing miniatures. They'll be able to not only explain, but also show techniques that will help get you started. Have fun!
I first use a really good "sprue cutter" like this one from Amazon https://www.amazon.com/Xuron-2175ET-Professional-Sprue-Cutter/dp/B001TMZ7QA/ref=sr_1_3?crid=25ZM1ZKGISST3&keywords=sprue+cutters+for+plastic+models&qid=1558789186&s=gateway&sprefix=Sprue%2Caps%2C196&sr=8-3 Then I use el cheapo Harbor Freight files and fine sandpaper like others have mentioned. This is your first one? Nice job! Bet it will clean up nicely :)
It's a kit, so it needs to be assembled. I bought it off Amazon from Mech Solutions Ltd, and the kit came with everything I needed to assemble and use it. Just follow the video and take your time to make sure the parts are properly aligned as the video guides you. I watched the video start to finish a couple of times and then ran through it and third time, pausing after each step to make sure I wasn't forgetting anything. All in all it took 2 or 3 hours to get it fully assembled, and it worked like a charm from the start, thanks to that video guide.
Yeah. Sitting outside in the sun should only take 5 minutes to cure, to be honest.
Just open a window, and place it in front of the window, with something like this
https://www.amazon.ca/dp/B082VQF5ND/ref=cm_sw_r_cp_apa_i_yhCtFbKNE12EK
Wow, you absolutely came to the right place for advice! :)
I would say check if he has a speed paint set. They’re an easy way to paint minis fast, and highlight details. If he doesn’t use them yet, it will be a totally new way for him to try painting. I bought the set in the link below and I now use them on every model.
I used to have one of these and although the purpose of this is good the quality is usually a huge let down. For me personally i prefer to have the bigger version which is in my opinion a lot more useful and higher quality.
​
No. I have one and it’s almost useless.
I have a big magnifying glass on a gooseneck, with an LED ring light surrounding it. Much, much better. I use mine all the time. Highly recommended. Amazon link: https://www.amazon.com/gp/product/B07MMZ27QK/ref=ppx_yo_dt_b_search_asin_title?ie=UTF8&psc=1
I use these for very intricate stuff. If you want to splash out a little a vortex spinner is something I cannot live without now. They can be. A bit pricey but very well made.
I use a lamp like this. Easy to move around and position without the clips getting in the way.
Probably something like this.
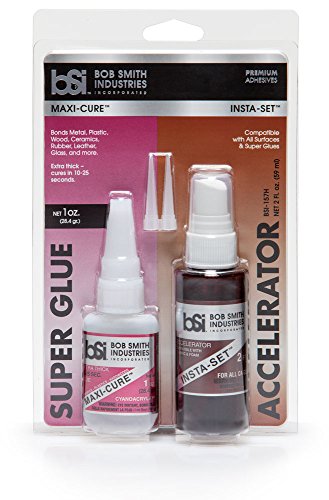
Use super glue and then spray it with the a super glue accelerator. I use https://www.amazon.com/Bob-Smith-Industries-BSI-151H-Accelerator/dp/B0166FFCCS/ It will instantly set the super glue. It does have a bit of an odor so use it outside if you can.
you might be able to find it cheaper somewhere else but the set is pretty nice and unfortunately it used to be even cheaper but supplies are likely running lower as the game is dead im pretty sure. However the minis are great.
I had a similar issue with the Elegoo Smokey Black on my Anycubic Photon. I bought a flexible print plate and am now able to print "flat" things directly on the print plate, with no warping. :)
Makes sense. Do you have to first wash them in the IPA or do you just go straight to the sonic cleaner? Feels like the IPA bath is probably the right call, get the majority of the resin off and then you need to clean out the ultrasonic cleaner less often right?
Any suggestions on a good cleaner to get? I was considering this one - seems large enough to fit even my biggest prints without being excessively large or over budget. But definitely want to shop around and make sure I find the right one.
I use Tenacious as an additive for flexibility. It's expensive, but I only mix like 10% in and it make a big difference.
FDMs are great for terrain and larger monsters but yea on the other hand you can get a resin printer for $200 or less if you watch out for the sales.
That'd be easy enough to kitbash with some of those zombies in a tube... Some superglue, sculpey and paint. Good to go! SCS Direct Zombie Action Figures -100 Glow in The Dark Zombies with 14 Unique Sculpts - Includes Zombies, Zombie Pets, Gravestones, and Humans https://www.amazon.com/dp/B00THFUFG8/ref=cm_sw_r_apan_i_48NCF7FP3KKSTAYE8Z2Y
Zip Kicker will cure it instantly. I like the version by Bob Smith Industries. You could also pick up a pair of "helping hands". They are alligator clips on flexible arms. Some come with magnifying glasses built in. Pinning the parts may help if they are big enough to do so.
Bob Smith Industries BSI-151H Insta-Set Super Glue Accelerator,Clear, 2 fl. oz. https://www.amazon.com/dp/B0166FFCCS/ref=cm_sw_r_apan_i_31FRY7GN0322BQPEPHSC
KOTTO Helping Hands Soldering, Third Hand Soldering Tool PCB Holder Four Arms Helping Hands Crafts Jewelry Hobby Workshop Helping Station Non-Slip Steel Weighted Base https://www.amazon.com/dp/B07MDKXNPC/ref=cm_sw_r_apan_i_049AE5DTZ6902R4GZG9Y
The one i got is two parts: a magnet sheet that permanently sticks to your old build plate with adhesive, and a stainless steel sheet which sticks firmly to that cause it's a magnet:
Sovol 3D Upgraded Platform 2 Pack, Resin Magnetic Flexible Steel Plate Flex Bed for ANYCUBIC Photon/Photon S/Photon Mono/Photon Mono SE/Qidi Shadow 5.5S SLA 3D Printer 135x80mm https://www.amazon.com/dp/B08LYP2VTT/ref=cm_sw_r_apan_i_M2X2DWAFSSKKPB15HBZT
Failing that, Tilting is probably the best, and/or printing bases separately and then gluing them on (which i do anyway)
I agree doesn't look like FDM but if it is, I have some like this...Marble PLA Filament 1.75mm 3D Printing Filament 1KG 2.2LBS 3D Printer Material Sparkly Stone Rock PLA CC3D https://www.amazon.com/dp/B07P8YTQB5/ref=cm_sw_r_awdo_WMPVJAQCQ3NWCH2QYXNP
It really wasn't. I just stood them up horizontally on their edge and supported them with a few medium supports and a whole lot of small supports! They actually printed surprisingly easy - after a failed print due to some mechanical malfunction :(
The resin is AnyCubic clear - https://www.amazon.com/gp/product/B07YZ7KD32
For dungeon stuff I actually use stone textured finish by Rustoleum. That’s an Amazon listing as an example but you can get it from wherever. It comes on a bunch of colors and covers layer lines nicely.
Gotcha. Several people have already mentioned using a tooth brush or scrub brush to clean the resin out of crevices like that. The other thing that I found worked really well was squeeze bottles like these:
https://www.amazon.com/gp/product/B005Z4RGDU
Being able to spray the alcohol directly into the crack was a big help... although it can also make a mess. I also used on hollowed models in order to spray alcohol inside them and clean out some of the resin. It's hard to get all of the resin out of a hollow model, but you can at least get most of it.
I have solutions for different segments of my minis collection.
For my old pre-painted WizKids minis, I just chuck all the normal sized ones in a wide flat plastic container. I keep the big ones condensed into a couple of original retail boxes with some packing paper. Nothing fancy. Some of them have gotten a little dinged up over the years, but they were never impressive sculpts or paint jobs to begin with.
For the miniatures I paint myself, including anything 3D printed, I have a much more delicate and somewhat costly solution. I keep them all in Feldherr foam storage cases. Specifically, these ones: https://www.amazon.com/Feldherr-Maxi-Bag-Bolt-Action/dp/B07T41Z6FH/ref=mp_s_a_1_7?keywords=Feldherr&qid=1645643860&sr=8-7
I figure that for all the money and effort I spend painting, it would be dumb to not protect that work with a good storage system. I’ve moved house twice now with these and not a single one of those minis has suffered so much as a scratch.
You really should! This is also my first printer and I’m so impressed.
All I did was follow this setup tutorial : https://youtu.be/9Fuhwn3mU7U
Then downloaded the STL: https://cults3d.com/en/users/onepagerules/creations
Then sliced it with Heavy supports in Chitibox at about a 45 degree angle on his back
Plugged it into the Proxima
Hit Print and this was my result
7 or 8 models worth of failed print pointy bits got sculpted into this: https://cults3d.com/en/3d-model/game/elder-oblex-tabletop-miniature Now I don't feel so bad about failed prints knowing that I can make unique and gross models.
if you like it, I have it available:
https://cults3d.com/en/3d-model/game/space-soldier-beaky-helmets
8 different variations and pre-supported.
I've test-printed it on my Anycubic Photon Mono, and can't wait to make more.
I loved how it turned out! I'm selling the model, if you want you can give it a look in my cults3D profile, it comes Pre-supported ready to be print 😃
Printed on a Phrozen Sonic Mini 4k
Resin: Phrozen Aqua Grey 4k Resin
Models: https://cults3d.com/en/3d-model/art/hollow-knight-hornet-devanborkhatria
A fun, simple paint with only a few colors. The parts were extremely fragile due to their thin width and some parts broke off. Some glue fixed that no problem though. Also experimenting with the woefully expensive Tamiya Grey primer, the results are definitely worth the extra money!
I combined two models that I found, the Goku was free on Cults and Saitama was a part of a One Punch Man bundle on Thingiverse, base was Saitama's just turned around. I believe I had to scale Saitama up to 150% and goku down a bit until they were roughly the same.
Its not exactly the same but Duncan Shadow Louca has some creatures called 'Chaos Hounds' which look quite similar to those ghouls in his Free Sculpts
That’s so weird. Maybe the link is not correct. Here it goes again https://gumroad.com/castnplay
It seems to be working on my phone.
Although, the treant is not there yet, it takes us a couple of days to upload the newer ones to the Gumroad.
Recently printed and painted a few of Duncan Louca's Demon found here: https://gumroad.com/duncanlouca (sorry for the poor photo quality)
Prusa MK3, .25mm nozzle and layer height .05mm.
I'm very new to painting, so I'd love any advice or comments that you have!
Sadly my printer had a total failure twice this morning, i need to order FEP films...
But you can check the final model here : https://gumroad.com/l/nNJSP
I created a gumroad to distribute my work. :)
The game is on the Unreal engine so it shouldn't be too difficult.
You can install it here. https://www.unrealengine.com/en-US/download
The difficulty will be that the model might not be perfectly suited for printing. Meshmixer is a good tool to get models printable.
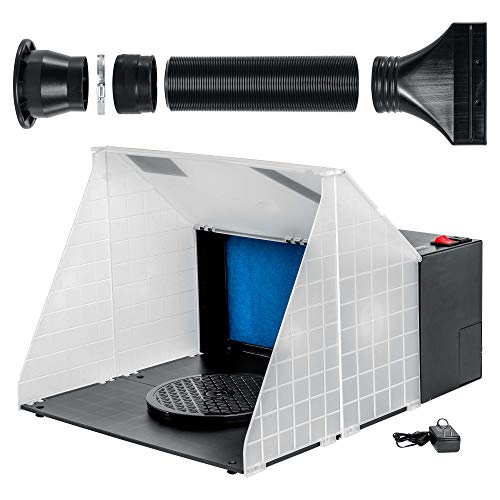
Master Airbrush Portable Hobby... https://www.amazon.com/dp/B00B2TESUQ?ref=ppx_pop_mob_ap_share
I got this one and added the LEDs. It’s loud and the hose is pretty stiff but it does the job and it was one of the cheapest options. I use a rattle can varnish and you can see the spray getting sucked up. So I give it a functional 3/5. If you’re not on a budget there are probably better options.
I use a toothpick to apply the same resin I printed the parts from to the join between the parts or to fill small gaps. I then use the 405nm flashlight here to cure the small amount of resin applied.
I find that it turns out a bit more shiny than the surrounding areas, but binds the parts significantly better than super glue. I prime & paint my pieces afterwards anyways, and then you definitely can't tell the difference.
PTFE is also known as Teflon. I know it's used in non-stick applications. Outside of that I don't know much.
Amazon link to what I use. saw a guy doing it on YouTube.
The model resurfaced for ~15 dollars, so if it is the original author then I don't think I should give it away for free. You can check it out here:
https://cults3d.com/en/3d-model/various/4th-planet-battleduke-pre-olympian-god-stroganoff
Thanks :) Not quite sure what you mean by Ark, the file can be found here , the same guy has lots of other cool fantasy plants for free.
You should hit yeggi.com and search for weapon effects. Here are two links i found in a fast search.
https://cults3d.com/en/3d-model/game/water-and-ice-effects-pack
Hi! Hope to get some good advice or motivation from here, I'm thinking about starting a Patreon, I only have a Cults3D profile where I sell my 3D models, can I start a Patreon page without followers or "Patrons"? I was thinking of to give some of the models I sell in Cults3D to my Patrons as a "welcome pack", is this a good way to start? some advice?
Here you can check my other models let me know what you think! : Cults 3D Profile
Thank you and hope you like it!
https://cults3d.com/en/users/virusesofdeath This guy has some for free on his page. Email him and ask about the 9th edition stuff he has made. He doesn't have a lot of his stuff posted because it gets taken down. Idk about his prices but he is highly recommend at r/printedwarhammer. There is also a discord link at that subreddit where you can find a link to a mega drive full of warhammer stls.
Printed on a Heavily Modified Rigidbot (Sadly cannot get resin because of ventilation reasons in my tiny apartment)
ABS
0.25 mm nozzle
0.08 mm layer height
45 mm/s (low acceleration and jerk)
Total print time: 4 hours 3 minutes
Model: https://cults3d.com/en/3d-model/game/dark-wizard-28mm-support-free-belvederehousegames
I am trying to push my old printer to the max with higher resolution pulleys, microstepping for finer layer heights, and slowing everything down. Primed and painted. Still a very long way to go before I am satisfied with the quality.
I don't do Patreon - at least yet - and I've kinda given up on thingi and moved my stuff to Cults. I've yet to release this guy, some fine tuning still to do.
Printed on an anycubic photon at 0.025.
Model can be found at my gumroad here: https://gumroad.com/l/ObHbu
I loved miniatures as a kid and grew up painting and converting warhammer every spare second I had. Over time painting and converting turned into digitial sculpting and texturing for games, something I've been doing professionally for several years. I'm coming full circle now that high quality 3D printers are becoming accessible to the average joe. I felt a little emotional holding this guy in my hands after I'd primed him, I think the kid in me would be proud.
I want to make more miniatures for you guys! Follow me on gumroad, twitter or instagram to stay up to date with what I'm working on and to let me know there's an audience for 3D printed minis!
Instead of trying to find the exact .STL that you want-I suggest using a program that can edit .STL files to select the part of the file you you want to print!
Meshmixer is a popular and purpose-made option for this, but you could use any 3D modeling software for this. Blender is a fantastic bit of open source software if you want to explore than just kitbashing .STL's! (Their recent v2.8 release made Blender much more user friendly too!)
Good luck!
I know there's mixed opinions the Elegoo Mars sub about PTFE lube. But I'm a huge fan of it. Ever since I started using it I have had significantly less problems.
With a clean vat you put a nickel sized drop in and wipe it around the FEP with a microfiber towel in small swirls. Give it a minute to dry then use a dry portion of the towel and buff it out until you can't tell it was ever in there.
I do that every time I clean my vat which isn't often.
Photon Mono and plastic container with some bottles of 99% Isopropyl alcohol. Lots of paper towels, nitrile gloves, safety goggles/glasses (just in case), and a roll of parchment paper (or silicone mat). You can get started with just this. Also a place to dump your contaminated ISO alcohol.
I highly recommend the Elegoo Carbon Filters. I run my Photon Mono with both of the filters on and they last longer than any print I've done. I went to work and came home 13hrs later and the filters were still humming quietly (silently) inside the enclosure, and the print had finished 6 hours earlier. There is absolutely zero smell with them running, until you open the enclosure. $25 well-spent.
I think I've spent about $300 on equipment, including reusable items and disposable items (nitriles, alcohol, paper towels). I have printed maybe 200 miniatures and some 75mm models. I use Anycubic Basic Grey resin ($18/500g) with 20% added Siraya Tenacious for durability. The Tenacious is crazy expensive ($60/kg) but so worth it and lasts forever.
What you want to do is introduce a brief burst of intense heat, that destroys thin, whispy strings and fuzz, but isnt there long enough to put heat into the proper plastic print.
a hair dryer could work, but the risk of putting to much heat into the proper model is high..and i've never had good success with it.
a heat gun is something like this, which gets significantly hotter than a hair dryer. It does a good job, but you have to remember it only takes a second to do the job. So you let it run and get to temperature, then you just brush it over the model for about a second. turn the model, and do it again, then turn it off and leave the heat gun alone until it cools off. Done right it shouldnt damage the print at all, while burning off all the whispies. Just an FYI, I provide that link as an example, not an endorsement or a specific "buy this" suggestion.
I've been using Damn Good UV Glue (https://www.amazon.com/gp/product/B06XJ28LZP) cured with a UV light for some models. On models I'm going to paint and I'm not worried about the glue vapors, I just use superglue. For models that need a more flexible adhesion, I use e6000.
All the light grey bits are printed. Check out Krackendoor on Cults3D and here for most bits. https://cults3d.com/en/3d-model/tool/viking-wolf-riders
I personally kitbashed a number of files to make them more dragony though.
Here is what I used for the body, and here are the legs. It's really fun experimenting in Chitubox with clipping objects into eachother (like what I did with the body and the turrets from both of those two files). Thanks!
thanks! I'll be releasing them in the next few days, I'll be posting on this subreddit when they go up or you can follow me on cults https://cults3d.com/en/users/davidmckenzieart
Printed on the Phrozen Sonic Mini with its stock aqua green on lowest layer height. Files can be found here, although the heads are from another file on thingiverse. They're very easy to find if you look. Sorry I don't have a link handy for that.
Here are the files aviable for those who are interested:
https://cults3d.com/en/3d-model/game/tower-thrasher-giant-inkredspot
These guys are a variation on some creepy models I made last month. If you're into them, they live at https://cults3d.com/en/3d-model/game/cult-of-the-dread-gateway :)
This is modeled to fit an old disk tower and it easily slots in to protect the minis. Each mini is held in by a clamping mechanism on their base. The dice are held in a threaded insert which can be unscrewed from the base of the holder. Here is a link to the files: https://cults3d.com/en/3d-model/game/miniature-and-dice-storage-travel-display-for-10-to-35mm-tabletop-miniatures-holds-up-to-21-minis-and-one-set-of-dice
So unfortunately I did not find all the exact files again bc the Leviathan seems to always dis- and reappear...
But here are two Creator's on cults that I got my other files from:
https://cults3d.com/en/users/Sumbu/creations
https://cults3d.com/en/users/KrackendoorStudios/creations
Hope you start printing an army because its even more bonding then buying it haha
Duncan Louca is going to be making some of the Gumroad sculpts Patron only, but has temporarily made the Mushroom Trees files available for free again. Get them here while you can.
Learning to use 3D drawing software, aka Computer Aided Design or CAD software, is pretty involved. There are quite a few programs, some free, most paid. Sculptris and Blender are two popular free ones.
As far as 3D scanning, there are consumer grade models, but I haven't heard much about it. I think the very fine details on minis makes them a poor candidate for scanning. Models ripped from video games are another common start point.
​
Mine is a basic UV handheld from amazon. You don't need anything super fancy. But remember, you should take some precaution using a UV flashlight, never look into it or shine it at people, and also, try to wear gloves if you're hand holding and gluing in this method. UV light is hostile to skin (the main cause of skin cancer) so you know, just be careful out there and treat your body like its the only one you got!
Hello everyone! Recently I bought an Ender 3 from Amazon in order to 3D print Intiative Tracking minis made with HeroForge.
I've printed this mini about 10 different times with multiple settings and this is the best result so far... but it still hasn't come out right. Consistently, regardless of settings, the shield will be deformed and the tail will just flat-out not come out correct.
I've been using the settings from this video as a basis: https://youtu.be/AqEWl51s9Rw but I've also tried printing slower, faster, hotter, colder, lying the mini flat, standing it up, using tree supports, using normal supports... everything.
The filament I have been using is this one: 3D Printer PLA Silk+ Filament 1.75mm 1KG/Roll for Creality/ANYCUBIC/Flashforge Fashion3D(Blue) https://www.amazon.com.au/dp/B08GJG49SL/ref=cm_sw_r_apan_glt_fabc_CKZHNTGE14QZDZX3ZZ3A?_encoding=UTF8&psc=1
The Ender 3 itself doesn't have any mods.
Please, any advice is appreciated... I'm desperate.
I haven't tried any of mz4250's models yet (although I'm sure I will at some point). If you're getting misprints due to bad geometry, I'd try taking it into Meshmixer (free here if you don't have it) and start by just re-exporting it as an STL, and see if Meshmixer can auto clean it up for you. If not, I've had good success with using Meshmixer's Make Solid tool (under Edit) for fixing bad models. It can be very CPU-intensive if you crank the quality up, but it outputs a good, printable result.
EDIT: I'm assuming you've already tried the options in Simplify3D's Repair menu... if not, start there first, especially Repair Normals.
If you like their designs, make sure to leave a like, since these will count for the final result. Thanks in advance! Happy printing :)
https://cults3d.com/…/3d-mo…/jewelry/two-wolves-set-of-rings
https://cults3d.com/en/users/El_Mutanto/creations
here they are, or at least as close as possible.
​
i think you might need Original SM arms, since i cant find arms in the files, or maybe i am just blind.
Never did get into the LCG but I started trying to model a few of the investigators from the board game in desktop hero. There are so many of them and my time is limited so I've only got like 3 half done. I would also be interested if someone has these done already or even if they have just a few here and there. I did make a gate token holder for the board game, I think they came out great.
https://cults3d.com/en/3d-model/game/arkham-horror-gate-token-holder
Thank you for letting us know about the file problem. Now the model is reloaded on myminifactory and is being checked again. But we placed the model on cults3d and you can download it there right now.
Sorry, after downloading I apparently didn't save the link. But I found it again: link
His designs are amazing and without your comment I would've forgotten. So thanks
Printed this Ancient Monster Transporter on the photon over the past week. Had to split the floor, two treads, sides, and the front plow in order to get it to fit on the build plate.
To get this to match my Feudal Guard army from Makers Cult, I pulled the Leman Russ hull lascannon and replaced parts from the Gorgon file in Tinkercad.