
What are
/r/TerrainBuilding's
favorite Products & Services?
From 3.5 billion Reddit comments
The most popular Products mentioned in /r/TerrainBuilding:


The most popular Services mentioned in /r/TerrainBuilding:
Cults.
Thingiverse
Google Photos
Lifehacker
Inkscape
Hackster
Pixabay
Autodesk Tinkercad
Kickstarter
OldVersion
Imgur
WordPress
DuckDuckGo
The most popular reviews in /r/TerrainBuilding:
$30 for a shit ton of minis. Nobody ever played the game because it wasn't a good game, but it's cheap as hell.
I like it, the ivy/moss looks great.
The only suggestions I have are on the door really. This is from the wrong time period/setting but it illustrates the point nicely.
Boards on doors tend to go from top to bottom, all the way, not interlocked like a floor.
All doors like this also tend to be inset into the frame.
Modern toy playsets are really great value for terrain. Have you checked out any of the TMNT stuff? This one stands at 42 inches in height!
In case you want some but can't find any more...
... Last year I bought these 100 skeletons at Amazon. Pretty decent. Though they're a bit more expensive and you have to buy 100 of them.
Depends on your money... as a fellow gamer, I got started with this relatively cheap printer available from Amazon: https://www.amazon.com/Monoprice-Maker-Select-3D-Printer/dp/B018GZBC3Y/ref=sr_1_2_sspa?s=industrial&ie=UTF8&qid=1505666716&sr=1-2-spons&keywords=monoprice+3d+printer&psc=1
It's a Monoprice Maker V2 - which is a renamed Wanhao Duplicator i3 0- which is a Chinese made version of a Prusa I3 (open source printer). With that printer there I was able to print several armies worth of WW2 tanks for Flames of War. The quality is quite nice. Feel free to PM me if you want more info.
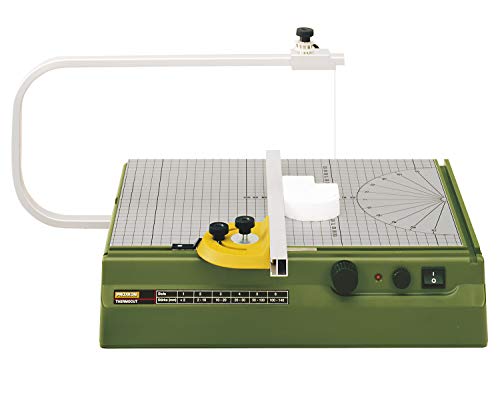
It's more of a hot wire cutter. But it is set in a small flat surface. You can run foam through it like using a table saw or band saw on wood.
https://www.amazon.com/Proxxon-37080-Wire-Cutter-THERMOCUT/dp/B0017NS8H6
I use an anti slide mat.
Got one of these. They are cheap, big and easy to cut to fit your terrain.
I use Inkscape for making drawings to print at a certain size. It takes a bit of practice to learn to use. I look up things in the manual here when I need to.
My go at a larger war memorial for my Post-Soviet modern terrain collection. Made in 1/50th scale to go with all my toy soldiers.
Its mostly a foam and plasticard base clad with plasticard textured sheets by Wills Kits. The T-34's made by HobbyBoss.
More blether about it and the various other war memorials I've made in the past (yeah, I somehow have more than one) can be found over on my blog:
Vietnamese Pho soup, Costco. Or Amazon: https://www.amazon.com/dp/B08HL531S5/ref=cm_sw_r_cp_api_glt_fabc_RSP1R8412M9N11SG8ATM
You don’t need to use the bowls to cook the food and they look like ornate round roofs to me.
Larger compressor is recommended. Smaller on-demand ones are available: https://www.amazon.com/Master-Airbrush-Multi-Purpose-Airbrushing-Compressor/dp/B00BF0MW9G/ref=sr_1_3_sspa but these have their drawbacks.
There's specially formulated cement for clear acrylic that's similar to plastic cement in that it "welds" the two pieces together...
https://www.amazon.com/Weld-Acrylic-Plastic-Cement-Applicator/dp/B0149IG548
If that's not an option for you, super glue activator is supposed to reduce or eliminate frosting.
Thanks!
The tiles are 1/2 inch MDF board. Homedepot has 2x4 foot boards that work great for about $8 (cad)
The MDF is very rigid it wont warp unless you really try to make it happen lol.
The white blocks are from a kids model building set. It was 5.99 at my local hobby store. They are tiny plaster bricks! I'll see if I can find a link for it on amazon. And update my response. Edit: https://www.amazon.ca/Teifoc-Small-House-Brick-Construction/dp/B003ZK6BVY
I totally recommend trying this is my 3rd attempt at making a table and I'm really happy with how its turning out.
I got mine at a local craft store but it's also available on Amazon.
https://www.amazon.com/dp/B0028D68B2/ref=cm_sw_r_other_apa_al71BbYZMMBE6
Edit
https://www.zoro.com/3m-masking-tape-paper-green-18-233/i/G4290011/#s
This one's cheaper.
This stuff is very inexpensive, comes in several sizes, and will cover a decent amount of terrain or bases. It comes in several shades of green and brown, and the tufts are tough enough to be painted if you want some slight variations in your desert scrub or weedy clumps.
I designed these models to be printed on fdm or resin printers, as terrain for wargaming.
You can get the stl-files here:
https://cults3d.com/en/3d-model/game/modular-xeno-shield-wall
If you don't own a printer, but are interested in parts for this shield wall, feel free to message me and I could print them for you.
Possibly treat them the same way you would for cleaning bones? https://lifehacker.com/how-to-clean-animal-bones-so-that-you-may-proudly-displ-1798191351 (Warning: pictures involve pig skulls so might not be appreciated by some) basically slow cook and hydrogen peroxide bath.
One decent starter set that covers an okay area would be something like https://smile.amazon.com/dp/B08RF25F4T/ref=cm_sw_r_apan_glt_fabc_MNN5MAQSNYE2GV53E5Z6?_encoding=UTF8&psc=1
Only costs around $13.
I think you mean “floral wire”. You can find some that is wrapped in brown paper that should work really nice. https://www.amazon.com/Floral-Rustic-Wrapping-Flower-Bouquets/dp/B07S2HP8RB/ref=mp_s_a_1_11?dchild=1&keywords=floral+wire&qid=1629435304&sr=8-11
I'd get some shelf liner at the dollar store or something and cut it to shape. That way no permanent modifications to either the terrain or table.
Nice. Try usingcoffee stirring sticks next. Better for this scale.
I used floral wire, and left the paper on. According to Amazon this is what I ordered. I thought it was cheaper, but that's probably because it was two years ago.
For length, I wrapped the wire around a 6" pot until the wire mass was about as wide as my thumb, then slid it off and cut it at an arbitrary point to make the individual wire lengths - I couldn't tell you how many individual wires were in there.
I took the technique from this channel. The tree in the video is pretty huge for a gaming table but its not hard to scale it down from there. That channel has lots of beautiful tree crafting vids.
Nice, looks great by itself, I just assumed you had a plan 😜 green stuff world mould? Have you heard of oyumaru?
https://www.amazon.co.uk/dp/B00GXUZSZI/ref=cm_sw_r_cp_apa_glt_fabc_54QP8G7YBN9DH6AG0NVP
Reusable mould maker. Just put in cup of hot water to remould. I used this to create some really cool stuff when I modelled. You could take details at a pretty decent level. I built an entire sci-fi Ork battle boat by basically using oyumaru to take panel details from flat pieces. Then I would put green stuff into it, wait till it was like half set, peel it out and then I had panels that I could flex onto a framework. Anyway I'm rambling, but I think you'd love the stuff.
There are customizable lights that’ll flicker if you check Amazon. And you can run them along wire and shroud it with cotton you can spray with grays for clouds.
They exist, though. Keep hunting with google searches and you’ll see something you like. Maybe this?
This is what I used. There are some videos online to make your own so may try that next. It didn't go as far as I'd hoped. https://www.amazon.com/gp/product/B000BL1SPE/ref=ppx_yo_dt_b_asin_title_o03_s00?ie=UTF8&psc=1
If you are just needing something quick and cheep to fill the stands with, you might wanna look into some 1" army men off of Amazon.
Of course. Let me see if I can remember and explain it well.
For the tents I build the frames out of bbq skewers and glued onto med weight chipboard for stability. I then grabbed some paper towel and dipped it in a mix of approximately 50% water and 50% pva glue and then formed them around the frames. From there I made some aesthetic upgrades with stuff from my bits box and more paper towel. Flocked the ground and called it a day.
Used britol board and paper towel (dipped in the water glue mix) to make the bedrolls.
For the rolled up bedrolls and for the fur pelts I scuffed up some Full Circle Squeeze Cellulose Cleaning Cloths until the resembled pelts enough for me. I dont think it was a perfect solution but it did okay. To make bedrolls I just rolled a bit of it up and tied it down with string.
I hope that explained enough and if you have any questions let me know.
No this was the base: https://smile.amazon.com/dp/B07YCTV6F1/ the drawers aren’t super well made but painted it looks decent. They’re big enough to fit like a fun-size candy but not very large either.
Plasticard .040 Inch Pack (6) https://www.amazon.com/dp/B00MR5PN1M/ref=cm_sw_r_cp_api_4w75ybB4HK01G
Bought all mine off amazon
I found .040 is the thinnest but the .080 is the best - although kinda expensive so I save that for the detail pieces that need to be larger/ thicker like ladders and signs
Ive heard for sale signs are also pretty good but I have not tried it my self yet.
It's old, but Games Workshop had their own "How to Make Wargames Terrain" manual, (of which I may or may not have a digital copy).
Hey sorry I should clarify, I used plaster for the rock molds, used the liquid plaster of paris and poured it in and let them set. But used the sculpt mold to stick to the foam and blend them in and fill in gabs, here is a link to the product https://www.amazon.ca/gp/product/B0016ZXY8I/ref=ppx_yo_dt_b_asin_title_o04_s00?ie=UTF8&psc=1
I've heard that it has dangerous fumes when burnt (such as through using a hot wire cutter). I believe it, and didn't look too deeply into the sources. I'm aware that many people choose to do it without a mask. I hear that lung damage/diseases are very costly and painful, though...
I use a ventilator mask that is vapor protective. 3M 60923 is the cartridge type. This should be protective from fumes and particulates when using rattle cans/air brush/harsh chemicals as far as I'm aware. Change it out once you can start smelling things while wearing it, I believe.
https://www.amazon.com/gp/product/B00AEFCKKY/ref=ppx_yo_dt_b_search_asin_title?ie=UTF8&psc=1
For heavy blade work, both XPS and EVA foam, I'd recommend a bald sharpener. I have this one from Kershaw, and in the few years I've had it, it has saved me hundreds of dollars in new blades.
Hey OP.
Jeremy doesn't use Minwax Satin Polyurethane anymore. It's clarified on his webpage. Because it's yellows over time.
He uses instead something called: Krylon Crystal Clear Matte. And he uses it both on terrain and miniatures, and it doesn't yellow over time.
I assume you could also just use the same kind of vanish you use on miniatures if you have given it modpodge then it shouldn't melt. But be careful: Test it before you use it on tiles you have spend many hours on.
I'd go with the rotary tool, or maybe even a utility knife/x-acto if the plastic is thin enough. If you're making straight cuts, a fine saw might be a good choice. (You can get little coping saws very cheaply on amazon. ~$10.)
A soldering iron will do the job but it's gonna leave a messy edge and stink to high heaven.
yeah I bought a 10 pack of plasctic canvas from Amazon for this and other projects
it's just a 50p flickering tea light LED.
Wasn't sure it'd be strong enough but it works ok
Need some help as to how I can up this a bit. The final picture is a Photoshop of missile trails I am thinking of doing, but I feel like the water/swamp/marsh needs something. I have these coming later today which I think will jazz it up a bit, and I was also toying with the idea of doing hanging vines/moss off of Command Wolf, but am having a hard time finding something the right scale, maybe tulle with some added leaves/grass/paint to it? Just not feeling it the way I feel about the Shadow Fox diorama.
I'm pretty certain that's from a Teenage Mutant Ninja Turtle Playset. Those things honestly would look great with a bit of work for tabletop displays or gameboards.
Yep, looks like its a variation of this set. Nice find!
Get him a nice quality woodcarving bench knife. The blades are much firmer and don't snap or break like a utility knife does.
I use one of these for watered down PVA rather than a spray.
Have to occasionally use a pin to re-open the nozzle, but only if I haven't used it for a while.
You can find them in the pound shop sometimes too.
Ah! I made very similar looking mushrooms!
I do like your conical ones too though, how did you make them?
I do this with a rasp, curry comb and sand papers. works quickly do it over yur shop vac to collect the dusties https://www.amazon.com/BOTH-WINNERS-Reversible-Stainless-Steel/dp/B07S9VB4LH/ref=sr\_1\_2\_sspa?crid=2J85YAQM9LDR4&keywords=horse+brush&qid=1670035082&sprefix=horse+brush%2Caps%2C98&sr=8-2-spons&psc=1&spLa=ZW5jcnlwdGVkUXVhb...
I'd not bother color matching, I'd add some boggy terrain bits to the bottom area. My house is situated at the top of a rise above a small wetland and this is pretty much looking like my back yard. The closer to the wetland the grass gets the darker it gets. Do some patched of tall grass and cat tails, maybe pour some pools of water effects here and there as well. Should sell the effect.
> Dried Herbs - Groundcover: > https://www.amazon.com/gp/product/B00IQXHEOI/ref=ppx\_yo\_dt\_b\_search\_asin\_title?ie=UTF8&psc=1
I routinely use a mix of bulk store Italian seasoning and fine flock as generic "low vegetation"/ground cover. Cheap, convincing, and only smells like spaghetti for a few months.
I had a lot of luck with these. They get about 12 kG2mm2 (the maximum for a craft magnet is 50, but no one needs 50).
I also recommend these for max power, but I would caution you to make sure you've got adhesive strong enough to keep the magnet attached to your minis. I bought these for foam terrain and had trouble securing them into the foam with more force than the magnets exert on each other.
Are you looking for actual builds or just images?
If you want actual builds, then the pre-fab Eberron elemental airships are probably about the best you'll find: https://www.amazon.com/3-Level-Terrain-Fantasy-Airship-Elemental/dp/B08HQGY4YB
For just images, click around here to look at the various canon ship hulls: http://www.spelljammer.org/ships/
I just saw them at walmart but amazon has them too. There's different colours and different textures of course.
Cardboard doesn't work as a base. It warps like crazy. I learned that the hardway as well.
I like to build scatter terrain using old CDs as bases. Just take some rough grit sandpaper to the label side to scratch the hell out of it and it will give you a decent gluing surface.
I have also used these hard boards since they are easy to cut and don't warp. I suggest cutting them out, beveling the edge a little, then going around the edge with some thinned down white glue to seal the edges. Don't soak the edges, just put on a thin coat.
This is the only correct answer:
It's a two part epoxy, come in giant tubs, makes a super hard super light foam solid that takes details and paint super well. The price is a bit high, but you get enough in these tubs to cover at least a 2x2 foot area. I've even used it to make gaunts in a two part mold. Can't recommend it highly enough. Very cost effective, light, hard, easy to work with. It's perfect.
THIS is the very ghetto little table I have.
And it came with THIS package, which was only $99 at the time (like 2 years ago)
I would not recommend getting that kit, at that price, nor that table at basically any price :P Because the table is really just crap, even though I have managed to make it work for my needs. And of the hand tools, while I have used the "engraver" and "sculpting tool" a couple of times, I really only ever use the "hot knife" with regularity, and the couple of times I did use the other two I could also have just used the hot knife - the other two tools were just slightly better tools for those couple jobs.
Were I to do it over, I would buy a mid-range table (I think that Vevor you're looking at looks great), and a longer/~6 in. hot-knife style hand tool.
This is the power supply I used - I went with the 60 Volt | 5 amp, but the 30 | 5 would work fine - I’m cutting with 24 volts at 2.5 amps. https://www.amazon.com/dp/B09WDCWW36/ref=cm_sw_r_api_i_6FKQDA656FA276KP48MZ_0?_encoding=UTF8&psc=1
Looks to me a little like these rubbery Speedy Carve blocks you use for printmaking. It's meant for getting nice smooth cuts with regular carving tools, but I think you could get that crumbly pink eraser look by hacking at it with blunt tools.
Amazon has it under some of those trade names. I usually buy 12"x12" sheets unless I'm doing something big; I've had issues with the poster-sized pieces in shipping.
1/4 inch should be enough, just ask someone their to suggest something that won't warp. I have used 1/4 oak ply for terrain bases and they haven't warped yet. The whole thing is though that if you just drench it in white glue to glue the foamboard on then yeah, it will probaby warp, which is why I highly suggest using some contact cement like this:
Stuff stinks to high heaven so make sure you ventilate the area and run a fan. You apply this to both pieces to be joined, wait until it dries to being tacky, then very carefully put them together. They will NEVER come apart, and this stuff won't actually soak into the wood and cause warping. If you wanted you could even do just around the edges of the plywood and foamcore sheet, then a couple spots in the center to save on the glue.
As to the foamcore, you do not want to strip the paper off the side you are gluing to the plywood. You do not want to strip the paper off the one you will be flocking. You do wanna strip the paper off the single side you will be making cobblestones on.
After gluing the plywood and foamcore together I would suggest painting the outside edge in a mix of black craft paint and PVA glue. This will protect the plywood from water and the foamcore from being too dinged up.
Prior to painting the cobblestones you should do a solid coat of 1 part PVE to 1 part water over the whole thing. Make sure it's a thin coat. This is so you can then spray prime it and not worry about melting the foam.
Also, pay attention to the types of foamcore you buy at the store. Most places have both glossy and matte varieties. Grab the matte, glue adhere to it better.
That would probably work. Not sure what to dye plastic with, but this stuff could work: https://www.amazon.com/Transparent-Correction-Lighting-Colored-Assorted/dp/B083Q6S1KQ/ref=mp_s_a_1_9?keywords=light+color+filters&qid=1663858317&sr=8-9
I use a product called rub 'n buff. It is easy to put a little on a rag and touch up the corners and edges for a nice effect.
It is a very dense paper product: Grafix Medium Weight Chipboard. It's the same material as you find as the backing on most legal pads. I use it more as a building material than a basing material. For basing I only use it for small pieces that have to be as close to the table surface as possible. I use a pair of heavy duty shears to cut it but a hobby knife or box cutter works if you do it multiple passes.
No i got them on amazon, and painted them to add the flowers. This is an amazon US link but if you search for Cayway you can probably find it wherever.
Although quite frankly I wouldn't recommend the set... The round bushes are very static and look meh up close, while the grassy bushes were a massive pain to remove from the plastic sheet they were glued to...
They sell these on amazon.
More like buying terrain, but you can work the base to your hearts content.
I use these standing LED lights which are USB powered and produce negligible heat over long sessions. You could attach them to the ceiling with a mount or literally just some tape to have some good directional lighting. You can swap out gel panels to change the color temperature (red, yellow and blue) to change up from the sterile white default color.
I got an Inswan document camera for 99$. There are probably better products and better deals out there, but I know nothing about cameras or webcams. It worked for me, anyhow! Maybe if I make this a more frequent thing I'll upgrade, but as a once-and-a-while event I think I can get by with this.
https://www.amazon.com/gp/product/B091CWP2JG/ref=ppx_yo_dt_b_asin_title_o00_s00?ie=UTF8&psc=1
It has software where you can draw on the screen and import photos and stuff so whenever characters were introduced I would pull up a photo I took of them on my camera for some higher resolution images.
I suggest a little bit of like double sided tape or something like velcro to run the plug down to the ground and and a wiring cover for the ground over to the plug. like this:
So you can not worry about it. I did this on my table and it made a 100000% upgrade in functionality especially around drinking people lol. My extension cord is at the base of my table and run to the wall under one of these, though it is a nicer one.
For blocks and modularity like you're describing - so, where you probably need straight edges and uniformity is critical - I'd recommend a scroll table.
You can find pretty excellent models out there for not-ridiculous prices.
I got this one as a part of a "Beginner Package" from HWFF, and while I've managed to make it work for me, I wish I'd spent more on something a little more robust like this.
I swear by this stuff. It isn't as high quality as some other materials but it is cheap and it's simple to work with. I made hundreds of gaunts out if it and blue stuff molds. I have repurchased it a couple times because of how well it works
I’m a fan of acrylic storage preferably stackable.
Look for stuff like this
https://www.amazon.ca/gp/product/B01MYUBPPZ/ref=ppx_yo_dt_b_search_asin_title?ie=UTF8&psc=1
https://www.amazon.ca/gp/product/B07W95KJBP/ref=ppx_yo_dt_b_search_asin_title?ie=UTF8&th=1
They take staining paint very well. Stain them different colors of foliage. Use a leaf-shaped punch and make fallen leaves for bases.
Wtrcsv 8 Color UV Fluorescent Powder, Neon UV Glow Powder,Safety Pigment Powder for Paint, Slime, Nails, Resin, Concerts or DIY -10g/0.35oz Each(Total 2.8oz) https://www.amazon.com/dp/B07SYYKLWH/ref=cm_sw_r_apan_i_7FXSST79SZDYJMXEV39H
Just add to modge podge and use as a tint! Or add to a base paint color for a more subdued effect.
Olson Saw 35-241 Fine Kerf Saw 35-550 42 tpi with Aluminum Thin Slot Miter Box, Slot Size .014-Inch, Slot Angles 45, 60, 90, Cutting Depth 7/8-Inch https://www.amazon.com/dp/B000BRBZYC/ref=cm_sw_r_apan_i_J0FJV2EVTQF0VFD64YJ0
So it’s actually a product from Amazon. They are sticky wrapping. Around different size foam blocks. They come with cuttable tacky bottoms to put on battle maps. They are reusable too!! So I first drew the map on the computer. Then placed the tiles on the board and stuck the walls around the tiles.
DIY Modular Dungeon Wall System - Stone Graphic 28mm Miniature Roll Playing Game - Dungeons and Dragons Maps - DND Role Play - Battle Grid Mat Accessory https://www.amazon.com/dp/B08688DW9C/ref=cm_sw_r_cp_api_i_N61Y71C31FE1B64RP7DD
I use a puff bottle similar to this and if I give it a good 2 minutes shaking before use. The grass seems to hit the glue and stand itself up immediately. And if doesn't, just blowing horizontally across it tends to do the trick.
I've not used this for any large application though, but it works well enough in patches on miniature bases. So YMMV.
Thank you. It’s a pack from Amazon that is a thick double sided foldable map. You can write on them too Ultimate Battle Grid Game Board - Dry Erase Square & Hex RPG Miniatures Mat - Tabletop Role-Playing Dice Map - Portable Reusable Dragons Gaming Dungeon https://www.amazon.com/dp/B087YGCH31/ref=cm_sw_r_cp_api_i_P1HD6TDKAQR9YZVNHD72?_encoding=UTF8&psc=1
Fits Hobby 1/35 Scale Plastic Military Model Building Kit Scene Leaves Maker Leaf Maker https://www.amazon.com/dp/B08PP4CB9Y/ref=cm_sw_r_apan_glt_i_J39X961386KC20D146VX?_encoding=UTF8&psc=1
I agree with what everyone else is saying, but I also think some leaves could do well.
Also is this Dark Souls? Really nice, very artistic. Capturing the moment you find a new bonfire is such a good idea for a diorama, like the eye of a hurricane.
Amazon carries evergreen brand - they go WAY back -
Evergreen Corrugated Iron Sheet, 1 x 150 x 300 mm, 1 Piece,1.0 mm Thick https://www.amazon.com/dp/B0006O5HN0/ref=cm_sw_r_apan_glt_i_Y39Q529Q2B8PEPD68HQD
Did a quick search for "evergreen styrene" and had all kinds of hits.
Good luck!
For a first attempt that's damned fine. I especially love the moss. As for keeping things together, I recommend magnets.
Office Magnets, Silver, 6x3mm are a good bang for the buck, though there is a mind boggling selection of shapes and sizes. For a good stick, I wouldn't go thinner than 3mm though.
And do not bother with magnetic tape, rolls, and the like. They seem like they should be the obvious solution, but their sticking power is frustratingly pathetic. One I tried could barely hold a piece of paper slightly larger than itself to a steel door. Infuriating. Don't make my mistake.
Looks like Crafting matchsticks (like these. Glue in place, spray brown, drybrush tan.
A wire brush like this:
DEWALT Wire Cleaning Brush, Stainless, 3-Inch x 7-Inch (DW49708) https://www.amazon.com/dp/B00FYZHVN0/ref=cm_sw_r_apan_glc_i_ACPK9E8PCDD86C8WTQN5
I found mine at Home Depot but you can probably get them anywhere in the tool/automotive section.
For brick walls I use foam and use the method that /u/thestonecutterguild linked, but for debris and small cover I just use air drying clay that I cut into small bricks. Alternatively The Army Painter - Battlefield Rocks are quick and easy for basing.
"Great stuff" foam in a can can be sprayed into a mass and then carved with a knife to make great hills.
Negative of this though, you pretty much have to use the whole can because it's very hard to re-use after it's dried.
Great Stuff Insulation Insulating Spray Foam Sealant, 12 oz. Aerosol Can, Cream 12 oz. 00157901-1 Each https://www.amazon.com/dp/B0115ZNIHK/ref=cm_sw_r_apan_glc_i_W4QCJCB5TJJA1PP7QR2W
I've used something like this:
You can find black ones as well of that's useful.
Turn it diagonal and you can get wire fences or lead lined windows
texture spray can Here you go sir ! It’s on Amazon but pretty easy to find at any Do it Yourself store (not sure about the name it’s from translation)
I cut cereal box down to 8mm strips using a paper cutter, then cut them into 13mm lengths using a hand miter cutter:
https://www.amazon.com/dp/B08YYH1JXV/ref=cm_sw_r_apan_glt_i_K1JZC063MKMQDF7G8KES
These things are amazing - I clamped a stop block on the right hand side, and could cut three strips at once. Pile o-shingles. I also use it for trimming all my little wood pieces to length - much less effort than knifing into a mat.
I marked my foam core roof in 5mm parallel lines, then just went through and glued them down one by one lining up the top of the shingles with the marked line. Very zen. Many podcasts. The little bit of variation in the sizes gave just enough interest so it didn't look tooooo straight and even, I think.
No. I bought that, and graduated to the one I’m linking right away. The wand type is unwieldy
Rustark 50Pcs 2 Sizes Adjustable Self-Adhesive Nylon Cable Straps Cable Ties Cord Clamp for Wire Management, Large and Small https://www.amazon.com/dp/B071RGCJLT/ref=cm_sw_r_apan_glt_i_49TKGAC0BPY96ZXC8WT9?_encoding=UTF8&psc=1
Found the share button!
>golden brand
Thanks! A higher pigment load always helps, but even vallejo paints didn't do the trick. Maybe I thinned too much though, I'll try again.
I don't think I can find the product u recommended it in Greece but I'll see if I can order it. Is this it?
12 Pack Led Fairy Lights Battery... https://www.amazon.com/dp/B07WG18RLT?ref=ppx_pop_mob_ap_share
There's a bunch of them that are the same. I now have enough to last a lifetime!
The enameled insulation is kind of a PITA to deal with, have to sand it off, but is worth it to keep the size down.
I'll post a guide for a the wiring harnesses I make for each building, including links for the micro connectors, switches, and battery packs. There are so many AMAZING builds people post every day, and a little light would make them shine! Wow, that's bad, even for me.
Here's a specific example of what I used. I'll leave you to google the rest. :)
I currently have an Etsy for STL digital files. And a cults 3D for some freebies. The Ones I used for this build aren’t currently available. Working on a pack. https://www.etsy.com/listing/970544670/tabletop-28mm-scale-sewer-set-stls-for
I used some 36 gauge aluminum from hobby lobby, cut to size and ran it through a toothpaste squeezer I’ll link the squeezer.
AmyZone Toothpaste Squeezer Full... https://www.amazon.com/dp/B07S8CJHVN?ref=ppx_pop_mob_ap_share
Depending on how you want your trees to look, I've gotten these off of Amazon. So might depend on what type of trees you want:
S0812 20PCS Dark Green Pine Model Cedar Trees 4.96 inch (126 mm) for Model Railroad Scenery Landscape Layout HO OO Scale New (4.9Inch) https://www.amazon.com/dp/B087YZVR9M/ref=cm_sw_r_apan_glt_i_CJ9SKRT4039HAE0MJR8K?_encoding=UTF8&psc=1
I actually got these from dollar tree.
12 Pieces Snap on Hair Roller, Large Size Plastic Hair Rollers Hair Curlers with Steel Pintail Comb Rat Tail Comb for Short Hair Long Hair Hairdressing Styling Tools (Peach Color,6.8 x 3 cm) https://www.amazon.com/dp/B091623679/ref=cm_sw_r_apan_glt_i_50FFTV4JTD5JRHWBV015?_encoding=UTF8&psc=1
This is the closest I found on Amazon. It's ten times the price though. So if you have a dollar store nearby. I'd check there first.
Ty for the reply. I got side tracked and completely forgot about this post. I will edit it but this is the one I currently have and use for my baked goods and edible art stuffs. I can't rem where I got the extra gun I have but I do know it's trigger spray not the toggle on top like the ones I've always seen and used. I sunk tons into this so I'm hoping to not do that again for non food related hobby arts.
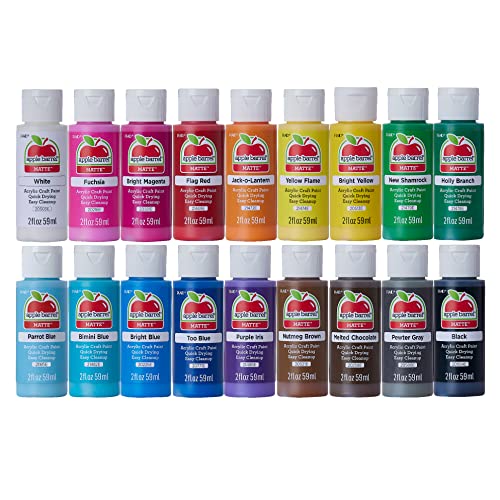
Here's what I have Master Airbrush Cool Runner II Dual Fan Air Compressor Professional Airbrushing System Kit with 3 Airbrushes, Gravity and Siphon Feed - 6 Primary Opaque Colors Acrylic Paint Artist Set - How to Guide https://www.amazon.com/dp/B00EKT30JK/ref=cm_sw_r_apan_glt_i_7XV2QNTA9XZQZSQCAN64?_encoding=UTF8&psc=1
Am I asking the wrong question in my post? Can you use the same compressor and just have dedicated guns/hoses for the areas of hobbies that overlap? I never thought about it until replying to this, I just assumed one is garage one is my kitchen so 2 separate systems. I have extra guns already that cane with the initial set plus a few cheapos I won in ebay auctions for pennies. I'm not sure since I've only sprayed cookies and cakes and gingerbread houses lol.
Haven’t used it myself, but I found one that may work. This one from Amazon looks pretty close to me: Melody Jane Dollhouse Light Green Grass Garden Scenic Scatter 40g 12s
Evemodel 8”x11” abs sheets 3 for $12.99
3pcs ABS Plastic Styrene Plasticard Roof Tiles Sheet 215mm x 300mm or 8.46 x 11.81inch White for Model Train Layout ABS38-3-NUS https://www.amazon.com/dp/B08F9NG247/ref=cm_sw_r_awdo_navT_a_3BTXWMXC4KN7XH9GY23M
Agree with the 2 part epoxies for gluing dissimilar materials. Also, JB Weld is an excellent choice for gluing metals. It has 2 parts as well. You can buy it in small tube or larger quantities. Amazon link:
J-B Weld 8265S Original Cold-Weld Steel Reinforced Epoxy - 2 oz. https://www.amazon.com/dp/B0006O1ICE/ref=cm_sw_r_apan_glt_i_54XEDB1Y565D59BE777D?_encoding=UTF8&psc=1
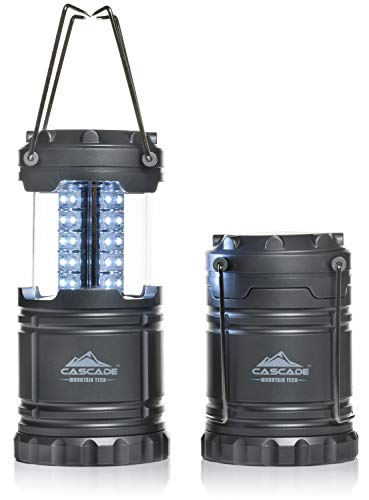
I used: Amazon Camping Laterne but there are similar designs and bundles available. Battery convenient on the table and they should be too bright.
I’ll have to check our dollar stores here because on Amazon, they’re CAD$30 for a pair: Cascade Mountain Tech Pop up LED Lantern -2 Pack - Perfect Lighting for Camping, BBQ's and Emergency Light https://www.amazon.ca/dp/B01FGE90WI/ref=cm_sw_r_cp_api_glt_i_3H6RN2NE9Z58ZZ5FNAQH?_encoding=UTF8&psc=1